MR91DFMK - Stove Montpellier - Free user manual and instructions
Find the device manual for free MR91DFMK Montpellier in PDF.

User questions about MR91DFMK Montpellier
0 question about this device. Answer the ones you know or ask your own.
Ask a new question about this device
Download the instructions for your Stove in PDF format for free! Find your manual MR91DFMK - Montpellier and take your electronic device back in hand. On this page are published all the documents necessary for the use of your device. MR91DFMK by Montpellier.
USER MANUAL MR91DFMK Montpellier
Installation and Operating Instructions
natural_image
Close-up of a black gas stove with asparagus being cooked, placed on a wooden cutting board (no text or symbols visible)90cm Single Cavity Range Cooker
MR91DFMX/K & MR91GOX/K
Dual Fuel & Gas Models in Stainless Steel & Black
Thank you for choosing this Montpellier Range Cooker.
Our Range Cookers have been designed to provide you with the best combination of style, reliability and performance to give you years of trouble-free use.
You may be familiar with a similar product, but please take time to read these instructions carefully before installing or using your Cooker to ensure you get the most from your purchase.
We recommend that you keep this manual in a safe place for future reference.

Your Range Cooker is covered by a comprehensive two year Parts & Labour Guarantee. In the unlikely event that you experience a problem with your Range Cooker, you can rest assured that you are fully protected against the cost of repairs for the first 24 months. Please note that any claim must be accompanied by the model reference number, serial number and proof of purchase.
To activate your guarantee, you will need your product serial number. This can be found on the rear of the machine.
There are two ways to register your Guarantee:
- Online: Visit the Support page on our website and complete the online Product Registration form. www.montpellier-appliances.com
- By Post: Simply detach and fill in the form provided, attach a stamp and send it in the post. Don't forget to include your e-mail address so that we can send confirmation through to you.

Note: We are unable to take registrations over the phone.
INDEX
1 INTRODUCTION 03
GENERAL WARNINGS 04
2 INSTALLER'S GUIDE 06
2.1 COOKER INSTALATION 06
2.2 GAS CONNECTION 08
2.3 ELECTRIC CONNECTION 09
2.4 CONVERSION TO OTHER TYPE OF GAS 10
2.5 GAS TAPS / VALVES MAINTENANCE AND CLEANING 12
3 USER'S GUIDE 12
3.1 PRELIMINARY ADVIC'ES 12
3.2 HOW TO USE BURNERS OF THE COOKING TOP 14
3.3 THE VITRO TABLE USE 15
3.4 HOW TO USE THE GAS OVEN AND THE GAS GRILL 16
3.5 HOW TO USE THE GAS OVEN AND THE ELECTRIC GRILL 17
3.6 HOW TO USE THE MULTIFUNCTION OVEN 18
3.7 HOW TO USE THE TURN SPIT 19
3.8 OVEN LIGHT USE 19
3.9 MINUTE COUNTER USE 19
3.10 ELECTRONIC PROGRAMMER 20
3.11 DIGITAL TIMER 22
3.12 RECOMMENDATION TO USE THE OVEN AND THE GRILL 23
4 INSTRUCTION FOR MAINTENANCE AND CLEANING 24
5 CONTROL OF THE PRODUCT 27
6 TABLES 28
7 TECHNICAL CHARACTERISTICS 29
8 HERE FOR YOU - SERVICE CONTACT DETAILS 30
1 INTRODUCTION
ATTENTION:
Installation, regulation or maintenance, both gas and electric, should be executed only by qualified and authorised personnel who are aware of installation regulations in force.
Please make sure to read this booklet carefully, containing general instructions for the Installation, Use and Maintenance of your cooker, before installing and using it.
It will be extremely useful to know detailed the way of operating and maintaining this appliance so that you will enjoy the benefits of it and assure best results.
Keep this instruction booklet with the appliance in case you pass it on to someone else.
GENERAL WARNINGS
Read the following carefully to avoid an electric shock or fire.
It is most important that this instruction book should be retained with the appliance for future reference. Should the appliance be sold or transferred, always ensure that the book is left with the appliance in order that the new owner can get to know the functions of the appliance and the relevant warnings. These warnings are provided in the interest of safety. You MUST read them carefully before installing or using the appliance.
- The appliance is not intended for use by young children or infirmed persons without supervision.
- This appliance is not intended for use by persons (including children) with reduced physical, sensory or mental capabilities, or lack of experience and knowledge, unless they have been given supervision or instructions concerning use of the appliance by a person responsible for their safety. Children should be supervised to ensure that they do not play with appliance.
- Young children should be supervised to ensure that they do not play with the appliance.
- WARNING: Ensure the appliance is switched off before replacing the lamp to avoid the possibility of electric shock.
- WARNING - In order to prevent accidental tipping of the appliance, for example by a child climbing onto the open oven door, the stabilizing means must be installed. Please refer to instructions for installation.
- WARNING - Accessible parts will become hot when in use. To avoid burns and scalds children should be kept away.
- WARNING - If the surface is cracked, switch off the appliance to avoid the possibility of electric shock.
- During use the appliance becomes hot. Care should be taken to avoid touching heating elements inside the oven.
- WARNING - Accessible parts may become hot during use. To avoid burns young children should be kept away.
- Do not use harsh abrasive cleaners or sharp metal scrapers to clean the oven door glass since be kept away.
- Do not use harsh abrasive cleaners or sharp metal scrapers to clean the oven door glass since they can scratch
the surface, which may result in shattering of the glass.
- WARNING - Ensure that the appliance is switched off before replacing the lamp to avoid the possibility of electric shock.
The appliance is not intended to operate by means of an external timer or separate remote-control system.
The appliance is not intended to be operated by means of an external timer or separate remote-control system.
Details indicating the correct installation of the shelves.
The instructions shall state that means for disconnection must be incorporated in the fixed wiring in accordance with the wiring rules.
- Do not spray aerosols in the vicinity of the appliance when it is in operation.
- Do not store or use flammable liquids or items in the vicinity of this appliance, eg aerosols.
- Accessible parts will become hot when in use. To avoid burns and scalds children should be kept away.
- Do not modify this appliance.
- Always turn the grill off immediately after use as fat left there may catch fire.
- Do not cover the insert with foil, as fat left there may catch fire.
- Always keep the grill dish clean as any fat left there may catch fire.
- Do not leave the grill on unattended.
- To avoid a fire, ensure that grill trays and fittings are always inserted into the appliance in accordance with the instructions.
- Switch the appliance off before removing the oven light glass for globe replacement.
- To avoid an accident, ensure that oven shelves and fittings are always inserted into the appliance in accordance with the instructions.
- Do not use the door as a shelf.
- Do not push down on the open oven door.
- Do not allow large cookware to overhang the hob onto the adjacent benchtop. This will cause scorching to the benchtop surface.
- An authorized person must install this appliance.
- Before using the appliance, ensure that all packing materials are removed from the appliance.
- In order to avoid any potential hazard, the installation instructions must be followed.
- Ensure that all specified vents, openings and airspaces are not blocked.
- Only authorized personnel should carry out servicing.
- Always ensure the appliance is switched off before cleaning or replacing parts.
- Always clean the appliance immediately after any food spillage.
- To maintain safe operation, it is recommended that the product be inspected every five years by an authorized service person.
- If the supply cord is damaged, it must be replaced by the manufacturer or its service agent or similarly qualified person in order to avoid a hazard.
Warning: Where this appliance is installed in marine craft or in caravans, it shall not be used as a space heater.
Warning: Never use the food-warmer drawer set at bottom of the range to store flammable substances or matters that cannot withstand heat such as wood, paper, spray cans rags, etc.
This appliance is unsuitable for use in marine craft, caravans or mobile homes, unless each burner is fitted with a flame safeguard.
2 INSTALLER'S GUIDE
2.1 COOKER INSTALLATION
Montpellier declines any an all responsibilities for damages to things or injuries to persons or animals deriving from incorrect installation or use of equipment.
This appliance is class 1: isolated kitchen appliance, free-standing installation, and is designed for non-professional use by private, adult and inside houses.
The gas and electricity conditions are indicated in labels near the gas / electricity inlets.
The cooker installation should be executed only by qualified and authorised personnel.
The appliance must be installed in places with proper conditions relative to dimensions, ventilation and exhaust of combustion products.
This appliance is not designed to be connected to a device for evacuating the combustion products
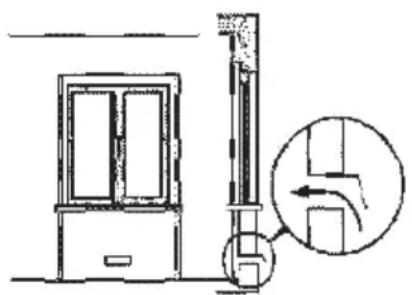
The appliance must be installed only in permanently ventilated rooms according to regulations into force
The installation site should have a permanent discharge of combustion products to the outside
Airflow must be done directly via permanent openings in the separating walls of the compartment with the exterior through conduits or air feed.
natural_image
Technical line drawing of a door and elevator assembly with a magnified inset showing internal flow direction (no text or symbols)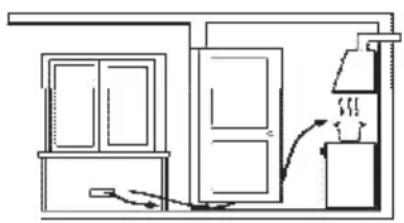
natural_image
Simple line drawing of a room interior with doors, pipes, and air flow indicators (no text or symbols)The air flow can also be obtained by indirect path via the installation sites adjacent to desired locations such that possess direct ventilation are not local fire hazard and are not bedrooms.
The air flow between the adjacent location and the installation location shall take place freely through permanent openings (obtainable increasing the space between the door and the floor, for example). The inlet air must have a minimum cross section of 100 cm2 and must not be unintentionally obstructed.
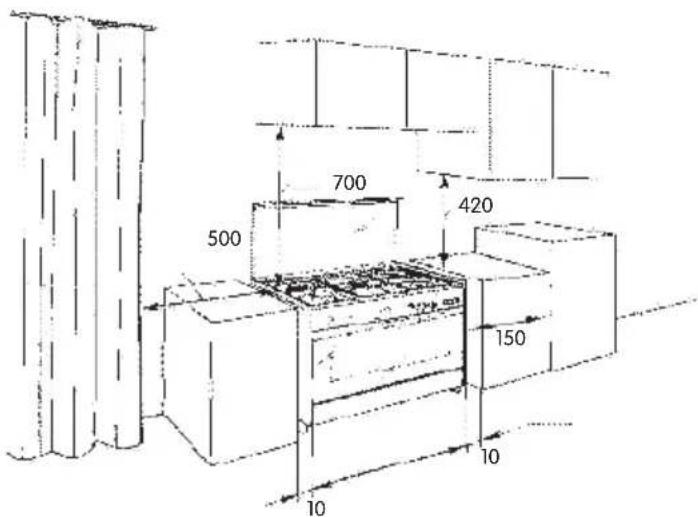
The walls of the sided furniture must resist to a temperature 75^ C higher than ambient temperature.
The back wall must be of non-combustible material.
Combustible materials, like curtains must be at the minimum distance of 500 mm.
The furniture sided the cooker, if higher than the cooking plan, must be at a minimum distance of 150 mm from the side of the appliance - unless that surface is constructed of a suitable non-combustible material for the entire length of the cooking surface.
Any horizontal surface situated within 200mm from the edge of any hob burner must be a minimum of 10mm below the cooking surface or else comply with the above.
If the cooker is installed under a suspended element, this one must be placed at a minimum 700 mm of distance from the cooking plan.
The furniture over and sided the appliance must have a minimum clearance of 420 mm from the cooking surface.
Any rangehood above the cooker must be installed according to the manufacturer's instructions, with a minimum distance of 650 mm from the cooking surface.
Before installing the cooker, remove the protective plastic sheathing covering some metal parts. If the appliance is on a support, devices must be used to avoid sliding the appliance as damage may occur.
Do not put in the compartment located underneath the oven, flammable materials (example: oils, plastics, paper ..)
If the cooker is placed on a foundation, must be provided to prevent rolling.
Install the cooker firmly and level it - some models with a small levelling feet
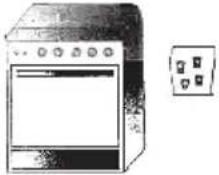 | Get leg accessories in polybag inside oven |
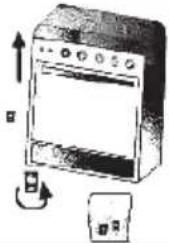 | Ask one person to lift one side of the unit.Never invert unit.Screw leg at corner holes below unit one at a time |
 | Ask your assistant to lift the other side of the unit.Now, screw thw other two leg the same way before at different corners. |
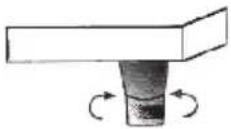 | Adjust height of leg by turning lower portion clockwise or counter-clockwise.Note: Unit must be level |
2.2 GAS CONNECTION
The cooker is provided with a label placed on the rear panel near the gas inlet, showing the type of gas and pressure for which the appliance has been originally adjusted.
Before connecting this appliance check if is prepared for the type of gas and pressure available in your home. If not, it is necessary to convert the appliance to another gas as indicated in section 2.4.
This appliance is suitable for connection to Natural and Propane Gas. Refer to gas pressure shown on the data plate and in the table n° 1.
All possible type of gas and pressures are shown on the data plate, and in the table n° 1.
The butane gas bottle are unable to function in places with low temperatures. In this case is recommendable to substitute the Butane for Propane gas (operation to be done by one qualified installer). Never place a propane gas bottle inside the building.
You may connect the appliance to a gas bottle fitted with its respective regulator, or to a gas network tap. Since this is a movable unit, the following types of tubes could be used:
- Flexible rubber or elastomer tube, certified according an applicable standard fixed to an adequate inlet gas connection and held tight by a clamp on both ends
- Flexible stainless steel tube, certified according an applicable standard, with threaded connections.
- Flexible rubber or elastomer tube, certified according an applicable standard, with threaded connections.
ATTENTION
- Ensure the tube is not bent or twisted.
- Ensure the tube is not in contact with the rear panel.
- The tube must be replaced before expire date.
- The tube must be checkcable in is whole length.
- The clamps should be adequate for a good tight
- The maximum length of the flexible rubber tube must be 1500 mm.
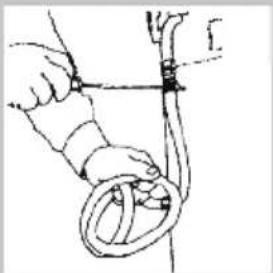
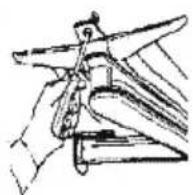
natural_image
Line drawing of a person tying a rope knot with a string (no text or symbols)The connection to the cooker should be done on the same side of the point of feeding, in way that the tube doesn't cross the backs of appliance. If necessary change the gas inlet or request to the services of technical attendance the adaptation tube so that the entrance of gas in the appliance is done on the side correct
After connecting the unit, check eventual leaks with a frothy product. NEVER USE A FLAME.
2.3 ELECTRIC CONNECTION
VERY IMPORTANT: The appliance must be always connected to the ground, according to actual regulations. The electric connection, should be executed only by qualified personnel who are aware of installation regulations in force.
Before the connection, check if the electric network is prepared for the required power (see the data plate, or table of technical characteristics).
The appliance must always be grounded in accordance with the regulations in force. The earth connection conductor is green/ yellow
中
With plug in devices must connect the plug to a wall socket with earth contact
The supply cable must be positioned that no point can reach a temperature 50^ C higher than ambient temperature.
Appliance are equipped with power cord and are designed to operate at a frequency of 50/60 Hz.
Verify the type of electric alimentation in the label placed on the back side of the appliance near the cable inlet, in the data plate placed in the dish warmer door, in the package label or in the characteristics table of technical characteristics.
According to the models, see table of technical characteristics, the alimentation could be, 230 V \~, single-phase current (2+1 conductors) or 400V 2N \~, two-phase current (3+1 conductors), or three-phase current 400V 3N \~ (4+1 conductors).
To proceed this transformation see next schemes:
| monophasic 220 - 240 V2 + 1 conductors | biphasic 380 - 415 V 2N3 + 1 conductors | triphasic 380 - 415 V 3N4 + 1 conductors |
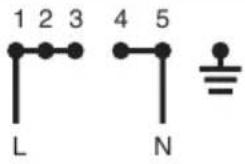 | 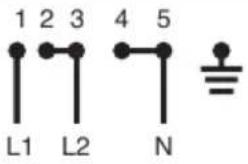 | 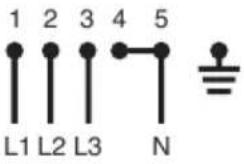 |
and to substitute the alimentation cable for the adequate, monophasic type HO5VV-F and triphasic type HO5RR-F.
NOTE: The producer is not responsible for eventual direct or indirect damages owing to a wrong installation, regulations misunderstanding or standards in force not respected.
2.4 CONVERSION TO OTHER TYPE OF GAS
This operation must be executed always by qualified and authorised personnel.
This appliance has been designed to function with Propane or Natural gas.
This appliance is provided with a label on the rear panel, near the gas inlet, indicating the type of gas and pressure for which the cooker has been adjusted.
The indication of the gas and pressure that the cooker has been adjusted to can also be found on the data label or on the package of the appliance.
In order to convert from one type of gas to an another, proceed as follows:
1 - Choose Inlet gas connection according to the type of gas available in your home.
2 - Cooking top burners:
2.1 - Remove the pan supports from the hob, the burner covers, burner speaders and the burner skirts.
2.2 - Unscrew and remove the injectors, and replace them those corresponding to the available gas (see table 1).
2.3 - Replace all burner components and the pan supports.
3 - Oven
| 3.1 - Open the oven door and remove all internal accessories and oven bottom | 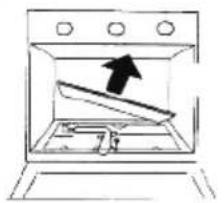 | 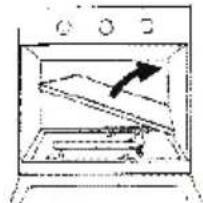 |
| 3.2 - Remove the burner by loosing the screw placed in the front and turning it highwards | 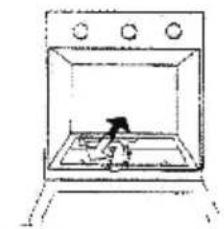 | 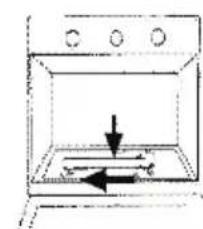 |
| 3.3 - Unscrew and remove the injector and replace them those corresponding to the available gas see table 1 | 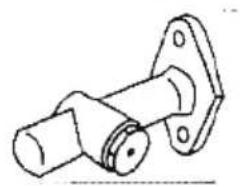 | |
3.4 - Screw the burner and put in place the oven bottom and the internal accessories
4 - Grill
4.1 - Open the oven door and remove all internal accessories.
4.2 - Remove the burner / reflector unit by loosing the screw fixing the reflector and remove all elements from the injector support by turning downwards
natural_image
Simple line drawing of a cabinet with an arrow pointing to the interior (no text or symbols)
4.3 - Unscrew and remove the injectors and replace them those corresponding to the available gas see table 1
4.4 - Screw the burner / reflector and put in place the internal accessories.
5 - Regulating the primary air - only the oven burner and / or grill
5.1 - move the air regulator which is input to the burner near the inyector to increase or decrease the air passage.
6 - Low flow adjustment:
6.1 - Light the burner on and put the knob to the Low Position.
6.2 - In this position, remove the knob of the tap.
6.3 - With screw - driver perform on the taps screw until the flame is conveniently regulated to the low position and stable

6.4 - Reassemble the knob and pass quickly from the Full On Position to the Low Position, several times, to ensure that the flame remains stable.
7 - After connecting the unit, check for gas leaks with soap and water solution. NEVER USE A FLAME.
8 - Place, near the inlet gas connection, a label indicating the type of gas for which the appliance is now prepared. "Appliance prepared for..."
2.5 GAS TAPS / VALVES MAINTENANCE AND CLEANING
If the gas tap / valve is hard to turn, do not force it. It might need lubricating
This operation must be executed always by qualified and authorised personnel
To access the taps / valves, pull burner heads and remove the cooking top
To lubricate the taps/ valves, follow these instructions
- With a screw-drive, remove the cover
- Pull the cone out of its housing
- Clean the cone with a dry lint-free cloth
- Lubricate the cone carefully, with grease recommended (Molykote, Staburgs N32, Rocol HT, Optitemp HT2 EP), and take off the excess grease to avoid obstructing the gas passages
- Introduce the cone and the spring and screw the cover
- Turn the cone several times, to ensure it is not hard
- Check for gas leaks, with the tap opened and closed. NEVER USE A FLAME.
BEFORE LEAVING
Check all connections for gas leaks with soap and water. DO NOT use a naked flame for detecting leaks. Ignite all burners to ensure correct operation of gas valves, burners and ignition. Turn gas taps to low flame position and observe stability of the flame. When satisfied with the cooker, please instruct the user on the correct method of operation. In case the appliance fails to operate correctly after all checks have been carried out, please call TECHNICAL CENTERS
3 USER'S GUIDE
3.1 PRELIMINARY ADVICE'S
Attention:
The accessible parts of the cooker could be heated, especially when the oven or the grill is in function. Do not let children close to the appliance.
The cooker should be always installed by qualified and authorised personnel.
The appliance is not intended for use by young children or infirm persons without supervision.
Young children should be supervised to ensure that they do not play with the appliance.
This appliance is class 1 (free installation) and designed for non-professional use by private individuals adults, a t home.
This appliance is type X: category for overheating.
Do not allow children to play near the cooker. Supervise children when it is being used so that they do not touch hot surfaces and are not near the appliance while it is in use.
Before switching on the appliance check that it is correctly regulated for the type of gas and electricity available.
When burners are lit check the Flame are always regular.
Before removing the saucepans turn off the burners
The user must not change the appliance electricity supply cable. For replacement contact only a qualified person.
The use of a gas appliance requires a regular exchange of air. Make sure that the installation complies with the Installation section 2.1.
Before using the oven for the first time pre-heat an empty oven to the maximum temperature for about 30 minutes to remove residual smells and smokes due to the manufacturing process without passing them to the food.
Gas appliance produce warm and moist products of combustion. Be sure that the location is well vented: Keep a window open or install a range hood or exhaust fan which vents to the outside.
In the case of intensive and prolonged use, it may be necessary to increase the ventilation, for example, open more windows or increase the speed setting of the range hood or exhaust fan, if one is installed.
The materials surrounding this appliance must withstand a temperature of 90^ C.
Before installing the cooker, remove the plastic sheathing covering some metal parts.
Only use the cover to protect the hob and for no other purpose.
Pay attention if cooking with grease or oil because if overheated, it can ignite.
Use exclusively pots and pans with a flat base.
During cooking the appliance becomes very hot. Never touch any parts on the top or inside the oven without protection from heatproof gloves.
WARNING:
Do not spray aerosols in the vicinity of this appliance while it operation.
Where this appliance is installed in marine craft or in caravans, it shall not be used as a space heater.
Do not store inflammable materials in the storage drawer.
3.2 HOW TO USE BURNERS OF THE COOKING TOP
If you use the burners properly, the consequence will be a maximum efficiency, thus saving energy.
The power of the burners is shown on table 1.
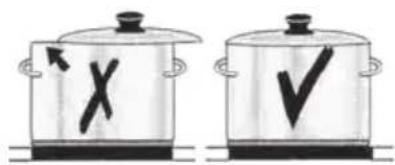
In order to obtain this, you must choose pans according to the size of the burner see the table 2.
If the flame is wider than the pan you are wasting energy.

YES
NO
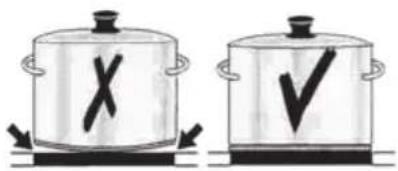
Attention
Only use containers with flat bottoms
Use containers that do not exceed the edges of the work table
This models having a grid reductive removable, it can be used to enable use of smaller containers with the necessary stability
IMPORTANT:
In the models with triple burner be attention with this point:
Put in the correct position the cover spreader of the middle screw down the cover spreader, to guarantee a good burning.
IGNITION OF THE HOT PLATE BURNERS
To ignite the burners proceed as follows:
- Press the ignition button
- Selecting the burner to use, push the corresponding knob and turn it counter clockwise to the "full position", indicated by a large flame 🔒.
- To reduce the power to turn the knob to the "low position", indicated by a small flame 🔒.
To switch off the burner, just turn the knob clockwise to the "off position", indicated by a black circle in the upper position of the panel ●.
All models have a security system in the burners of the cooking top
If the gas supply is deficient or if the flame is extinguished accidentally, the gas circuit will be automatically closed.
To restart is necessary an user intervention.
In this case and after verify that isn't a gas supply problem, wait at least one minute and repeat the lighting. For ignite this type of burner it's necessary maintaining the knob under pressure for 10 seconds.
After this time release the knob of the burner which must be in function.
3.3 THE VITRO TABLE USE
If the bottom of the pan you use is plane, It's possible user glass recipients or porcelain recipients
The pans diameters should be accorded to the diameter of the work area.
Don't use recipients with a inferior diameter to the work area.
Cover the recipients during the cooking, for economise energy.
How to use the work area:
The functioning of the work area is realised turning the handle in 3 positions, to the selected position (1 - minimum; 3 - maximum).
In the models with double heating (ref ^a D), this is activated turning the handle clockwise until doing a "click" the double area is activated, put the handle in the position selected (1-3).
To switch off the area, just turn the handle for the 0 position.
A light signal placed in the control panel indicates the working of a heating area.
A light signal placed in the frontal area of the glass indicates the "residual heat".
If the gas supply is deficient or if the flame is extinguished accidentally, the gas circuit will be automatically closed. To restart is necessary an user intervention.
In this case and after verify that isn't a gas supply problem, wait at least one minute and repeat the lighting.
For ignite this type of burner it's necessary maintaining the knob under pressure for 10 seconds.
After this time release the knob of the burner which must be in function.
3.4.1 Gas Oven
Some models have a thermostatic gas valve, which permit choice the temperature in the oven.
In this models the gas consumption reduce automatically since the temperature choised is reached.
To ignite the oven burner proceed as follows:
| Press the ignition button or bring the flame near the burner | 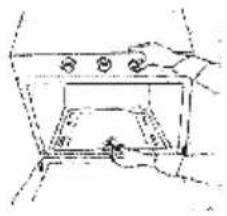 |
Push the oven knob under the symbol ☐ or ☐ and turn it counterclockwise and choose the temperature for the temperature that you need for cooking.
To switch off the burner, just turn the knob clockwise to the "Off Position", indicated by a black circle in the upper position of the panel ●
3.4.2 Gas Grill
To ignite the grill burner, operate as follows:
| Press the ignition button or bring the flame near the burner |  |
Push the grill knob ☐ or ☐ and turn it counterclockwise to the grill position, maintaining the knob under the pressure for 10 seconds.
After this time, release the knob; the grill must be in function.
If not, repeat the operation.
To switch off the burner, just turn the knob clockwise to the "Off Position", indicated by a black circle in the upper position of the panel
3.5 HOW TO USE THE GAS OVEN AND THE ELECTRIC GRILL (NOT APPLICABLE)
For security reasons the design of the appliance do not permit the work of the gas oven and the electric grill at the same time (if fitted).
For use the gas oven, procede like 3.3.1
To use the electric grill, turn the handle clockwise until the point
● until the Word grill or symbol on the grill
panel
3.6 HOW TO USE THE MULTIFUNCTION OVEN (APPLICABLE MODELS ONLY)
Various cooking options can be selected by the use of switching of different elements, and temperature that is controlled by a thermostat.
Oven light

In this position only the light is in operation. The light stays on the other seven use positions.
Fan forced

The circular heating element and fan come into operation and the heat is spread evenly to all shelf positions. Various types of food can be cooked on different shelves, naturally with the appropriate cooking times. The oven must be preheated before food is placed inside. Fan mode provides optimum results with: cakes large quantities of foods and cooking various dishes simultaneously.
To operate, select Fan Forced function along with the temperature.
Fan grill

Use of the Grill Element and Fan. Use for grilling meats, vegetables and poultry. Preheat oven, place food on grill rack in baking tray and place in the middle of the oven. Other foods maybe cooked underneath whilst grilling.
Grill

Grill Element - Use for toasting and melting cheese or browning. No longer than 5 minutes cooking time. To operate, select Full Grill Function along with the temperature.
Static oven

The heat is provided from the top and bottom element. The oven must be preheated before food is placed inside. Static cooking provides optimum results with: cakes, pizzas, bread and for gentle slow cooking of casseroles.
Characteristics of static cooking: heat provided from above and below, cooking is possible only on middle shelf and should be centrally located in the oven.
Ventilated oven

With this function a continuous circulation of the hot air is provoked, particularly indicated to cook on several levels of the oven. The scheduled temperature will be reached in little time. The resistance inferior and superior of the oven are together in operation with the thermostat. The fan is always in operation.
Defrosting

The defrosting takes place in the same way as at room temperature, but with the advantage that it is much more rapid. In this position only the fan is in operation.
Fan Assisted

The outside ring of the top element and the bottom element and fan come into operation and the heat is spread evenly to all shelf positions. Suitable for cooking pies and single layer baking. The oven must be preheated before food is placed inside. To operate, select Fan Assisted function along with the temperature.
The Oven door must be closed for all cooking functions
The accessible parts of the cooker can become hot, if the oven or the grill is in operation.
Do not let children close to the appliance.
3.7 HOW TO USE THE TURN-SPIT (APPLICABLE MODELS ONLY)
| In this model with turn spit put the aliments in the center of the spitPut the support grill in the two sides of the oven.Introduce the spit rod in to the motor shaft hole obtained in the back wall and check the rearend is well set. |  |
| Lay everything on the support grid using the spit rod collar placed near handleIn certain models fit the spit in the grill and push it to the interior of the oven, verifying the good fitting of the shaft into the motor hole | 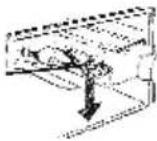 |
| Set the basin for collecting drips on the lower guideThe handle is used only to easily remove the food when cooking is over.To switch on the spit turn the knob which is under the symbol (without grill) or (with grill). | 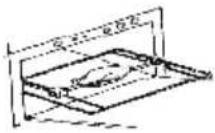 |
3.8 OVEN LIGHT USE
For your commodity and economy you could watch the cooking through the oven glass window, without open the door if you use the oven light.
To switch on the oven light turn the knob until the symbol

Some models with electric oven (EV) light illuminates when you turn the handle of the oven, and stays on until you turn off the oven
3.9 MINUTE-TIMER USE
With minute-timer you could selected time, from 0 to 120 minutes. To
use the minute-timer, turn the knob which is under the symbol
one complete round clockwise; after,
you must back in counter clockwise until put the time you want in the upper position of the knob.
When the pre-set time has elapsed, the bell rings.
The bell does not interrupt the working of any element of the cooker.
Montpellier
Gas Mark to °F & °C – Temperature Conversion
| GAS MARK | °F | MAIN FAN OVEN | TOP CONVENTIONAL OVEN | MAIN CONVENTIONAL OVEN |
| 12 | 250 | 100°C | 110°C | 120°C |
| 1 | 275 | 120°C | 130°C | 140°C |
| 2 | 300 | 130°C | 140°C | 150°C |
| 3 | 325 | 140°C | 150°C | 160°C |
| 4 | 350 | 160°C | 170°C | 180°C |
| 5 | 375 | 170°C | 180°C | 190°C |
| 6 | 400 | 180°C | 190°C | 200°C |
| 7 | 425 | 200°C | 210°C | 220°C |
| 8 | 450 | 210°C | 220°C | 230°C + |
All timings given are purely as a guide. Timings may always vary due to personal methods, size of food being prepared and the temperature of said food stuffs. We always recommend following the cooking guidelines on your meat products and packets. For additional information, please call Montpellier on 03333 234 474.
| Food Type | Rack Position | Temperature | Cooking Time |
| Small Cakes | 1 to 3 | 180 - 200 ^ C | 15-20 mins |
| Biscuits | 3 | 180 - 200 ^ C | 12-15 mins |
| Fruit Cakes | 3 | 135-145 ^ C | 4hrs - 4hrs 45 mins |
| Sponge Cakes | 2 | 180 - 200 ^ C | 50 mins |
| Bread | 2 or 3 | 190 ^ C | 20-30 mins |
| Rolls | 3 | 200 ^ C (5) 180 ^ C (15-20) | 5 mins/15-20 mins |
| Beef Rib (Bone in/out) - 4 - 8 pounds (lb) | 3 | 140-150 ^ C | 23-30/39-43 mins min per lb - Allow to rest for 3-5 mins. |
| Beef - Eye round roast - 2 - 3 pounds (lb) | 3 | 140-150 ^ C | 20-22 mins min per lb - Allow to rest for 3-5 mins. |
| Beef Tenderloin Roast - 4 - 6 pounds (lb) | 3 | 200 ^ C | 35 - 45 mins Total |
| Roast Lamb | 3 | 140-145 ^ C | 20 - 26 mins per lb - Allow to rest for at least 3 mins |
| Roast Chicken (Whole Chicken) 4 - 8 pounds (lb) | 3 | 170 ^ C | 20 - 30 mins per lb - Check the internal temperature in the innermost part of the thigh, innermost part of the wing & thickest part of the breast. |
| Roast Turkey | 3 | 170 ^ C | 20 - 30 mins per lb - Check the internal temperature in the innermost part of the thigh, innermost part of the wing & thickest part of the breast. |
| Roast Pork: Loin, Shoulder, Leg - Bone In | 3 | 140 ^ C | 20-25 mins per lb - Allow to rest for at least 3 mins |
| Roast Pork: Loin, Shoulder, Leg - Boneless | 3 | 140 ^ C | 22-33 mins per lb - Allow to rest for at least 3 mins |
| Roast Potatoes | 2 or 3 | 180 ^ C | 55 mins |
| Roasted Vegetables | 2 or 3 | 160 ^ C | 25 - 35 mins |
| Casseroles/Bakes | 2 or 3 | 140-150 ^ C | 2 - 3 hours |
| Fish (Whole) | 3 | 180 ^ C | 20-30 mins |
| Pasta Bake | 2 or 3 | 180 ^ C | 25-35 mins |
| We always recommend Pre-Heating. Firstly, set the required temperature and allow the oven to get to temperature (up-to 15 minutes) before placing food in the cavity. | |||
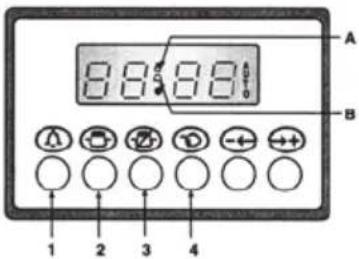
3.10 ELECTRONIC PROGRAMMER
SETTING UP THE ACTUAL HOUR:
Once the electrical connection is made to the oven, the display blinks and shows 0.00.
Press keys (1) and (2) at the same time, then press keys (-) and (+) to set up the actual hour within 4 seconds; the oven remains in manual operation and no programming is necessary.
GENERAL REMARKS:
- Between 10.00 p.m and 6.00 a.m. the display intensity dims automatically.
- If not deactivated as per the following instructions, the acoustic signal is cut off after 2 minutes.
- Any programming described hereunder is activated after approx. 4 seconds from its setting up.
- 23 hours and 59 minutes is the maximum time allowed for programming the oven.
- If the supply voltage fails, all the programmed settings are erased. When the supply voltage returns, the display blinks and shows 0.00. Set up the actual hour and the programme again to reset the equipment operation.
SAFETY LOCK FOR CHILDREN
The programmer is provided with a safety lock which stops the cooking programming and consequently the oven operation;
Lock running:
- press both switches (1) (2) at same time for about 8 seconds
- the display shows "ON"; release the switches
- press switch (+); the display shows "OF" and the symbol "..key.."
Now the safety lock starts running and after about 5 seconds the display shows the current time and the symbol "..key.."
Lock deactivation:
- press both switches (1) (2) at same time for about 8 seconds
- the display shows "OF"; release the switches
- press switch (+); the display shows "ON"
Now the safety lock is deactivated and after about 5 seconds the display shows the current time.
Automatic Operation
The oven can be programmed to switch on and off automatically.
To do this proceed as follows:
- Select the required cooking function and temperature using the function selector and the thermostat dial
- Press key (2) and set the cooking time by pressing keys (-) and (+) within the next 4 seconds
- Press key (3) and set the end of the cooking time in the same way.
The actual time reappears and pilot light (AUTO) remains ON, when the cooking process starts, pilot light (A) will remain on. The cooking time left can be controlled by pressing key (2), or the time can be changed by repeating the same procedure.
Reset the cooking time to 0.00 to erase the preset programme, and when the actual time reappears, press key (4) to reset the manual function. Once the cooking process is over the acoustic signal goes off and the oven is automatically switched off. Press one of the keys from (1) to (4) to return the programmer to the manual function.
Semi-automatic Operation
The oven can be programmed to switch off automatically.
To do this proceed as follows:
- Select the required function and temperature using the cooking function selector and the thermostat dial.
- Press key (2) and set the cooking time by pressing keys (-) and (+) within the next 4 seconds. The actual time reappears and pilot lights (A) and (AUTO) remain ON.
The cooking time left can be checked by pressing key (2), or the time can be changed by repeating the same procedure.
To erase the pre-set programme, reset the cooking time to 0.00, when the actual time reappears, press key (4) to reset to manual function.
Once the cooking programme is complete, the acoustic signal will sound and the oven is automatically switched off. Press one of the keys from (1) to (4) to switch off the acoustic signal. Press key (4) to return the programmer to the manual function.
Minute minder
When this device is used as a simple minute minder, press key (1) and programme the required time by pressing keys (-) and (+) within the next 4 seconds: the actual time reappears and the symbol (B) is activated. Press one of the keys from 1 to 4 to disconnect the acoustic signaller. Also symbol (B) is deactivated.
Manual Operation
The oven may be used manually without any programming. Press key (4) for the manual operation ("AUTO" pilot light off).
3.11 DIGITAL TIMER
20:46


Time of Day Adjustment
Press the + and - buttons together. The point between the hours and minutes will start to flash.
Using the + and - buttons, you can adjust the current time of day. Long presses of those buttons will enable fast adjustments.
Pressing the + and - buttons a long time, until the hour and point between the hours and minutes start to flash, will enable you to adjust just the hours portion of the display.
Minute Minder Adjustment
Press the + button. The screen will return to displaying the ' 0.00 ' and the bell symbol will start to flash. You can adjust the minute minder using the + or - buttons.
After 6 seconds following the adjustment, the bell symbol will be stabilized. The minute minder will start to countdown. The minute minder time increments are in 10 seconds up to 99 minutes 50 seconds, thereafter the display will show 1 hour and 40 minutes and the adjustment will be in 1 minute steps.
Note: In order to cancel a minute minder program, set the minute minder time down to 0.00
Cancelling the Buzzer Sound
When countdown of the minute minder is completed, the screen will return to displaying the current time of day. The bell symbol will start to flash, a buzzer alarm is heard and will sound, if not stopped, for 7 minutes. Press any button to cancel the sound.
Buzzer Tone Adjustment
You may adjust the buzzer tone of the timer in following way:
1) Pressing the (-) button, you can hear the currently set tone
2) Releasing (-) and then pressing again, you can hear the next available (total 3) tone
3) The last sound heard will be your adjusted one
Note: Factory setting is the maximum level ( highest frequency ) a long interrupt of power may result in reloading this setting.
3.12 RECOMMENDATION TO USE THE OVEN AND THE GRILL
The accessible parts of the cooker could be hot, if the oven or the grill is in operation. Do not let children close to the appliance.
Don't let children sit down or play with the oven door. Do not use the drop down door as a stool to reach above cabinets
Warning:
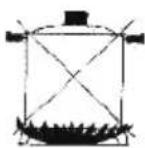
Never use the food - Warmer drawer set at the bottom of the range to store inflammable substances or waters that cannot withstand heat such as: wood, paper, spray cans, rags, etc...
Pre-heat of the oven until it reaches the temperature, before you put the food into the oven.
Never use low-edged containers nor trays as baking-pan for roasts in order to soil the minimum possible the walls of the oven, thus preventing fat splashes, sauce burning and smoke production.
If the grease falls down into the oven burner it could inflame.

natural_image
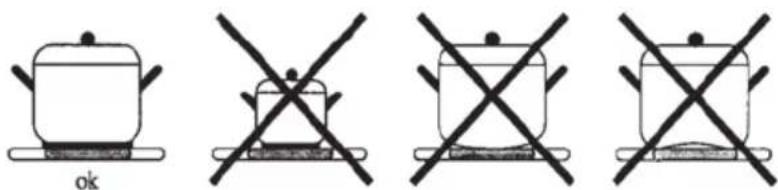
Diagram of a microwave oven with internal cooling unit and heating screen (no text or labels)Use instead high-edged containers, preferably terracotta containers, put on the grate at about half the height of the oven.
When the food is directly on the grate, you must put the basin for collecting
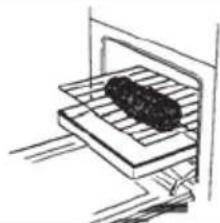
natural_image
Simple line drawing of a stove interior with a rack and stove (no text or symbols)Never use the oven without the rubber seal
natural_image
Simple line drawing of an open oven with a handle and lid, no text or symbols presentDuring the functioning of the oven and of the grill, the oven door must rest completely closed.
It is advisable to:
Place the cooking tray on the middle level of the oven.
Avoid opening the door during the cooking, since the temperature changes will spoil your cooking and increase energy consumption.
The oven can be turned off some minutes before the victuals are completely roasted; the residual temperature will be enough for having just roasted.
4 INSTRUCTIONS FOR MAINTENANCE AND CLEANING
Warning: Servicing should be carried out only by authorised personnel. Before maintenance or cleaning your cooker, switch off the circuit breaker, turn off the isolating gas valve or the gas mains and allow the cooker to cool down.
GENERAL CLEANING
Adequate maintenance and cleaning will prolong the life of the appliance, as well as ensure trouble-free service.
Before you let down the cover glass it is necessary to decrease the temperature of the burners and electric plate.
The cooker must be washed with warm water, using a damp sponge and ordinary detergent.
Never use scouring powder, steel wool or acids to clean the cooker.
The stainless steel parts should be washed, after the use, with water and dried with a soft cloth. If the spots still persist, it is necessary to use a non-abrasive detergent or warm vinegar.
The glass of the oven's door should be washed with warm water and a nylon pad soaked in ordinary detergent.
Avoid scrubbing the front panel, because this will erase the designs stencilled over each knob.
The enamelled grids of the knob can be washed in the dishwasher.
The cooker not must be cleaned with vapour equipments (eg. steam cleaners).
After a possible grid removal for cleaning, we recommend to verify the presence of such rubber pads and to put the grids back in their stable and centred correct position
NO
YES
BURNERS CLEANING
The burners should be cleaned with soapy warm water and well rinsed and dried. Ensure there are completely dry before using.
CLEANING CERAN COOKTOP
After use, once the cooker has cooled down, clean thoroughly as even small amounts of dirt can become impossible to remove when re-heated.
Do not use abrasive pads, sponges or powders to clean, as these products can scratch the surface of the glass.
Small amounts of dirt can be removed using a damp cloth or hot, soapy water.
Soap stains should be removed with water, and the glass should then thoroughly dried.
For encrusted dirt, it is recommended that you use a glass scraper, with a metal blade, which can easily be found on the market.
Only clean when the surfaces is cold.
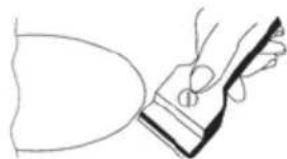
natural_image
Simple line drawing of a hand holding a tool near a curved object (no text or symbols)OVEN CLEANING
The oven should be washed with warm water and a nylon pad soaked in ordinary detergent. The oven is "Easy to Clean" enamel, don't need abrasive detergent for cleaning.
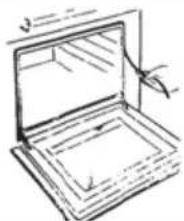
How to remove the interior glass on the oven's door for cleaning :
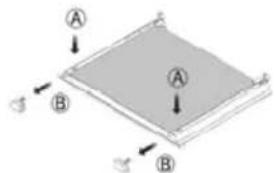 | - Press the (A), and remove the superior tops (B) |
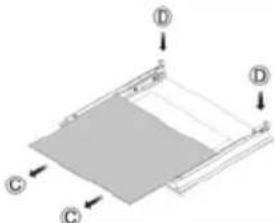 | - Release the interior glass (C), from the interior tops (D)- Remove the interior glassCleaning the glass with warm water and a nylon pad soaked in ordinary deterge |
 | - Place the glass in the supports- slide in the guide till engage the groove (D) of the interior tops |
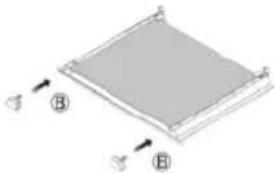 | - Introduce the superior tops (B) |
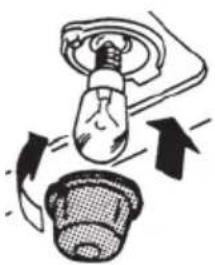
REPLACING THE OVEN BULB
Once the appliance has been electrically disconnected, unscrew the glass protection cap and the bulb, replacing it with another one suitable for high temperatures (300°C) having the following characteristics:
Voltage: 220 - 240 V
Power: 15 / 25 W
Socket: E14
Reassemble the glass cup and reconnect the appliance.
natural_image
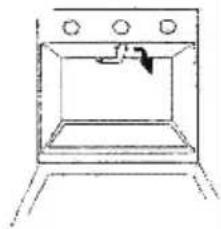
Diagram of a light bulb being heated by a curved tube, with arrows indicating airflow direction (no text or symbols)Protection Filter of the Oven Fan
During the cooking, to minimise fat/debris going on to the fan, install the filter cover. When cooking is complete, remove the filter and wash it. To install the filter, mount the filter leaning it against the rear wall at the same level of the fan, then push the "tang" downwards. Reverse this operation to remove the filter.
The cleaning of the fan must be doing by a technical service

natural_image
Simple line drawing of a microwave oven with a circular vent and a black arrow indicating direction (no text or symbols)To facilitate cleaning chrome side grills can be removed. For this follow the instructions 1. for 3. for disassembled oven grill. To set back following the instructions of a 3. for 1.
natural_image
Diagram showing a metal bracket with a magnified inset view of its side profile (no text or symbols)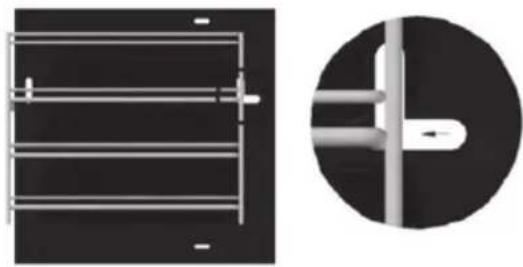
natural_image
Technical diagram showing a metal frame structure and its cross-sectional view (no text or symbols)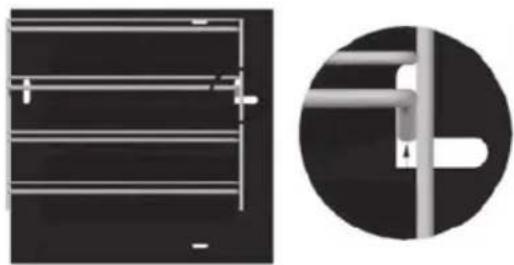
natural_image
Technical illustration of a metal frame structure and its cross-sectional view (no text or symbols)-
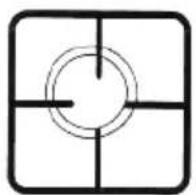
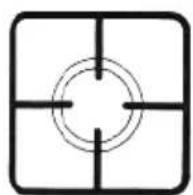
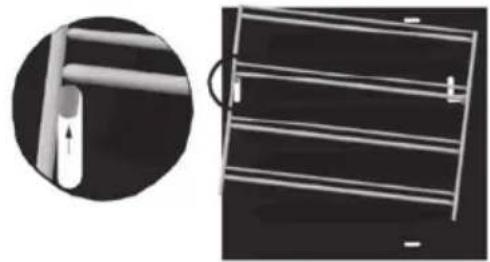
Raise the grill vertically and remove the pin in the groove on the front side of the oven
-
Move the grid in the direction indicated so that moves into the slot along the coast of the oven
-
Move the grid in the direction indicated so that moves into the slot along the coast of the oven. Vertical lift and remove the pin in the groove in the back side of the oven
The stainless steel runners that support the enameled pans can be removed and placed in three levels of the side grilles.
5 CONTROL OF THE PRODUCT
The producer certifies that this appliance has undergone the following verifications:
- Electric unit operation
- Dielectric rigidity
- Earthing continuity
- Operation with one type of gas
- Leak control
- Operation of the safety valves
- Aesthetic control
Manufacturer address: Unit 1, Tewkesbury Retail Park, Northway Lane,
Tewkesbury, Gloucestershire, GL20 8JH.
www.monipellier-appliances.com
6 TABLES
| TABLE 1 - BURNERS | |||||||
| BUTAN GAS PROPAN GAS NATURAL GAS | |||||||
| Pressure nominal operation, mbar 28 - 30 37 20 | |||||||
| Pressure nominal operation, mbar 35 45 25 | |||||||
| Pressure nominal operation, mbar 20 25 17 | |||||||
| Power W (P.C.S.) Rate Injector Rate Injector Rate | |||||||
| Burners | Normal | Minimum | g/h | mm | g/h | mm | L/h |
| Auxiliary | 1 000 | 300 | 73 | 0,50 | 72 | 0,72 | 95 |
| Semi Rapid | 1 750 | 500 | 127 | 0,65 | 125 | 0,97 | 167 |
| Rapid | 3 000 | 1250 | 218 | 0,85 | 215 | 1,15 | 286 |
| Wok | 4 000 | 1500 | 295 | 0,100 | 236 | 1,50 | 314 |
| Oven 61 L | 2 750 | 1100 | 200 | 0,80 | 197 | 1,20 | 262 |
| Grill 61 L | 1 800 | --- | 131 | 0,70 | 129 | 1,00 | 172 |
| Oven 115 L | 4 000 | 1250 | 284 | 0,95 | 279 | 1,45 | 372 |
| Grill 115 L | 2 800 | --- | 204 | 0,80 | 200 | 1,20 | 267 |
TABLE 2 - TABLE OF RECIPIENTS (To use pots with the plane fund)
| Recommended diameters, cm | ||
| Burners | minimum | maximum |
| Auxiliary ∅ 42 | 10 | 16 |
| Semi-rapid ∅ 62 | 15 | 22 |
| Rapid ∅ 92 | 22 | 28 |
| Wok ∅130 | 24 | 30 |
EE Burner - EE work table - IEE Oven - According (EU) 66/2014
| BURNERS | Power, W | ||||||||
| GAS | ELE | MR95DFP/B/R | MR191DFMX | MR91DFMX/K | MR91G0X/K | ||||
| Auxiliary | 67 | 1 000 | --- | 1 | 1 | 1 | 1 | 1 | 1 |
| Semi-rapid | 66 | 1 750 | --- | 2 | 2 | 2 | 2 | 2 | 2 |
| Rapid | 64 | 3 000 | --- | 1 | 1 | 1 | 1 | 1 | 1 |
| Work | --- | 1 000 | 1 | 1 | 1 | 1 | 1 | 1 | |
| Oven | --- | 4000 | 3800 | E | E | E | E | G | |
| Grill | --- | 2800 | 2800 | E | E | E | E | C | |
| EIG gas work table (%) | 65 | 65 | 65 | 65 | 65 | 65 | -- | ||
| Maximum gas power KW (PCS) | 11.050 | 11.000 | 11.000 | 106.8 - A | 106.8 - A | 106.7 - A | 106.7 - A | ||
| EIG oven (% ) | 106.8 - A | 106.8 - A | 106.8 - A | 106.7 - A | 106.7 - A | 106.7 - A | 106.7 - A | ||
| Oven, L | 121 | 121 | 115 | 114 | 114 | 114 | 114 | ||
| IEE oven (%) | 106.8 - A | 106.8 - A | 106.8 - A | 106.7 - A | 106.7 - A | 106.7 - A | 106.7 - A | ||
| Circular | |||||||||
| Circular | --- | --- | 3000 | E | E | E | E | --- | |
After-sales assistance
If you continue to experience problems with your Range Cooker, please call the Montpellier customer service helpline on: 03333 234 473.
Please have all your product details available, including the model number, serial number, date of purchase, and your retailer's details before registering a fault.
The service call cannot progress without this information.
Your 2 year Manufacturer's guarantee
THIS DOES NOT AFFECT YOUR STATUTORY RIGHTS.
Your new Montpellier appliance carries a free guarantee which protects you against the cost of repairs during the first 24 months from date of purchase provided that:
Any claim is accompanied by evidence of the model reference, model serial number and proof of purchase, such as a Sales Receipt, showing that the appliance was purchased within the 24 months prior to the date of claim.
What is not covered under the Guarantee
- Any appliance not correctly installed and operated in accordance with the manufacturer's instructions.
- Any appliance that is used for anything other than domestic purposes.
- Any defect caused by accident, misuse, unauthorised modification or inexpert repair.
- Cost of Call-out where a fault cannot be found with the appliance.
- Cost of Call-out for work covering routine maintenance, such as, but not exclusively, cleaning of filters or defrosting.
- Cost of Call-out for work required to correct the alignment of doors following door reversal procedures carried out by you.
• Use of the appliance by anyone other than the Householder.
• Use in any commercial environment. - Consumable items, such as, but not exclusively, fuses in plugs, bulbs and breakable items which require routine replacement.
- Repair costs incurred that have not been authorised by Repairtech and/or carried out by a non-approved Repairtech engineer.
YOUR GUARANTEE IS VALID ONLY IN THE UK & ROI.
To register your appliance simply complete the card in your appliance pack and return it with a stamp affixed or alternatively you can register online at www.montpellier-appliances.com/support
SERVICE HELP-LINE
Should your appliance develop a fault, please call the Montpellier customer service helpline on: 03333 234 473.
Please remember to have all your product details available, including the model number, serial number, date of purchase and your retailer's details before registering a fault.
Your service call cannot progress without this information.
Montpellier Domestic Appliances Ltd.
Unit 1, Tewkesbury Retail Park, Northway Lane,
Tewkesbury, Gloucestershire GL20 8JU
www.montpellier-appliances.com

The symbol on the product or on its packaging indicates that this product may not be treated as household waste. Instead it shall be handed over to the applicable collection point for the recycling of electrical and electronic equipment. By ensuring this product is disposed of correctly, you will help prevent potential negative consequences for the environment and human health, which could otherwise be caused by inappropriate waste handling of this product. For more detailed information about recycling of this product, please contact your local city office, your household waste disposal service or the shop where you purchased the product.