MR90CMC - Stove Montpellier - Free user manual and instructions
Find the device manual for free MR90CMC Montpellier in PDF.

User questions about MR90CMC Montpellier
0 question about this device. Answer the ones you know or ask your own.
Ask a new question about this device
Download the instructions for your Stove in PDF format for free! Find your manual MR90CMC - Montpellier and take your electronic device back in hand. On this page are published all the documents necessary for the use of your device. MR90CMC by Montpellier.
USER MANUAL MR90CMC Montpellier
Installation and Operating Instructions
MODELS: MR90CEMK, MR90CEMX, MR90CMC & MR90CMK
90cm Range Cooker - Electric
natural_image
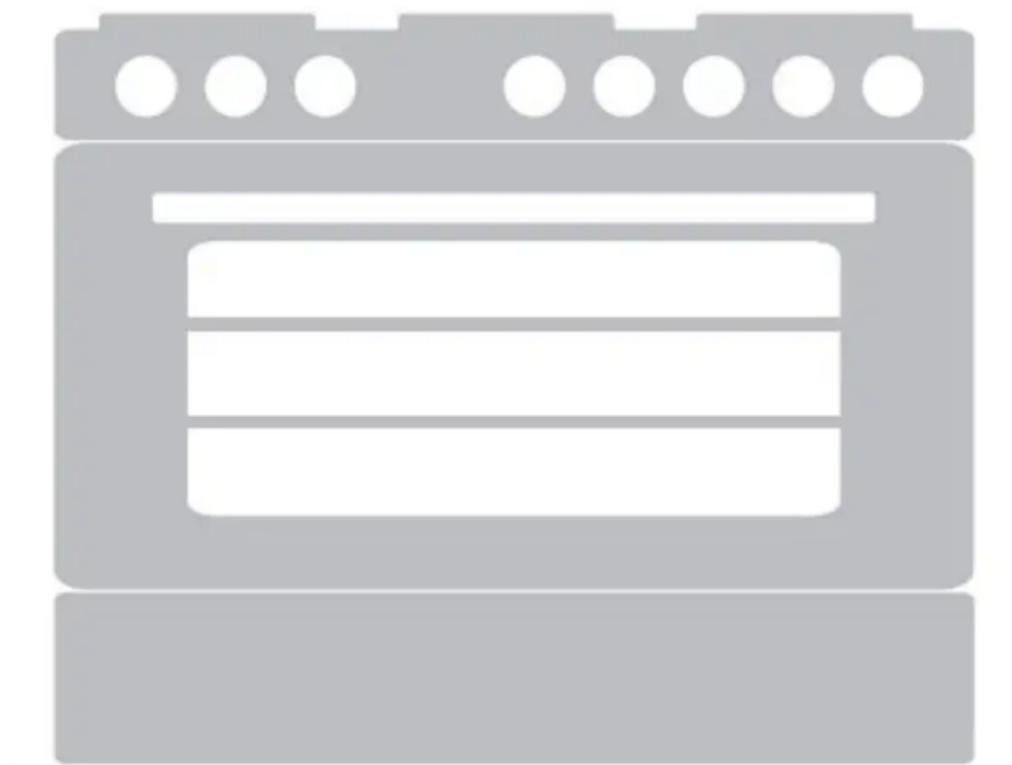
Simple gray icon of a kitchen oven with six windows (no text or symbols)(Picture indicative of model supplied)
Please read these instructions carefully before attempting to install or use this appliance. It is advisable to keep these instructions in a safe place for future reference. N.B. Should your appliance require attention, our service agents will not be able to book a service call without your unique serial number which can be found on the last page of this manual.
Introduction
Thank you for choosing this montpellier branded appliance. It has been designed to give years of trouble-free use provided it is installed and maintained correctly.
Please read these instructions carefully before installing or using your appliance. It is advisable to keep your purchase and installation receipts with these instructions in a safe place for future reference. Included is some important safety information in addition to guidelines and recommendations that will enable you to take full advantage of all the functions available.
This quality appliance has been tested and certified to meet all applicable UK electrical and safety standards.
This appliance must be installed and connected in accordance with current regulations.
After unpacking the appliance ensure that there is no visible damage. If the appliance has been damaged during transit, do not use it, contact your retailer immediately.
Your 2 year Manufacturer's guarantee THIS DOES NOT AFFECT YOUR STATUTORY RIGHTS.
Your new montpellier appliance carries a free guarantee which protects you against the cost of repairs during the first 24 months from date of purchase provided that:
Any claim is accompanied by evidence of the model reference, model serial number and proof of purchase, such as a Sales Receipt, showing that the appliance was purchased within the 24 months prior to the date of claim.
What is not covered under the Guarantee:
- Any appliance not correctly installed and operated in accordance with the manufacturer's instructions.
- Any appliance that is used for anything other than domestic purposes.
- Any defect caused by accident, misuse, unauthorized modification or inexpert repair.
- Cost of Call-out where a fault cannot be found with the appliance.
- Cost of Call-out for work covering routine maintenance, such as, but not exclusively, cleaning of filters or defrosting.
- Cost of Call-out for work required to correct the alignment of doors following door reversal procedures carried out by you.
- Use of the appliance by anyone other than the Householder.
- Use in any commercial environment.
- Consumable items, such as, but not exclusively, fuses in plugs, bulbs and breakable items which require routine replacement.
- Repair costs incurred that have not been authorised by Repairtech and/or carried out by a non-approved Repairtech engineer.
To Register your Appliance simply complete the card in your appliance pack and return it with a stamp affixed or Alternatively you can Register online at www.repairtechuk.com
SERVICE HELP-LINE
Should your appliance develop a fault, please call the Repairtech Service Helpline on: 01527-888133
Please remember to have all your product details available, including the model number, serial number, date of purchase and your retailer's details before registering a fault.
Your service call cannot progress without this information.
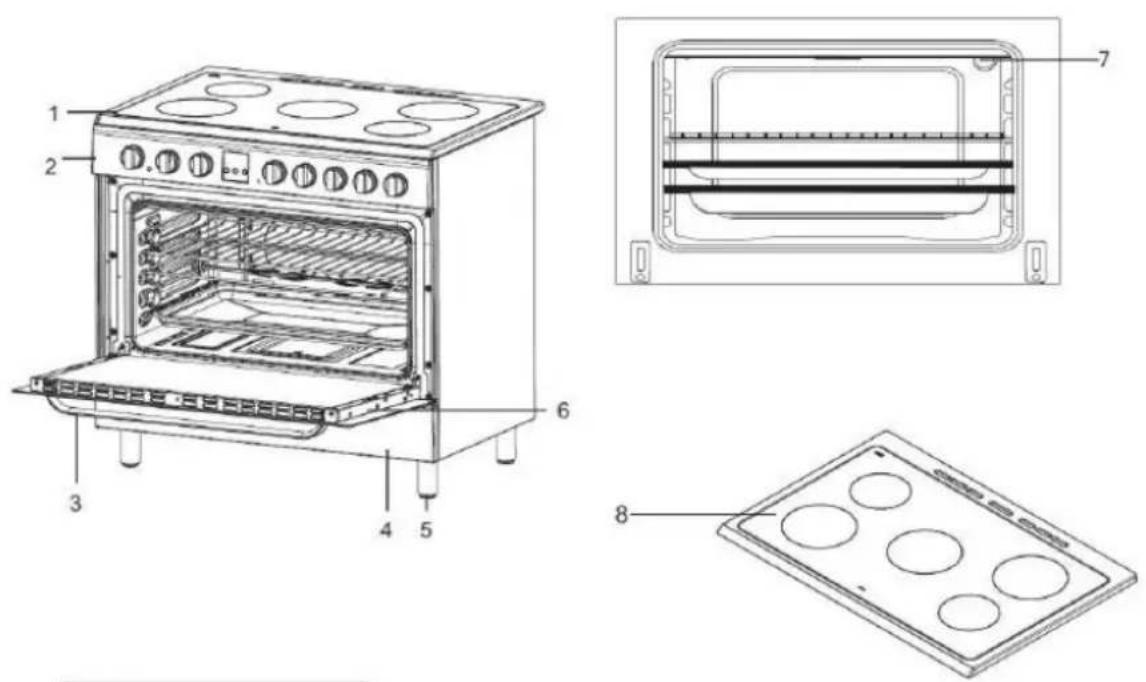
Description Of The Appliance
| PRODUCT DIMENSIONS | ||
| DEPTH (cm) | WIDTH (cm) | HEIGHT (cm) |
| 60 | 90 | 85/90 |
- Hotplate
- Control Panel
- Oven Door Handle
- Storage Cover
- Adjustable Feet x 4
- Oven Door
- Interior Light
- Heat Zones x 5
(Please note that the drawings used in this manual are schematic and may vary from the actual model supplied. In addition, the model supplied may not have all of the features shown/described in this manual).
CONTENTS:
Section 1. Installation
Section 2. Safety Advice
Section 3. Operating the Appliance
Section 4. Maintenance
Section 1. Installation
- Remove all packaging, protective film and securing tape from the appliance.
• Position the appliance in a dry atmosphere. - The following dimensions are provided as a guide for installation – your installer will carry out the installation in accordance with the current regulations.
- Your installer will connect the power cable in accordance with the current regulations.
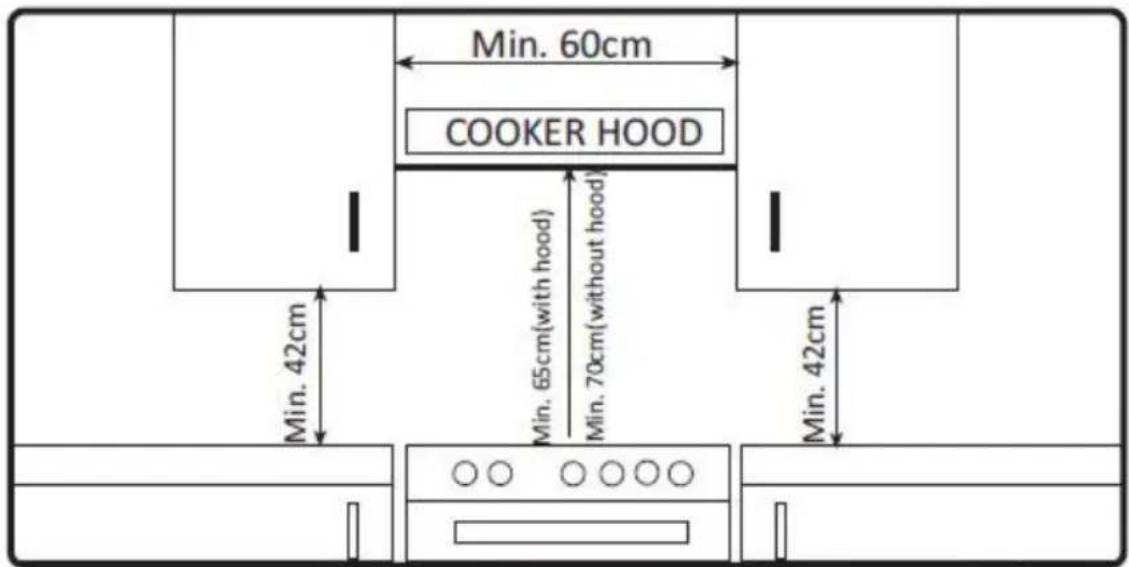
1.1. Positioning the Appliance
- Position the appliance as shown in the diagram below.
- Ensure an air gap of at least 2cm on all sides of the appliance.
- You must ensure a minimum gap of 65cm between the top of the appliance and a cooker hood. The gap must be 70cm if there is no cooker hood installed above the appliance.
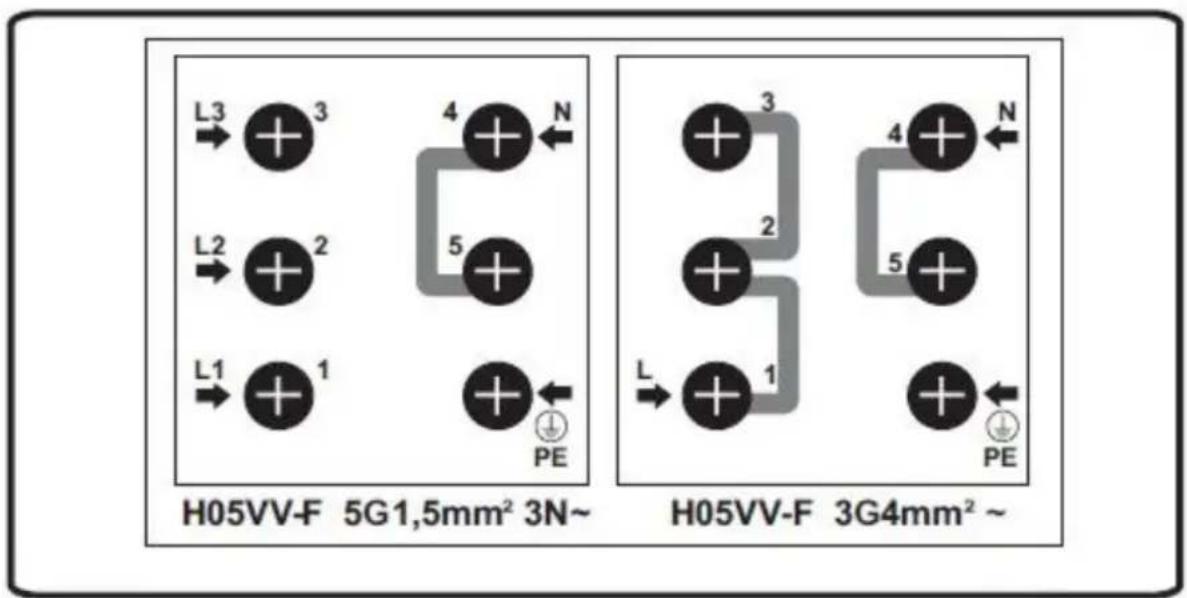
1.2. Electrical Connection
This appliance must be ‘hard wired’ into a suitable fused spur adjacent to the appliance housing, by a Qualified Electrician. Please note that a switchable spur should be accessible above the work surface in order that the power can be turned off by the consumer.
Your installer will supply and use the appropriate diameter of electrical cable based on the Power Rating of the appliance as shown on the Rating Label affixed to the appliance.
Electrical Connection Diagram:
flowchart
graph TD
    subgraph H05VV-F 5G1,5mm² 3N~
        L3 --> +
        +3 --> +
        +2 --> +
        +1 --> +
        L1 --> +
        +1 --> +
        N --> +
        +4 --> +
        +4 --> +
        +5 --> +
        +5 --> +
        +6 --> +
        +6 --> +
        +7 --> +
        +7 --> +
        +8 --> +
        +8 --> +
        +9 --> +
        +9 --> +
        +10 --> +
        +10 --> +
        +11 --> +
        +11 --> +
        +12 --> +
        +12 --> +
        +13 --> +
        +13 --> +
        +14 --> +
        +14 --> +
        +15 --> +
        +15 --> +
        +16 --> +
        +16 --> +
        +17 --> +
        +17 --> +
        +18 --> +
        +18 --> +
        +19 --> +
        +20 --> +
        +20 --> +
        +21 --> +
        +21 --> +
        +22 --> +
        +22 --> +
        +23 --> +
        +23 --> +
        +24 --> +
        +24 --> +
        +25 --> +
        +25 --> +
        +26 --> +
        +26 --> +
        +27 --> +
        +27 --> +
        +28 --> +
        +28 --> +
        +29 --> +
        +29 --> +
        +30 --> +
        +30 --> +
        +31 --> +
        +31 --> +
        +32 --> +
        +32 --> +
        +33 --> +
        +33 --> +
        +34 --> +
        +34 --> +
        +35 --> +
        +35 --> +
        +36 --> +
        +36 --> +
        +37 --> +
        +37 --> +
        +38 --> +
        +38 --> +
        +39 --> +
        +39 --> +
        +40 --> +
        +40 --> +
        +41 --> +
        +41 --> +
        +42 --> +
        +42 --> +
        +43 --> +
        +43 --> +
        +44 --> +
        +44 --> +
        +45 --> +
        +45 --> +
        +46 --> +
        +46 --> +
        +47 --> +
        +47 --> +
        +48 --> +
        +48 --> +
        +49 --> +
        +49 --> +
        +50 --> +
        +50 --> +
        +51 --> +
        +51 --> +
        +52 --> +
        +52 --> +
        +53 --> +
        +53 --> +
        +54 --> +
        +54 --> +
        +55 --> +
        +55 --> +
        +56 --> +
        +56 --> +
        +57 --> +
        +57 --> +
        +58 --> +
        +58 --> +
        +59 --> +
        +59 --> +
        +60 --> +
        +60 --> +
        +61 --> +
        +61 --> +
        +62 --> +
        +62 --> +
        +63 --> +
        +63 --> +
        +64 --> +
        +64 --> +
        +65 --> +
        +65 --> +
        +66 --> +
        +66 --> +
        +67 --> +
        +67 --> +
        +68 --> +
        +68 --> +
        +69 --> +
        +69 --> +
        +70 |
    end
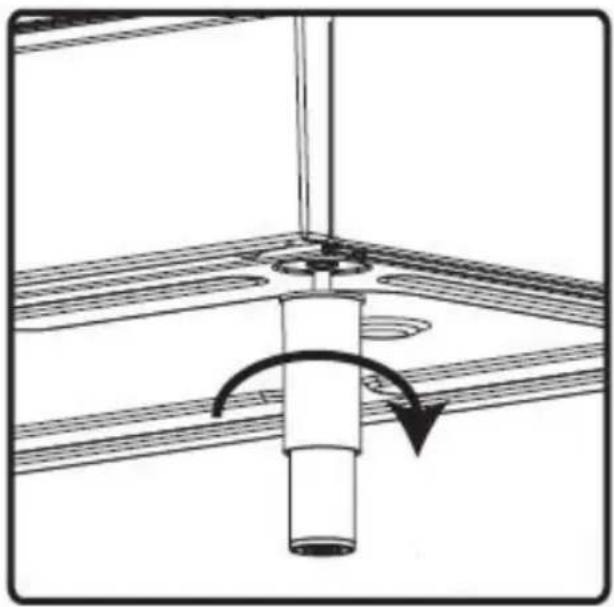
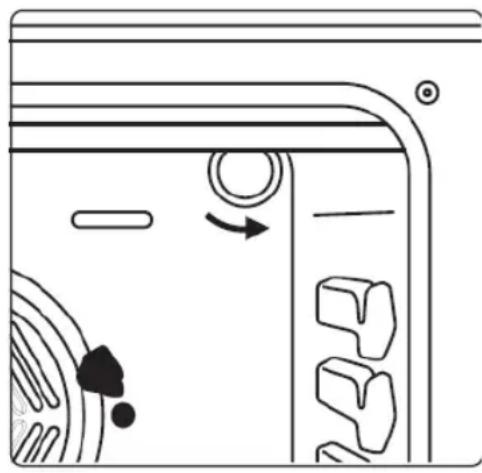
1.3. Level the Appliance
Finally, ensure that the appliance is level by adjusting the 4 feet as shown below.
natural_image
Diagram of a mechanical assembly with a rotating shaft and base plate (no text or symbols)Section 2. Safety Advice
- Please read this booklet thoroughly before installing and switching on the appliance. The manufacturer accepts no responsibility for incorrect installation and usage.
- This appliance is guaranteed for Domestic Use Only.
- The appliance is not intended for use by persons (including children) with reduced physical, sensory or mental capabilities, or lack of experience and knowledge, unless they have been given supervision or instruction concerning the use of the appliance by a person responsible for their safety. Children should be supervised to ensure that they do not play with the appliance.
- This appliance must only be used for cooking/heating food items. Do not use it for any other purpose.
- If using an adaptor, this must be used in accordance with the manufacturers instructions and ensure that the electrical circuit is not overloaded as this could cause overheating.
- Do not twist or bend the cables, and keep them away from hot surfaces.
- Following installation make sure that the power cable is not trapped underneath the appliance.
- Keep the appliance surfaces clean. Failure to do this could lead to the appliance malfunctioning.
- The surface of this appliance will get extremely hot during use. Take care when using the appliance and keep children well away.
- The interior and surface of this appliance will remain hot after it has been turned off. Do not touch or clean the appliance until it has completely cooled down.
- Never lift this appliance using the door handle or 'open' door.
- If the power supply cord is damaged, it must be replaced by the manufacturer, it's service agent or similarly qualified persons in order to avoid a hazard.
Section 3. Operating the Appliance
3.1. Oven Control Panel
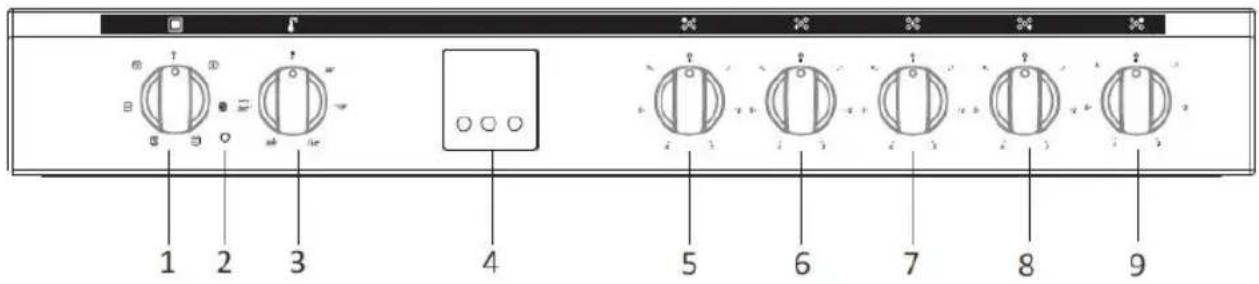
- Oven Function Control Knob
- Oven Thermostat Operation Light
- Oven Thermostat Control Knob
- Digital Timer
- Rear Left Heat Zone Control Knob
- Front Left Heat Zone Control Knob
- Centre Heat Zone Control Knob
- Front Right Heat Zone Control Knob
- Rear Right Heat Zone Control Knob
3.2. Cooking & Functions
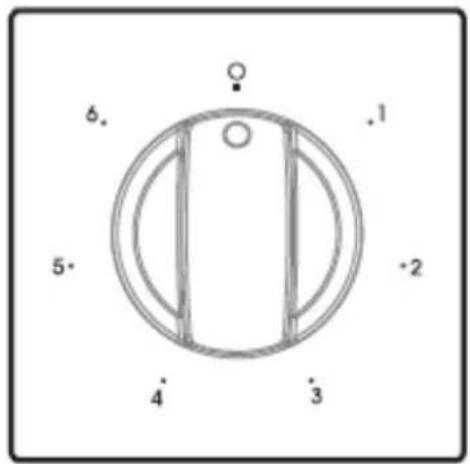
3.2.1. Operating the Hotplate
- Turn the appropriate Heat Zone control knob to the required heat setting (Position 1 is low and position 6 is high – see diagram below).
- Use only flat bottomed pans.
- Never use a pan with a smaller diameter than that of the heat zone.
- Remember to turn the Heat Zone control knob back to Zero when you have finished cooking.
3.2.2. Operating the Oven
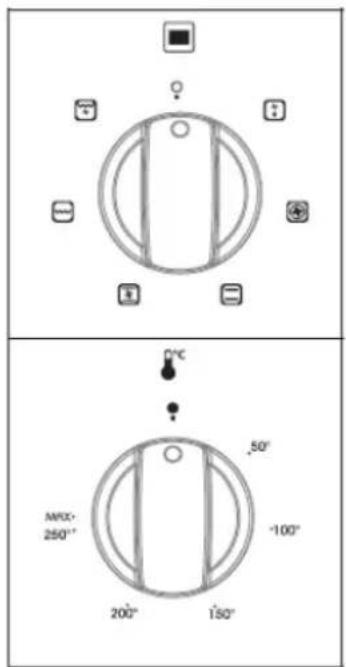
- Turn the Oven Function Control Knob to the required setting (See diagram below). See Section 3.2.4 for function list.
- Turn the Oven Thermostat Control Knob to the required heat setting (See diagram below)
- The Oven Thermostat Operation Light will illuminate whilst the oven heater is operating.
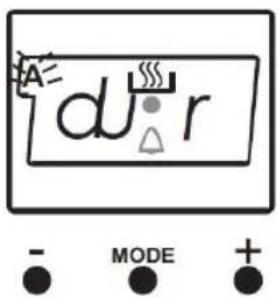
3.2.3. Setting the Timer
| Use of digital minute minder | |
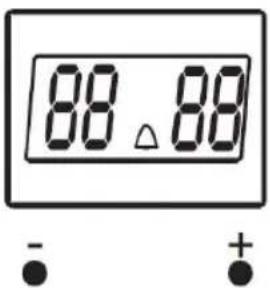 | Simultaneously press (+) and (-) buttons of digital minute minder. The display will start flashing, and then you can set the time setting by using (+) and (-) buttons. When you press (+) or (-) buttons after setting the time (Δ) symbol is displayed, and the desiring timer set. At the end of this time period, it will make a beep sound but the oven continues working. In order to turn the oven off, you must take the switch and thermostat of the oven to closed position.Sound AdjustmentWhile the timer shows the time of day; if the (-) button on is kept pressed for 1-2 sec., it will give an audible signal beep. After that each time the (-) button is pressed, it will give three different types of signal beep. Do not press any further buttons and it will save the last selected signal type. |
| Use of digital timer | |
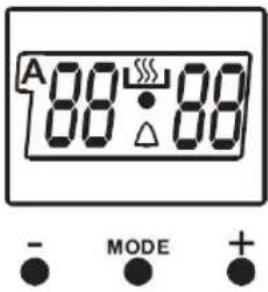  | Time Adjustment:The time must be adjusted before starting to use the oven. Following the power supply to the oven, the symbol (A) and the three “0” on the screen will begin to flash. Press the (+) and (-) keys simultaneously. The symbol will appear on the screen. Also, the dot in the middle of the screen will begin to flash. Using the (+) and (-) buttons, adjust the day's time while this dot is flashing. After the adjustment, it should be expected that the dot will be lit continuously.Following the power supply to the oven, when the symbol (A) and the three “0” on the screen begin to flash, the oven can not be operated using the control buttons. When the (+) and (-) buttons are pressed simultaneously for time adjustment, the symbol will appear on the screen. When this symbol appears on the screen, you can manually operate the oven part. As the adjusted time will be reset in the event of a power failure, time adjustment operation will have to performed again.Audible Warning Time Adjustment:The time must be adjusted before starting to use the oven. Following the power supply to the oven, the symbol (A) and the three “0” on the screen will begin to flash. Press the (+) and (-) keys simultaneously.The symbol will appear on the screen. Also, the dot in the middle of the screen will begin to flash. Using the (+) and (-) keys, adjust the day’s time while this dot is flashing. After the adjustment, it should be expected that the dot will be lit continuously. This function can be used to recieve audible warning at the completion of the adjusted time period.Press the MODE key in the middle. The △ symbol will flash on the screen. Also three “0”s will appear. Adjust the desired time period for the warning by using (+) and (-) keys while the △ symbol is flashing. Some time after the completion of the adjustment, the △ symbol will begin to light continuously. When the △ symbol begins to light continuously, the audible warning time adjustment is done.The audible warning time can be set to a time between the time range of 0 and 23.59.When the set time is up, the timer gives an audible warning and the △ symbol begins to flash on the screen. Pressing any key will stop the audible warning and the △ symbol disappears on the screen.Audible Warning time adjustment is for warning purposes only. The oven will not be activated at this function. |
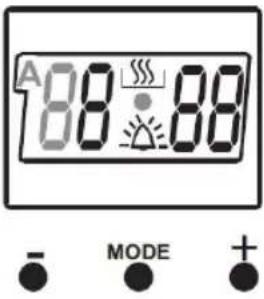
 | Semi - Automatic Time Adjustment According to Cooking Period:This function is used to cook in the desired time range. The foods to be cooked are put into the oven. The oven is adjusted to the desired cooking function. The oven thermostat is adjusted to the desired degree depending on the dish to be cooked. Keep pressing on the MODE button until you see “stop” on the timer screen. When you see “stop” on the timer screen, the symbol (A) will begin to flash. Adjusted the cooking period for the food you wish to cook, byusing the (+) and (-) buttons while the timer is in his position. Some time after the adjustment operation is completed, the day's time will appear on the screen and the symbols (A) and will begin to continuously light on the screen. While doing this, the oven will also start to operate.A cooking period between the time range of 0 and 10 hours can be set.At the completion of the set duration, the timer will stop the oven and give an audible warning. Also, the symbol (A) will begin to flash on the screen. After bringing the oven button and oven thermostat button to 0 position, pressing any button of the timer will end the audible warning. Also, the timer will be brought to manual use function. |
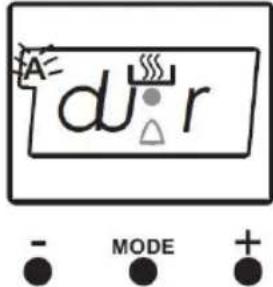
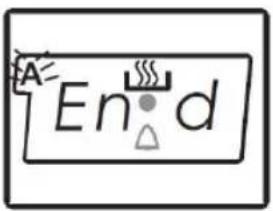 - MODE + - MODE + | Semi - Automatic Programming According to Finish Time:This function is used to cook according to desired finishing time. The food to be cooked is put into the oven. The oven is adjusted to the desired cooking function. The oven thermostat is adjusted to the desired degree depending on the dish to be cooked. Keep pressing on the MODE button until you see "end" on the timer screen, the symbol (A) and the day's time will respectively begin to flash.Adjust the finishing time for the food you wish to cook, by using the (+) and (-) keys while the timer is in this position. Some time after the adjustment operation is completed, the day's time will appear on the screen and the symbols (A) and will begin to continuously light on the screen. While doing this, the oven will also start to operate.You can set a time which can be up to 10 hours after the day's time.At the completion of the set duration, the timer will stop the oven and give audible warning. Also the symbol (A) will begin to flash on the screen. After bringing the oven button and oven thermostat button to 0 position, pressing any button of the timer will end the audible warning. Also, the timer will be brought to manual use function. |
Full-Automatic Programming:
This function is used to cook after a certain period of time, within a certain duration. The food to be cooked is put into the oven. The oven is adjusted to the desired cooking function. The oven thermostat is adjusted to the desired degree depending on the dish to be cooked.
First; keep pressing on the MODE button until you see "stop" on the timer screen. When you see "stop" on the timer screen, the symbol (A) will begin to flash. Adjust the cooking period for the food you wish to cook, by using the (+) and (-) keys while timer is in this position. Some time after the adjustment operation is completed, the day's time will appear on the screen and the symbols (A) and will begin to continuously light on the screen.
A cooking period between the time range of 0 and 10 hours can be set.

Second; keep pressing on the MODE button until you see "end" on the timer screen. When you see "end" on the timer screen, the symbol (A) and the day's time will begin to flash, with the addition of the cooking period. Adjust the finishing time for the food by using the (+) and (-) keys while the timer is in this position. Some time after the adjustment operation is completed, the day's time will appear on the screen and the symbol (A) will begin to continuously light on the screen.
You can set a time which can be up 23.59 hours after the time obtained by adding the cooking period the day's time.
The oven will start operating at the time calculated by deducting the cooking period from the set finishing time, and will stop at the set finishing time. The timer will give an audible warning and the symbol (A) will begin to flash. After bringing the oven button and oven thermostat button to 0 position, pressing any button of the timer will end the audible warning. Also, the time will be brought to manual use function.
3.2.4. List of Cooking Functions
Please note that your model may not feature all of the functions listed below:
| Oven Lamp | |
| Only the oven light will be turned on and it remains on in all the cooking functions. | |
| Static Cooking Function | |
| The oven's thermostat and warning lights will be turned on, the lower and upper heating elements will start operating.The static cooking function emits heat, ensuring even cooking of the lower and upper food. This is ideal for making pastries, cakes, baked pasta, lasagne and pizza. Prehating the oven for 10 minutes is recommended and it is best to cook on only one shelf at a time in this function. | |
| Defrost Function | |
| The oven's warning lights will be turned on, the fan starts operating.To use the defrost function, take your frozen food and place it in the oven on a shelf placed in the third slot from the bottom. It is recommended that you can place an oven tray under the defrosting food, to catch the water accumulated due to melting ice. This function will not cook or bake your food, it will only help to defrost it. | |
| Grilling Function | |
| The oven's thermostat and warning lights will be turned on, the grill heating element will start operating.The function is used for grilling and toasting foods, use the upper shelves of oven. Lightly brush the wire grid with oil to stop foods sticking and place foods in the center of the grid. Always place a tray beneath to catch any drips of oil or fat. It is recommended to pre-heat the oven about 10 minutes.Warning:When grilling, the oven door must be closed and the oven temperature should be adjusted to 190°C. | |
| Turbo Function | |
| The oven's thermostat and warning lights will be turned on, the ring heating element and fan will start operating.The turbo function evenly disperse the heat in the oven. All foods on all racks will be cooked evenly. It is recommended to pre-heat the oven about 10 minutes. | |

Fan Function
The oven's thermostat and warning lights will be turned on, the upper and lower heating elements and fan will start operating.
This function is very good for obtaining results in baking pastry. Cooking is carried out by the lower and upper heating element within the oven and by the fan providing air circulation, which will give a slight grill effect to the food. It is recommended to pre-heat the oven about 10 minutes.

Grill and Fan Function
The oven's thermostat and warning lights will be turned on, the grill heating element and fan will start operating.
The function is ideal for thicker foods when grilling, use the upper shelves of oven. Lightly brush the wire grid with oil to stop foods sticking and place foods in the center of the grid. Always place a tray beneath to catch any drips of oil or fat.
Warning: When grilling, the oven door must be closed and the oven temperature should be adjusted to 190^ C.
Section 4. Maintenance
Before any maintenance or cleaning work is carried out, DISCONNECT the appliance from the ELECTRICITY supply and ensure that the appliance is completely cool.
4.1. Cleaning the Oven
Clean spillages from inside the oven as soon as possible after use. Always ensure that the surface has cooled down before cleaning.
Use a cloth with warm soapy water to clean the surface. If the spillage has dried on the surface you may need to use a specialist oven cleaner, available from all good supermarkets.
Clean the glass door with warm soapy water – always ensure the glass is cool before you clean it!
4.2. Changing the Oven Bulb (If fitted to your model)
natural_image
Diagram of a door with circular components and directional arrows indicating motion (no text or symbols)Proceed as follows when the glass is cold:
- Unscrew the glass cover
- Remove the bulb
• Fit new like for like bulb (*) - Replace glass cover
(*) Must be a 25w Type E14 replacement oven bulb available from specialist hardware & lighting shops
4.3. Removing the Oven Door
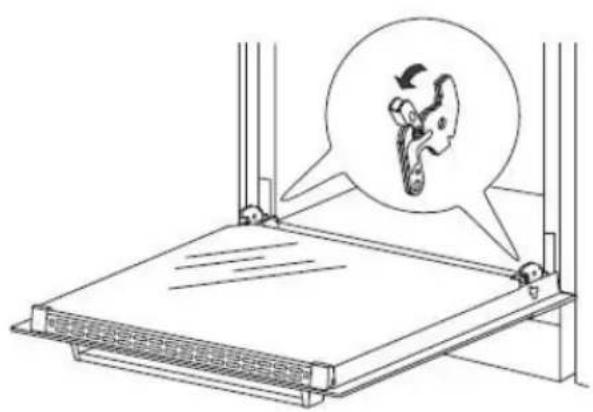
If your oven is fitted with a removable door, proceed as follows:
natural_image
Diagram of a mechanical device with a magnified inset showing a hand holding a tool, no text or symbols present.In order to improve access when cleaning the oven, you can remove the door as follows:
Lift the two safety catches up then close the oven door partially. Now lift the door upwards and away from the oven. To refit the door carry out the above in reverse order, ensuring the safety catches are lowered back into place.
natural_image
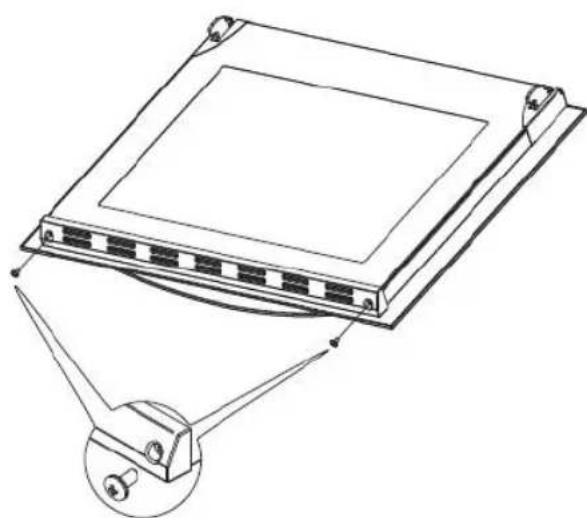
Technical line drawing of a rectangular electronic device with mounting brackets and a separate inset showing a pin (no text or symbols)If you need to clean in between the glass door panels, remove the 2 screws and the end panel (as shown left) and then carefully slide the glass out of the door frame. Clean the glass panels and carefully slide the glass back into the door frame. Refit the end panel and ensure that the 2 screws are in place.
N.B. Your guarantee does not cover damaged or broken glass on the oven door.
4.4. What to do if something goes wrong
There is no power to the appliance:
- Check there is not a power cut
- Check there is power to the electric socket/appliance
The oven operates but the oven light is not working:
- If your model is fitted with an oven light, replace the oven bulb as described in section 4.2. above. Please note that bulbs are not covered under the guarantee.
To Register your Appliance simply complete the card in your appliance pack and return it with a stamp affixed or Alternatively you can Register online at www.repairtechuk.com
SERVICE HELP-LINE
Should your appliance develop a fault, please call the Repairtech Service Helpline on:
01527-888133
Please remember to have all your product details available, including the model number, serial number, date of purchase and your retailer's details before registering a fault.
Your service call cannot progress without this information.
DOMESTIC APPLIANCE DISTRIBUTORS;
HENRY JOHN HOUSE
NORTHWAY LANE
ASHCHURCH
TEWKESBURY
GLOUCESTERSHIRE
GL20 8JH
Important Note:
This appliance is marked according to the European directive 2002/96/EC on Waste Electrical and Electronic Equipment (WEEE). By ensuring this product is disposed of correctly, you will help prevent potential negative consequences for the environment and human health, which could otherwise be caused by inappropriate waste handling of this product.
The symbol on the product, or on the documents accompanying the product, the Crossed Out Wheelie Bin, indicates that this appliance may not be treated as household waste. Instead it shall be handed over to the applicable collection point for the recycling of electrical and electronic equipment.
Disposal must be carried out in accordance with local environmental
regulations for waste disposal. For more detailed information about treatment, recovery and recycling of this product, please contact your local authority, your household waste disposal service or the retailer where you purchased the product.
natural_image
Symbol of a trash bin crossed with no text or labels, accompanied by a black rectangular block below (no readable text or symbols)We continuously try to improve our products for the benefit of our customers.
For this reason we reserve the right to make changes to any product at any time, without notice
Issue: 01/27-11-2014