MMW20GTW - Microwaves Montpellier - Free user manual and instructions
Find the device manual for free MMW20GTW Montpellier in PDF.

| Product Type | Solo Microwave with Grill |
| Brand | Montpellier |
| Model | MMW20GTW |
| Capacity | 20 Liters |
| Microwave Power | 700 W |
| Grill Power | 1000 W |
| Dimensions (H x W x D) | 259 x 440 x 359 mm |
| Weight | 10.5 kg |
| Turntable Diameter | 245 mm |
| Power Supply | 220-240 V, 50 Hz |
| Display Type | Digital LED |
| Control Type | Touch Buttons + Rotary Knob |
| Functions | Microwave, Grill, Combination, Defrost, Timer, Clock |
| Defrost Function | Auto Defrost by Weight/Time |
| Child Lock | Yes |
| Interior Light | Yes |
| Door Type | Side Opening with Handle |
| Material | Stainless Steel / Plastic |
| Cleaning Instructions | Wipe interior with damp cloth; avoid abrasive cleaners |
| Safety Certification | CE, EMC, LVD |
| Spare Parts Availability | Contact Montpellier customer service |
| Warranty | 2 years (subject to registration) |
Frequently Asked Questions - MMW20GTW Montpellier
User questions about MMW20GTW Montpellier
0 question about this device. Answer the ones you know or ask your own.
Ask a new question about this device
Download the instructions for your Microwaves in PDF format for free! Find your manual MMW20GTW - Montpellier and take your electronic device back in hand. On this page are published all the documents necessary for the use of your device. MMW20GTW by Montpellier.
USER MANUAL MMW20GTW Montpellier
Installation and Operating Instructions
MODEL: MON-MMW20GTW 20L Microwave Oven with Grill
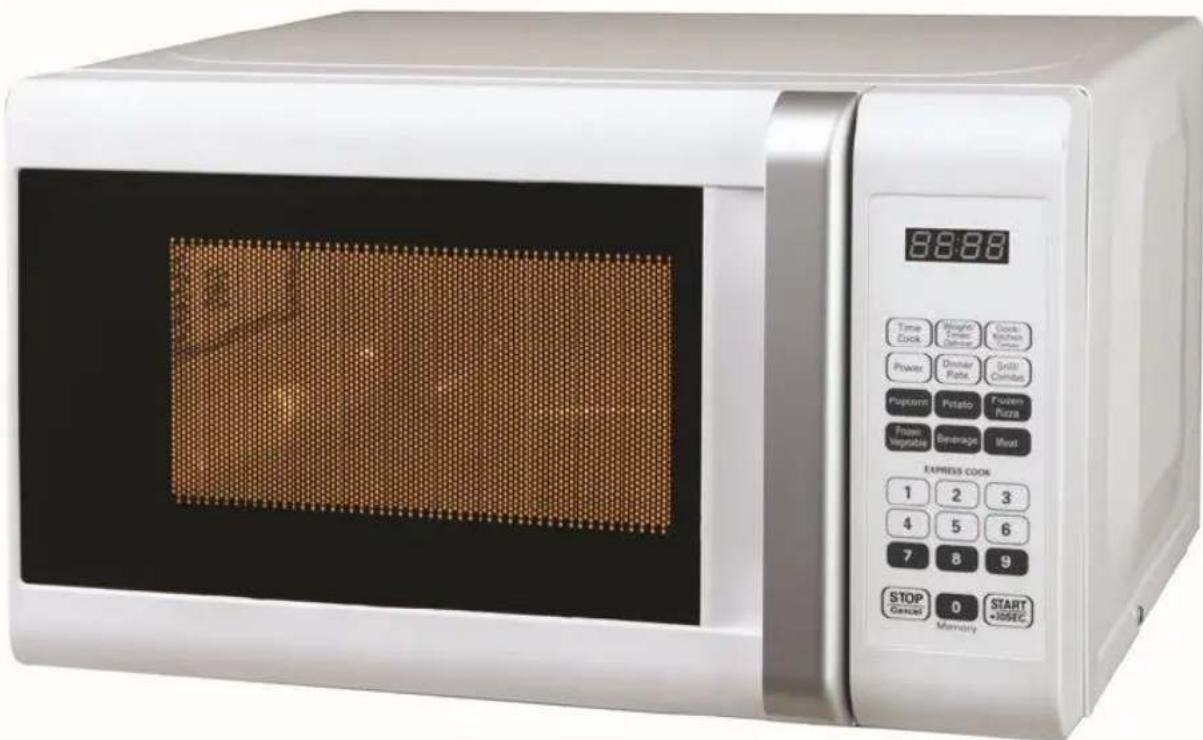
natural_image
Exterior view of a white microwave oven with digital display and control buttons (no visible text or symbols on the main body)(Picture indicative of model supplied)
Please read these instructions carefully before attempting to install or use this appliance. It is advisable to keep these instructions in a safe place for future reference.
N.B. Should your appliance require attention, our service agents will not be able to book a service call without your unique serial number which can be found on the last page of this manual.
Introduction
Thank you for choosing this Montpellier branded appliance. It has been designed to give years of trouble-free use provided it is installed and maintained correctly.
Please read these instructions carefully before installing or using your appliance. It is advisable to keep your purchase and installation receipts with these instructions in a safe place for future reference. Included is some important safety information in addition to guidelines and recommendations that will enable you to take full advantage of all the functions available.
This quality appliance has been tested and certified to meet all applicable UK electrical and safety standards.
This appliance must be installed and connected in accordance with current regulations.
After unpacking the appliance ensure that there is no visible damage. If the appliance has been damaged during transit, do not use it, contact your retailer immediately.
Your 2 year Manufacturer's guarantee
THIS DOES NOT AFFECT YOUR STATUTORY RIGHTS.
Your new Montpellier appliance carries a free guarantee which protects you against the cost of repairs during the first 24 months from date of purchase provided that:
Any claim is accompanied by evidence of the model reference, model serial number and proof of purchase, such as a Sales Receipt, showing that the appliance was purchased within the 24 months prior to the date of claim.
What is not covered under the Guarantee:
- Any appliance not correctly installed and operated in accordance with the manufacturer's instructions.
- Any appliance that is used for anything other than domestic purposes.
• Any defect caused by accident, misuse, unauthorized modification or inexpert repair. - Cost of Call-out where a fault cannot be found with the appliance.
- Cost of Call-out for work covering routine maintenance, such as, but not exclusively, cleaning of filters or defrosting.
- Cost of Call-out for work required to correct the alignment of doors following door reversal procedures carried out by you.
- Use of the appliance by anyone other than the Householder.
- Use in any commercial environment.
- Consumable items, such as, but not exclusively, fuses in plugs, bulbs and breakable items which require routine replacement.
- Repair costs incurred that have not been authorised by Repairtech and/or carried out by a non-approved Repairtech engineer.
To Register your Appliance simply complete the card in your appliance pack and return it with a stamp affixed or Alternatively you can Register online at www.repairtechuk.com
SERVICE HELP-LINE
Should your appliance develop a fault, please call the
Repairtech Service Helpline on: 01527-888133
Please remember to have all your product details available, including the model number, serial number, date of purchase and your retailer's details before registering a fault.
Your service call cannot progress without this information.
Description Of The Appliance
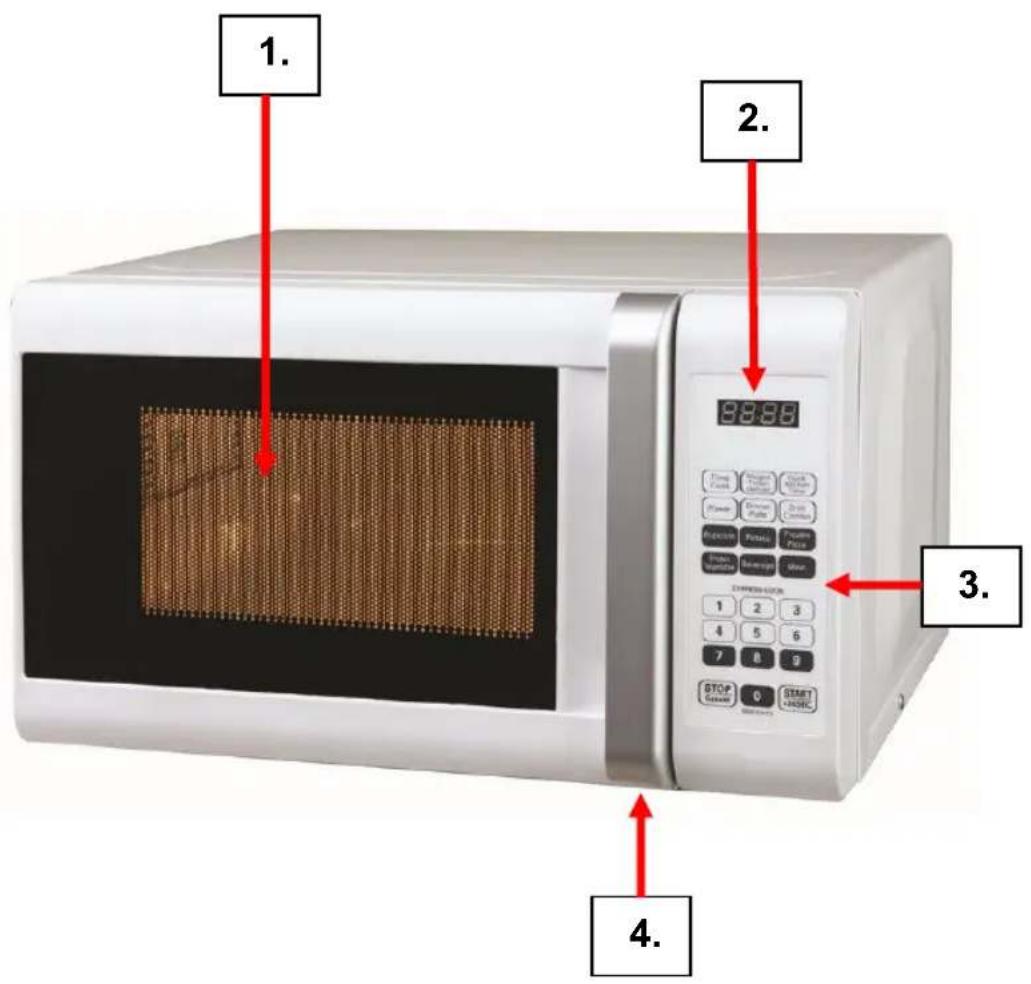
- Door & Viewing Window
- LED Display Panel
- Control Panel
- Door Handle
(Picture indicative of model supplied)
CONTENTS:
Section 1. Installation
Section 2. Safety Advice
Section 3. Operating the Appliance
Section 4. Maintenance
Section 1. Installation
- This is a free-standing oven and must NOT BE BUILT-IN.
- Leave a minimum clearance of 30cm above the appliance.
- Leave a minimum clearance of 20cm between the oven and any rear/side walls.
- Never remove the legs or block the air intake or outlet.
- Remove all packaging, protective film and securing tape from the appliance.
- Wash the interior of the appliance with warm soapy water.
- Position the appliance in a dry atmosphere.
- Keep the microwave oven away from the TV, Radio or antenna as picture disturbance or noise may occur.
- Please note that certain parts of this appliance have been protected with a light film of oil. During initial use you may see light smoke coming from the oven as the oil is burnt off. This is quite normal.
- Connect the plug to an adjacent ‘easily accessible’ 13amp socket outlet and ensure that the appliance is not standing on the supply cable.
- Never operate this oven without food or liquids inside
- Remove the turntable and rotating ring from the packaging, wash in warm soapy water and dry thoroughly. Fit the rotating ring on the base of the interior and then carefully place the turntable onto the rotating drive, ensuring that it ‘locks’ into place.
- The turntable and rotating ring can be removed from the appliance and washed using warm soapy water
- Replace the rotating ring on the base of the interior and then carefully place the turntable onto the rotating drive, ensuring that it ‘locks’ into place
- This appliance is fitted with a safety door interlock. Do not operate the appliance if either of the two interlock levers are damaged. Please note that the appliance will fail to operate if the door has not been closed correctly.
- The turntable rotates whilst the appliance is operating – this helps the food/liquids to cook/heat more evenly.
Section 2. Safety Advice
- Please read this booklet thoroughly before installing and switching on the appliance. The manufacturer accepts no responsibility for incorrect installation and usage.
- This appliance is guaranteed for Domestic Use Only.
- The appliance shall not be used by children aged from 8 years and above and persons with reduced physical, sensory or mental capabilities, or lack of experience and knowledge, unless they have been given supervision or instruction on how to use the appliance in a safe way and understand the hazards involved. Children shall not play with the appliance. Cleaning and user maintenance shall not be made by children without supervision.
- This appliance must only be used for cooking/heating foods and liquids. Do not use it for any other purpose.
- If using an adaptor, this must be used in accordance with the manufacturers instructions and ensure that the electrical circuit is not overloaded as this could cause overheating.
- Do not twist or bend the cables, and keep them away from hot surfaces.
- If the power supply cord is damaged, it must be replaced by the manufacturer, it's service agent or similarly qualified persons in order to avoid a hazard.
- Do not plug in or unplug this appliance with wet hands.
- Following installation make sure that the power cable is not trapped underneath the appliance.
- Remove all twist-ties from food bags before placing them in the oven.
- Do not heat oil or fat inside the oven.
- Do not over cook food inside the oven.
- Do not heat sealed containers or try to cook eggs (inside their shells) in this oven – they may explode.
- Potatoes, sausages and items such as chestnuts must be peeled or pierced before placing them in the oven.
- After liquids have been heated in the oven wait a few moments before removing the container – handle with care as the container may be hot – use protective gloves.
- Liquids and foods should be stirred and the temperature checked prior to consumption.
- If you cover a container with cling film, remove it very carefully after the cooking process has finished – steam will escape and may burn your hands.
- Always let the turntable cool down before washing it.
- Never cook foods directly on the turntable.
- Make sure that plates/dishes do not touch the walls when the turntable rotates.
- Keep the interior surfaces clean. Failure to do this could lead to the appliance malfunctioning.
Important Utensil Information:
- Do not use metal pans or dishes with metal handles.
- Do not use anything with a metal trim.
- Do not use paper covered wire twist-ties on plastic bags.
- Do not use melamine dishes as they contain a material which will absorb microwave energy. This may cause the dishes to crack or burn, and will slow down the cooking speed.
- Use only cookware that is approved to be used in a microwave oven.
- Do not cook using a container with a restricted opening, such as bottles, as they may explode.
- Do not heat baby bottles with the teat left on and remove the teat if replacing the bottle back into the oven.
- Only use thermometers that are approved for microwave ovens.
- Do not use the microwave oven for heating utensils.
Section 3. Operating the Appliance
3.1. Setting the Clock
- Press the Clock/Kitchen Timer button once and "00:00" will be displayed.
- Use the number keys to enter the correct time, for example if the actual time is 12:10, enter 1,2,1,0
- Press the Clock/Kitchen Timer button again to set the time.
3.2. Microwave Cooking
Please refer to Section 2. Safety Advice for important utensil information.
- Press Time/Cook once, the LED will display "00:00"
- Press the number keys to select the required cooking time, for example if you want to cook for 10 minutes enter 1,0,0,0, and the display will show “10:00” (Max’ 99 Minutes & 99 seconds).
- Press Power once, the screen will display "PL10" (Full power).
- If you require a lower power simply press the required number key, i.e. 50% power is number 5 (See chart below).
- Press the Start/+30Sec button to begin cooking.
- Press Stop/Cancel twice at any time to end or cancel the cooking time
Please note the following power levels:
| Level | 10 | 9 | 8 | 7 | 6 | 5 | 4 | 3 | 2 | 1 | 0 |
| Power | 100% | 90% | 80% | 70% | 60% | 50% | 40% | 30% | 20% | 10% | 0% |
| Display | PL10 | PL9 | PL8 | PL7 | PL6 | PL5 | PL4 | PL3 | PL2 | PL1 | PL0 |
3.3. Quick Start
- Press Start/+30Sec to start cooking with 100% power.
- Each additional press will increase the time by 30 seconds up to a maximum of 99 minutes & 99 seconds.
- You can also press Time/Cook once, enter time and press Start/+30Sec to start cooking with full power.
3.4. Defrost by Time
- Press Weight/Time Defrost twice, 'dEF2' will be displayed.
- Use the number keys to enter the required cooking time up to a maximum 99 minutes & 99 seconds.
- Press Start/+30Sec to start defrosting.
3.5. Defrost by Weight
- Press Weight/Time Defrost once, 'dEF1' will be displayed.
- Enter the weight of the food to be defrosted using the number keys. The input figure must be between 100-2000g.
- Press Start/+30Sec to start defrosting.
3.6. Kitchen Timer (This is a count-down timer – microwave does not operate)
- Press the Clock/Kitchen Timer button twice. The screen will display "00:00".
- Use the number keys to enter the required time, for example, enter 1,0,0,0 for 10 minutes.
- Press Start/+30Sec to confirm and start the timer.
- When the required time has been reached the display will go out and a buzzer will sound.
3.7. Grill Cooking
- Press the Grill/Combo button. The screen will display "G-1"
- Use the number keys to input the grilling time, i.e. 3,5,0,0 for 35 minutes.
- Press Start/+30Sec to start grilling. An audible signal will sound half way through the set time – this is a reminder to turn the food over.
3.8. Combination Cooking
- Press the Grill/Combo button twice to select “Combi 1” or three times to select “Combi 2”. (“C-1” or “C-2” see chart below)
- Use the number keys to select the cooking time, i.e. 3,0,0,0, for 30 minutes (Max' 99 mins & 99 secs)
- Press Start/+30Sec to start cooking.
| Function | Display | Microwave Power | Grill Power |
| Combi.1 | C-1 | 55% | 45% |
| Combi.2 | C-2 | 36% | 64% |
3.9 Popcorn
- Press the Popcorn button repeatedly until the weight of the popcorn to be cooked appears in the display, i.e. “50” or “100” grams.
- Press the Start/+30Sec button to confirm.
3.10. Potato
- Press the Potato button repeatedly until the number of potatoes to be cooked appears in the display, i.e. "1", "2" etc
- Press Start/+30Sec to start cooking
3.11. Frozen Pizza
- Press the Frozen Pizza button repeatedly until the approximate weight in grams appears in the display, i.e. "100" "200" etc.
- Press Start/+30Sec to start cooking.
3.12. Frozen Vegetable
- Press the Frozen Vegetable button repeatedly until the approximate weight of the vegetables to be cooked appears in the display, i.e. “150”, “350” grams.
- Press Start/+30Sec to start cooking.
3.13. Beverage
- Press Beverage repeatedly until the numbers of cups you wish to heat appears in the display, i.e. "1", "2" or "3".
- Press Start/+30Sec to start heating the beverage.
3.14. Meat
There are three meat options to choose from, Chicken, Beef or Pork.
- Press the Meat button once for Chicken, twice for Beef or three times for Pork.
- Press Start/+30Sec to confirm the option selected.
- Press the Meat button repeatedly to select the approximate weight (in grams).
- Press Start/+30Sec to start cooking.
3.15. Dinner Plate
- Press the Dinner Plate button repeatedly until the approximate weight of the food to be cooked appears in the display, i.e. "250", "300" grams etc.
- Press Start/+30Sec to start cooking.
3.16. Child Lock
- Press Stop/Cancel for 3 seconds or until the long 'beep' sounds. The Control Panel is now locked.
- To unlock, simply press the Stop/Cancel button for 3 seconds or until the long 'beep' sounds.
3.17. Memory
You can memorise three cook settings as follows:
- Press the 0/Memory button repeatedly for 1, 2 or 3.
- Press Time/Cook and then set the cooking time (Section 3.2.)
- Press Power and set the power level (See Section 3.2.)
- Press Start/+30Sec to save the setting.
- The next time you want to use the same setting simply press the 0/Memory button once, twice or three times depending which number you saved the setting under, i.e. if you saved the setting under Memory 2, simply press the Memory button twice to recall the setting, then press Start/+30Sec to auto start the cooking setting.
3.18. Unsuitable Materials/Utensils
| Aluminum tray | May cause arcing. Transfer food into microwave-safe dish. |
| Food carton with metal handle | May cause arcing. Transfer food into microwave-safe dish. |
| Metal or metal-trimmed utensils | Metal shields the food from microwave energy. Metal trim may cause arcing. |
| Metal twist ties | May cause arcing and could cause a fire in the oven. |
| Paper bags | May cause a fire in the oven. |
| Plastic foam | Plastic foam may melt or contaminate the liquid inside when exposed to high temperature. |
| Wood | Wood will dry out when used in the microwave oven and may split or crack. |
3.19. Suitable Materials/Utensils
| Aluminum foil | Shielding only. Small smooth pieces can be used to cover thin parts of meat or poultry to prevent overcooking. Arcing can occur if foil is too close to oven walls. The foil should be at least 1 inch (2.5cm) away from oven walls. |
| Browning dish | Follow manufacturer's instructions. The bottom of browning dish must be at least 3/16 inch (5mm) above the turntable. Incorrect usage may cause the turntable to break. |
| Dinnerware | Microwave-safe only. Follow manufacturer's instructions. Do not use cracked or chipped dishes. |
| Glass jars | Always remove lid. Use only to heat food until just warm. Most glass jars are not heat resistant and may break. |
| Glassware | Heat-resistant oven glassware only. Make sure there is no metallic trim. Do not use cracked or chipped dishes. |
| Oven cooking bags | Follow manufacturer's instructions. Do not close with metal tie. Make slits to allow steam to escape. |
| Paper plates and cups | Use for short-term cooking/warming only. Do not leave oven unattended while cooking. |
| Paper towels | Use to cover food for reheating and absorbing fat. Use with supervision for a short-term cooking only. |
| Parchment paper | Use as a cover to prevent splattering or a wrap for steaming. |
| Plastic | Microwave-safe only. Follow the manufacturer's instructions. Should be labeled "Microwave Safe". Some plastic containers soften, as the food inside gets hot. "Boiling bags" and tightly closed plastic bags should be slit, pierced or vented as directed by package. |
| Plastic wrap | Microwave-safe only. Use to cover food during cooking to retain moisture. Do not allow plastic wrap to touch food. |
| Thermometers | Microwave-safe only (meat and candy thermometers). |
| Wax paper | Use as a cover to prevent splattering and retain moisture. |
3.20. Cooking Tips
a) Place thicker areas of food towards the outer area of the turntable and thinner food towards the centre
b) Always follow the cooking instructions on the food packaging
c) Turn or stir food during the cooking to ensure even cooking
d) Allow the cooked food to 'stand' for a while before consuming
e) If you use a 'browning' dish, stand it on a plate in the oven
f) Do not let plastic ‘cling film’ to come in contact with the food during the cooking process
3.21. Normal Operating Points to Note
You will hear the sound of the motor during operation – this is quite normal.
There will be an audible ‘buzzer/beep’ at the end of the cooking period.
You may hear the turntable rotating inside the oven, this is normal.
You may see water on the inside of the door – this is quite normal due to condensation forming from some foods and/or liquids during the cooking process.
The microwave oven light may appear dim at times – this may happen during the cooking process and is quite normal, particularly during low power cooking.
Section 4. Maintenance
Before any maintenance or cleaning work is carried out, DISCONNECT the appliance from the ELECTRICITY supply and ensure that the appliance is completely cool.
4.1. Internal Cleaning
Clean the interior and accessories with warm soapy water. Rinse and dry thoroughly. Do not use detergents, abrasive powders, highly perfumed cleaning products, wax polishes or cleaning products containing bleach or alcohol.
4.2. External Cleaning
Wash the fascia and door with warm soapy water. Do NOT use abrasive products.
4.3. What to do if something goes wrong
There is no power to the appliance:
- Check there is not a power cut
- Check there is power to the electric socket/appliance
- Check the fuse in the plug (Must be 13 amp)
The oven will not operate:
- Is the Timer control set to the required time?
- Has the door been closed correctly?
Should your appliance develop a fault, please call the Repairtech Service Helpline on: 01527-888133
Please remember to have all your product details available, including the model number, serial number, date of purchase and your retailer's details before registering a fault.
Your service call cannot progress without this information.
Domestic Appliance Distribution, Henry John House, Northway Lane, Ashchurch, Tewkesbury, Gloucestershire, GL20 8JH
Important Note:
This appliance is marked according to the European directive 2002/96/EC on Waste Electrical and Electronic Equipment (WEEE). By ensuring this product is disposed of correctly, you will help prevent potential negative consequences for the environment and human health, which could otherwise be caused by inappropriate waste handling of this product.
The symbol on the product, or on the documents accompanying the product, the Crossed Out Wheelie Bin, indicates that this appliance may not be treated as household waste. Instead it shall be handed over to the applicable collection point for the recycling of electrical and electronic equipment.
Disposal must be carried out in accordance with local environmental
regulations for waste disposal. For more detailed information about treatment, recovery and recycling of this product, please contact your local authority, your household waste disposal service or the retailer where you purchased the product.
natural_image
Symbol of a trash bin crossed with no text or labels, accompanied by a black rectangular block below (no readable text or symbols)We continuously try to improve our products for the benefit of our customers.
For this reason we reserve the right to make changes to any product at any time, without notice
Issue: 02/31-03-2016