
C1242-0002 - Tripod OConnor - Free user manual and instructions
Find the device manual for free C1242-0002 OConnor in PDF.

| Product Type | Follow Focus |
| Model | C1242-0002 O-Focus DM Cine Set |
| Weight (with LWS rod bridge and handwheel) | 1.52 lbs (0.69 kg) |
| Weight of bridges (without handwheel) | 0.73 lbs (0.33 kg) |
| Dimensions (excluding handwheel) | 7.2 x 2.2 x 1.5 in (182 x 57 x 37 mm) |
| Handwheel dimensions | Ø4 x 3.2 in (Ø102 x 81 mm) |
| Maximum lens diameter (with LW rods) | Ø116 mm |
| Gear ratio | 35:19 (1:1.84) |
| Drive gear coupling | Standard serrated star |
| Module coupling system | Backlash-free |
| Rod system compatibility | 15 mm LWS, studio 15 mm/19 mm |
| Positioning of driver gear | Main bridge interlock (back/front) |
| Construction material | Lightweight, durable black anodized aluminum |
| Key features | Double-sided follow focus; low-profile direct-drive design; eccentric adjustment for line of sight and reach; optimized focus throw for cine lenses; Minimal Backlash Mechanism |
| Included accessories | LWS rod bridge, CFF-1 Studio Handwheel (full-size offset knob), marking discs (10 pack), gears (Z60, Z35, Z43), friction driver 35 |
| Optional accessories | Studio rod bridge (C1241-1300), handwheel for double-sided use (C1241-1100 Cine or C1242-1100 Photo), handwheel extension 70 mm (C1241-1500), glow-in-the-dark marking discs |
| Cleaning instructions | Wipe clean with a damp cloth; never use solvents |
| Safety warnings | Do not hang heavy items; do not overtighten drive gear; always use genuine OConnor parts; dismantle when not in use |
Frequently Asked Questions - C1242-0002 OConnor
User questions about C1242-0002 OConnor
0 question about this device. Answer the ones you know or ask your own.
Ask a new question about this device
Download the instructions for your Tripod in PDF format for free! Find your manual C1242-0002 - OConnor and take your electronic device back in hand. On this page are published all the documents necessary for the use of your device. C1242-0002 by OConnor.
USER MANUAL C1242-0002 OConnor
• DO NOT hang heavy items over the FromuswDeal.
- DO NOT attempt to move the camera by pulling on the O-Focus DM handwheel.
- AVOID overtightening the drive gear onto the lens focus drive.
- ALWAYS use genuine OConnor parts and accessories with the O-Focus DM.
• ALWAYS dismantle when not in use and before transporting.
- Never use solvents to clean the O-Focus DM. Wipe clean with a damp cloth.
Contents
Caution 2
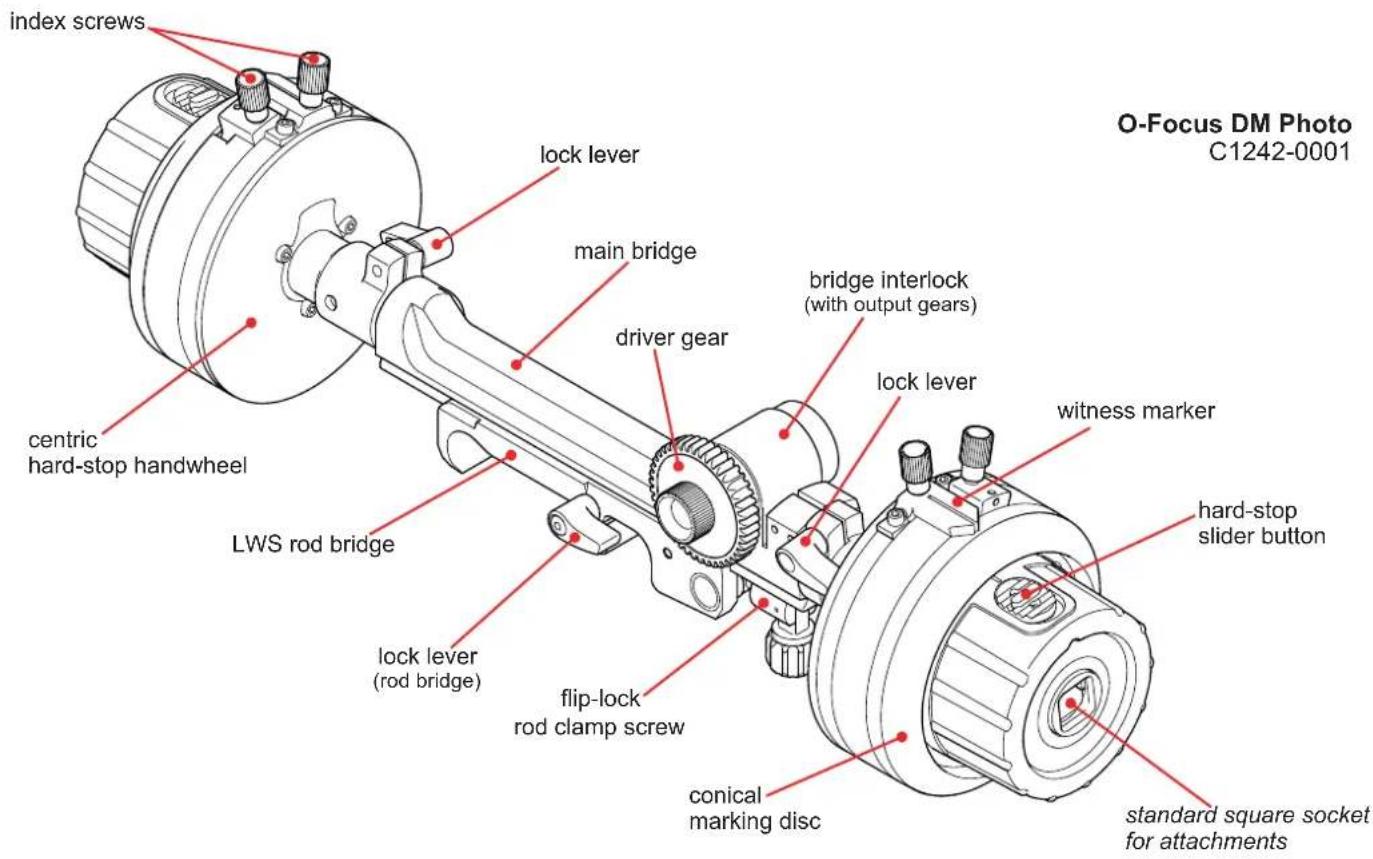
The O-Focus Dual Mini 4
O-Focus DM Photo
Specification 9
In the box 7
O-Focus DM Cine
Specification 6
In the box 7
Components 10
Assembly
assembling the bridge 12
mounting the handwheel 13
mounting onto the camera rods....14
mounting the O-Focus to the lens 15
setting the focal distances 16
Options and extras 18
OConnor Offices worldwide....19
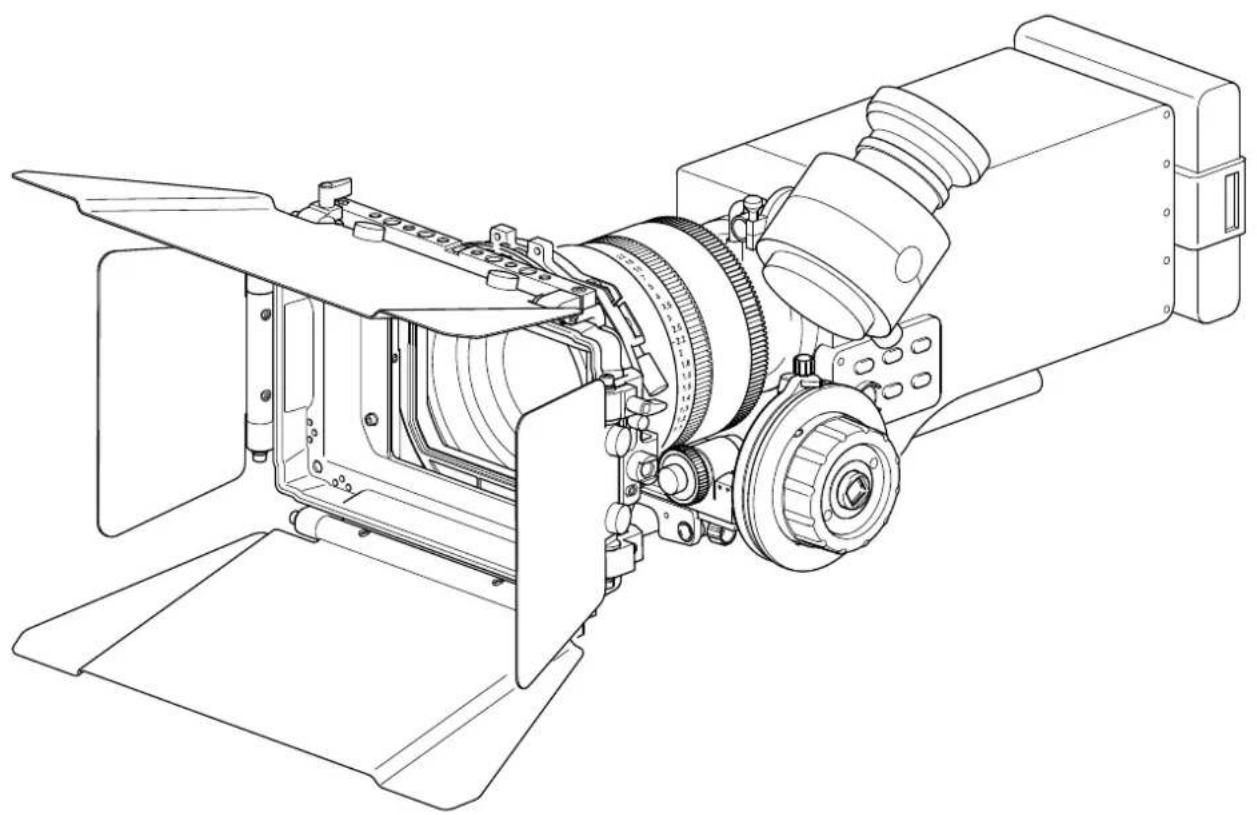
The O-Focus DM Cine
natural_image
Technical line drawing of a mechanical device with internal components and mounting brackets (no text or symbols)Congratulations on the purchase of your new OConnor O-Focus DM!
We want you to get the most from your new O-Focus Dual Mini, and therefore encourage you to read this user guide to familiarize yourself with its many features, some of which may be new to you. It also covers essential information about safety and product care.
Features and benefits of your new O-Focus DM
The O-Focus Dual Mini, the latest addition to the range of genuine accessories from OConnor, offers a host of inspired and productive features:
• the double-sided follow focus is constructed of lightweight, durable black anodized aluminum
• the low-profile design with a direct-drive gear is ideal for large barrel diameter lenses
- optimized focus throw: the O-Focus DM Photo offers a longer, more exacting focus pull for short throw lenses and the O-Focus DM Cine offers a shorter, more exacting focus pull for cine lenses
- multi-functional, modular design: the bridge features a sliding dovetail design and accommodates an LWS rod bridge (included) or, optionally, a heavy-duty bridge for 15/19 mm studio setups, as well as interchangeable gears, mixed or matched handwheels, and a handwheel extension
Special features
The O-Focus DM is the first compact cine-specific unit. The O-Focus DM Photo has been optimized for use with still photo lenses in cine setups.
The highly adaptable O-Focus DM Cine has been designed for precision movement control of higher sustained torque loads. The eccentric design means it can be adjusted for optimal 'line of sight' as well as for reach.
The O-Focus DM follow focus integrates seamlessly with standard equipment such as cranks, gears, and whips, thus protecting your investment in equipment by ensuring compatibility also in the future.
Specification
O-Focus DM Photo Set (C1242-0001)
Weight of unit (incl. LWS rod bridge, handwheel) 1.23 lbs (0.56 kg)
Weight of bridges (excl. handwheel)....0.73 lbs (0.33 kg)
Dimensions (excl. handwheel) 7.2 x 2.2 x 1.5 in. (182 x 57 x 37 mm)
Dimensions of hard-stop handwheel ....03.2 x 3.7 in. (∅82 x 94 mm)
Max. lens diameter (with LW rods).... ∅116 mm
Gear ratio 19:25 (0:.75)
Positioning of driver gear .... main bridge interlock (back / front)
Module coupling system .... backlash-free
Drive gear coupling .... standard serrated star
Rod system compatibility.... 15 mm LWS, studio 15 mm/19 mm
Gears and friction wheel (see table on page 10 for details)
Specifications are subject to change without notice
In the box
O-Focus DM Photo Set
C1242-0001

Matching OConnor accessories:
Studio rod bridge
C1241-1100 (depending on lens)
Handwheel (for double-sided use)
C1241-1100 (Cine)
C1242-1100 (Photo)
Handwheel extension (70 mm)
C1241-1500
Marking disc
C1242-2421 (single, small)

natural_image
Technical line drawing of an electric motor (no text or symbols on the diagram itself)O-Focus Hard-Stop
Handwheel
C1242-1100
natural_image
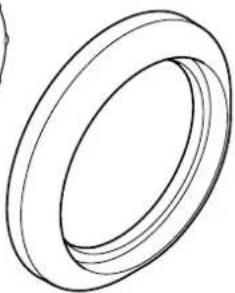
Simple line drawing of a ring or washer (no text or symbols)Marking Discs
(conical, 10 pack)
C1242-1530
Gear Z60
C1241-1900
Gear Z35
C1241-1700
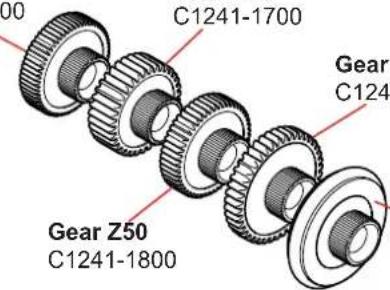
Gear Z43
C1241-1600
Friction Driver 35
C1242-1001
(for details about driver sizes and lenses see table on page 10)
Specification
O-Focus DM Cine Set (C1242-0002)
Weight of unit (incl. LWS rod bridge, handwheel) 1.52 lbs (0.69 kg)
Weight of bridges (excl. handwheel)....0.73 lbs (0.33 kg)
Dimensions (excl. handwheel) 7.2 x 2.2 x 1.5 in. (182 x 57 x 37 mm)
Dimensions of Cine handwheel....Ø4 x 3.2 in. (∅102 x 81 mm)
Max. lens diameter (with LW rods).... ∅116 mm
Gear ratio 35:19 (1:1.84)
Positioning of driver gear .... main bridge interlock (back / front)
Module coupling system .... backlash-free
Drive gear coupling .... standard serrated star
Rod system compatibility.... 15 mm LWS, studio 15 mm/19 mm
Gears and friction wheel (see table on page 10 for details)
Specifications are subject to change without notice
In the box

C1242-0002
O-Focus DM Cine Set
natural_image
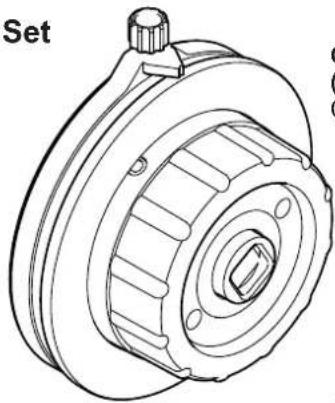
Technical line drawing of a mechanical component with no visible text or symbolsCFF-1 Studio Handwheel
(full-size offset knob)
C1241-1100
natural_image
Simple line drawing of a ring or washer (no text or symbols)Marking Discs (10 pack)
C1241-1530
Matching OConnor accessories:
Studio rod bridge
C1241-1300 (depending on lens)
Handwheel (for double-sided use)
C1241-1100 (Cine)
C1242-1100 (Photo)
Handwheel extension (70 mm)
C1241-1500
"Glow-in-the-dark" marking disc
C1241-2117 (single disc, large)
C1241-1531 (10 pack, large)
Gear Z60
C1241-1900
Gear Z35
C1241-1700
Gear Z43
C1241-1600

Friction Driver 35
C1242-1001
(for details about driver sizes and lenses see table on page 10)
Components

| Part no. | Gear size | Lens type |
| C1241-1700 | 35 tooth 0.8M 10 mm face | Cine |
| C1241-1600 | 43 tooth 0.8M 6 mm face | Cine |
| C1241-1800 | 50 tooth 0.6M 7.5 mm face | Canon ENG focus |
| C1241-1900 | 60 tooth 0.5M 7.5 mm face | Fujinon ENG focus |
| C1242-1001 | ∅39 mm surface | non-geared photo lenses |
Components
Assembly – assembling the bridge

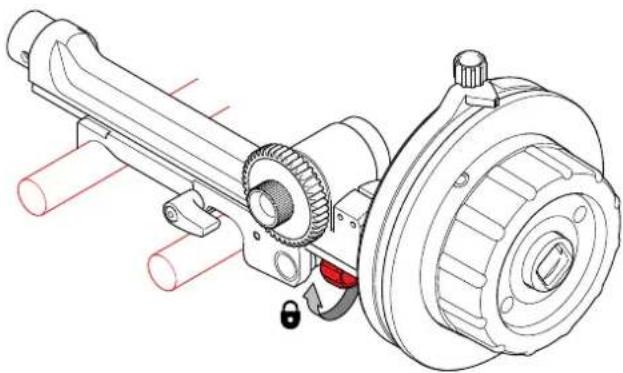
1 Assemble the bridges. Slide the LWS rod bridge onto the main bridge. Turn the lock lever clockwise to secure the LWS bridge in position.
The position of the main bridge can be adjusted using the sliding dovetail when mounting the O-Focus DM to the lens (see page 14).
natural_image
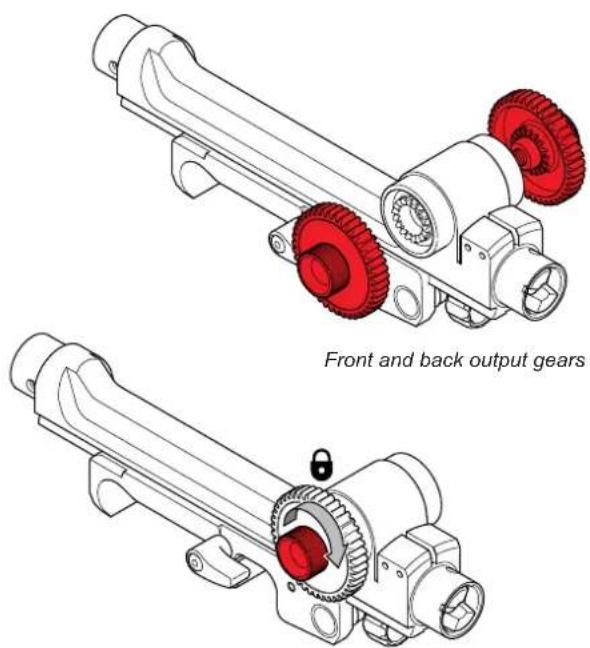
Technical illustration of two mechanical components with red gears and a lock, labeled 'Front and back output gears' (no other text or symbols)2 Mount the driver gear. Choose a compatible driver gear for your lens (see page 10). Locate the driver on the output gear at the front or back of the interlock bridge as desired. Ensure the serrations fully interlock, then tighten the hollow knurled screw.
mounting the handwheel

natural_image
Technical illustration of a red mechanical component with gear and housing assembly (no text or symbols)1 Push-fit the handwheel firmly onto the main bridge. The handwheel must be fully engaged for the backlash-reducing mechanism to be effective.
2 Turn the lock lever clockwise to secure the handwheel on the main bridge.

The O-Focus DM incorporates a Minimal Backlash Mechanism to guarantee precision focus pull with less play and higher accuracy. Note that the assembly instructions apply to both types of handwheel.
natural_image
Technical line drawing of a mechanical assembly with gears and housing (no text or symbols)3 When mounting the assembled bridges and handwheel onto the camera rods underneath the lens: Turn the knurled screw clockwise to tighten the rod clamp, then flip down to lock the O-Focus DM securely on the rod.
NOTE: Lock levers are fitted with a spring. Should a lever obstruct the path of a camera rod, for example, adjust its position: Pull the lever off the shaft as far as possible, turn it a few degrees, then let it retract. Check the clamping is tight.
mounting onto the camera rods
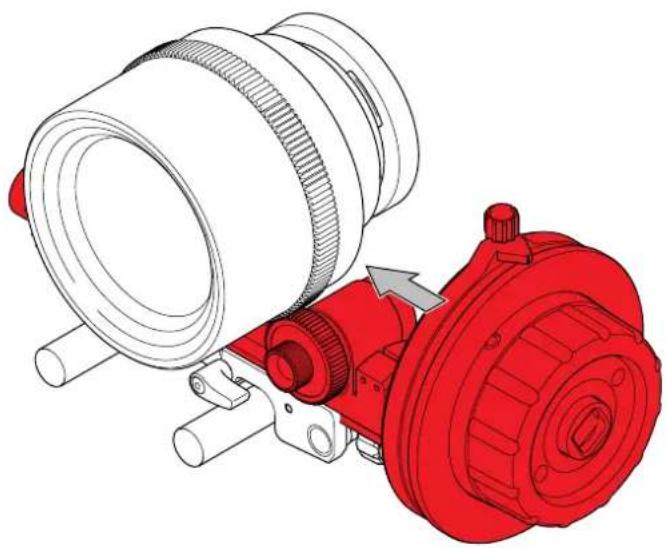
Mounting the O-Focus DM to the lens requires the assembly to be adjusted in two steps: first assemble and mount the O-Focus on the camera rods, then adjust the main bridge, until the driver gear engages with the lens focus drive.
For more information about the focal length and diameter of a wide range of camera lenses visit OConnor Labs online at the OConnor website (OConnor > Labs > 'Lens Diameters').

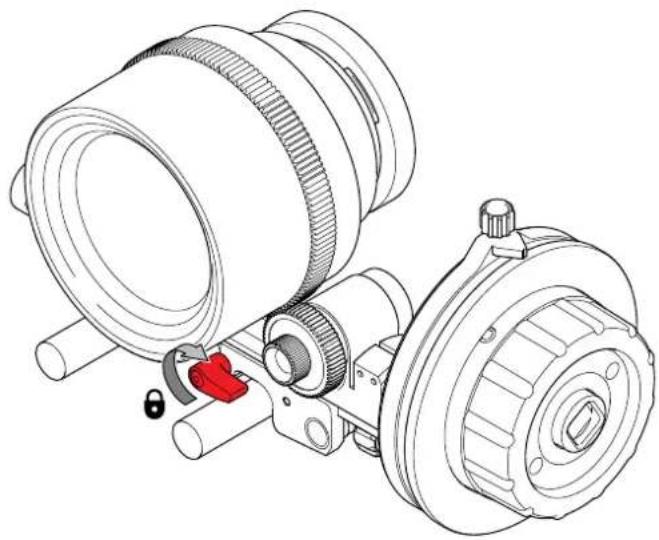
1 With the 15 mm LWS rod bridge securely mounted underneath the lens, turn the lock lever counter-clockwise to release the main bridge assembly.
natural_image
Technical illustration of a mechanical assembly with red and white components, no visible text or symbols2 Mount the O-Focus DM to the lens focus drive. Push the main bridge towards the lens focus drive, until the serrations of the driver gear fully engage. Take care not to overtighten the gear on the lens focus drive.
mounting the O-Focus to the lens
natural_image
Technical line drawing of a mechanical assembly with gears and housing (no text or symbols)3 Turn the lock lever clockwise to secure the main bridge in position. Ensure the bridge is firmly locked to avoid backlash.
Depending on the setup, the LWS rod bridge can also be replaced with a studio bridge to accommodate heavy-duty 15 mm or 19 mm studio camera rods (see page 10).
For more information about different types of camera rods visit OConnor Labs online at the OConnor website (see OConnor > Labs > 'Rod Standards Explained').
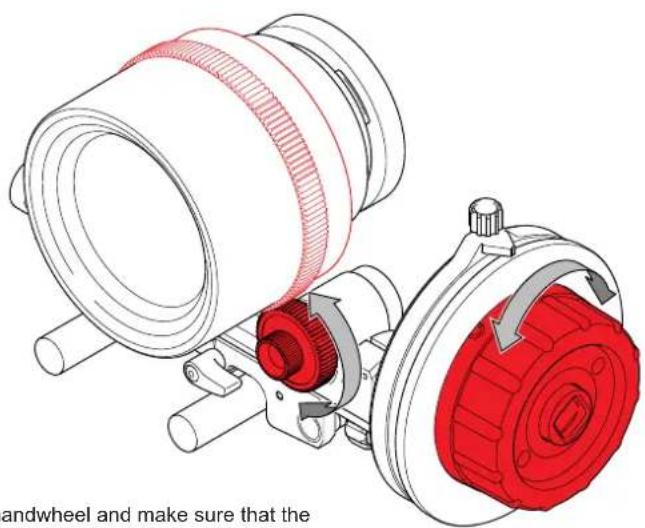
4 Turn the handwheel and make sure that the driver gear engages with the lens focus drive adjusting the lens focus smoothly in either direction.
setting the focal distances
Set the lens focal range for the O-Focus DM Photo. Using a suitable pen mark the reference points for the maximum and minimum focal distances. Hard stops prevent lenses with infinite rotation from being turned too far. The hard stops can also be used as hard focus points for run and gun shooting.

Using the handwheel find the start focal point, mark this point and set the index. Turn the handwheel and establish the end stop of the focus pull. Mark with a pen, then adjust the index stoppers.

natural_image
Technical line drawing of an electric motor with three red components and mounting brackets (no text or labels)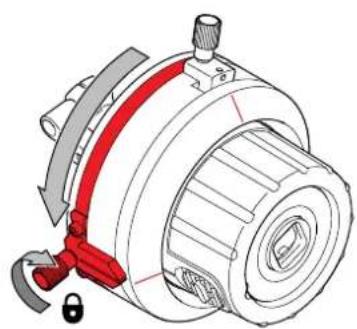
natural_image
Technical illustration of a mechanical assembly with red clamping elements and a central rotating component (no text or symbols)2 Set the focal distances. Loosen the index, move the large witness marker to the end position, and tighten the screw. For the start position set the index slightly beyond the first marker. Finally, move the slider button between the stops, then push it in.

natural_image
Technical illustration of a mechanical assembly with red and gray components (no text or symbols)
natural_image
Technical line drawing of a mechanical component with no visible text or symbolssetting the focal distances
natural_image
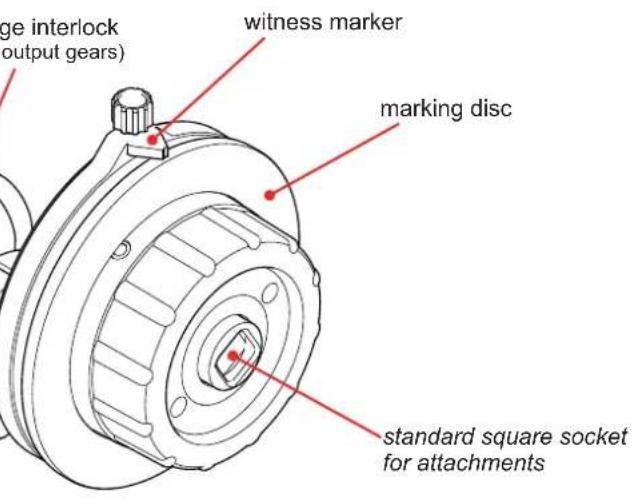
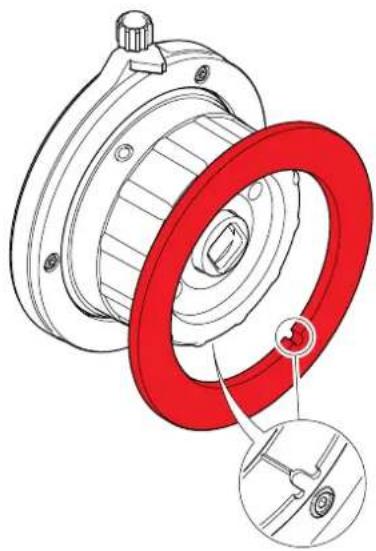
Technical illustration of a mechanical component with red ring and mounting holes (no text or symbols)1 Mount the marking disc. Align the tongue on the handwheel with the cutout on the marking disc, then push the disc onto the handwheel until it audibly 'clicks' into place.
Set the focal distances for the O-Focus DM Cine. Using a suitable pen mark the lens focal reference points. The focus throw is optimized for cine lenses to provide a shorter, more exacting focus pull.

natural_image
Technical line drawing of a mechanical assembly with rotating components (no text or symbols)2 Set the initial lens focus and loosen the index to set it to the preferred eye level. Use a pen to mark the focal reference points on the marking disc, until the desired distance is marked out.
3 If preferred, set the witness mark to another focal reference point. Adjust the index as required.
The O-Focus DM is now set up and ready for use.
CAUTION: Always remove the marking disc before cleaning. Do not use solvents on the O-Focus DM. Follow the instructions supplied with the marking pen when cleaning the marking discs.
Options and extras
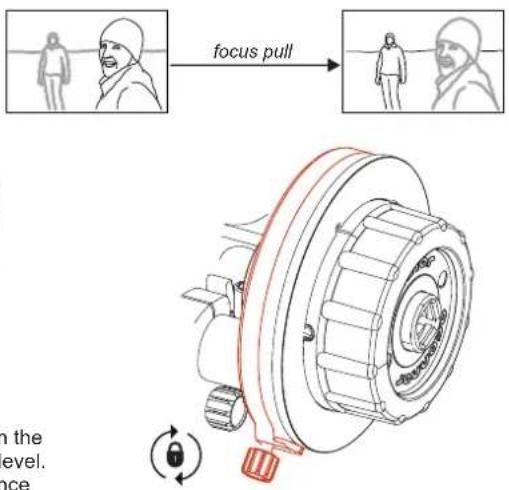
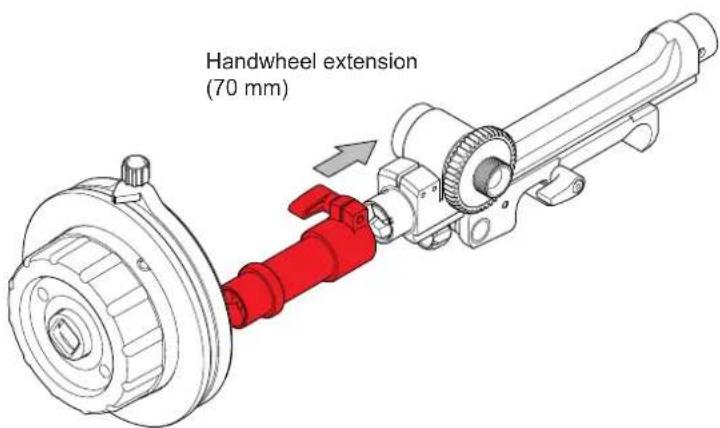
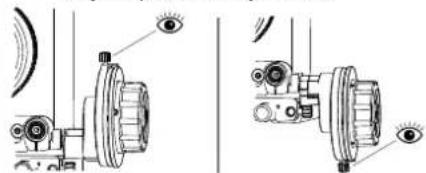
For larger camera packages the O-Focus DM can also be used with an optional 70 mm handwheel extension (see page 7 for details). The eye level of the eccentric CFF-1 studio handwheel can be adapted for optimal 'line of sight' and for reach.
Note: Adjust the handwheel index up or down for your preferred eye level.
natural_image
Technical line drawing of mechanical components with eye symbols, no readable text or labels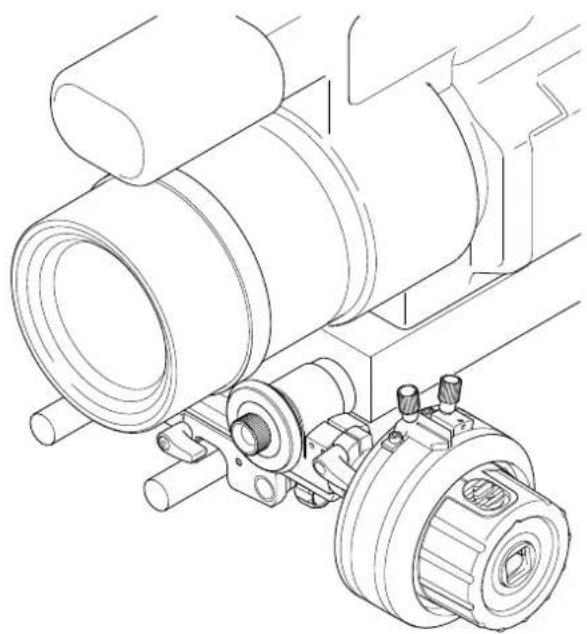
natural_image
Technical line drawing of a mechanical assembly with rollers and gears (no text or symbols)The O-Focus DM has been optimized to work with still photography lenses used in cinema applications. A toothless friction driver wheel is included for use with non-geared, rubber focus barrel still lenses.
OConnor Offices worldwide
ASIA
CHINA
Room 706, Tower B
Derun Building
YongAn Dongli A No. 8
Jianwai Ave.
Chaoyang District
100022 Beijing, China
Tel.: +86 10 8528 8748
Fax: +86 10 8528 8749
JAPAN
P.A. Building 5F
3-12-6 Aobadai
Meguro-ku
Tokyo 153-0042
Japan
Tel.: +81 3 5456 4155
Fax: +81 3 5456 4156
SINGAPORE
6 New Industrial Road
02-02 Hoe Huat Industrial
Building
Singapore 536199
Tel.: +65 6297 5776
Fax: +65 6297 5778
EUROPE
FRANCE
William Vinten Building
Western Way
Bury St Edmunds
Suffolk IP33 3TB
United Kingdom
Tel.: +44 1284 752 121
Fax: +44 1284 750 560
Sales Fax: +44 1284 757 929
natural_image
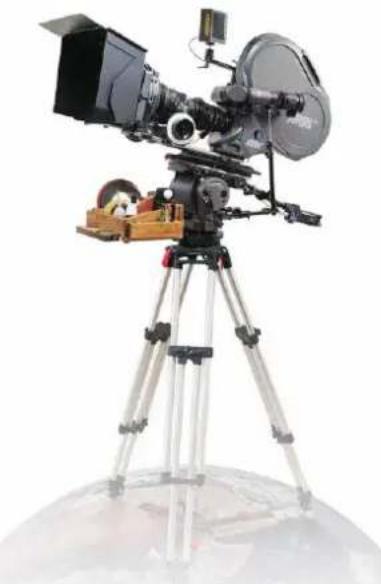
Professional video camera on a tripod with a globe in the foreground (no visible text or symbols)www.ocon.com - sales@ocon.com
HEADQUARTERS
2701 N. Ontario St.
Burbank, CA 91504
USA
Valley Cottage, NY 10989
USA
Tel.: +1 845 268 0100


- Contents
- O-Focus DM Photo
- O-Focus DM Cine
- Assembly
- The O-Focus DM Cine
- Congratulations on the purchase of your new OConnor O-Focus DM!
- Features and benefits of your new O-Focus DM
- Special features
- Specification
- O-Focus DM Photo Set (C1242-0001)
- In the box
- Matching OConnor accessories:
- O-Focus DM Cine Set (C1242-0002)
- Components
- Assembly – assembling the bridge
- mounting the handwheel
- mounting onto the camera rods
- mounting the O-Focus to the lens
- setting the focal distances
- Options and extras
- OConnor Offices worldwide
- ASIA
- CHINA
- JAPAN
- SINGAPORE
- 02-02 Hoe Huat Industrial
- EUROPE
- FRANCE
- HEADQUARTERS
Brand : OConnor
Model : C1242-0002
Category : Tripod