PDP4250 - Television Palsonic - Free user manual and instructions
Find the device manual for free PDP4250 Palsonic in PDF.


| Product Type | PDP TV |
| Display Size (Diagonal) | 107 cm |
| Resolution | 852 x 480 |
| Brightness | 1000 cd/m² |
| Contrast Ratio | 3000:1 |
| Viewing Angle | 160° horizontal / 160° vertical |
| TV System | PAL / SECAM / NTSC |
| Audio Output | 10 W x 2 |
| Power Supply | AC 240 V, 50 Hz |
| Power Consumption | 400 W |
| Weight (with stand) | 39 kg |
| Dimensions (W x H x D) | 1247 x 718 x 270 mm |
| Input Terminals | RF, AV, S-Video, VGA, DVI, Component (YPbPr/YCbCr) x2 |
| Output Terminals | Video Out, Audio Out, Headphone |
| Special Features | Picture-in-Picture, Split Screen, Sleep Timer, Picture Freeze |
| Cleaning Instructions | Unplug and clean with a dry cloth; do not use liquid cleaners. |
| Safety Precautions | Do not block ventilation openings; avoid heat sources; use only specified attachments. |
| Remote Control Batteries | Two AAA batteries |
Frequently Asked Questions - PDP4250 Palsonic
User questions about PDP4250 Palsonic
0 question about this device. Answer the ones you know or ask your own.
Ask a new question about this device
Download the instructions for your Television in PDF format for free! Find your manual PDP4250 - Palsonic and take your electronic device back in hand. On this page are published all the documents necessary for the use of your device. PDP4250 by Palsonic.
USER MANUAL PDP4250 Palsonic
WATERLOO NSW 2017 AUSTRALIA
TEL: (02) 9313 7111
FAX: (02) 9313 7555
www.palsonic.com.au
PALSONIC CUSTOMER SERVICE
TELEPHONE
AUSTRALIA: 1300 657 888
Table of Contents 1
Important Safety Precautions 2
Preparations 5
Using the Remote Control 5
Batteries for the Remote Control .... 5
Power connection 6
Speaker connection 6
Antenna connection 7
Identification of Controls 8
Main unit (front view) 8
Main unit (rear view) 9
Remote Control 10
Connections 12
Cautions before connecting 12
Connect a VCR 12
Connect a Camcorder 13
Connect a DVD player 14
Connect a DTV receiver 15
Connect a PC 16
Connect a VCR (for recording) or external amplifier 17
Turning the Unit On and Off 18
Memorising the Channels 19
Storing Channels in Memory Automatically .... 19
Manual Search 19
Setting Auto Fine Tune (AFT) 20
Manual Fine Tuning 20
Adding and Erasing Channels 20
Basic Operations 21
Changing Channels 21
Adjusting the Volume 21
Select input source signal 22
Setting Channel Options 23
Editing Channel Label 23
Setting Picture 24
Customising the Picture 24
Using the Preset Picture Mode 24
Setting System 25
Setting the Menu Background 25
Setting Colour and Sound System 25
Setting Current Time 25
Setting Sleep Timer 25
Changing Screen Options 26
Changing the Scaling mode of Image ..... 26
Freezing the Picture 26
Changing the Position of the Image ..... 27
Using Digital Pan and Zoom 27
Setting Sound 28
Using the Preset Audio Mode 28
Customising the Sound 28
Adjusting the Headphone Volume 28
Using the Auto Volume 29
Stereo/Bilingual Selection 29
Changing Screen Layout 30
Selecting Screen Layout 30
PIP 31
Split Screen 31
POP3 31
Grid 31
PIP Operations 32
Viewing the Picture-in-Picture 32
Swap the Contents of the PIP Image and Main Image 32
Changing the Position of the PIP Frame. 33
Adjusting the Size of PIP Frame 33
Adjustment in PC (VGA) Mode 34
Adjusting Picture 34
Adjusting the Phase and Frequency ..... 34
Adjusting the Picture Automatically ..... 34
Changing the Scaling mode of Image ..... 35
Changing the Position of Image 35
Displaying the Information 35
Adjustment in YPbPr Mode 36
Changing the Scaling mode of Image ..... 36
Changing the Position of Image 36
Adjusting Image width and height 36
Troubleshooting 37
Specifications 38
Dimensional Drawings 39
Electrical energy can perform many useful functions, but it can also cause personal injuries and property damage if improperly handled. This product has been engineered and manufactured with the highest priority on safety. But IMPROPER USE CAN RESULT IN POTENTIAL ELECTRICAL SHOCK OR FIRE HAZARD. In order to prevent potential danger, please observe the following instructions when installing, operating and cleaning the product. To ensure your safety and prolong the service life of your PDP TV product, please read the following precautions carefully before using the product.
- Read these instructions---All operating instructions must be read and understood before the product is operated.
- Keep these instructions---These safety and operating instructions must be kept in a safe place for future reference.
- Heed all warnings---All warnings on the product and in the instructions must be observed closely.
- Follow all instructions---All operating instructions must be followed.
- Do not use this apparatus near water---for example, near a bathtub, washbowl, kitchen sink, or laundry tub, in a wet basement, or near swimming pool, and the like.
Do not use immediately after moving from a low temperature to high temperature environment, as this causes condensation, which may result in fire, electric shock, or other hazards.

natural_image
Illustration showing a no-smoking sign, a road accident with smoke, and a TV (no text or symbols)- Clean only with dry cloth---Unplug this product from the wall outlet before cleaning. Do not use liquid cleaners or aerosol cleaners. Use a damp cloth for cleaning.

natural_image
Illustration of a medical worker cleaning a patient's abdomen with a monitor and cable (no text or symbols)- Ventilation---Do not block any ventilation openings. Install in accordance with the manufacturer instructions. The vents and other openings in the cabinet are designed for ventilation. Do not cover or block these vents and openings since insufficient ventilation can cause overheating and/or shorten the life of the product. Do not place the product on a bed, sofa, rug or other similar surface, since they can block ventilation openings. This product is not designed for built-in installation; do not place the product in an enclosed place such as a bookcase or rack, unless proper ventilation is provided or the manufacturer's instructions are followed.

- Heat sources---Do not install near any heat sources such as radiators, heat registers, stoves, or other apparatus (including amplifiers) that produce heat.

natural_image
Illustration of a fire safety scene with a person on a stove, a TV, and a sun (no text or symbols)- Grounding or Polarisation---Do not defeat the safety purpose of the polarised or grounding-type plug. A polarised plug has two blades with one wider than the other. A grounding type plug has two blades and a third grounding prong. The wide blade or the third prong are provided for your safety. If the provided plug does not fit into your outlet, consult an electrician for replacement of the obsolete outlet. (America only)
- Power cord protection---Protect the power cord from being walked on or pinched particularly at plugs, convenience receptacles, and the point where they exit from the apparatus.
-
Attachments---Only use attachments/ accessories specified by the manufacturer. Do not use attachments not recommended by the manufacturer. Use of improper attachments can result in accidents.
-
Stand---Use only with the cart, stand, tripod, bracket, or table specified by the manufacturer, or sold with the apparatus. Do not place the product on an unstable trolley, stand, tripod or table. Placing the product on an unstable base can cause the product to fall, resulting in serious personal injuries as well as damage to the product. When mounting the product on a wall, be sure to follow the manufacturer's instructions. Use only the mounting by the hardware recommended manufacturer.

natural_image
Simple line drawing of a chair, TV, and no sign symbol (no text or labels)- Carefully move---When a cart is used, use caution when moving the cart/apparatus combination to avoid injury from tip-over. Sudden stops, excessive force and uneven floor surfaces can cause the product to fall from the trolley.

natural_image
Silhouette of a person holding a large 'no' symbol next to a computer monitor (no text or symbols present)- Lightning---Unplug this apparatus during lightning storms or when unused for long of periods time. For added protection for this television equipment during a lightning storm, or when it is left unattended and unused for long periods of time, unplug it from the wall outlet and disconnect the antenna. This will prevent damage to the equipment due to lightning and power-line surges.

-
Servicing---Refer all servicing to qualified service personnel. Servicing is required when the apparatus has been damaged in any way, such as power-supply cord or plug is damaged, liquid has been spilled or objects have fallen into the apparatus, the apparatus has been exposed to rain or moisture, does not operate normally, or has been dropped.
-
Replacement parts---In case the product needs replacement parts, make sure that the service person uses replacement parts specified by the manufacturer, or those with the same characteristics and performance as the shock and/or original parts. Use of unauthorised parts can result in fire, electric other danger.
-
Overloading---Do not overload wall outlets, extension cords, or convenience receptacles on other equipment as this can result in a risk of fire or electric shock.
-
Entering of objects and liquids---Never insert an object into the product through vents or openings. High voltage flows and/or in the product, and inserting an object can cause electric shock short internal parts. For the same reason, do not spill water or liquid on the product.
-
Damage, requiring service---If any of the following conditions occurs unplug the power cord from the AC outlet, and repairs. request a qualified service person to perform
a. When the power cord or plug is damaged.
b. When a liquid is spilled on the product or when objects have fallen into the product.
c. When the product has been exposed to rain or water.
d. When the product does not operate properly as described in the operating instructions.
Do not touch the controls other than those described in the operating instructions. Improper adjustment of controls not described in the instructions can cause damage, which often requires extensive adjustment work by a qualified technician. e. If the product has been dropped or the cabinet has been damaged in any way.
f. When the product displays an abnormal condition or exhibits a distinct change in performance. Any noticeable abnormality in the product indicates that the product needs servicing.
-
Safety checks---Upon completion of service or repair work, request the service technician to perform safety checks to ensure that the product is in proper operating condition.
-
Wall or ceiling mounting---When mounting the product on a wall or ceiling, be sure to install the product according to the method recommended by the manufacturer. This is a safety feature.
-
Power source---This product is intended to be supplied by a listed power supply indicated on the marking label. If you are not sure of the type of power supply to your home, consult your product dealer or local power company. For added protection for this product during a lightning storm, or when it is left unattended and unused for long periods of time, unplug it from the wall outlet and disconnect the cable system. This will prevent damage to the product due to lightning and power line surges. When the unit has to be used with another power supply voltage, the power cable must be changed. Consult your product dealer. The socket outlet should be installed near the equipment and easily accessible. Use only the power cord designated by our dealer to ensure safety and EMC. When connecting other products such as VCRs and personal computers, you should turn off the power of the unit for protection against electric shock.
-
Panel protection---The PDP panel used in this product is made of glass.
Therefore, it can break when the product is dropped or impacted upon by other objects. Be careful not to be injured by broken glass pieces in case the PDP panel breaks.
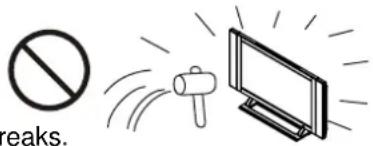
- Pixel defect---The PDP panel is a very high technology product, giving you finely detailed pictures. Occasionally, a few non-active pixels may appear on the screen as a fixed point of blue, green or red. Please note that this does not affect the performance of your product.
If an outside antenna is connected to the television equipment, be sure the antenna system is grounded so as to provide some protection against voltage surges and built-up static charges. Section 810 of the National Electrical Code provides information with respect to proper grounding of the mast and supporting structure, grounding of the lead-in wire to an antenna discharge unit, size of grounding conductors, location of antenna-discharge unit, connection to grounding electrodes, and requirements for the grounding electrode. (America only)
EXAMPLE OF ANTENNA GROUNDING AS PER NATIONAL ELECTRICAL CODE

NEC---NATIONAL ELECTRICAL CODE
■ An outside antenna system should not be located in the vicinity of overhead power lines or other electric light or power circuits, or where it can collide with such power lines or circuits. When installing an outside antenna system, extreme care should be taken to keep from touching such power lines or circuits, as contact with them might be fatal.

Using the Remote Control
■ Use the remote control by pointing it towards the remote sensor window of the set. Objects between the remote control and sensor window may prevent proper operation.
Note: the illustration is for your reference only, the remote sensor may locate differently with different model.

Cautions regarding use of remote control
■ Do not expose the remote control to shock. In addition, do not expose the remote control to liquids, and do not place in an area with high humidity.
■ Do not install or place the remote control under direct sunlight. The heat may cause deformation of the unit.
■ The remote control may not work properly if the remote sensor window of the main unit is under direct sunlight or strong lighting. In such a case, change the angle of the lighting or PDP TV set, or operate the remote control closer to the remote sensor window.
Batteries for the Remote Control
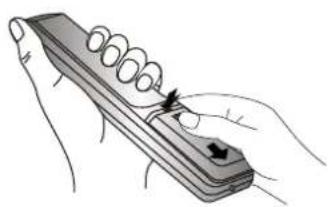
If the remote control fails to operate the PDP TV functions, replace the batteries in the remote control.
1 Open the battery cover.
natural_image
Illustration of a hand holding a handheld electronic device with a coiled cable (no text or symbols visible)2 Insert two size-AAA batteries.

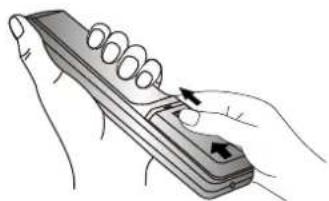
3 Replace the cover and slide in reverse until the lock snaps.
natural_image
Illustration of a hand holding a coiled spring and a rectangular object with an arrow indicating rotation (no text or symbols)■(Slide the cover while pressing down.)
■ (Place the batteries with their terminals corresponding to the (+) and (-) indications in the battery compartment.)
Precautions on battery use
Improper use of batteries can result in a leakage of chemicals and/or explosion. Be sure to follow the instructions below.
■ Place batteries with their terminals corresponding to the (+) and (-) indications.
■ Different types of batteries have different characteristics. Do not mix batteries of different types.
■ Do not mix old and new batteries. Mixing old and new batteries can shorten the life of new batteries and/or cause old batteries to leak chemicals.
■ Remove batteries as soon as they are non-operable. Chemicals that leak from batteries can cause a rash. If chemical leakage is found, wipe with a cloth.
■ The batteries supplied with the product may have a shorter life expectancy due to storage conditions.
■ If the remote control is not used for an extended period of time, remove the batteries from the remote control.
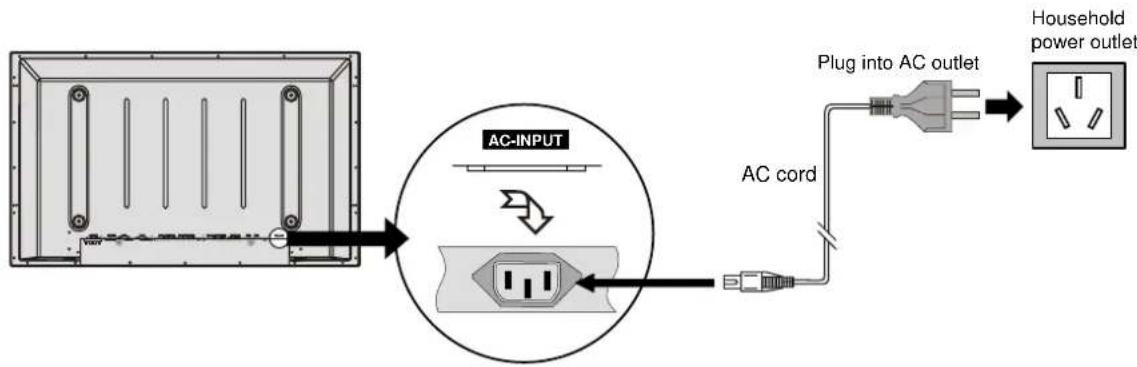
Power connection
flowchart
graph TD
    A["AC INPUT"] --> B["AC cord"]
    B --> C["Plug into AC outlet"]
    C --> D["Household power outlet"]
- Connecting the female plug to the AC socket on the unit.
- Connecting the male plug to the wall outlet as illustrated.
Note:
■ This product should be operated only from the type of power source indicated on the marking label.
■ Always unplug the AC cord from power outlet when not using for a long period of time.
■ The illustration of the AC plug is for your reference only depending on your area.
Speaker connection
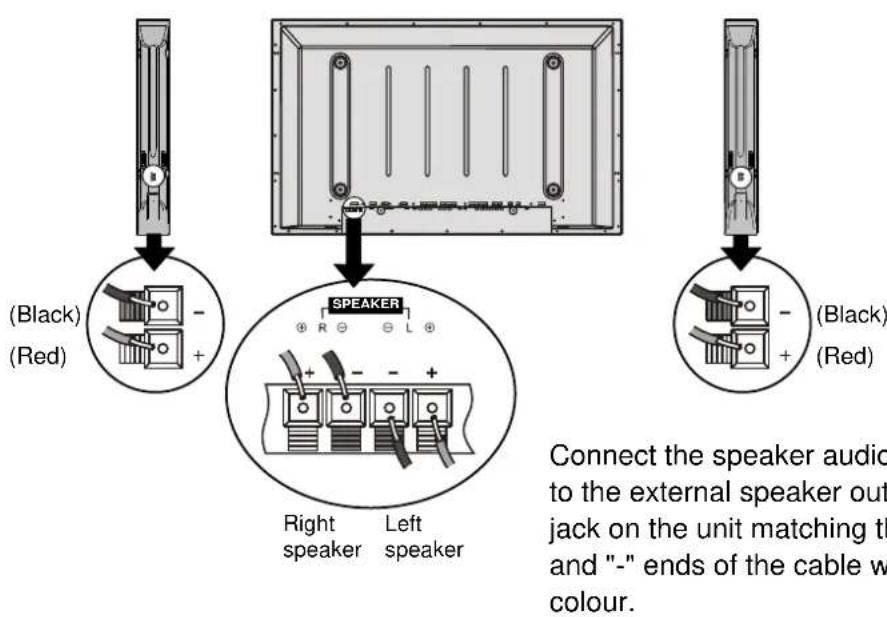
Note: the illustration may be different depending on model.
Antenna Connection
INSTALL the unit in a room where direct light will not fall upon the screen. Total darkness or a reflection on the picture screen may cause eyestrain. Soft and indirect lighting is recommended for comfortable viewing.
Optimum reception of colour requires a good signal and will generally mean that an outdoor aerial must be used. The exact type and position of the aerial will depend upon your particular area.

Note:
It is recommended that the 75-ohm coaxial cable be used to eliminate interference and noise which may occur due to radio wave conditions.
The aerial cable should not be bundled with the power cord and the like.
Main unit (front view)



1. SOURCE
Press this button to display SOURCE select menu.
2. MENU
Press this button to access the MENU main page.
3. Volume ◀ / ▶
Press the VOL▶ or VOL ◀ button to directly increase or decrease the sound volume level. In OSD Menu, press these buttons to adjust the value or setting of each item.
4. Channel ▲/▼
Press these two buttons to directly change the TV channel. In OSD Menu, press these buttons to choose the OSD items.
Note:
Functions of SOURCE, MENU, VOL◄/► and CH▲/▼ are also provided to the remote control. this operation manual provides a description based on operating functions with the remote control.
Main unit (rear view)

1. RS232 terminal
For service use only. The user cannot operate the unit through the RS232 terminals.
2. DVI input /Audio in
Receives the digital video/audio signals from a set top box or PC.
3. VGA input /Audio in
Connect to the VGA/audio output jacks on your PC.
4. Component inputs 1 (Y, Pb/Cr, Pr/Cr, Audio)
Connect to the audio and component output jacks of a DVD player or Set-Top Box.
5. Component inputs 2 (Y, Pb/Cr, Pr/Cr, Audio)
Connect to the audio and component output jacks of a DVD player or Set-Top Box.
6. Headphone jack
7. AV outputs (Video, Audio L, R)
Connect to the VCR input jacks to record programs.
8. AV inputs (Video, Audio L, R)
Receive a video/audio signals from external sources such as VCR or DVD player.
9. Antenna input
Allows you to connect cable or outdoor antenna.
10. S-Video input
Receive a S-Video signal from external source such as VCR or DVD player.
Remote Control

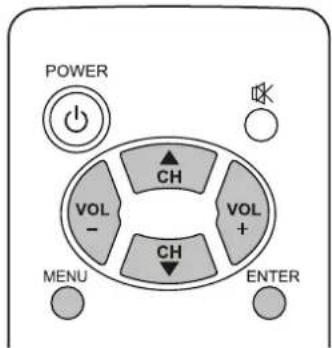
- POWER
Turn the unit on or off
- CH ▲/▼, VOL+/-
Use to switch channels or adjust volume;
In MENU operation, use CH ▲/▼ to select menu item and VOL+/- to adjust selected item.
- MENU
To access the MENU main page
- STILL
To freeze current picture
- ZOOM
To go into ZOOM or PAN mode
- S.M
To access sound mode select menu
- PM
To access picture mode select menu
- 0\~9 digit buttons
Direct channel select
- SOURCE
To access source select menu
- MUTE
Sound mute
- ENTER
To confirm your operation or setting or access the submenu
12.SLP
To access Sleep timer setting menu
- CLK
To access Current time setting menu
- RETURN ≡
To quickly jump between current channel and last selected channel.
- DSP
To display channel status or signal information.
- MTS
To select the sound multiplex mode.
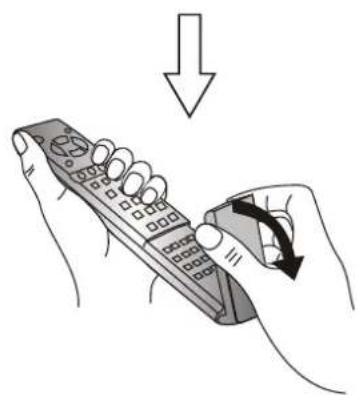
natural_image
Illustration of a hand holding a remote control with a downward arrow indicating action (no text or symbols present)Flip the cover, open in the direction of the arrow.
Remote Control

17. MODE
To access screen layout select menu
18. PIP display
To activate picture in picture
19. POS
To access PIP frame position select menu
20. SIZE
To access PIP frame size adjusting menu
21. SPEAKER
In multi-picture mode, press this button to output the sound of the selected picture frame from speaker
22. SWAP
To exchange PIP and MAIN PICTURE source
23. HEADPHONE
In multi-picture mode, press this button to output the sound of the selected picture frame from headphone
24. MENU
To access the MENU main page
25. ▲ ▼ ◀ ▶ ←
▲▼: To move upward or downward in menu operation;
To adjust zoom rate in ZOOM mode and pan picture in PAN mode;
to select picture frame in multi-picture mode, the selected picture frame displays with a green border;
◀ ▶: To move left or right in menu operation;
To adjust selected menu item in menu operation;
To pan picture in PAN mode;
◀: To confirm your operation or setting or access a submenu
26. AUTO
To rectify the picture automatically in VGA mode
Cautions before connecting
- Carefully check the terminals for position and type before making any connections.
● The illustration of the external equipment may be different depending on your model. - Loose connectors can result in image or colour problems. Make sure that all connectors are securely inserted into their terminals.
- Refer to the operating manual of the external device as well.
- When connecting an external device, turn the power off on the panel to avoid any issues.
Connect a VCR

How to connect:
Connect the Audio/Video cables between the Audio (L/R)/Video jacks on the unit and VCR.
Note:
For better video, you can use the S-video terminal source supports it. When you use S-video terminal, the source menu displays SV instead of AV. The S-Video is prior to Video terminal when they are connected at the same time.
To play VCR
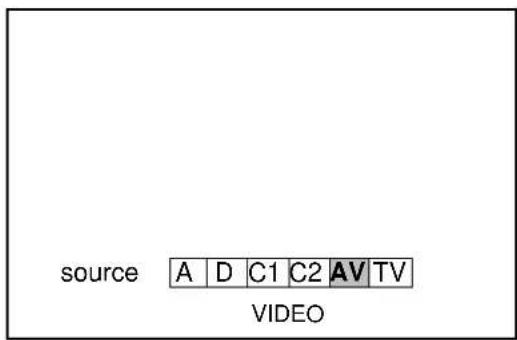
- Turn on your PDP TV, press SOURCE ← button on the remote control.
- Press VOL+/- to select AV (VIDEO) and press ENTER to confirm.
- Turn on your VCR, insert a videotape and press the Play button.
Connect a Camcorder

How to connect:
Connect the Audio/Video cables between the Audio (L/R)/Video jacks on the unit and camcorder.
To playback Camcorder
- Turn on your PDP TV, press SOURCE ← button on the remote control.
- Press VOL+/- to select AV (VIDEO) and press ENTER to confirm.
- Turn on your camcorder and set it to output mode. (For details, refer to your camcorder owner's manual.)
- Insert the tape into the camcorder and press Play button.
Note:
The operation of the camcorder may be different and is dependent on your model. Please read the owner's manual of your camcorder to confirm operation.

Connect a DVD Player

How to connect a DVD Player using Component Video Connections:
Connect the Video cable between the Y, Cb, Cr input jacks on the unit and Y, Cb, Cr output jacks on the DVD player. Connect the Audio cable between the AUDIO input jack on the unit and AUDIO output jacks on the DVD player.
To play DVD
- Turn on your PDP TV, press SOURCE button on the remote control.
- Press VOL+/- to select C1 (YPbPr1/YCbCr1) or C2 (YPbPr2/YCbCr2).
- Press ENTER to confirm.
- Turn on your DVD player, insert a DVD disc and press the Play button.

Note:
This unit identifies the type of component video terminals automatically. If you connect Y, Cb, Cr terminals, the screen displays YCbCr detected on the bottom-right corner. Similar, if the component video terminals are Y, Pb, Pr, the screen displays YPbPr detected on the bottom right corner
Connect a DTV receiver
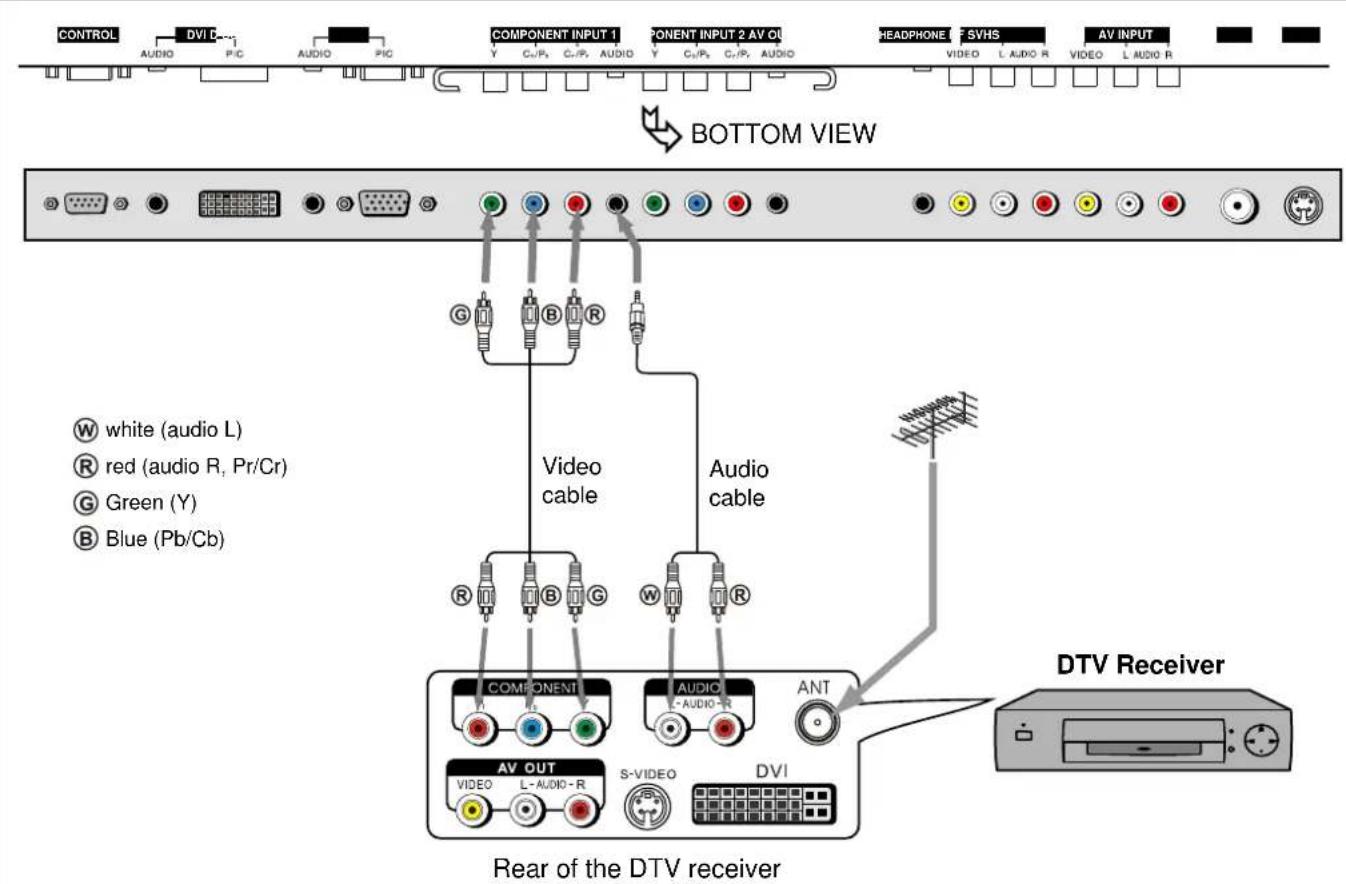
How to connect:
Connect the cable or antenna to the antenna input jack on the DTV receiver.
Connect the Video cable between the Y, Pb, Pr input jacks on the unit and Y, Pb, Pr output jacks on the DTV receiver.
Connect the Audio cable between the AUDIO input jack on the unit and AUDIO output jacks on the DTV receiver.
To Watch DTV
- Turn on your PDP TV, press SOURCE ↩ button on the remote control.
- Press VOL+/- to select C1 (YPbPr1/YCbCr1) or C2 (YPbPr2/YCbCr2).
- Press ENTER to confirm.
- Turn on your DTV receiver.

Connect a PC
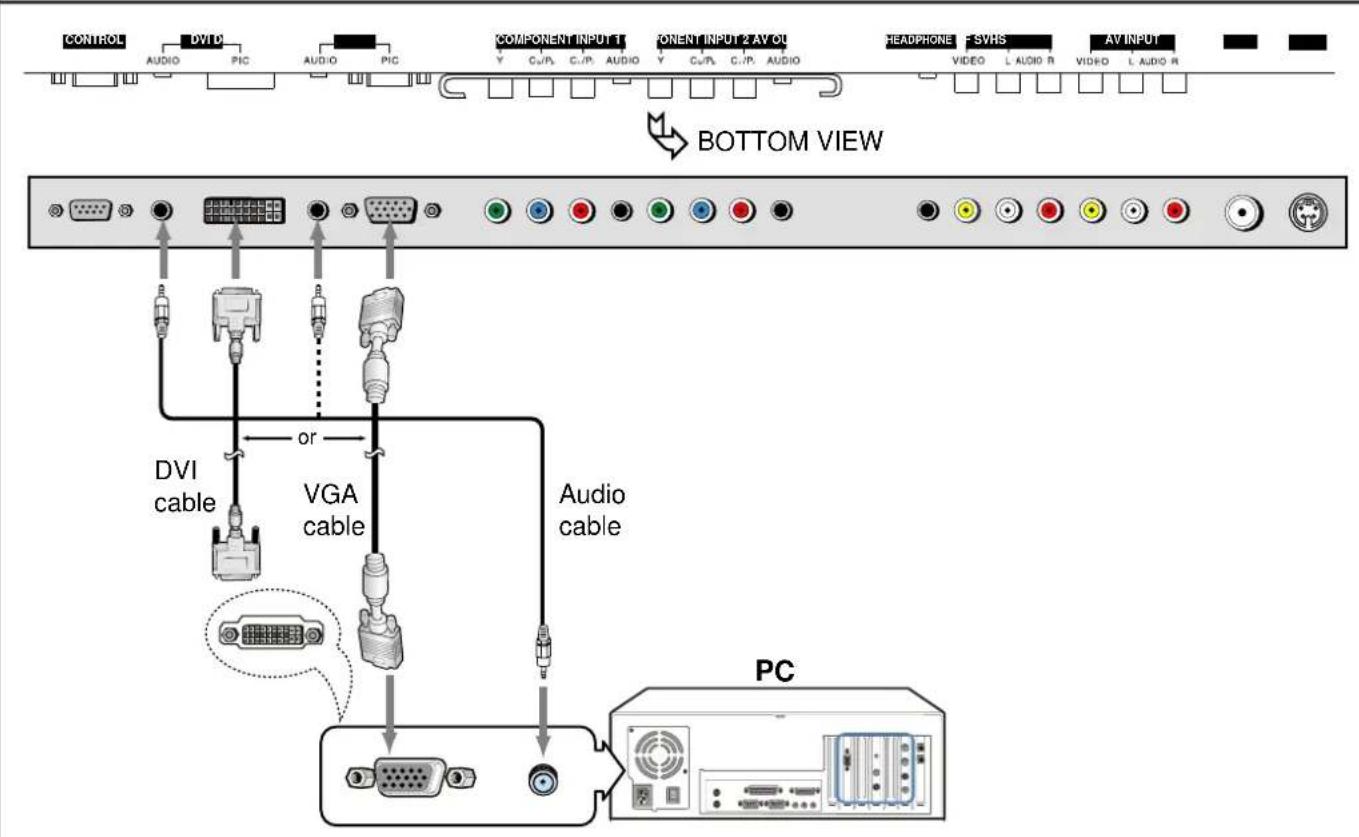
How to connect:
Connect a VGA (or DVI) cable between the VGA (or DVI) jack on the PC and the VGA (or DVI) input jack on the unit. Connect an Audio cable between the AUDIO output on the PC and AUDIO input jack on the unit.
To Watch the PC screen
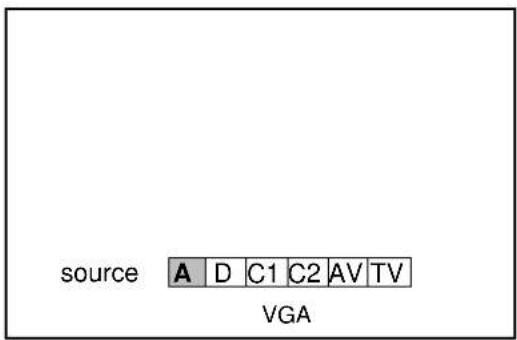
- Turn on your PDP TV, press SOURCE button on the remote control.
- Press VOL+/- to select A (VGA) or D (DVI).
- Press ENTER to confirm.
- Turn on your PC and check for PC system requirements.
- Adjust the PC screen.
Connect a VCR (for recording) or external amplifier

How to connect:
Connect the Audio/Video cables between the Audio (L/R)/Video jacks on the unit and VCR.
$$ - \circ r - $$
Connect the Audio cables between the Audio (L/R) jacks on the unit and external amplifier.
To record program
- Turn on your PDP TV, select a program you wish to record.
- Turn on your VCR, insert a videotape for recording.
- Press the Record button to begin recording.
To enjoy high-quality sound through an external amplifier
- Turn on your PDP TV, select a program.
- Turn the main volume of the amplifier to minimum.
- Turn on the amplifier and adjust for a proper volume.
Note:
The operations of the amplifier may be different depending on model. Please read the owner's manual of your amplifier to confirm proper operation.
The AV output terminals output audio/video signal inputted from Antenna input or AV inputs.
Turning the Unit On and Off
Turning On
Insert the power cord into the wall outlet.
Press the Power Switch on the unit.
Press the Power ⏻ button on the remote control.
The unit will be turned on and you will be ready to use it's features.
Turning Off
With the power on, Press the Power ⏻ button on the remote control to turn off the unit temporarily. If you want to cut off the power completely, press the power switch on the unit directly.

Viewing the Menus and Displays
Your PDP TV has a simple, easy-to-use menu system that appears on the screen. This system makes it convenient and fast to use features on the unit.
Viewing the Menus
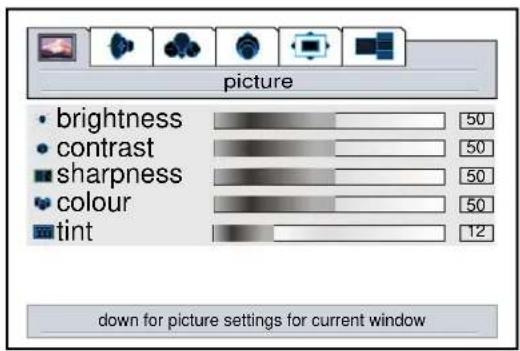
1 With the power on, press the MENU button on the remote control. The main menu appears on the screen.
2 Use the CH ▲/▼ to select menu item. Use VOL+/- to adjust value or setting of each item. Use ENTER to confirm or access items of menu.
On-screen menu will disappear from the screen automatically after about 15 seconds, or you can press the MENU button repeatedly to exit the menu.
Note:
To clearly introduce the menu operations, this operation manual provides a description based on operation with the remote control.
3 In MENU operations, the ▲/▼ buttons have the same function with the CH ▲/▼ buttons, the ◀/▶ buttons have the same function with the VOL+/- buttons, the ← button has the same function with the ENTER button on the top keyboard.

Displaying Status Information
Press the DSP button on the remote control, the unit will display current status information such as channel number or signal source, etc.
Your PDP TV can memorise and store all of the available channels. After the available channels are memorised, use CH ▲/▼ to scan through the available stations.
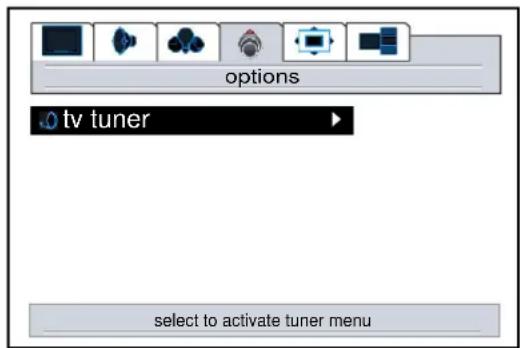
Storing Channels in Memory Automatically
1 Press MENU to display the menu main page.
2 Press VOL+/- repeatedly to display options menu page.
3 Press CH▼ to select tv tuner item.
4 Press VOL+ or ENTER to access the submenu.
If the search menu does not appear on the screen, press VOL+/- to select search menu page
5 Press CH▼ twice to select autoset item.
6 Press ENTER to store channels in memory automatically. The unit will begin memorising all of the available channels.
Note:
The process of auto memory will be stopped if you press the MENU button. After the process of auto memory, the auto fine tune item will be set to on automatically.
Before you start auto channel memory, please refer to [Setting colour and Sound System] on page 25 to select a proper sound system according to your area.


Manual Search
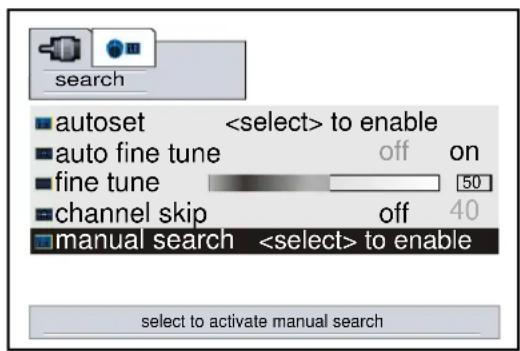
Use Manual Search if desired channels cannot be memorised or if you would like to store channels to specific channel numbers one by one.
1 Repeat steps 1\~4 in [Storing Channels in Memory Automatically] to display search menu page.
2 Press CH▼ repeatedly to select manual search item.
3 Press VOL+/- to start manual search.
Pressing VOL+, the set searches towards higher frequency; Pressing VOL-, the set searches towards lower frequency; The search stops when a program is found and this program will be stored in current channel.
Setting Auto Fine Tune (AFT)
1 Repeat steps 1\~4 in [Storing Channels in Memory Automatically] to display search menu page.
2 Press CH▼ repeatedly to select auto fine tune item.
3 Press VOL+/- to select on or off.
When the AFT is set to On, the unit will automatically tune the program frequency to provide the best possible picture and sound.
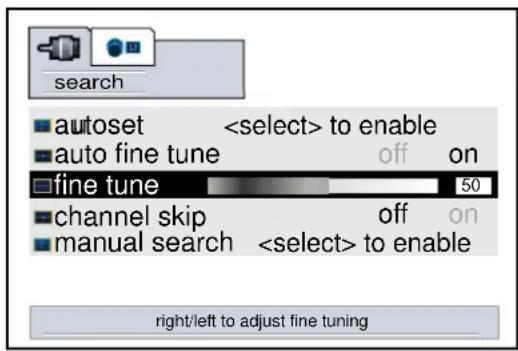
Manual Fine Tuning
1 Repeat steps 1\~4 in [Storing Channels in Memory Automatically] to display search menu page.
2 Press CH▼ repeatedly to select fine tune item.
3 Press VOL+/- to fine tune till the best possible picture and sound are obtained.
If you fine tune a program manually, the auto fine tune item will be turned to off automatically.

Adding and Erasing Channels
1 Use number buttons to directly select a channel that will be added or erased.
2 Repeat steps 1\~4 in [Storing Channels in Memory Automatically] to display search menu page.
3 Press CH▼ repeatedly to select channel skip item.
4 Press VOL+/- to select on or off.
When the item is set to on, the selected channel will be erased. When the item is set to off, the selected channel will be added. The erased channels can not be selected by using the CH▲/▼ buttons unless you use number buttons to input channel number directly.

Changing Channels
Using the Channel Buttons (CH ▲ or CH ▼)
Press the CH▲ or CH▼ to change channels.
When you press the CH▲ or CH▼, the unit changes channels in sequence. You will see all the channels that the unit has memorised.
You will not see channels that were erased, not memorised or unavailable.
Direct Accessing Channels
Press the number buttons to go directly to a channel.
To select a one-digit channel:
Input the channel using the 0-9 number buttons directly and then press ENTER or wait for 3 seconds.
To select a two-digit channel:
Input the channel using the 0-9 number buttons directly and then press ENTER or wait for 3 seconds.
To select a three-digit channel:
Input the channel using the 0-9 number buttons directly.
Note:
Be sure to enter the channel within 3 seconds.
When you use the number buttons. You may directly select channels that were erased.
Using the RETURN Ⓧ button
Press this button to switch between the current channel and the previous channel.
Adjusting the Volume
Using the volume buttons (VOL- and VOL+)
Press the VOL+ or VOL- to increase or decrease the volume.
Using the Mute
Using the MUTE ✕ button
At any time, you can temporarily turn off the sound using the MUTE 📁 button.
1 Press the MUTE ✗ button and the sound turns off.
2 To turn mute off, press the MUTE ✕ button again, or simply press either the VOL- or VOL+.
Select input source signal
1 Press the SOURCE ← button to access source menu.
2 Press VOL+ or VOL- to select a desired input channel.
3 Press ENTER to confirm and the unit display signal from the selected input channel.
A----VGA, select signal from VGA (5-pin D-sub) terminals.
D----DVI, select signal from DVI terminals.
C1----YCbCr1, select signal from YCbCr1 terminals.
C2----YCbCr2, select signal from YCbCr2 terminals.
AV----VIDEO (S-VIDEO), select signal from S-Video or Video terminal.
The S-Video is prior to Video terminal when they are connected at the same time.
TV----Select TV signal.

Note:
This unit identifies the type of component video terminals automatically. If you connect Y, Cb, Cr terminals, the screen displays YCbCr detected on the bottom-right corner. Similarly, if the component video terminals are Y, Pb, Pr, the screen displays YPbPr detected on the bottom-right corner.
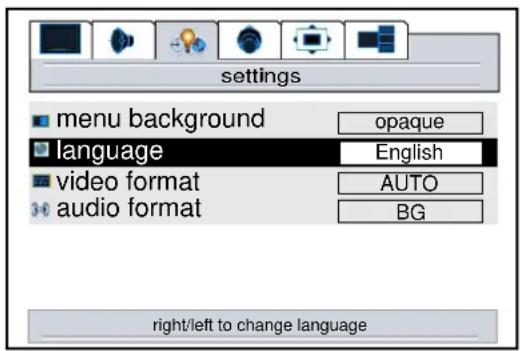
Selecting a MENU language
1 Press MENU to display the menu main page.
2 Press VOL+/- to display settings menu page.
3 Press CH ▲ to select language item.
4 Press VOL+/- to select an OSD language.
Note:
In some models, there may be only one menu language available. In this case, the menu language may not be adjusted by the user.
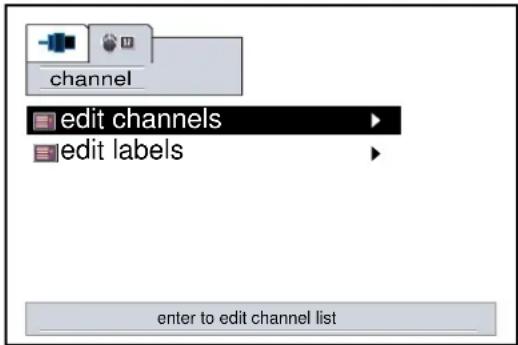
Editing Channels
The edit channels function is for you to arrange channel order as you wish.
1 Press MENU to display the menu main page.
2 Press VOL+/- repeatedly to display options menu page.
3 Press CH▼ to select tv tuner item.
4 Press VOL+ to enter.
5 Press VOL+ again to display channel menu page.
6 Press CH▼ to select edit channels item.
7 Press VOL+/- to enter into channel editing interface.
8 Use CH▲/▼ to select channel.
Use ◀ / ▶ to move cursor left or right.
Use ▲/▼ to select target channel number.
Use ENTER to confirm exchanging contents in current channel and the target channel.
Use MENU to return.


Editing Channel Label
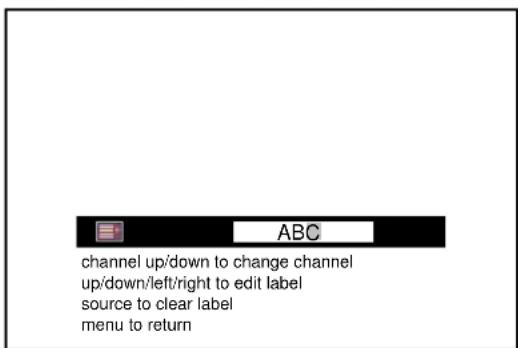
1 Repeat steps 1\~5 in [Editing Channels] to display channel menu page.
2 Press CH▼ twice to select edit labels item.
3 Press VOL+ to enter into channel label editing interface.
4 Use CH▲/▼ to select a channel you want add label to.
Use ▲/▼ to select character.
Use ◀ / ▶ to move cursor left or right.
Use SOURCE ☐ to clear label text if you wish to reset.
Use MENU to return.

Customising the Picture
1 Press MENU to display the menu main page.
If the picture menu does not display, press VOL+/- repeatedly to display picture menu page.
2 Press CH▲/▼ to select the item you wish to change.
3 Press VOL+/- to adjust the value of the item.
4 Press MENU to exit.
Note:
The tint function is for NTSC only.

Using the Preset Picture Mode
1 Press P.M to display picture mode select menu.
2 Press VOL+/- to select a desired picture mode.
3 Press MENU to exit.
There are three preset picture modes (Normal, Bright and Soft) and one user-set picture mode (User).
Each preset mode has its own picture settings.
Normal: Select for a normal picture.
Bright: Select for a bright picture.
Soft: Select for a fine/soft picture.
Adjusted settings are stored in User mode.

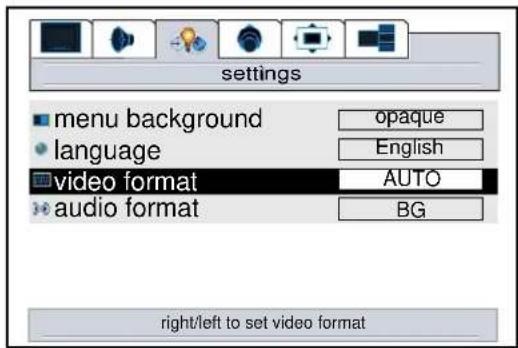
Setting the Menu Background
1 Press MENU to display the menu main page.
2 Press VOL+/- to display settings menu page.
3 Press CH▼ to select menu background item.
4 Press VOL+/- to select opaque or translucent.
Setting Colour and Sound System
1 Press MENU to display the menu main page.
2 Press VOL+/- to display settings menu page.
3 Press CH▼ repeatedly to select video format item.
4 Press VOL+/- to select a proper colour system.
5 Press CH▼ to select Audio format item.
6 Press VOL+/- to select a proper sound system.
Note:
The Audio format function is available in TV mode only.
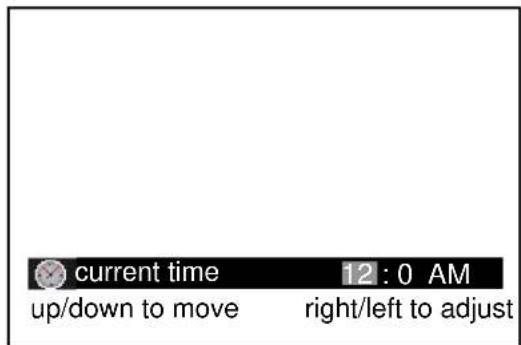
Setting Current Time
1 Press the CLK button to display current time menu.
2 Press CH ▲/▼ to select hour or minute.
3 Press VOL+/- to adjust.
4 Press MENU to exit.
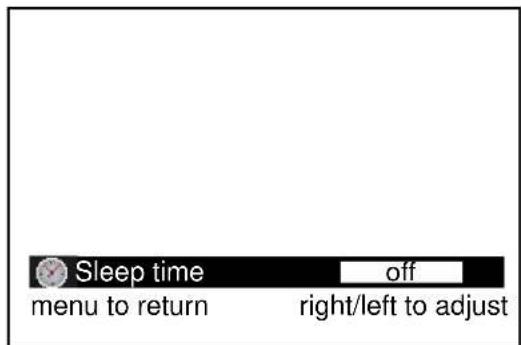
Setting Sleep Timer
1 Press the SLP button to display sleep time menu.
2 Press VOL+/- to adjust.
3 Press MENU to exit.

Changing the Scaling mode of Image
1 Press MENU to display the menu main page.
2 Press VOL+/- to display window menu page.
3 Press CH▼ to select image size item.
4 Press VOL+/- to select a proper image size.
The image size can be selected between: fill all, normal, wide and zoom.

Fill All
The Fill All mode stretches the input vertically and horizontally to fill the display from edge to edge. This mode is the default mode.
Normal
The Normal mode fills the display vertically with a 4:3 aspect picture, preserving the geometry of the input format. It performs the same as the Fill to Aspect Ratio mode.
Wide
The Wide mode only affects displays that are greater than 4:3 aspect. If the picture is less than or equal to 4:3 this mode acts as if it is in Normal mode. It is intended to display 4:3 images on a 16:9 panel with the least picture deformity. The centre of the picture is left unstretched. The left and right sides of the picture are stretched in a non-linear fashion with the areas of greatest distortion on the extreme left and right edges of the picture. The top and bottom five percent of the picture are cropped.
Zoom
If the display aspect ratio is greater than 4:3 this mode fills the panel horizontally, cropping 10 percent off the top and bottom of the picture. If the display aspect ratio is less than 4:3 this mode crops the picture by 16.5 percent on all sides and fills the panel with the remaining picture.
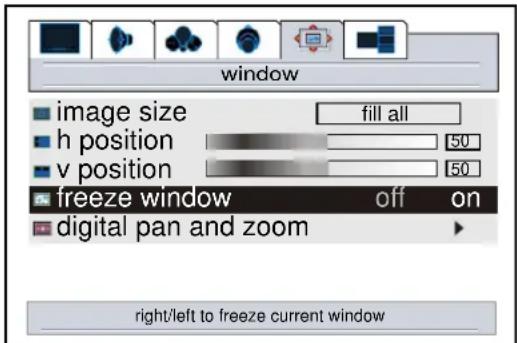
Freezing the Picture
1 Press MENU to display the menu main page.
2 Press VOL+/- to display window menu page.
3 Press CH▼ repeatedly to select freeze window item.
4 Press VOL+/- to select on or off.
When you set this item to on, the current picture will be frozen until you set this item to off.
Note:
This menu item appears only when the current screen layout is full screen.
You can also quickly freeze current picture by using the STILL button.
For the sake of protecting the screen, please do NOT freeze a picture for a long time.
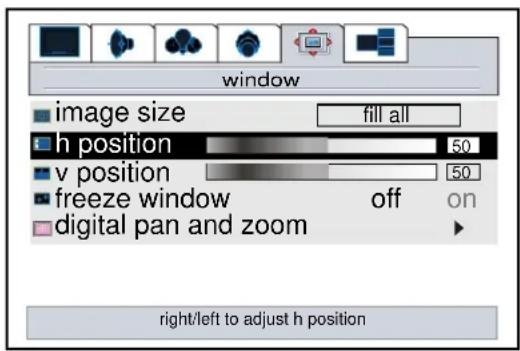
Changing the Position of the Image
The unit allows you to adjust the position of the image if it is not well-aligned.
1 Press MENU to display the menu main page.
2 Press VOL+/- to display window menu page.
3 Press CH▼ repeatedly to select h position or v position item.
4 Press VOL+/- to adjust until the picture is well-aligned.
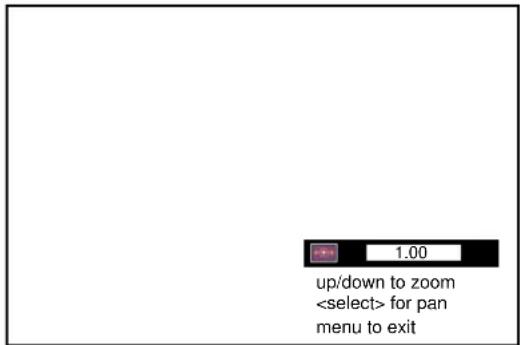
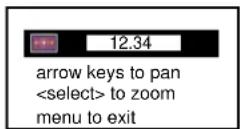
Using Digital Pan and Zoom
1 Press MENU to display the menu main page.
2 Press VOL+/- to display window menu page.
3 Press CH▼ repeatedly to select digital pan and zoom item.
4 Press VOL+ to enter.
5 Press CH▲/▼ to adjust zoom ratio.
Note:
You can quickly access Zoom menu by using the ZOOM button. Digital pan and zoom are not always available.
The unit allows you to pan the picture after you zoom in the picture
1 Repeat steps 1\~5 above to zoom in the picture.
2 Press ENTER to access Pan mode.
3 Press VOL+/- or CH ▲/▼ to pan the current picture in the relevant direction.

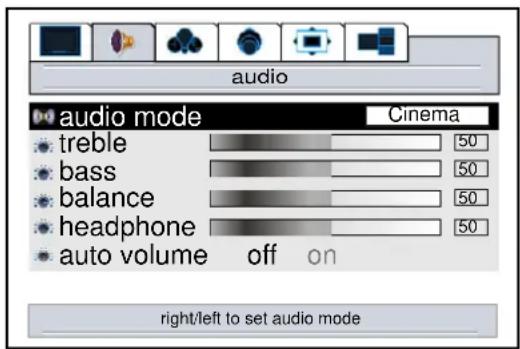
Using the Preset Audio Mode
1 Press MENU to display the menu main page.
2 Press VOL+/- to display audio menu page.
3 Press CH▼ to select Audio mode item.
4 Press VOL+/- to select a desired Audio mode.
Note:
You can not access the treble and bass item unless the Audio mode is set to User.
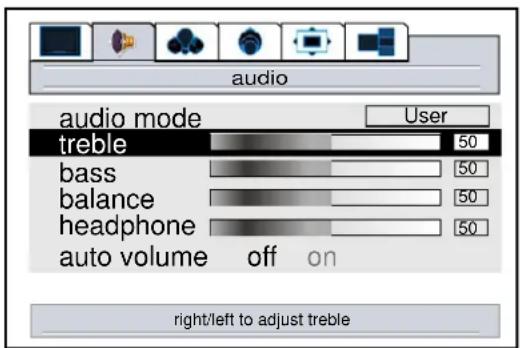
Customising the Sound
1 Press MENU to display the menu main page.
2 Press VOL+/- to display audio menu page.
3 Press CH▲/▼ to select treble, bass or balance item.
4 Press VOL+/- to adjust the value of the item.
Using the S.M button
1 Press S.M to display Audio mode select menu.
2 Press VOL+/- to select a desired Audio mode.
3 Press MENU to exit.
There are three preset Audio modes (Cinema, Music and News) and one user-set Audio mode (User).
Each preset mode has its own Audio settings.
Cinema: Select for a movie program picture.
Music: Select for a music program.
News: Select for a speech or conversation program.
Adjusted settings are stored in User mode.
Adjusting the Headphone Volume
1 Press MENU to display the menu main page.
2 Press VOL+/- to display audio menu page.
3 Press CH ▼ repeatedly to select headphone item.
4 Press VOL+/- to adjust the volume of headphone.


Using the Auto Volume
Each broadcasting station has its own signal conditions, which can make it necessary to adjust the volume every time the channel is changed. "Auto volume" lets you automatically adjust the volume of the desired channel by lowering the sound output when the modulation signal is high or by raising the sound output when the modulation signal is low.
1 Press MENU to display the menu main page.
2 Press VOL+/- to display audio menu page.
3 Press CH▼ repeatedly to select Auto volume item.
4 Press VOL+/- to select on or off.

Stereo/Bilingual Selection
You can quickly select sound multiplex mode by using the MTS ⊙ button on the remote control.
• NICAM Broadcast Selection
This enables the selection of the reception mode when receiving a NICAM signal. To let you enjoy NICAM broadcasting, this TV set receives NICAM system stereo, bilingual, and monaural broadcasts.
Stereo
When the TV set is receiving a stereo broadcast, please select NICAM STEREO or NICAM MONO mode by pressing the MTS Ⓐ button. When NICAM MONO mode is selected, the TV sound is output monaurally.
Bilingual
When the TV set is receiving a bilingual program, please select NICAM DUAL1, NICAM DUAL2 or NICAM MONO mode by pressing the MTS ⊕ button.
- IGR (German stereo system) Broadcasts
This enables the selection of the reception mode when receiving an IGR signal. To let you enjoy IGR broadcasting, this TV set receives IGR system stereo and bilingual broadcasts.
Stereo
When the TV set is receiving a stereo broadcast, please select STEREO or MONO mode by pressing the MTS Ⓧ button. When MONO mode is selected, the TV sound is output monaurally.
Bilingual
When the TV set is receiving bilingual program, please select DUAL1, DUAL2 or MONO mode by pressing the MTS ⊙ button.
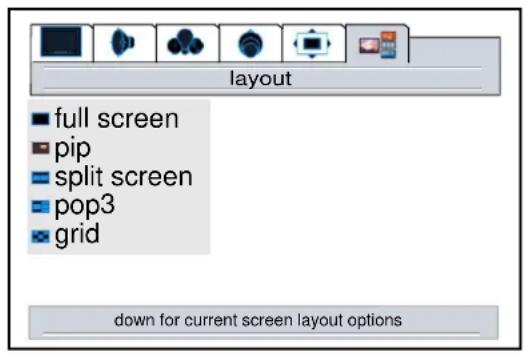
Selecting Screen Layout
Using the Layout Menu
1 Press MENU to display the menu main page.
2 Press VOL+/- to display layout menu page.
3 Press CH ▲/▼ to select item.
4 Press VOL+ or ENTER to confirm.
Using the MODE button
1 Press the MODE button to display the screen layout select menu.
2 Press VOL+/- to select item.
3 Press ENTER to confirm.
4 Press MENU to exit.

Full Screen
When this item is selected, only main frame displays on the screen.
Main Frame
PIP
When this item is selected, one main frame and one PIP frame display on the screen at the same time.

Split Screen
When this item is selected, the screen will be split into two frames.
| Main Frame | Split Frame |
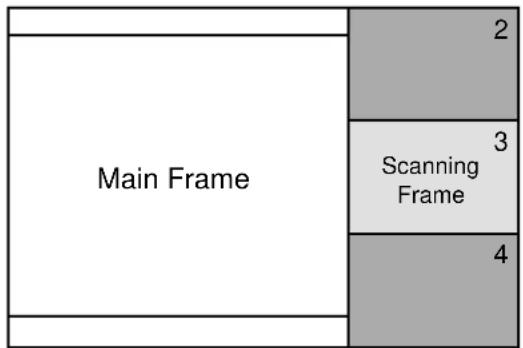
POP3
When this item is selected, one main frame and three scanning frames display on the screen.
Grid
When this item is selected, the screen displays 9 scanning frames.
| 1 | 2 | 3 Scanning Frame |
| 4 | 5 | 6 |
| 7 | 8 | 9 |
Viewing the Picture-in-Picture
This unit includes a two-tuner Picture-in-Picture (PIP) feature. This allows you to watch two (2) live broadcasts at the same time with or without an external video source such as a VCR, cable box, etc.
1 Press MENU to display the menu main page.
2 Press VOL+/- to display layout menu page.
3 Press CH▼ twice to select pip item.
4 Press VOL+ or ENTER to display pip frame.
The screen displays one main frame and one PIP frame.
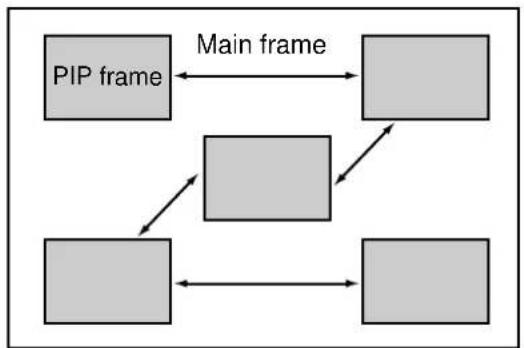
5 Press ▲ or ▼ to select main frame or PIP frame. The selected frame displays with a green border.
Note:
▶ You can quickly open or close PIP frame by directly using the PIP displaying ☐ button.
▶ Many but not all adjustments and settings can be applied to the PIP picture when the PIP frame is selected.
To cancel PIP frame, press the PIP displaying button or select the full screen item and confirm.
The audio of the select picture can be output from the speaker or headphone by using the SPEAKER or 🔒 button on the remote control.


Swap the Contents of the PIP Image and Main Image
1 Press the PIP displaying ☐ button to display the PIP frame.
2 Press the SWAP button to swap the contents of the PIP image and main image.

natural_image
Silhouette of a small island with palm tree and mountain arch, no text or symbols present
natural_image
Simple black-and-white illustration of a palm tree on a island with a small icon below (no text or symbols)Changing the Position of the PIP Frame
1 With the PIP frame displaying, press MENU to display the menu main page.
2 Press VOL+/- to display window menu page.
3 Press CH▼ repeatedly to select pip position item.
4 Press VOL+/- to select a desired position for the PIP frame.
Using the POS button
1 Press the POS button to quickly access the pip position select menu.
2 Press VOL+/- to select a desired position for the pip frame.
3 Press MENU to exit.
Adjusting the Size of PIP Frame
1 With the PIP frame displaying, press MENU to display the menu main page.
2 Press VOL+/- to display window menu page.
3 Press CH▼ repeatedly to select pip size item.
4 Press VOL+/- to adjust the size of PIP frame.
5 Press MENU to exit.
Using the SIZE button
1 Press the SIZE button to quickly access the pip size adjusting menu.
2 Press VOL+/- to adjust the size of the pip frame.
3 Press MENU to exit.

flowchart
graph TD
    A["PIP frame"] <--> B["Main frame"]
    B --> C[" "]
    C --> D[" "]
    D --> E[" "]
    E --> F[" "]
    F --> G[" "]
    G --> H[" "]
    H --> I[" "]
    I --> J[" "]
    J --> K[" "]
    K --> L[" "]
    L --> M[" "]
    M --> N[" "]
    N --> O[" "]
    O --> P[" "]
    P --> Q[" "]
    Q --> R[" "]
    R --> S[" "]
    S --> T[" "]
    T --> U[" "]
    U --> V[" "]
    V --> W[" "]
    W --> X[" "]
    X --> Y[" "]
    Y --> Z[" "]
    Z --> A


With working in VGA mode, this unit allows you to perform many adjustments.
Adjusting Picture
1 Press MENU to display the menu main page.
If the picture menu does not display, press VOL+/- repeatedly to display picture menu page.
2 Press CH ▲/▼ to select brightness or contrast item.
3 Press VOL+/- to adjust the value of the item.

Adjusting the Phase and Frequency
1 Press MENU to display the menu main page.
If the picture menu does not display, press VOL+/- repeatedly to display picture menu page.
2 Press CH ▲/▼ to select phase or frequency item.
3 Press VOL+/- to adjust the value of the item.
4 Press MENU to exit.

You may find that images blur, depending on the clock phase of your PC's Processor. If you experience blurring, you can obtain a clearer image by adjusting the phase item.
Adjust the clock frequency of the set's internal clock signal. If shimmering or rainbow-like noise is apparent in the image, try adjusting the frequency item.
Adjusting the Picture Automatically
If you are not satisfied with the picture, you may quickly adjust the picture by using the AUTO button directly.
After the AUTO button is pressed, the message "Auto running" appears on the screen and the picture adjustments are automatically activated.
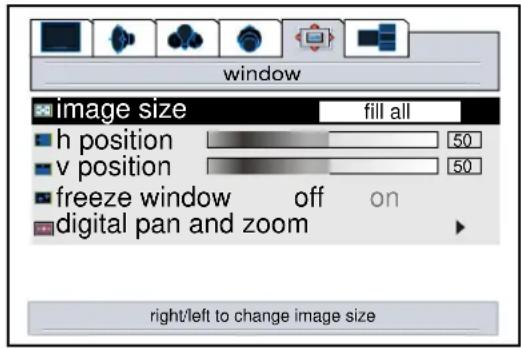
Changing the Scaling mode of Image
1 Press MENU to display the menu main page.
2 Press VOL+/- to display window menu page.
3 Press CH▼ to select image size item.
4 Press VOL+/- to select fill all or Normal.
5 Press MENU to exit.
Changing the Position of Image
After connecting the unit to your PC, adjust the position of the screen if it is not well-aligned.
1 Press MENU to display the menu main page.
2 Press VOL+/- to display window menu page.
3 Press CH▲/▼ to select h position or v position item.
4 Press VOL+/- to adjust the value of the item until the screen is well-aligned.
5 Press MENU to exit.

Displaying the Information
When the DSP button is pressed in PC (VGA) mode, the unit displays some information such as the vertical frequency and resolution.
Changing the Scaling mode of Image
1 Press MENU to display the menu main page.
2 Press VOL+/- to display window menu page.
3 Press CH▼ to select image size item.
4 Press VOL+/- to select a desired scaling mode.
5 Press MENU to exit.

Changing the Position of Image
After connecting the unit to your STB, adjust the position of the screen if it is not well-aligned.
1 Press MENU to display the menu main page.
2 Press VOL+/- to display window menu page.
3 Press CH ▲/▼ to select h position or v position item.
4 Press VOL+/- to adjust the value of the item until the screen is well-aligned.
5 Press MENU to exit.

Adjusting Image width and height
1 Press Menu to display the menu main page.
2 Press VOL+/- to display window menu page.
3 Press CH▲/▼ to select h wide or v high item.
4 Press VOL+/- to adjust the value of the item.
5 Press Menu to exit.

Before calling for repair service, check the following items for possible remedies to an encountered symptom.
| Symptoms | Check item |
| "Ghost" or double images | ·This may be caused by obstruction to the antenna due to high rise buildings or hills. Using a highly directional antenna may improve the picture. |
| No power | ·Check that the AC power cord is plugged into the mains socket.·Unplug the power cord, wait for 60 seconds. Then reinsert plug into the mains socket and turn on the unit again. |
| No picture | ·Check antenna connections at the rear of the unit to see if it is properly connected to the unit.·Possible broadcast station trouble. Try another channel.·Adjust the contrast and brightness settings.·Select a correct input.·Is a non-compatible signal being input? |
| Good picture but no sound | ·Increase the VOLUME.·Check that the unit is not muted.·Check Whether the sound is output to headphone. |
| Good sound but poor colour | ·Adjust the contrast, colour and brightness settings. |
| Poor picture | ·Sometimes, poor picture quality occurs when having activated an S-VHS camera or camcorder connected and having connected another peripheral at the same time. In this case, switch off one of the other peripherals.·Check whether the room is too bright. |
| Horizontal dotted line | ·This may be caused by electrical interference (e.g. hair dryer, nearby neon lights, etc.)·Turn off the equipment. |
| Television not responding to remote control | ·Check whether the batteries are working. Replace if necessary.·Clean the remote control sensor lens on the unit.·Do not use the remote control under strong or fluorescent lighting.·The batteries should be inserted with polarity (+,-) aligned. |
| Snowy picture and noise | ·Check the antenna connection. |
| No stable or not synchronised VGA picture | ·Check if you have selected the correct VGA mode in your PC. |
| No output from one of the speakers | ·Adjust Balance in the audio menu. |
| Control buttons do not work | ·Unplug the power cord, wait for some seconds. Then re-plug the power cord and turn on the unit again. |
Note:
If your problem is not solved, restart your TV by turning it off and then on again once.
Never attempt to repair a defective TV yourself.
| Type | PDP TV | |
| Display Size diagonal | 107cm | |
| Display Feature | ||
| Resolution | 852 X 480 | |
| Pixel Pitch | 1.095 X 1.110 mm | |
| Maximum Colours | 16,777,216 | |
| Brightness | 1000 nit | |
| Contrast | 3000:1 | |
| Viewing Angle | 160^/160^ | |
| TV Tuner & Colour System | ||
| Tuner | Tuner x 2 | |
| TV System PAL/SECAM/NTSC | ||
| Audio Speaker System | ||
| Maximum Audio Output | 10W x 2 | |
| Power Supply | AC 240V, 50Hz | |
| Power Consumption | 400W | |
| Weight (kg) TV unit/TV unit with Stand | 39 | |
| TV Unit Dimension (WxHxD) (mm) | 1247 x 718 x 270 | |
| Terminals | ||
| Video In | RF :TV/CATV 75ohms coaxial x 1 | |
| AV: RCA 75ohms composite video x 1 | ||
| S-Video: 4-pin DIN x 1 | ||
| D-Sub 15 x 1 | ||
| DVI x 1 | ||
| YPbPr/YCbCr (Support HDTV): RCA 75 ohms x 2 | ||
| Video Out | RCA 75 ohms | |
| Audio In | L/R RCA for S-Video or AV x 1 | |
| Stereo mini phone Jack for PC x 1 | ||
| Stereo mini phone Jack for DVI x 1 | ||
| Stereo mini phone Jack for YPbPr/YCbCr x 2 | ||
| Audio Out | L/R RCA for Video Out x 1 | |
| Headphone Jack: Stereo mini phone Jack x 1 | ||
| Speaker Out x 2 | ||
| Other | RS232 x 1 | |
| Other Features | Double Screen, Picture in Picture, Sleep Timer, Picture Freeze | |
| Display Format Supported by This UnitFor VGA: 640x480 @ 60Hz,72Hz,75Hz,85Hz; 800x600 @ 60Hz,72Hz,75Hz,85Hz;1024x768 @ 60Hz 1280x1024 @ 60Hz.For DVI: 640x480 @ 60Hz,72Hz,75Hz,85Hz; 800x600 @ 60Hz,72Hz,75Hz,85Hz;1024x768 @ 60Hz 1280x1024 @ 60Hz.For YPbPr: 480P @ 50Hz,59Hz,60Hz; 720P @ 50Hz,59Hz,60Hz;1080i @ 50Hz,59Hz,60Hz. | ||
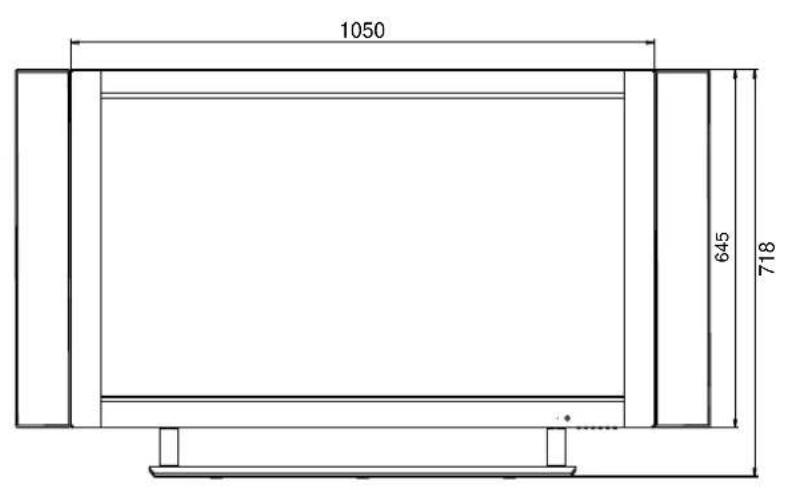


(Unit: mm)
Design and specifications are subject to change without notice.
PALSONIC CORPORATION PTY LTD
1 JOYNTON AVENUE
WATERLOO NSW 2017 AUSTRALIA
TEL: (02) 9313 7111
FAX: (02) 9313 7555
www.palsonic.com.au
PALSONIC CUSTOMER SERVICE
TELEPHONE
AUSTRALIA: 1300 657 888
604-PS42D83-19
Ver. 1.0
- NEC---NATIONAL ELECTRICAL CODE
- Using the Remote Control
- Cautions regarding use of remote control
- Batteries for the Remote Control
- Precautions on battery use
- Power connection
- Note:
- Speaker connection
- Antenna Connection
- Main unit (front view)
- SOURCE
- MENU
- Volume ◀ / ▶
- Channel ▲/▼
- RS232 terminal
- DVI input /Audio in
- VGA input /Audio in
- Component inputs 1 (Y, Pb/Cr, Pr/Cr, Audio)
- Component inputs 2 (Y, Pb/Cr, Pr/Cr, Audio)
- Headphone jack
- AV outputs (Video, Audio L, R)
- AV inputs (Video, Audio L, R)
- Antenna input
- S-Video input
- Remote Control
- MODE
- PIP display
- POS
- SIZE
- SPEAKER
- SWAP
- HEADPHONE
- MENU
- ▲ ▼ ◀ ▶ ←
- AUTO
- Cautions before connecting
- How to connect:
- To play VCR
- To playback Camcorder
- How to connect a DVD Player using Component Video Connections:
- To play DVD
- To Watch DTV
- To Watch the PC screen
- To record program
- To enjoy high-quality sound through an external amplifier
- Turning the Unit On and Off
- Turning On
- Turning Off
- Viewing the Menus and Displays
- Viewing the Menus
- Displaying Status Information
- Storing Channels in Memory Automatically
- Manual Search
- Setting Auto Fine Tune (AFT)
- Manual Fine Tuning
- Adding and Erasing Channels
- Changing Channels
- Using the Channel Buttons (CH ▲ or CH ▼)
- Direct Accessing Channels
- Using the RETURN Ⓧ button
- Adjusting the Volume
- Using the volume buttons (VOL- and VOL+)
- Using the Mute
- Using the MUTE ✕ button
- Select input source signal
- Selecting a MENU language
- Editing Channels
- Editing Channel Label
- Customising the Picture
- Using the Preset Picture Mode
- Setting the Menu Background
- Setting Colour and Sound System
- Setting Current Time
- Setting Sleep Timer
- Changing the Scaling mode of Image
- Fill All
- Normal
- Wide
- Zoom
- Freezing the Picture
- Changing the Position of the Image
- Using Digital Pan and Zoom
- Using the Preset Audio Mode
- Customising the Sound
- Using the S.M button
- Adjusting the Headphone Volume
- Using the Auto Volume
- Stereo/Bilingual Selection
- • NICAM Broadcast Selection
- Stereo
- Bilingual
- - IGR (German stereo system) Broadcasts
- Selecting Screen Layout
- Using the Layout Menu
- Using the MODE button
- Full Screen
- PIP
- Split Screen
- POP3
- Grid
- Viewing the Picture-in-Picture
- Swap the Contents of the PIP Image and Main Image
- Changing the Position of the PIP Frame
- Using the POS button
- Adjusting the Size of PIP Frame
- Using the SIZE button
- Adjusting Picture
- Adjusting the Phase and Frequency
- Adjusting the Picture Automatically
- Changing the Position of Image
- Displaying the Information
- Adjusting Image width and height
Brand : Palsonic
Model : PDP4250
Category : Television