
Madia - Mp3 player Sunstech - Free user manual and instructions
Find the device manual for free Madia Sunstech in PDF.

| Product Type | MP3 player |
| Brand | Sunstech |
| Model | Madia |
| Dimensions (W x H x D) | 47 x 85 x 15 mm |
| Weight | 38.5 g |
| Display | 1.5" TFT color display |
| Battery Type | Built-in Li-Polymer |
| Charging Time | Approx. 2-4 hours |
| Interface | USB 2.0 High Speed |
| Memory Support | Up to 16GB microSD card |
| Audio Formats | MP3 (8-320 kbps), WMA (5-384 kbps) |
| Video Formats | AMV (conversion required for other formats) |
| Image Formats | JPEG, BMP, GIF |
| Text Format | TXT |
| Recording | WAV audio recording |
| FM Radio | FM tuner (87.0-108.0 MHz or 76.0-90.0 MHz Japan band) |
| Pedometer | Steps, path length, energy consumption |
| Frequency Response | 20 Hz - 20 kHz |
| Signal-to-Noise Ratio | >80 dB |
| Earphone Output | 10 mW |
| Accessories Included | Earphone, USB cable, CD, clip, armband |
| Warranty | 2 years from purchase date |
| Care & Cleaning | Clean with a soft, dry cloth. Avoid moisture and solvents. |
| Safety Notes | Do not insert or remove microSD card while device is on. Charge with switch in ON position. |
| Repairability | Unauthorized repairs void warranty. Contact Sunstech support. |
Frequently Asked Questions - Madia Sunstech
User questions about Madia Sunstech
0 question about this device. Answer the ones you know or ask your own.
Ask a new question about this device
Download the instructions for your Mp3 player in PDF format for free! Find your manual Madia - Sunstech and take your electronic device back in hand. On this page are published all the documents necessary for the use of your device. Madia by Sunstech.
USER MANUAL Madia Sunstech
natural_image
Simple line drawing of a handheld electronic device with a screen and control knob (no text or symbols)En la caja
natural_image
Simple line drawing of a handheld electronic device with a screen and control buttons (no text or symbols)Inside the box
1 x MADIA player
1 x Earphone
1 x USB cable
1 x CD
1 x English manual
1 x Clip
1 x Armband
Content
Button locations and usages
Basic Operation
Power on and off
Pedometer
Text
Music
Video
Driver and Software Utilities Installation
Converting different video format to .AMV
Recorder
Voice
FM Radio
Photo
System
Technical Specification
Trouble Shooting
Button locations and usages
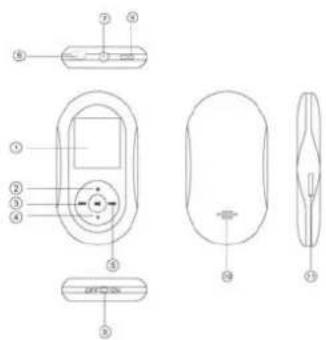
(12) 1.5" Color Display
(13) Menu / Select
(14) Previous / Backward
(15) Volume control
(16) Next / Forward
(17) USB port
(18) Earphone jack
(19) Strap hole (strap not included)
(20) Main power switch
(21) Loudspeaker
(22) MicroSD card slot
Basic Operation
Power on and off
- To power on the player, slide the main power switch to "ON". During standby mode, long press >| for 3 seconds to turn on the player.
- To power off the player, slide the main power switch to "OFF" or long press >| until the player is turned off.
Insert and pull out a MicroSD card
With the player powered off,
- Insert the card into the card slot gently with the card's gold contacts facing up.
- Pull out the card by slightly pushing it inwards, the card will bounce by a section, and then you can pull it out.
Caution: Inserting or pulling out a microSD card during the player is under operation or is powered on will cause memory loss or data corrupt or damages on the microSD card.
Pedometer
From main menu, press |<< or >>| to select "Pedometer" and press M to enter the menu where you will see:
● Time (press >|| to start counting and press >|| again to stop counting)
- Steps (count the total steps taken during counting)
● Path L.G. (count the total path length by meter during counting)
● Energy (count the total calories consumed during counting).
Pedometer setup
Exit to the main menu, press |<< or >>| to select "System" and press M to enter. Press |<< or >>| to select "Pedometer set" and press M to enter the sub-menu where you will find settings:
- Step size (enter user's step distance)
- Weight (enter user's weight)
- Units (select between Metric system and Imperial system for data entry)
Text
Text mode can support .txt document files only.
From main menu, press |<< or >>| to select "Text" and press M to enter to the list of text files. Press |<< or >>| to select a desired file and press >|| to enter.
During text reading, press |<< or >>| to scroll up or down the page. During text reading, press M to enter a sub-menu where you will find settings:
- Bookmark select (start reading from a particular bookmark page)
● Bookmark delete (delete a particular bookmark) - Bookmark add (add a bookmark to the current reading page)
From the list of text files, press M to enter a sub-menu where you will find settings:
- Card folder (see the list of all text files)
- Playback set (select from manual play or auto play)
- Delete file (delete a particular text file)
- Delete all (delete all text files)
Music
Music mode can support .MP3, and .WMA, audio files only.
From main menu, press |<< or >>| to select "Music" and press M to enter to the playing menu. Press |<< or >>| to select your desired file and press >|| to start playback; press >|| again to pause.
Volume control - During music playback, press V to enter volume level bar, press |<< or >>| to adjust the volume level and press >|| to continue playback.
Sub-menu
(1) In playing menu, during music pause, press M to enter a sub-menu where you can select or delete files.
(2) In playing menu, during music playback, press M to enter a sub-menu where you can setup:
- Repeat (Normal / Repeat one / Folder / Repeat Folder / Repeat All / Random / Intro)
● Equalizer (Natural / Rock/ Pop / Classic / Soft / Jazz / DBB)
8
● Replay mode (Repeat mode for A-B repeat setting / Repeat times / Replay gap)
HINT: press |<< or >>| to navigate and short press M to select your choice and long press M to exit to main menu.
Video
Video mode can support .AMV video files only.
From main menu, press |<< or >>| to select "Video" and press M to enter to the playing menu. Press |<< or >>| to select your desired file and press >|| to start playback and press again >|| to pause.
During playback, long press |<< for fast backward and long press >>| for fast forward. Release the button to return to normal playback speed.
Volume control - During playback, press >|| to pause, then press V to enter volume level bar. Press |<< or >>| to adjust the volume level and press >|| to return
to playing menu; press >|| to continue playback.
In playing menu, press M to enter a sub-menu where you can select or delete files or setup repeat mode by Normal / Repeat one / Folder / Repeat Folder / Repeat All / Random / Intro.
HINT:
- press |<< or >>| to navigate and short press M to select your choice and long press M to exit to main menu.
- This player only supports .AMV video file format. Other video formats must be converted to .AMV format by the video converter provided inside the CD ROM.
Driver and Software Utilities Installation
If you are using Windows" 98/98SE, you must install the driver before you can download any files to your player.
**If you are using Windows above 98/98SE, you may skip the following installation procedures.
(4) Insert the CD into the CD ROM drive of your PC. Double click "Setup.exe" to start the driver
installation.
10
(5) Follow thru the on-screen menu to complete the installation steps.
(6) Click "Close" once you reach the Installation Complete screen.
Converting different video format to .AMV video
(6) After installing the driver and software utilities, click "Start".
(7) Select All Programs > MP3 Player Utilities > AMV Convert Tool.
(8) Click "Input File" to select the video file you want to convert to an .AMV format.
(9) Click "Output File" to set the designated location to save the converted file.
(10) Click "Convert" to start the converting process. You will see .AMV video file is being converted and saved to the designated location once completed.
Note:
The video converter provided in the CD can convert .DAT, .WMV, .AVI video format into .AMV format. If the resolution of the video file is less than 160x120, the converter may not be able to convert it to .AMV format successfully.
Record
Recorder can create .WAV audio files only.
From the main menu, press |<< or >>| to select "Recorde" and press M to enter to the Recorder menu. Press >|| to start recording and press again to pause and press again to continue recording, etc.
When recording is completed, long press >|| and you will see "Saving" appears then the screen will return to recorder menu automatically. A .WAV file you just recorded is stored.
Voice
Voice mode can support .WAV audio files only.
To playback the recorded file, go to main menu, select "Voice" and press M to enter to the Voice menu.
Press |<< or >>| to select the desired .WAV file. Press >|| to start playback and press >|| again to pause.
Volume control - During voice playback, press V to enter volume level bar, press |<< or >>| to adjust the volume level and press >|| to continue playback.
Sub-menu
(1) In playing menu, during pause mode, press M to enter a sub-menu where you can select or delete files.
(2) In playing menu, during playback, press M to enter a sub-menu where you can setup:
- Repeat (Normal / Repeat one / Folder / Repeat Folder / Repeat All / Random / Intro)
● Replay mode (Repeat mode for A-B repeat setting / Repeat times / Replay gap)
HINT: press |<< or >>| to navigate and short press M to select your choice and long press M to exit to main menu.
13
FM Radio
From main menu, press |<< or >>| to select "FM Radio" and press M to enter the FM frequency bar. Press |<< or >>| by step to search a radio station manually, or long press |<< or >>| to auto scan a radio station.
To adjust volume control, press V to enter volume level bar, press |<< or >>| to adjust the volume level and press >|| to exit.
Press M to enter a sub-menu where you will find settings:
- Save (to store a radio channel)
● FM record (to record a radio signal) - Delete Channel (to delete a stored radio channel)
- Delete all (to delete all the stored radio channels)
● Auto Search (to scan a radio channel)
● Normal Band (to show the frequency bar between 87.0 and 108.0MHz)
● Japan Band (to show the frequency bar between 76.0 and 90.0 MHz)
Photo
Photo mode can support .JPG, .BMP and .GIF image files only.
From the main menu, press |<< or >>| to select "Photo" and press M to enter to the list of photo files.
Press |<< or >>| to select a photo file and press >|| to view the photo. During photo viewing, press |<< or >>| to go to the previous or the next photo.
From the list of photo files, press M to enter a sub-menu where you will find settings:
- Local folder (to the list of all photo files)
● Playback set (Manual Replay / Auto Replay) - Delete file (to delete a particular photo file)
- Delete all (to delete all the photo files)
System Setup
From the main menu, press |<< or >>| to select "System Setup" and press M to enter and press |<< or >>| to scroll up and down, you will find the below settings:
- System Time (adjust the player's date and time) Press V to select the year / month / date / hour / minute / second slot, and press |<< or >>| to adjust the data.
- LCD set (set the backlight off time from 0 to 50 seconds, set to 0 to keep backlight always on)
● Language (select an OSD language) - Power Off (to preset player's auto off time) "Off time" – the player will automatically power off after idle by the preset time from 0 to 200 minutes,
set to 0 to turn this function off.
“Sleep time” – the player will automatically power off by the preset time from 0 to 120 minutes, set to 0 to turn this function off.
16
● Memory Info (to show the remaining memory)
- Format Device (to format the memory)
**caution: after confirm to format the memory, all data stored in the memory will be erased.
● Firmware version (show the firmware version of this player)
● Firmware Upgrade (for after sales service firmware upgrade use only)
- Pedometer set (please refer to Pedometer of this user manual)
17 Technical Specification
| Flash Memory Support upto 16GBmicroSD card | |
| Audio formats MP3(8 – 320 kbps)WMA(5-384kbps) | |
| Video formats AMV | |
| Image formats JPEG / BMP / GIF | |
| Battery | Built-in |
| Interface USB 2.0 High Speed | |
| Display | 1.5” |
| Frequency Response 20Hz – 20KHz | |
| S/N ratio >80dB | |
| Earphones Output 10mW | |
Li-Polymer
TFT
Display
| Weight (g) 38.5g | |
| Dimensions 47(W)*85(H)*15(D) mm | |
Trouble Shooting
What should I do if there's no sound when playing?
You should check the volume first. If the volume has been turned up, maybe the memory format of the device is incorrect.


Specifications are subject to change without prior notice. No part of this document may be reproduced or transmitted in any form or by any mean including photocopying and recording or translating to another languages for any purposes without the prior written consent of the manufacturer.
All brand names, logos and registered trademarks mentioned are property of their respective owners. All rights reserved.
20
IMPORTANT ADVISE
- To make sure that the charge is in process, the switch has to be in ON position. On the contrary, the device doesn't charge.
- Battery duration is not exact and each one the users has their own experience. It can change, depending upon many factor as volume level, frequency of use, intervals in which the screen is on o if it's always on.
● The recommended charge time is aprox. between 2-4 hours. - Li-Polymer batteries get their maximum performance around the 5^th period of charge aprox.
*CLIP
It's very important that you make you sure that the clip is well positioned. For that, please adjust the clip properly in the device, putting it in their corresponding holds, placed at both sides.
21
Warranty conditions
- The warranty of this product is for 2 years since the purchase date.
- The warranty will exclude breakdowns caused by bad use of the product, wrong installation or installation in not desirable places for a proper maintenance of the product, rips, updates of the products that are not the supplied by the brand, pieces wore away for its use or for not domestic or inappropriate use. Also are excluded breakdowns caused for manipulations of the products by people or companies alien to our company.
- For any request regarding the warranty terms, the purchase receipt must be attached.
sunstech ^12
MADIA
natural_image
Simple line drawing of a handheld electronic device with a screen and control knob (no text or symbols)Na caixa
1 x leitor MADIA
1 x Auscultadores
1 x cabo USB
1 x CD

- En la caja
- Inside the box
- Content
- Button locations and usages
- Basic Operation
- Power on and off
- Insert and pull out a MicroSD card
- Pedometer
- Pedometer setup
- Text
- Music
- Sub-menu
- Video
- HINT:
- Driver and Software Utilities Installation
- Converting different video format to .AMV video
- Record
- Voice
- FM Radio
- Photo
- System Setup
- 16
- Trouble Shooting
- IMPORTANT ADVISE
- Warranty conditions
- sunstech 12
- MADIA
- Na caixa
Brand : Sunstech
Model : Madia
Category : Mp3 player