
32DW6558 - Television PHILIPS - Free user manual and instructions
Find the device manual for free 32DW6558 PHILIPS in PDF.


| Product Type | Television with integrated digital and analog tuners |
| Screen Size | 32 inches (16:9 and 4:3 formats) |
| Power Supply | 220-240 V, 50 Hz AC |
| Power Consumption | Less than 3 W in standby mode |
| Tuner | Dual: Digital (DVB-T) and Analog |
| Remote Control | Yes, with TV, VCR/DVD mode selector |
| EasyLink | Yes, for compatible VCR/DVD recorders |
| Common Interface Slot | Yes, for CAM and smartcard (Pay TV) |
| Connections | EXT1 (RGB, audio/video), EXT2 (S-VHS, audio/video), EXT3 (front), Headphone jack |
| Picture Formats | 4:3, Zoom 14:9, Zoom 16:9, Subtitle Zoom, Super Zoom, Wide Screen |
| Analog Teletext | Yes, with 4 favorite pages |
| Digital Text | Yes, via digital channels |
| Sound | Virtual Dolby Surround, AVL, Stereo/Mono |
| Child Lock | Program and key lock with PIN code |
| Timer/Alarm | Sleep timer up to 240 min, programmable on/off timer |
| Software Update | Over-the-air download via standby mode |
| Cleaning Instructions | Use soft lint-free cloth; no alcohol or solvents |
| Safety | Place on stable surface, at least 5 cm clearance, avoid liquids/heat sources |
Frequently Asked Questions - 32DW6558 PHILIPS
User questions about 32DW6558 PHILIPS
0 question about this device. Answer the ones you know or ask your own.
Ask a new question about this device
Download the instructions for your Television in PDF format for free! Find your manual 32DW6558 - PHILIPS and take your electronic device back in hand. On this page are published all the documents necessary for the use of your device. 32DW6558 by PHILIPS.
USER MANUAL 32DW6558 PHILIPS
natural_image
Diagram of a power outlet connected to a heater with an antenna, showing wiring and grounding (no text or symbols)natural_image
3D rendering of a remote control box with a small inset showing internal components (no text or symbols)natural_image
Hand interacting with a touchscreen device (no visible text or symbols)natural_image
Simple diagram of a rectangular object with two curved arrows indicating rotation or movement (no text or symbols)
4:3 Modo
natural_image
Illustration of a server rack connected to a CD and network unit (no text or symbols visible)natural_image
Diagram of a computer tower with ventilation slots and a close-up of the tower's internal structure (no text or symbols)Thank you for purchasing this television set.
This handbook has been designed to help you install and operate your TV set.
We would strongly recommend that you read it thoroughly.
We hope this new television meets entirely with your satisfaction.
Table of Contents
Installing your television set 2
The keys on the TV set ....2
The remote control keys ....3
Digital or Analogue channels ?....3
Switch on for the first time ....4
Understanding the information on the banner 4
Rearrange TV channels / radio station 5
§ View or Listen new TV services ....5
List Channel types 5
Add new services 6
Σ Reinstall all services ....6
Test reception 6
◀ Language and location preferences ....7
Access restrictions 7
Setting up your favourite list 8
Informations menu 8
Downloading new software 8
Using the Options menu 9
TV guide 9
Recording function 10
Automatic tuning of analogue programmes .....11
Sorting analogue programmes 11
Manual tuning of analogue programmes 12
Σ Naming analogue programmes .....12
EasyLink function 12
Adjusting the picture 13
O Adjusting the sound 13
Rotating the picture 13
Timer function 14
< Locking the set ....14
Analogue Teletext ....15
Digital Text 16
16:9 Formats 16
Connecting peripheral equipment 17
To select connected equipment 17
VCR / DVD mode selector 18
Glossary 19
Tips 19
Centre Frequencies Table (in KHz) 20

Recycling
The materials used in your set are either reusable or can be recycled.
To minimise environmental waste, specialist companies collect used appliances and dismantle them after retrieving any materials that can be used again (ask your dealer for further details).
Installing your television set
① Positioning the television set
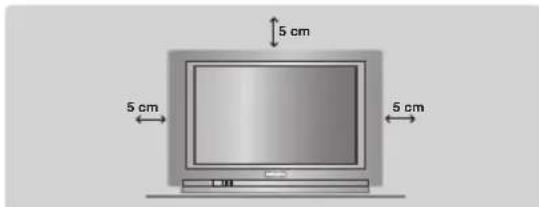
Place your TV on a solid, stable surface, leaving a space of at least 5 cm around the appliance. To avoid accidents, do not put anything on the set such as a cloth or cover, a container full of liquid (vase) or a heat source (lamp). The set must not be exposed to water.
③ Remote control

natural_image
3D rendering of a remote control device with a handle and internal components (no text or symbols visible)Insert the two R6-type batteries (supplied) making sure that they are the right way round. The batteries supplied with this appliance do not contain mercury or nickel cadmium. If you have access to a recycling facility, please use this facility (if in doubt, consult your dealer). When the batteries are replaced, use the same type.
② Connections

natural_image
Illustration of a power outlet connected to a switch and plug, with no visible text or symbols- Insert the aerial plug into the 7F socket at the rear of the set.
- Insert the mains plug into a wall socket (220-240 V / 50 Hz).
④ Switching on

To switch on the set, press the on/off key. A red indicator comes on and the screen lights up. Go straight to the chapter Switch on for the first time, on page 4. If the television remains in standby mode, press P ⊕ on the remote control.
The indicator will flashe when you use the remote control.
The keys on the TV set
The television set has 4 keys which are located on the front or the top of the set depending on the model.
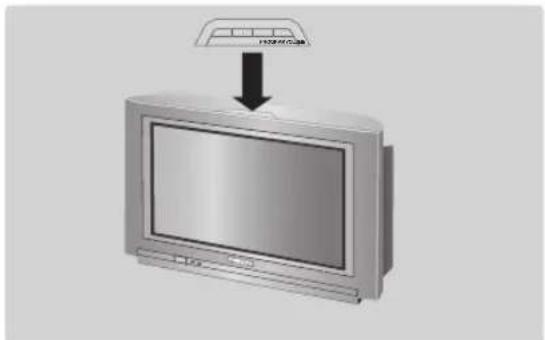
The VOLUME - + (- ∠ +) keys are used to adjust sound levels.
The PROGRAM - + (- P +) keys are used to select the required programmes.
To access the menus, simultaneously hold down the △ - and △ + keys. The PROGRAM - + keys may then be used to select an adjustment and the - △ + keys to make that adjustment.
To exit from the menus, hold down the 2 △ - and △ + keys.
Note: when the CHILD LOCK function is activated, these keys are unavailable (refer to FEATURES menu on page 14).
The remote control keys
Screen information
In digital mode, press once to display the information banner, a 2^nd time to get more information on the programme and a 3rd time to remove it (see p. 4). In analogue mode, this displays / removes the programme informations (number, name, time, sound mode). Hold down for 5 seconds to permanently display the analogue programme number on the screen. The volume level and the smart control adjustments are then displayed each time they are used.
Mode selector
To activate the remote control in VCR or DVD mode (see p. 18).
Teletext features (p. 15) and VCR/DVD keys (p.18).
TV Menu
To display or exit from the analogues menus
Select
In digital mode this displays / clears the programme list. Use the ⬆ keys to select a programme and the (or OK) key to display it.
Volume
To adjust the sound level
Mute
To disable or enable the sound.
16:9 formats (p. 16)
Surround sound
To activate / deactivate the Virtual Dolby Surround * effect. In stereo, you can obtain Dolby Surround Pro Logic sound quality. In mono, a stereo spatial effect is simulated.
* Manufactured under license from Dolby Laboratories. "Dolby" "Pro Logic" and the double-D symbol are trademarks of Dolby Laboratories.
Picture and sound settings
Accesses a series of picture and sound settings.
The position PERSONAL corresponds to the settings stored in the menus.
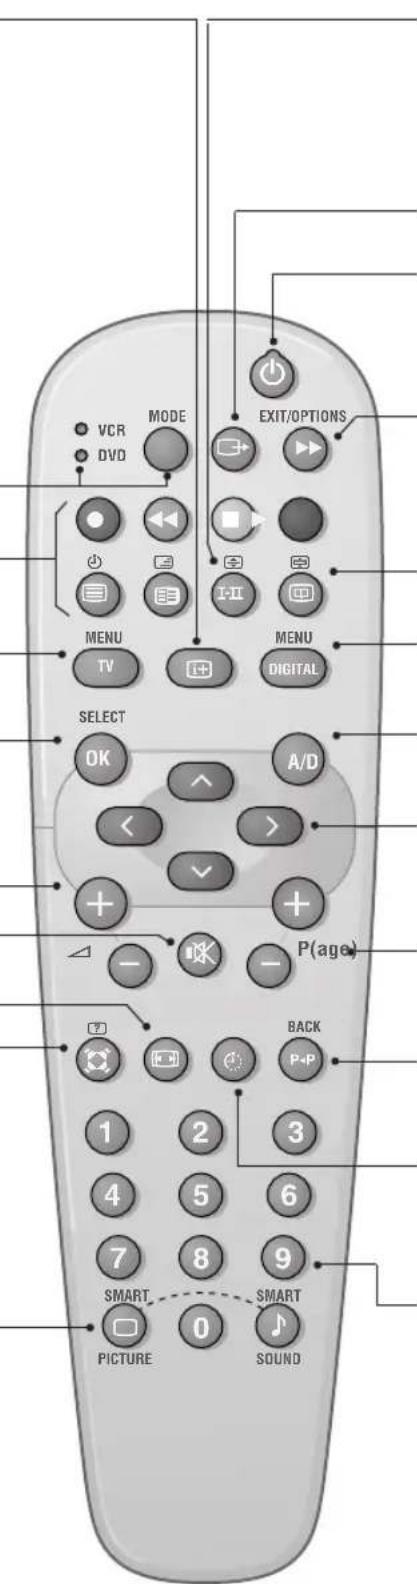
Sound mode
To switch from STEREO to MONO or to choose between different languages (Dual I, Dual II, ...). When the sound mode is switched to MONO, the indication is displayed in red.
Select EXT sockets (see p.17).
Standby
To set the TV to standby mode. To switch the TV set on again, press P ⊖ + or ① ⑨.
Options menu (see p.8).
TV guide (see p.9).
Program list (analogue mode)
To display/clear the program list.
Use the ⬆▼ keys to select a programme and > to display it.
Digital Menu
To display or exit from the digital menus (when TV is in digital mode).
Analogue or Digital mode
To switch the television between analogue and digital mode.
Cursor
These 4 keys are used to move within the menus or to directly access the 16:9 screen formats (p 16).
Programme selection
To access the next or previous programme (or page in digital menus).
Previous programme
To access the previously viewed programme.
Sleeptimer
To select the length of time before the set automatically switches to standby (from 0 to 240 minutes)
Numerical keys
For direct access to programmes. For a 2 (3) digit programme number, the 2^nd ( 3^rd ) digit must be entered before the dash disappears. The number, the name (and the sound mode, in analogue mode) are displayed for a few seconds.
Digital or Analogue channels?
To receive TV channels, your television is equipped with 2 tuners. One is for digital channels, the other is for analogue channels. Use the Ⓐ key of the remote control to switch the TV between analogue and digital mode. Then use the P ⊖ + or Ⓞ ⑨ keys to select channels.
Switch on for the first time
The first time the TV set is switched on, a congratulation message will appear on screen. The language of which changes every 5 seconds.
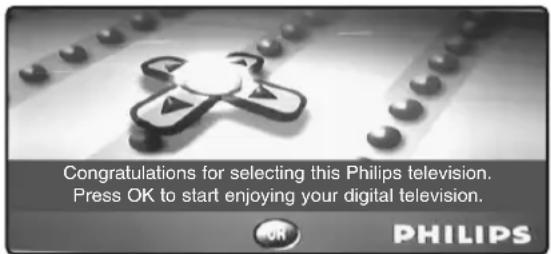
1 Press the Ⓞ key on the remote control, the moment your preferred language is visible on the screen. The Setup menu is displayed:

② The language, corresponding country and time zone is now preselected according to the opening screen. However, you can still change your preferences before you start a service scan.
③ With the cursor keys, select language, country or Time zone and check if the adjustment is according to your preferences. If necessary, use the cursor keys to make your adjustment and press OK to exit.
Caution: if you select a wrong country, the channel numbering will not be according to the standard for your country.
4 Select service scan from the menu and press OK to start the installation. The service scan menu is displayed. All the digital and analogue programmes are search for and stored automatically. When the search is complete, the menu will indicate the number of digital services and analogues programmes found.
5 Press the OK key to start watching TV. The television then displays the current programme. The installation is now complete.
Understanding the information on the banner
When you select a digital programme, an information banner is displayed for a few secondes at the top of the screen.
You can also use the Ⓓ key of the remote control to display this banner. A second press displays more information about the programme (when available).
Banner description:

The banner contains information on the preset number, channel name, programme duration, transmission clock, programme title and the time remaining of the current programme (if set in the options menu).
Symbols description :
i more information about this programme is available: press the ⓘ+ key to display or remove it.
☐ subtitling is available : if you want to display them, press the OPTIONS key to access the options menu and select subtitles.
I-II other audio languages are available and can be selected in the options menu.
😊the selected Favourite list is displayed in the colour of the activated list.
Rearrange TV channels / radio station
This menu allows you to change the order of the stored digital channels or radio station.
① From digital mode, press the DIGITAL MENU key to display the setup menu.
② Use the √ key to select installation and press > twice to select the Service lists menu.

③ Use the ⬆▼ keys to select Rearrange TV channels or Rearrange radio stations and press >.
4 Use the ⬆▼ keys to select the channel you want to exchange.
5 Press OK to activate.
If you want to uninstall the selected channel, press the red key.
6 Select ( ) the new channel number you want to exchange it with.
7 Press OK to confirm. The exchange is done.
⑧ Repeat the operations ④ to ⑦ until all the channels are in the required order.
9 Press the DIGITAL MENU key to leave the menu.
View or Listen to new services
This menu allows you to check the availability of new TV channels or new radio stations that have been launched by the broadcaster after the initial installation.
① From digital mode, press the DIGITAL MENU key to display the setup menu.
② Use the √ key to select installation and press > twice to select the Service lists menu.
③ Use the ⬆▼ keys to select View new TV channels or Listen to new Radio station.
4 If new services are available, press ⬤ to enter into the list and use the ⬌ keys to move through the list.
5 Press the DIGITAL MENU key to leave the menu.
List Channel types
This menu allows you to restore the original list of channels defined by the broadcaster during the initial installation.
① From digital mode, press the DIGITAL MENU key to display the setup menu.
② Use the √ key to select installation and press > twice to select the Service lists menu.
③ Use the ⬆▼ keys to select List channel types and press >.
④ Select Original list of channels and press OK if
you want to restore the original list of channels defined by the broadcaster.
Remark: when this option is set, it is not possible to rearrange TV channels or radio stations.
5 Select User-definable list of services and press OK if you want to get your preferred channel list.
6 Press the DIGITAL MENU key to leave the menu.
Add new services
This menu allows you to search for new TV channels or radio stations that have been launched by the broadcaster after the initial installation.

① From digital mode, press the DIGITAL MENU key to display the setup menu.
② Use the ⬇ key to select installation and press ⭠.
3 Select Service setup (√) and press >.
4 Press ➤ to select Add new services and press OK to activate the installation. The search begins and only new channels will be stored and added to the channel list menu. The percentage of the installation that has been completed and the number of channels found is displayed.
⑤ When the search is complete, select store and press OK to accept the new services.
6 Press the DIGITAL MENU key to leave the menu.
Reinstall all services
This menu allows you to reinstall all the digital TV channels and radio stations.
① From digital mode, press the DIGITAL MENU key to display the setup menu.
② Use the ⏻ key to select installation and press ⚠.
③ Select Service setup (√) and press >.
4 Select Reinstall all services (√) and press >.
5 Press OK to start the installation.
A search is then made for all digital services which are then stored automatically. When the search is completed, the menu will indicate the number of digital services found.
⑥ When the search is complete, press OK to store the services.
7 Press the DIGITAL MENU key to leave the menu.
Test reception
This menu allows you to check the strength of the signal you are receiving through your aerial.
① From digital mode, press the DIGITAL MENU key to display the setup menu.
② Use the ⬇ key to select installation and press ⬇ to display the installation menu.
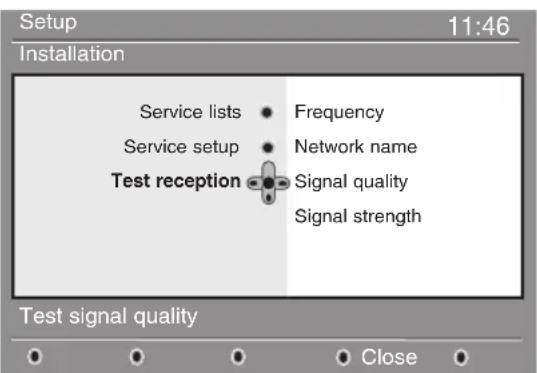
③ Use √ to select Test reception and press >. You obtain an indication of the actual programme frequency, the network name, the signal quality and strength.
④ You now have to enter the frequency of the digital channel you want to test.
Your Tv magazine can provide the list of digital channel numbers. Use the table on page 20 to get the frequency.
5 If the signal quality and strength is poor, a message appears at the bottom of the menu prompting you to enter the frequency between the lower and the higher limit. If after keying the frequency, the reception is still poor, you can try improving, renewing, adjusting or updating the aerial. It is however advisable to contact a specialised aerial installer in order to achieve best results.
Language and location preferences
This menu allows you to select your preferred language for audio, subtitle, teletext and menu and make changes to the location (country and time zone).
① From digital mode, press the DIGITAL MENU key to display the setup menu.
② Use the √ key to select preferences and press >.

③ Select Languages or Location (☑) and press ☑.
4 Use the ⬇^ keys to select a setting and press > to enter into the sub-menu. Make your adjustment and press OK or < to exit.
Language default settings:
• Audio: to select the audio sound language.
- Subtitle: to select the subtitle language.
- Subtitles for hearing impaired to activated or deactivate the specific subtitle for hearing impaired (if made available by the broadcaster).
- Teletext: to select the teletext language.
- System: to select the menu language.
Location settings:
• Country: to select the country where you are located.
• Time zone: to select the time zone where you are located.
- Daylight saving time: to select automatic, manual or no daylight saving time.
5 Press the DIGITAL MENU key to leave the menu.
Access restrictions
This menu allows you to setup the access restrictions of the digital channels.
① From digital mode, press the DIGITAL MENU key to display the setup menu.
② Use the ⬇ key to select Access restriction and press >.
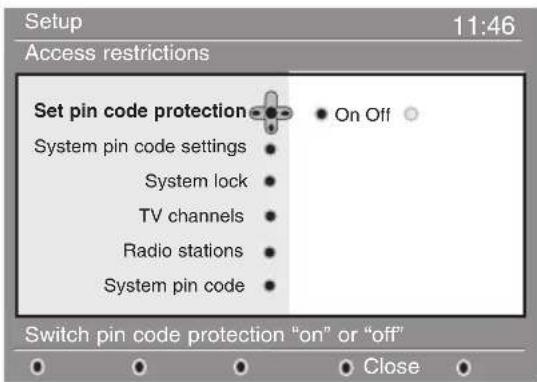
3 Press the ➤ key to enter into the Set pin code protection menu.
4 Use the ◀◀▶ keys to set to on and press ⓄK to exit. You can then access to the other adjustments :
Warning: the moment you use any kind of access restriction, you need to fill in the pin code when you schedule a program for recording.
- Maturity rating: select your preferred rating to lock the channel.
Maturity rating will only block certain programmes if the broadcaster providedes with the programme.
- System lock: press OK if you want to completely lock the digital tv. To unlock, enter your pin code (or the universal code 0711).
• TV channels: select the tv channel you want to lock and press OK. - Radio station: select the radio station you want to lock and press OK.
- Change pin code: press ⬤ to enter in the menu. Follow the on-screen instruction to change your access code.
The default pin code is 1234. If you have forgotten your personal code, you can reset to the default pin code (1234) by enter the universal code 0711.
5 Press the DIGITAL MENU key to leave the menu.
The TV is equipped with a Common Interface (CI) slot (see p.18). A CI module can enable additional services, for example Pay TV. The Access Restrictions menu will show the CI Access Restrictions when a CI module is installed. The CI module is responsible for the messages and texts on screen. In case of failure or strange behaviour, you must call your CI service provider.
Setting up your favourite list
This menu enables you to create a favourite list with your preferred TV channels and radio stations. For example, each member of your family can create his/her own favourite list.
① From digital mode, press the DIGITAL MENU key to display the setup menu.

2 Press > to enter into the favourites list menu. You have the choice to create 4 different favourite lists.
③ Use the √^ keys to select your favourite list : List 1, List 2, List 3 or List 4 and press >.
4 Use the √^ keys to select a setting and press > to enter into the sub-menu.
- Name: use the ⏻ keys to move around the name display area (15 characters) and the ⏻P⊕ keys to select the characters. When the name has been entered, press Ⓞ to exit.
- Select TV channels: use the ⏻ keys to select your favourite TV channels and confirm with Ⓞ. Press ⏻ to exit.
- Select radio stations: use the ⏻ keys to select your favourite radio station and confirm with OK. Press < to exit.
- Add all services: press OK if you want to add all the service into your favourite list.
- Remove all services: press OK if you want to remove all the service from your favourite list.
5 Press the DIGITAL MENU key to leave the menu.
6 Your favourite list can be selected using the options menu (see next page).
Information
This menu provides informations about the software version, the installation of new software and problem reports.
① From digital mode, press the DIGITAL MENU key to display the setup menu.
② Use the ⬇ key to select information and press >.
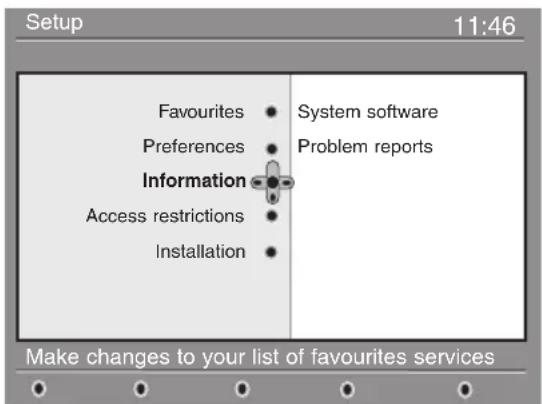
3 Select Problem reports and press ⬤ to access any reported errors. In the event of a technical problem, your tv service organisation
might ask you to tell them if there are any reports and what they say.
4 Select System software and press ▶. The software version is displayed.
5 You can activate the menu to automatically accept any software update of your digital TV. Normally the product will detect if an update is available while it is in standby mode. Next time the television is turned on a banner will appear at the bottom of the screen indicating new software is available. Selecting OK activates the software download. The software download menu will give a description of the software together with the date and time of the download. This may update certain menus, functions or add new features, but the general way in which the TV operate will not change. Once accepted the download will take place at the designated time and date.
Note: The TV must be put into standby when the download is due in order for it to take place.
6 Press the DIGITAL MENU key to leave the menu.
Downloading new software
Whenever a new software is available, it is advisable to always accept and download the software. In case new software is available, you will see a message when you switch on the TV.
Using the Options menu
This menu gives you direct access to the: favourite list, the language selection and some other selections.
① From digital mode, press the EXIT/OPTIONS key to display the options menu.
② Use the ⏻ keys to select a setting and press ⬾ to enter the sub-menu.

- Favourites: use the ⬇^ keys to select your favourite list and confirm with OK.
The "none" option deactive any favourite list. To create your own favourite list, see page 8.
- Subtitle language: use the ⏻ keys to temporarily change the language and confirm with Ⓞ.
- Subtitle for hearing impaired: select Yes and confirm with OK to temporally activate this feature.
• Audio language: to temporarily change the audio sound language.
To permanently change the audio and subtitle languages, use the Preferences menu (p. 7). - Mode: you can choose to only have radio stations, TV channels or services without audio or video.
Remark: for the UK only, the TV list will contain both radio stations and TV channels.
• Show the remaining play time ?: select Yes and confirm with OK if you want to display the remaining play time when you call the banner.
- banner duration: to select the duration for which the banner is visible.
③ Press the EXIT/OPTIONS key to leave the menu.
TV guide
The TV guide is an Electronic Service Guide that allows you to look up digital programmes as you would in a newspaper or TV magazine. You can navigate through the list of digital programmes and obtain detailed information on the programmes. You can also program the TV to provide a digital channel to be recorded.
① From digital mode, press the Ⓞ key to display the TV guide :
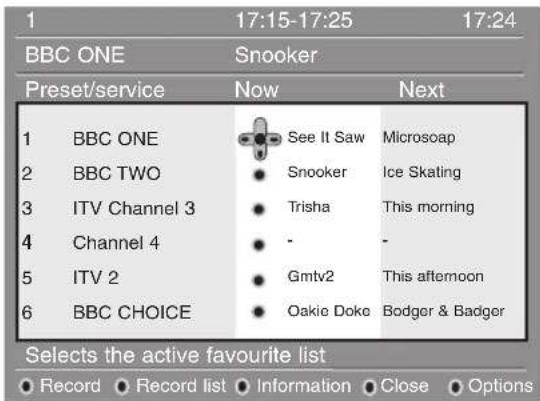
A list with all the installed digital programmes is displayed.
② Use the ⏻ keys to select a programme.
③ The TV guide features are displayed at the
bottom of the screen. Use the coloured keys red, green, yellow, blue or white to activate them :
- Record (red key): this feature enables you to program the recording of the video recorder (if it has an EasyLink feature and is connected to EXT2). If your video recorder is not equipped with Easylink, the TV will provide a digital channel to be recorded. You will still have to program your video recorder.
- Record list (green key) : this menu gives the list of recording schedules. You can check, modify, delete or add a new schedule by using the cursor or coloured keys as indicated on the screen.
• Information (yellow key): you can obtain more detailed information on the selected programmes. - Close (blue key) : to exit from the TV guide.
- Options (white ▶▶ key) : with this menu, you can select your favourite list, mode or themes. Themes are areas of interest, you can for example decide to display only : drama, news, movie, ...
④ Press the 🔒 key to leave the menu.
Recording function
This feature enables you to program a digital recording and control the VCR (if it has an EasyLink feature and is connected to EXT2). If your video recorder is not equipped with Easylink, the TV will provide a digital channel to be recorded. You will still need to program your video recorder.
Important: The video recorder must be connected to EXT2. Please note that it is NOT possible to record one digital channel and watch another digital channel at the same time. You can however record a digital channel and watch an analogue channel on your TV, or vice versa. Philips recorders with only the TV link feature do not support easy recording: you will still have to program your VCR.
① From digital mode, press the Ⓞ key to display the TV guide.
② Press the RED key to call the Record menu.
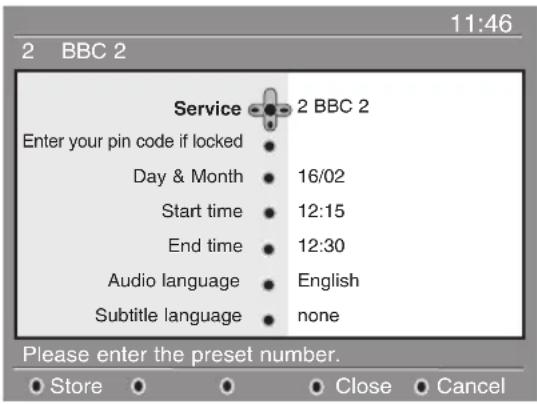
③ Use the ⏻ keys to select a setting and press ⚠ to enter into the sub-menu. Make your adjustment and press Ⓜ or ⏻ to exit.
- Service : you can change the number of the programme you want to record. Press OK to confirm.
-
Enter your pin code if locked: enter your secret code only if you have activated the access restriction feature (see p.7). Press OK to confirm.
-
Day & Month : enter the date by using the 0⑨ or - P + keys. Press OK to exit
- Start time : enter the start time.
• End time : enter the end time. - Audio language : select your language and confirm with OK.
- Subtitle language : make your selection and confirm with OK.
- Subtitle for hearing impaired: select Yes or No and confirm with OK.
- Occurrence: select Once, Daily or Weekly and confirm with OK.
4 Press the RED key to store your recording. The TV guide reappears.
You can press the GREEN key to display the list of recordings you have set.
5 If your video recorder is not equipped with Easylink feature, remember you still need to program it.
6 If you have finished watching television, you must leave it in standby in order for the recording program to be activated.
Important: n ever switch off the TV with the power button when a recording has been programmed, but use the standby key on the remote control.
⑦ If you wish to continue watching another digital channel after setting a timer, you can do so by changing channels in the normal way.
8 If you are watching another digital channel when the timer is due to start, the timer alarm will sound and present you with the option of switching channels or continuing to watch the current channel.
⑨ You can also watch analogue channels while recording digital channels. Press the ^A/D key to switch the TV to analogue mode.
The moment a timer start, you get a warning message and you can still decide to stop recording.
Automatic tuning of analogue programmes
This menu allows you to automatically search for all the analogue programmes available in your region.
① From analogue mode, press the TV MENU key to display the main menu.
② With the cursor, select the INSTALL menu then the AUTO STORE menu and press >. The search begins. After several minutes, the
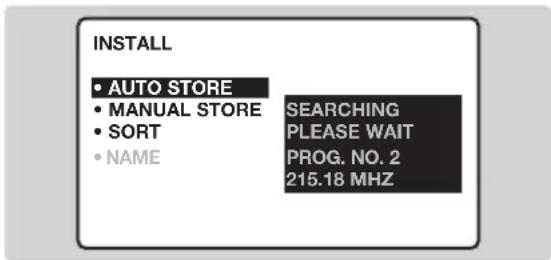
INSTALL menu reappears automatically.
③ If the transmitter or the cable network broadcasts the automatic sort signal, the programmes will be correctly numbered.
4 If this is not the case, the programmes found will be numbered in descending order starting at 99, 98, 97, etc.
Use the SORT menu to renumber them.
Some transmitters or cable networks broadcast their own sort parameters (region, language, etc.). Where this is the case, make your choice using the ⏰ keys and confirm with >.
To exit or interrupt the search, press the Ⓜ key. If no picture is found, refer to the chapter entitled Tips on p. 16. See also: EasyLink function, page 9.
⑤ To exit from the menus, press ⓘ.
Sorting analogue programmes
① Press the TV MENU key to display the main menu.
② With the cursor, select the INSTALL menu, then SORT. The SORT menu appears. The FROM option is activated.

flowchart
graph TD
    A["• PICTURE\n• SOUND\n• FEATURES\n• INSTALL"] --> B["INSTALL"]
    B --> C["• AUTO STORE FROM\n• MANUAL STORE TO\n• SORT EXCHANGE\n• NAME"]
③ Select the programme you wish to renumber using ◀◀▶ keys or Ⓞ to ⑨.
Example: to renumber programme 78 as 2 press ⑦ ⑧.
⑤ Select TO (using ⬇ key) and enter the new number with ⏻ keys or ① to ⑨ (for the example given, enter ②).
6 Select EXCHANGE (▼ key) and press ⚠. The message EXCHANGED appears, the exchange takes place. In our example, programme 78 is renumbered as 2 (and programme 2 as 78).
⑦ Select the option FROM (▲ key) and repeat stages ④ to ⑥ as many times as there are programmes to renumber.
See also: EasyLink function, page 9.
⑧ To exit from the menus, press ⓘ.
Manual tuning of analogue programmes
This menu allows you to store the analogue programmes one at time.
① Press TV MENU
② With the cursor, select the INSTALL menu then MANUAL STORE :

③ SYSTEM : select EUROPE (automatic detection*) or WEST EUR (BG standard), EAST EUR (DK standard), UK (I standard) or FRANCE (LL' standard).
* Except for France (standard LL'): select the option FRANCE.
4 SEARCH: If you know the frequency of the programme required, enter its number directly using the ① ⑨ keys. Alternatively press >. The search begins. As soon as a programme is found, the search will stop.
If no programme is found, refer to the Tips chapter on page 19).
5 FINE TUNE : if the reception is not satisfactory, try adjusting the frequency using the ◀▶ keys.
6 PROG. NO : enter the required number with the ◀> or 0 to 9 keys.
⑦ STORE : press >. The programme is stored.
See also: EasyLink function, below.
⑧ Repeat steps ④ to ⑦ for each programme to be stored.
⑨ To quit the menus, press ⓘ+
Naming analogue programmes
If required, you can give a name to the first 40 analogue programmes (from 1 to 40) and external connectors.
① Press TV MENU
② With the cursor, select the INSTALL menu, then NAME (concealed at the bottom of the screen):
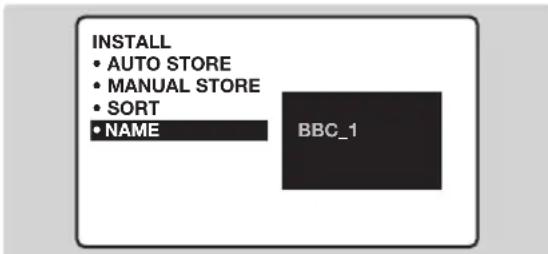
③ Select the programme you wish to name using the keys ① ⑨ or -P +.
Note: on installation, the programmes are named automatically when the correct information is transmitted by the broadcaster.
4 Use the ◀ keys to move within the name display area (5 characters) and the ^▼ keys to choose the characters.
5 When the name has been entered, press TV MENU. The name is stored.
See also: EasyLink function, below.
⑥ Repeat steps ③ to ⑤ for each programme to be named.
⑦ To exit from the menus, press ⓘ+
EasyLink function
If the set is connected (by the EXT2 socket) to a video equipped with the EasyLink function, the language, country and analogue channels found are automatically transmitted to the video recorder at the time of installation.
A message is displayed on-screen during loading. The list of video recorder analogue channels is then the same as those of the set. You must first check in the menus that the Easylink function is activated :
① Press TV MENU key.
② Select OPTIONS (☑) and press >. The OPTIONS menu is displayed.
③ Use ▼ key to select EASY LINK and press ➕ to set it to ON. If your video recorder is not equipped with this function, set to OFF.
4 Press ⓘ+ to exit the menus.
The EASY LINK setting is set to OFF by default.
Adjusting the picture
① Press TV MENU then >.
The PICTURE menu appears :

② Use ⬆ keys to select a setting and ◀ keys to adjust.
Note: the menu is a scroll-down menu. Keep the key ⬇ held down to access the settings hidden at the bottom of the screen.
③ Once the adjustments have been made, select STORE and press ⬤ to store them.
4 To exit from the menus, press ⓘ.
Description of the settings: • BRIGHTNESS: alters the brightness of the
image.
• COLOUR: alters the colour intensity.
- CONTRAST: alters the variation between light and dark tones.
- SHARPNESS: alters the crispness of the image.
- STORE: stores the picture settings.
- COLOUR TEMP (colour temperature): adjusts the colour temperature of the picture. Three options are available here: COOL (blue white), NORMAL (balanced) or WARM (red white).
- NR (Noise Reduction): alleviates fuzziness (snowy picture) in analogue mode. This setting is useful when reception is difficult.
- CONTRAST + : automatic adjustment of the picture contrast which permanently sets the darkest part of the picture to black.
Note: settings changed while in the analogue mode will apply to all analogue channels, settings changed while in digital mode will apply to all digital channels.
Adjusting the sound
① Press TV MENU select the SOUND option (√) and press >. The SOUND menu appears :

② Use the cursor keys to select and adjust. Note: to access the AVL setting (hidden at the bottom of the screen) hold down √ key.
③ Once the adjustments have been made, select STORE and press ⬤ to store them.
④ To exit from the menus, press ⓘ.
Description of the settings:
- TREBLE: alters the level of the high frequency sound.
• BASS: alters the level of the low frequency sound.
• BALANCE: to balance the sound between the left and right speakers. - DELTA VOLUME (volume difference): allows you to compensate for the volume differences between the different programmes or the EXT sockets. This setting is available for programmes 1 - 40 and the EXT sockets.
- STORE: stores the sound settings.
- AVL (Automatic Volume Leveller): automatic volume control used to avoid sudden increases in volume, particularly when changing programmes or during advertisements
Rotating the picture
Larger screens are sensitive to variations in the earth's magnetic field. This setting makes it possible to compensate for this phenomenon.

natural_image
Simple diagram of a rectangular object with two curved arrows indicating rotation or movement (no text or symbols)① Press TV MENU key.
② Select FEATURES (☑) and press >.
The FEATURES menu appears.
③ Use ▼ key to select ROTATION and use ◀ keys to alter the angle of the image.
4 Press ⓘ+ to exit from the menus.
Timer function
This menu allows you to use your TV as an alarm clock.
① Press TV MENU
② Select FEATURES (☑) and press > twice. The TIMER menu appears :

flowchart
graph TD
    A["• PICTURE<br>• SOUND<br>• FEATURES<br>• INSTALL"] --> B["FEATURES TIMER<br>• TIME<br>• START TIME<br>• STOP TIME<br>• PROG; NO;<br>• ACTIVATE"]
    B --> C["10:56"]
3 Press > to enter and exit the sub-menus and use keys ^ to adjust:
④ TIME: enter current time.
Note: the time is updated automatically each time the set is switched on using information taken from
the digital module.
5 START TIME: enter the start time.
6 STOP TIME: enter the stop time.
⑦ PROG. NO:: enter the number of the programme required.
⑧ ACTIVATE: you can set the alarm to be activated :
- ONCE ONLY for a one-off alarm,
• DAILY for a daily alarm or - STOP to cancel.
9 Press ☐ to exit the menu. If the TV is then put in standby it will automatically switch on at the time programmed. If you leave the TV switched on, it will only change programme at the time indicated.
The combination of the CHILD LOCK and TIMER functions may be used to limit the length of time your television is in use, for example, by your children.
Locking the set
You can bar access to certain programmes or completely lock the set by locking the keys.
Locking programmes
① Press TV MENU
② Select FEATURES (☑) and press >.
3 Select PARENTAL. CONT. (☑) and press >.
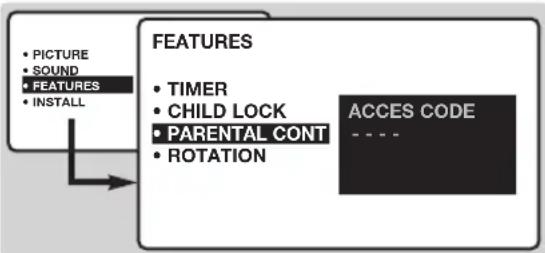
flowchart
graph TD
    A["• PICTURE\n• SOUND\n• FEATURES\n• INSTALL"] --> B["FEATURES"]
    B --> C["• TIMER\n• CHILD LOCK\n• PARENTAL CONT\n• ROTATION"]
    C --> D["ACCES CODE ----"]
④ Enter your confidential access code. The first time, enter the code 0711 then confirm by re-entering 0711. The menu appears.
5 Press ➤ to go into the menu.
6 Use keys ⬇️ to select the required programme and confirm with >.The symbol 🔒 is displayed alongside the programmes or sockets that have been locked.
7 Press ⓘ+ to exit.
To watch a programme which has been locked you will now need to enter the confidential code; otherwise the screen will remain blank.
The INSTALL menu access is also locked.
Caution: in the case of encrypted programmes which use an external decoder, it is necessary to lock the corresponding EXT socket.
To unlock all programmes
Repeat stages ① to ④ above, then select CLEAR ALL and press >.
To change the confidential code
Repeat stages ① to ④ above, then:
⑤ Select CHANGE CODE and enter your own 4-digit number.
6 Confirm by entering it again.
Your new code will be stored.
⑦ Press ⓘ+ to exit from the menus.
If you have forgotten your confidential code, enter the universal code 0711 twice.
Locking the keys
① Press TV MENU, select FEATURES (▼) and press >.
② Select CHILD LOCK (▽) and press ▶ to set the lock to ON.
③ Switch off the set and put the remote control out of sight.
The set cannot be used (it can only be switched on using the remote control).
④ To cancel: switch CHILD LOCK to OFF.
Analogue Teletext
Teletext is an information system, broadcast by most of analogue TV channels. It also provides subtitles for people with hearing difficulties.
| Press : | You will obtain: | |
 | Teletext call | To call up or exit from teletext.When first pressed, the main index page appears with a list of the items available.Each page has a corresponding 3-figure number.Somedigital programmesmay also include analogue teletext. If this is the case, it can be accessed by pressing the teletext key for 3 seconds.If no teletext is available, 100 will appear and the screen will remain blank (in this case, exit from teletext and choose another channel). |
| Selecting a page | Use the 0 to 9 or -P + or ▲▼ keys to enter the page number required . Example: page 120, enter 1 2 0.The number is displayed top left, the counter turns and then the page is displayed. Repeat this operation to view another page.If the counter continues to search, this means that the page is not transmitted. Select another number. | |
| Direct access to the items | Coloured areas are displayed at the bottom of the screen.The 4 coloured keys are used to access the items or corresponding pages.The coloured areas flash when the item or the page is not yet available. | |
| Contents | This returns you to the contents page (usually page 100). | |
| Direct selection of sub-pages | Certain pages contain sub-pages. For example, if page 120 contains sub-pages 1/3, 2/3 and 3/3, the page number is displayed in green and preceded by the symbols ▶, ▶ or ◀ ▶. Use the keys ◀▼ to directly access the sub-pages of your choice. | |
| Text overlaying & double page text | To activate or deactivate teletext overlay on the picture.To activate or deactivate the dual page text display. | |
| Double height teletext | Press this key several times to display the upper, then the lower part of the screen and then return to the normal size teletext page. | |
| Hidden information | To display or hide the concealed information (games solutions). | |
| Favourite pages | Instead of the standard coloured areas displayed at the bottom of the screen, you can store 4 favourite pages on the first 40 channels which can then be accessed using the coloured keys (red, green, yellow, blue). Once set, these favourite pages will become the default every time tetetext is selected.Press the TV MENU key to change to favourite pages |
Digital Text
Some digital channels, which you select like any other channel, offer dedicated teletext services (for instance BBCTEXT). Some digital channels also offer information on the programme being broadcast (a message may appear at the bottom of the screen).
① To use the digital teletext, follow the instructions on screen.
② Depending on the service, you can be asked to use the cursor and SELECT keys (OK), the coloured keys, the TEXT key (☐) and sometimes the numerical keys.
③ When you have finished watching teletext, select a different channel with ⏻ P Ⓑ keys or follow the on screen instructions to return to picture. Some digital programmes will require the EXIT function. You can find EXIT under the first menu item of options menu.
16:9 Formats
The pictures you receive may be transmitted in 16:9 format (wide screen) or 4:3 format (conventional screen). 4:3 pictures sometimes have a black band at the top and bottom of the screen (letterbox format). This function allows you to optimise the picture display on screen.
Automatic switching
This TV set is also equipped with automatic switching which will select the correct-screen format, provided the specific signals are transmitted with the programmes.
Using the different screen formats
Press the Ⓗ to select the different modes:
4:3, ZOOM 14:9, ZOOM 16:9, SUBTITLE ZOOM, SUPER ZOOM and WIDE SCREEN.
With analogue programs only, you can access directly these settings with the ◀ and ▶ key.

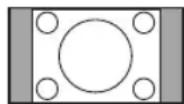

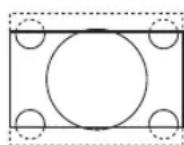


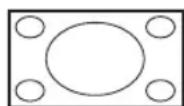
4:3 Mode
The picture is reproduced in 4:3 format and a black band is displayed on either side of the picture. With analogue programs only, the picture may be progressively enlarged using the ⏻ keys.
ZOOM 14:9
The picture is enlarged to 14:9 format, a thin black band remains on both sides of the picture. With analogue programs, the ⏻ keys allow you to compress vertically the image to view the top or the bottom of the picture (subtitles).
ZOOM 16:9
The picture is enlarged to 16:9 format. This mode is recommended when displaying pictures which have black bands at the top and bottom (letterbox format). With analogue programs, use the ⏻ keys if you wish to display the top or the bottom of the picture.
SUBTITLE ZOOM
This mode is used to display 4:3 pictures using the full surface of the screen leaving the sub-titles visible. With analogue programs, use the ⬆ keys to increase or decrease the section at the bottom of the picture.
SUPERWIDE
This mode is used to display 4:3 pictures using the full surface of the screen by enlarging the sides of the picture. With analogue programs, the ⏻ keys allow you to move the image up or down.
WIDE SCREEN
This mode restores the correct proportions of pictures transmitted in 16:9 using full screen display.
Note: If you display a 4:3 picture in thid mode, it will be enlarged horizontally.
Connecting peripheral equipment
The television has 2 external sockets situated at the back of the set (EXT1 and EXT2).
The EXT1 socket has audio and video inputs/outputs and RGB inputs.
The EXT2 socket has audio and video inputs/outputs and S-VHS inputs.
Video recorder

Video recorder (only)
Carry out the connections featured opposite. To record digital programmes from your TV, the VCR must be connected to EXT2.
If your video recorder does not have a euroconnector socket, the only connection possible is via the aerial cable. You will therefore need to tune in your video recorder's test signal and assign it programme number 0 (refer to manual store, p. 12).
To reproduce the video recorder picture, press ①. In this case it will not be possible to record digital channels.
Video recorder with decoder
Connect the decoder to the second euroconnector socket of the video recorder. You will then be able to record scrambled transmissions.
Other equipment

Satellite receiver, decoder, DVD, games, etc.
Carry out the connections featured opposite.
To optimise picture quality, connect the equipment which produces the RGB signals (digital decoder, games, etc.) to EXT1, and the equipment which produces the S-VHS signals (S-VHS and Hi-8 video recorders, certain DVD drives) to EXT2 and all other equipment to either EXT1 or EXT2.
Side connections

Carry out the connections featured opposite.
Using the ☐ key, select EXT3 for a VHS or 8mm camcorder and S-VHS3 for an S-VHS or Hi-8 camcorder.
For a mono set, connect the sound signal to the AUDIO L (or AUDIO R) input. The sound automatically comes out of the left and right speakers of the TV.
Headphones
The ⏻ △ ⊕ keys allow you to adjust the volume on the headphones and on the set. Press ☑ if you want to cut off the sound on the set.
The headphones must have an impedance of between 32 and 600 ohms.
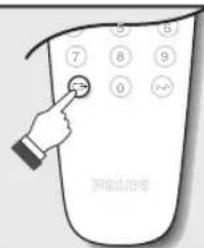
To select connected equipment
Press the ⏻ key to select EXT1, EXT2, S-VHS2 (S-VHS signals from the EXT2 socket) and EXT3 or S-VHS3 for connections on the front panel.
Most equipment (video recorder, etc) carries out the switching automatically.
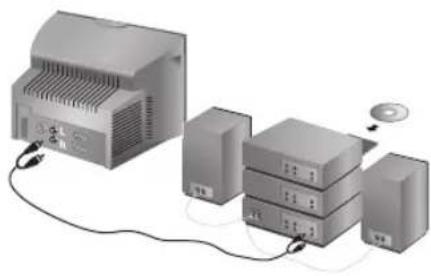
Amplifier
natural_image
Illustration of a server rack connected to a server unit via cable, with a CD and monitor nearby (no text or symbols)To connect to a hi-fi system, use an audio connection cable and connect the "L" and "R" outputs on the TV set to the "AUDIO IN" "L" and "R" input on your hi-fi amplifier.
Common interface

natural_image
Illustration of a microwave oven with ventilation slots and a separate device (no text or symbols)A common interface is available to connect a CAM (conditional access module) and a smartcard. Please contact your service provider to get more information about these modules.
Note: the television should always be switched off before any module is inserted in the common interface slot.
VCR / DVD mode selector
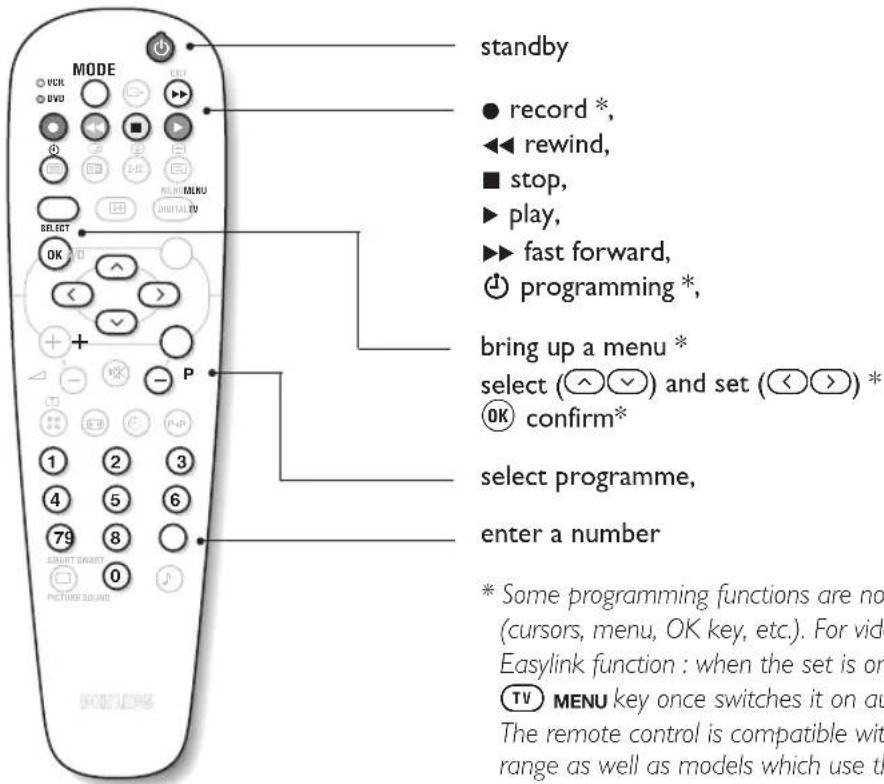
The remote control allows you to control the main functions of your video recorder or DVD.
① Press the MODE key to select the required mode: VCR (video recorder) or DVD.
A green indicator lights up to show the selected mode. It returns automatically (TV mode) after 20 seconds without action.
② Then press one of the following keys :
Glossary
CAM and Smart Card : A CAM (conditional access module) and a smart card can be connected to the television. This unit allows you to access subscription digital channels or special services from the provider.
Digital receiver : The television is equipped with an integrated digital tuner which enables you to receive a digital transmission with a terrestrial antenna. The tuner is able to received Digital Video Broadcast compliant with MPEG-2, up to Main profile @ Main level.
EasyLink : Digital link between the set and the video recorder which allows a direct transfer of certain information such as channel setting.
System : Analogue programmes are not broadcast in the same way in all countries. There are different standards: BG, DK, I, and L L'. The SYSTEM setting (p. 9) is used to select these different standards. This is not to be confused with PAL or SECAM colour coding. Pal is used in the majority of European countries, Secam in France, Russia and the majority of African countries. The United States and Japan use a different system called NTSC. The inputs EXT1 and EXT2 are used to read NTSC coded recordings.
16:9 : Refers to the ration between the length and height of the screen. Wide screen televisions have a ration of 16/9, conventional screen TV sets have a ration of 4/3.
Tips
Poor reception (in analogue mode)
The proximity of mountains or high buildings may be responsible for ghost pictures, echoing or shadows. In this case, try manually adjusting your picture: see "fine tuning" (p.12) or modify the orientation of the outside aerial. Does your antenna enable you to receive broadcasts in this frequency range (UHF or VHF band)? In the event of difficult reception (snowy picture) switch the NR on the PICTURE analogue menu to ON. (p. 13).
Bad picture (in digital mode)
If the picture freezes a lot, or in cases of block effect, there is a problem of poor reception. Please check with the signal strength menu (see p.6).
Depending on the strength of digital terrestrial signals available in your area, standard aerials used for analogue transmissions will in most cases provide satisfactory reception of digital signals. If it is not the case, a good quality narrow beam antenna should be professionally installed outside the property and aligned to capture the maximum digital signal strength.
No picture
Have you connected the aerial socket properly? Have you chosen the right system? (p. 12).
Poorly connected euroconnector cables or aerial sockets are often the cause of picture or sound problems (sometimes the connectors can become half disconnected if the TV set is moved or turned). Check all connections.
Peripheral equipment gives a black & white picture
You have not selected the right socket with the
key: S-VHS2 (S-VHS3) instead of EXT2 (EXT3). To play a video cassette, check that it has been recorded under the same standard (PAL, SECAM, NTSC) which can be replayed by the video recorder.
No sound (in analogue mode)
If on certain channels you receive a picture but no sound, this means that you do not have the correct TV system. Modify the SYSTEM setting (p. 9).
The remote control no longer works.
Check that the mode selector on the side of the remote control is set to TV.
The TV set does not react to the remote control; the indicator on the set no longer flashes when you use the remote control? Replace the batteries.
Standby
When you switch the TV set on it remains in standby mode and the indication LOCKED is displayed when you use the keys on the TV set? The CHILD LOCK function is switched on (p. 14). If the set receives no signal for 15 mins, it automatically goes into standby mode.
To save power, your set is fitted with components that give it a very low power consumption when in standby mode (less than 3 W).
Cleaning the set
Only use a clean, soft and lint-free cloth to clean the screen and the casing of your set. Do not use alcohol-based or solvent-based products.
Still no results?
If your TV set breaks down, never attempt to repair it yourself: contact your dealer's after-sales service.
Centre Frequencies Table (in KHz)
Digital television broadcast bands channel numbers and centre frequencies.
UK and SPAIN
| Digital Frequency N Channel Frequency | Nominal Centre KHz |
| 21 | .474 000 |
| 22 | .482 000 |
| 23 | .490 000 |
| 24 | .498 000 |
| 25 | .506 000 |
| 26 | .514 000 |
| 27 | .522 000 |
| 28 | .530 000 |
| 29 | .538 000 |
| 30 | .546 000 |
| 31 | .554 000 |
| 32 | .562 000 |
| 33 | .570 000 |
| 34 | .578 000 |
| 35 | .586 000 |
| 36 | .594 000 |
| 37 | .602 000 |
| 38 | .610 000 |
| 39 | .618 000 |
| 40 | .626 000 |
| 41 | .634 000 |
| 42 | .642 000 |
| 43 | .650 000 |
| 44 | .658 000 |
| 45 | .666 000 |
| 46 | .674 000 |
| 47 | .682 000 |
| 48 | .690 000 |
| 49 | .698 000 |
| 50 | .706 000 |
| 51 | .714 000 |
| 52 | .722 000 |
| 53 | .730 000 |
| 54 | .738 000 |
| 55 | .746 000 |
| 56 | .754 000 |
| 57 | .762 000 |
| 58 | .770 000 |
| 59 | .778 000 |
| 60 | .786 000 |
| 61 | .794 000 |
| 62 | .802 000 |
| 63 | .810 000 |
| 64 | .818 000 |
| 65 | .826 000 |
| 66 | .834 000 |
| 67 | .842 000 |
| 68 | .850 000 |
| 69 | .858 000 |
AUSTRALIA
| Digital Frequency Nominal Centre Channel Frequency KHz | |
| Band III | |
| 6 | .177 500 |
| 7 | .184 500 |
| 8 | .191 500 |
| 9 | .198 500 |
| 9A | .205 500 |
| 10 | .212 500 |
| 11 | .219 500 |
| 12 | .226 500 |
| Band IV | |
| 27 | .522 500 |
| 28 | .529 500 |
| 29 | .536 500 |
| 30 | .543 500 |
| 31 | .550 500 |
| 32 | .557 500 |
| 33 | .564 500 |
| 34 | .571 500 |
| 35 | .578 500 |
| Band V | |
| 36 | .585 500 |
| 37 | .592 500 |
| 38 | .599 500 |
| 39 | .606 500 |
| 40 | .613 500 |
| 41 | .620 500 |
| 42 | .627 500 |
| 43 | .34 500 |
| 44 | .641 500 |
| 45 | .648 500 |
| 46 | .655 500 |
| 47 | .662 500 |
| 48 | .669 500 |
| 49 | .676 500 |
| 50 | .683 500 |
| 51 | .690 500 |
| 52 | .697 500 |
| 53 | .704 500 |
| 54 | .711 500 |
| 55 | .718 500 |
| 56 | .725 500 |
| 57 | .732 500 |
| 58 | .739 500 |
| 59 | .746 500 |
| 60 | .753 500 |
| 61 | .760 500 |
| 62 | .767 500 |
| 63 | .774 500 |
| 64 | .781 500 |
| 65 | .788 500 |
| 66 | .795 500 |
| 67 | .802 500 |
| 68 | .809 500 |
| 69 | .816 500 |
- 4:3 Modo
- Table of Contents
- Recycling
- Installing your television set
- ① Positioning the television set
- ③ Remote control
- ② Connections
- ④ Switching on
- The keys on the TV set
- The remote control keys
- Screen information
- Mode selector
- TV Menu
- Select
- Volume
- Mute
- Surround sound
- Picture and sound settings
- Sound mode
- Select EXT sockets (see p.17).
- Standby
- Options menu (see p.8).
- TV guide (see p.9).
- Digital Menu
- Analogue or Digital mode
- Cursor
- Programme selection
- Previous programme
- Sleeptimer
- Numerical keys
- Digital or Analogue channels?
- Switch on for the first time
- Understanding the information on the banner
- Symbols description :
- Rearrange TV channels / radio station
- View or Listen to new services
- List Channel types
- Add new services
- Reinstall all services
- Test reception
- Language and location preferences
- Language default settings:
- Location settings:
- Access restrictions
- Press the DIGITAL MENU key to leave the menu.
- Setting up your favourite list
- Information
- Downloading new software
- Using the Options menu
- TV guide
- Recording function
- Automatic tuning of analogue programmes
- Sorting analogue programmes
- Manual tuning of analogue programmes
- Naming analogue programmes
- EasyLink function
- Adjusting the picture
- Adjusting the sound
- Description of the settings:
- Rotating the picture
- Timer function
- Locking the set
- Locking programmes
- To unlock all programmes
- To change the confidential code
- Locking the keys
- Analogue Teletext
- Digital Text
- 16:9 Formats
- Automatic switching
- Using the different screen formats
- 4:3 Mode
- ZOOM 14:9
- ZOOM 16:9
- SUBTITLE ZOOM
- SUPERWIDE
- WIDE SCREEN
- Connecting peripheral equipment
- Video recorder (only)
- Video recorder with decoder
- Satellite receiver, decoder, DVD, games, etc.
- Headphones
- To select connected equipment
- Amplifier
- Common interface
- VCR / DVD mode selector
- Glossary
- Tips
- Poor reception (in analogue mode)
- Bad picture (in digital mode)
- No picture
- Peripheral equipment gives a black & white picture
- No sound (in analogue mode)
- The remote control no longer works.
- Cleaning the set
- Still no results?
- Centre Frequencies Table (in KHz)
Brand : PHILIPS
Model : 32DW6558
Category : Television