
XL3751 - Simulator PHILIPS - Free user manual and instructions
Find the device manual for free XL3751 PHILIPS in PDF.


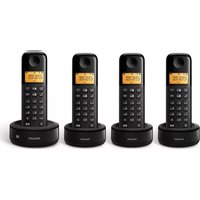
| Product Type | Cordless Telephone with Answering Machine |
| Brand | Philips |
| Model | XL3751 |
| Handset Dimensions | Approx. 160 x 45 x 28 mm (excluding antenna) |
| Base Station Dimensions | Approx. 120 x 100 x 60 mm |
| Handset Weight | Approx. 130 g (including battery) |
| Base Station Weight | Approx. 80 g |
| Power Supply | AC adapter: Input 100-240V, 50/60Hz; Output 6V DC, 300mA |
| Battery Type | 2 x AAA NiMH rechargeable (pre-installed) |
| Battery Capacity | 400 mAh each |
| Standby Time | Up to 200 hours |
| Talk Time | Up to 15 hours |
| Range (indoors) | Up to 50 m |
| Range (outdoors) | Up to 300 m |
| Display | Backlit LCD |
| Phonebook Capacity | Up to 100 entries |
| Caller ID | Supported |
| Answering Machine | Built-in (XL375 only), recording time up to 30 minutes |
| Cordless Technology | DECT |
| Frequency | 1.9 GHz |
| Maintenance | Clean with a soft dry cloth; avoid liquids and abrasives |
| Safety | Use only supplied batteries and power adapter; do not expose to moisture |
| Spare Parts | Batteries, chargers, handset available from Philips |
| Warranty | Standard manufacturer warranty (see user manual) |
Frequently Asked Questions - XL3751 PHILIPS
User questions about XL3751 PHILIPS
0 question about this device. Answer the ones you know or ask your own.
Ask a new question about this device
Download the instructions for your Simulator in PDF format for free! Find your manual XL3751 - PHILIPS and take your electronic device back in hand. On this page are published all the documents necessary for the use of your device. XL3751 by PHILIPS.
USER MANUAL XL3751 PHILIPS
natural_image
Elderly couple smiling while washing dishes in a kitchen sink (no visible text or symbols)Quick start guide
XL370/XL375
PHILIPS
What's in the box

Handset

Base station (XL375) Base station (XL370)


Charger*
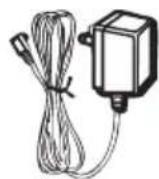
Power adapter*

Line cord**

User manual
Quick start guide
Guarantee
Note
* In multi-handset packs, there are additional handsets, chargers and power adapters.
** In some countries, you have to connect the line adapter to the line cord, then plug the line cord to the telephone socket.
Caution
Use only the supplied batteries and power adapter.
1 Connect
Connect the base station

1 Connect each end of the power adapter to: the DC input jack at the bottom of the base station; the power socket on the wall.
2 Connect each end of the power adapter to (for multi-handset packs):
the DC input jack at the bottom of the extra handset charger.
the power socket on the wall.
3 Connect each end of the line cord to:
the telephone socket at the bottom of the base station;•
the telephone socket on the wall.•
2 Install
Install the handset

Charge 16 hours

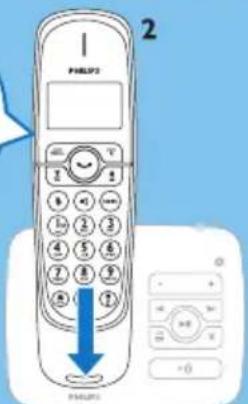
1 The batteries are pre-installed in the handset. Pull the battery tape off from the battery door before charging.
2 Place the handset on the base station to charge the handset. When the handset is placed correctly on the base station, you hear the docking sound.
The handset starts charging.
Note Charge the batteries for 16 hours before first use.
Configure your phone (if necessary)
1 [OK] you see the welcome message, press
2 [OK] your country, press to confirm.
3 Set the date and time.
If the time is in 12-hour format, press ↩ / key to sele[AM] or [PM].
The phone is now ready to use.
Check the battery level

When the handset is off the base station/charger, the bars indicate the battery level (full, medium and low). When the handset is on the base station/charger, the bars keep scrolling until charging completes.

The empty battery icon flashes and you hear an alert tone. The battery is low and needs recharging.
3 Enjoy
Call
To make a call, press • and dial the phone number.
To answer a call, press ◦ when the phone rings.
To end a call, press
Adjust the earpiece volume
Press ▲ or ▼ to adjust the volume during a call.
Add a contact in the phonebook
1 Press MENU.
2 [PHONEBOOK] > [NEW ENTRY] then press [OK] to confirm.
3 [OK] the name then press to confirm.
4 [OK] the number, then press to confirm.
Record an announcement (for XL375 only)
1 Press MENU.
2 [ANSWER MACHINE] >
[ANNOUNCEMENT], then press[OK] to confirm.
3 [ANSWER & REC.] or [ANSWER ONLY] then press [OK] to confirm.
4 [RECORD] , then press [OK] to confirm.
5 Start recording close to the microphone after the beep.
6 [OK] to stop recording.
→ You can listen to the newly recorded announcement on the handset.
Listen to messages recorded on the answering machine (for XL375 only)
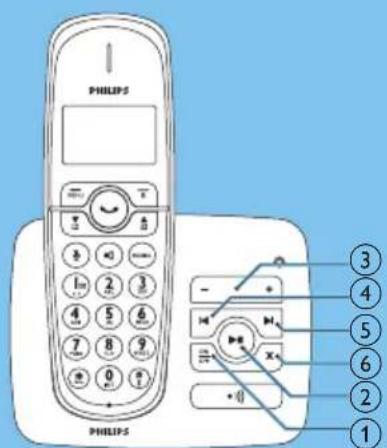
Switch on/off the answering machine: Press ①.
② Stall/Stop listening to the recorded messages: Press
③ Adjust the volume: Press
Skip backward:④
When you listen to the messages, press ◀ to listen to the message from the beginning.
During the first second of the current message, press ◀ to listen to the previous message.
⑤ Skip forward: Press ▶ to skip to the next message.
Delete the current message: Press ✅
Note For more information, see the Telephone answering machine section in the user manual.
Welcome to Philips
Register your product at www.philips.com/welcome
Need help?
User Manual
Refer to the user manual that came with your new phone.
Online help
www.philips.com/support

Reproduction in whole or in part is prohibited without the written consent of the copyright owner. Trademarks are the property of Koninklijke Philips Electronics N.V. or their respective owners. © 2009 Koninklijke Philips Electronics N.V. All rights reserved.

C€0168
Printed in China
QSG_XL370-375_05_EN_V1.11
WK9491

- Quick start guide
- What's in the box
- Note
- Caution
- Connect
- Install
- Install the handset
- Configure your phone (if necessary)
- Check the battery level
- Enjoy
- Call
- Adjust the earpiece volume
- Add a contact in the phonebook
- Record an announcement (for XL375 only)
- Listen to messages recorded on the answering machine (for XL375 only)
- Welcome to Philips
- Need help?
Brand : PHILIPS
Model : XL3751
Category : Simulator