
DVP2902 - DVD player PHILIPS - Free user manual and instructions
Find the device manual for free DVP2902 PHILIPS in PDF.


| Type de produit | DVD Player |
| Dimensions | 9.9 x 2.0 x 7.4 inches (250 x 50.2 x 187.7 mm) |
| Poids | Approx. 1.95 lbs (0.88 kg) |
| Alimentation | 120 V AC ±10%, 60 Hz ±0.5% |
| Consommation | 7 W (standby: 0.9 W) |
| Formats vidéo | NTSC |
| Formats de disque compatibles | DVD-Video, DVD-R, DVD-RW, Audio CD, CD-R, CD-RW, JPEG (sur DVD/CD) |
| Région DVD | 1 ou ALL |
| Sorties vidéo | HDMI (avec HDCP), Composite (VIDEO OUT) |
| Sorties audio | HDMI (PCM/Bitstream), Audio stéréo analogique (L/R) |
| Formats audio | Dolby Digital (via HDMI Bitstream), PCM, MPEG (2 canaux) |
| Fonctions de lecture | Lecture, pause, recherche avant/arrière (x2, x4, x8, x20), ralenti, zoom (x1.5, x2, x2.5), répétition (chapitre, titre, disque), répétition A-B, lecture aléatoire, recherche par piste/fichier/titre/chapitre/temps |
| Fonctions spéciales | Sélection de langue audio/sous-titres, angle de caméra, contrôle parental (mot de passe), EasyLink (HDMI-CEC), guide vocal (anglais uniquement) |
| Température de fonctionnement | 41°F à 104°F (5°C à 40°C) |
| Sécurité | Classe 1 laser, double isolation, arrêt automatique après 25 min d'inactivité |
| Accessoires inclus | Télécommande (NC091UL), câbles audio/vidéo, guide de démarrage rapide |
| Entretien | Nettoyer le boîtier avec un chiffon doux ; nettoyer les disques du centre vers l'extérieur ; lentille laser nettoyable par un professionnel |
| Garantie | 90 jours limitée (pièces et main-d'œuvre) |
Frequently Asked Questions - DVP2902 PHILIPS
User questions about DVP2902 PHILIPS
0 question about this device. Answer the ones you know or ask your own.
Ask a new question about this device
Download the instructions for your DVD player in PDF format for free! Find your manual DVP2902 - PHILIPS and take your electronic device back in hand. On this page are published all the documents necessary for the use of your device. DVP2902 by PHILIPS.
USER MANUAL DVP2902 PHILIPS

Register your product and get support at
www.philips.com/welcome
User Manual
For further assistance, call the customer support service in your country.
• To obtain assistance, contact Philips Customer Care Center; In the U.S.A., Canada, Puerto Rico, or the U.S. Virgin Islands; 1-866-515-1124
PRECAUTIONS
Included accessories
• Remote control (NC091UL)
• Audio/video cables
- Quick Start Guide
Connecting to RF modulator (not included)
If your TV has "Antenna In (RF in)" jack only, it is still possible to connect this unit to your TV by using an RF modulator.
In this case, follow the instructions below.
1) Disconnect the Power cords of the devices from the AC outlet.
2) Make the Connection as illustrated below.
3) Set your RF modulator's channel 3/4 switch to either 3 or 4, whichever the TV channel is least used in your area. If your RF modulator has a modulator / antenna switch, set it according to the manual included with the RF modulator.
4) Plug in the Power cords of the devices to an AC outlet.
5) Turn On your TV and choose the same channel as you set to the RF modulator's channel 3/4 switch to. For more details, follow the manual included with the RF modulator.

flowchart
graph TD
    A["Rear of this unit"] --> B["Video cable"]
    B --> C["Audio cable"]
    C --> D["Rear of TV"]
    D --> E["RF coaxial cable"]
    E --> F["Set channel 3 or 4"]
    G["VHF / UHF antenna"] --> H["Cable TV company"]
    H --> I["RF coaxial cable"]
    I --> J["Antenna/Channel"]
    J --> K["AUDR/TV"]
    K --> L["VR coaxial cable"]
    L --> M["Antenna/TV"]

Note(s):
- RF modulator is not included with this unit. You need to purchase it at your local store.
- The quality of picture may become poor if this unit is connected to an RF modulator.
Contents
PRECAUTIONS
IMPORTANT SAFETY INSTRUCTIONS 3
About the discs 6
Playable discs 6
Unplayable discs 6
SETUP
Connections 7
Rear terminals 7
Connection to a TV 8
Connection to an audio system 9
HDMI audio 9
HDMI mode and actual output signals 9
About the remote control 10
Remote control....10
Installing the batteries for the remote control 10
DVD FUNCTIONS
Playback 11
JPEG playback 12
Search functions....12
Using track / file search 12
Using title / chapter search....12
Using time search 12
On-screen display 13
Repeat / random playback 14
Repeat playback 14
Repeat A-B playback 14
Random playback 14
Special settings.... 15
Subtitle language 15
Audio language 15
Camera angles 15
DVD settings 16
System Settings 17
Language settings 18
Audio settings 19
Video settings 20
Preference settings 21
INFORMATION
Troubleshooting guide 22
Specifications 22
LIMITED WARRANTY 23
Español 24
GARANTÍA LIMITADA 25
The model and serial numbers of this unit may be found on the cabinet. Model No.: ____ You should record and retain those numbers for future reference. Serial No.: ____
WARNING: TO REDUCE THE RISK OF FIRE OR ELECTRIC SHOCK, DO NOT EXPOSE THIS APPARATUS TO RAIN OR MOISTURE. APPARATUS SHALL NOT BE EXPOSED TO DRIPPING OR SPLASHING AND NO OBJECTS FILLED WITH LIQUIDS, SUCH AS VASES, SHALL BE PLACED ON THE APPARATUS.

CAUTION
RISK OF ELECTRIC SHOCK DO NOT OPEN

CAUTION:
TO REDUCE THE RISK OF ELECTRIC SHOCK, DO NOT REMOVE COVER (OR BACK). NO USER SERVICEABLE PARTS INSIDE. REFER SERVICING TO QUALIFIED SERVICE PERSONNEL.

The lightning flash with arrowhead symbol, within an equilateral triangle, is intended to alert the user to the presence of uninsulated “dangerous voltage” within the product’s enclosure that may be of sufficient magnitude to constitute a risk of electric shock to persons.

The exclamation point within an equilateral triangle is intended to alert the user to the presence of important operating and maintenance (servicing) instructions in the literature accompanying the appliance.
The important note and rating are located on the rear or bottom of the cabinet.

The symbol for CLASS II (Double Insulation)
IMPORTANT SAFETY INSTRUCTIONS
- Read these instructions.
- Keep these instructions.
- Heed all warnings.
- Follow all instructions.
- Do not use this apparatus near water.
- Clean only with dry cloth.
- Do not block any ventilation openings. Install in accordance with the manufacturer's instructions.
- Do not install near any heat sources such as radiators, heat registers, stoves, or other apparatus (including amplifiers) that produce heat.
-
Do not defeat the safety purpose of the polarized or grounding-type plug. A polarized plug has two blades with one wider than the other. A grounding type plug has two blades and a third grounding prong. The wide blade or the third prong are provided for your safety. If the provided plug does not fit into your outlet, consult an electrician for replacement of the obsolete outlet.
-
Protect the power cord from being walked on or pinched particularly at plugs, convenience receptacles, and the point where they exit from the apparatus.
- Only use attachments / accessories specified by the manufacturer.
- Use only with the cart, stand, tripod, bracket, or table specified by the manufacturer, or sold with the apparatus. When a cart is used, use caution when moving the cart/apparatus combination to avoid injury from tip-over.
- Unplug this apparatus during lightning storms or when unused for long periods of time.
- Refer all servicing to qualified service personnel. Servicing is required when the apparatus has been damaged in any way, such as power-supply cord or plug is damaged, liquid has been spilled or objects have fallen into the apparatus, the apparatus has been exposed to rain or moisture, does not operate normally, or has been dropped.
FCC WARNING
This equipment may generate or use radio frequency energy. Changes or modifications to this equipment may cause harmful interference unless the modifications are expressly approved in the manual. The user could lose the authority to operate this equipment if an unauthorized change or modification is made.
RADIO-TV INTERFERENCE
This equipment has been tested and found to comply with the limits for a Class B digital device, pursuant to Part 15 of the FCC Rules. These limits are designed to provide reasonable protection against harmful interference in a residential installation. This equipment generates, uses, and can radiate radio frequency energy and, if not installed and used in accordance with the instructions, may cause harmful interference to radio communications. However, there is no guarantee that interference will not occur in a particular installation. If this equipment does cause harmful interference to radio or television reception, which can be determined by turning the equipment off and on, the user is encouraged to try to correct the interference by one or more of the following measures:
1) Reorient or relocate the receiving antenna.
2) Increase the separation between the equipment and receiver.
3) Connect the equipment into an outlet on a circuit different from that to which the receiver is connected.
4) Consult the dealer or an experienced radio / TV technician for help.

Continued on next page.
Disconnect the mains(AC) plug to shut off when find trouble or not in use. The mains(AC) plug shall remain readily operable.
CAUTION: Danger of explosion if battery is incorrectly replaced. Replace only with the same or equivalent type. WARNING: Batteries (Battery pack or battery installed) shall not be exposed to excessive heat such as sunshine, fire or the like.
LASER SAFETY
This apparatus is classified as a CLASS 1 LASER PRODUCT.
This apparatus employs a laser. Only a qualified service person should remove the cover or attempt to service this apparatus, due to possible eye injury.
CAUTION: Use of controls or adjustments or performance of procedures other than those specified herein may result in hazardous radiation exposure.

IMPORTANT COPYRIGHT INFORMATION
Unauthorized copying, broadcasting, public performance and lending of discs are prohibited. This item incorporates copy protection technology that is protected by U.S. patents and other intellectual property rights of Rovi Corporation. Reverse engineering and disassembly are prohibited.
Do not place the unit on the furniture that is capable of being tilted by a child and an adult leaning, pulling, standing or climbing on it. A falling unit can cause serious injury or even death.
In order to avoid interruption of ventilation, this unit should not be placed in built-in equipment such as a book cabinet, rack, etc., and the vents of this unit should not be covered with anything such as a tablecloth, curtain, newspaper, etc. Make sure to leave a space of 4.0 inches (10cm) or more around this apparatus.
When installing this unit in a temperate environment, avoid a place with rapid temperature changes.
This unit should not be used in a tropical environment as it has not been evaluated under such conditions.
No objects should be placed directly on or under this unit, especially lighted candles or other flaming objects.
Never use a gas duster on this unit.
The gas trapped inside of this unit may cause ignition and explosion.
To avoid the hazards of electrical shock and fire
- Do not handle the AC power cord with wet hands.
- Do not pull on the AC power cord when disconnecting it from an AC outlet. Grasp it by the plug.
- Do not put your fingers or objects into the unit.
Location and handling
- Do not install the unit in direct sunlight, near strong magnetic fields, or in a place subject to dust or strong vibration.
- Avoid a place with drastic temperature changes.
- Install the unit in a horizontal and stable position. Do not place anything directly on top or bottom of the unit. Depending on your external devices, noise or disturbance of the picture and / or sound may be generated if the unit is placed too close to them. In this case, please ensure enough space between the external devices and the unit.
- Depending on the environment, the temperature of this unit may increase slightly. This is not a malfunction.
- Be sure to remove the disc and unplug the AC power cord from the outlet before carrying the unit.
Dew condensation warning
- Dew condensation may form inside the unit in the following conditions. If so, do not use this unit at least for a few hours until its inside gets dry.
—The unit is moved from a cold place to a warm place.
- Under conditions of high humidity.
—After heating a cold room.
Note about recycling
- This unit's packaging materials are recyclable and can be reused. Please dispose of any materials in accordance with your local recycling regulations.
- Batteries should never be thrown away or incinerated but disposed of in accordance with your local regulations concerning chemical wastes.
- For product recycling information, please visit - www.recycle.philips.com
Notice for progressive scan output
- Consumers should note that not all high definition television sets are fully compatible with this product and may cause artifacts to be displayed in the picture. In case of picture problems with 525(480) progressive scan output, it is recommended that the user switch the connection to the ‘standard definition’ output.
Disposal of used batteries
- In certain localities, disposing batteries with household waste is not permitted. Please ensure you dispose of batteries according to local regulations.

TRADEMARK INFORMATION

HIGH-DEFINITION MULTIMEDIA INTERFACE
The terms HDMI and HDMI High-Definition Multimedia Interface, and the HDMI Logo are trademarks or registered trademarks of HDMI Licensing LLC in the United States and other countries.

Manufactured under license from Dolby Laboratories. Dolby, Dolby Audio, and the double-D symbol are trademarks of Dolby Laboratories.

ENERGY STAR
ENERGY STAR® is a joint program of the U.S. Environmental Protection Agency and the U.S. Department of Energy helping us all save money and protect the environment through energy efficient products and practices.

is a trademark of DVD Format / Logo Licensing Corporation.
SYMBOLS USED IN THIS MANUAL
The following symbols appear in some headings in this manual.

DVD
: Description refers to DVD-video.

CD
: Description refers to audio CD.

JPEG
: Description refers to DVD, CD-RW/-R with JPEG files.
MAINTENANCE
Servicing
- Please refer to relevant topics on the "Troubleshooting guide" on page 22. If you cannot find any solution there, our service center is pleased to assist you.
- Even if this unit becomes inoperative, Do not open the cabinet to repair it by yourself. There are no user-serviceable parts inside. Turn off the unit, unplug the AC power plug and then call our support center mentioned on the front page. Before calling, please check model and serial number on the unit.
Cleaning the cabinet
- Wipe the front panel and other exterior surfaces of the unit with a soft cloth.
- Never use a solvent, thinner, benzene or alcohol to clean the unit. Do not spray insecticide liquid near the unit. Such chemicals may discolor the surface or damage the unit.
Cleaning discs
- When a disc is dirty, clean it with a cleaning cloth. Wipe the disc from the center to the outside. Do not wipe in a circular motion.
- Do not use solvents such as benzine, thinner, commercially available cleaners, detergent, abrasive cleaning agents or antistatic spray intended for analog records.
Cleaning the disc lens
Depends on unit circumstances, the laser optical pickup unit's disc lens may get dirty. If this unit still does not perform properly although you refer to the relevant sections and to "Troubleshooting guide" in this owner's manual, consult a local dealer or an authorized service center for inspection and cleaning of the disc lens.
Disc handling
- When you handle a disc, hold it by its edge and try not to touch the surface of the disc.
• Always store the disc in its protective case when not in use
playable discs
| Type of media | Mark (logos) | Region codes | Recorded signals | Disc sizes | Disc types |
| DVD-video*1, 2, 4, 6, 8 |  |  | digital video (MPEG2) | 5 inches(12 cm)or3 inches(8 cm) |  |
| DVD-RWDVD-R*1, 3, 4, 5,6, 7, 8 | — | digital video (MPEG2)or JPEG |   | ||
| audio CD*4, 6, 8 |  | — | digital audio | 5 inches(12 cm)or3 inches(8 cm) |   |
| CD-RWCD-R*4, 5, 6, 7, 8 |  | — | digital audio or JPEG |
If you cannot play back a disc which bears one of the marks above, check the following notes.
*1: This unit conforms to the NTSC color system. Discs recorded in other color systems such as PAL cannot be played back.
*2: Certain DVD-video do not operate as described in this manual due to the intentions of the disc's producers.
*3: Discs recorded in the VR (Video Recording) format cannot be played back.
*4: Scratched or stained discs may not be played back.
*5: Some discs cannot be played back because of incompatible recording conditions, characteristics of the recorder or special properties of discs.
*6: You can play back discs which bear the marks above. If you use non-standardized discs, this unit may not play them back. Even if they are played back, the sound or video quality will be compromised.
*7: If the recorded portion of the disc is too small (smaller than 2-3/16 inches (55mm) across), it may not be played back.
*8: Do not glue paper or put stickers on to the disc. These may damage the disc, and the unit may not read it correctly.
Unplayable discs
NEVER play back the following discs as a malfunction may result!
DVD-audio / DVD-RAM / DVD-ROM for personal computers / DVD with region codes other than 1 or ALL / CD-ROM for personal computers / HD DVD / Blu-ray Disc™ / photo CD / CD-i / video CD
Any other discs without compatibility indications.
Note(s):
- Only the sound recorded on the normal CD layer can be delivered. The sound recorded on the high density super audio CD layer cannot be delivered.
SETUP
Connections
Rear terminals
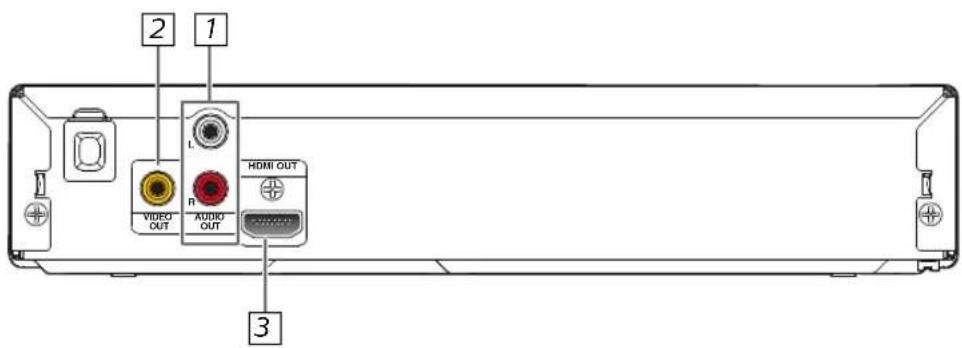
1 AUDIO OUT jacks
Connect an audio cable here through the audio Input jacks on a television or another audio device.
2 VIDEO OUT jack
Connect a video cable here through the video Input jack on a television.
3 HDMI OUT jack
Connect a TV / AV receiver / amplifier or other device with an HDMI compatible port with an HDMI cable.
Note(s):
- Please purchase the necessary cables at your local store. (Refer to pages 8 - 9.)

Included cables used in this connection are as follows:
• Audio cable (L/R) × 1
- Video cable × 1
Note(s):
- Connect this unit directly to your TV. If audio / video cables are connected to a VCR, pictures may be distorted due to the copy protection system.
After connecting to your TV:
You will need to find the viewing channel (external input channel) on your TV.
Please refer to your TV's owner's manual for details.
Input modes for common TV brands:
Listed below are inputs for common brand name TV's.
| Philips:VIDEO,Emerson:VIDEO,Hitachi:INPUT,JVC:VIDEO,VIDEO1,VIDEO2,VIDEO3LG:INPUT,Magnavox:AUX CHANNEL,SOURCEPanasonic:TV/VIDEO | SOURCEAUXAUXAUX | RCA:INPUT,TV/VCR,00,90,91,92,93Samsung:TV/VIDEOSanyo:VIDEOSharp:00Sony:VIDEO1,Toshiba:TV/GAME | VIDEO2, |
Connection to an audio system

flowchart
graph TD
    A["Audio"] --> B["Analog audio input jacks"]
    B --> C["Audio cable (included)"]
    C --> D["This unit"]
    D --> E["VIDEO OUT"]
    D --> F["AUDIO OUT"]
    G["Analog audio connection"] --> H["Stereo system with analog audio Input jacks"]
    H --> I["Analog audio input jacks"]
    I --> J["L R"]
    I --> K["R"]
    L["VIDEO OUT"] --> M["HDMI OUT"]
    M --> N["AUDIO OUT"]

Included cables used in this connection are as follows:
• Audio cable (L/R) × 1
Please purchase the rest of the necessary cables at your local store.
HDMI audio
| Media Audio recording format | “HDMI Audio” setting | ||
| “Bitstream” “PCM” | |||
| DVD-Video | Dolby Digital Dolby | Digital 2ch PCM | |
| DTS DTS Mute | |||
| MPEG 2ch PCM | 2ch PCM | ||
| LPCM 2ch PCM | 2ch PCM | ||
| audio CD 2ch PCM | 2ch PCM 2ch PCM | ||
| DTS-CD DTS DTS Mute | |||
HDMI mode and actual output signals
You can change the resolution of the video signal being output from the HDMI OUT in "SYSTEM" menu. (Refer to page 17.)
Copyright protection system
To play back the digital video images of DVD-video via an HDMI connection, it is necessary that both the player and the display device (or an AV receiver / amplifier) support a copyright protection system called HDCP (high-bandwidth digital content protection system). HDCP is copy protection technology that comprises data encryption and authentication of the connected AV device. This unit supports HDCP.
Please read the operating instructions of your display device (or AV receiver / amplifier) for more information.
Note:
- When using HDCP-incompatible display device, the picture will not be viewed properly.
- The audio signals from the HDMI jack (including the sampling frequency, the number of channels and bit length) may be limited by the device that is connected.
- Among the display device(s) that support HDMI, some do not support audio output (for example, projectors). In connections with device such as this unit, audio signals are not output from the HDMI output jack.
- When this unit's HDMI jack is connected to a DVI-D compatible display device(s) (HDCP compatible) with an HDMI-DVI converter cable, the signals are output in digital RGB.
Remote control
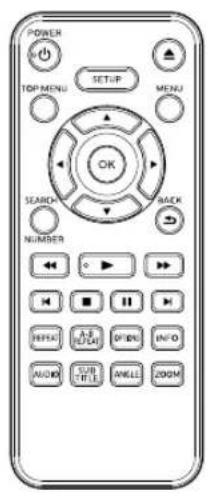
Installing the batteries for the remote control
Install 2 AAA (1.5V) batteries matching the polarity indicated inside battery compartment of the remote control.

\* Batteries not included.
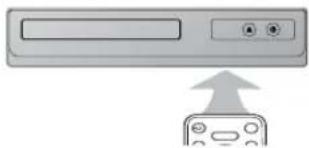
Keep in mind the following when using the remote control:
• Make sure that there are no obstacles between the remote control and the remote sensor on the unit.
- The maximum operable ranges from the unit are as follows.
-Line of sight:
approx. 23 feet (7m)
Either side of the center:
approx. 16 feet (5m) within 30°
-Above: approx. 16 feet (5m) within 15^
-Below: approx. 10 feet (3m) within 30^
natural_image
Simple diagram showing a device with an input button and an external device with an upward arrow (no text or symbols)Note(s):
- Do not mix alkaline, standard (carbon-zinc), or rechargeable (nicad, ni-mh, etc) batteries.
- Do not mix old and new batteries.
• Always remove batteries from remote control if they are dead or if the remote control is not to be used for an extended period of time. This will prevent battery acid from leaking into the battery compartment.
| MediaButton( alphabetical order) | ||
 | · To move the cursor.· To enter values in the input field. | |
| ——— | · To switch between pages when a file list is displayed.· To rotate the picture during playback of JPEG files. (JPEG) | |
 | · To repeat between your chosen points A and B. (DVD) (CD) | |
 | · To select camera angles on a disc. | ——— |
 | · To select audio language on a disc. | ——— |
 | · To display the current disc information. | |
 | · To select Items or settings. | |
 | · To search forward / backward through a disc. (×2, ×4, ×8, ×20) (DVD) (CD) | |
| · To begin slow forward playback in the pause mode. | ——— | |
 | · To call up the menu on a disc. | · To display the thumbnail when a disc with JPEG files is inserted and the file is highlighted. (JPEG) |
 | ——— · To play back randomly. (CD) | |
 | · To open or close the disc tray.· To turn on the unit. | |
 | · To pause disc playback. | |
| · To advance playback one frame at a time. | ——— | |
 | · To start playback or resume playback. | |
 | · To play back a chapter, title or disc repeatedly. | · To play back repeatedly. |
 | · To call up the menu when playing back a disc. | · To return to the file list when thumbnail is displayed. (JPEG) |
 NUMBER NUMBER | · To search chapter, title or time.· To select button in menu. (DVD) | · To search tracks or files.· To search time. (CD) |
 | · To call up the setup menu. | |
 | · To skip chapters or titles. | · To skip tracks.· To switch between pages when thumbnail is displayed. (JPEG). |
 | · To turn the unit on or to turn the unit into the standby mode. (To completely turn off the unit, you must unplug the AC power cord.) | |
 | · To stop playback. | |
 | · To select subtitle language on a disc. | ——— |
 | · To call up the title menu on a disc. | ——— |
 | · To magnify part of a picture. (×1.5, ×2, ×2.5) (DVD) (JPEG) | |
DVD FUNCTIONS
Please note :
- Most instructions in this manual refer to remote control use.
- This unit will automatically turn on the screen saver after 5 minutes of inactivity and into the standby mode after 25 minutes of inactivity.
Playback
Before:
Turn on the TV, amplifier and any other device(s) which are connected to this unit. Make sure the TV and audio receiver (not included) are set to the correct channel/Input.



⇒ on page 12)
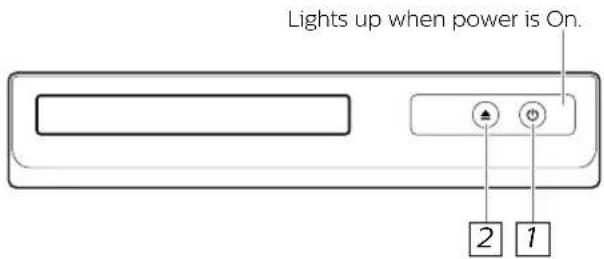
1 Press [ ◊ ] to turn on this unit.
2 Press [▲] and insert a disc with label facing up.
3 Press [▶] to start playback.
4 Press [■] to stop playback.

Disc menu

Some discs contain menus which allow you to customize DVD playback. Use [▲/▼/◄/►] to select an item, then press [OK], [►] (on the unit).
Calling up a menu screen during playback

- Press [MENU] to call up the disc menu.
- Press [TOP MENU] to call up the title menu.
Note(s):
- Menu operations may vary depending on the disc. Refer to the manual accompanying the disc for more details.
Resume playback


Press [■] during playback. PRE STOP icon will appear at the top-left on the TV screen. Press [▶]. RESUME icon will appear at the top-left on the TV screen and playback will resume from the Point where playback was stopped.

Note(s):
- To cancel resume, press [■] one more time in the stop mode.
- The resume playback information stays in unit memory even when the power is turned off, as long as the disc stays in the unit.
Pause and step-by-step playback


Press [11] during playback
To continue playback, press [▶].


The disc goes forward by one frame each time [■■] (on the remote control) is pressed in the pause mode. To continue playback, press [▶].
Note(s):
- When you play back a DVD or CD-R/-RW with JPEG Files, refer to details on page 12.
- “This operation is not available.” may appear at the top-left on the TV screen when the operation is prohibited by the disc or this unit.
- Some DVD may start playback from title 2 or 3 due to specific programs.
- During the playback of a 2-layered disc, pictures may stop for a moment. This happens while the 1st layer is being switched to the 2nd layer. This is not a malfunction.
- You can change the on-screen language in "Menu" setting (Refer to page 18.)
Fast forward / Reverse search

Use [▶▶] or [◀◀] repeatedly during Playback to select the required forward or reverse speed. To continue playback, press [▶].

Note(s):
- Fast forward or reverse search speed is different depending on the disc. Approximate speed is ×2, ×4, ×8 and ×20.
Slow forward search

Press [▶▶] repeatedly in the pause mode to select the required forward speed. To continue playback, press [▶].

Note(s):
- Slow forward speed is different depending on the disc. Approximate speed is × 1/2 , × 1/4 and × 1/8 .
Zoom


1) Press [ZOOM] repeatedly during playback to select the required zoom factor: ×1.5, ×2 or ×2.5.
2) Use [▲/▼/◄/►] to slide the zoomed picture across the TV Screen.
3) To exit the zoom function, press [ZOOM] repeatedly to select "ZOOM 1"(Off).
Note(s):
- Zooming function does not work while the disc menu is displayed.
- Some part of the picture may not be zoomed depending on the disc or playback status.
JPEG is a method of compressing data in files.
You can copy JPEG files on DVD or CD-R/-RW from a computer and play back the files on this unit.

Insert a JPEG formatted disc, then the file list will automatically appear on the TV screen. (For a disc with JPEG files only)
It is recommended that the files are recorded under the following conditions :
| 1 Select the desired folder or file. | Applicable JPEG file | Remarks |
| Normal playbackPixel upper limit: 6,000 × 6,000 pixelPixel lower limit: 96 × 96 pixel | A JPEG image that extends beyond the screen is reduced so that it will be displayed within the screen. |
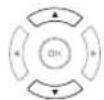

2 Press [OK] or [▶] (on the unit). Playback will start from the first file of the folder or files.
Note(s):
• Some selections may take a while to be recognized.
- Refer to "On-screen display" on page 13 for more details.
- A maximum of 189 folders or 9999 files may be recognized on one disc. (ISO9660 format files)
For UDF format files recorded on DVD media, maximum of 2,000 files may be recognized. It may take a while to switch between pages for a file list.
- Up to 8 hierarchies can be recognized in one folder.
File in the 9th or deeper hierarchies cannot be played back.
• To rotate the picture, press the cursor buttons during playback of JPEG files
Search functions
Using track / file search

Using [SEARCH/NUMBER]
![PHILIPS DVP2902 - Using [SEARCH/NUMBER] - 1](/content/2026/05/1142670/images/b3ca35d605e90376a712bcbb809468bdf96504ebfa8033fee52f569569da6fa8.jpg)
| Available search mode | Displayed list |
| Track search | |
| File search | File list / thumbnail |
2 Enter the desired track / file number.

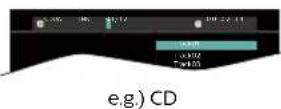
• Displayed digit differs depending on the contents. The same number of digits that are stored on the disc must be entered.
- Press cursor [◀] or [▶] to move the digit that you wish to change.
- Press cursor [▲] or [▼] to change the number.
3 Press [OK]
Note(s):
- The random playback will be cleared when you select track search during random playback (for CD only).
Using [|◀◀,▶▶] (SKIP)
![PHILIPS DVP2902 - Using [|◀◀,▶▶] (SKIP) - 1](/content/2026/05/1142670/images/30f5ce2504ead45f0f6fb3a86fe69dcd0cc1ff3eefd3f26d18a5d4c4d1857603.jpg)
flowchart
graph TD
    A["Input Block 1"] --> B["Control Block 2"]
    B --> C["Current Track"]
    C --> D["TR 1"]
    C --> E["TR 2"]
    C --> F["TR 3"]
    C --> G["TR 4"]
Using title / chapter search

Using [SEARCH/NUMBER]
![PHILIPS DVP2902 - Using [SEARCH/NUMBER] - 1](/content/2026/05/1142670/images/651c68c151faaf5d210ac4ebf473582ebc918fe6a763d999362787c75b0a9e3d.jpg)
- Press [SEARCH/NUMBER] once for the title search.
2 Enter the desired title or chapter number.
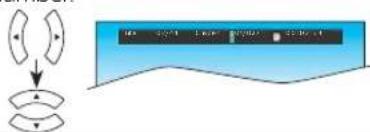
- For the chapter search, press cursor [▶] to highlight the chapter number.
• Title number is displayed with 2-digit, Chapter number is displayed with 3-digit. - Press cursor [◀] or [▶] to move the digit that you wish to change.
- Press cursor [▲] or [▼] to change the number.
3 Press [OK].
Using [|◀◀,▶▶] (SKIP)
![PHILIPS DVP2902 - Using [|◀◀,▶▶] (SKIP) - 1](/content/2026/05/1142670/images/bafc59f8b60737687cb5165d2a34f0ccbf534c27343b2c7db1d390dfc6041c6a.jpg)
flowchart
graph TD
    A["Input Block"] --> B["Current Chapter"]
    B --> C["CH 1"]
    B --> D["CH 2"]
    B --> E["CH 3"]
    B --> F["CH 4"]
Using time search


Press cursor [▶] to highlight the time.
2 Enter the desired time.
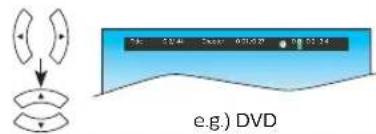
- Press cursor [◀] or [▶] to move the digit that you wish to change.
- Press cursor [▲] or [▼] to change the number.
3 Press [OK]
Note(s):
- The random playback will be cleared when you select time search during random playback (for CD only).
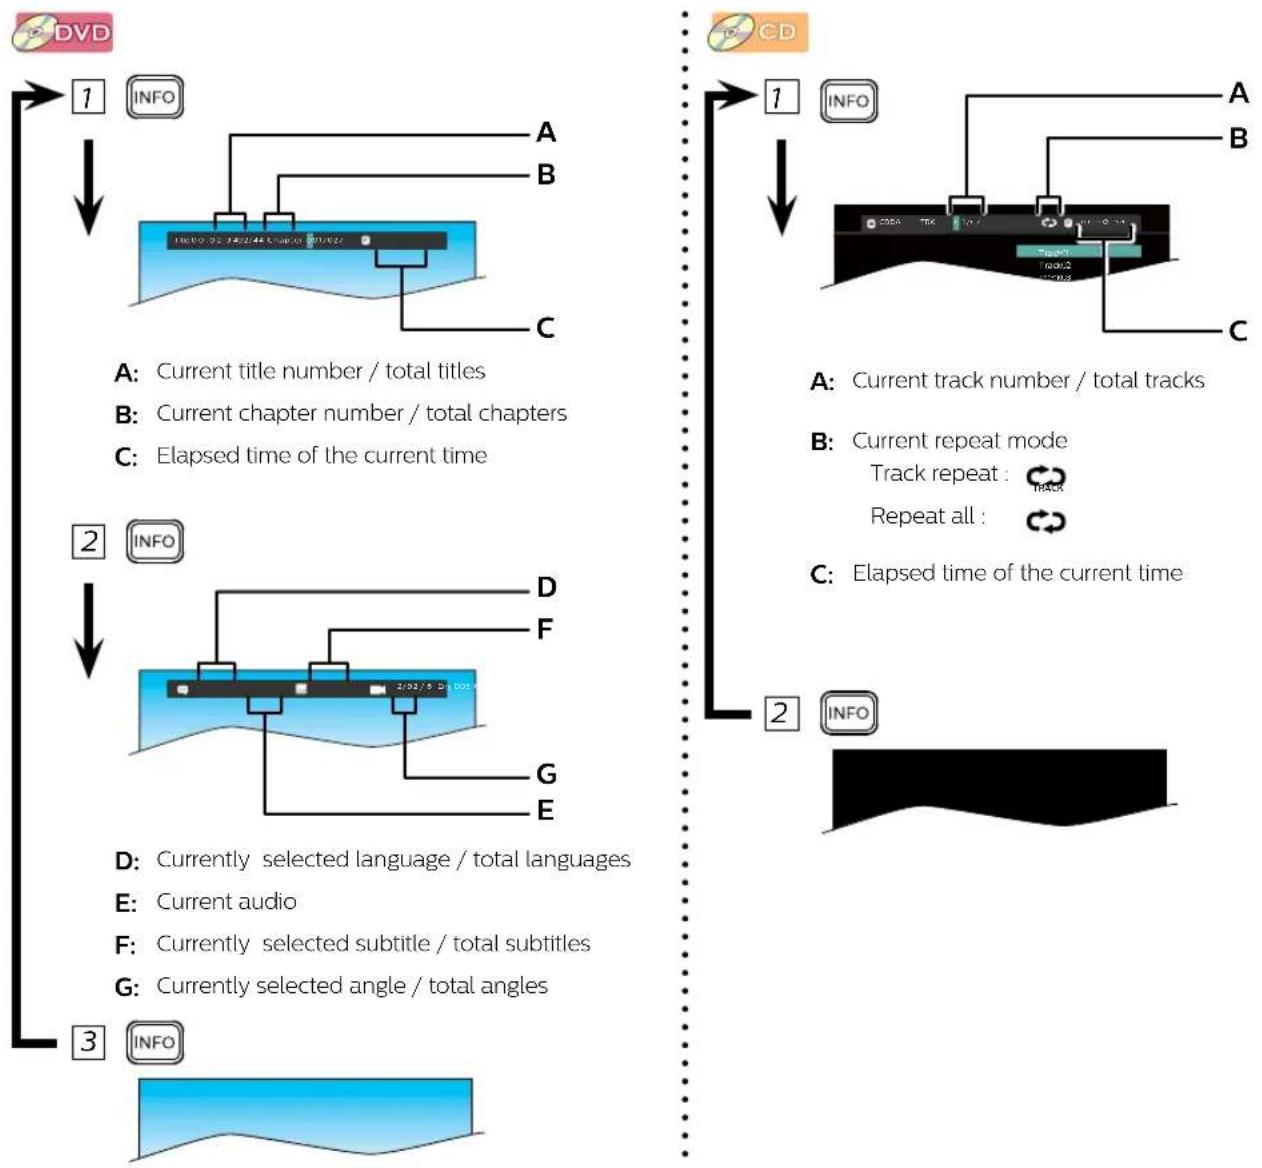
You can check the information about the current disc by pressing [INFO].
flowchart
graph TD
    A["1 DVD"] --> B["INFO"]
    B --> C["A"]
    B --> D["B"]
    C --> E["C"]
    D --> E
    E --> F["2 INFO"]
    F --> G["D"]
    G --> H["F"]
    H --> I["G"]
    I --> J["E"]
    J --> K["3 INFO"]

Insert a JPEG formatted disc, then the folder / file list will automatically appear on the TV screen.
Press [MENU] to display the thumbnail screen while an available file is highlighted.
![Thumbnail (only while JPEG file list is displayed) Folder name File / folder list File size Date of the file Resolution of the file MENU BACK File name Press [◀◀] or [▶◀] to switch between pages. Press [BACK] to go back to the file list.](/content/2026/05/1142670/images/d58ea0852a7c0cf284be9efad5f38b5f9b1b01e6d99a35b0eff65bd195e85702.jpg)
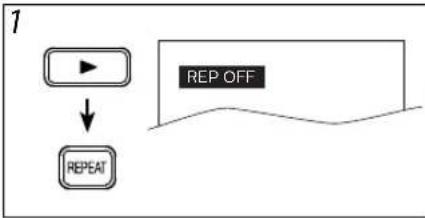
Repeat playback

Repeat function is available only during playback.
flowchart
graph TD
    A["REPEAT"] --> B["REPOFF"]
    style A fill:#f9f,stroke:#333
    style B fill:#ccf,stroke:#333
Each time you press [REPEAT], repeat function changes as example below.


flowchart
graph TD
    A["REP OFF"] --> B["REP CHAPTER"]
    B --> C["REP TITLE"]
    C --> D["REP ALL"]
    style A fill:#f9f,stroke:#333
    style B fill:#ccf,stroke:#333
    style C fill:#cfc,stroke:#333
    style D fill:#fcc,stroke:#333


flowchart
graph TD
    A["REP OFF"] --> B["↓"]
    B --> C["REP 1"]
    C --> D["↓"]
    D --> E["REP ALL"]
    style A fill:#f9f,stroke:#333
    style B fill:#ccf,stroke:#333
    style C fill:#cfc,stroke:#333
    style D fill:#fcc,stroke:#333
    style E fill:#cff,stroke:#333
    note right of A: (Repeat off)
    note right of B: (Current track repeat)
    note right of C: (Entire disc repeat)


flowchart
graph TD
    A["REP OFF"] --> B["↓"]
    B --> C["REP 1"]
    C --> D["↓"]
    D --> E["REP DIR"]
    E --> F["↓"]
    F --> G["REP ALL"]
    style A fill:#f9f,stroke:#333
    style G fill:#f9f,stroke:#333
    note right of A (Repeat off)
    note right of C (Current track repeat)
    note right of E (Current folder repeat)
    note right of G (Entire disc repeat)
Repeat A-B playback

Repeat function is available only during playback.

flowchart
graph TD
    A["Play Button"] --> B["A-B REPEAT"]
    C["Repeat A-"] --> D["e.g.) DVD"]
Press [A-B REPEAT] at your desired starting Point. (A)

Press [A-B REPEAT] again at your desired ending point. (B)
- Point B should be in the same title or track as point A.
Note(s):
- To exit the sequence, press [A-B REPEAT] so that "A-B CANCEL" appears.
Random playback

This function shuffles the playing tracks in a random mode instead of playback in a sequential track mode.

flowchart
graph TD
    A["▶"] --> B["↓"]
    B --> C["OPTIONS"]
    D["Music"] --> E["RANDOM : On"]
    style D fill:#000,stroke:#fff,color:#fff
    style E fill:#000,stroke:#fff,color:#fff
Note(s):
- During random playback, you cannot go back to the previous track. Press [▶▶] to search tracks or files randomly.
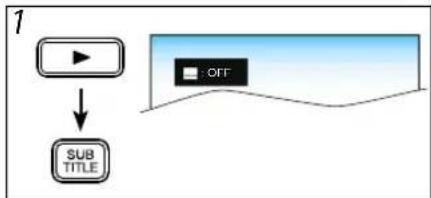
Subtitle language

This unit allows you to select a subtitle language (if available) during DVD Playback.
flowchart
graph TD
    A["▶"] --> B["SUB TITLE"]
    C["OFF"] --> D["Line"]
Each time you press [SUBTITLE], subtitle language changes as example below.

flowchart
graph TD
    A["Off"] --> B["1 English"]
    B --> C["2 French"]
    C --> D["..."]
    style A fill:#fff,stroke:#000
    style B fill:#fff,stroke:#000
    style C fill:#fff,stroke:#000
    style D fill:#fff,stroke:#000
Note(s):
- If your language is not shown after pressing [SUBTITLE] several times, the disc may not have that language. However, some discs allow subtitle language setting on the disc menu. (Operation varies depending on the disc, so refer to the manual along with the disc.)
- When “X This operation is not available.” appears on the TV screen, it means no subtitle is recorded on the scene.
• Some discs will only allow you to change the subtitle from the disc menu. Refer to the manual accompanying the discs for details.
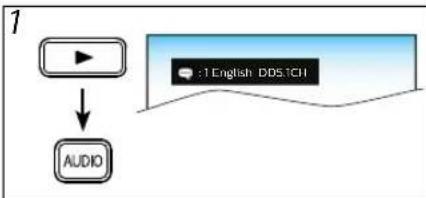
Audio language

This unit allows you to select an audio language (if multiple languages are available on a disc) during DVD playback.
flowchart
graph TD
    A["Input"] --> B["↓"]
    B --> C["AUDIO"]
    C --> D["1:1 English DDS.1CH"]
Each time you press [AUDIO], audio language changes as example below.

flowchart
graph TD
    A["1 English"] --> B["2 French"]
    B --> C["3 Spanish"]
    C --> D["..."]
    style A fill:#f9f,stroke:#333
    style B fill:#f9f,stroke:#333
    style C fill:#f9f,stroke:#333
    style D fill:#ccf,stroke:#333
Note(s):
• Some discs will only allow you to change the audio setting from the disc menu. Refer to the manual accompanying the discs for details
- If your language is not shown after pressing [AUDIO] several times, the disc may not have that language. However, some discs allow audio language setting on the disc menu. (Operation varies depending on the disc, so refer to the manual accompanying the disc.)
Camera angles

Some DVD's may contain scenes which have been shot simultaneously from various angles. You can change the camera angle if on appears on the TV screen.

Each time you press [ANGLE], camera angle changes.
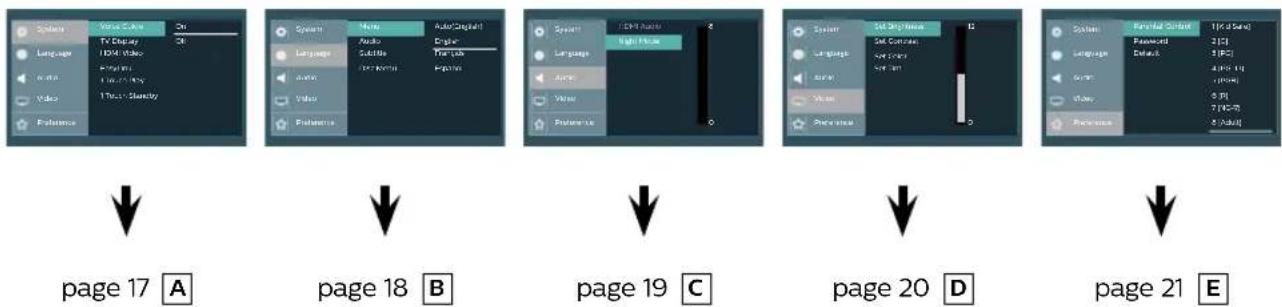
You can change the settings on the unit. Setting items are displayed in gray when they are not available under the conditions at the time.

flowchart
graph TD
    A["1 Press [SETUP"].<Setup menu>] --> B["2 Select the desired item."]
    B --> C["3 Setup menu with System options: Voice Guide, TV Display, HDMI Video, Audio, EasyLink, Audio, Touch Play, Preference"]
    C --> D["OK"]
System menu Language menu Audio menu Video menu Preference menu
flowchart
graph TD
    A["Page 17"] --> B["Page 18"]
    B --> C["Page 19"]
    C --> D["Page 20"]
    D --> E["Page 21"]

System Settings
You can change the display functions. Follow steps 1 and 2 on page 16.

4
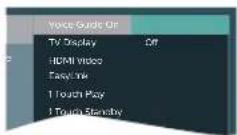
Voice Guide: (Default: On)
Turns on/off the voice guide function.
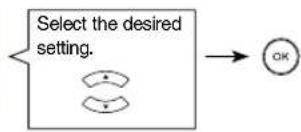
flowchart
graph TD
    A["Select the desired setting."] --> B["OK"]
TV Display: (Default: 16:9 Widescreen)
Sets the aspect ratio of the playback image to fit your TV. See the note on the right.

HDMI Video: (Default: Auto)
You can select the desired "HDMI Video" among the settings. See the note on the right.

EasyLink: (Default: On)
EasyLink allows integrated system control over HDMI. See the note below.

5
To Exit the Menu

Note(s):
Voice Guide:
• In order to enable the voice guide function, the OSD language needs to be set to English. Voice guide is not available in French or Spanish.
- "HDMI Audio" cannot be configured when voice guide is set to On, as it is fixed to PCM. In order to configuring the setting, set voice guide to off.
TV Display:
- Select "4:3 Crop" for a full height picture with both sides adjusted.
- Select "4:3 Normal", black bars may appear on the top and bottom of the TV screen.
- Select "16:9 Widescreen" if a wide-screen TV is connected to this unit.
- Select "16:9 Squeeze" to display 4:3 aspect ratio in the center of the 16:9 screen when playing back 4:3 images.
Note:
HDMI video:
Auto:
HDMI video resolution will be selected automatically depending on the connected HDMI device.
EasyLink:
- EasyLink allows integrated system control over HDMI and is part of the HDMI standard. This function may not work properly depending on the device connected to the unit. When "EasyLink" setting is set to "On" the functions listed below will be available.
■ One touch play
When the buttons below on the remote control are pressed then operations are performed on this unit, the TV will automatically be turned on and switched to the appropriate video input. Buttons for one touch play:
- [PLAY▶], [SKIP ◀◀◀,▶▶I], [INFO], [SETUP]
- [TOP MENU], or [MENU] (when a disc is inserted in the unit)
■ One touch standby
When you press and hold [POWER] for 2 seconds, it turns off the TV first, then turns off this unit.
When the connected EasyLink (HDMI CEC) compatible display device is turned off first, it then turns off the power to this unit.
■ System information
Get & set menu language
The unit recognizes the OSD language set on the TV and automatically sets the same language as the on-screen language in "Menu" setting.
Feature is available only when "Menu" in "LANGUAGE" menu is set to "Auto" while connected via an HDMI cable.
B
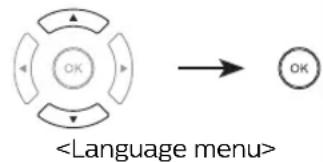
Language settings
Follow steps 1 and 2 on page 16.
3
Select the desired item.

flowchart
graph TD
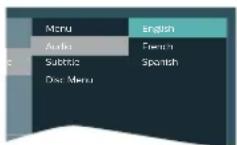
    A["<<Language menu>>"] --> B["Menu: (Default: English) Sets the language for the on-screen display."]
    B --> C["Select the desired language."]
    C --> D["OK"]
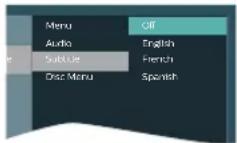
    A --> E["Audio: (Default: English) *1 *2 Sets the audio language."]
    E --> F["Subtitle: (Default: Off) *1 *2 Sets the subtitle language."]
    F --> G["Disc Menu: (Default: English) *1 Sets the language in DVD menu."]
5
To exit the menu
flowchart
graph LR
    A["Start"] --> B["OK"]
    style A fill:#fff,stroke:#000
    style B fill:#fff,stroke:#000
    note bottom of B: <Language menu>

4
Menu: (Default: English)



Note(s):
*1 · Language options are not available with some discs.
- Only the languages supported by the disc can be selected.
*2 "Language" setting for "Audio" and "Subtitle" are not available with some discs. If multiple languages are available on disc, then select [AUDIO] or [SUBTITLE] to select the desired language. Refer to page 15 for detail.
- In order to enable the voice guide function, the OSD language needs to be set to English. Voice guide is not available in French or Spanish.

Audio settings
Choose the appropriate audio settings for your device. It only affects the sound during DVD playback. Follow steps 1 and 2 on page 16.
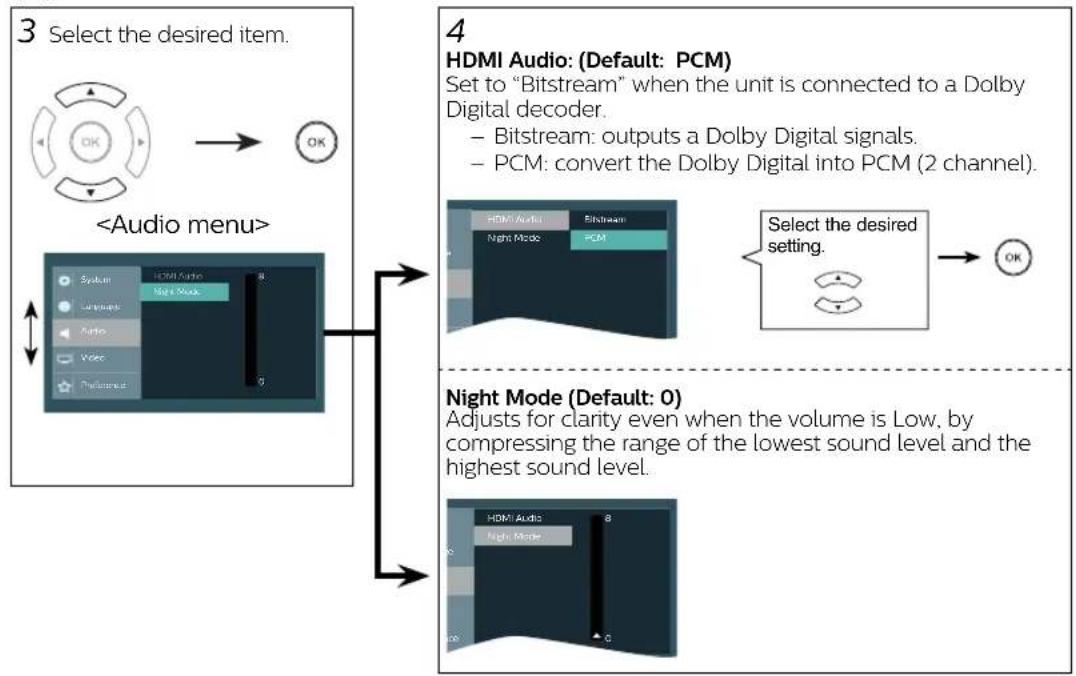
flowchart
graph TD
A["3 Select the desired item."] --> B["<Audio menu>"]
B --> C["4 HDMI Audio: (Default: PCM)"]
C --> D["Select the desired setting."]
D --> E["Night Mode (Default: 0)"]
E --> F["4 HDMI Audio: (Default: PCM)"]
F --> G["Set to "Bitstream" when the unit is connected to a Dolby Digital decoder.<br>- Bitstream: outputs a Dolby Digital signals.<br>- PCM: convert the Dolby Digital into PCM (2 channel)."]
E --> H["Night Mode: Adjusts for clarity even when the volume is Low, by compressing the range of the lowest sound level and the highest sound level."]

Note(s):
Audio Out:
- Bitstream:
Connecting to a Dolby Digital decoder for Dolby Digital audio output.
The multi-channel audio signals are output from HDMI OUT jack with Bitstream or LPCM.
PCM:
Connecting to another device (an MD deck or DAT deck etc.) without a Dolby Digital decoder. Convert the Dolby Digital into LPCM (2 channel).
- This unit does not support DTS audio. This is not a malfunction.
You need to set this unit to "Bitstream" in the "HDMI Audio" Menu and also need to connect to a TV or amplifier that supports DTS, then the audio will be output as DTS. It is only available when connected via a HDMI cable. - "HDMI Audio" cannot be configured when voice guide is set to on, as it is fixed to PCM. In order to configuring the setting, set voice guide to off.

Video settings
You can change the video functions. Follow steps 1 and 2 on page 16.

flowchart
graph TD
    A["3 Select the desired item"] --> B["<Video menu>"]
    B --> C["4 Set Brightness (Default: 6) Adjusts the brightness."]
    C --> D["Set Contrast (Default: 6) Adjusts the contrast."]
    D --> E["Set Color (Default: 0) Adjusts the color saturation."]
    E --> F["Set Tint (Default: 0) Adjusts the color tone."]
    F --> G["5 To Exit the Menu SETUP"]
Note(s):
- The horizontal white bars indicate the default setting.
- The settings will remain effective even if the unit is switched into the Standby mode.
- The effect of picture adjustment may differ depending on the connected TV.
E
Preference settings
You can change the display functions. Follow steps 1 and 2 on page 16.
3
Select the desired item.

![System Language Audio Video Preference Parento Control Password Default 1 [Nis Sola] 2 [G] 3 [PSI] 4 [PG-13] 5 [PSR] 6 [S] 7 [NK-14] 8 [Aout]](/content/2026/05/1142670/images/04a4ccfbe20bc439bd4313e49d577c42092f10575a944b9481ebe5bd620d8531.jpg)
4
Parental Control: (Default: 8[Adult])
Sets the rating level for the disc playback.
Rating settings allows you to set the rating levels of your DVD. Playback will stop if the ratings exceed the levels you set.
- The rating level can be changed when a password has not been set yet for the first time use.
- If you have set a password already, "Parental Control" cannot be selected.
![Parental Control Password Default 1 [Kins Safe] 2 [SI] 3 [PG] 4 [PG 1] 5 [PCR] 6 [RI] 7 [IAC-0] 8 [ACult]](/content/2026/05/1142670/images/c8b5e108c184b9b60426d084a296e01b240948ee1cdfb535a53ce3deb7f6d0d4.jpg)
![PHILIPS DVP2902 - Parental Control: (Default: 8[Adult]) - 2](/content/2026/05/1142670/images/2b5067a321159a2f0a10a70a225e95e0d8212171e359e243fa7fdefbcbe4c069.jpg)
flowchart
graph TD
    A["Select the desired rating."] --> B["OK"]
Password:
Sets the password for "Parental Control" and "Default" settings.
-For the first time use.
- This number will be used as the password. Record in case you forget it.


Enter any 4-digit number(except for 4737).
- Press cursor [▲] or [▼] to change the number, then press cursor [▶].
- Press cursor[◀] to erase if you input the incorrect number.
- When 4-digit numbers are entered, press [OK].
-A password has been set already 🔍 is displayed.)


Enter your 4-digit password.
- Press cursor [▲] or [▼] to change the number, then press cursor [▶].
- When 4-digit numbers are entered, press [OK]
Default:
Reset to default setting.
- "Default" is not selected if you have set a password already.


5
To exit the menu

Note(s):
Password:
- If you forget the password, enter "4737" at step 4, then enter your new password.
- Playback will stop if the ratings exceed the levels you set, it will require you to enter a password before the disc will play back.
- This function is available only when 📄 displayed.
Default:
- When you do not wish to initialize, press [SETUP] to exit the menu at step 4.
INFORMATION
Troubleshooting guide
If the Unit does not perform properly when operated as instructed in this owner's manual, refer to the following.
| Problem Corrective action | |
| No power. | - Check if the AC power cord is properly connected.- Unplug from the AC outlet, and wait for 5-10 seconds and then plug it in again. |
| No sound or picture. | - Check if the TV is switched on.- Check the video connection.- Check the audio / video cable connections to the TV.(Refer to page 8.)- Check whether the connected TV or other device supports HDCP.(This unit will not output a video signal unless the other device supports HDCP.) |
| Distorted picture. | - Sometimes a small amount of picture distortion may appear.This is not a malfunction.- Connect the unit directly to the TV. |
| Completely distorted picture or black / white picture with DVD. | - Connect this unit directly to the TV.- Make sure the disc is compatible with the unit. |
| No Sound or Distorted Sound. | - Adjust the volume.- Check that the speakers are connected correctly. |
| No DTS Audio Is Output. | - This unit does not support DTS audio.This is not a malfunction.- You need to set this unit to "Bitstream" in "HDMI Audio" menu and also need to connect to the TV or amplifier that supports DTS, then the audio will be output as DTS. It is only available when connected via a HDMI cable.- "HDMI Audio" cannot be configured when voice guide is set to on. In order to set "HDMI Audio" to "Bitsstream", set voice guide to Off. |
| Bitstream is not output in Dolby Digital audio. | - Make sure that "Voice Guide" is set to "Off". "HDMI Audio" is fixed to "PCM" when "Voice Guide" is set to "On". In order to set "HDMI Audio" to "Bitstream", set "Voice Guide" to "off". |
| Picture freezes momentarily during playback. | - Check the Disc for Fingerprints/Dirty and Clean with a Soft cloth wiping from center to edge.- When Voice Guide is set to "On" and playback functions (such as Fast-forward, etc) are used, DVD playback will be interrupted while a Voice Guide message is being output. In order to disable Voice Guide, press [SETUP] on the remote control, then select "SYSTEM" → "Voice Guide" → "Off". |
| Disc cannot be played back. | - Clean the disc.- Ensure the disc is inserted in correct position.- Insert a correct Type disc that plays back on this unit.- Check if the disc is defective by trying another disc.- Check if the parental settings exceeds the levels you set in the "Movie Rating" setting. (for DVD only)- Handle a disc with special care so that it does not have fingerprints, scratches, or dust on its surface. |
| No Return to Start-up Screen when Disc is Removed. | - Turn off the unit once and then restart. |
| The Unit does not Respond to the Remote Control. | - Aim the remote control directly at the sensor on the front panel.- Reduce the distance to the unit.- Re-insert the batteries with their polarities (+ / - signs) as indicated.- Replace the batteries in the remote control.- Press and hold any buttons on the remote control toward a digital camera. The remote control is working if you confirm a pulsating infrared light through the digital camera. |
| Buttons Do Not Work or the Unit Stops Responding. | - Please attempt to reset the unit by unplugging the AC power cord from the wall outlet and then plug it in again after 5-10 seconds. |
| The Unit Does Not Respond to some Operating Commands during Playback. | - Operations may not be permitted by the disc. Refer to the instructions for the disc. |
| The Unit Cannot Read CD / DVD. - | Use a commonly available cleaning CD / DVD disc to clean the lens before sending the unit for repair. |
| Angle Does Not Switch. | - The angle cannot be switched for a DVD which does not contain multiple angles. In some cases multiple angles are only recorded for specific scenes. |
| The Password for Rating Level has been Forgotten. | - Enter the default password "4737", then your forgotten password will be cleared. Then the rating level plus password will have to be set again. |
- Some functions are not available in specific modes, but this is not a malfunction. Read the description in this owner's manual for more details on correct operation's.
- Not all functions are available for all commercial discs.
Specifications
Output signal format:
NTSC color
Power source:
120 V AC + / - 10%, 60 Hz + / - 0.5%
Power consumption:
7 W (standby : 0.9 W)
Operating temperature:
41°F (5 °C) to 104 °F (40 °C)
Dimensions:
W : 9.9 inches (250 mm)
H : 2.0 inches (50.2 mm)
D : 7.4 inches (187.7 mm)
Weight:
Approx. 1.95 lbs. (0.88 kg)
- Designs and specifications are subject to change without notice.
- If there is a discrepancy between languages, the default language will be English.
NINETY (90) DAY LIMITED WARRANTY
WARRANTY COVERAGE:
This warranty obligation is limited to the terms as set forth below.
WHO IS COVERED:
This product is warranted to the original purchaser or the person receiving the product as a gift against defects in materials and workmanship as based on the date of original purchase (“Warranty Period”) from an Authorized Dealer. The original sales receipt showing the product name and the purchase date from an authorized retailer is considered such proof.
WHAT IS COVERED:
This warranty covers new products if a defect workmanship occurs and a valid claim is received within the Warranty Period. At its option, the company will either (1) repair the product at no charge, using new or refurbished replacement parts, or (2) exchange the product with a product that is new or which has been manufactured from new, or serviceable used parts and is at least functionally equivalent or most comparable to the original product in current inventory, or (3) refund the original purchase price of the product.
The Company warrants replacement products or parts provided under this warranty against defects in materials and workmanship from the date of the replacement or repair for ninety (90) days or for the remaining portion of the original product's warranty, whichever provides longer coverage for you. When a product or part is exchanged, any replacement item becomes your property and the replaced item becomes the company's property. When a refund is given, your product becomes the company's property.
Note: Any product sold and identified as refurbished or renewed carries a ninety (90) day limited warranty. Replacement product can only be sent if all warranty requirements are met. Failure to follow all requirements can result in delay.
WHAT IS NOT COVERED - EXCLUSIONS AND LIMITATIONS:
This Limited Warranty applies only to new company manufactured products that can be identified by the trademark, trade name, or logo affixed to it. This Limited Warranty does not apply to any hardware product or any software, even if packaged or sold with the product, as manufacturers, suppliers, or publishers may provide a separate warranty for their own products packaged with the bundled product. The company is not liable for any damage to or loss of any programs, data, or other information stored on any media contained within the product, or other additional product or part not covered by this warranty. Recovery or reinstalla, data or other information is not covered under this Limited Warranty. This warranty does not apply (a) to damage caused abuse, misuse, neglect, misapplication, or non-supplied product, (b) to damage caused by service performed by anyone oth
company approved Authorized Service Location, (c) to a product or a part that has been modified without written company permission, or (d) if any serial number has been removed or defaced, or (e) product, accessories or consumables sold "AS IS" without warranty of any kind by including refurbished product sold "AS IS" by some retailers.
This Limited Warranty does not cover:
- Shipping charges to return defective product. - Labor charges for installation or setup of the product, adjustment of customer controls, installation or repair of antenna/signal source systems outside of the product.
in material repair and/or part replacement because of improper installation or maintenance, connections to improper voltage supply, power line surge, lightning damage, retained images or screen markings resulting from viewing fixed stationary content for extended periods, product cosmetic appearance items due to normal wear and tear, unauthorized repair or other cause not within the control of the company.
- Damage or claims for products not being available for use, or for lost data or lost software.
- Damage from mishandled shipments or transit accidents when returning product.
- A product that requires modification or adaptation to enable it to operate in any country other than the country for which it was designed, manufactured, approved and/or authorized, or repair of products damaged by these modifications.
- A product used for commercial or institutional purposes (including but not limited to rental purposes).
- Product lost in shipment and no signature verification receipt can be provided.
- Failure to operate per Owner's Manual.
TO OBTAIN ASSISTANCE...
Contact Customer Care Center at:
1-866-515-1124
REPAIR OR REPLACEMENT AS PROVIDED UNDER THIS WARRANTY IS THE EXCLUSIVE REMEDY FOR THE CONSUMER, WITH THE ISSUING COMPANY NOT LIABLE FOR ANY INCIDENTAL OR CONSEQUENTIAL DAMAGES FOR BREACH OF ANY EXPRESS OR IMPLIED WARRANTY ON THIS PRODUCT. EXCEPT TO THE EXTENT PROHIBITED BY APPLICABLE LAW, ANY IMPLIED WARRANTY OF MERCHANTABILITY OR FITNESS FOR A PARTICULAR PURPOSE ON THIS PRODUCT IS LIMITED IN DURATION TO THE DURATION OF THIS WARRANTY.
ation of programs Some states do not allow the exclusions or limitation of incidental or consequential damages, or allow limitations on how long an implied by accident warranty lasts, so the above limitations or exclusions may not apply to you.
1 Conexiones

This product has been manufactured by and is sold under the responsibility of P&F USA, Inc., and P&F USA, Inc. is the warrantor in relation to this product.
The Philips trademark and the Philips Shield Emblem are registered trademarks of Koninklijke Philips N.V. used under license.


- PRECAUTIONS
- Included accessories
- Connecting to RF modulator (not included)
- Note(s):
- Contents
- SETUP
- DVD FUNCTIONS
- INFORMATION
- CAUTION:
- IMPORTANT SAFETY INSTRUCTIONS
- FCC WARNING
- RADIO-TV INTERFERENCE
- Disconnect the mains(AC) plug to shut off when find trouble or not in use. The mains(AC) plug shall remain readily operable.
- LASER SAFETY
- IMPORTANT COPYRIGHT INFORMATION
- To avoid the hazards of electrical shock and fire
- Location and handling
- Dew condensation warning
- Note about recycling
- Notice for progressive scan output
- Disposal of used batteries
- TRADEMARK INFORMATION
- SYMBOLS USED IN THIS MANUAL
- MAINTENANCE
- Servicing
- Cleaning the cabinet
- Cleaning discs
- Cleaning the disc lens
- Disc handling
- Unplayable discs
- NEVER play back the following discs as a malfunction may result!
- Connections
- Rear terminals
- Included cables used in this connection are as follows:
- After connecting to your TV:
- Input modes for common TV brands:
- Connection to an audio system
- HDMI mode and actual output signals
- Copyright protection system
- Note:
- Installing the batteries for the remote control
- \* Batteries not included.
- -Line of sight:
- Please note :
- Playback
- Before:
- Disc menu
- Calling up a menu screen during playback
- Resume playback
- Pause and step-by-step playback
- Fast forward / Reverse search
- Slow forward search
- Zoom
- Search functions
- Using track / file search
- Using [SEARCH/NUMBER]
- Enter the desired track / file number.
- Press [OK]
- Using [|◀◀,▶▶] (SKIP)
- Using title / chapter search
- Enter the desired title or chapter number.
- Press [OK].
- Using time search
- Enter the desired time.
- Repeat playback
- Repeat A-B playback
- Random playback
- Subtitle language
- Audio language
- Camera angles
- System Settings
- 4
- Voice Guide: (Default: On)
- TV Display: (Default: 16:9 Widescreen)
- HDMI Video: (Default: Auto)
- EasyLink: (Default: On)
- 5
- Voice Guide:
- TV Display:
- HDMI video:
- EasyLink:
- B
- Language settings
- Audio settings
- Audio Out:
- Video settings
- E
- Preference settings
- 3
- Parental Control: (Default: 8[Adult])
- Password:
- Default:
- Troubleshooting guide
- Specifications
- Output signal format:
- Power source:
- Power consumption:
- Operating temperature:
- Dimensions:
- Weight:
- NINETY (90) DAY LIMITED WARRANTY
- WARRANTY COVERAGE:
- WHO IS COVERED:
- WHAT IS COVERED:
- WHAT IS NOT COVERED - EXCLUSIONS AND LIMITATIONS:
- This Limited Warranty does not cover:
- TO OBTAIN ASSISTANCE...
- Conexiones
Brand : PHILIPS
Model : DVP2902
Category : DVD player