EDS6255 - Security Camera ENGENIUS - Free user manual and instructions
Find the device manual for free EDS6255 ENGENIUS in PDF.

User questions about EDS6255 ENGENIUS
0 question about this device. Answer the ones you know or ask your own.
Ask a new question about this device
Download the instructions for your Security Camera in PDF format for free! Find your manual EDS6255 - ENGENIUS and take your electronic device back in hand. On this page are published all the documents necessary for the use of your device. EDS6255 by ENGENIUS.
USER MANUAL EDS6255 ENGENIUS
natural_image
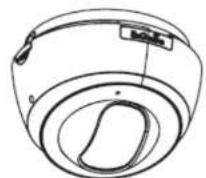
Close-up of a white spherical ceiling-mounted camera lens with a circular lens and control panel (no visible text or symbols)EDS6255
version 1.0
2Megapixel Full HD Wireless Dome Network Camera
Table of Content
- Product Overview....6
1.1. Introducon 6
1.2. Read Before Using 7
1.3. Key Features....8
1.4. Package Contents....9
1.5. Physical Descripon 10 - Installaon 11
2.1. Hardware Setup 11
2.2. Ceiling / Wall Mount 15
2.3. IP Camera Connecon....17
2.3.1. Connecng via Ethernet Cable....18 - Accessing the Camera aer Installaon....19
3.1. Managing using PC or Laptop 20
3.1.1. EnViewer Finder 20
3.1.1.1. EnViewer Finder: DDNS 28
3.1.1.2. EnViewer Finder: Cong 30
3.1.1.3. EnViewer Finder: Upgrade....33
3.1.1.4. EnViewer Finder: Reset.... 34
3.1.1.5. EnViewer Finder: Reboot....35
3.1.2. Web Browser 36
3.2. Manage using Tablet or Mobile Phones 38
4. First Time Basic Sengs 39
4.1.1. Seng the Interface Language 44
4.1.2. Changing the Camera Name 45
4.1.3. Seng the Camera Time 47
4.1.4. Seng the Storage Folder 48
4.1.5. Adding a User Account....49
5. User Interface....50
5.1. Navigaon Panel 51
5.2. Live View Sengs 54
5.3. Main Menus 57
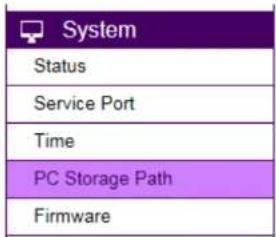
5.4. System....59
5.4.1. Status....60
5.4.2. Service Port....61
5.4.3. Time 62
5.4.4. PC Storage Path....63
5.4.5. Firmware....64
5.4.6. Backup....67
5.4.7. Reboot/Reset to Default 72
5.4.8. Language 73
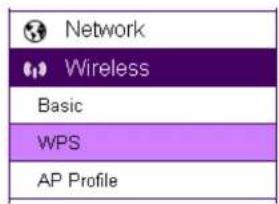
5.5. Network 74
5.5.1. IP Conguraon 75
5.5.2. EnGenius Cloud Service 79
5.5.3. UPnP 84
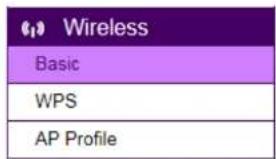
5.6. Wireless....85
5.6.1. Basic 85
5.6.2. WPS 88
5.6.3. AP Prole....90
5.6.3.1. Add 91
5.6.3.2. Edit 93
5.6.3.3. Move Up / Down 94
5.6.3.4. Delete 94
5.6.3.5. Connect 95
5.7. Media 96
5.7.1. Video 97
5.7.2. Camera 99
5.7.2.1. Light Setng 100
5.7.2.2. Flicker Control 103
5.7.2.3. Mirror 104
5.7.2.4. Day/Night Mode....106
5.7.3. Advanced....107
5.7.4. Privacy Mask 109
5.7.5. Audio 110
5.8. Event Management....112
5.8.1. Event Control....113
5.8.1.1. Moon Detecon.... 116
5.8.1.2. Audio Detecon 119
5.8.1.3. Tampering Detecon....120
5.8.1.4. Event Acon 121
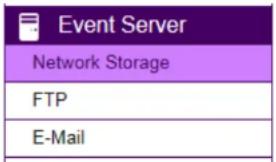
5.9. Event Server 123
5.9.1. Network Storage 125
5.9.1.1. NFS (Network File System)....126
5.9.1.2. SAMBA....127
5.9.2. FTP (File Transfer Protocol)....128
5.9.3. E-mail Alerts 129
5.10. Storage Info 131
5.9. User Management 133
5.10.3. Delete User 138
5.10.4. Push Message Mobile List....140
- Camera Connecng to EnGenius Router 141
5.11. Enable Router Storage Funcon 144
5.12. Camera Prole....148
5.12.1. Add Prole....148
5.12.2. Edit Prole....151
5.12.3. Delete Prole 152
5.12.4. Synchronize....153
5.13. Fine Tune Camera Conguraon set by the Router....154
5.14. Access the Media les on the Router 155
5.14.1. Using web browser....155
5.14.2. Using Windows File Explorer 159
6. Camera Connecng to Other Router 162
7. Applicaon Guide....163
7.1. Example: Remote Surveillance and Moon Detecon....164
7.1.1. Step 1: Choose Event Control....165
7.1.2. Step 2: Congure Moon Detecon....166
7.1.3. Step 3: Congure Event Acon 167
8. Trouble Shoong....168
8.1. Viewing Your Video....168
8.2. Networking....170
8.3. Security and Privacy 171
8.4. Cloud Video Services....172
9. Appendix 173
1. Product Overview
The EDS6255 is a 2-Megapixel Day & Night wireless Dome Network Camera which adds surveillance capability to a variety of network environments. With a built-in removable mechanical IR-cut Iter, it helps users keep an eye on what maers and get need by what just happened on demand allowing 24/7 monitoring remotely.
It features LED Infrared Night Vision with automatic acvaon system. Megapixel HD with High speed H.264 encoding ensures high quality image recording without losing any details. Infrared Night Vision feature can assist to deliver 24/7 non-stop monitoring. With the support of patented EnGenius Cloud service, users can monitor their surveillance networks remotely in real me any me anywhere on any computer or on iOS or Android based mobile devices using EnGenius APPs.
1.1. Introducon
This document will guide you through detail steps for EDS6255 installaon and both basic and advanced conguraons. Familiarizing with the product features can help you to fully ulize the camera for various applicaon scenarios. Please note that the product feature may improve over me, be sure to check out the latest rmware and user's manual for most updated changes on EnGenius web site.
Thank you for choosing EnGenius products.
1.2. Read Before Using
For users' convenience, the camera is congured with DHCP enabled by default which allows the camera to get an IP address for itself automatically. This applies to majority of the surveillance network sengs. However, if you are connecng the product in an oce (or any public setng), you may need to consult the IT department in charged for IP setng detail to avoid IP address conict.
Like all electronic devices, do not install the product in hazardous environment where humidity or temperature is high to avoid danger. This camera is designed for indoor usage; when the camera is wall-mount installed, please secure the camera and wires in place to prevent it from dangling.
1.3. Key Features

■ Megapixel HD Resoluon to Deliver Quality Streaming on A Variety of Mobile Devices and PCs
■ LED Infrared Night Vision up to 49 Feet (15 Meters) with Automac Acvaon System
■ Wireless N Network Compliant with Opmum Wi-Fi Performance
■ Supports Simultaneous Dual-Stream Recording with High Speed H.264 Encoding
■ Built-in Microphone
■ Mulple Storage Opons-Built-in Micro SD/SDHC Slot for Onboard Storage and Samba/FTP Client to Save to an External Storage
■ Supports Push Message and Play Back on Smart Devices triggered by Moon
■ EnGenius Cloud Services Supported (Apps and Web-based Services)
1.4. Package Contents
The package should contain all of following items shown below.
EDS6255

CD with User Manual and Software

Ceiling Mount Hooks

RJ-45 Ethernet Cable
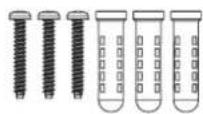
Screws / Plastic Anchors

Quick Start Guide
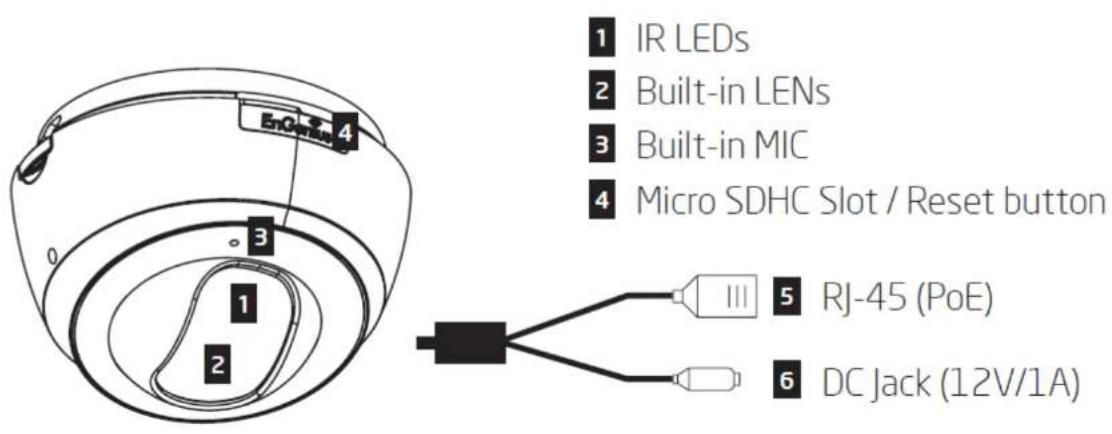
1.5. Physical Descripon
2. Installaon
2.1. Hardware Setup
Before installing the camera, please make sure the camera is properly congured and tested before hardware installaon especially if it is mounted on a wall. Please also make sure the power outlet is available near the installaon site.
I. Basic Connecon (without PoE)
A) Connect the camera to a switch via Ethernet Cable.
B) Connect the supplied power cable from the camera to the power outlet.

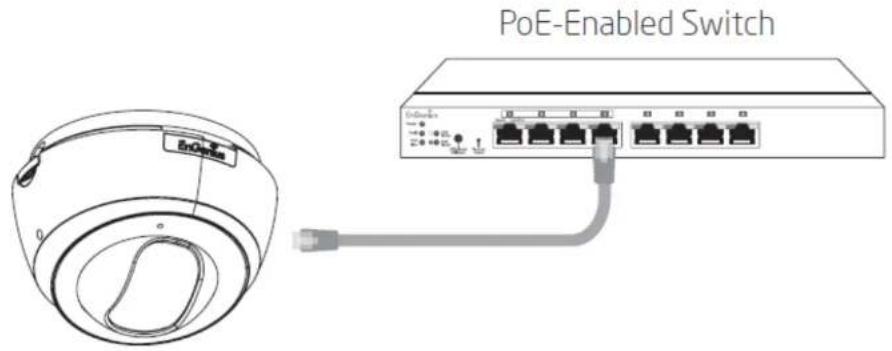
II. Power over Ethernet (PoE) Connecon
A) When connecng to PoE-Enabled Switch:
The camera is PoE compliant, please connect the Ethernet Port from the Cable Harness to a PoE-enabled Switch using single Ethernet Cable.
B) When connecng to a non-PoE Switch:
Connect the camera to a non-PoE Switch via PoE Injector (oponal).

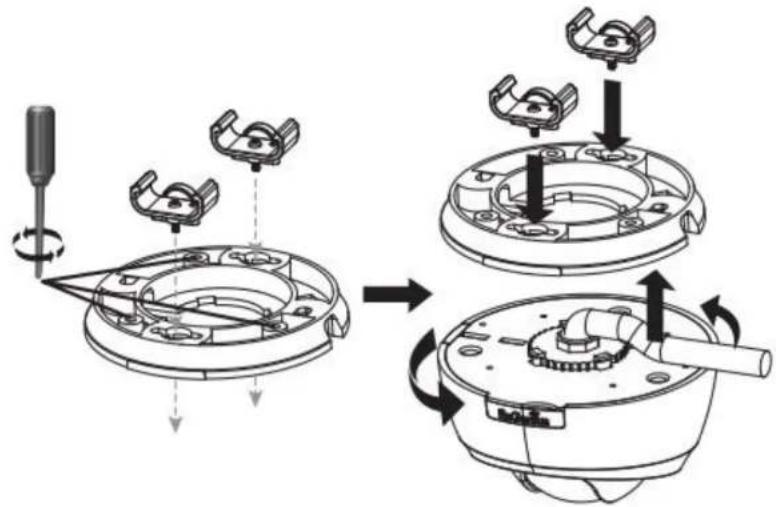
2.2. Ceiling / Wall Mount
- Locate an area on the ceiling / wall and make sure the area is capable of supporting the weight of camera.
- Use the ceiling mount bracket screw slots to drill the moung screws into the ceiling or wall.
● Twist the camera body into the ceiling mount bracket and route cables into the side of conduit entry tunnel.
● Twist the camera to set counter-clockwise carefully and slowly until it is secured rmly.
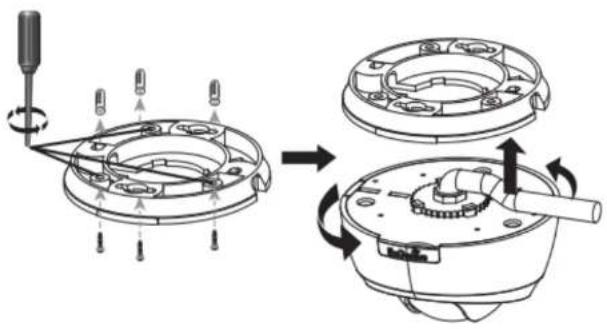
For Installaon with ceiling mount hooks into the ceiling light grid steel framing, rst use the hooks and screw into the ceiling mount bracket unl xed upon the ceiling light grid steel framing. When done, twist the camera unl it is secured.
2.3. IP Camera Connecon
Before setting up the camera with your router, please ensure the Internet is ready. When camera is configured with the router with Internet connecon, you can then access the camera through the Internet anytime anywhere. This second will guide you through the conncon setup. Please follow the following guide step by step to setup the conncon between your camera and the router. There are two ways to establish conncon between the camera and router: Wired (Ethernet) and Wireless (Wi-Fi).
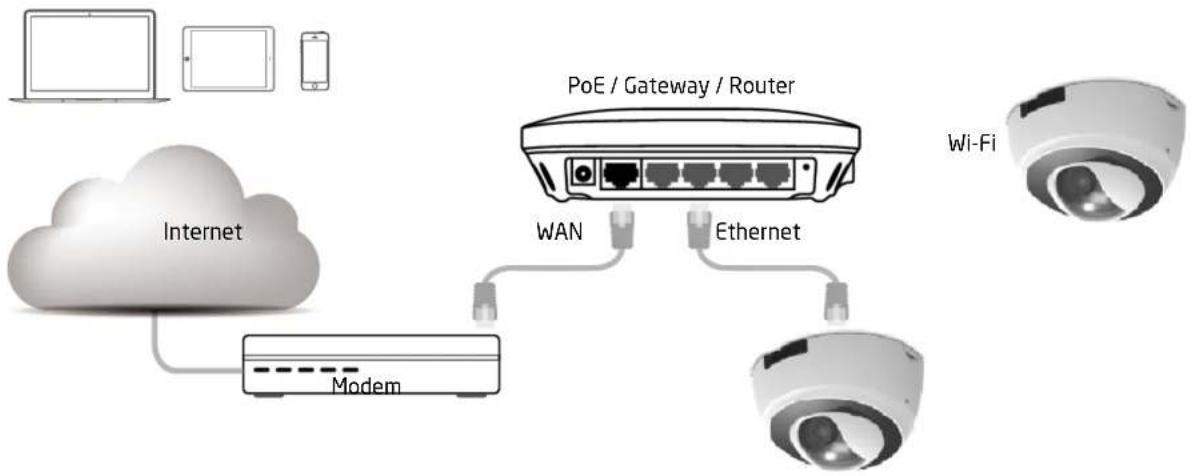
flowchart
graph TD
    A["Wi-Fi"] --> B["PoE / Gateway / Router"]
    C["Internet"] --> D["Modem"]
    D --> E["WAN"]
    D --> F["Ethernet"]
    G["Smartphone"] --> H["Smartphone"]
    I["Computer"] --> J["Smartphone"]
2.3.1. Connecting via Ethernet Cable
Connect the camera to the router on the LAN ports with a network RJ45 Ethernet cable (shown below). You may use the cable that came with the package for initial setup; however, you may be required to switch to wireless seng or purchase a longer cable to extend the camera for longer range. As a rule of thumb, if your camera is close enough to the router use Ethernet cable if possible for optimized result; and for wall mount installaon, it's best to adopt wireless setup. You can choose either way for the applicaon you nd suitable.
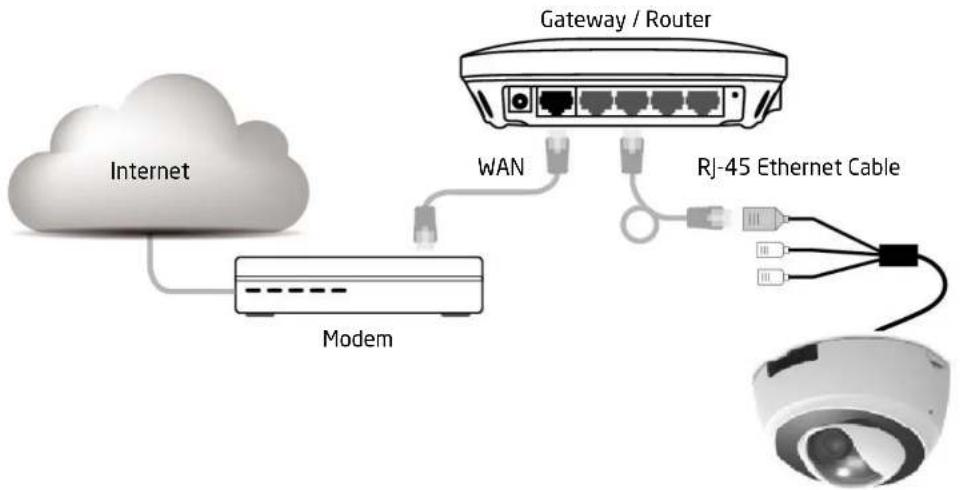
flowchart
graph TD
    A["Internet"] --> B["Modem"]
    B --> C["WAN"]
    C --> D["Gateway / Router"]
    D --> E["RJ-45 Ethernet Cable"]
    E --> F["Satellite"]
3. Accessing the Camera aer Installaon
There are several ways to get access to your camera on your network. You should probably have a setup similar to the following diagram. You can manage the camera using your PC, Laptop, Tablet or iOS/Android based on mobile phone; we will call it management staon in the following context. The key point is that management staon and the camera must be connected under the same subnet.

flowchart
graph TD
    A["Management Station"] -->|Wireless Signal| B["Gateway / Router"]
    C["Smart Phone"] -->|Wireless Signal| B
    D["Computer"] -->|Wireless Signal| B
    B -->|Ethernet| E["Wire Setup"]
    B -->|Wi-Fi| F["Wireless Setup"]
3.1. Managing using PC or Laptop
3.1.1. EnViewer Finder
EnViewer Finder is a tool provided by EnGenius that helps you discover the camera within a local network. You should be able to nd the tool inside the CD. Please install the tool to your management staon desktop for quick access when you need it. Please take note of the IP address shown. In this example, 192.168.0.101 is the camera IP address.
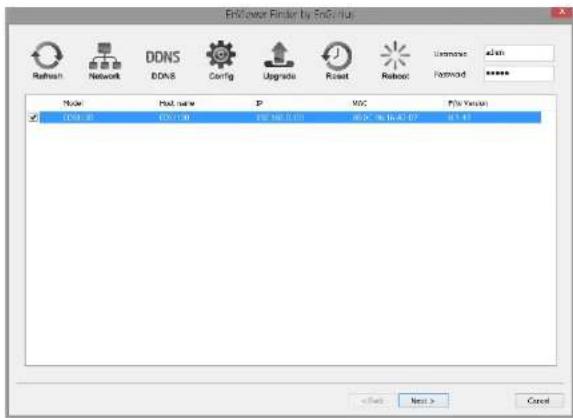

Double-click on the icon to run.
The camera list at the center displays the discovered cameras currently connected to your router (local network). If you do not nd the one you intend to congure, please click on Refresh to rescan the network unl it appears on the list. Please turn o any heavy-loading applicaons such as P2P that may occupy your network.
Enter Username and Password for the selected camera on the list.
Click on Next to start conguraon.
The EnViewer Finder will guide you step by step through the basic settings Network, DDNS and Cong. You can also switch between sengs by clicking the icons on the panel.


Rescan the network for camera.
Go to Network seng
DDNS
DDNS

Config

Upgrade
Go to DDNS seng
Go to Camera Video Conguraon seng
Upgrade the current camera rmware

Reset
Reset the current camera to factory default

Reboot
Reboot/restart the current camera
EnViewer Finder: Network
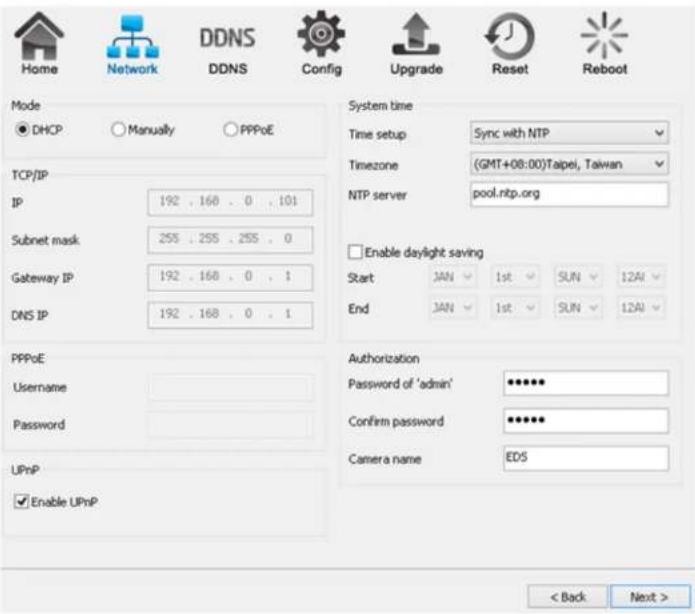
MODE: There are three modes that your camera can get its IP address. DHCP, Manually, or PPPoE.
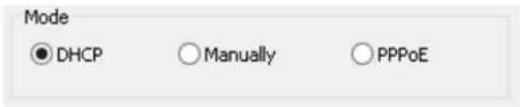
DHCP:
It is the most popular way in the home network seng. It will request IP address from your router automacally. The requirement is that your router should enable DHCP (which is basically the default setng for most of the home router vendors). You are not required to enter any IP related informaon.
Manual:

You will need to assign the IP address details in TCP/IP secon. Please ensure that the IP address is not being used by someone else in the network.
PPPoE:
PPPoE
Username
Password
If you are connecng to the Internet without going through your router, you can connect the camera directly to your modem (given that your Internet service is using PPPoE protocol). Please consult your local ISP provider for more detail. Basically, the PPPoE seng is exactly the same as your router. You need to provide at least the Username and Password to get access.
UPnP: this feature must be enabled so that the camera can be discovered by UPnP services. Leave it enabled if you unsure what UPnP is.
UPnP
Enable UPnP
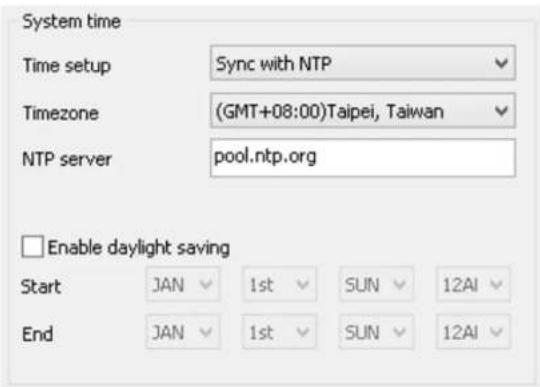
System Time:
Like any other surveillance system, me is essenal because we want to keep track of the me of the events recorded or detected by the camera. By default, the camera is connected to a public NTP server (pool.ntp.org) and its me is always synchronized with the server over the Internet. Normally, you only need to change the Time Zone. Choose the one that matches your locaon. Leave the other seng as default should be ne. Seng the wrong me server or me zone will result in inaccurate scheduling and me stamp.
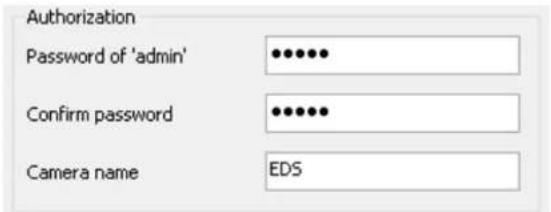
Authorizaon:
You may change the Password of 'admin' or Camera Name here. Please note that, once you changed the password. You will need to provide your new password next me upon login to the camera through EnViewer Finder or Web Browser. The Camera Name is the camera host name that represents the identity of the camera. If you installed several cameras, please assign a unique name for each camera for beer idencaon.
3.1.1.1. EnViewer Finder: DDNS
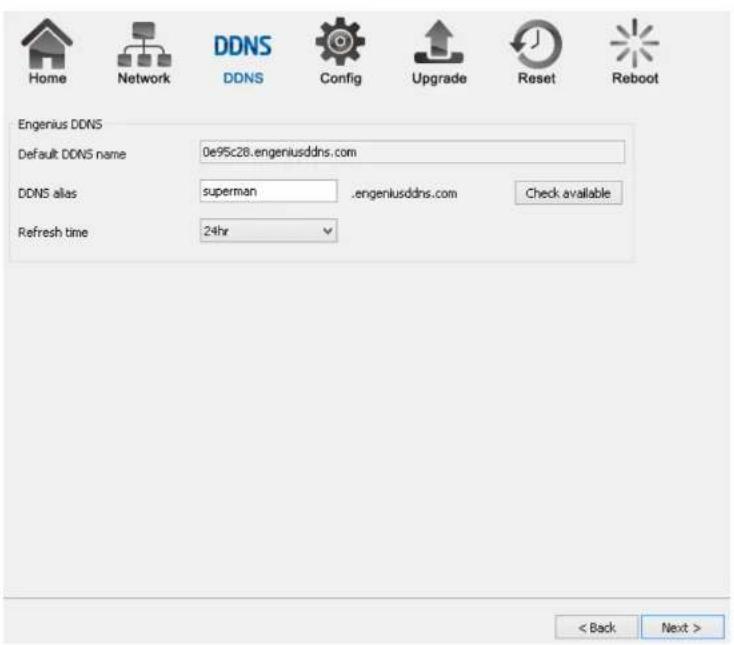
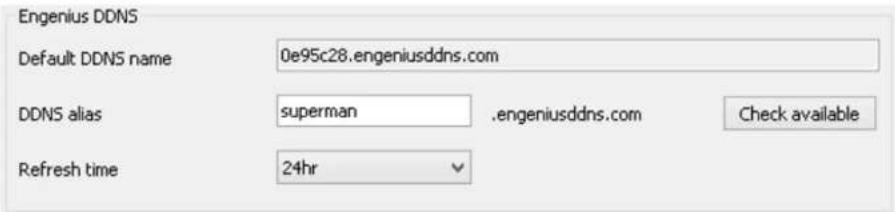
Default DDNS name: Each camera has a unique DDNS name printed on the back of your camera. It is the default DDNS name.
DDNS Alias: You may try to rename it (alias) to a name so that you can memorize it beer. For instance, you can use your inials with your birthday as a combinaon; for example, ab19791220. Then you need to check whether the name has been taken by someone else by clicking on Check Availability buon. If the alias is not being used by others, then you can access the camera with both your default DDNS and the new alias DDNS (ab19791220.engeniusddns.com).
Refresh Time: opons are 3HR, 6HR, 9HR, 12HR and 24HR. DDNS server needs to synchronize with your IP address often so that you can access your device over the Internet with DDNS name. Depends on your Internet Service provider, your WAN IP address lease me will be dierent. You can check with your local Internet Service provider for WAN IP address refresh me. The default seng is 24HR (which means DDNS server will check the synchronizaon every 24 hours). Normally, the default seng 24HR is okay for most cases.
3.1.1.2. EnViewer Finder: Cong
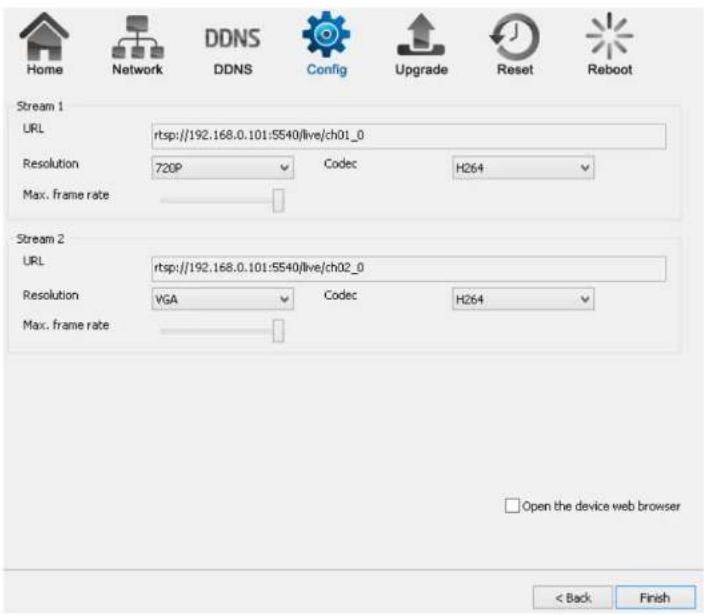
URL
The URLs are provided for your reference. There are many 3 ^rd party media player that supports RTSP streams. You can provide these URLs to those players and view the camera streams in real me.
Resoluon
Usually you do not need to worry about this page seng. However, you may need to know that the camera has two concurrent video streams running at the same me. Stream 1 serves for monitoring over browser while Stream 2 serves mobile APP EnViewer. The reason that Stream 2 has lower resoluon (VGA) is that mobile devices have smaller screens and have limited network bandwidth than regular PC/Laptop; therefore, keeping lower resoluon helps to smoother the view.
Codec
This seng determines what codec used for video compression. Please use the default for optimized performance. The compression method aects overall performance and media le size. The opons are reserved for advanced purposes only.
Max frame rate
This seng determines how many frames are taken per second. This seng aects the quality of the video. High frame rate results in smoother video but larger video le.
□ Open the device web browser
Please Select this opon before hing Finish buon. This will open the web browser with the detect Camera IP address entered in the web browser URL for you. Please bookmark it to your favorite so that you don't have to memorize the IP address when next me you want to login into the camera. You can also use your DDNS name to access the camera management page. Either way works ne.
Click Finish when completed.
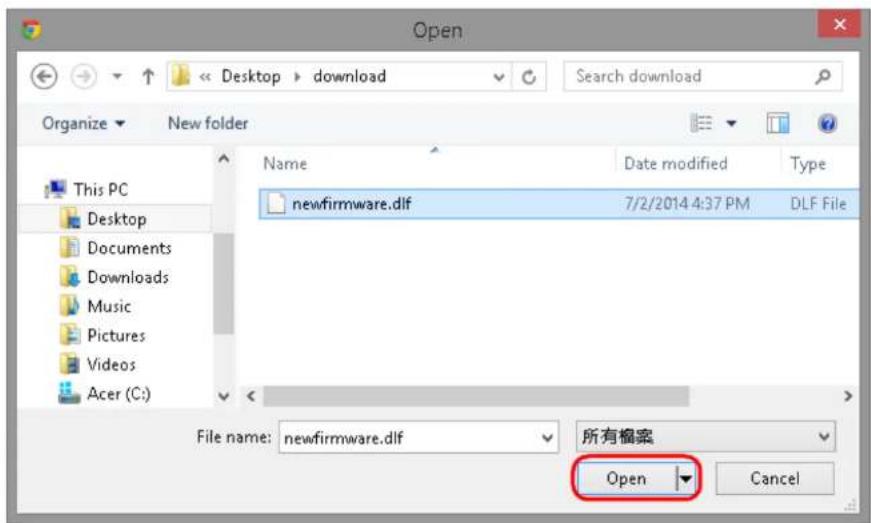
3.1.1.3. EnViewer Finder: Upgrade

EnViewer Finder also allows you to upgrade your camera rmware. The product feature may improve over me, you may check EnGenius social web site for the latest rmware. New rmware may contain bug xes or feature improvement; please download the latest rmware le to your local computer rst before proceeding further:
Click Browse and select the rmware le you downloaded.
Click Update to proceed with upgrade process.
It may take a moment for the upgrade process; please wait paently.
WARNING: Do not turn o the device in the middle of upgrade process. Terminang the device during the process will damage the device and may cause the device to fail.
3.1.1.4. EnViewer Finder: Reset

You can reset the camera to its factory default state and your sengs on the camera will be erased.
Note: It will take a while for the camera to come back on again. Therefore, the camera will not appear on the camera list if you rescan the network before it resets to default and boots up.
3.1.1.5. EnViewer Finder: Reboot

You can reboot the camera on EnViewer Finder if the camera stops responding for unknown reason.
Click on Yes to proceed.
Note: It will take a while for the camera to come back on again. Therefore, the camera will not appear on the camera list if you rescan the network before it boots up.
3.1.2. Web Browser
You can use web browser on the management staon to access the camera by entering IP address or DDNS of your camera. DDNS works only if your router is connected to the Internet. Please refer to the previous secon if you do not know the IP address or DDNS of your camera.
For this example we have our DDNS and IP address as follows:
DDNS: ab19791220.engeniusddns.com
IP Address: 192.168.0.101
If you are using EnGenius Intelligent Router or IoT Gateway please proceed to Manage camera over EnGenius Router chapter. If not, please proceed to First Time Basic Setng chapter for more detail guide on camera initial sengs.
EnGenius Router/Gateway
If you are using EnGenius Intelligent Router or IoT Gateway, you can manage the camera through the router management interface. The benet of this is that you can manage both the router and the camera on a single integrated user interface. Please refer to Manage camera over EnGenius Router secon for detail.
Please select a function to get started.
EnGenius®
Device Management


Router Management
EnGenius Cloud Services


EnShare | Storage Sharing


EnRoute | GPS Location Tracking


EnViewer | IP cam viewer
Note: Supports EnGenius IP-Cam only.
Start
3.2. Manage using Tablet or Mobile Phones
You can manage your camera over Tablet or Mobile Phones using the free EnGenius APP EnViewer. EnViewer currently supports the two most popular Android and iOS plaorms. Please search the keyword "EnViewer" in Google Play or iOS Store.

4. First Time Basic Sengs
Open your browser and type in the camera IP (e.g. 192.168.0.103) address or the given DDNS name printed on the label on the back of your camera (e.g. 0f9e76a.engeniusddns.com) using a regular web browser.
EnGenius®
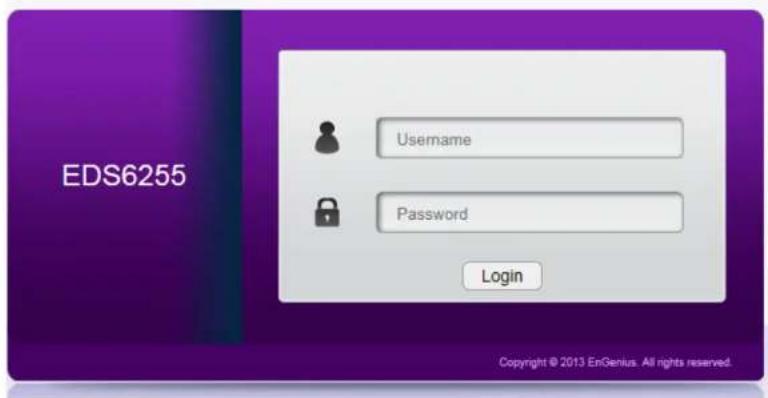

Enter the default username admin and password admin. Click Login to proceed.
For the rst me of login, you will be informed to download and install "WebCMS". Please click on "Download WebCMS" to start download (you will be required to have Internet conncon on your router). WebCMS enables browsers to support camera feature. Don't worry if you are prompted with a dierent version number because the soware upgrades from me to me.
WebCMS 0.2.3.0
Installation of IP Camera "WebCMS" plug-in control requires your attention.
You need to download the latest "WebCMS" plug-in and install to continue view camera web user interface.
Download WebCMS
If prompted with the following queson, click on Save (Internet Explorer).
Do you want to run or save webCMS_0.2.1.0.exe (4.74 MB) from 192.168.0.103?

This type of file could harm your computer.
Run
Save
Cancel
Save the downloaded le.
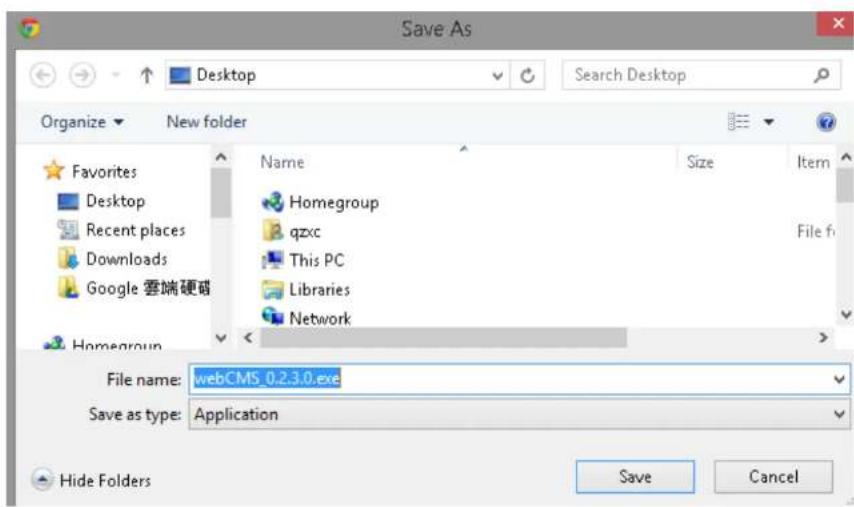
Once download is completed, you MUST close all the browsers before install WebCMS.

webCMS_0....
Double click on WebCMS to install the program. You may not have noced, the installaon is very fast, it only takes a few seconds for WebCMS to be installed.
When installaon is completed, open the browser and login into the camera again. You should be able to see the camera viewer in live as shown below. If you do not see the viewer that means you did not install WebCMS properly or try login using other browsers.
NOTE: If you are seeing grey color in the viewer, it is because the camera has detected insucient of light in the room and enabled night vision mode automatically. If you point your camera to a brighter area, you should be able to see it switched to normal color mode. Try a few places to get a feeling on how it works. If listening closely, you may hear the click sound from the camera when night vision is switched on and o.

Congratulaons, you are now ready to proceed with further camera sengs!
4.1.1. Setting the Interface Language
First of all you may want to change the user interface language. The default factory language is English. To change the language, click on

icon the make the change. On the language list, click to select the one you feel comfortable with from the list. The user interface with
refresh automacally with your chosen language.
Select Display Language

4.1.2. Changing the Camera Name
On the management page, click to access the conguraon Main Menu.
On the Main Menu, select Network → UPnP
Then, you may want to assign the camera with proper names for beer idencaon if you have several cameras at the same me. Meaningful names such as living room, kitchen, baby room or any other descripons you nd suitable to describe the space being monitored.
Select Network → UPnP
Host Name
EDS
UPnP
Enable
Disable
UPnPc
Enable
Disable
Apply
Cancel
Hostname: Enter a new name into this eld Click Apply to change the camera name.
4.1.3. Seng the Camera Time
It is crucial to setup camera me properly so that scheduling can be arranged and events be recorded with accurate date and me.
On the Main Menu, select System→Time
Please refer to Chapter 5 for me seng detail.
4.1.4. Seng the Storage Folder
The Storage Folder is the locaon where media les will be placed. On the Main Menu, select System → PC Storage Path
Please refer to Chapter 5 for detail seng
4.1.5. Adding a User Account
On the Main Menu, select User Management → User Account

Please refer to Chapter 5 for User Management for adding a User.
5. User Interface

Camera management page allows you to view and congure the camera at real me. This chapter will introduce all supported features and detail conguraons.
5.1. Navigaon Panel

The Navigaon Panel is located at the top-right corner of the page. Since there are two different user levels (Administrator and Viewer), the funcons shown on the Navigaon Panel also vary accordingly. For more informaon about user account, please refer to User Management secon.

Administrator has full control of all the camera sengs.

The viewer only has camera view features.
The descripons are as follows
| Switch the management page to camera viewer within which snapshots or video clips can be taken at real me. | |
| Switch the management page to camera seng. Please refer to Main Menu secon for detail camera seng. | |
| Allows user to change management page language seng. | |
| Cloud Service Page |

Download NOW!
moving your workforce and enjoyment toward a mobile lifestyle.
Android

iOS (for iPhone and iPad)


Logout
5.2. Live View Sengs
The Live View Management menu is located at the right side of the page.
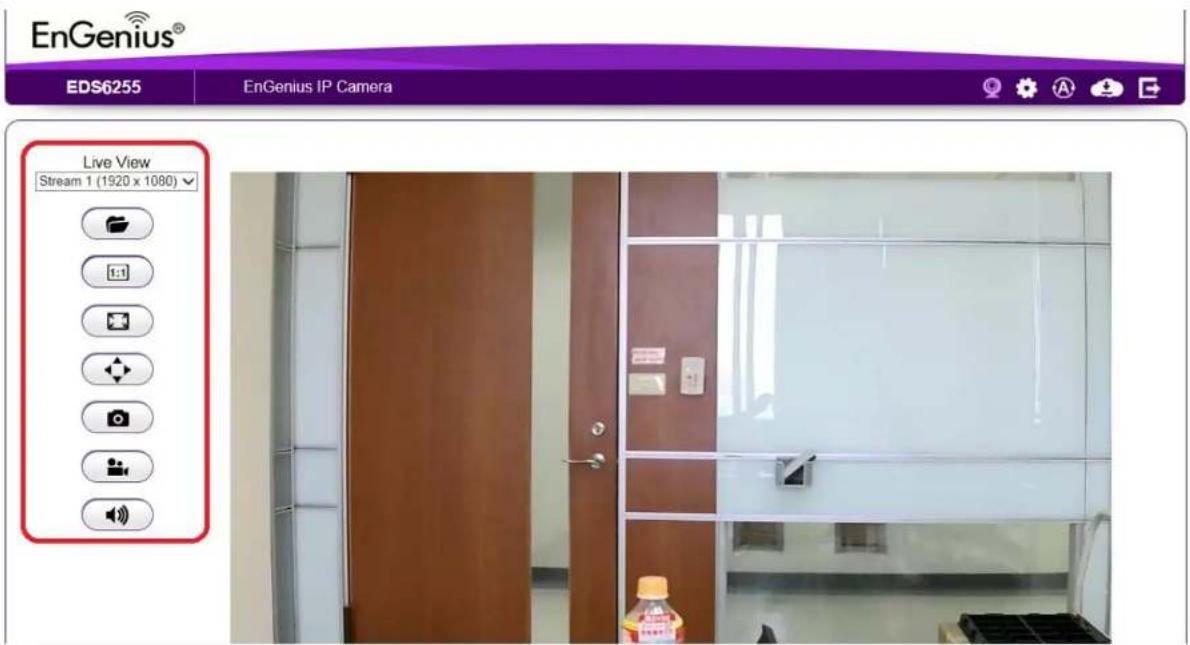
| Live ViewStream 1 (1920 x 1080)Stream 2 (640 x 360) | There are two streams running concurrently: Stream1 (1920x1080) and Stream2 (640x360). Stream1 has the higher resoluon than stream2. Stream2 serves lower resoluon for mobile devices which has smaller screens. You can preview each stream at real me by selecng it from the list. |
 | This opens the local folder where the real me captured images and clips are stored. You may change the folder path atMain Menu → System → PC Storage Path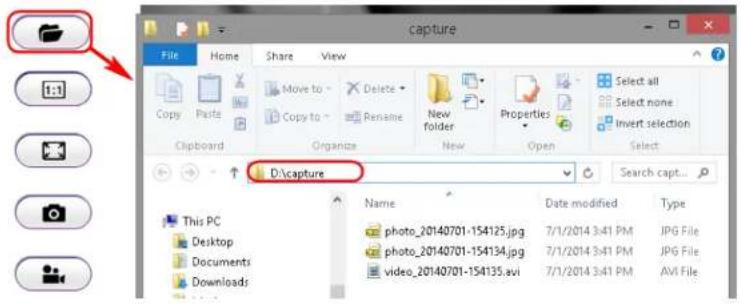 |
 | This switch only applies to resoluon 640 x 360. When enabled, the preview image will switched to 1:1 mode. By default the image will expand and ll the view screen if the actual image is smaller than the view. |
  | |
 | This switch will hide the browser and expand the view to full screen. You can press ESC buon to cancel the full screen mode. |
 | This buon takes a snap-shot on the real me view and store the image in the local folder. |
 | ePTZ display the digital zoom in for the region of interest, use your mouse to move the green window at the le boom to the area you intend to monitor.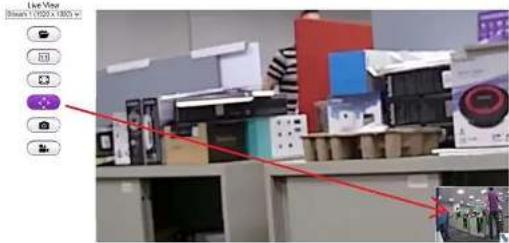 Toggle this buon to start recording movie clip at real me. Click on the buon to start recording. Please note that when icon changed to purple icon the camera is recording. To stop recording, simply click the buon again. Toggle this buon to start recording movie clip at real me. Click on the buon to start recording. Please note that when icon changed to purple icon the camera is recording. To stop recording, simply click the buon again. |
5.3. Main Menus
Only Administrator Users can get access to Main Menus. Viewers do not have the privilege of changing camera sengs.

To get access to the Main Menu, click on the seng icon.

The Main Menu is shown below.
EnGenius®
EDS6255
EnGenius Wireless IP Camera


| System |
| Status |
| Service Port |
| Time |
| PC Storage Path |
| Firmware |
| Backup |
| Reset to Default / Reboot |
| Language |
| Network |
| Wireless |
| Media |
| Event Management |
| Event Server |
| Storage Info |
| User Management |
System
Model
EDS6255
Uptime
1 hours 4 min 4 sec
Current Date/Time
2015/11/05 07:01:22
Serial Number
157266096
Firmware
0.0.1
WebCMS Version
1.0.18
Default UID
105f7ba
Default DDNS Name
105f7ba.engeniusddns.com
Network
Attain IP Protocol
IP Address
10.0.92.70
Subnet Mask
255.255.255.0
Default Gateway
10.0.92.254
MAC Address
88:DC:96:FA:08:45
Primary DNS
10.0.92.240
Secondary DNS
10.0.200.182
Video
Stream 1
Resolution
1920 × 1080
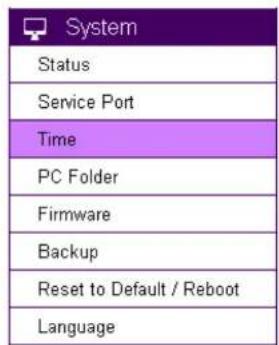
5.4. System
The System seng menu consists of system related conguraons.
| System |
| Status |
| Service Port |
| Time |
| PC Storage Path |
| Firmware |
| Backup |
| Reset to Default / Reboot |
| Language |
5.4.1. Status
Status Page displays the detail system level informaon on the page including current me, rmware version, DDNS name, IP address and etc.
System
| Model | EDS6255 | |
| Uptime | 1 hours 4 min 4 sec | |
| Current Date/Time | 2015/11/05 07:01:22 | |
| Serial Number | 157266096 | |
| Firmware | 0.0.1 | |
| WebCMS Version | 1.0.18 | |
| Default UID | 105f7ba | |
| Default DDNS Name | 105f7ba.engeniusddns.com | |
| Network | ||
| Attain IP Protocol | ||
| IP Address | 10.0.92.70 | |
| Subnet Mask | 255.255.255.0 | |
| Default Gateway | 10.0.92.254 | |
| MAC Address | 88:DC:96:FA:08:45 | |
| Primary DNS | 10.0.92.240 | |
| Secondary DNS | 10.0.200.182 | |
| Video | ||
| Stream 1 | ||
| Resolution | 1920 x 1080 | |
5.4.2. Service Port
The default seng is as follows. This is only reserved for advanced users who want to keep certain ports for other particular services. Changing the ports will result in unexpected result. Unless necessary, please keep the default seng.
Port Settings
Note: We recommend that you keep the default settings to ensure that the service to function properly.
| HTTP Port | 80 |
| HTTP External Port | 50000 |
| RTSP Port | 554 |
| RTSP External Port | 50037 |
| EnViewer Port | 9091 |
| EnViewer External Port | 50075 |
Apply Cancel
5.4.3. Time
Like any other surveillance system, me is essenal because we want to keep track of the me of the events recorded or detected by the camera. By default, the camera is connected to a public me server (pool.ntp.org) and its me is always synchronized with the server over the Internet. Normally, you only need to change the Time Zone. Choose the one that matches your locaon. Leave the other seng as default should be ne. Seng the wrong me server or me zone will result in inaccurate scheduling and me stamp.
Time Settings
Current Date/Time 2015/11/03 01:47:13
Time Setup Synchronize with the NTP Server
Time Zone (GMT)Greenwich Mean Time: Dublin, Edinburgh, Lisbon, London
NTP Time Server pool.ntp.org
√ Automatically adjust for daylight saving time changes.
Apply
Cancel
Time Setup: synchronized with me server/ manually setup or synchronized with PC me
Time Zone: select me zone
NTP Time Server: the me server address
Automacally adjust for daylight saving me changes: check the box if applicable
5.4.4. PC Storage Path
Recording / Snapshot Path
Folder Path
C:\Users\Eric\AppData\LocalLow
Browse
Snapshot File Type
JPG
Recording File Type
AVI
Note: The video recording and snapshot will be stored in the target folder.
Apply
Cancel
Folder Path: click "Browse" to change the path
Snapshot File Type: support image format JPG, PNG & BMP
Recording File Type: support format AVI & MP4
Compression rate comparison (High to Low):
JPG > PNG > BMP
MP4 > AVI
You should consider keeping the default seng because it reduces image or clip le size.
5.4.5. Firmware
The product feature may improve over me; you may check EnGenius ocial web site for the latest rmware. New firmware may contain bug xes or feature improvement which is beneficial to you.
Either download the latest rmware le to your local computer or use Auto Firmware Upgrade when Internet conncon is available. For manual upgrade, click Browse and select the rmware le to start upgrading rmware.
Manual Firmware Upgrade
To upgrade the device firmware, please ensure that you have saved the target firmware in the computer. Then, click on Choose File (or Browse) and select the file to be uploaded.
浏览
Apply
Cancel
Auto Firmware Upgrade
Current Firmware version
New Firmware version
Release Date
Firmware File Size
● Enable
v1.0.0
unknown
unknown
Ok
○ Disable
Relase Note
Upgrade
Select the downloaded new rmware then click on Open.
Click Apply to start upgrading the rmware.
You can upgrade the firmware of the IP-CAM in this page. Ensure, the firmware you want to use is on the local hard drive of your computer. Click on Browse to browse and locate the firmware to be used for your update.
Browse
Apply
Cancel
It may take a moment for the upgrading process, please wait paently.
WARNING: Do not turn o the device in the middle of upgrade process. Terminang the device during the process will damage the device and may cause the device to fail.
5.4.6. Backup
There are mes that you may want to test new sengs or keep dierent sengs for different applicaon scenarios. You can do this with following steps:
■ Save Sengs
Backup Settings
Backup current settings to file
Restore saved settings from file

Click Save to initiate seng backup process.
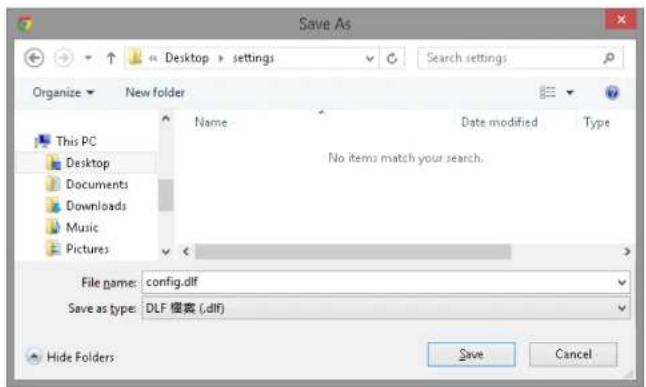
Click Save to store the le to the chosen locaon.
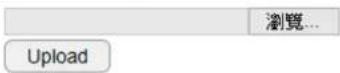
■ Restore Sengs
Backup Settings
Backup current settings to file
Backup
Restore saved settings from file
瀏覽
Upload
Click on Browse to select the backup le.
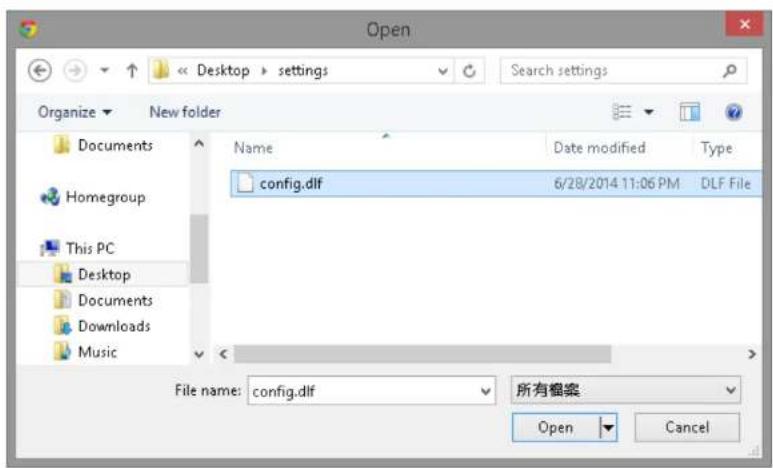
Choose the conguraon le and click on Open.
Click on Upload to start storing process.
Backup Settings
Restore Settings
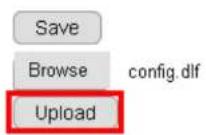
It may take a moment for the uploading process, please wait paently.
WARNING: Do not turn o the device in the middle of the upload. Terminating the device during the process will damage the device and may cause the device to fail.
5.4.7. Reboot/Reset to Default
There may be mes that you feel like to restore the settings to factory default. To reset to default click on the buon Reset to Default
If the camera for some reason stop responding or acng abnormally, you can choose to Reboot the Device. If the device sll does not recover to normal operaon, please consider to perform a hard reset (unplug and re-plug the power adapter).
To proceed Reset to Default will erase current settings and restore the device to its original factory settings. Note: We suggest you to back up current settings before running the reset.
Reset to Default
In case that the system stops responding or functioning incorrectly, you can perform Reboot the Device to restart. The current settings will be kept without change.
Reboot the Device
5.4.8. Language
The default User Interface language is English, you can change the language with just a mouse click.
On the language list, click to select the one you feel comfortable with from the list. The user interface with refresh automacally with your chosen language.
Select Display Language

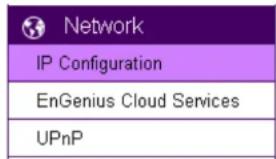
5.5. Network
| Network |
| IP Configuration |
| EnGenius Cloud Services |
| UPnP |
The Network seng menu consists of Network related conguraons.
5.5.1. IP Conguraon
Each camera should be assigned with an IP address in the network for idencaon. IP Conguraon setng allows you to change the method with which the camera obtains its IP address. The default seng Dynamic IP (DHCP) is applicable to most of the applicaon scenario. However, advanced users can also change to Stac IP or PPPoE whichever suit the purpose.
Mode
MAC Address
Dynamic IP (DHCP) ▼
88:DC:96:16:A3:D7
Note: We recommend that you keep the default settings to ensure that the service to function properly.
Apply
Cancel
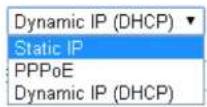
Mode: Stac IP, PPPoE and Dynamic IP (DHCP)
Stac IP
IP Configuration Settings
| Mode | Static IP |
| IP Address | |
| IP Subnet Mask | |
| Default Gateway | |
| Primary DNS | |
| Secondary DNS | |
| MAC Address | 00:51:31:09:25:04 |
Note: We recommend that you keep the default settings to ensure that the service to function properly.
Apply Cancel
If your network requires Stac IP, you need to specify the detail IP sengs similar to above. Please note that, if you are managing your camera in local network similar to the example shown above, you will need to conjure your management PC/Laptop under the same domain.
PPPoE
IP Configuration Settings
Mode
Username
Password
Service Name
MAC Address
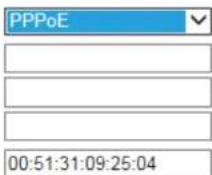
Note: We recommend that you keep the default settings to ensure that the service to function properly.

If you are connecng to the Internet without going through your home router, you can connect the camera directly to your modem (given that you are using PPPoE for your Internet service). Please consult your local network service provider for more detail. Basically, the PPPoE seng is exactly the same as what your home router. You need to provide at least Username and Password to get access.
Dynamic IP (DHCP)
IP Configuration Settings
Mode
MAC Address
Dynamic IP (DHCP)
00:51:31:09:25:04
Note: We recommend that you keep the default settings to ensure that the service to function properly.
Apply
Cancel
MAC Address: Type in the MAC address to insert the local MAC address into the eld.
Click Apply when conguraon is done to acvate new sengs.
Note: If you have a working Internet conneccon through your router, there is no need to type in the MAC address. Providing such MAC address only if the IP address assigner binds each IP with a speci MAC address.
5.5.2. EnGenius Cloud Service
EnGenius Cloud Settings
Status
Type

Using Default UID / EnGenius DDNS Service
Default UID
UID Status
Default DDNS Name
Alias DDNS Name
0e95c28
Connected
0e95c28.engeniusddns.com

Availability Check
Refresh Time
DDNS Status

Connected
You must Enable EnGenius Cloud first and then choose the Type.
A key part about EnGenius Cloud Service is DDNS. Dynamic DNS (DDNS) is a type of DNS that works with dynamic IP address. DDNS keeps update its mapping regularly and ensures a consistent matching so that your device can be accessed over the Internet using a fixed DDNS name. You can either use the default EnGenius DDNS Service or other 3^rd party Service you prefer.
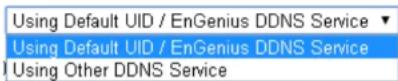
Users are recommended to use the free DDNS address printed on the label enclosed in the package. This is because ISP often leases dynamic WAN IP address that changes from time to time. DDNS domain name will always be the same even if the WAN IP address changes. The domain name can also be found on your System→Status page.
EnGenius Cloud Settings
Status
- Enable - Disable
Type
Using Default UID / EnGenius DDNS Service ▼
Default UID
0e95c28
UID Status
Connected
Default DDNS Name
0e95c28.engeniusddns.com
Alias DDNS Name

.engeniusddns.com
Availability Check
Refresh Time

DDNS Status
Connected
Default UID: default UID
UID Status: when working properly, it should show "Connected".
Default DDNS: shows the default DDNS
Alias DDNS Name: You may nd that your DDNS is too dicult to remember. EnGenius provides free DDNS name registraon as long as the alias is not yet been taken other EnGenius product users. You can check the availability by clicking on the button Availability Check for vericaon. In this example, "superman.engeniusddns.com" is available. That is, when the seng is acvated, both DDNS name "superman.engeniusddns.com" and "0e95c28.engeniusddns.com" can be used to access this camera.
Refresh Time: opons are 3HR, 6HR, 9HR, 12HR and 24HR. DDNS server needs to synchronize with your IP address often so that you can access your device over the Internet with DDNS name. Depends on your Internet Service provider, your WAN IP address lease me will be different.
You can check with your local Internet Service provider for WAN IP address refresh me. The default setng is 24HR (which means DDNS server will check the synchronizaon every 24 hours). Normally, the default seng 24HR is okay for most cases.
DDNS Status: when working properly, it should show "Connected".
Note: DDNS will only work only if your router is connected to the Internet. If router is not connected to the Internet, your DDNS status will show "Disconnected".
EnGenius Cloud Settings
Status
Type
Enable
Disable
Using Other DDNS Service
Server Address
3322(qdns)
Host Name
Username
Password

Apply
Cancel
If you prefer to use third-party DDNS server, you can choose this opon.
The current supported third-party DDNS services are 3322(qdns), DHS, DynDNS, ZoneEdit and CyberGate. Choose the one that best suits your purpose. You should provide your account informaon so that the camera can communicate with the selected DDNS vendor.
Your third-party DDNS service account credenal should include the following informaon.
Host Name: please enter your registered Host Name
Username: please enter your registered Username
Password: please enter the password for this
Click Apply when conguraon is done to acvate new sengs.
5.5.3. UPnP
Universal Plug and Play (UPnP) allows the other device to detect the presence of the camera so that communicaon become possible. You should enable UPnP if you wish your camera to be recognized by your router. UPnP Traversal makes camera remote access over the Internet possible using camera DDNS name. You won't be able to access the camera if you disable UPnP feature. Please keep it Enable if you are not sure.
Hostname: You may rename your camera to other meaningful names such as storage room, lobby, or any other descripons you nd suitable to describe the space being monitored.
UPnP: Enable or Disable
UPnP Traversal: Enable or Disable
UPnP Settings
Host Name
UPnP
UPnP Traversal
EDS-F7BA
● Enable ○ Disable
● Enable ○ Disable
Apply
Cancel
Click Apply when conguraon is done to acvate new sengs.
5.6. Wireless
Please skip this step if you only use wired setup for your camera. Ensure your router supports wireless conncon and enabled.
On the management page, click press the conguraon Main Menu.

On the other hand, we also need to enable camera's wireless feature; please check again to ensure you have wireless enabled.
All wireless related sengs can be found under Wireless menu. The camera store several AP proles (candidate AP list) although only one AP will be connected at any given me.
5.6.1. Basic
On the Main Menu, select Wireless → Basic
Wireless Settings
Status
Site Survey
● Enable ○ Disable
Scan
Wireless Information
SSID
Status
Channel
...
Disconnected
-
To setup a wireless conncon, you must rst enable wireless by choosing Enable onpon
Click on Scan buon to search for existing wireless access points (AP).
When prompted with Site Survey window, click on Refresh buon if you do not nd your AP on the list.
On the site list, choose your preferred AP and then click Add to AP Prole.
Site Survey
| No. | Select | Channel | SSID | BSSID | Encryption | Auth | Signal(%) | Mode |
| 1 | 6 | home | D0:22:BE:C8:2F:41 | AES | WPA2PSK | 7 | 11b/g/n |
Refresh
Add to AP Profile
Then, on the AP Prole Sengs window, please check if the security sengs are correct. Please review the settings: Encrypon, WPA type, and
Pre-Shared Key type. They are automatically detected. Normally, you only need to provide the Pre-Shared Key (password). However, you can still change the sengs if they do not match with the actual AP wireless security sengs.
Enter your Pre-Shared Key and press Save to complete the seng.
AP Profile Settings
| Network Name (SSID) : | home |
| Encryption : | WPA pre-shared key ▼ |
| WPA Type : | ○ WPA(TKIP) ● WPA2(AES) |
| Pre-Shared Key Type : | Passphrase ▼ |
| Pre-Shared Key : | 12345678 |
Save
Please wait for a moment for the setup to complete.
Module is reloading, please wait 10 seconds
While waiing, you can remove RJ45 Ethernet Cable from the camera. It may take a moment for the camera to detach from wired network and
switch to the newly established wireless conncon with the chosen AP (your router).
To check if the conncon is successful, you can verify it by login into your camera again. In case the camera is sill not accessible, please check your router again to see whether your camera is connected. Also, check the security seng again just for sure.
5.6.2. WPS
Wi-Fi Protected Setup (WPS) is a network security standard that allows users to easily secure a wireless network. This feature allows user to setup wireless conncon between the camera and AP without entering any detail wireless security conguraons such as SSID, encrypon method or pre-shared key (password). However, you need to initiate WPS process on both the camera and the AP at the same me so that they can nd each other.
Normally, for WPS-enabled products, you should be able to nd the WPS buon on the product. Only few rare cases that require user to initiate WPS process over web page. Make sure WPS feature is Enabled on both the camera and your AP or wireless router. Then, you need to know how to initiate AP or wireless router's WPS process rst. It is mostly likely a simple push of the WSP button on your AP or wireless router. On EDS6255, you can initiate WPS process on the web page or by pressing the WPS buon.
WPS Buon
The simplest way to setup wireless conncon with an AP or wireless router is by pressing on the WPS buon.
First, press the WPS buon on the AP (there may be changes on the LED lights as signs of iniaon).
Then, press the WPS buon of the camera.
Wait a minute for two devices to establish the wireless conncon.
Done!
WPS over web page
You can initiate camera's WPS process on the web page.
First, press the WPS buon on the AP or wireless router (there may be changes on the LED lights as signs of iniaon).
On camera's WPS page, press Start to Process.
Wait a minute for two devices to establish the wireless conncon.
Done!
Wi-Fi Protected Setup (WPS) Settings
Status
- Enable - Disable
WPS Via Push Button
Start to Process
NOTE: For WPS to setup wireless conneccon successfully, ming is essenal. Once AP or wireless router has initiated WPS process, your camera WPS process must be initiated within a given me range. It would be best if you have two devices in close range so that WPS process on both sides can be initiated immediately aer another.
5.6.3. AP Prole
You can keep several AP Proles (sengs) if your applicaon may need to switch between APs in case one of them failed. Each prole matches to a specific AP.
AP Profile Table
| Select | No. | SSID | MAC | Authentication | Encryption |
| 1 | SNWL | 00:02:6F:DB:9F:D5 | WPA2_PSK | AES |
| Add | Edit | Move Up | Move Down | Delete Selected | Delete All | Connect |
5.6.3.1. Add
AP Profile Settings
Network Name (SSID) :
hallAP
Encryption :
WPA pre-shared key ▼
WPA Type :
WPA(TKIP) WPA2(AES)
Pre-Shared Key Type :
Passphrase
Pre-Shared Key :
EMUE3ZLJB85G
Save
WPA pre-shared key
Network Name (SSID): enter the SSID of the target AP
Encrypon: supports Disabled, WEP and WPA pre-shared key
WPA Type: supports WPA (TKIP) and WPS2(AES)
Pre-Shared Key Type: Passphrase or HEX (64 character)
WEP
Please note that WEP has proven be insure, this security opon is reserved only for legacy products that supports WEP only.
Authencaon Type: supports Open System and Shared Key
Key Length: 64bit and 128bit (the longer the safer)
Key Type: ASCII or HEX
Default Key: the key that will be used for authencaon
Encrypon Key 1\~4: the candidate keys for authencaon
AP Profile Settings
| Network Name (SSID) : | hallAP |
| Encryption : | WEP ▼ |
| Authentication Type : | ● Open System ● Shared Key |
| Key Length : | 64-bit ▼ |
| Key Type : | ASCII (5 characters) ▼ |
| Default key : | Key 1 ▼ |
| Encryption Key 1 : | ***** |
| Encryption Key 2 : | ***** |
| Encryption Key 3 : | ***** |
| Encryption Key 4 : | ***** |
Save
5.6.3.2. Edit
On the table Select the prole and then click on Edit to modify the prole seng.
AP Profile Table
| Select | No. | SSID | MAC | Authentication | Encryption |
| 1 | SNWL | 00:02:6F:DB:9F:D5 | WPA2_PSK | AES |

Once complete the modicaon, click Save to make the changes eecve.
AP Profile Settings
| Network Name (SSID) : | SecondaryAP |
| Encryption : | WPA pre-shared key ▼ |
| WPA Type : | ○ WPA(TKIP) ● WPA2(AES) |
| Pre-Shared Key Type : | Passphrase ▼ |
| Pre-Shared Key : | 99999999 |
Save
5.6.3.3. Move Up / Down
Each prole the ordered by the number at the front, the ones on top has higher priority when camera tries to search for the existing AP. You can change the AP priority by moving them up or down. Select the prole and then click either on Move Up or Move Down.
AP Profile Table
| Select | No. | SSID | MAC | Authentication | Encryption |
| 1 | SNWL | 00:02:6F:DB:9F:D5 | WPA2_PSK | AES | |
| 2 | EAP900H-2.4GHz | 8A:DC:96:1A:B7:F5 | WPA2_PSK | AES |

5.6.3.4. Delete
Delete Selected: only delete the selected prole.
Select the prole to be deleted and then click on Delete Selected buon.
AP Profile Table
| Select | No. | SSID | MAC | Authentication | Encryption |
| 1 | SNWL | 00:02:6F:DB:9F:D5 | WPA2_PSK | AES | |
| 2 | EAP900H-2.4GHz | 8A:DC:96:1A:B7:F5 | WPA2_PSK | AES |
Delete All: this will delete all the AP proles on the table
5.6.3.5. Connect
AP Profile Table
| Select | No. | SSID | MAC | Authentication | Encryption |
| 1 | SNWL | 00:02:6F:DB:9F:D5 | WPA2_PSK | AES | |
| 2 | EAP900H-2.4GHz | 8A:DC:96:1A:B7:F5 | WPA2_PSK | AES |
Select a prole to be connected and then click on Connect to initiate the wireless conncon.
5.7. Media

All media quality related sengs can be found under Media menu. These setngs will have direct eect on the captured image or video.
5.7.1. Video

Display overlay
Timestamp and Video Title
The Ground Truth image displays a single, solid horizontal line. According to Rule 2 (UNDERSCORE & LINE RULES), this is a stylistic or background line, not a placeholder underscore. Therefore, the OCR result must ignore it and output nothing or only meaningful text. The provided OCR content is "____", which consists of four underscores. This is an incorrect interpretation of the line as a placeholder, violating the rule that stylistic lines must be ignored. The OCR has hallucinated underscores where none should exist based on the GT's visual context. Hence, the OCR result is inconsistent with the Ground Truth.
(A-Z,0-9, :, /, -)
Stream 1
Compression Format
Resolution
Max. Frame per Second
Bit Rate Encoding
Bit Rate Value
| H.264 | √ |
| 1920 x 1080 | √ |
| 30 fps | √ |
| Constant Bit Rate | √ |
| 4 Mbps | √ |
Stream 2
Compression Format
Resolution
Max. Frame per Second
Bit Rate Encoding
Bit Rate Value
| H.264 | √ |
| 640 x 360 | √ |
| 15 fps | √ |
| Constant Bit Rate | √ |
| 256 Kbps | √ |
Note: You may adjust Bit Rate Value according to your connectivity mode or bandwidth conditions.
Higher bit rates delivers excellence resolution when video is viewed in full-screen on PC. Lower bit rates may be better choices in limited-bandwidth environments or via remote Wi-Fi network.
Default Settings Apply Cancel
Enable: it is recommended that you enable Time Stamp and Video Title; the mestamp will show on the top-le corner of your video as shown below.


natural_image
Abstract grayscale pattern with no discernible text, symbols, or structured elements5.7.2. Camera
Image Settings
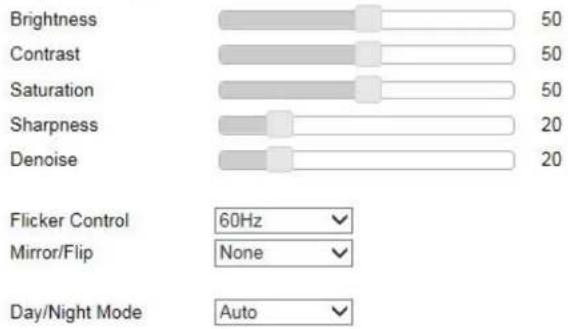
You can get beer quality by tuning the lightng condion of the camera. For example, in a dark room you may want to set the Brightness higher to generate clearer result. When directly facing an outdoor window (too much light) you may want to lower the Brightness a bit. There may be different sengs under different circumstance; therefore, you should tune the setng if the image quality has become too low to serve its purpose. Please refer to the following examples for comparison between low and high for each of the light sengs.
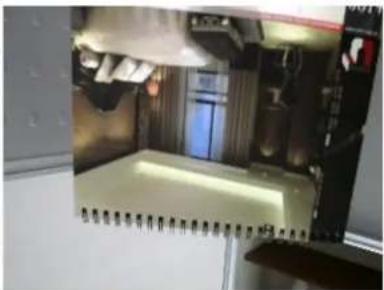
5.7.2.1. Light Setng
Brightness

natural_image
Interior view of a dimly lit room with a red ceiling lamp and patterned curtains (no visible text or symbols)
natural_image
Interior view of a modern office or meeting room with a large ceiling light and a central desk (no visible text or symbols)Contrast

natural_image
Interior view of a modern living room with chandelier, large wall-mounted furniture, and patterned seating (no visible text or symbols)
natural_image
Interior view of a modern living room with a chandelier, large windows, and a dark table (no visible text or symbols)Sturaon

natural_image
Interior view of a modern minimalist kitchen with large windows and ceiling lights (no visible text or symbols)
natural_image
Interior view of a modern living room with orange furniture and ceiling lights (no visible text or symbols)Sharpness

natural_image
Interior view of a modern living room with large windows and a curved ceiling light (no visible text or symbols)
natural_image
Interior view of a modern living room with a curved ceiling, large windows, and a single sofa (no visible text or symbols)De-noise

natural_image
Interior view of a modern living room with large windows, a circular ceiling light, and a sofa (no visible text or symbols)
natural_image
Interior view of a modern living room with large windows, chandelier, and patterned ceiling (no visible text or symbols)Please note that some of the eects will be more obvious in higher resolution at real me.
5.7.2.2. Flicker Control
The supported opons are: 60Hz & 50Hz
Flicker Control is an an-icker feature seng.
AC lamp can cause a icker effect, which is a consequence of the AC power frequency (50 or 60 Hz). As the light can change from picture to picture, causing light icker. This will lead to inconsistent light source between each snapshot. To eliminate icker, congure your camera to PAL (60Hz) or NTSC (50Hz) modes to compensate the eects. Check the power supply of your region for proper seng.
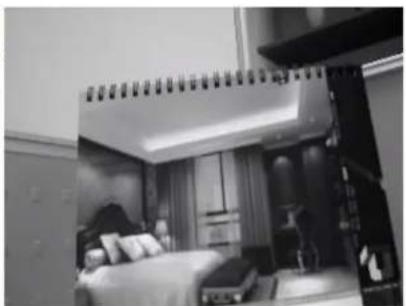
5.7.2.3. Mirror
Support Mirrors: None, Mirror, Flip and Both
There are mes that the camera will have to be mounted upside down for sideways. That is, the view become difficult to monitor when it is upside down. The Mirror sengs does not react on the preview at real me (unlike lightng condion sengs). Therefore, you have to click on Apply to see the result.
The following examples compares none with a chosen mirror eect.
Mirror (Horizontal)
natural_image
Interior view of a modern hotel room with double-decker furniture and large windows (no visible text or symbols)None
Mirror
Flip (Vercal)

natural_image
Interior view of a modern bedroom with bed, nightstand, and large window (no visible text or symbols)None
Flip
Both (Horizontal and Vercal)

natural_image
Interior view of a modern bedroom with bed, nightstand, and large window (no visible text or symbols)None
Both

natural_image
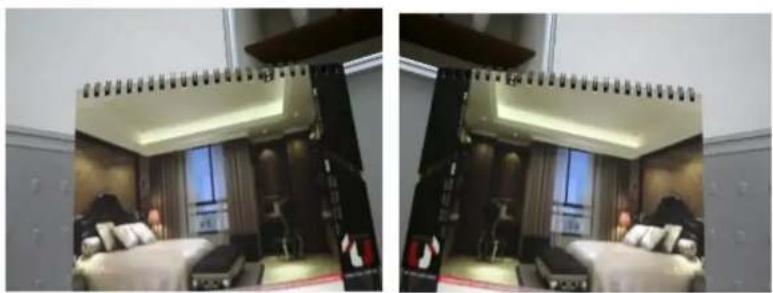
Interior view of a modern kitchen or kitchen area with appliances and lighting (no visible text or symbols)5.7.2.4. Day/Night Mode
This controls Night Vision ON and OFF.
Auto: auto detect light suciency and switch between Day and Night automacally.
Day: force the camera to turn OFF Night Vision.
Night: force the camera to turn Night Vision ON.

natural_image
Interior view of a modern bedroom with bed, nightstand, and large window (no visible text or symbols)Day
natural_image
Interior view of a modern bedroom with bed, nightstands, and wall-mounted equipment (no visible text or symbols)Night
5.7.3. Advanced
Exposure Settings
Mode
Gain Control
Shutter Time
Max (sec)
Min (sec)

Others
EV Compensation
WDR Status
WDR Level
Low Light Compensation

● Enable ○ Disable

● Enable ○ Disable

natural_image
Interior view of a modern kitchen appliance with brown door, white cabinet, and stainless steel door (no visible text or symbols)Default Settings
Apply
Cancel
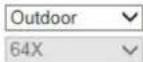
Exposure Sengs
Mode: Manual, Indoor, Outdoor
For regular users, please choose indoor or outdoor, if you are not sure about the terms and behavior, the default values will the preconfigured. The areas are grey out for preconfigured sengs when you choose Indoor or Outdoor.
Manual
Choose Manual if you would like to ne tune some of the sengs that suits your applicaon. Please be noted that these sengs may have impacts on the image quality and performance.
Exposure Settings
| Mode | Manual |
| Gain Control | 64X |
Shutter Time
| Max (sec) | 1/30 | √ |
| Min (sec) | 1/10000 | √ |
Others
| EV Compensation | 0 | ✓ |
| WDR Status | ● Enable | ○ Disable |
| WDR Level | 2 | ✓ |
| Low Light Compensation | ● Enable | ○ Disable |

natural_image
Interior view of a room with a brown cabinet and white wardrobe (no visible text or symbols)Default Settings
Apply
Cancel
5.7.4. Privacy Mask
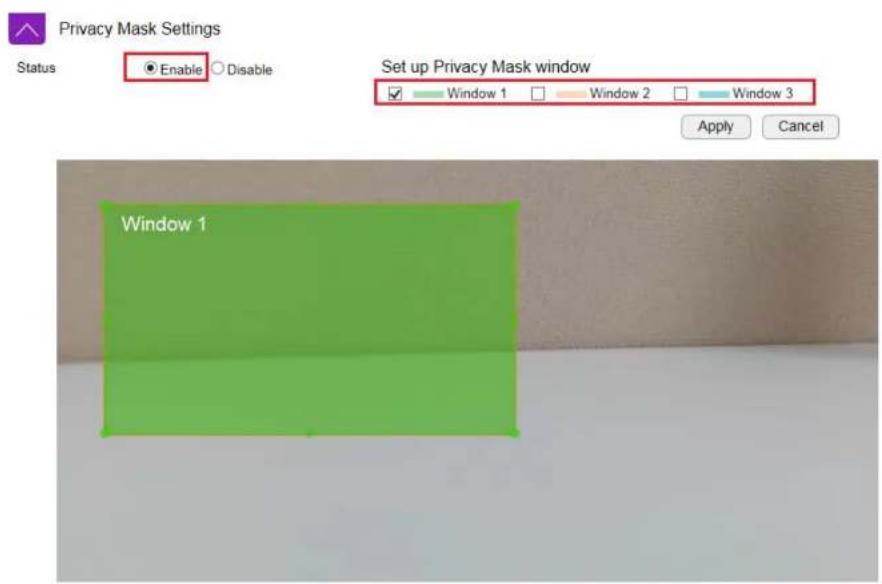
Choose Enable if you would like to put certain areas in private. Please use selected window to hide certain area for privacy purpose.
5.7.5. Audio
Status
If you audio is important to what you are monitoring, you need to set the audio status to Enable. So that the microphone can pick up sounds in the environment. On the other hand, if audio is not necessary (for instance an open space with a lot of noises), you are advised to Disable the audio to reduce the clips le size.
Audio Settings
Status
Mode
Microphone (Input) Gain
Encoding
Sample Rate
Bit Rate
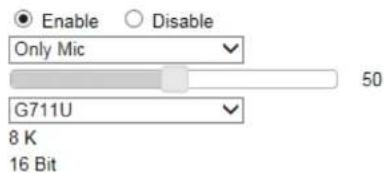

Mode
Only Mic: enable only the microphone
Input Gain: seng the sensitivity of the microphone. High gain will result in higher volume and but picks up more noise.
Encoding: supports G711A, AAC and G711U.
Sample Rate: 8 K
Bit Rate: 16 Bit
Changing Sample Rate and Bit Rate will impact the audio quality. The higher the rate, the beer the quality and the larger the le will become.
| Event Management |
| Event Control |
| Motion Detection |
| Tampering Detection |
| Event Action |
This camera supports many smart features that allows you to ulize the camera in many applicaon scenarios. This secon will introduce each of them in detail.
5.8.1. Event Control
| Event Management |
| Event Control |
| Motion Detection |
| Audio Detection |
| Tampering Detection |
| Event Action |
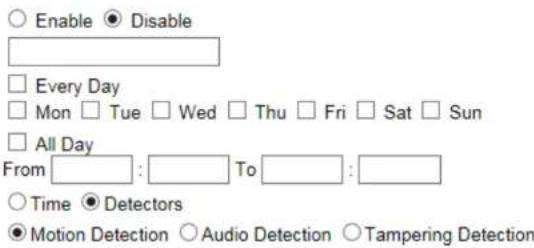
Event Control
| Enable | Name | Schedule | Trigger Type | Action Type | Storage Destination | Action |
| Schedule Record | Always | Time | Record | SD Card | Edit | |
| Motion Detection | Always | Motion Detection | Disable | --- | Edit | |
| Audio Detection | Always | Audio Detection | Disable | --- | Edit |
Add
When camera detects an event that matches the predened condition an event will be triggered and proceed with the dened acons; for instance, taking snapshots or recording videos for the specified length of me and interval. There are two proles for default seng, you can click "Edit" for detail seings or create a new prole by "Add".
Event Control
Enable
Name
Schedule
Time of day
Trigger Type
Event Notification
Push Message
○ Enable ● Disable
○ Enable ● Disable
Event Action
Action Type

Enable/Disable the event control
Schedule to set the camera to record video regularly based on a predened schedule.
Time of day can specify the me range for each schedule.
Trigger Type by Time or Detectors, if you select the detectors, it can be trigger by Moon detecon, Audio detecon or Tampering detecon.
Event Nocaon can send the message to user when event triggered, you can select Push message, E-mail and VMS at the same me.
Event Acon includes two types of the acon when event triggered.
Event Action
Action Type

Record to Network Storage or FTP, please remember to setup and enable the correlate settings of Network Storage and FTP, you can refer to Ch5.8.1 and 5.8.2.
Record
Network Storage ○ FTP
Snapshot to Network Storage, FTP or E-Mail, please remember to setup and enable the correlate sengs of Network Storage, FTP, E-mail, you can refer to Ch5.8.1, 5.8.2 and 5.8.3.
Snapshot
● Network Storage ○ FTP ○ E-Mail
5.8.1.1. Moon Detecon

Motion Detection Settings
Video OSD Prompt
Enable
○ Disable
Set up motion detecting window
Window 1
Sensitivity : 60 %
Window 2
Sensitivity : 60 %
Window 3
Sensitivity : 60 %

Apply
Cancel
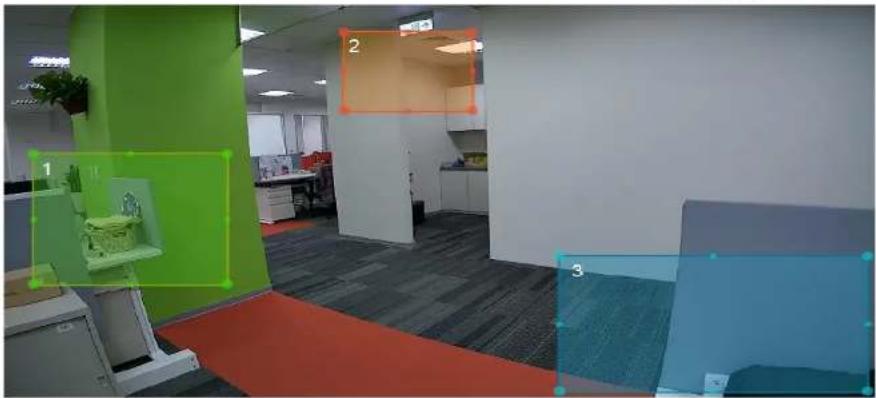
Moon Detection Window is a hot zone that the camera analyzes for moon (image changes). When a moon is detected within the zone an event will be triggered.
When the window is selected, use your mouse to move the window to the area you intend to monitor. There can be 3 windows at the most. The Windows are dierenated by color; Window 1 is Green, Window 2 is Red and Window 3 is Blue.
Video OSD Prompt displays the warning on the top li of the live view page when moon triggered.
Uncheck the window to remove the window from the view.
Sensitivity: Level 0% to Level 100% (with Level 100% being the most sensitive)
Depends on your applicaon, high sensitivity will trigger event more oen than low sensitivity and produce more snapshots or videos. However, overly sensitive events will ll up the storage very quickly. Even if you have unlimited storage space, large amount of les can become a problem when you need search through each of the les to nd what you are really looking for. It may take some me for you to ne tune the opmal sensitivity for your applicaon.
You can adjust the motion detecting area by dragging the four corners to resize the window.

natural_image
A red square on a white wall next to a black rectangular object, with no visible text or symbols.
natural_image
Abstract diagram with red rectangular blocks and white arrows pointing inward, no text or symbols presentTherefore, you can have a combinaon of three dierent detecon window sizes.

natural_image
Abstract composition with red, white, and green rectangular blocks (no text or symbols)5.8.1.2. Audio Detecon
Audio Detection Settings
Sensitivity Level

60%
Apply
Cancel
Sensitivity Level: 0% to 100% (with 100% being the most sensitive)
Similar to moon detecon, high sensitivity will trigger events more oen than low sensitivity and produce more snapshots or videos. However, over-sensitive events will ll up the storage very quickly. Even if you have unlimited storage space, large amount of les can become a problem when you need to search through each of the les to nd what you are really looking for. It may take some me for you to ne tune the opmal sensitivity for your applicaon.
5.8.1.3. Tampering Detecon
Tampering Detection Settings
Video OSD Prompt
Sensitivity Level

Apply
Cancel
Tamper detecon is a seng within your IP camera that will send you an alert when the camera is tampered with. Once an acon has been detected, whether it's someone trying to knock the camera down or blocking its view, the alert lets you know to log into the acons to see what happened.
Video OSD Prompt displays the warning on the top li of the live view page when moon triggered.
Sensitivity Level: Level 0% to Level 100% (with Level 100% being the most sensitive)
Depends on your application, high sensitivity will trigger event more oen than low sensitivity and produce more snapshots or videos. However, overly sensitive events will ll up the storage very quickly. Even if you have unlimited storage space, large amount of les can become a problem when you need search through each of the les to nd what you are really looking for. It may take some me for you to ne tune the opmal sensitivity for your applicaon.
5.8.1.4. Event Acon
Event Action
Buffer Duration Until Next Event
20 sec(s)

Event Snapshot
Snapshot Duration
10 sec(s)

Event Recording
Video Format
AVI
Stream Type
H.264 (1920 × 1080)
Time
1 min(s)
Detectors
Pre-event Buffer
Record Duration
1 sec(s)
20 sec(s)
Apply
Cancel
This page provides Event-related sengs.
Event Action/Buffer Duration until Next Event: can set 20sec(s), 30sec(s), 1min(s), 5min(s), 10min(s), if you set 20sec(s) for this item, system will ignore any trigger during this 20sec(s).
Event Snapshot/Snapshot Duration: can set 10sec(s), 20sec(s), if you set 10sec(s) for this item, system will send a snapshot in every 10sec(s).
Event Recording Stream Type: H.264 (1920x1080) or H.264 (640x360)
Video Length: the maximum video length of me per le
Detectors Pre-event Buer: the length of pre-event me (1\~5 seconds)
Record Duraon: the length of recording me when alarm is triggered.
Note:
If setting Buffer Duration Until Next Event to 30 seconds, the camera will keep recording for 30 seconds when event is triggered. In this case, if the Video Length is 10 seconds, then 3 les will be generated for single instance of event. If Video Length is 30 seconds, then only 1 le will be generated. Please note that pre-event buer will extend the length of the video clip for the chosen extra length of me.
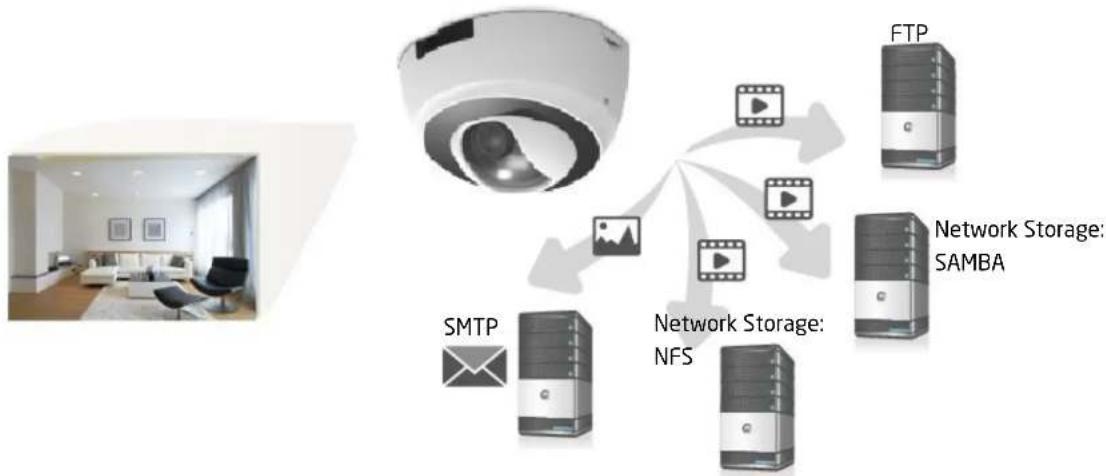
5.9. Event Server
It is required for users to congregate Event Server settings before setting camera Event or Schedule Recording. You will have to tell where the captured images or clips are going to be stored. The following concept diagram depicts the ow of the image le when and when captured. The le is stored at one of the predene storage locaons.
For EDS6255, Network Storage and FTP are required to have existing servers ready for upload. SMTP is good for small image capture since it sends the le through email. You should choose what is best for your applicaon.
flowchart
graph TD
    A["Smart Room"] --> B["Satellite"]
    B --> C["Network Storage: NFS"]
    B --> D["Network Storage: SAMBA"]
    C --> E["FTP"]
    D --> E
    B --> F["SMTP"]
    B --> G["Image Icon"]
    C --> H["Computer"]
    D --> I["Computer"]
5.9.1. Network Storage
This camera supports two types of Network Storage: NFS and SAMBA.
Before going further, you need to Enable to congregate the network storage rst.
Status
Enable Disable
Apply Cancel
Please refer to the following seconds for NFS and SMABA.
5.9.1.1. NFS (Network File System)
Network Storage Settings
Status
Protocol
Server
Path
Storage Size
Folder Size
√ Overwrite
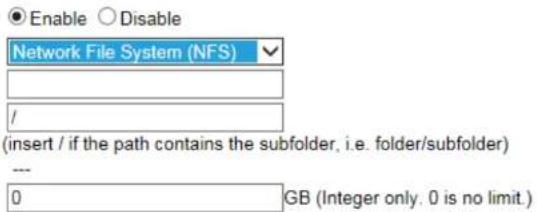

Server: IP address of the NFS server
Path: enter the initial path if applicable
Folder Size: storage allocated for the camera; the default value 0 signies innity.
Overwrite: when the defined folder is full, the oldest files will be overwritten to accommodate the new one.
Click Apply when done.
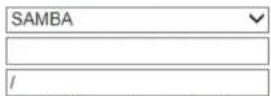
5.9.1.2. SAMBA
Network Storage Settings
Status
Protocol
Server
Path
Username
Password
Storage Size
Folder Size
Overwrite
● Enable ○ Disable
(insert / if the path contains the subfolder, i.e. folder/subfolder)

0 GB (Integer only. 0 is no limit.)
Test
Apply
Cancel
Server: IP address of the SAMBA server
Path: enter the initial path if applicable
User Name: username for accessing SAMBA server
Password: password for accessing SAMBA server
Folder Size: storage allocated for the camera; the default value 0 signifies innity.
Overwrite: when the dened folder is full, the oldest files will be overwritten to accommodate the new one.
Click Test to verify the conneccon with the server using the username and password. Click Apply when done.
5.9.2. FTP (File Transfer Protocol)
FTP Settings
Server IP address
Port
Username
Password
FTP Path
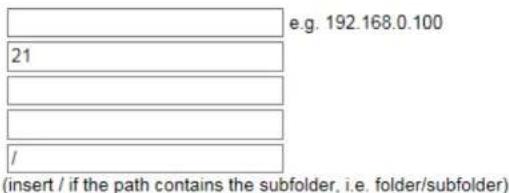
Test
Apply
Cancel
Server: IP address of the FTP server
Port: the FTP server port; default 21
User Name: username for accessing FTP server
Password: password for accessing FTP server
FTP Path: enter the initial path if applicable
Click Test to verify the conneccon with the server using the username and password.
Click Apply when done.
5.9.3. E-mail Alerts
E-mail SMTP Settings
Please refer to the settings from your email service provider to configure correctly.
Email Service Provider
SSL/TLS
SMTP Server
Port
Account
Password
From
To
Manual
None
| 25 |
e.g. user@domain.com
e.g. user@domain.com
e.g. user1@domain.com, user2@domain.com
Note: If you'd like to add multiple recipients, simply separate each email with a comma.
Subject
EDS5250 IPCam Alert
Test
Apply
Cancel
EDS6255 allows camera to send captured images to the predened email box to nofy about an event or alarm.
SMTP is an email sender's server. You need to check whether your email service provider supports SMTP and obtain the required informaon for this seng.
Email Server Provider: supported Gmail, Yahoo and Hotmail.
SSL/TSL: select the type of the authencaon as Transport Layer Security (TLS) protocol or Secure Sockets Layer (SSL) protocol
SMTP Server: enter the SMTP server address (e.g. smtp.gmail.com).
Port: enter SMTP server port (normally 587 or 465)
Account: the email account name; if your email is myemail@gmail.com, myemail is the account name.
Password: the password you use to login into your email box.
From: you can type in your email address or other address if you would like the receiver to reply the email to.
To: enter the receiver email here (usually your or the administrator's email).
Subject: enter the email subject here.
5.10. Storage Info

System will display the storage informaon on this page; it includes the network storage status, total size and available size. User can click the "Refresh" buon to get the latest informaon of these informaon.
| Storage Info | |||||
| Status | Total Size | Available Size | |||
| SD Card | Ready | 15.30 GB | 15.28 GB | Dismount | Format |
| Network Storage | Ready | 100.00 GB | 11.22 GB | ||
| Refresh | |||||
| Name | Size | Last Modified | Action |
| tmp | --- | 2015/09/25 15:08:06 | Delete |
| timelapse-20150925-1343.avi | 10123K | 2015/09/25 14:49:16 | Delete |
| timelapse-20150925-1402.avi | 8999K | 2015/09/25 15:08:28 | Delete |
It depends on dierent browsers, user can double click the mouse on the records of .avi or .jpg le to save and view the video or snapshot.
This camera supports MicroSD card slot. Please be careful when choosing the SD card type. You need to insert a blank SD card into the slot as shown below. It may take a few seconds for the camera to recognize the inserted SD card.
You will be seeing the le list aer inserted the SD card. If not, refresh the page by clicking on Refresh buon and double check if the Micro SD card has been properly inserted into the slot.
Dismount: you should dismount the SD card before physically removing it from the slot to avoid le damage.
Format: You can clean a SD card by formang it (all data will be erased).
You can browse through the folder like any other le manager by clicking on the folder name.
Click on the les to view it directly as shown below.
| Name | Size | Last Modified | Action |
| tmp | --- | 2015/09/25 15:08:06 | Delete |
| timelapse-20150925-1343.avi | 10123K | 2015/09/25 14:49:16 | Delete |
| timelapse-20150925-1402.avi | 8999K | 2015/09/25 15:08:28 | Delete |
5.9. User Management
| User Management |
| User Account |
| Push Message Mobile List |
User List
| Select | No. | Username | Authority |
| □ | 1 | admin | Administrator |
| □ | 2 | guest | Viewer |

There are two types of user accounts: Administrator and Viewer. Administrator has full control over the camera sengs while viewer only has the accessibility of watching the real me video. Viewer account is particularly useful when you have mulple users such as other sta members. You may have many administrators as well as viewers depending on your needs.
Administrator has full control of the camera interface with conguraon features as shown below.

Viewer only has basic camera view interface.

5.10.1. Add User
User Name
Password
Confirm Password
Authority
Add
Reset


Administrator ▼
User Name: enter username
Password: enter password
Conrm Password: enter password for conrmaon
Authority: select Administrator or Viewer
Click Add to add the user
5.10.2. Edit User
User List
| No. | User Name | Authority | Select |
| 1 | admin | Administrator | |
| 2 | guest | Viewer | |
| 3 | family | Viewer | |
| Edit | Delete Selected | Delete All | Reset |
Select a user from the list by click on the check box. Click Edit to change the user account seng.
| User Name | friend |
| Password | .... |
| Confirm Password | ....| |
| Authority | Viewer |
| Edit | Reset |
Make the changes and then click Edit to save the changes.
Once all necessary changes are made to the accounts, click Apply to make the changes aecve.
User List
| No. | User Name | Authority | Select |
| 1 | admin | Administrator | |
| 2 | guest | Viewer | |
| 3 | friend | Viewer |
Edit Delete Selected Delete All Reset
Apply Cancel
5.10.3. Delete User
On the user list, select the user account to be deleted.
Click on Delete Selected to delete the account.
User List
| No. | User Name | Authority | Select |
| 1 | admin | Administrator | |
| 2 | guest | Viewer | |
| 3 | friend | Viewer | |
| Edit | Delete Selected | Delete All | Reset |
Apply Cancel
When prompted with delete conrmaon, click Yes to delete.
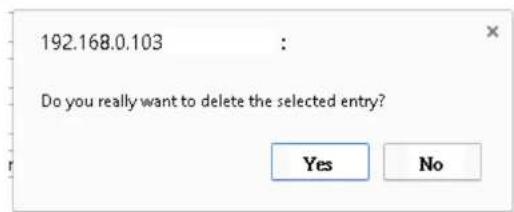
Once all necessary changes are made to the accounts, click Apply to make the changes aecve.
User List
| No. | User Name | Authority | Select |
| 1 | admin | Administrator | |
| 2 | guest | Viewer | |
| Edit | Delete Selected | Delete All | Reset |
Apply Cancel
5.10.4. Push Message Mobile List
Here will list the devices which enable the feature of push message on this camera. When an event triggered, camera will send the message to all the devices in this list. You can click "Delete" to disable the feature of the mobile device.
| Mobile List | |||
| Description | Platform | Device Token | Action |
| John | iOS | 7ef97c571d... | Delete |
| Mary | Android | APA91bGz0f... | Delete |
6. Camera Connecng to EnGenius Router
Smart Recording is an intelligent camera management technology that allows EnGenius users to manage cameras collectively with ease. EnGenius bundles cameras with Intelligent Router and IoT gateway series and provides a single point of entrance for integrated management. Tradionally, if you have mulple cameras installed you will need to go through the tedious conguraons on each of the camera. The benets of Smart Recording are as follows:
1. Easy and Integrated Access
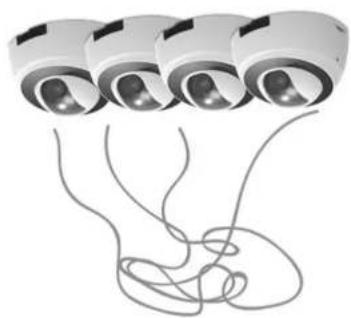
natural_image
Illustration of four identical camera lenses connected to a coiled cable (no text or symbols)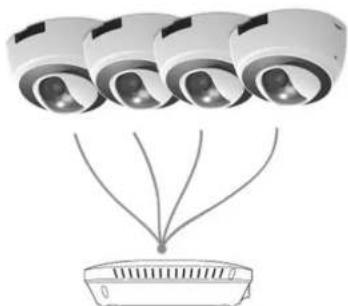
natural_image
Diagram showing multiple surveillance cameras above a device with radiating lines (no text or symbols)EnGenius
2. Integrated Storage
Smart Recording technology integrates the EnGenius Intelligent Router and IoT Gateway storage feature and allows you to store the media les on the centralized storage over the router.
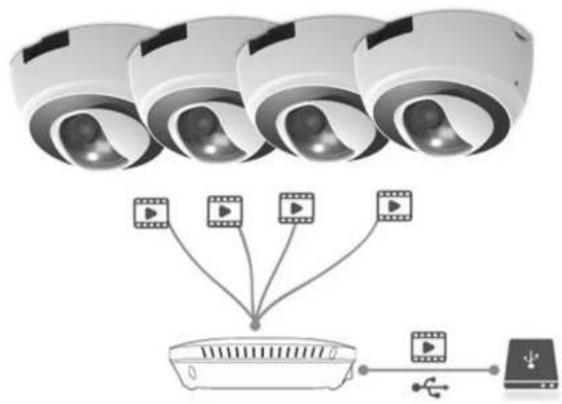
flowchart
graph TD
    A["Camera 1"] --> C["Central Device"]
    B["Camera 2"] --> C
    D["Camera 3"] --> C
    E["Camera 4"] --> C
    C --> F["Device"]
    F --> G["USB Interface"]
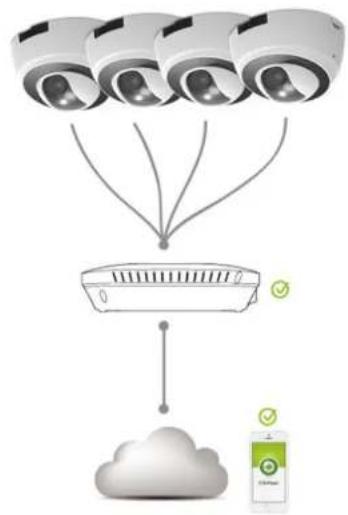
3. Easy Remote Access over Internet
Traditionally, you cannot get access to your Camera over the Internet without some manual conguraon known as Port Forwarding because your camera is installed under a local network. Smart Recording technology takes care of all the complicated setup and leave you with ease of control. That is, you will be able to access any of the cameras in your home by providing their DDNS names on EnViewer or web browser if you are using PC/Laptop.

flowchart
graph TD
    A["Camera 1"] --> B["Router"]
    C["Camera 2"] --> B
    D["Camera 3"] --> B
    E["Cloud"] --> B
    F["Network Component"] --> B
    G["Satellite"] --> B
flowchart
graph TD
    A["Camera 1"] --> C["Central Air Conditioner"]
    B["Camera 2"] --> C
    D["Camera 3"] --> C
    E["Camera 4"] --> C
    F["Cloud"] --> C
    G["Battery icon"] --> H["Water meter"]
5.11. Enable Router Storage Funcon
The best thing about Smart Recording is that you can make use of the EnGenius Router Storage funcon. You should each an external USB storage device (portable hard-disk or USB ash drive) to your router. Enter the Username and Password of your router and press Login.
If you have not yet enable Samba Server on your router, choose USB Port→ File Sharing. Skip this step if samba is already enabled. Then, Enable Samba Service and click on Apply to acvate the funcon.
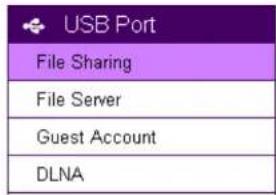
Samba Service

Enable

Disable
Apply
Cancel
On your router's Main Menu, Click System→ IP Camera to access the connected cameras.
Note: that only EnGenius Cameras can be managed collectively by EnGenius Router. For other vendor's cameras, you still have to conjure them one by one manually.
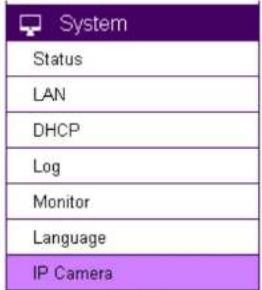
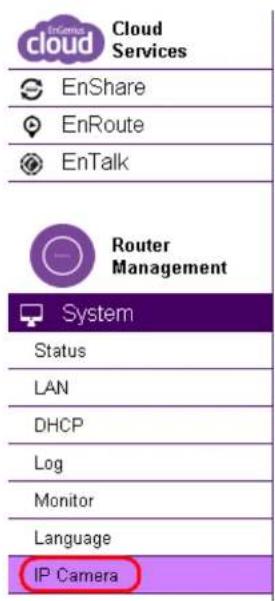
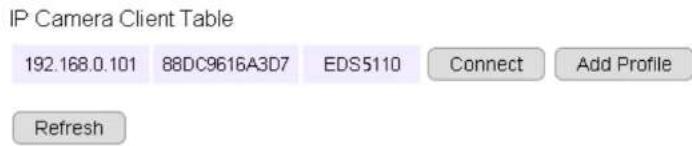
Current IP-Camera Profile

You should be see all your cameras listed on the IP Camera Client Table. If not, click Refresh buon to scan the network again. Please be noted that only EnGenius Cameras will be listed on the table.
IP Camera Client Table
| 192.168.1.107 | 88DC9604CEE1 | EDS3200Lobby | Connect | Add Profile |
| 192.168.1.105 | 88DC9604CF38 | EDS5200ParkingEntrance | Connect | Add Profile |
| 192.168.1.106 | 88DC96025E7B | EDS5200SecuritySideWalk | Connect | Add Profile |
| 192.168.1.113 | 004270003077 | EDS5110 | Connect | Add Profile |
Refresh
Connect: You can get access to the selected cameras' camera mange page.
Add Prole: Add the selected camera to a prole (please refer to next secon for more detail on Prole)
5.12. Camera Prole
A Prole is an entry that represents the added camera. You must add the camera to a prole so that the router has the privilege to congure your camera and link them together.
5.12.1. Add Prole
This example shows 4 connecng cameras on the router. We have chosen to add two cameras (Lobby and Entrance) for demonstraon purpose.
Click on Add Prole buon to add the chosen camera.
IP Camera Client Table
| 192.168.1.113 | 004270003077 | EDS1130 | Connect | Add Profile |
| 192.168.1.107 | 88DC9604CEE1 | EDS5110Lobby | Connect | Add Profile |
| 192.168.1.100 | 003110016621 | EDS3110 | Connect | Add Profile |
| 192.168.1.105 | 88DC9604CF38 | EDS5110ParkingEntrance | Connect | Add Profile |
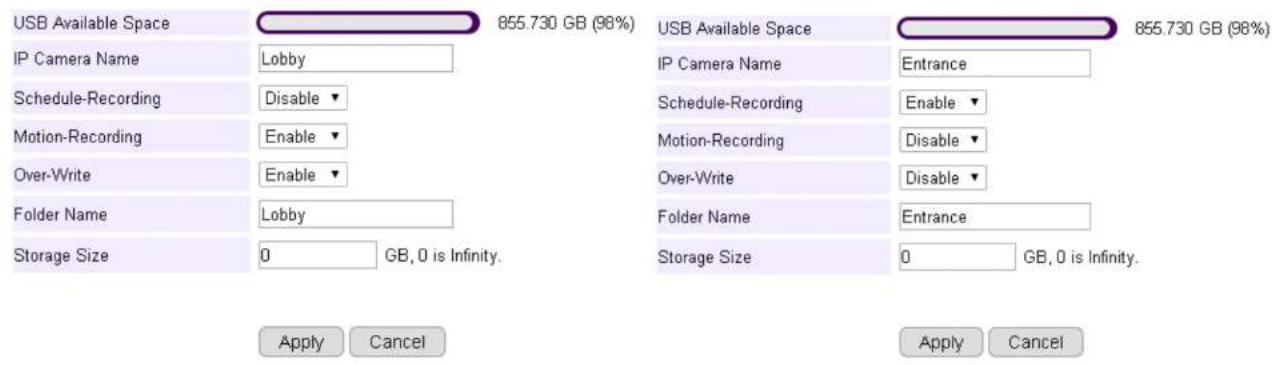
IP Camera Name: Lobby (use meaningful name for beer idencaon)
Scheduled-Recording: Enable/Disable this type of recording
Moon-Recording: Enable/Disable this type of recording
Over-Write: Enable/Disable over-wring the old les when there's no space for storing the new les
Folder Name: The name of the folder where the media les of this camera will be stored on the router storage.
Storage Size: put 0 if storage is unlimited.
Click Apply when done.
The added cameras will be listed as shown below.
Current IP-Camera Profile
| No. | Name | IP Address | MAC | Recording | Motion | Over-Write | Folder Name | Storage Size | Select |
| 1 | Lobby | 192.168.1.107 | 88DC9604CEE1 | Lobby | 0 | ||||
| 2 | Entrance | 192.168.1.105 | 88DC9604CF38 | Entrance | 0 |
Edit
Delete Selected
Delete All
Synchronize with IPCAM
You can Edit or Delete prole by selecng the prole and click on the buons below.
5.12.2. Edit Prole
Current IP-Camera Profile
| No. | Name | IP Address | MAC | Recording | Motion | Over-Write | Folder Name | Storage Size | Select |
| 1 | Lobby | 192.168.1.107 | 88DC9604CEE1 | Lobby | 0 | ||||
| 2 | Entrance | 192.168.1.105 | 88DC9604CF38 | Entrance | 0 |
Edit
Delete Selected
Delete All
Synchronize with IPCAM
Select the camera prole and then click Edit button to make the changes.
5.12.3. Delete Prole
Current IP-Camera Profile
| No. | Name | IP Address | MAC | Recording | Motion | Over-Write | Folder Name | Storage Size | Select |
| 1 | Lobby | 192.168.1.107 | 88DC9604CEE1 | Lobby | 0 | ||||
| 2 | Entrance | 192.168.1.105 | 88DC9604CF38 | Entrance | 0 |
Edit
Delete Selected
Delete All
Synchronize with IPCAM
Select the camera prole and then click Delete Selected button to delete the prole.
Click Delete All to delete all the proles.
5.12.4. Synchronize
Current IP-Camera Profile
| No. | Name | IP Address | MAC | Recording | Motion | Over-Write | Folder Name | Storage Size | Select |
| 1 | Lobby | 192.168.1.107 | 88DC9604CEE1 | Lobby | 0 | ||||
| 2 | Entrance | 192.168.1.105 | 88DC9604CF38 | Entrance | 0 |
Edit Delete Selected Delete All Synchronize with IPCAM
5.13. Fine Tune Camera Conguraon set by the Router
This secon provides extra informaon on what actually happened to your camera's seng aer you added it to the Prole on the router. It is helpful for you to go through the automatically congured camera sengs and make proper changes when necessary.
Click on Connect buon to open the chosen camera's login page.
IP Camera Client Table
| 192.168.1.113 | 004270003077 | EDS1130 | Connect | Add Profile |
| 192.168.1.105 | 88DC9604CF38 | EDS5200ParkingEntrance | Connect | Add Profile |
| 192.168.1.106 | 88DC96025E7B | EDS5200SecuritySideWalk | Connect | Add Profile |
| 192.168.1.107 | 88DC9604CEE1 | EDS5110Lobby | Connect | Add Profile |
| 192.168.1.100 | 003110016621 | EDS3110 | Connect | Add Profile |
5.14. Access the Media les on the Router
5.14.1. Using web browser
Please refer to EnGenius Router user's manual for more detail on the Shared Storage feature.
You can click on USB Port to access the storage.
EnGenius®

Please select an account
EnGenius®


Admin (The Admin user is allowed to access all the folders of the storage page)


Guest (The Guest user has right to access the Guest folder only)
Start
Choose Admin and click on Start buon.
EnShare Web Access
Select a target USB device to access the storage sharing
Note: Connecting single USB drive is suggested if there is no device shown on the list.

Generic Flash Disk, 7.358G / 8G
Choose the storage device to access the le.
EnShare Web Access
Index of /usb_admin/sda1/
| Name | Last Modified | Size | Type | Rename | Select |
| Parent Directory | - | Directory | |||
| Album_Uploads | 2011-Jan-01 00:01:34 | - | Directory | ||
| Guest | 2011-Jan-01 00:01:34 | - | Directory | ||
| IP Camera | 2014-Jul-13 22:53:56 | - | Directory | ||
| System Volume Information | 2014-May-30 09:16:44 | - | Directory | ||
| video | 2011-Jan-01 00:01:32 | - | Directory |
In the previous example, the Lobby camera prole denes the path /sda1/IP_Camera/Lobby/ The media les will be stored as shown below.
EnShare Web Access
Index of /usb_admin/sda1/IP_Camera/Lobby/video/20140713/


| Name | Last Modified | Size | Type | Rename | Select |
| Parent Directory | - | Directory | |||
| alarm_video_20140713-065601.avi | 2014-Jul-13 14:56:10 | 5.5M | video/x-msvideo | ||
| alarm_video_20140713-065612.avi | 2014-Jul-13 14:56:20 | 5.0M | video/x-msvideo | ||
| alarm_video_20140713-065622.avi | 2014-Jul-13 14:56:32 | 5.0M | video/x-msvideo |
Click the le to download it.
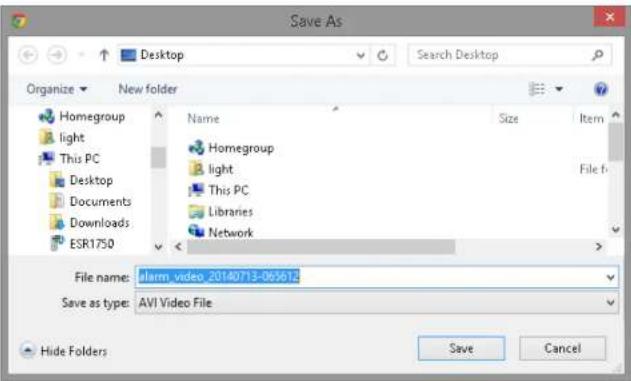
5.14.2. Using Windows File Explorer
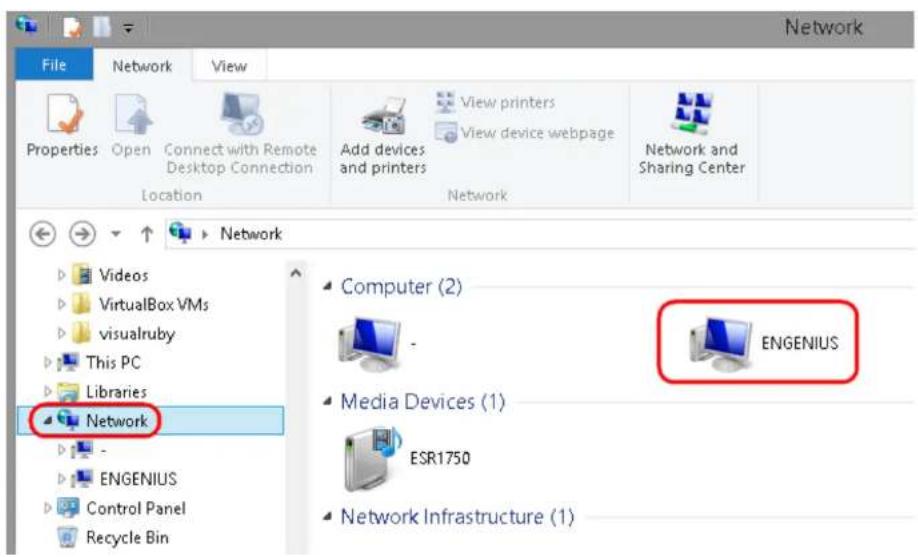
Once enabled Samba on the EnGenius router, you should nd the router under Network in your File Explorer as shown above.
Double click on ENGENIUS to get access to the storage space.
Upon security prompt, enter the router's username and password to connue.
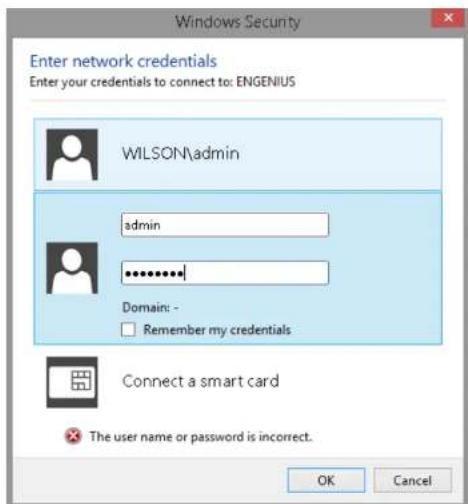
You can access the media les located under \ENGENIUS\sda1\IP_Camera\Lobby
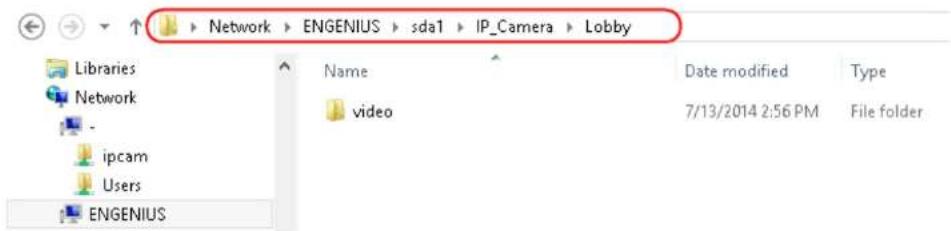
6. Camera Connecng to Other Router
Normally, you do not need to make any changes to your router setting to be able to use the camera. However, in case if you experience issues in connecng the camera, you should probably check for the following sengs. UPnP, UPnP Traversal and Firewall.
UPnP and UPnP Traversal:
Universal Plug and Play (UPnP) allows the other device to detect the presence of the camera so that communicaon become possible. Please ensure that your router supports UPnP Traversal and has it enabled. Most of the modern wireless router today supports this feature. You should enable UPnP if you wish your camera to be recognized by the home router. If you can't nd the related settings, they are most likely enabled by default. UPnP Traversal makes camera remote access over the Internet possible using camera DDNS name.
Firewall:
By default, the rewall funcon of the router is not congured to liter out specic trafc. However, in case if you have trouble accessing the camera view, it's likely that the trafc has been blocked by the rewall on your router. You may want to double check whether you have blocked the service ports. Check the camera seng System→Service Port. Make sure you do not block the following ports: 80, 50000, 554, 50045, 9091 and 50075.
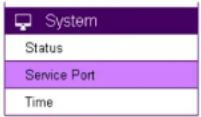
7. Applicaon Guide
This chapter demonstrates a common applicaon using EnGenius Camera. The examples assume that the camera is already connected to a router that has Internet accessibility.
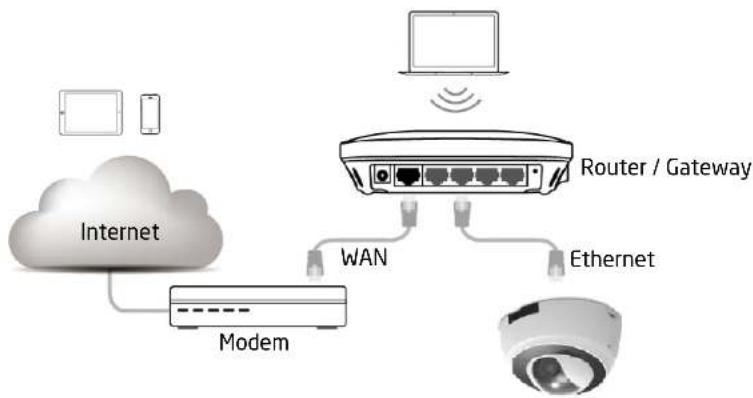
flowchart
graph TD
    A["Internet"] --> B["Modem"]
    B --> C["Router / Gateway"]
    C --> D["Ethernet"]
    C --> E["WAN"]
    E --> B
    F["Laptop"] --> C
    G["Mobile Device"] --> A
Note: Please ensure that your router supports UPnP Traversal and has it enabled. Most of the modern wireless router today supports this feature. If you can't nd the related setngs, they are most likely enabled by default. UPnP Traversal makes camera remote access over the Internet possible using camera DDNS name (0e95c28.engeniusddns.com).
7.1. Example: Remote Surveillance and Moon Detecon.
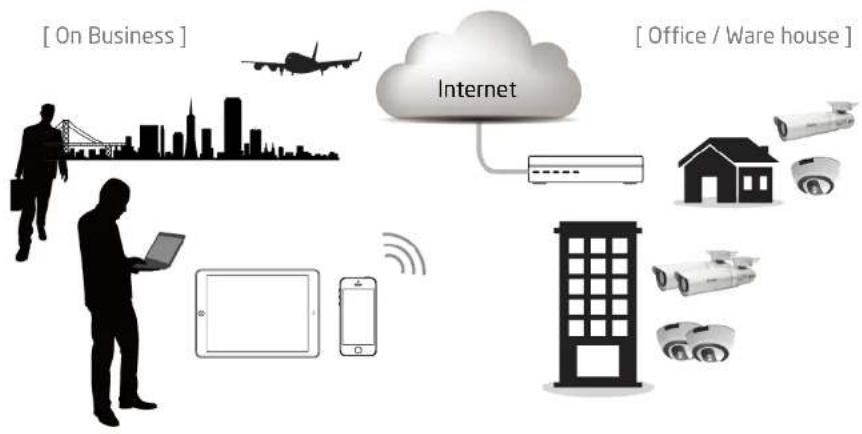
flowchart
graph TD
    A["On Business"] --> B["Car with city skyline"]
    B --> C["Internet"]
    C --> D["House with cameras"]
    C --> E["Office / Ware house"]
    F["Laptop with tablet"] --> G["Smartphone"]
    H["Camera"] --> I["Building"]
    J["Camera"] --> K["Smartwatch"]
    style A fill:#f9f,stroke:#333
    style B fill:#ccf,stroke:#333
    style C fill:#cfc,stroke:#333
    style D fill:#fcc,stroke:#333
    style E fill:#cff,stroke:#333
    style F fill:#ffc,stroke:#333
    style G fill:#cfc,stroke:#333
    style H fill:#fcc,stroke:#333
    style I fill:#ffc,stroke:#333
    style J fill:#fcc,stroke:#333
    style K fill:#ffc,stroke:#333
The applicaon concept diagram shows a camera monitoring the property like oce or warehouse. The management sta wants to remotely monitor their responsible property and needs to be alarmed when moon (intrusion) is detected.
7.1.1. Step 1: Choose Event Control
Please select preferred Event Acon; for example here, E-Mail would be suggested.
7.1.2. Step 2: Configure Moon Detecon
Motion Detection Settings
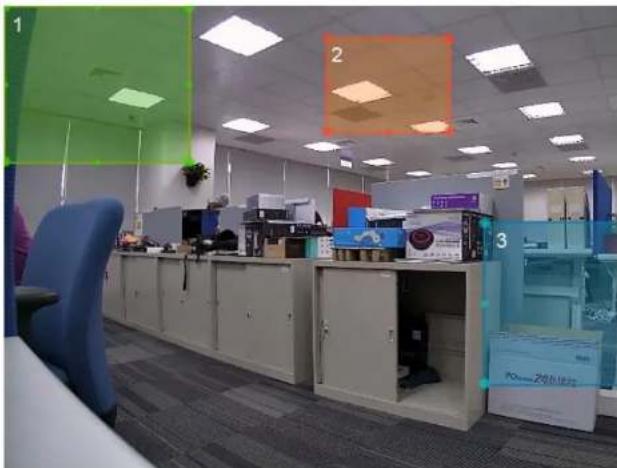
natural_image
Interior view of an office with cubicles, storage cabinets, and numbered windows (no visible text or symbols)Note: You can adjust the motion detecting area by dragging the four corners to resize the window.
Please specify Window of your interest and click Apply.
7.1.3. Step 3: Configure Event Acon

Select desired Event Duraon and Interval; if you enable Event Recording via available methods such as Network Storage or FTP, please also review related settings regarding length and resolution. Once done, click Apply to acvate the settings.
8. Trouble Shoong
8.1. Viewing Your Video
How do I view using a mobile?
You can view your video on your mobile devices (iOS or Android) by using EnViewer. EnViewer is an App that allows you to view and manage your camera at real me.
Where can I download my app?
You can download it by searching APP store (iOS) or Google Play(Android) for "EnViewer". You can also scan the following QR code to download EnViewer directly.
Android


iOS (for iPhone and iPad)


How do I use the web viewer on a computer?
You can view the camera at real me using a web browser. The supported web browsers are Google Chrome and Microsoft Internet Explorer. Given that you have congured your camera properly, you should be able to get access to your camera by entering its DDNS or IP address.
If you may have troubles nding your camera on your network, please use the provided ulity on the enclosed CD, EnViewer Finder, to nd out your camera's current IP address.
8.2. Networking
How can I minimize interference?
Make sure there is no electrical appliance near the camera, such as microwave or devices that may interfere with the camera. Upon experiencing interference, try to turn o possible electrical devices that are currently running.
8.3. Security and Privacy
Accessing the camera from the Internet is convenient; however, it is also possible for anyone who has your username and password to login into your camera. Therefore, it is crucial to keep your username and password safe and change them regularly. Your videos or images are stored either locally or in network storage. The images and videos are accessible only when provided with proper security check.
Can EnGenius employees view my video?
No! No one can view your video or login into your camera without security check. The username and password is stored locally in your camera and it is not accessible by anyone but yourself. Therefore, it is important to keep your security informaon safely.
8.4. Cloud Video Services
If I cannot connect to the cloud service, what should I do next?
Please check your router's Internet sengs. You can rst check the Internet connecvity from other devices connecng to the router and determine possible sources to cause the issue. If other connecng devices can connect to the Internet through the router, the problem may be caused from other router setngs. Check wireless security sengs and turn off any rewall rules on the router to see if conncon can get through.
9. Appendix
Federal Communication Commission Interference Statement
This device complies with Part 15 of the FCC Rules. Operation is subject to the following two conditions: (1) This device may not cause harmful interference, and (2) this device must accept any interference received, including interference that may cause undesired operation.
This equipment has been tested and found to comply with the limits for a Class B digital device, pursuant to Part 15 of the FCC Rules. These limits are designed to provide reasonable protection against harmful interference in a residential installation. This equipment generates, uses and can radiate radio frequency energy and, if not installed and used in accordance with the instructions, may cause harmful interference to radio communications. However, there is no guarantee that interference will not occur in a particular installation. If this equipment does cause harmful interference to radio or television reception, which can be determined by turning the equipment off and on, the user is encouraged to try to correct the interference by one of the following measures:
- Reorient or relocate the receiving antenna.
- Increase the separation between the equipment and receiver.
- Connect the equipment into an outlet on a circuit different from that to which the receiver is connected.
- Consult the dealer or an experienced radio/TV technician for help.
FCC Caution: Any changes or modifications not expressly approved by the party responsible for compliance could void the user's authority to operate this equipment.
This transmitter must not be co-located or operating in conjunction with any other antenna or transmitter.
Radiation Exposure Statement:
This equipment complies with FCC radiation exposure limits set forth for an uncontrolled environment. This equipment should be installed and operated with minimum distance 20cm between the radiator & your body.