EDS5115 - Security Camera ENGENIUS - Free user manual and instructions
Find the device manual for free EDS5115 ENGENIUS in PDF.

User questions about EDS5115 ENGENIUS
0 question about this device. Answer the ones you know or ask your own.
Ask a new question about this device
Download the instructions for your Security Camera in PDF format for free! Find your manual EDS5115 - ENGENIUS and take your electronic device back in hand. On this page are published all the documents necessary for the use of your device. EDS5115 by ENGENIUS.
USER MANUAL EDS5115 ENGENIUS
EnGenius Video Management Software
User Manual
Ver : 1.0.0.0
TABLE OF CONTENTS
EnGenius Networks
1. GETTING STARTED 2
1.1 Minimum System Requirements ....2
1.2 VMS Installation....2
2. USING VMS 3
2.1 User Interface Overview....6
2.1.1 Screen Division....7
2.1.2 System Information....7
2.1.3 eMAP 7
2.1.4 Playback....7
2.1.5 Configuration 7
2.1.6 Multi-Screen 8
2.1.7 Exit....8
2.1.8 Camera List ....8
2.2 Configuration 8
2.2.1 System....8
2.2.4 Account....11
2.2.5 Recording 12
2.2.6 Log View 13
2.3 eMAP 14
2.4 Playback 16
EnGenius Networks
1. Getting Started
1.1 Minimum System Requirements
Before installing the EnGenius Video Management Software, please make sure your system meets the following recommended minimum system requirements.
| Server Hardware Minimum Requirements (recommended) | |||
| Operating System | Windows Server 2000, 2003, 2008/Windows XP (32/64 bit), Windows 7 (32/64 bit), Windows 8 (32/64 bit) | ||
| Recording Channels | 16 CH | 16~32 CH* | 64CH* |
| CPU | 2nd Generation Intel®CoreTM i3 Processors | 2nd Generation Intel®CoreTM i5 Processors | 2nd Generation Intel®CoreTM i5 Processors |
| RAM | 2 GB or above | 4GB or above | 8GB or above |
| Network Interface Card | Ethernet, 1000 BASE-T recommended | ||
| Graphics Adapter | DirectX 9 compatible 1 GB graphics card | ||
| Hard Disk Type | SATA, SCSI, SAS (7200 rpm or faster) in NTFS format | ||
| Hard Disk Space | 1 TB** | ||
*EnGenius 32 CH & 64 CH VMS will be available later and can be updated easily from the current 16-channel version. Please visit engeniustech.com for the latest available version.
**The VMS video raw data will overwrite when Hard Disk Free Space less than 20%, default path is Disk C, recommend to change to another Disk path to keep HDD usage.
Note: Only users with Administrator privileges can install or use VMS on a Windows Vista system. It is assumed that all the cameras have already been installed and operational as this manual is specifically for monitoring software installation instruction only.
1.2 VMS Installation
The Installation CD contains the software needed to run the program:
- Video Management Software: Includes Live View monitoring, eMAP, Configuration, Recording mode and Playback features.
- IP Utility: This utility allows a user to easily discover the IP cameras, basic configurations and perform multiple firmware upgrades for connected IP cameras.
Please select your CD-ROM drive manually and open the VMS folder. Click
EnGenius_VMS_Install.exe to initiate the installation. Click Finish to complete process.
EnGenius Networks
2. Quick Start
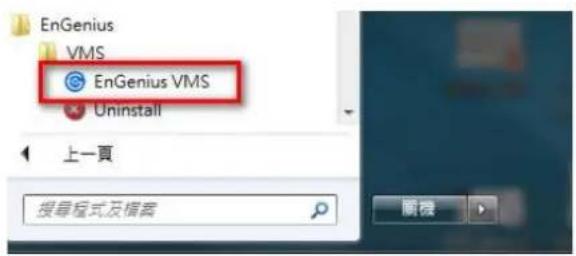
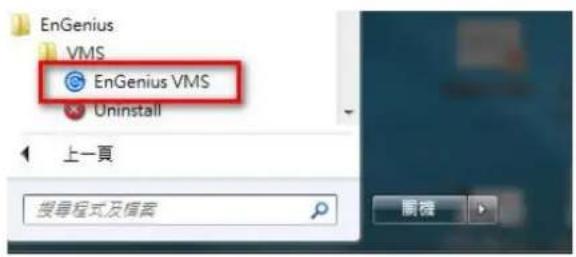
Step 1: Go to Start > All Programs > EnGenius > VMS > "EnGenius VMS" to execute Live Monitor
Step 2: Enter default username/password both admin, then click on Login.
2.1 Install IP Camera(s)
Step 1: Setup the IP camera(s) by referring to the user manual
Step 2: Make sure you can access this camera through IE browser.
Step 3: Add the IP camera(s) to the system by following the steps below.
2.2 Add IP camera(s)
Step 1: Execute EnGenius VMS.
Step 2: Type in user name and password and log in to the system.
Step 3: In Live Monitor, go to Configuration and select Device to obtain the Camera setting panel.
Step 4: Go to Camera tab, click Add to open Add Camera page

EnGenius Networks
Step 5: Click on Camera Discovery to detect IP cameras under this local area network (LAN).
Note: The Discovery function is available only when the IP cameras support UPnP.
Step 6: Select one of the IP cameras that are available and click OK.
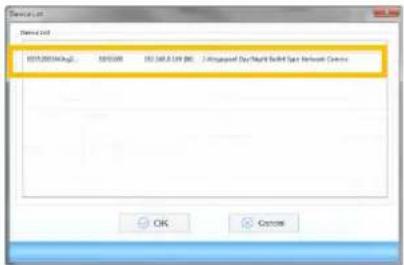
Step 7: Enter the Camera username & password and Click "Get Camera Settings" to verify camera link.
Step 8: check the Camera settings ok, than Click "Save" to add the camera and exit.

2.3 Set Recording
Step 1: Execute EnGenius VMS.
Step 2: Type in user name and password and log in to the system.
Step 3: In Live Monitor, go to Configuration and select Recording for detail setting
Step 4: Choose a camera and then select recording mode
Note: The Camera list had been save on this VMS first.
Step 5: left-click on the schedule bar for selection area.
Step 6: Select Save to update the recording schedule.
Step 7: exit the Configuration to go back to Live Monitor.
EnGenius Networks
2.4 Playback
Step 1: Execute EnGenius VMS.
Step 2: Type in user name and password and log in to the system.
Step 3: In Live Monitor, Click on Playback.
Step 4: In Playback, Select on Start Time & End Time range than click Play
Step 5: click on Show Records to make sure the video is available, left click on mouse and drag to select a video clip to replay; user can also select multiple channels to replay at the same time.
Note: The Playback function up to 4 channel IP Camera.

2.5 eMAP
Step 1: Execute EnGenius VMS.
Step 2: Type in user name and password and log in to the system.
Step 3: In Live Monitor, Click on eMAP
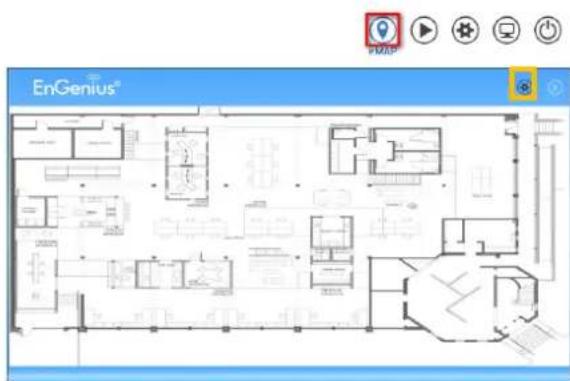
Step 4: In eMAP, click on Configuration to upload Background Image, select the image file and click Save to change Background Image
Step 5: right click on mouse, show the camera and move the camera to current location and adjust the view angle
Noticed: the camera view angle just for reference, it will not control the real camera view angle.
![Group1 Delete all eMAP items CH01 - ED58110 [192.168.0.101] 30000 30000](/content/2026/05/1142462/images/cd136818c15949098fa4ddcad2966f89c1002613398ae474be951afdccc3e40a.jpg)
EnGenius Networks
3. Using VMS
Step 1: Go to Start > All Programs > EnGenius > VMS > EnGenius VMS to execute Live Monitor.
Step 2: Enter the default username/password: admin, then click on Login.
Username: admin
Password: admin
EnGenius Networks
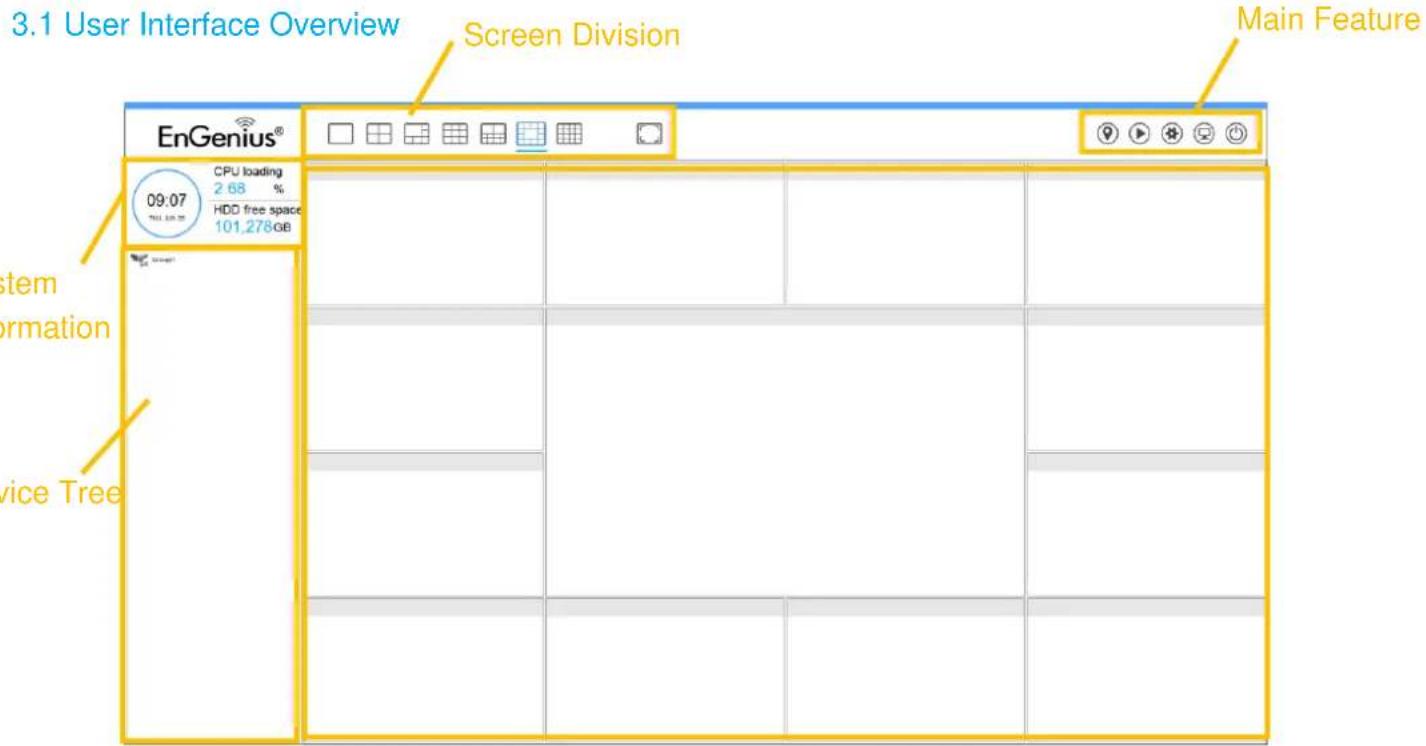
3.1.1 Screen Division
You can allocate the sub-screen display by clicking on the desired layout icon. To switch to single camera display, double click on a particular sub-screen. Double click on the screen again to regain the previous screen division layout.
 | Switches to 1 screen |  | Divides into 4 screens |  | Divides into 6 screens |  | Divides into 9 screens |
| Divides into 10 screens | Divides into 13 screens | Divides into 16 screens | Switches to Full screen |
3.1.2 System Information
Displays the current date, time, free disk space, and CPU loading information.
Note: It is recommended that the computer running VMS should have the CPU loading control under 90%, if it is higher than 90% it may affect VMS recording performance.

CPU loading
11.84 %
HDD free space
12,591 GB
3.1.3 eMAP
Select the eMap icon to view the E-Map page. The eMAP feature helps to locate devices easily while the information window helps to show the status and orientation of each device.

3.1.4 Playback
Select the Playback icon to watch recorded video, search recorded video, adjust images within stored data, save video/pictures, print images, check log information and event records, and configure the recording settings.

3.1.5 Configuration
Select the Configuration icon to modify the general system settings, camera settings, user account settings, recording settings, system logs and so on.

EnGenius Networks
3.1.6 Multi-Screen

Select the Multi-Screen icon to view Live Monitor and/or eMAP features on multiple monitors.
3.1.7 Exit
Select the Exit icon to exit the surveillance system.

3.1.8 Camera List
Displays a list of currently connected cameras by group. The camera can be defined within different groups for application notices. You can modify groups under the Configuration section.
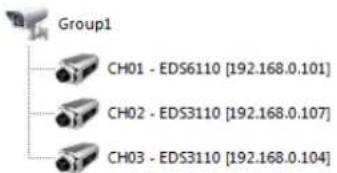
flowchart
graph TD
    A["Group1"] --> B["CH01 - EDS6110 [192.168.0.101"]]
    A --> C["CH02 - EDS3110 [192.168.0.107"]]
    A --> D["CH03 - EDS3110 [192.168.0.104"]]
3.2 Configuration
3.2.1 System
![Configuration System Camera Account Recording Log View VMS Information VMS Name: Engenius VMS Time Zone: GMT 08:00 (Pacific Standard Time) System Version: 1.0.0.0 Language: English Video Record [The system need to be restarted after you changed this path] Folder C:\EnGeniusVMS\Record Select... Video Export Folder C:\EnGenius\VMS\Export Select... Snapshot Playback Always ask me where to save the snapshot image Folder C:\EnGenius\VMS\Snapshot_Playck Select... Save](/content/2026/05/1142462/images/773940adb674960d96ded655abca63fa5ddcc2ba6d904f7a335c7a0eb50bc5c2.jpg)
VMS Information: Displays information about the VMS program:
a. VMS Name: Displays the VMS name. The VMS name can be modified.
b. Time Zone: Displays the Time Zone. The Time Zone is automatically synchronized with your client computer.
EnGenius Networks
c. System Version: Displays the current version of VMS you are using.
d. Language: Select the GUI language you wish to use. More languages will be supported in subsequent versions. (coming soon)
Video Record: Assign the default folder for the system where you wish to store all recorded video files.
Note: It is highly recommended that you do not save in system Hard Disk (C:) to avoid computer efficiency dropping when free storage is low.
Video Export: Assign the default folder for the system where you wish to do video export files.
Snapshot: Shows configuration settings for the Snapshot feature.
Snapshot Playback: Check the box to enable the ability to save and playback snapshot images from recorded video clips. Assign the default folder for the system where you wish to store all recorded snapshot files.
3.2.2 Adding Cameras
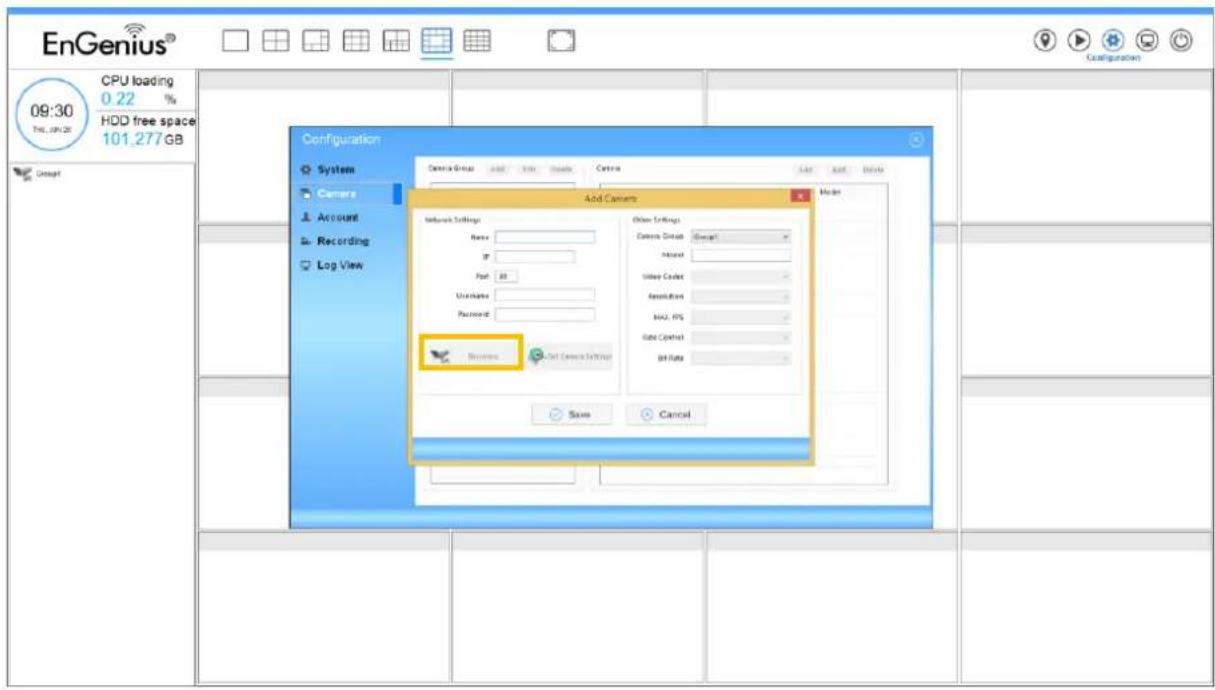
To add a Camera to the VMS, click Configuration > Camera > Add to add Cameras to the VMS. Click on Discovery to detect and automatically add cameras to the VMS using the Discovery Tool.
EnGenius Networks
Discovery: Click Discovery to open a window that displays all the cameras that are connected to the local network. Select one and click OK to add it. Repeat the process for any other cameras you would like to add.
![Camera List Name Model IP Description EDS6200 EDS6200 10.15.15.108 [80] 2-Megapixel Day/Night Dome Type Network Camera EDS3200 EDS3200 10.15.15.107 [80] 2-Megapixel Day/Night Box Type Network Camera EDS5200 EDS5200 10.15.15.104 [80] 2-Megapixel Day/Night Bullet Type Network Camera EDS3110 EDS3110 10.15.15.110 [80] 1-Megapixel Day/Night Mini Box Type Network Camera EDS3200 EDS3200 10.15.15.103 [80] 2-Megapixel Day/Night Box Type Network Camera EDS6110 EDS6110 10.15.15.101 [80] 1-Megapixel Day/Night Mini Dome Type Network Camera EDS5110 EDS5110 10.15.15.109 [80] 1-Megapixel Day/Night Mini Bullet Type Network Camera OK Cancel](/content/2026/05/1142462/images/c78630ebd974d29d3bc7d5bc6140c5d85987584fb3e965e0b86b67c27d43a1db.jpg)
To Manually Add Cameras Without Using the Discovery Tool
In the event that you are unable to automatically detect a camera, you can manually enter in camera information to connect it to the VMS.
Name: Enter the camera name you would like to use for the camera.
EnGenius Networks
IP: Enter the camera's IP address in the IP field.
Port: Enter the HTTP port in use for the camera.
Username: Enter the camera username (admin by default).
Password: Enter the camera password (admin by default).
Other Settings
a. Camera Group: Select a camera group from the group list.
b. Model: The VMS will detect the camera model name.
c. Video Codec: Select the camera's desired codec (eg. H.264, MPEG-4 or MJPEG).
d. Resolution: Choose the camera's Video stream resolution. Your options are: 1280x720, 720x480, 640x352 or 448x256.
e. MAX. FPS: Select the camera's max FPS rate. Your options are: 8, 15, 24 or 30FPS.
f. Rate Control: Select the camera's rate control. Your options are: CBR or VBR.
g. Bit Rate: Select the camera's bit rate. The range is from 128 Kbps\~4 Mbps.
When you have finished reviewing the Other Settings section, click Save to manually add the camera to the list.
3.2.3 Account
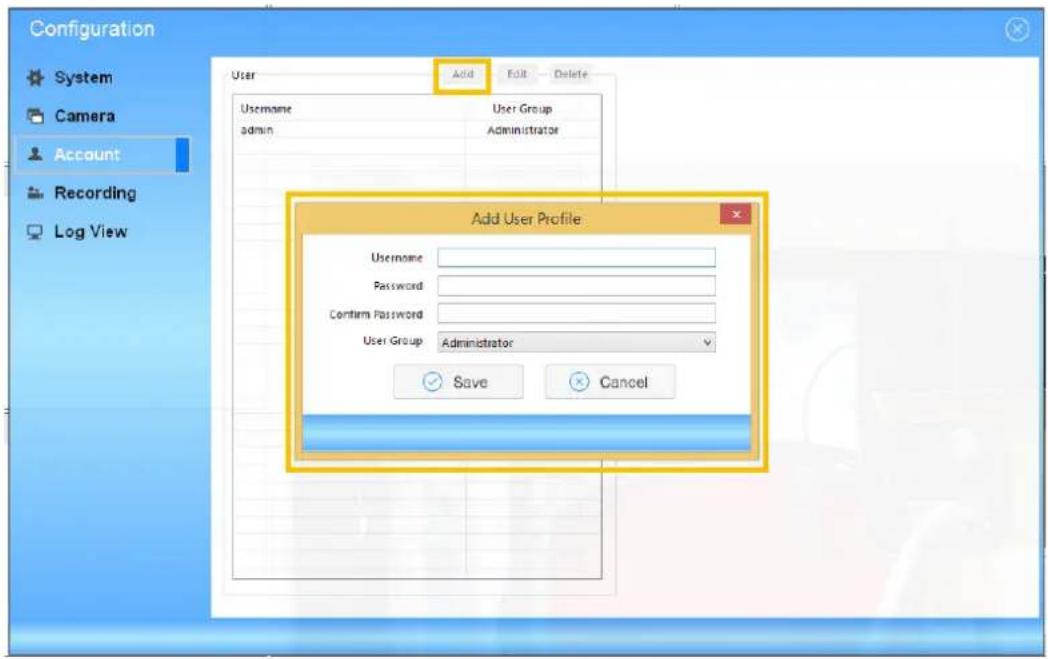
User: You can manage user accounts for the VMS here. Click Add, Edit, or Delete to add a new user, modify an existing user account, or delete an existing account.
EnGenius Networks
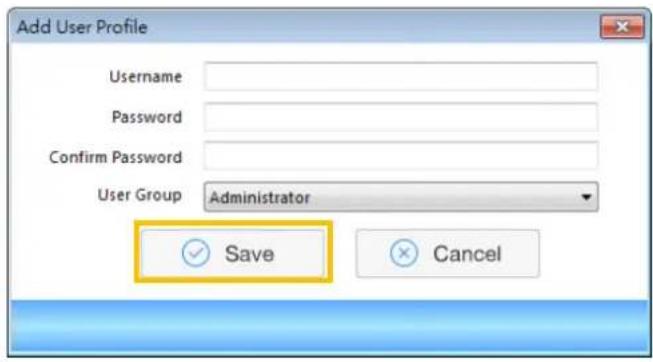
Adding/Editing A User Profile
a. Username: Enter to create/modify the username for the VMS user account.
b. Password: Enter to create/modify the password for the VMS user account.
c. Confirm Password: Confirm the password for the VMS user account.
d. User Group: There are two (2) levels of VMS's users. Please select the level based on the user's access needs.
i. Administrator: Has full control of all functions and features of the VMS.
ii. Operator: Has limited control of the VMS's functions and features.
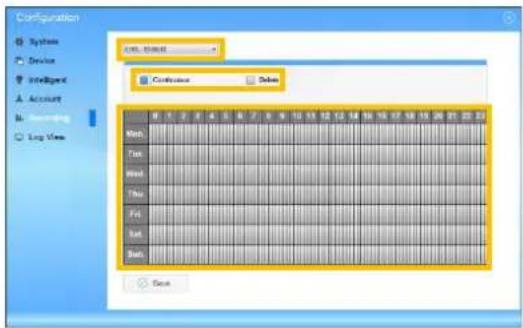
2.2.4 Recording
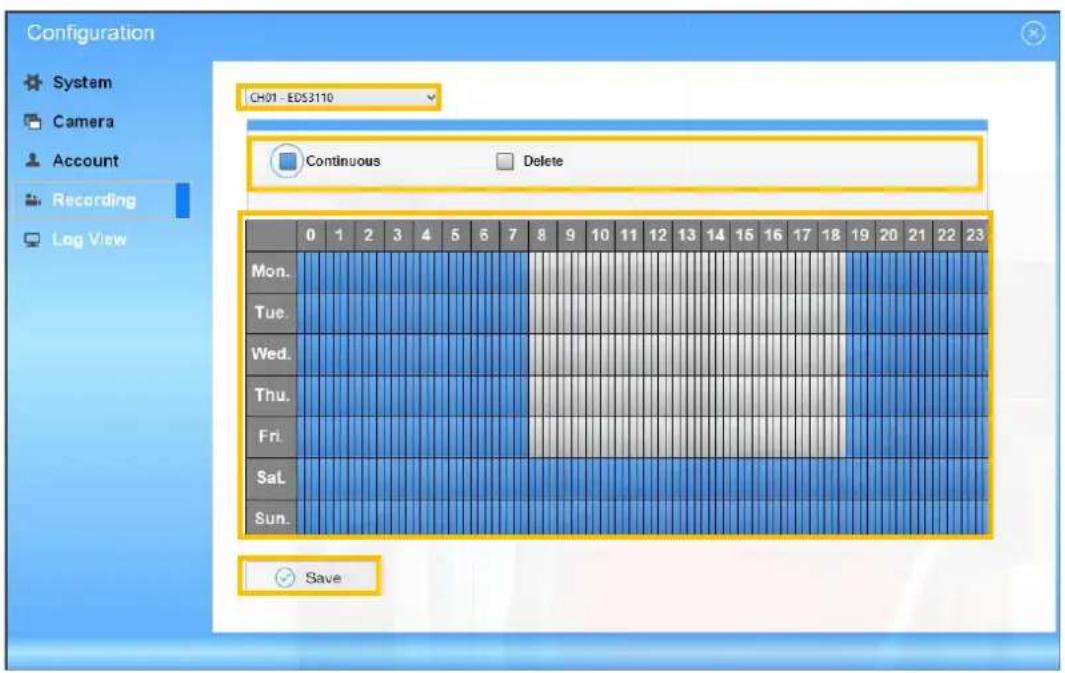
Recording Schedule: You can manually change the settings at any time after you insert or load a schedule template to the system.
EnGenius Networks
Camera: Choose from the drop-down list to select a camera.
Recoding Mode: There are two (2) different recording modes that can be selected:
a. Continuous: Select this option to record video continuously.
b. Delete: Does not record within this time slot.
Schedule Settings: You can manually change the settings at any time after you insert or load a schedule.
a. Click to draw a rectangle over the time slots you wish to include in the schedule. They will be highlighted. You can draw multiple rectangles to cover multiple time slots.
b. Click Save to save this recording rule.
3.2.5 Log View
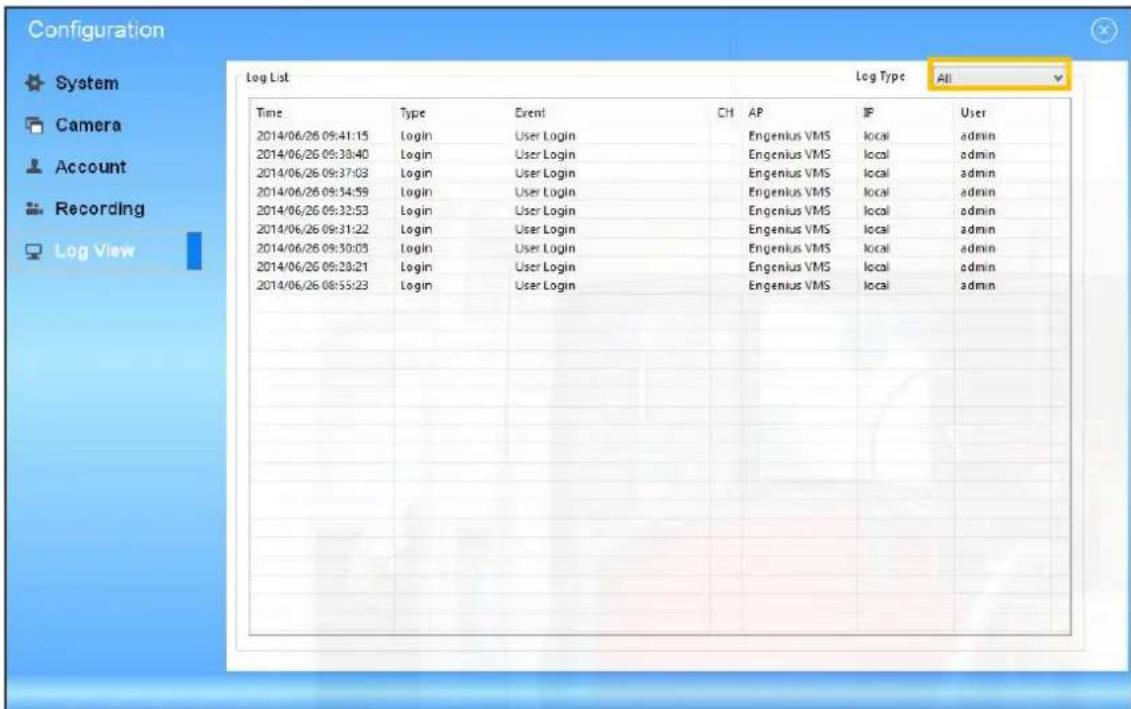
Log View: Click Log View to view the current log history on the VMS.
Log Type: Select a Log Type from the drop-down list. Choose the type of event you wish to view or select All from the drop-down list to view all event types. Your options are: All, Login, Recording, Service, and Motion Detection.
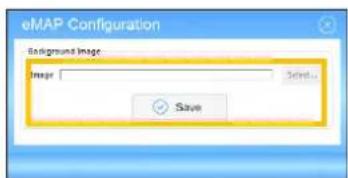
3.3 eMAP
EnGenius Networks
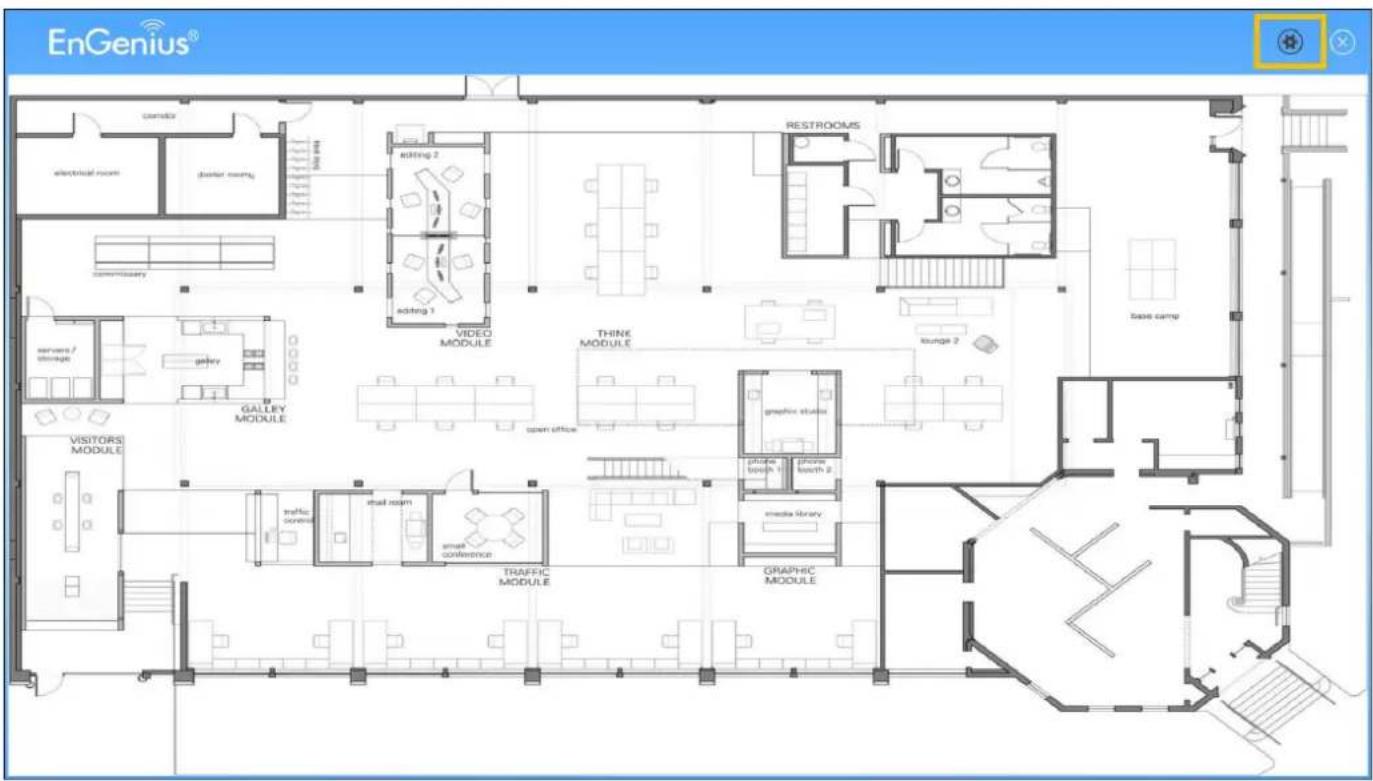
eMAP: The VMS supports an intuitive eMAP feature which allows users to upload eMAPs for planning out initial network device deployments, adding or repositioning devices within an existing network, and better overall device management.
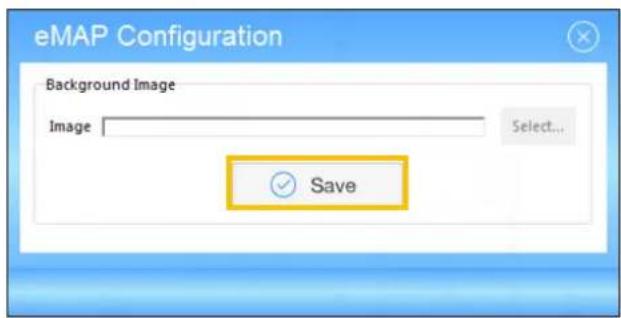
Configuration Icon: Click Configuration to upload a background image in a .jpeg format. Click Save to save the image to the system.
EnGenius Networks
To add icons to the eMap, right-click on the eMAP icon to show a dialog box:
a. You can select a camera from the group list. The camera icon will show on the eMAP.
b. You can show all live views when the camera icon is shown on the eMAP.
c. You can hide all live views when the camera icon is shown on the eMAP.
d. You can remove all cameras on the eMAP.
![Group1 Show all live views Hide all live views Delete all eMAP items CH01 - EDS6110 [192.168.0.102] CH02 - EDS3110 [192.168.0.103] CH03 - EDS6110 [192.168.0.105] CH04 - EDS3110 [192.168.0.104] CH01 - EDS6110 × 192.168.0.102](/content/2026/05/1142462/images/48e4ef622a1582c353c2b9cd81d5b65954d12d425ad8aa79767a043ad9adfe93.jpg)
Camera Icon
a. When you mouse over the camera icon, it will show detailed camera information.
b. By clicking 📋, you can open this camera's web browser to view detailed configuration information.
c. By clicking, you can view the camera's live stream page.
d. By clicking ✗, you will remove this camera icon from the eMAP
Select Open E-Map to view the E-Map page. The GUI map helps to locate devices easily and the information window helps to show the status of each device.
EnGenius Networks
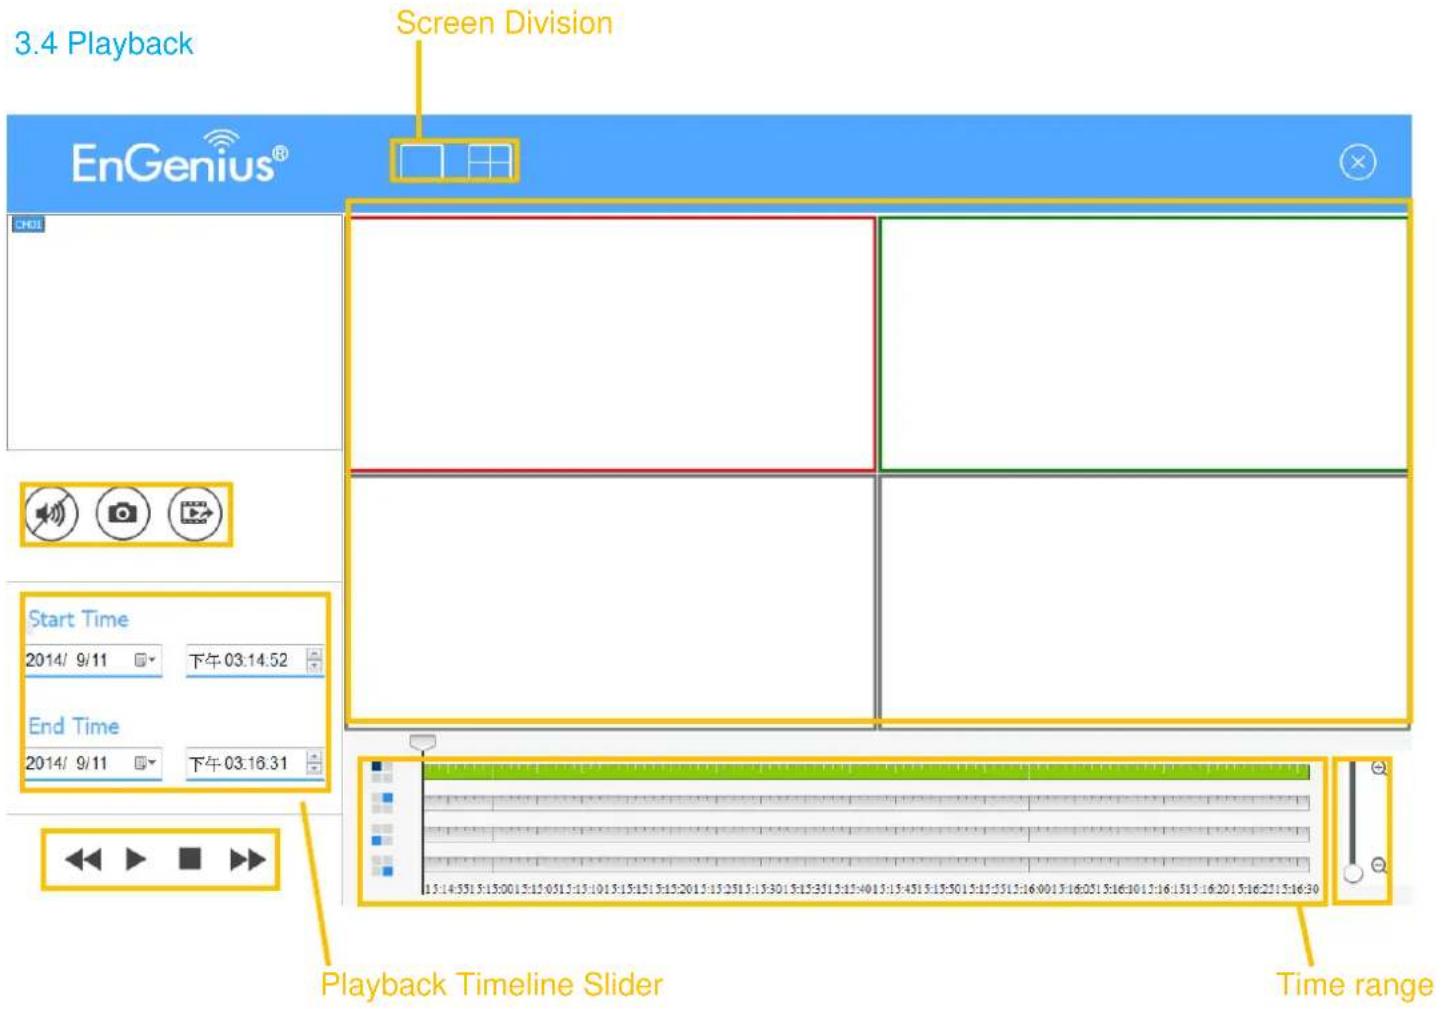
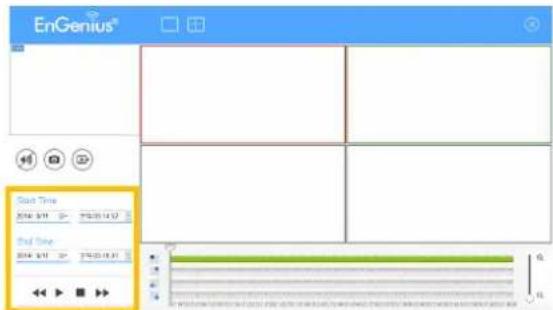
Playback: the Playback feature allows you to search and playback recorded and saved video.
Recorded Channel list: Displays the recorded channel list.
Recorded video playback window: Click Play will display the recorded video.
Playback control panel
a. Click to slow motion control.
b. Click to Start/Pause control
c. Click to stop control
d. Click to speed up control
Snapshot Button: To take a snapshot of the recorded video clip you are playing.
Audio Button: Click to turn the channel's audio on/off.
Time Range: Click on the + and - signs to zoom-in/out the timeline.
3.5 Multi-Screen
EnGenius Networks
![EnGenius® CPU loading 3.64 % HDD free space 101,340 GB 09:44 TNC 128.26 Image1 CHF: GCG110[50.10.13.112] Multi-Screen Implementation Monitor Live Monitor Monitor 1 about Monitor 1 Multi-Screen](/content/2026/05/1142462/images/9bc866c955c2fcf7580fe6cb394f9a9b1527543291c001afc7bca188f4970498.jpg)


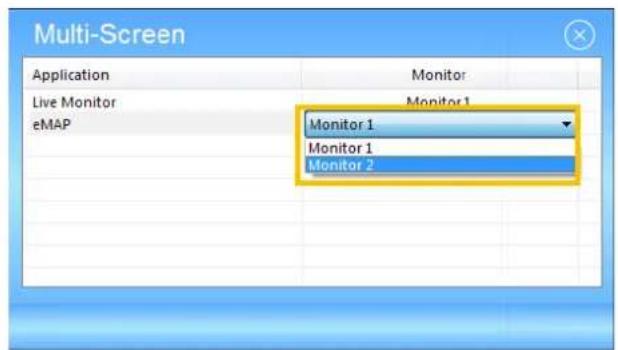
Multi-Screen: if you have a multi display available for the VMS, you can select different applications to be viewed on multiple monitors.
Note: the Live Monitor feature on the initial computer cannot change to a different monitor.