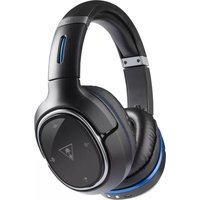
TB033904 - Headphones TURTLE BEACH - Free user manual and instructions
Find the device manual for free TB033904 TURTLE BEACH in PDF.


| Product Type | Wireless Gaming Headset |
| Brand | Turtle Beach |
| Model | TB033904 (Elite 800) |
| Driver Size | 50 mm with Neodymium Magnets |
| Frequency Response | 20 Hz – 20 kHz |
| Microphone | Dual Hidden Noise-Cancelling Microphones |
| Surround Sound | DTS Headphone:X 7.1 |
| Wireless Connectivity | RF with Intelligent Channel Hopping (up to 30 ft / 9 m) |
| Bluetooth | Yes (HSP + A2DP) for mobile devices |
| Active Noise Cancellation | Yes (on/off via button) |
| Battery Type | Rechargeable Lithium Polymer |
| Battery Life | Over 10 hours |
| Charging Method | Magnetic Charging Stand or micro-USB cable (third-party) |
| Audio Inputs | Digital Optical (Toslink), USB |
| Compatibility | PS4, PS3, Xbox One (with adapter sold separately), Windows, Mac, Mobile devices |
| Controls | Power/ANC, Game Volume, Chat Volume, Preset, Mic Mute, Bluetooth/Multi-Function |
| Special Features | Mic Monitoring, Dynamic Chat Boost, Companion App (Android), Swappable Rocker Plates |
| Included Accessories | Transmitter/Charging Stand, USB Transmitter Cable, USB Programming Cable, Mobile Cable, Digital Optical Cable, Turtle Beach Sticker, Welcome Guide |
| Maintenance | Wipe with a soft, dry cloth. Avoid moisture and extreme temperatures. |
| Safety Information | Use at moderate volume to prevent hearing damage. Keep away from small children (small parts). Do not store in temperatures above 113°F/45°C. |
| Spare Parts & Repairability | Replacement earpads, mic foam, cables, and swappable rocker plates available at turtlebeach.com. Firmware upgrades via Ear Force Audio Hub. |
Frequently Asked Questions - TB033904 TURTLE BEACH
User questions about TB033904 TURTLE BEACH
0 question about this device. Answer the ones you know or ask your own.
Ask a new question about this device
Download the instructions for your Headphones in PDF format for free! Find your manual TB033904 - TURTLE BEACH and take your electronic device back in hand. On this page are published all the documents necessary for the use of your device. TB033904 by TURTLE BEACH.
USER MANUAL TB033904 TURTLE BEACH
WIRELESS NOISE-CANCELLING DTS SURROUND SOUND HEADSET USER GUIDE
For our Knowledgebase and Technical Support visit turtlebeach.com/support

natural_image
Line drawing of a pair of white headphones with a circular badge labeled 'A' (no text or symbols on the headphones themselves)Turtle Beach Elite 800 Headset

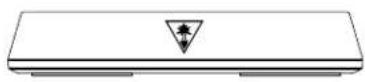
Elite 800 Transmitter & Magnetic Charging Stand

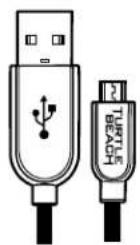
USB Transmitter Cable

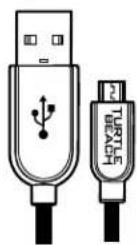
USB Programming Cable


natural_image
Two identical line drawings of a handheld electronic device with no text or symbols


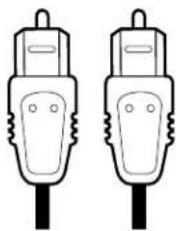
Mobile Cable Digital Optical Cable Turtle Beach Sticker Turtle Beach Elite
Program Welcome
Elite 800
Preset Reference

natural_image
Close-up of two black headsets with a triangular logo on the front, against a blue abstract background (no text or symbols visible)About the Elite 800 5
Parts and controls 7
Headset Charging 10
PS4™ and PS3™ Console Setup 11
PS4™ Setup 12
PS3™ Setup 14
Xbox One™ Setup 16
Windows® and Mac® OSX Computer Setup 20
Wired Setup 21
Bluetooth Pairing 22
Bluetooth Operation 23
Pairing the Headset and Transmitter 24
Active Noise Cancellation 25
Adjusting the Sound 26
Firmware Upgrades and Personalization 29
Replacing Rocker Plates 30
Specifications 31
Troubleshooting tips 32
Important safety information 34
Regulatory Compliance Statement 35
Declaration of Conformity 36
Warranty 40
About the Elite 800
The Turtle Beach Elite 800 is a sophisticated gaming headset designed to unlock the audio potential of games, music, movies and more. To get the most from your Elite 800, please take a few moments to review this introduction.
Overview
Welcome to the future of gaming audio with Turtle Beach Elite. Powerful sound, abundant comfort and dynamic function combine to exceed your wildest expectations with the Turtle Beach Elite 800. Uncompromising, the Elite 800 is the ultimate in completely wireless PS4 & PS3 noise-cancelling, surround sound gaming audio.

natural_image
Product collage of black headphones with digital audio waveforms and headsets (no visible text or symbols)Silence is Golden
Eliminate unwanted distractions with Active Noise Cancellation in console and mobile modes.
Crystal Clear Wireless
Intelligent channel-hopping for an interference-free wireless experience.
DTS Headphone:X 7.1 Surround Sound
Creates an amazing, 3D 360-degree sound stage with unmatched spatial accuracy.
Enhanced DTS Surround Sound Modes & Presets
Custom DTS Surround Sound modes combine with enhanced Turtle Beach genre-specific presets to further immerse you in your favorite games, movies and music.
Hidden, High-Quality Microphones
Dual hidden microphones, with environmental presets to ensure you are always heard – regardless of your surroundings.
About the Elite 800

Magnetic Charging Stand
Low profile magnetic charging stand keeps your Elite 800 fully charged without cables.
Bluetooth Versatility
Enjoy wireless Bluetooth connectivity with all your mobile devices including PS Vita™.
Never Miss a Text or Call
Pair your mobile phone to hear text notifications or take calls while gaming.
Rechargeable Battery
Built-in rechargeable battery delivers over 10 hours of wireless gaming.
Companion App
Download the Ear Force Audio Hub app for Android™ OS to wirelessly change presets on the fly using your mobile phone or tablet.
Swappable Rocker Plates
Easy-to-use rocker plates can be swapped with new designs from turtlebeach.com/speakerplates.
About the Elite 800

Separate Volume Controls
Set your mix of game and chat volume levels right on the headset.
Stop SHOUTING!
Mic Monitoring lets you hear your own voice in the headset to avoid shouting.
Dynamic Chat Boost™
Even during loud gameplay spikes, chat volume automatically rises to ensure you never miss a command.
Easy Setup
Setup is easy from the USB and optical connections to the magnetic charging stand, which doubles as the wireless transmitter
Parts and controls
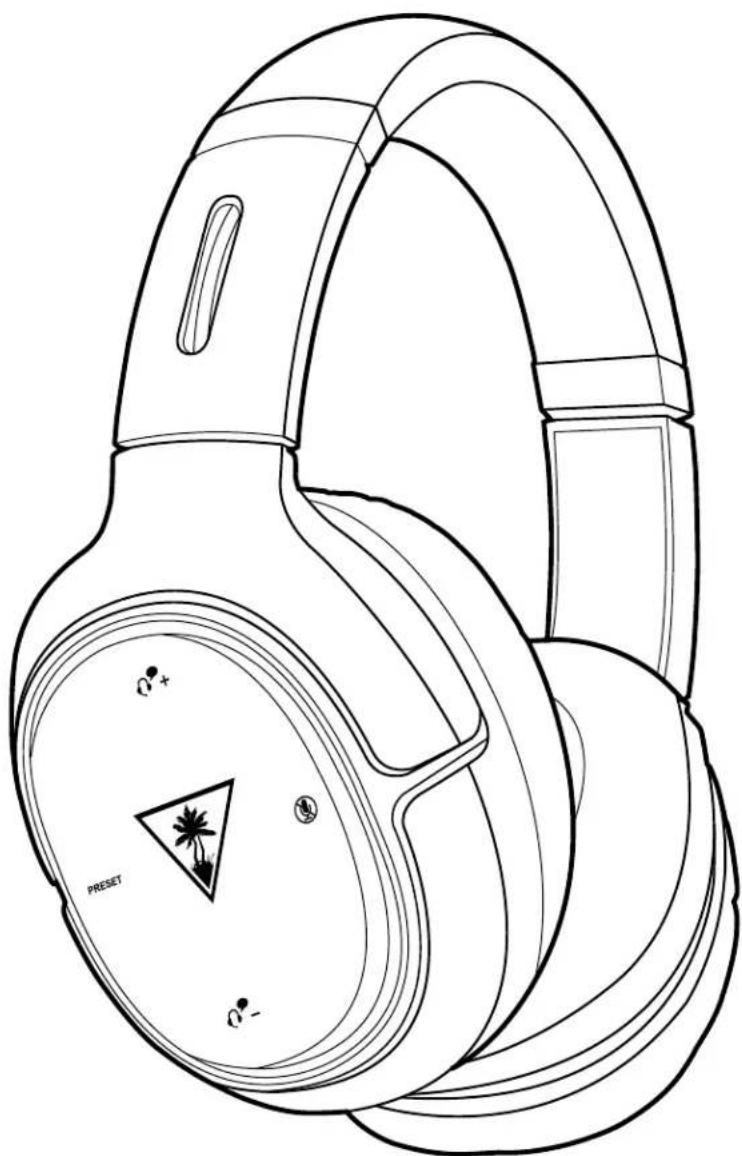
Headset Controls: Left Earcup
Power/ANC Button
Press = Active Noise Cancellation On/Off Press and Hold = Headset Power On/Off
Mobile Connection
Power LED
HEADSET STATUS
Red = Charging
Blue = Active Noise Cancellation Off/Fully Charged
Pink = Active Noise Cancellation On
PAIRING STATUS
Single Blink = Headset Connected
Double Blink = Headset Not Connected
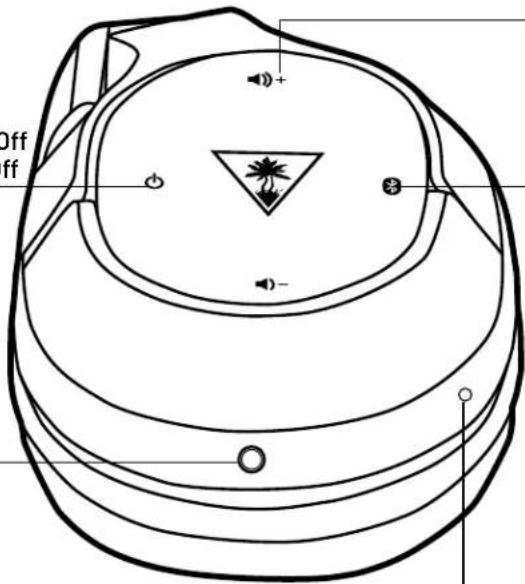
Game Volume +/- Buttons
Raise and lower the Game Volume.
Bluetooth/Multi-Function Button
See the "Bluetooth Pairing and Operation," pages 22-23.
Parts and controls
Headset Controls: Right Earcup
Chat Volume +/- Buttons
Raise and lower Chat Volume
Preset Button
Press = Cycle through Turtle Beach Signature Audio Presets. A voice prompt in the Headset will confirm your selection.
Press and Hold = Cycle through DTS Headphone:X Surround Modes. A voice prompt in the Headset will confirm your selection.
Bluetooth Status LED
AUDIO MODE
Blue = Call Mode (HSP)
Pink = Stereo Mode (A2DP)
PAIRING STATUS
Single Blink = Headset Connected Double Blink = Headset Not Connected
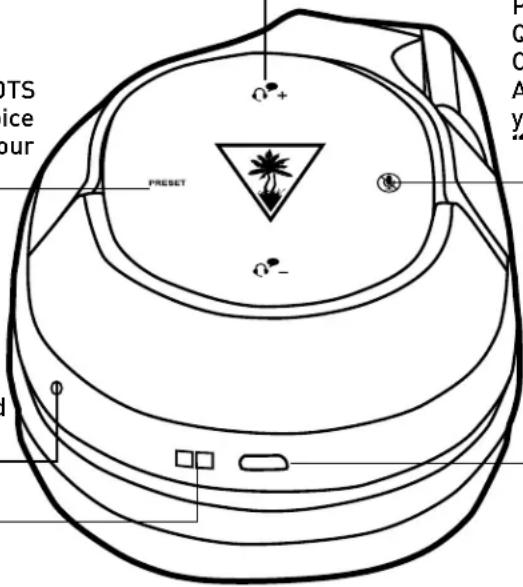
Mic Mute Button
Press = Mic On/Off. A high tone in the Headset will confirm Mic On. A low tone will confirm Mic Off.
Press and Hold = Cycle through Mic Presets. Quiet Room > Normal Room > Loud Room > Outdoor.
A voice prompt in the Headset will confirm your selection. For more information, see "Adjusting Sound," page 26.
USB Charging Port.
For more information, see "Headset Charging," page 10.
Charging Contacts
DTS Headphone:X Surround Modes




GAME MODE MOVIE MODE MUSIC MODE SURROUND OFF
• Signature Sound
- Shooter
· Racing
· Sports
· Superhuman hearing
- Footstep Focus
- Signature Sound
-
Action
· Horror
· Drama -
Signature Sound
- Stadium
-
Acoustic
· Drama -
Natural Sound
· Bass Booster
· Bass & Treble Booster
· Vocal Booster
Parts and controls
Transmitter: Front
Bluetooth Status LED
CHARGING STATUS
Red = Headset Seated on Transmitter
Blue = Headset Not Seated on Transmitter
PAIRING STATUS
Solid On = Headset Wirelessly Connected
Double Blink = Headset Not Connected

natural_image
Simple line drawing of a rectangular object with a triangular symbol and a small tree-like symbol on top (no text or labels)Pairing Button
Transmitter: Back
To initiate pairing, in the unlikely event that it becomes necessary. See "Pairing the Headset

Headset Charging
Even when the Elite 800 operates via wired connection to mobile devices, it can still use the internal amplifier and so requires power from its rechargeable battery. When charging, both the Headset Power LED and the Transmitter LED will glow Red.

- Connect the USB end of the USB Transmitter Cable to a USB port on the game console or computer.
- Connect the micro-USB end of the USB Charging Cable to the Power and Chat USB Port on the Transmitter.
- Place the Headset on the Transmitter. Align the charging contacts on the right earcup of the Headset with the charging pins on the right side of the Transmitter.
NOTE: The Status LED on the front of the Transmitter will turn Red when the Headset is properly seated on the Transmitter. If the Status LED is Blue or Pink, properly align the charging contacts of the Headset. If you are running older headset firmware you may hear “Powering On, Power Off” prompts when first charging the headset. This is normal.
It is also possible to recharge the Headset during game play, with the use of a third-party USB-A-to-micro-USB cable, sold separately. We recommend a cable of sufficient length for comfortable game play.

- Connect the USB end of the third-party cable to a USB port on the game console or computer.
- Connect the micro-USB end of the third-party cable to the USB Charging Port on the Headset.
NOTE: The Power LED on the Headset does not indicate charging status when you recharge via USB cable.
WARNING: Never fully deplete the battery then put the unit in storage, as this may cause irreversible damage to the battery. Following these simple guidelines will ensure that your Turtle Beach wireless headset will provide many hours of enjoyment.
NOTE: In order to achieve and maintain optimal battery performance for your Turtle Beach wireless headset, proper care is required when charging and storing. Always charge the battery before storing the unit for more than 3 months! Never store the unit in temperatures above 113°F/45°C. Store the headset at room temperature (72°F/22.5°C) and at humidity below 75%.
PS4™ and PS3™ Console Setup
The Elite 800 headset is designed for use with PS4 ^TM and PS3 ^TM consoles.

flowchart
graph TD
    A["PROGRAM ONLY"] --> B["DIGITAL OUT"]
    B --> C["DIGITAL IN"]
    C --> D["PAIR"]
    E["Device 1"] --> F["Console Console"]
    G["Device 2"] --> F
    H["Device 3"] --> F
    I["Device 4"] --> F
    J["Device 5"] --> F
    K["Device 6"] --> F
    L["Device 7"] --> F
    M["Device 8"] --> F
    N["Device 9"] --> F
    O["Device 10"] --> F
- Connect the USB end of the USB Transmitter Cable to a USB port on the game console.
- Connect the micro-USB end of the USB Transmitter Cable to the main USB port on the Transmitter.
NOTE: Do not use the USB port labeled "PROGRAM ONLY."
- Connect the Digital Optical Cable from the Digital Out port of the game console to the Digital In port of the Transmitter.
PS4™ Setup
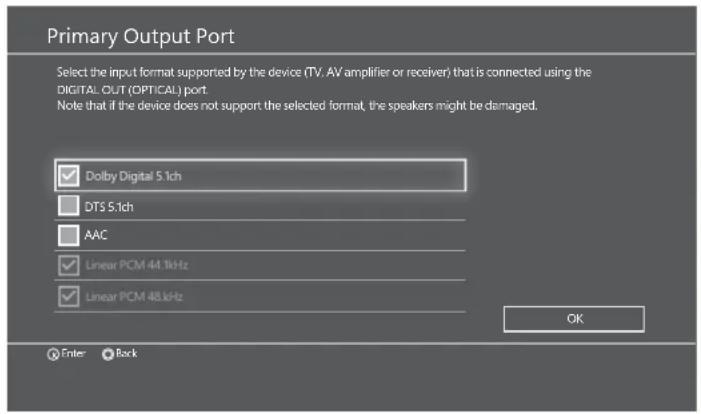
- In the PS4 menu, go to Settings > Sound and Screen > Audio Output Settings > Primary Output Port > Digital Out (OPTICAL).
- In the check-off boxes, select ONLY Dolby Digital 5.1 ch.
NOTE: Do not select DTS. While the Elite 800 features DTS Headphone:X surround sound, the system requires a Dolby Digital input signal.
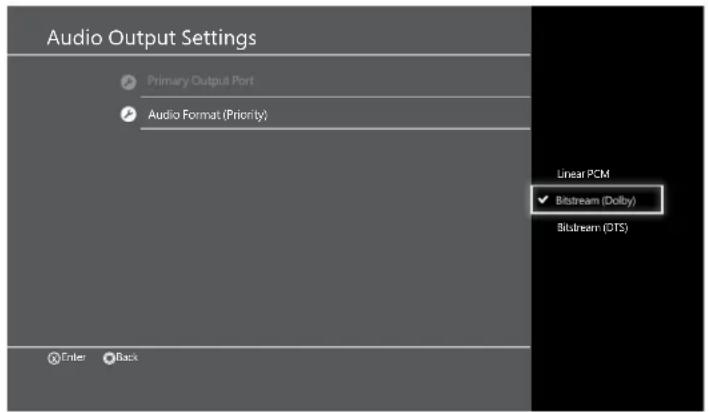
- Go to Settings >> Sound and Screen >> Audio Output Settings >> Audio Format (Priority)
- Select Bitstream (Dolby)

- Go to Settings >> Devices >> Audio Devices
- Select USB Headset(Turtle Beach Elite 800 Chat) for Input & Output Device
- Set Output to Headphones to Chat Audio
- Set Volume Control (Headphones) level to maximum
PS4™ Setup
![Microphone Level Speak into the microphone and adjust the microphone level so that the input volume is in the [Good] range. Increase the microphone level if the input volume is too low, and decrease the microphone level if the input volume is too high. Input Volume Too Low Good Too High Microphone Level OK Back User1](/content/2026/05/1142305/images/8fdd63156f54d6a6c84dd77c4dd3dd55a3aff616fca93f1643a10b966d54ca5e.jpg)
- Go to Settings > Devices > Audio Devices > Headsets and Headphones > Microphone Level.
- Follow the on-screen instructions to calibrate your microphone
PS3™ Setup

- In the PS3 menus, go to Settings > Accessory Settings
Audio Device Settings.
- Set the Input Device and Output Device fields to Turtle Beach Elite 800.
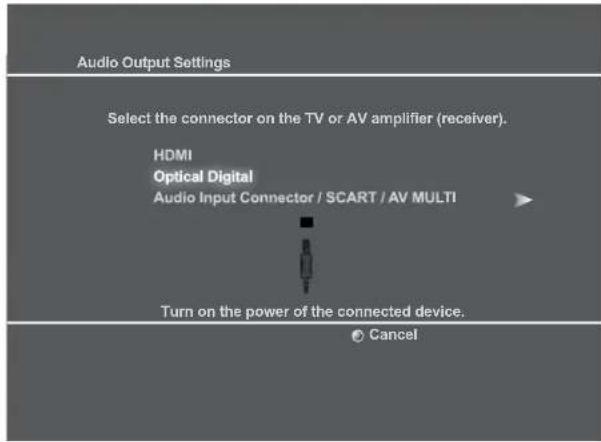
- Go to Settings > Sound Settings > Audio Output Settings > Optical Digital.
PS3™ Setup
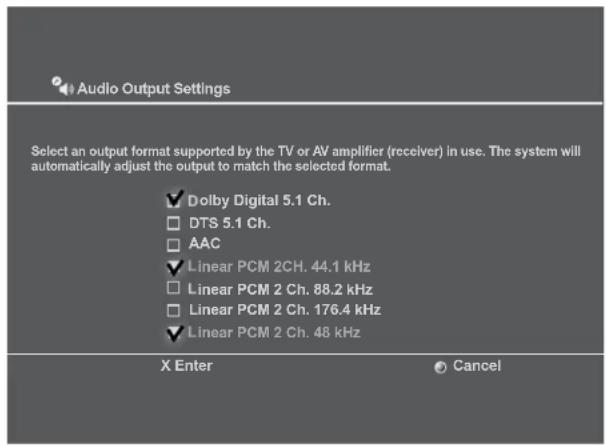
- In the check-off boxes, select ONLY Dolby Digital 5.1 Ch. NOTE: Do not select DTS. While the Elite 800 features DTS Headphone:X surround sound, the system requires a Dolby Digital input signal.
![0 12/14 12:15 PM Audio Output Settings Audio Multi-Output On Sets to output audio through multiple connectors simultaneously. Audio output to connectors that are not selected in [Audio Output Settings] is downscaled to 2 Ch.](/content/2026/05/1142305/images/395a91c2fd7811476281422e7900ef1080754a06b2e7f05237cb517958419e11.jpg)
- Go to Settings > Sound Settings > Audio Multi Output.
- Select On.
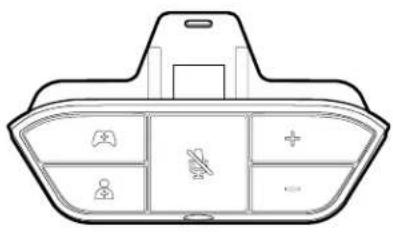
Xbox One Setup
Requires Xbox One Headset Adapter (Sold Separately)
natural_image
Top-down line drawing of a car dashboard with compartments and buttons (no text or symbols)
flowchart
graph TD
    A["PROGRAM ONLY"] --> B["DIGITAL OUT"]
    B --> C["USB"]
    C --> D["DIGITAL IN"]
    D --> E["PAIR"]
    F["Console Console"] --> G["USB"]
    G --> H["USB"]
    H --> I["USB"]
- Connect the USB end of the USB Transmitter Cable to a USB port on the game console.
- Connect the micro-USB end of the USB Transmitter Cable to the main USB port on the Transmitter.
NOTE: Do not use the USB port labeled "PROGRAM ONLY."
- Connect the Digital Optical Cable from the S/PDIF port of the game console to the Digital In port of the Transmitter.
Xbox One Setup
-
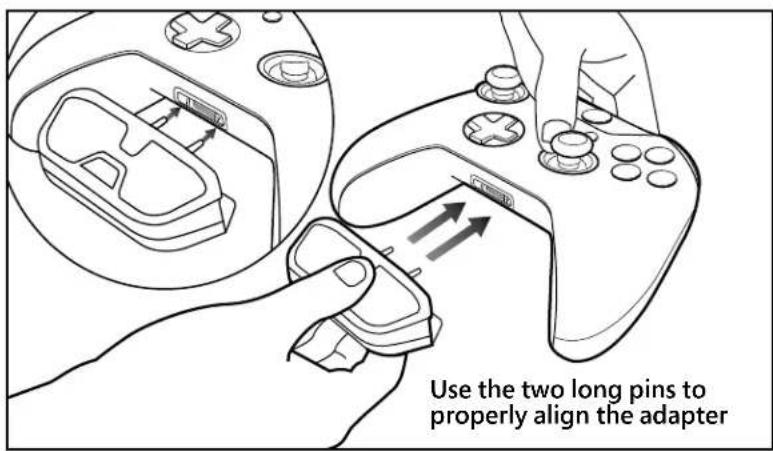
Insert the Xbox One headset adapter, sold separately, into the Xbox One controller.
-
Connect the Mobile Cable to the Xbox One headset adapter and the Mobile Connection on the left earcup of the Headset.
- Connect the Xbox One Controller to the Xbox One Console using the Micro USB Update Cable.

Xbox One Setup
- Follow the on-screen prompts to update your controller.

- Take this time to update additional controllers if necessary.
Note: If your adapter is not functioning correctly after these steps, try updating your controller again. To do this go to Settings >> System >> Update Controller. This will repeat the original process.

- Hold down the Chat Balance button on the Xbox One Audio Adapter until you hear a tone. This will allow game audio to only travel through your Elite 800 transmitter.
Xbox One Setup

- Go to the Xbox One Home Screen and
Pres the 📄 button on the Xbox
One Controller.

-
Go to Settings > Display & Sound > Optical Audio.
-
Select Bitstream Out.

-
Go to Settings > Display & Sound > Bitstream Format.
-
Select Dolby Digital.
NOTE: Do not select DTS. While the Elite 800 features DTS Headphone:X surround sound, the system requires a Dolby Digital input signal.
This step is particularly important for clear game sound. If you skip this step, the Elite 800 will receive two streams of game sound, slightly out-of-sync. Clarity will be degraded.
Windows® and Mac® OSX Computer Setup
The Elite 800 can also be used on Windows or Mac OSX computers equipped with a Dolby Digital Live (DDL) sound card using a digital optical S/PDIF output.
NOTE: Your computer must have a sound card with Dolby Digital Live installed in order to hear DTS Headphone:X surround sound through the headset. If your computer does not have that, you will only hear enhanced stereo audio. Connections for Windows and Mac computer game audio
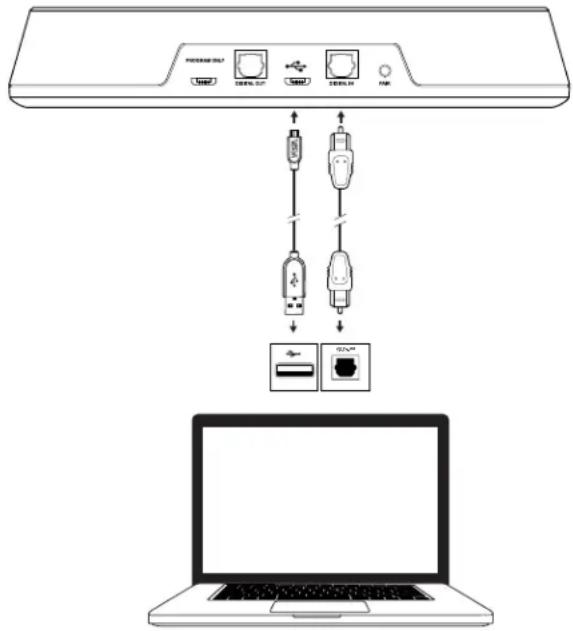
- Connect the USB end of the USB Transmitter Cable to a USB port on the computer.
- Connect the micro-USB end of the USB Transmitter Cable to the main USB port on the Transmitter.
NOTE: Do not use the USB port labeled "PROGRAM ONLY."
- Connect the Digital Optical Cable to the Digital In port on the Transmitter and to the computer's digital optical output port.
- Set your computer's Digital Optical Output as the Default Playback (output) Device: a. For Windows computers: Go to Start > Control Panel > Hardware and Sound > Sound > Playback tab. Right-click Digital/Optical Output (or similar) and select Set as Default Device.
b. For Mac OSX computers: Go to Apple Menu > System Preferences > Sound > Output tab. Select Digital/Optical Output (or similar) from the list.
- Power on the Elite 800 Headset.
- Play a track on your computer. You should hear audio in the Headset.
- Set your computer's Mic Input for Turtle Beach Elite 800 Chat:
a. For Windows computers: Go to Start > Control Panel > Hardware and Sound > Sound > Recording tab. Right-click Turtle Beach Elite 800 and select Set as Default Device. Click OK to accept the settings and exit the Sound dialog box.
b. For Mac OSX computers: Go to Apple Menu > System Preferences > Sound > Input tab. Select Turtle Beach Elite 800 (or similar) from the list. Close the Sound dialog box and close the System Preferences folder.
Wired Setup
The Turtle Beach Elite 800 is equipped to take advantage of game audio, music and video sound tracks from portable devices, including laptops, tablets, mobile phones and handheld gaming consoles, via the supplied Mobile Cable.
Connect one end of the Mobile Cable to the Mobile Connection on the left earcup of the Headset and the other end to the headphone output jack of your mobile device.
NOTE: You can continue to enjoy stereo audio via wired connection, even when the Headset power is off. When the Headset power is on, you can also take advantage of the built-in microphones and Active Noise Cancellation.

natural_image
Line drawing of a pair of headphones connected to devices, no text or symbols presentBluetooth Pairing
While the supplied Mobile Cable gives you wired connection to mobile devices, the Bluetooth feature enables wireless connections (HSP + A2DP). Enjoy the Turtle Beach Elite 800 with compatible mobile devices, such as tablets, smartphones and the PS Vita™ handheld system.
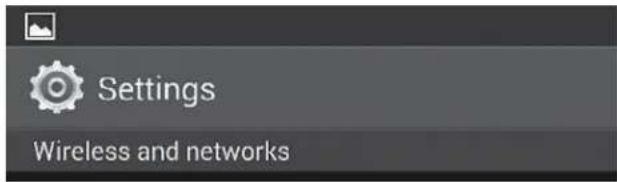
- Power on your mobile device and go to Settings > Wireless and Networks, or the equivalent.

- Power on the Elite 800 Headset. Press and hold the Bluetooth/Multi-Function button on the left earcup for four seconds.

- On your mobile device, select Turtle Beach Elite 800 from the list of available Bluetooth devices and complete pairing.
Bluetooth Operation
The effect of the Bluetooth Multifunction Button varies depending on whether you're in call mode or stereo mode.

| Action Call Mode Stereo Mode | ||
| Single Press Answer | End call Play/Pause | |
| Double Press Redial | Next Track | |
In addition, three buttons on the right earcup change function when you're using the Elite 800 exclusively via Bluetooth connection. NOTE: Functionality may vary by connected Bluetooth device.

Pairing the Headset and Transmitter
The Elite 800 Headset and Transmitter come paired out of the box. When paired, with both the Headset and Transmitter powered on, the Transmitter's LED will be on solid (lit, but not blinking). However, if your Transmitter's LED is double-blinking, follow the steps below to pair your Headset and Transmitter.

-
Start this process with the headset powered OFF. Press and hold the Pairing Button on the Transmitter until the Transmitter's Pairing LED flashes rapidly (5 seconds), then release.
-
Press and hold the Power Button on the Headset until the Headset's Power LED flashes rapidly (5 seconds), then release.

- Within 30 seconds, the Transmitter's LED will remain on solid, and the Headset's Power LED will blink steadily once per second, indicating that pairing has been successful.
Active Noise Cancellation
Active Noise Cancellation suppresses ambient noise, especially low-frequency noise such as aircraft engines and road noise. The system works by sensing outside noise with the built-in microphones and sending an equal-but-opposite signal into the headphones. The soft cushions of the Elite 800 also help block external sound, providing an added level of noise reduction.
- To turn on Active Noise Cancellation (ANC), with the headset on, press the Power/ANC Button. A voice prompt in the Headset will confirm your selection and the Power LED will flash Pink.
- To turn off ANC, with the headset on, press the Power/ANC Button again. A voice prompt in the Headset will confirm your selection and the Power LED will flash Blue.
NOTE: To comply with safety requirements in airline use, be sure that Elite 800 Bluetooth operation is turned off. NOTE: You can only turn Active Noise Cancellation on or off when the Elite 800 Headset itself is turned on.
natural_image
Line drawing of a multi-band headphones with no visible text or symbols on the body itselfAdjusting the Sound
| If you want to... Then | |
| Adjust game/media volume. Use | the Game Volume Up/Down buttons on the left earcup of the Headset. |
| Adjust chat volume. Use the Chat | Volume Up/Down buttons on the right earcup of the Headset. |
| Turn the microphone on or off. | Press the Mic Mute Button on the Headset. A high tone in the Headset will confirm Microphone On. A low tone will confirm Microphone Off. |
| If you want to... Then | |
| Select Microphone Presets. The | Headset features built-in microphones and powerful digital signal processing to optimize the sound for different environments. Press and hold the Mic Mute button to cycle through the mic presets.Your selection will be confirmed by a voice prompt in the Headset.Quiet Room. For a quiet room with no outside noise distractions. This setting features the widest field of voice pickup and natural voice fidelity.Normal Room. Block out normal room noises: air conditioning, fridge humming, conversations in other rooms, etc.Loud Room. Block out louder room noises: ceiling fan, music in other rooms, conversations in the same room, etc.Outdoor. Focus voice pickup around your mouth—like holding an inline mic right up to your mouth. Reduce the pickup of other sounds when talking outdoors.NOTE: These descriptions itemize the modes available using the initial firmware version for the Elite 800. Upgraded or personalized headsets may have additional or revised modes not shown here. |
| Turn Active Noise Cancelling on or off. | Press the Power/ANC Button on the Headset. A voice prompt in the Headset will confirm your selection. In addition, the Headset Power LED will flash Pink when ANC is on and flash Blue when ANC is Off.NOTE: You can only turn Active Noise Cancellation on or off when the Elite 800 Headset itself is turned on. |
Adjusting the Sound
| If you want to... Then | |
| Adjust surround sound. The Elite | 800 takes advantage of DTS® Headphone:X Surround Sound, which uses sophisticated processing to create surround sound using just two speakers. The system detects Dolby Digital® sound tracks from the PS4TM and PS3TM game consoles and compatible computers. The DTS system then processes these signals especially for headset playback. The system reproduces the sonic characteristics of rooms optimized for specific types of content. Press and hold the Preset Button on the right earcup of the Headset to cycle through four surround modes. Your selection will be confirmed by voice prompts in the Headset.Game Mode > Movie Mode > Music Mode > Surround Off (Stereo Mode)NOTE: These descriptions itemize the modes available using the initial firmware version for the Elite 800. Upgraded or personalized headsets may have additional or revised modes not shown here. |
| Select presets. For each of the | DTS® Headphone:X Surround Sound modes, Turtle Beach has designed presets that optimize the sound for specific types of games, music and movies. Press the Preset Button the right earcup of the Headset cycle to each of four surround modes.Your selection will be confirmed by voice prompts in the Headset.NOTE: The descriptions below itemize the modes available using the initial firmware version for the Elite 800. Upgraded or personalized headsets may have additional or revised modes not shown here. |
| DTS Headphone:X7.1 Surround Modes | Turtle BeachSignature Presets |
| SURROUND GAME MODE | Signature Sound.Turtle Beach tuning places you in the middle of the action, enabling you to hear your games just as the developers intended.First Person Shooter.Enter the warzone fully armed. Feel your gun's recoil hit your chest. Experience the full force of explosions as you lead your squad to victory.Racing.Feel the engine underneath you and hear your opponents' cars at your back as you battle for the win.Sports.Put yourself in the middle of a packed stadium with fans cheering you on from every angle.Superhuman Hearing.Gain the ultimate audio advantage. Amplify low and faint sounds to hear everything. Pinpoint your enemies and defeat them before they know you're there.Footstep Focus.Focus on the sound of enemy footsteps approaching. Hear every detail and gain a true audio advantage. |
| SURROUND MOVIE MODE | Signature Sound.Turtle Beach gives you the best seat in the house. Experience your movies as never before.Action.Be the hero. Face the explosions. Duck the gunfire and hear the evac chopper circling overhead as you save the world again.Horror.Build the suspense. Hear every creaking footstep and bone-rattling scream. Just try to get out alive.Drama.Intensify the story and bring characters to life with pinpoint vocals and enhanced dialog. |
Adjusting the Sound
| DTS Headphone:X7.1 Surround Modes | Turtle BeachSignature Presets |
| SURROUND MUSIC MODE | Signature Sound.Turtle Beach brings the music onto your personal stage. Scan your ticket for your own private concert.Stadium.Experience live concert music as it was meant to be heard. Feel the crowd around you as the band on stage turns it up to 11.Acoustic.Experience a personal concert for one: just you and your favorite artist.Dance.Put your hands in the air and place yourself in the middle of a nightclub as the DJ drops your favorite track. |
| SURROUND OFF(STEREO MODE) | Natural Sound.Turtle Beach tuned natural sound delivers your media just as the creators intended.Bass Booster.Turn up the bass. Feel the deep sound effects in your games and the punch of music tracks.Bass & Treble Booster.Turn up the excitement with increased highs and lows for a more powerful audio experience.Vocal Booster.Tune in to the vocals on music tracks and dialog in games and movies.Make characters and stories come alive. |
| Control Bluetooth sources. Special functions are available when you're using the Elite 800 exclusively via Bluetooth connection. For details, see “Bluetooth Operation,” page 23. | |
Firmware Upgrades and Personalization
Turtle Beach Windows Ear Force Audio Hub

The Elite 800 is a highly programmable, microprocessor-based headset, designed to accept firmware upgrades from the Windows Ear Force Audio Hub.
Firmware upgrades
You can check to see that you have the latest, most advanced firmware at www.turtlebeach.com/Elite800.
To upgrade the Elite 800, connect the Transmitter & Headset to an internet-connected computer using the USB Programming Cable. Connect the micro-USB end of the cable to the Programming USB port on the back of the Transmitter (the one that says PROGRAM ONLY). Follow the instructions on the website for downloading and upgrading the firmware.
NOTE: The operation of upgraded and/or personalized headsets may not completely match the operations described in this manual.
Turtle Beach Android Ear Force Audio Hub

Download the Ear Force Audio Hub app to wirelessly change presets on the fly using your Android™ mobile phone or tablet. Future Turtle Beach Companion Apps may provide additional opportunities to customize and control your Elite 800 headset.
Replacing Rocker Plates
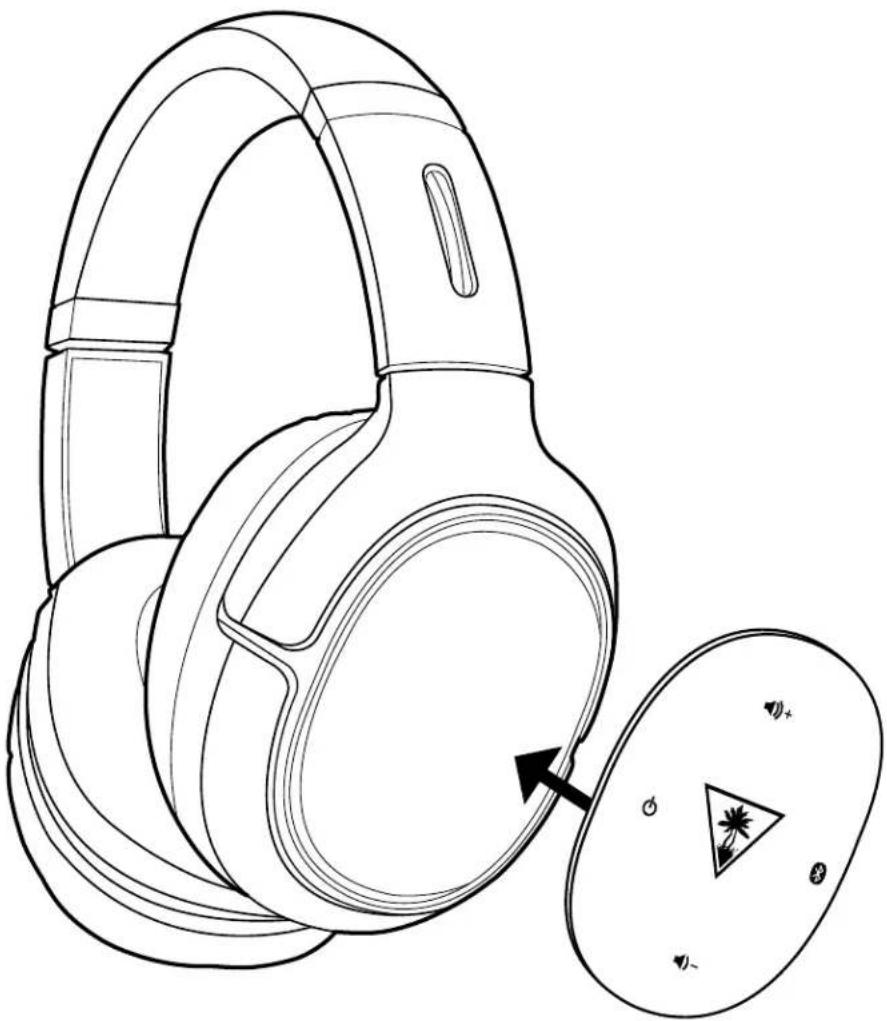
natural_image
Line drawing of a pair of headphones with an open case showing a triangular display (no text or symbols)Customize your headset at www.turtlebeach.com/plates
NOTE: The availability of additional speaker plates varies by market as is subject to local restrictions.
Specifications
HEADSET
Speakers: 50 mm with Neodymium Magnets
Frequency Response: 20 Hz - 20 kHz
Earcup Design: Around-Ear (Closed)
Microphone Design: Dual Hidden Noise-Cancelling Microphones
Bluetooth: Bluetooth Radio with Dual-Pairing Mode and A2DP Compatibility
Battery: Rechargeable Lithium Polymer
TRANSMITTER
Game Input: Digital Optical (Toslink) with Digital Optical Pass-through
Chat/Mic Input/Output: USB
Surround Sound Processing: DTS Headphone:X 7.1
Wireless Connection: RF with Intelligent Channel Hopping
Wireless Range: Up to 30 ft. (9 m)
Power: USB

natural_image
Line drawing of a pair of headphones with decorative icons on the seat (no text or symbols)Troubleshooting Tips
No sound
| Possible cause Solution | |
| Power is off Confirm that the Headset | is on. The Headset Power LED should be illuminated. |
| Dead/low battery Recharge the Headset | See “Headset Charging,” page 10.NOTE: The Ear Force Audio Hub app for AndroidTM phones and tablets enables you to check battery status. |
| Game Volume turned down Press the | Game Volume Up Button on the Headset. |
| Loose connection In game console and computer use, confirm that Transmitter is firmly connected.Check that the USB Transmitter Cable and Digital Optical Cable are completely seated at both ends.In mobile use, confirm that the Mobile Cable plugs are firmly seated in the Headset and the mobile device. | |
| Lost pairing Confirm that the Status LED on the Transmitter stays on. If the LED is slowly pulsing, it indicates that the Transmitter isn’t communicating with the Headset.See “Pairing the Headset and Transmitter,” page 24. | |
| Poor Wi-Fi transmission For best performance, stay within 30 feet from the Transmitter.Confirm that there is no wall or other large object between the Headset and Transmitter.Confirm that the location of the Transmitter is clear of obstructions and isolated from Wi-Fi base stations or other potential sources of interference. | |
Audio Drops, Popping or Clicking Sounds
| Possible cause Solution | |
| Poor Wi-Fi transmission For best performance, stay within 30 feet from the Transmitter. Confirm that there is no wall or other large object between the Headset and Transmitter. Confirm that the location of the Transmitter is clear of obstructions and isolated from Wi-Fi base stations or other potential sources of interference. |
Voice Chat Drops
Most in-game voice chat drops are caused by network congestion or "lag." They usually subside after a few moments so please be patient. In extreme cases, you may need to leave the game and return to reset the chat function.
If you use a wireless internet connection, low signal strength from your modem/router can make the voice chat malfunction.
For best results, we recommend a wired connection from your modem/router to your computer.
Troubleshooting Tips
Voice Chat Drops
| Possible cause Solution | |
| Not selected as an Input Device Select | the Elite 800 as an Input Device. Depending on your platform,see “PS4 Setup” on page 12, “PS3 Setup” on page 14, “Xbox One Setup” on page 16 or“Windows and Mac OSX Computer Setup” on page 20.When using the Elite 800 with a computer, you may also need to check theAudio Settings in the specific software program you are using. |
| Mic muted Press the Mic Mute Button | on the right earcup of the Headset. A high tone in theHeadset will confirm that the mic is now on. |
Bluetooth not working
Try using the Bluetooth pairing instructions (see "Bluetooth Pairing" on page 22) to pair your headset to a different Bluetooth-ready mobile phone than the one you usually use. With the headset paired to the phone, call a friend/relative.
Is the person you are calling able to hear you?
Are you able to hear the person you are calling? If you're experiencing the same issue with two different phones, you will want to contact our support team via the link below.
If your issue is not resolved by these steps, please visit turtlebeach.com/support
Important Safety Information
To avoid potential damage to the device, always disconnect all cables before transporting it.
WARNING: Permanent hearing damage can occur if a headset is used at high volumes for extended periods of time, so it is important to keep the volume at a safe level. Over time, your ears adapt to loud volume levels, so a level that may not cause initial discomfort can still damage your hearing. If you experience ringing in your ears after listening with the headset, it means the volume is set too loud.
The louder the volume is set, the less time it takes to affect your hearing. So, please take care to listen at moderate levels.
- Before placing a headset on your ears, turn the volume down completely, then slowly increase it to a comfortable level.
- Turn down the volume if you can't hear people speaking near you.
- Avoid turning up the volume to block out noisy surroundings.
Regulatory Compliance Statements for the Elite 800 RX & TX Models
Federal Communications Commission (FCC) Compliance Notices
This section includes the following FCC statements for the Elite 800 RX & TX Models:
• FCC ID: XGB-TB3390 & XGB-TB3391
• Class B Interference Statement
• RF Radiation Exposure & Hazard Warning
• Non-Modification Statement
- Deployment Statement
Class B Interference Statement
This equipment has been tested and found to comply with the limits for a Class B digital device, pursuant to Part 15 of the FCC Rules. These limits are designed to provide reasonable protection against harmful interference in a residential installation. This equipment generates, uses, and can radiate radio frequency energy and, if not installed and used in accordance with the instructions, may cause harmful interference to radio communications. However, there is no guarantee that interference will not occur in a particular installation. If this equipment does cause harmful interference to radio or television reception, which can be determined by turning the equipment off and on, the user is encouraged to try to correct the interference by one or more of the following measures:
- Reorient or relocate the receiving antenna.
- Increase the separation between the equipment and receiver.
- Connect the equipment into an outlet on a circuit different from that to which the receiver is connected.
- Consult the dealer or an experienced radio/TV technician for help.
FCC Caution:
This device complies with Part 15 of the FCC Rules. Operation is subject to the following two conditions: (1) This device may not cause harmful interference, and (2) this device must accept any interference received, including interference that may cause undesired operation.
RF Radiation Exposure & Hazard Statement
To ensure compliance with FCC RF exposure requirements, this device must be installed in a location such that the antenna of the device will be greater than 2 cm (0.8 in.) from all persons. Using higher gain antennas and types of antennas not covered under the FCC certification of this product is not allowed. Installers of the radio and end users of the product must adhere to the installation instructions provided in this manual. This transmitter must not be co-located or operated in conjunction with any other antenna or transmitter.
Non-Modification Statement
Use only the supplied internal antenna. Unauthorized antennas, modifications, or attachments could damage the Elite 800 RX & TX Models and violate FCC regulations. Any changes or modifications not expressly approved by the party responsible for compliance could void the user's authority to operate this equipment. Please contact Turtle Beach for a list of approved 2.4 GHz and 5.0 GHz antennas.
Deployment Statement
This product is certified for indoor deployment only in the 5150 – 5250 MHz band. Do not install or use this product outdoors in that frequency band in the United States.
Canadian ICES Statements
IC: 3879A-3390 & 3879A-3391
This device complies with ICES-003 and RSS-210 of Industry Canada. Operation is subject to the following two conditions:
- This device may not cause interference, and
- This device must accept any interference, including interference that may cause undesired operation of the device.
To prevent radio interference to the licensed service (i.e. co-channel Mobile Satellite systems) this device is intended to be operated indoors and away from windows to provide maximum shielding. Equipment (or its transmit antenna) that is installed outdoors is subject to licensing and not supported by Elite 800 RX & TX Models.
RF Radiation Exposure & Hazard Statement
To ensure compliance with RSS-102 RF exposure requirements, this device must be installed in a location such that the antenna of the device will be greater than 2 cm (0.8 in.) away from all persons. Using higher gain antennas and types of antennas not covered under the IC certification of this product is not allowed. Installers of the radio and end users of the product must adhere to the installation instructions provided in this manual. This transmitter must not be co-located or operated in conjunction with any other antenna or transmitter.
Exposition aux radiations RF & Mention de danger
Deployment Statement
This product is certified for indoor deployment only in the 5150 – 5250 MHz band. Do not install or use this product outdoors in that frequency band in Canada.
This symbol on the product or its packaging indicates that this product must not be disposed of with your other household waste. Instead, it is your responsibility to dispose of your waste equipment by handing it over to a designated collection point for the recycling of waste electrical and electronic equipment. The separate collection and recycling of your waste equipment at the time of disposal will help conserve natural resources and ensure that it is recycled in a manner that protects human health and the environment. For more information about where you can drop off your waste for recycling, please contact your local authority, or where you purchased your product.
European Union and European Fair Trade Association Regulatory Compliance
This equipment may be operated in the countries that comprise the member countries of the European Union and the European Fair Trade Association. These countries, listed below, are referred to as The European Community throughout this document:
AUSTRIA, BELGIUM, BULGARIA, CYPRUS, CZECH REPUBLIC, DENMARK, ESTONIA, FINLAND, FRANCE,, GERMANY, GREECE, HUNGARY, IRELAND, ITALY, LATVIA, LITHUANIA, LUXEMBOURG, MALTA, NETHERLANDS, POLAND, PORTUGAL, ROMANIA, SLOVAKIA, SLOVENIA, SPAIN, SWEDEN, UNITED KINGDOM, ICELAND, LICHTENSTEIN, NORWAY, SWITZERLAND
The Elite 800 RX & TX devices communicate with each other to provide wireless local area networking (WLAN) capabilities. Additionally, the Elite 800 RX device has a BT radio transceiver for communicating with users over the internet connection provided in the host platform. The Elite 800 TX Model includes one 802.11a radio with one 802.11a omni-directional internal antenna. The Elite 800 RX Model includes one 802.11a radio and one 2.4 GHz BT radio with two 802.11a and one 2.4 GHz BT omni-directional internal antennas, respectively.
Declaration of Conformity Marking by this symbol:

indicates compliance with the Essential Requirements of the R&TTE Directive of the European Union (1999/5/EC). This equipment meets the following conformance standards:
Safety: EN 60950-1: 2006 + A11: 2009 + A1: 2010 + A12: 2011 (T-Mark License) IEC 60950-1: 2005 (2nd Edition) + Am 1: 2009 (CB Scheme Report/Certificate), EN 50332-1: 2000, EN50332-2: 2003
Also Licensed for Standards:
UL 60950-1: 2007 R12.11, CAN/CSA-C22.2 No. 60950-1-07 + A1: 2011
Additional licenses issued for specific countries available on request.
EMC: EN 55022: 2010, EN 301 489-1 v1.9.2 (2011-09), EN 301 489-17 v2.1.1 (2009-05)
EN 61000-4-2: 2009, EN 61000-4-3: 2010, EN 61000-4-8: 2010
The products are licensed, as required, for additional country specific standards for the International Marketplace. Additional issued licenses available upon request.
Radio: EN 300 328 v.1.7.1 (2006-10) & EN 301 893 v.1.6.1 (2011-11)
Electromagnetic compatibility and Radio spectrum Matters (ERM); Wideband transmission systems; Data transmission equipment operating in the 2,4 GHz ISM band and using wide band modulation techniques and Broadband Radio Access Networks (BRAN); 5 GHz high performance RLAN. Certifications are harmonized to the EN standards covering essential requirements under article 3.2 of the R&TTE Directive. Compliance includes testing with antennas as specified in attached table.
SAR: EN 62311: 2008
Environmental: Low Voltage Directive 2006/95/EC, RoHS 2011/65/EU, WEEE 2002/96/EC, REACH 2006/1907/EC, Packaging 94/62/EC, Battery 2006/66/EC
Finland:
Greece:
Bulgaria: С това, Turtle Beach обявява, че този модел на радио на ELITE 800 RX & TX, е със съгласие с съществените изисквания и други важни условия на директива 1999/5 на европейски съюз
Czech Republic: Turtle Beach tímto prohlašuje, že tento ELITE 800 RX & TX, je ve shodi se základními požadavky a dalšími pôíslušnými ustanoveními smìrnice 1999/5/ES.
Denmark: Undertegnede Turtle Beach erklærer herved, at følgende udstyr ELITE 800 RX & TX, overholder de væsentlige krav og øvrige relevante krav i direktiv 1999/5/EF.
English: Hereby, Turtle Beach declares that this ELITE 800 RX & TX, is in compliance with the essential requirements and other relevant provisions of Directive 1999/5/EC.
Estonia: Käesolevaga kinnitab Turtle Beach seadme ELITE 800 RX & TX, vastavust direktiivi 1999/5/EÜ põhinõuetele ja nimetatud direktiivist tulenevatele teistele asjakohastele sätetele.
Turtle Beach vakuuttaa täten että ELITE 800 RX & TX, tyyppinen laite on direktiivin 1999/5/EY oleellisten vaatimusten ja sitä koskevien direktiivin muiden ehtojen mukainen.
France: Par la présente Turtle Beach déclare que l'appareil ELITE 800 RX & TX, est conforme aux exigencies essentielles et aux autres dispositions pertinentes de la directive 1999/5/CE.
German: Hiermit erklärt Turtle Beach., dass sich das Gerät ELITE 800 RX & TX, in Übereinstimmung mit den grundlegenden Anforderungen und den übrigen einschlägigen Bestimmungen der Richtlinie 1999/5/EG befindet.
ΜΕ ΤΗΝ ΠΑΡΟΥΣΑ Turtle Beach.ΗΛ.ΝΕΙ ΟΤΙ ELITE 800 RX & ΤΧ, ΣΥΜΜΟΡΦ.ΝΕΤΑΙ ΠΡΟΣ ΤΙΣ ΟΥΣΙ..ΕΙΣ ΑΠΑΙΤΗΣΕΙΣ ΚΑΙ ΤΙΣ ΛΟΙΠΕΣ ΣΧΕΤΙΚΕΣ .ΙΑΤΑΞΕΙΣ ΤΗΣ Ο.ΗΓΙΑΣ 1999/5/ΕΚ.
Hungary: Alulírott, Turtle Beach nyilatkozom, hogy a ELITE 800 RX & TX, megfelel a vonatkozó alapvető követelményeknek és az 1999/5/EC irányelv egyéb előírásainak.
Italy: Con la presente Turtle Beach dichiara che questo ELITE 800 RX & TX, è conforme ai requisiti essenziali ed alle alter disposizioni pertinenti stabilite dalla direttiva 1999/5/CE.
Latvia: Ar šo Turtle Beach deklarç, ka ELITE 800 RX & TX, atbilst Direktivas 1999/5/EK bûtiskajâm prasibâm un citiem ar to saistîtajiem noteikumiem.
Lithuania: Šiuo Turtle Beach deklaruoja, kad šis ELITE 800 RX & TX, atitinka esminius reikalavimus ir kitas 1999/5/EB Direktyvos nuostatas.
Malta: Hawnhekk, Turtle Beach., jiddikjara li dan ELITE 800 RX & TX, jikkonforma mal-tiijiet essenzjali u ma provvedimenti orajn relevanti li hemm fid-Dirrettiva 1999/5/EC.
Netherlands: Hierbij verklaart Turtle Beach dat het toestel ELITE 800 RX & TX, in overeenstemming is met de essentiële eisen en de andere relevante bepalingen van richtlijn 1999/5/EG.
Poland: Niniejszym Turtle Beach ooewiadcza, ¿e ELITE 800 RX & TX, jest zgodny z zasadniczymi wymogami oraz pozosta³ymi stosownymi postanowieniami Dyrektywy 1999/5/EC.
Portugal:
Voyetra Turtle Beach, Inc. ("VTB") warrants to the original end-user purchaser ("Purchaser") that the retail Turtle Beach hardware product herein ("Product") will be free of defects in materials and workmanship for a period of one year from the date of purchase by the Purchaser ("Warranty Period"). Any Extended Warranty or Service Plans purchased through a Retail store are not honored by VTB. The Warranty refers to the repair/replacement of a defective product during this period and not a refund.
This limited warranty is extended only to the original Purchaser of a new product, which was not sold "AS IS". It is not transferable or assignable to any subsequent purchaser. This limited warranty is applicable only in the country or territory where the Product was purchased from an authorized VTB retailer and does not apply to a Product that has been purchased as used or refurbished or was included as part of a non-VTB product.
WARRANTY SERVICE:
In the USA and CANADA Warranty Service is provided by our Turtle Beach USA offices and in all other Countries it is provided by our local International Distributors when available. Refurbished/Recertified products are sold on an AS IS basis with a 90-day Warranty or less in accordance with each vendor's policy.
VTB does not warrant uninterrupted or error-free operation of the Product and is under no obligation to support the Product for all computer operating systems or future versions of such operating systems.
If a defect should occur during the Warranty Period, Purchaser must contact VTB to obtain a Return Merchandise Authorization ("RMA") number on the basis of the dated purchase receipt. Purchaser will be responsible for shipping costs incurred in returning the defective Product to an authorized VTB service center, or to the repair facility located at VTB's corporate headquarters. VTB will not be responsible for other products or accessories included with the defective Product sent to VTB. The RMA number must be clearly indicated on the outside of the package. Packages without an RMA number will be refused by VTB or its representatives and returned to sender at the sender's expense.
In the event of a defect, Purchaser's sole and exclusive remedy, and VTB's sole liability, is expressly limited to the correction of the defect by adjustment, repair, or replacement of the Product at VTB's sole option and expense. VTB owns all Products it has replaced and all parts removed from repaired Products. VTB uses new and reconditioned parts made by various manufacturers in performing warranty repairs and building replacement products. If VTB repairs or replaces a product, the original Warranty Period is not extended, however, VTB warrants that repaired or replacement parts will be free from defects in material and workmanship for a period of thirty (30) days from the date of repair or replacement, or for the remainder of the Warranty Period, whichever is greater.
This warranty does not apply to any Product that has had its serial number altered, removed or defaced, or any Product damage caused by shipping, improper storage, accident, problems with electrical power, abuse, misuse, neglect, ordinary wear, acts of God (e.g. flood), failure to follow directions, improper maintenance, use not in accordance with product instructions, unauthorized modification or service of the Product or damage resulting from the use of the Product with hardware, software or other products not provided by or specifically recommended by VTB.
NOTES:
- Replacement Parts and accessories that are subject to “wear and tear” such as earpads, mic foam covers, talkback cables, etc. have a three (3) month Warranty.
- Replacement Parts for Discontinued Products are sold on an AS IS basis, they are not supported and come with a 30 day Warranty.
THIS LIMITED WARRANTY IS PURCHASER'S SOLE AND EXCLUSIVE REMEDY AND IS IN LIEU OF ALL OTHER WARRANTIES, EXPRESS OR IMPLIED. TO THE EXTENT PERMITTED BY APPLICABLE LAW, VTB HEREBY DISCLAIMS THE APPLICABILITY OF ANY IMPLIED WARRANTY OF MERCHANTABILITY, FITNESS FOR A PARTICULAR PURPOSE OR USE FOR THE PRODUCT. IF SUCH A DISCLAIMER IS PROHIBITED BY APPLICABLE LAW, THE IMPLIED WARRANTY IS LIMITED TO THE DURATION OF THE FOREGOING LIMITED WRITTEN WARRANTY.
IN NO EVENT SHALL VTB BE LIABLE FOR ANY INDIRECT, INCIDENTAL, SPECIAL, PUNITIVE OR CONSEQUENTIAL DAMAGES, OR DAMAGES, INCLUDING BUT NOT LIMITED TO ANY LOST PROFITS, DATA, OR LOSS OF USE, ANY THIRD PARTY CLAIMS, AND ANY INJURY TO PROPERTY OR BODILY INJURY (INCLUDING DEATH) TO ANY PERSON, ARISING FROM OR RELATING TO THE USE OF THIS PRODUCT OR ARISING FROM BREACH OF THE WARRANTY, BREACH OF CONTRACT, NEGLIGENCE, TORT, OR STRICT LIABILITY, EVEN IF VTB HAS BEEN ADVISED OF THE POSSIBILITY OF SUCH DAMAGES.
This warranty supersedes all prior agreements or understandings, oral or written, relating to the Product, and no representation, promise or condition not contained herein will modify these terms. Some states do not allow the exclusion or limitation of incidental or consequential damages, so the above exclusion or limitation may not apply to you. This warranty gives you specific legal rights. You may also have other rights, which vary from state to state. Any action or lawsuit for breach of warranty must be commenced within eighteen (18) months following the purchase of the Product.
EXCLUSIONS FROM LIMITED WARRANTY:
This Limited Warranty shall not apply and VTB has no liability under this Limited Warranty if the Turtle Beach Product:
- is used for commercial purposes such as "LAN, Call Centers" (including rental or lease);
- is modified or tampered with;
- is damaged by Acts of God, power surge, misuse, abuse, negligence, accident, wear and tear, mishandling, misapplication, or other causes unrelated to defective materials or workmanship;
- serial number is defaced, altered or removed;
- is not used in accordance with the documentation and use instructions; or
- is repaired, modified or altered by other than authorized repair centers.
- is no longer available because it was discarded.

Watch Turtle Beach product training videos at: youtube.com/TurtleBeachVideos

Product support and warranty information: TurtleBeach.com/support
© 2014 Voyetra Turtle Beach, Inc. Turtle Beach, the Palm Tree Logo, Voyetra, Ear Force, and Audio Advantage are trademarks of Voyetra Turtle Beach, Inc. For DTS patents, see http://patents.dts.com. Manufactured under license from DTS Licensing Limited. DTS, the Symbol, & DTS and the Symbol together are registered trademarks, and DTS Headphone:X is a trademark of DTS, Inc. © DTS, Inc. All Rights Reserved. Dolby and the double-D symbol are trademarks of Dolby Laboratories. PlayStation, PS4, PS3 and PS Vita are trademarks of Sony Computer Entertainment, Inc. Bluetooth is a trademark of Bluetooth SIG, Inc. Google Play is a trademark of Google Inc. Android is a trademark of Google Inc. Actual product appearance may differ from package imagery. **The Elite Membership Program is available in markets where Turtle Beach products are sold. Program benefits vary by market and are subject to local restrictions. To receive the program benefits, you must register at www.turtlebeach.com/elite within 60 days of purchase.
This product is compliant with the Consumer Product Safety Improvement Act of 2008, Public Law 110-314 (CPSIA)
- For our Knowledgebase and Technical Support visit turtlebeach.com/support
- About the Elite 800
- Overview
- Silence is Golden
- Crystal Clear Wireless
- DTS Headphone:X 7.1 Surround Sound
- Enhanced DTS Surround Sound Modes & Presets
- Hidden, High-Quality Microphones
- Magnetic Charging Stand
- Bluetooth Versatility
- Never Miss a Text or Call
- Rechargeable Battery
- Companion App
- Swappable Rocker Plates
- Separate Volume Controls
- Stop SHOUTING!
- Dynamic Chat Boost™
- Easy Setup
- Parts and controls
- Headset Controls: Left Earcup
- Power/ANC Button
- Mobile Connection
- Power LED
- HEADSET STATUS
- PAIRING STATUS
- Headset Controls: Right Earcup
- Preset Button
- Bluetooth Status LED
- Mic Mute Button
- Charging Contacts
- DTS Headphone:X Surround Modes
- GAME MODE MOVIE MODE MUSIC MODE SURROUND OFF
- Transmitter: Front
- CHARGING STATUS
- Transmitter: Back
- Headset Charging
- PS4™ and PS3™ Console Setup
- PS4™ Setup
- PS3™ Setup
- Xbox One Setup
- Windows® and Mac® OSX Computer Setup
- Wired Setup
- Bluetooth Pairing
- Bluetooth Operation
- Pairing the Headset and Transmitter
- Active Noise Cancellation
- Adjusting the Sound
- Firmware Upgrades and Personalization
- Turtle Beach Windows Ear Force Audio Hub
- Firmware upgrades
- Turtle Beach Android Ear Force Audio Hub
- Replacing Rocker Plates
- Specifications
- HEADSET
- TRANSMITTER
- Troubleshooting Tips
- Voice Chat Drops
- Bluetooth not working
- Important Safety Information
- Regulatory Compliance Statements for the Elite 800 RX & TX Models
- Federal Communications Commission (FCC) Compliance Notices
- Class B Interference Statement
- FCC Caution:
- RF Radiation Exposure & Hazard Statement
- Non-Modification Statement
- Deployment Statement
- Canadian ICES Statements
- Exposition aux radiations RF & Mention de danger
- European Union and European Fair Trade Association Regulatory Compliance
- Declaration of Conformity Marking by this symbol:
- Also Licensed for Standards:
- Finland:
- Greece:
- Portugal:
- WARRANTY SERVICE:
- NOTES:
- EXCLUSIONS FROM LIMITED WARRANTY:
Brand : TURTLE BEACH
Model : TB033904
Category : Headphones