SD70FAER - Digital photo frame Hanns.G - Free user manual and instructions
Find the device manual for free SD70FAER Hanns.G in PDF.

| Product Type | Digital Photo Frame |
| Brand | Hanns.G |
| Model | SD70FAER |
| Screen Size | 7 inches |
| Display Resolution | 800 x 480 pixels |
| Display Type | LCD |
| Memory Card Support | SD, MMC, Memory Stick |
| USB Port | USB 2.0 (for data transfer) |
| Built-in Memory | 256 MB |
| Supported Photo Formats | JPEG, BMP, GIF |
| Slideshow | Yes, with adjustable intervals |
| Clock/Calendar | Yes (built-in) |
| Remote Control | Yes (infrared) |
| Power Supply | DC 5V, 1A |
| Power Consumption | 5 W (typical) |
| Dimensions | 200 x 150 x 25 mm |
| Weight | 350 g |
| Included Accessories | Remote control, USB cable, AC adapter, user manual |
| Cleaning | Wipe with a soft, dry cloth |
| Safety | Keep away from liquids; do not disassemble |
| Repairability | Contact Hanns.G support for service |
| Warranty | 1 year |
Frequently Asked Questions - SD70FAER Hanns.G
User questions about SD70FAER Hanns.G
0 question about this device. Answer the ones you know or ask your own.
Ask a new question about this device
Download the instructions for your Digital photo frame in PDF format for free! Find your manual SD70FAER - Hanns.G and take your electronic device back in hand. On this page are published all the documents necessary for the use of your device. SD70FAER by Hanns.G.
USER MANUAL SD70FAER Hanns.G
FCC Class B Radio Frequency Interference Statement 2
Copyright 3
Getting Started....6
IO Description 6
Descriptions of Keys 6
Turn on/off. 7
Main menu....7
Photo....8
-
Slideshow Mode ....8
-
Thumbnails Mode .....8
-
Browse Mode ....8
Calendar 9
[Mode 1] Month Calendar .....9
[Mode 2] Digital Clock .....9
[Mode 3] Analog Clock .....9
Setting Function 10
-
Photo Setup .... 10
-
Calendar Setup ....10
-
System Setup .....11
Specifications 12

FCC Class B Radio Frequency Interference Statement
This equipment has been tested and found to comply with the limits for a Class B digital device, pursuant to Part 15 of the FCC Rules. These limits are designed to provide reasonable protection against harmful interference in a residential installation. This equipment generates, uses and can radiate radio frequency energy, and if not installed and used in accordance with the instructions, may cause harmful interference to radio communications. However, there is no guarantee that interference will not occur in a particular installation. If this equipment does cause harmful interference to radio or television reception, which can be determined by turning the equipment off and on, the user is encouraged to try to correct the interference by one or more of the following measures:
- Reorient or relocate the receiving antenna.
- Increase the separation between the equipment and receiver.
- Connect the equipment into an outlet on a circuit different from that to which the receiver is connected.
- Consult the dealer or an experienced radio/TV technician for help.
The device complies with Parts 15 of the FCC Rule. Operation is subject to the following two conditions: (1) this device may not cause harmful interference; and (2) this device must accept any interference received, including interference that may cause undesired operations.
CANADA
This Class B digital apparatus meets all requirements of the Canadian Interference-Causing Equipment Regulation.
CE
This device complies with requirement of EMC directive 2004/108/EC with regard to Electromagnetic Compatibility, and 73/23/EEC and 93/68/EEC with regard to Low Voltage directive.
Socket-outlet shall be near the equipment and shall be accessible.
Copyright
©Copyright 2011 Hannspree, Inc.
All rights reserved. This manual is protected by copyright and distributed under licenses restricting its use, copying and distribution. No part of this manual may be reproduced in any form by any means without the prior written authorization of Hannspree. The DPF described in this manual may include copyrighted software of Hannspree (or other third parties). Hannspree (or other third parties) preserves the exclusive rights for copyrighted software, such as the right to distribute or reproduce the copyrighted software. Accordingly, and to the extent allowed by applicable law, any copyrighted software contained in the product described herein shall not be distributed, modified, reverse engineered, or reproduced in any manner without the prior written authorization of Hannspree (or of other third parties).
The Hannspree logos presented herein are trademarks of Hannspree. All other product names, trademarks or logos mentioned herein are used for identification purpose only, and may be the trademarks or registered trademarks of their respective owners.
The purchase of the product described herein shall not be deemed to grant, either directly or by implication, estoppel or otherwise, any license under the copyrights, patents, patent applications or trademarks of Hannspree, except for the normal, non-exclusive use that arises by operation of law in the sale of a product.
RECYCLING INFORMATION
We, the Hannspree care very much about our environment protection strategy and firmly believe that it helps us have healthier earth via appropriate treatment and recycling of industrial technology devices at the end-of-life.
These devices contain recyclable materials, which can be re-decomposed and re-integrated into brand-new marvels. On the contrary, other material can be classified to hazardous and poisoned substances. We strongly encourage you to contact the provided information to recycle this product.
For more information, please visit www.hannspree.com

SAFETY NOTICE
- The changes or modifications not expressly approved by the party responsible for compliance could void the user's authority to operate the equipment.
-
Shielded interface cables and AC power cord, if any, must be used in order to comply with the emission limits.
-
The manufacturer is not responsible for any radio or TV interference caused by unauthorized modification to this equipment. It is the responsibilities of the user to correct such interference.
-
Only use attachments/accesories specified by the manufacturer.
WARNING:
To prevent fire or shock hazard, do not expose the DPF to rain or moisture.
Dangerously high voltages are present inside the DPF. Do not open the cabinet.
Refer servicing to qualified personnel only.
PRECAUTIONS
- Do not use the DPF near water, e.g. near a bathtub, washbowl, kitchen sink, laundry tub, swimming pool or in a wet basement.
- Do not place the DPF on an unstable cart, stand, or table. If the DPF falls, it can injure a person and cause serious damage to the appliance. Use only a cart or stand recommended by the manufacturer or sold with the DPF. If you mount the DPF on a wall or shelf, use a mounting kit approved by the manufacturer and follow the kit instructions.
- Slots and openings in the back and bottom of the cabinet are provided for ventilation. To ensure reliable operation of the DPF and to protect it from overheating, be sure these openings are not blocked or covered. Do not place the DPF on a bed, sofa, rug, or similar surface. Do not place the DPF near or over a radiator or heat register. Do not place the DPF in a bookcase or cabinet unless proper ventilation is provided.
- The DPF should be operated only from the type of power source indicated on the label. If you are not sure of the type of power supplied to your home, consult your dealer or local power company.
- Unplug the unit during a lighting storm or when it will not be used for long period of time. This will protect the DPF from damage due to power surges.
- Do not overload power strips and extension cords. Overloading can result in fire or electric shock.
- Never push any object into the slot on the DPF cabinet. It could short circuit parts causing a fire or electric shock. Never spill liquids on the DPF.
- Do not attempt to service the DPF by yourself; opening or removing covers can expose you to dangerous voltages and other hazards. Please refer all servicing to qualified service personnel.
- The wall socket shall be installed near the equipment and shall be easily accessible.
SPECIAL NOTES ON DIGITAL PHOTO FRAME
The following symptoms are normal with DPF and do not indicate a problem.
- Due to the nature of the fluorescent light, the screen may flicker during initial use. Turn off the Power Switch and then turn it on again to make sure the flicker disappears.
- You may find slightly uneven brightness on the screen depending on the pattern you use.
- The LCD screen has effective pixels of 99.99% or more. It may include blemishes of 0.01% or less such as a missing pixel or a pixel lit all of the time.
- Due to the nature of the LCD screen, an afterimage of the previous screen may remain after switching the image, when the same image is displayed for hours. In this case, the screen is recovered slowly by changing the image or turning off the Power Switch for hours.
- If the screen suddenly flashes erratically or the backlighting fails, please contact your dealer or service center for repair. Do not attempt to repair the DPF yourself.

Preface
Thank you for purchasing a Hannspree Digital Photo Frame. Your new DPF will allow you to view your favorite photographs while enriching your lifestyle with advanced technology.
Please carefully read this manual throughout before setting up, using or operating your DPF. To ensure the safe and correct installation and operations of the DPF, it is important that the safety and operation instructions in this manual are followed.
This instruction manual is designed to assist you in setting up and using the DPF. The information in this manual has been carefully checked for accuracy; however, no guarantee is given to the correctness of the contents. The information in this manual is subject to change without notice.
To the extent allowed by applicable law, Hannspree, Inc. (“Hannspree”) shall not be liable for direct, indirect, special, exemplary, incidental or consequential damages arising from any defect or omission in this manual, even if advised of the possibility of such damages in advance.
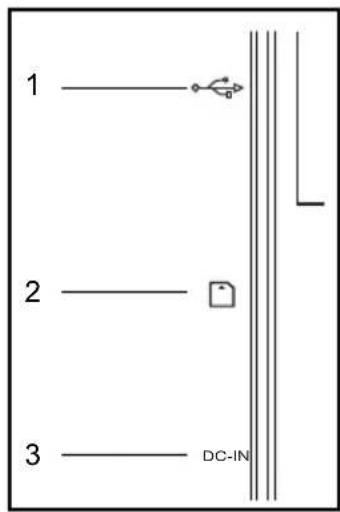
IO Description
# Icon Description

SD, MMC, MS Card Slot (MMC/MS card requires its adapter)
2

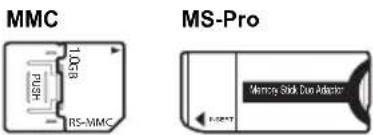
3 DC-IN DC In Jack
Descriptions of Keys
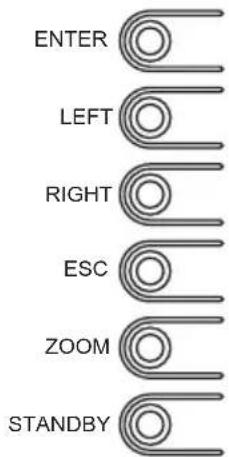
The DPF is equipped with six keys. The description of initial keys is as follows:
| Keys | Functional Description | Keys | Functional Description |
| ENTER Confirm or into the next level ESC Exit or return to one level | |||
| LEFT Left ZOOM | Expand 125%, 150%, 175%, 200%, 225%, 250% | ||
| RIGHT Right STANDBY | Long press to turn on/off; short press to return to main menu | ||
Turn on/off
Press STANDBY to turn on, while long press STANDBY in operating condition to turn off.
Main menu
In main menu, press ESC key to switch SD card or USB flash disk, press ENTER to confirm.

Photo
1. Slideshow Mode
In photo setup, set the Display Mode to Slideshow, it will automatically slideshow all photos.
2. Thumbnails Mode
In photo setup, set the Display Mode to Thumbnail, it will show Thumbnails.
3. Browse Mode
In photo setup, set the Display Mode to Browse, it will show single photo. The key function as follow:
| Keys | Functional Description | Keys | Functional Description |
| ENTER Play/Pause ESC | Exit to Mode of Thumbnails, press again to return to main menu | ||
| LEFT View the previous photo ZOOM Pause slide show and expand photos | |||
| RIGHT View the next photo STANDBY | Long press to turn on/off; short press to return to main menu | ||
When pressing ZOOM to access to the expand photo as follows:

natural_image
Close-up of three plush toys: a blue giraffe, a yellow elephant with purple spots, and a brown lion with white spots, displayed against a leafy background (no text or symbols visible)The key function as follow:
| Keys | Functional Description | Keys | Functional Description |
| ENTER N/A ESC | Return to original state | ||
| LEFT | Move the photo left, long press to move up | ZOOM Expand the photo | |
| RIGHT | Move the photo right, long press to move down | STANDBY | Long press to turn on/off; short press to return to main menu |
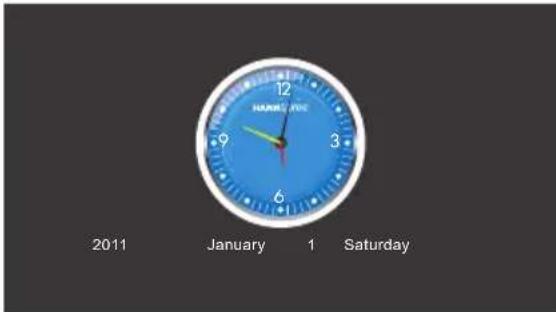
In Calendar setup, choose Display Mode from following 3 modes.
[Mode 1] Month Calendar

[Mode 1A] Week start from Sunday.

[Mode 1B] Week start from Monday.
**Press ENTER key can switch between [Mode 1A] and [Mode 1B].
[Mode 2] Digital Clock

[Mode 3] Analog Clock
Setting Function
In the main menu, shift left and right to Setting, press ENTER to enter into the setup menu. The key function as follow:
| Keys | Functional Description | Keys | Functional Description |
| ENTER Enter sub-menu ESC Return to main menu | |||
| LEFT Switch the menu setting ZOOM N/A | |||
| RIGHT N/A STANDBY | Long press to turn on/off; short press to return to main menu | ||
1. Photo Setup
Description of Setting:
| Setting Item Description | |
| Display Mode Optional: Slideshow, Thumbnail, Browse | |
| Display Ratio Optional: Full Screen, Fit to Screen, Crop to Fill | |
| Slideshow Duration 5/15/30/60 seconds, 5/15 minutes | |
| Slideshow Repeat Once, Repeat cycle | |
| Slideshow Effect | Transition effect of Slideshow |
2. Calendar Setup
Description of Setting:
| Setting Item Description | |
| Display Mode Calendar, Digital Clock, Analog Clock | |
| Date | Setup the date |
| Clock Mode | 12/24 hours system |
| Clock Time | Setup the time |
| Alarm Settings | Alarm function on/off |
| Alarm Time | Setup alarm time |
| Alarm Tone | Setup alarm tone |
| Alarm Frequency | Optional: everyday, Monday to Friday, weekend, only once |
3. System Setup
Description of Setting:
| Setting Item Description |
| Language Setup languages |
| Backlight Adjust backlight, optional: 1, 2, 3, 4, 5 |
| Brightness Adjust brightness, optional: 0, 1, 2, 3, 4, 5, 6 |
| Contrast Adjust contrast, optional: 0, 1, 2, 3, 4, 5, 6 |
| Saturation Adjust saturation, optional: 0, 1, 2, 3, 4, 5, 6 |
| Power On Automatically power on enable |
| Auto Boot Time Automatically power on: time setting |
| Power Off Automatically power off enable |
| Auto Shut Time Automatically power off : time setting |
| Auto Power Frequency Optional: everyday, Monday to Friday, weekend, only once |
| Default Reset to default |
| Version Description of firmware version |
| System Upgrade Upgrade firmware for SD card |
The descriptions of key function are as follows:
| Keys Functional Description | |
| ENTER N/A | |
| LEFT Switch to next setup item | |
| RIGHT Switch to next option | |
| ESC | Return to main menu |
| ZOOM | N/A |
| STANDBY | Long press to turn on/off; short press to return to main menu |
Note:
If you do not make any operation at the main menu for 15 seconds, you will be regarded as viewing slides.
Specifications
| Display 7" Color TFT LCD | |
| Power Adapter | INPUT: 100-240VAC, 50/60Hz |
| OUTPUT: 5V/1A ,5W | |
| Power Consumption 4.5W | Maximum |
| Built-in Speakers Output 1 W x 1 | |
| Max. Resolution 800 x 480 | |
| Support | Image Files: JPEG |
| Supports up to 64 Mega (8176X8176) pixels image files | |
| Memory Card SD/SDHC/M S/MMC | |
| USB USB 2.0 HOST (NO $upports Hard drive) | |
Note:
All the specifications above depend on the actual product, and may be changed without prior notification.
Adapter source:
SHEN ZHEN K-PROMISE TECHNOLOGY CO.,LTD
EU: PSEA050100V W
UK: PSEA050100B W
US: PSEA050100U W