9281FH05 - Simulateur Interquartz - Free user manual and instructions
Find the device manual for free 9281FH05 Interquartz in PDF.

User questions about 9281FH05 Interquartz
0 question about this device. Answer the ones you know or ask your own.
Ask a new question about this device
Download the instructions for your Simulateur in PDF format for free! Find your manual 9281FH05 - Interquartz and take your electronic device back in hand. On this page are published all the documents necessary for the use of your device. 9281FH05 by Interquartz.
USER MANUAL 9281FH05 Interquartz
This INTERQUARTZ telephone is intended for use on 2 wire analogue PSTN and PABX circuits within Europe.
Declaration of Conformity
Interquartz (UK) Limited declares under its sole responsibility that this product
Model : VOYAGER MEMORY PHONE 9281
Is in conformity with the following relevant harmonized standards
Health & Safety EN60950 : 1992
Electromagnetic Compatibility EN55022 : 1998 & EN55024 : 1998
Following the provisions of Council Directive on radio equipment and telecommunications terminal equipment
January 2002
Notes
- The REN number of this telephone is 1.
- The European code for emergency services is 112. You can still use 999 in the UK. An access code may be required if the phone is connected to a PABX
Installation
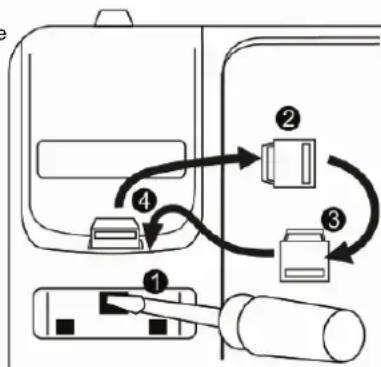
- Plug in the line cord to the line socket at the rear of the telephone (Figure 3)
- Plug in the handset cord to the handset socket at the side of the telephone.
- Set the ringer volume control, and ringer pitch adjust as desired (Figure 3)
- If the telephone is for wall mounting then you need to re-position the handset retainer as shown in (Figure 1) before mounting in the telephone on the wall.
4.1 Use screw-driver to push the handset retainer
4.2 Push the handset retainer out of the slot
4.3 Turn the handset retainer 180 degree
4.4 Insert the handset retainer back into its slot
flowchart
graph TD
    A["Device 1"] --> B["Switch"]
    B --> C["Device 2"]
    C --> D["Switch"]
    D --> E["Device 3"]
    E --> F["Switch"]
    F --> G["Device 4"]
    G --> H["Switch"]
    H --> I["Device 5"]
    I --> J["Switch"]
    J --> K["Device 6"]
    K --> L["Switch"]
    L --> M["Device 7"]
    M --> N["Switch"]
    N --> O["Device 8"]
    O --> P["Switch"]
    P --> Q["Device 9"]
    Q --> R["Switch"]
    R --> S["Device 10"]
FIGURE 1
- Do not adjust the switches located at bottom case. Contact your PABX Manager or Network Supplier if you need to adjust the Recall switch (TBR/ER) and Voice Message (S1/ S2 / N) switch
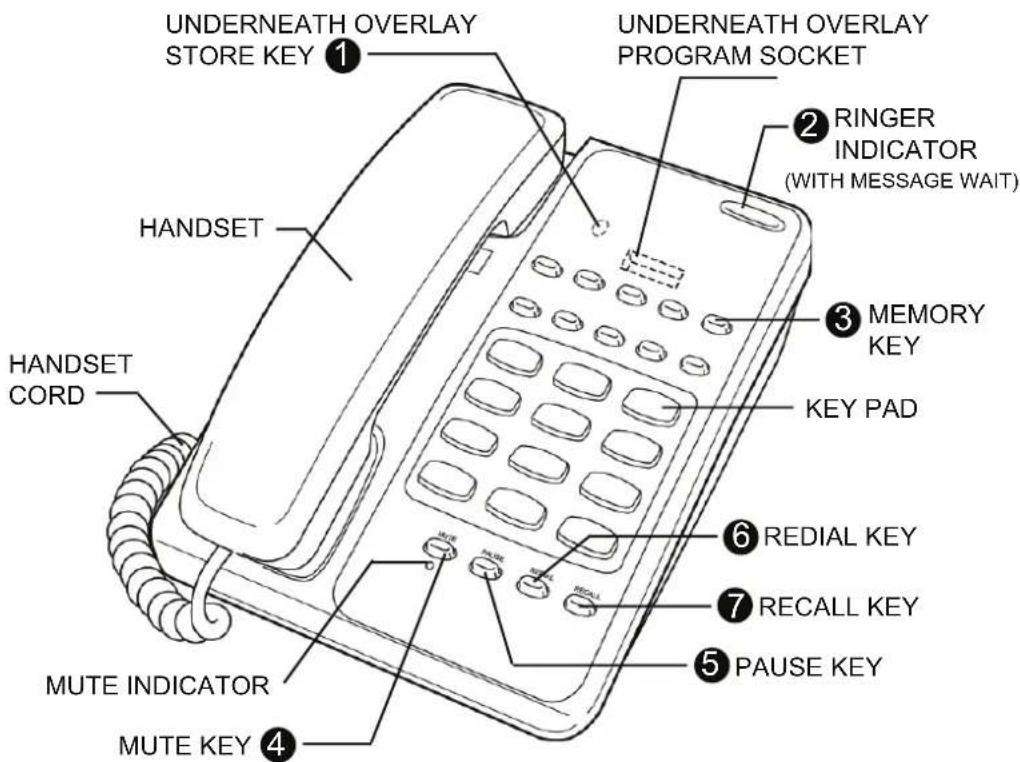
FIGURE 2 - GENERAL APPEARANCE
Features – Top view
-
Store Button (underneath Overlay)
Used to store numbers into the direct access memory buttons. -
Ringer Indicator Flashes when the telephone rings with an incoming call.
-
Memory Key 10 memory locations, each is able to store 32 digits.
-
Mute Button Press mute button for cutting off the handset so that caller cannot hear your conversation. Pressing it second time cancels the mute and returns to normal conversation.
-
Pause Button Lift handset, dial any digits required before the pause. Press Pause button, and dial remaining digits.
-
Redial Button Lift the handset, and wait for tone. Press the Redial button to dial the last number redial.
-
Recall Button For PABX use, to carry out call transfers, and access other PABX facilities.
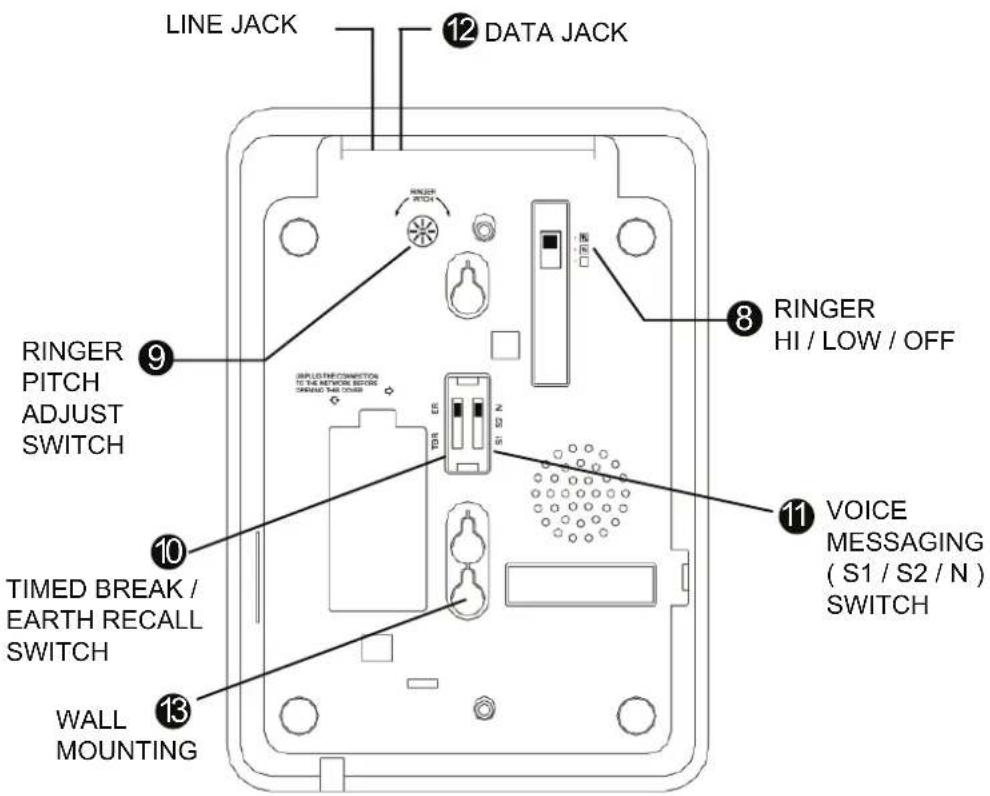
FIGURE 3 - BOTTOM VIEW
Features – Bottom view
- Ringer Volume switch (Hi/Low/Off)
Select for no sound (OFF), muted sound (LOW) or full sound (HIGH) ringing on incoming call.
- Ringer Pitch Control
Allow the pitch of the ringer to be altered from a high pitch to a low pitch.
10.Timed Break/Earth Recall (TBR/ER) switch
See installation section to select Time break (TBR) or Earth Recall (ER) for matching your system.
- Voice Messaging (S1/S2/N) switch
See installation section in full manual to select normal or reverse message wait signal for matching your system.
12.Data Port
The data port provides access to the telephone line for equipment e.g computers with a modem.
13.Wall Mounting
See installation section in full manual for wall mounting.
OPERATION
Answering a call

Making a call

Store numbers in Memory

flowchart
graph LR
    A["User"] --> B["STORE"]
    B --> C["ENTER TELE. NO."]
    C --> D["STORE"]
    D --> E["MEMORY BUTTON"]
    E --> F["Phone Icon"]
Dial numbers in Memory

For details of maintenance, problem solving, warranty & service, please contact your PABX Manager or Network Supplier. For further advice or a more detailed manual for this product, you may visit our
website www.interquartz.co.uk