
Voice Tracer VTR8110 - Dictaphone PHILIPS - Free user manual and instructions
Find the device manual for free Voice Tracer VTR8110 PHILIPS in PDF.


| Brand | Philips |
| Model | Voice Tracer VTR8110 |
| Product Type | Digital Voice Recorder (Dictaphone) |
| Dimensions (approx.) | 110 x 40 x 15 mm |
| Weight (approx.) | 60 g |
| Power Source | Rechargeable lithium-ion battery |
| Battery Capacity | 300 mAh |
| Recording Format | MP3 / WAV |
| Recording Time | Up to 70 hours (varies by quality) |
| Built-in Memory | 4 GB |
| Microphone | Built-in stereo microphones |
| Speaker | Built-in loudspeaker |
| Display | Backlit LCD screen |
| Controls | Buttons for record, play, stop, menu |
| Connectivity | USB 2.0 for file transfer and charging |
| Headphone Jack | 3.5 mm stereo |
| Key Features | Voice activation, variable playback speed, password protection |
| Cleaning Instructions | Wipe with a soft, dry cloth. Do not use liquids. |
| Safety Warnings | Avoid exposure to moisture, heat, and magnetic fields. |
| Spare Parts / Repairability | Battery can be replaced by qualified technician. USB cable available separately. |
| Manual | User manual available online (76 pages) |
Frequently Asked Questions - Voice Tracer VTR8110 PHILIPS
User questions about Voice Tracer VTR8110 PHILIPS
0 question about this device. Answer the ones you know or ask your own.
Ask a new question about this device
Download the instructions for your Dictaphone in PDF format for free! Find your manual Voice Tracer VTR8110 - PHILIPS and take your electronic device back in hand. On this page are published all the documents necessary for the use of your device. Voice Tracer VTR8110 by PHILIPS.
USER MANUAL Voice Tracer VTR8110 PHILIPS
Register your product and get support at
www.philips.com/welcome

VTR8110
使用手册 / User Manual
| 中文 | 03 | English | 39 |
VIDEO TRACER
VTR8110
PHILIPS
[Non-Text]
—
[Non-Text]
[Non-Text]
[Non-Text]
[Non-Text]
[Non-Text]
[Non-Text]
[Non-Text]
[Non-Text]
[Non-Text]
[Non-Text]
[Non-Text]
[Non-Text]
[Non-Text]
[Non-Text]
[Non-Text]
[Non-Text]
[Non-Text]
[EMPTY]
[Non-Text]
[Non-Text]
[Non-Text]
[Non-Text]
[Non-Text]
[Non-Text]
[Non-Text]
[Non-Text]
[Non-Text]
[Non-Text]
[Non-Text]
[Non-Text]
[Non-Text]
[Non-Text]
[Non-Text]
[Non-Text]
(No text)
[Non-Text]
[Non-Text]
[Non-Text]
[Non-Text]
[Non-Text]
[Non-Text]
[Non-Text]
[Non-Text]
[Non-Text]
[Non-Text]
[Non-Text]
[Non-Text]
[Non-Text]
[Non-Text]
[Non-Text]
[Non-Text]
[Non-Text]
[Non-Text]
[EMPTY]
[Non-Text]
—
[Non-Text]
[Non-Text]
[Non-Text]
[Non-Text]
[Non-Text]
[Non-Text]
[Non-Text]
[Non-Text]
[Non-Text]
[Non-Text]
[Non-Text]
[Non-Text]
[Non-Text]
[Non-Text]
[Non-Text]
[Non-Text]
[Non-Text]
[Non-Text]
[Non-Text]
[Non-Text]
[EMPTY]
[Non-Text]
[Non-Text]
[Non-Text]
[Non-Text]
[Non-Text]
[Non-Text]
[Non-Text]
[Non-Text]
[Non-Text]
[Non-Text]
[Non-Text]
[Non-Text]
[Non-Text]
[Non-Text]
[Non-Text]
[Non-Text]
(No text)
[Non-Text]
[Non-Text]
[Non-Text]
[Non-Text]
[Non-Text]
[Non-Text]
[Non-Text]
[Non-Text]
[Non-Text]
[Non-Text]
[Non-Text]
[Non-Text]
(No text)
(No text)
(No text)
(No text)
(No text)
(No text)
(No text)
(No text)
(No text)
目录
1 欢迎 05
156

051.1 产品特点
167
录音
062 重要须知
178
一键回放模式
062.1 安全


3.2 主机概览

① 麦克风
② 镜头
③ 照明灯
④ 状态指示灯
⑤ 光敏电阻
⑥ 红外灯
⑦ 遥控指示灯
⑧ 激光灯
⑨ 对讲咪头
⑩ 喇叭
⑪ 显示屏

提示
录音界面说明

录像文件播放界面说明:

语音文件播放界面说明:

17.2 取下背夹
19 胸针的佩戴方式
19.1 佩戴胸针
19.2 取下胸针
36 ZH

注意
- 佩戴胸针需要穿执法外套。
20 常见问题
www.philips.com/support
无法启动音视频记录仪:
电池电量已耗尽请及时充电。
显示时间 / 日期不正确:
2.1 Safety 43
2.2 Hearing safety 43
2.3 Legal restrictions on recording 43
3 Your Video & Audio Recorder
- I What's in the box? 44
3.2 Overview 44
3.3 Remote control (Optional) overview 45
4 Get Started
4.1 Power On/Off 46
4.2 Recharge 46
4.3 PC Connection 47
5 Recording
6 Camera
7 Voice Recording
8 One-touch Playback Mode 52
9 Video Mode 53
9.1 Video Playback 53
10 Camera Mode 55
II Voice Mode 56
11.1 Voice Playback 57
12 Remote Control(Optional) 58
12.1 Remote Control Enable/Disable 58
12.2 Matching the Remote Control 58
13 HDMI 59
14 Expanded function 60
14.1 GPS(Optional) 60
14.2 Walkie-talkie Transmitter (Optional) 60
14.3 Multi-function base (Optional) 60
15 Settings Mode 61
15.1 Voice Settings 61
15.2 Video Settings 62
15.3 Camera Settings 63
15.4 System Settings 64
EN 39
16 Changing the battery 69
17 How to use the back clip of the device 70
17.1 Back clip installment 70
17.2 Back clip uninstallment 70
18 How to wear the back clip 70
19 How to use the brooch of the device 71
19.1 Brooch installment 71
19.2 Brooch uninstallment 71
20 FAQs 72
21 Technical Parameters 73
I Welcome
Congratulations on your purchase and welcome to Philips! To fully benefit from the support that Philips offers, visit our website for support information such as user manuals, software downloads, warranty information and more: www.philips.com
1.1 Product Highlights
- One-touch voice recording: Just press the voice record button to start recording, and then press again to save the file.
- One-touch video recording: Just press the video record button to start recording, and then press again to save the file.
- One-touch playback: After voice or video recording, press the stop button to play the file.
• Real HQ voice and video recorder. - Use intelligent audio codec, dual microphone head active noise reduction, sound clearer
- 170° ultra-wide angle lens free from dead zones for video recording.
- Double-filter switcher for images without color deviation
during the day and clearer images at night.
• HDMI for convenient file check on monitor or TV settings.
- 2.5mm standard earphone connector enabling use of earphones in noisy environments.
- Character superimposing for improved legal evidence by adding time, product number and user code to all videos and images, which cannot be edited.
- Super-long file name containing product number, time, and user ID, etc for data archiving and searching
• Automatic partitioning and saving of video files against loss by erroneous operation.
• VTR8110 support up to 128 G TF card.
- HQ vibrating speaker giving you a live effect while playing voice and video files.
• Recording in the common WAV format.
- USB2.0 for rapid access to recorded files and data.
- Use as a USB mass storage to ensure the best compatibility.
- Can be adjusted at any angle of the damping shaft clip, wear flexible and reliable.
- Built-in high-strength suction of the magnet, combined with special brooch, video more stable.
- A large variety of optional accessories satisfying the needs in various scenarios.
- Wireless control for remote power on/off.
- Link to GPS for providing global positioning information
through satellite signals.
- Link to walkie-talkie to use as a shoulder microphone.
- Multi-function base, charging more flexible and convenient.
2 Important
2.1 Safety
- Protect the cables from being pinched, particularly at plugs.

Note
- Please read this User Manual carefully before using the device. The company shall not be liable for any data loss caused by force majeure. Special attention should be given to correct operations and file backup.
2.2 Hearing safety
Observe the following guidelines when using your headphones:
- Adjust to a desired volume; do not use headphones for a long period of time.
- Please remember not to turn the volume up beyond your tolerance.
- Do not turn up the volume so high that you can't hear what's being said around you.
-
Use caution or temporarily discontinue use in potentially
-
Adjust to a desired volume; do not use headphones for a long period of time.
- Please remember not to turn the volume up beyond your tolerance.
- Do not turn up the volume so high that you can't hear what's being said around you.
Use caution or temporarily discontinue use in potentially hazardous situations.
Do not use headphones when driving, cycling, and skateboarding to avoid traffic accidents and violating laws and regulations.
2.3 Legal restrictions on recording
- The use of the device's recording function is subject to the legal restrictions that may apply in your country. You should also respect the privacy and personal rights of the third parties if you record talks or lectures.
- Please note that, in certain countries, you may be legally required to inform the person you are conversing with on the telephone that you are recording the conversation, or that the recording of telephone conversations is illegal. Please check if the use of such data is legal in your country prior to recording telephone calls.
3 Your digital recorder
3.1 VTR8110, What's in the box?


3.2 Overview:
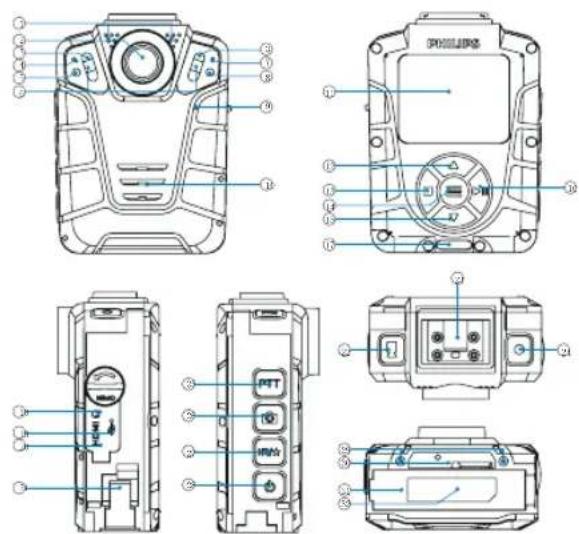
① Microphone
② Camera
③ Lamp
④ Working status indicator
⑤ Lightsensor
⑥ Infrared lamp
⑦ Remote control indicator
⑧ Laser light
⑨ Microphone for walkie-tallkie function
⑩ Speaker
⑪ Display
⑫ Menu option/file choosing/increasing volume
⑬ Stop/Return/lighting
⑭ Menu/ Menu option
⑮ Menu option/file choosing/decreasing volume
⑯ Play/Pause/confirm
⑰ Notch
18 Headphone
⑲ USB interface
20 HDMI interface
② Battery cover latch
22 Video recording
23 Slot for clip
24 Voice recording
25 PTT button
26 Photo taking
⑳ Infrared/File marking
⑳ Power/LCD off
⑲ 29 Locating hole for Multifunctional interface
30 Multifunctional interface
③ Battery cover
3.3 Remote control (Optional) overview:
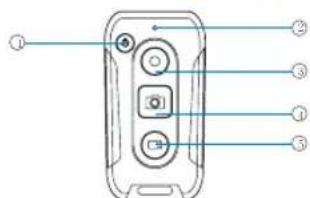
① Power on/off
② Remote indicator
③ Voice recording
④ Photo taking
⑤ Video recording
4 Get Started
4.1 Power On/Off

Note
- Please charge the device for 3.5 hours in the status of power off before using it for the first time!
When the device is off, it can be started by pressing the Power On/Off button for 3s; the screen then displays the "PHILIPS" logo. See the picture below:

Then the device displays the preview interface as seen in the following figure. On this interface, the status indicator becomes green; press Menu button quickly to return to the Settings interface. Long press "▲" or "▼" to zoom in or out the preview interface. Press "sensitivity" button and the menu will pop-up, then the record gains setting will be available.

Note
- The device has a built-in lithium battery. If the device is idle for a long time, please turn off the device by pressing the Power On/Off button for 3 Sec.
- If the device doesn't work normally, please make sure the device is not out of power.
- VTR8110, When the device is working, do not unplug the external card directly, or it may damage files or cause a malfunction.
- When the battery indicator symbol “■” is displayed, please charge the device promptly or replace the battery, less than 3 minutes recording time are left.
4.2 Recharge
I The device has a replaceable battery, which can be taken
out and recharged with the supplied desktop recharger or case recharger.
2 The device can be connected to a PC using the USB cable. When recharging, the indicator remains green. When the indicator goes out, the device is fully recharged.
3 The device can be connected to the recharger using the USB cable. When recharging, the indicator remains green. When the indicator goes out, the device is fully recharged.
4 Lithium battery is used for the remote control. Charging the device with the equipped charger or connecting the device to PC with a USB cable. During the charging, the charging indicator is green, and it will go off if the device is fully charged.

Note
- Recharging may be conducted when the device is either off or on. Under normal circumstances, the device will be fully recharged within 3.5 hours when it is off, or about 6 hours when it is turned on.
4.3 PC Connection
The Video Tracer can be used as a USB mass storage to
conveniently store, back up and move files. The Video Tracer can be linked to a computer with a USB cable. VTR8110, The Video Tracer can automatically be recognized as a mass storage device without the need to install any software, as shown in the following picture.


Note
- When moving files to or from the recorder, please do not disconnect the device from the computer.
- Please connect the device with PC with the USB cable when the device is power on or long press the power button for 3 seconds after connecting the device to PC.
- If you need to format the TF card in the range of 16GB to 64 GB, the file system option must choose FAT32 to format. If the card capacity is 128GB, the file system option must be selected for exFAT for formatting. NTFS format can not be used or the machine will not be able to record.
5 Video Recording
Please note the instructions in this section when you make the first video recording with your Video Tracer!
(I) On the Preview interface, press the "Video Record" button to start recording. The device will vibrate twice briefly, and the state indicator flickers red.
(2) Long press " ▲" or " ▼ to zoom in and out the preview interface.
(3)When recording at night, in a low light environment or of the infrared is in manual mode, please long press the "IR/★" button to change to night recording mode. The screen will become black/white.
(4) Long press the Play button to turn on the laser light, which can be used to locate recording area.
(5) When recording at night or in a low light environment, long press the Stop button to gain more light.
(6)Press the "Capture" button to capture the current video recording picture.
(7)Press the "IR/★button to mark the file as an important document, so the file will not be covered when loop recording or be deleted on the device. It can only be deleted by formatting the device or through computer.
(8) Long press voice recording button to transfer from video recorder to voice recorder.
(9)Press the "Video Record" button again to end the recording. The device will vibrate twice briefly, the red light goes out, and the device returns to the preview interface. The state indicator turns green.
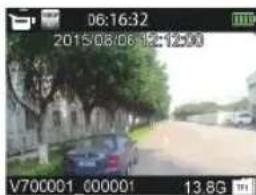
Recording Interface Reference:
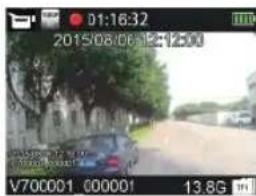
Illustration of Video Recording Interface:
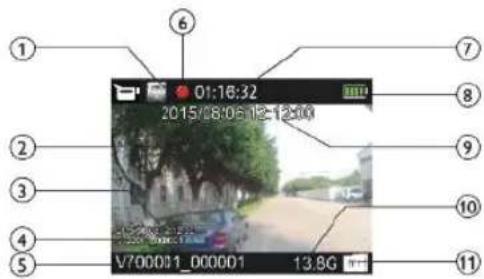
① Resolution
② Current system date
③ Time watermark
④ ID Number watermark
⑤ ID Number
⑥ Video record state
⑦ Current recording time
⑧ Battery
⑨ Current system time
⑩ Remain video
⑪ TF card

Note
- When the low battery icon appears, it means the battery is nearly empty and the system will automatically shut down. If the device is recording, the system will automatically save the recorded file, then shut down. If the device has a low battery, please recharge the device promptly. When the device shuts down on a low battery, it will vibrate and the following icon will be displayed.


Note
- Prior to video recording please set the desired recording parameters.
- Please delete any unnecessary files before recording.
- For video recording in the dark, press the infrared button to enter the night mode. The recorded video will be black and white.
6 Camera
Please note the instructions in this section when you take the first photo with your Video Tracer!
On the preview interface, press the Camera button to take a photo. While taking a photo, a red light appears with a "click" sound. If taking a photo in a dark environment, the device needs its infrared lamp or additional lamp to secure good quality videos. During the video recording the user can press the camera button to make a photo.
7 Voice Recording
Please note the instructions in this section when you make the first voice recording with your Video Tracer!
I On the preview interface, press the "Voice Record" button to start recording. The status indicator turns yellow. Please rotate the built-in microphone toward the source of sound.
2 Press the "IR/★button to mark the file as an important document, so the file will not be deleted by loop recording.
3 Long press voice recording button to transfer from video recorder to voice recorder.
4 Press the "Record" button to end recording. The device returns to the Preview interface.
Illustration of Recording Interface:
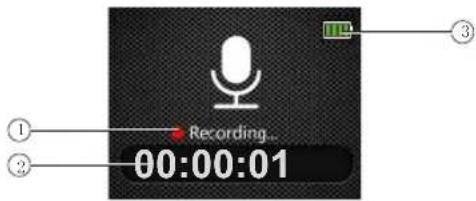
① Record state
③ Status of the battery
② Current recording time

Note
- Prior to recording, please preset the type of recording you need.
- Please delete any unnecessary files before recording.
- Make a test recording to make sure that the Video Tracer settings are correct.
- VTR8110When recording, please do not remove the card or the recorded file may be damaged.
- When recording, please do not cut off the power supply or the Video Tracer will fail; loss or damage to recorded files may occur.
- If the recorder needs to be used for a long time, please charge the device before recording.
8 One-touch Playback Mode
On the Preview interface, press the Stop button quickly after the video recording file is saved, the Video Tracer will directly play the file. Press the Stop button quickly after the voice recording file is saved, the Video Tracer will directly play the file. By default, the one-touch playback will play the last video recording file as soon as the device is powered on.
9 Video Mode
On the preview interface, you can enter the playback review interface through the Play button; press the “▲” or “▼
" button to select Video Playback, and then press the Play button quickly to enter the video file list interface. The video file list interface is shown in the following figure:
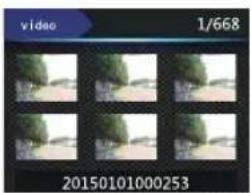
Press the “▲” or “▼button to select a video file to play and then press the Play button quickly to enter the Video Stop interface.
Illustration of Video Playback Interface:
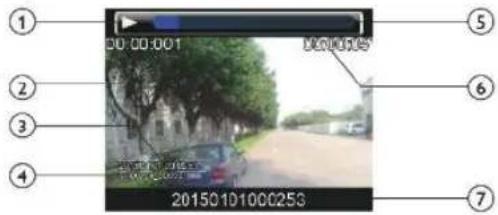
English
① Play state
⑤ Progress bar
② Current recording time
⑥ Total time
③ Time watermark
⑦ Time file name
④ ID Number watermark
9.1 Video Playback
I Press the “▲” or “▼” button to select a file to play.
2 Press the "Play" button to start playing, and the status indicator will turn green.
3 Press the Menu button, than the volume icon and the volume value will display on the lcd display, press the “▲” or “▼” adjust volume. Adjust volume will exit when press the Stop button or without any operation 8s.
EN 53
4 Press the "Stop" button to stop playing a video and return to the video file list interface.
5 When playing, press to pause, press again to continue playing.
6 When playing, press “▲” or “▼” to choose 2x, 4x, 8x, 16x, 32x, 64x to fast forward or backward.
7 Press the" IR/ ★"button to mark the current file as important. And the file will not be covered when loop recording and only can be deleted through computer.

Note
- If the headphones are plugged in, the speaker of the recorder is disabled.
10 Camera Mode
On the preview interface, you can enter the playback review interface through the Play button; press the “▲” or “▼”
"button to select Photo Playback, and then press the Play button quickly to enter the photo file list interface. The photo file list interface is shown in the following figure:
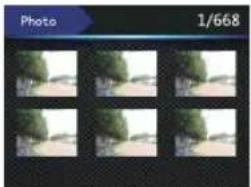
Press the “▲” or “▼” button to select a photo file to play back, and then press the Play button quickly to enter the Photo Browse status. Press the “▲” or “▼” button to select the desired photos.
When playing, press the "IR" button to mark the current file as important. And the file will not be covered when loop recording and only can be deleted through computer.
II Voice Mode
On the Preview interface, you can enter the playback review interface through the Play button; press the “▲” or “▼” button to select Voice Playback, and then press the Play button quickly to enter the voice file list interface. The voice file list interface is shown in the following figure:

Press the “▲” or “▼” button to select a voice file to play back, and then press the Play button quickly to enter the Voice Stop interface.
Illustration of Voice Playback Interface:

① Play state
② Current time
③ Time file name
4 Progress bar
⑤ Total time
11.1 Voice Playback
I Press the “▲” or “▼” button to select a file for play back.
2 Press the "Play" button to start playing, and the status indicator turns green.
3 Press the Menu button, than the volume icon and the volume value will display on the lcd display, press the “▲” or “▼” adjust volume. Adjust volume will exit when press the Stop button or without any operation 8s.
4 Press the "Stop" button to end playing and return to the voice file list interface.
5 When playing, press "▶" to pause, press "▶" again to continue playing.
6 Press the "IR/★" button to mark the current file as important. And the file will not be covered when loop recording and only can be deleted through computer.

Note
- If the headphones are plugged in, the speaker of the recorder is disabled.
12 Remote Control(Optional)
Remote control allows the user to control the device remotely. The supplied remote control offers remote shutdown, voice record, video record, camera, and other functions.
12.1 Remote Control Enable/Disable
When the device is off, if the white lamp for the remote control indicator goes out, the remote control is disabled. At that time, press the Menu button for 3 seconds. When the white lamp is lit, later slowly flashes and the remote control is enabled.
2 When the device is off, if the white lamp on the remote control stays on and flicker slowly, the remote control is still turned on. Press the Power On/Off button on the remote control to remotely control the device. Press the Menu button for 3 seconds to turn off the remote control.

Note
- The remote control of the device should be enabled before using the remote control to operate the device.
- Please charge the remote control for at least 2 hours

Note
before using for the first time!
- If the red indicator is flickering all the time when the remote control is working after the code is matched, it means it is low battery. Please charge the remote control.
• The remote control can be enabled and disabled only when the audio and video recorder is off. - Only if the white lamp for the remote control indicator slowly flashes, then the remote control is enabled. The red indicator on the remote control flashes once when taking photo, twice when audio or video recording are enabled, and three times when saving recorded audio or video files.
- The remote control allows horizontal control without a barrier at any angle within 10 meters.
12.2 Matching the Remote Control
When the device is off and the remote control is disabled, press the Menu button for 8 Sec to make the white lamp for remote control indicator flicker rapidly. The Power On/Off button on the remote control must be pressed within 3 Sec. When the white lamp stops flickering and stays on, the code match is completed. If the device will automatically start, the code match is successful. If not, code match failed.
13 HDMI
On the preview interface of recording, connect the device to a HD display devices with a Micro HDMI switch HDMI cable (cthis cable is available as an accessories), all the operations are still available.

Note
- When connecting HDMI, there are some inconsistencies between HD display devices and machine display.

14 Expanded function
14.1 GPS(Optional)
The device can be provided with GPS and a Beidou chip. The map playback body worn camera trace can display the latitude and longitude on the LCD. During use, GPS should be enabled on the menu.

Note
- To guarantee the compatibility of the device, please use dedicated GPS module.
- If you no longer need GPS, turn it off in the menu.

Note
- To guarantee the compatibility of the device, please use dedicated GPS module.
14.3 Multi-function foundation(Optional)
The Multi-function foundation can be connected to the recharger using the USB cable. Please Insert in the correct order when charging the device or battery. When recharging, the indicator remains green. When the indicator goes out, the device is fully recharged.
14.2 Walkie-talkie Transmitter (Optional)
The device can be provided with GPS and a Beidou chip. The map playback body worn camera trace can display the latitude and longitude on the LCD. During use, GPS should be enabled on the menu.
15 Settings Mode
On the preview interface, press the Menu button to enter the Settings interface. See the Settings interface reference. It is comprised of Voice Settings, Video Settings, Camera Settings and System Settings. Press the menu key to switch each Settings.
15.1 Voice Settings
The Voice Settings menu includes Record Type, MIC Sensitivity and Noise cut. Select the Voice Settings menu icon, and press the “▲” or “▼” button to select the item to be set; then press the Play button to enter.
15.1.1 Record Type
The Record Type menu provides two options: "HQ," and "SLP." If HQ recording is selected, the device automatically saves the recorded file after the recording lasts for one hour, and then resumes recording. The interface reference has the following settings:

HQ: WAV format, high quality, bit rate 1536kbps. SLP: WAV format, average quality, bit rate 385kbps.
15.1.2 MIC Sensitivity
The MIC Sensitivity menu has three options: "High, Medium, Low." Different recording effects can be achieved by selecting different levels. The interface reference has the following
settings:

15.1.3 Noise cut
An intelligent codec is used in device, the audio and video recorder can realize dual Mic automatic noise reduction,
EN 61
Noise cut has two options: Off and On. Press the “▲” or “▼” button to select.
After turning on automatic noise reduction, if you do not press the "IR/★" key while recording or recording, the saved file name of the video and audio file will contain "RNC" letter, marking this file as noise reduction file. If you press the "IR/★" key, the saved audio and video file name will contain "IMP" letters, marking this file as an important markup file.
15.2 Video Settings
The Video Settings menu includes Resolution, Video Quality, Pre-record, and Delay Record. Select the Video Settings menu icon, press the “▲” or “▼” button to select the item you wish to set, and then press the Play button to enter.
15.2.1 Resolution
Recording resolution has five levels, i.e. 1920 × 1080 30P, 1280 × 720 60P, 1280 × 720 30P, 848 × 480 60P and 848 × 480 30P, to satisfy the needs in most scenarios. Press the “
▲” or “▼” button to select the desired resolution. After selection, press the Play button to confirm, or press the Back button to return to the previous menu.
The interface reference is presented in the following figure:

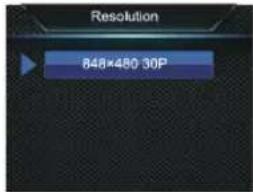
15.2.2 Video Quality
The Video Quality menu has three options: "S. Fine, Fine, Normal." Different quality can be selected for different needs. Higher quality will require a larger file within the same recording period.
15.2.3 Pre-record
When Pre-record is enabled, you can record a video for some seconds before an event. Pre-record has two options: Off and On. Press the “▲” or “▼” button to select. After selection, press the Play button to confirm, or press the Back button to return to the previous menu.
15.2.4 Delay Record
When Delay Record is enabled, you can keep recording for
a set time after pressing the button to save the recorded video. Delay Record has six options: Off, 5 Sec, 10 Sec, 15 Sec, 30 Sec and 60 Sec. Press the “▲” or “▼” button to select. After selection, press the Play button to confirm, or press the Back button to return to the previous menu.
15.3 Camera Settings
The Camera Settings menu includes Photo Size, Photo Quality, Photo Rate, and Auto Shooting. Select the Camera Settings menu icon, press the “▲” or “▼” button to select the item to be set, and then press the Play button to enter.
15.3.1 Photo Size
Photo Size has 10 levels: 34M、23M、20M、18M、16M、14M、12M、8M、5M、3M. Press the “▲” or “▼” button to select the desired resolution. After selection, press the Play button to confirm, or press the Back button to return to the previous menu. The interface reference is illustrated below:

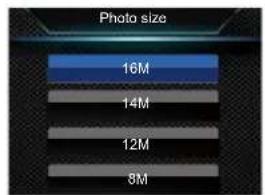

English
15.3.2 Photo Quality
On the Camera Settings menu, select the "Photo Quality" menu, and then press the Play button to enter the Photo Quality menu. The Photo Quality menu has three options: "S. Fine, Fine, Normal." Different quality is selected for different needs. The better quality, the larger file within the same recording period.
15.3.3 Photo Rate
Photo Rate means that the device can take photos continuously by pressing the Camera button once in the preview mode or in the course of video recording. On the Camera Settings menu, select the "Photo Rate" menu, and then press the Play button to enter the Photo Rate menu. The Photo Rate menu has five options: Off, 3 P, 5 P, 10 P and 20 P. Press the "▲" or "▼" button to select the desired photo rate. After selection, press the Play button to confirm, or press the Back button to return to the previous menu.
15.3.4 Photo selftimer
Photo selftimer means that the device takes a photo at regular intervals when the Camera button is pressed in the Preview mode or in the course of video recording, until the Camera button is pressed, the card is full or the battery is empty.
Photo selftimer offers six options: Off, 3 Seconds, 5 Seconds, 10 Seconds, 30 Seconds and 60 Seconds. Press the "▲" or "▼" button to select the desired number of seconds. After selection, press the Play button to confirm, or press the Back button to return to the previous menu.
15.4 System Settings
The System Settings menu comprises Language, TV Mode, Default Settings, LCD Brightness, System Time, Auto Off, LCD Auto Off, Volume, In-car Model, Video Loop, In-car Record, Duration Off, Key Tone, Light Indicator, Infrared Switch, Motion Detection, EV, ID Number and System Information. Select the System Settings menu icon, and press the “▲” or “▼” button to select the item to be set, and then press the Play button to enter.
15.4.1 Language
On the Language menu, you can select the desired language as the system language. The Language interface reference is illustrated below:

TV Mode has two options: NTSC and PAL. When the device is linked to TV, the correct option is selected based on the TV mode.
15.4.3 Default Settings
This allows the user to reset the parameters of the device.
15.4.4 LCD Brightness
This allows the user to adjust the LCD to the required brightness. The LCD brightness has three levels: High, Medium and Low. Press the “▲” or “▼” button to select the desired level. After selecting the level, press the Play button to confirm, or press the Back button to return to the previous menu.
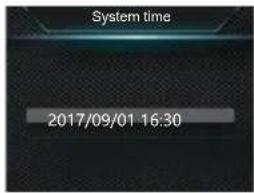
15.4.5 VTR8110, System Time
The System Time interface is illustrated below:
65 EN
English
On the interface, press “▲” or “▼” and Menu to set the current time. Press Menu to select Year, Month, Day; and press “▲” or “▼” to change these value. Press the Play button to confirm.
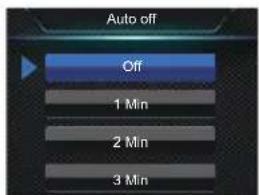
15.4.6 Auto Off
If the user does not perform an operation on the device over a pre-set time, the system automatically shuts down. See the auto off setting interface reference below:

EN 65
15.4.7 LCD Auto Off
LCD Auto Off has 5 options: OFF, 1 Min, 2 Min, 3 Min and 5 Min. If no operations performed on the device by the user during a set time period, the LCD automatically turns itself off. If "OFF" is selected, the LCD will be remain on.
15.4.8 Volume
This function allows you to adjust the sound volume of the device.
Volume can be set to any of 17 values within 0 to 16. Press the “▲” or “▼” button to select the desired value and confirm by pressing the Play button.
15.4.9 In-car mode
The device can be used as car driving recorder which defaults to "Off", and "In-car recording" and "Video loop" are unavailable at this time. When the "In-car mode" is on, "Video loop" and "In-car recording" are unavailable and "LCD auto Off" defaults to "Off".
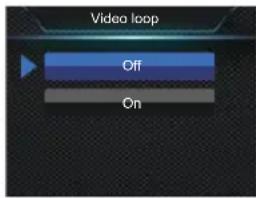
15.4.10 Video loop
On the video recording setting menu, choose "Video loop" and press Play button to confirm. Press ♥ or "▲to choose "On/Off" and press Play button to confirm, return button to return to the previous menu.
The interface is as below:
15.4.11 In-car recording
Choose whether to record the voice in car or not by this function.
15.4.12 Duration
Video recording has five time periods: 5 Min, 10 Min, 15 Min, 20 Min and 30 Min. In the course of video recording, this function can automatically save a video file periodically at the selected time interval, and enter the recording for the next time period without any delay. The automatic off interface reference is illustrated below:


15.4.13 Key Tone
This function creates a sound when any button is pressed if the recording is stopped. Turn on/off key tone with this function.
15.4.14 Indicator light
Turn on/off indicator according to needs.
15.4.15 Infrared Switch
On the System Settings menu, press the ▲ or ▼button to select the "Infrared" menu, and then press the Play button to enter the Infrared Switch menu. The menu offers two options: Manual and Auto. After selecting the mode, press the Play button to confirm, or press the Back button to return to the previous menu.
15.4.16 Motion Detection
In detection mode, the Video Tracer automatically starts recording when any object enters the coverage of the body worn camera. After the object gets out of the range of coverage, it ends the recording and saves the recorded file. Motion detection has four options: Off, Low, Medium and High. It can be turned off or set to a desired level.
15.4.17 EV
As an exposure control mode, EV can adjust the brightness of photos. You can adjust the brightness for unique visual effects. EV can be set to any of 13 values within -2.0 to +2.0. Press the "Menu" button to select the desired exposure value. Press the Play button to confirm after selection.
15.4.18 GPS
Audio and video recorder built-in GPS module for providing global positioning information through satellite signals, it can be used only if the device's GPS function is enabled. If you no longer need GPS, turn it off in the menu.
15.4.19 VTR8110 ID Number
The PID setting interface is illustrated below:
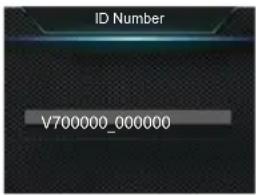
On the interface, press "▲" or "▼" and menu button to set the Equipment No. and User No. of the device. Press "Menu" to select the corresponding value, and press "Menu" to move to the corresponding figure.
15.4.20 System Information
The System Information menu includes Total Space, Available Space, Remain Video, Remain Sound, Battery Power and Firmware Version;
Total Space: This allows the user to check the amount of memory space in the device.
Available Space: This allows the user to check the remaining space available.
Remain Video: This allows the user to check how long the device can record for the current video resolution.
Remain Sound: This allows the user to check how long the device can record for the current record type.
Battery Power: This allows the user to check the current battery power.
Firmware Version: This allows the user to check the version of firmware.
16 Changing the battery
16.1 Battery loading
I Hold the battery door by hand, open the battery button with your finger, and then open the battery cover.
2 Put battery into the slot as shown in below picture:
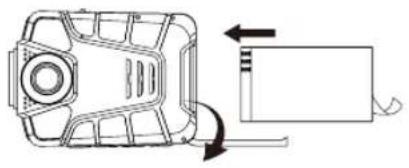
3 Close the battery door, press the battery door home.

Note
- The battery may explode if it is not replaced properly. Only the same model or type of battery should be used on the device.
16.2 Battery unloading
I Hold the battery door by hand, open the battery button with your finger, and then open the battery cover.2 Take out the battery.
3 Close the battery door, press the battery door home.
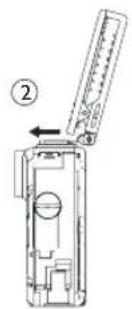
17.1 Back clip installment
Match the back clip with the slot ① on the device, and install the clip according to direction ②, as shown in below picture.
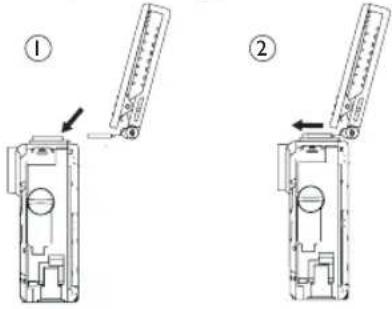
17.2 Back clip uninstallment
Remove the clip when the buckle to lift, and then press the opposite direction and increase the force to pull out.
18 How to wear the back clip 17 How to use the back
(1) Open the clip by pressing the finger position, then nip the epeulet and make the clip hook hookup the bottom of the epaulet.
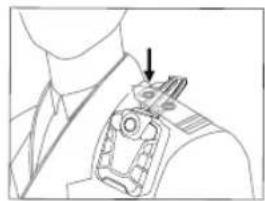
(2) Adjust the device to a proper position.

19 How to use the brooch of the device
19.1 Brooch installment
Buckle the brooch to the right position in loose coat, than match the iron on the brooch with the magnet slot of the audio and video recorder, as shown in below picture
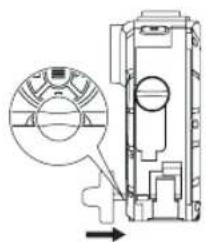
19.2 Brooch uninstallment
Pull out the brooch from in opposite and up direction, and remove the brooch.


Note
• Police has to wear the Law enforcement coat when wearing a brooch
20 FAQs
Answers to the frequently asked questions are listed here to solve simple problems with the recorder. If the problem cannot be solved, please contact the dealer or visit our official website:
www.philips.com/support
My Video Tracer cannot power on:
The battery is out of power, please recharge promptly.
Incorrect time/date:
Please set the time/date in the menu if the recording time is incorrect.
Blurred photo/video:
If the camera lens are unclean, please clean up the lens with a piece of flannelette.
My Video Tracer does not record anything:
The Video Tracer's memory is full, and the loop record is off. Please delete some recordings or move them to other storage devices.
My Video Tracer does not play recordings:
The battery is out of power, please recharge.
My Video Tracer crashes:
If the device cannot start, display a black screen or fails to function, resetting the device provides the most common solution. A reset button is located inside a pinhole at the slot of the battery cover. The recorder can be reset by using tweezers or any pointed object to press inside the pinhole.

Note
- This operation will not cause any loss or damage to files.
21 Technical Parameters
Storage
Internal Storage
Estimated Recording Time (32GB): around 44 hours with HQ recording mode, around 180 hours with SLP Recording mode Type of Internal Storage: C10 TF card
Dimensions and Weight
Wide × Long × High: 59×28×79 (mm)
Weight (with battery): 170g
System Requirements
Operating System: Windows 10/8/7/Vista/XP/2000,
Mac OS X, Linux
Port: USB
Voice Record
HQ REC: bit rate 1536kbps, WAV format
SLP REC: bit rate 385kbps, WAV format
Operating Conditions
Temperature: -30–55°C
Humidity: 10–90%, no condensation
[Non-Text]
—
[Non-Text]
[Non-Text]
[Non-Text]
[Non-Text]
[Non-Text]
[Non-Text]
[Non-Text]
[Non-Text]
[Non-Text]
[Non-Text]
[Non-Text]
[Non-Text]
[Non-Text]
[Non-Text]
[Non-Text]
[Non-Text]
[Non-Text]
____
[Non-Text]
[Non-Text]
[Non-Text]
[Non-Text]
[Non-Text]
[Non-Text]
[Non-Text]
[Non-Text]
[Non-Text]
[Non-Text]
[Non-Text]
[Non-Text]
[Non-Text]
[Non-Text]
[Non-Text]
[Non-Text]
The Ground Truth image displays a single, solid horizontal line. According to Rule 2 (UNDERSCORE & LINE RULES), if the GT contains lines used for stylistic emphasis or as background (like ruled paper), the OCR result must ignore them. The line in the GT is clearly a stylistic or background line, not a placeholder for text. Therefore, the OCR should not have output any underscores. Outputting `____` constitutes an error under Rule 2, as it hallucinates placeholder symbols where none are semantically intended. Hence, the OCR result is inconsistent with the Ground Truth.
[Non-Text]
[Non-Text]
[Non-Text]
[Non-Text]
[Non-Text]
[Non-Text]
[Non-Text]
[Non-Text]
[Non-Text]
[Non-Text]
[Non-Text]
[Non-Text]
[Non-Text]
[Non-Text]
[Non-Text]
[Non-Text]
[Non-Text]
[Non-Text]
[Non-Text]
[Non-Text]
[Non-Text]
____
[Non-Text]
[Non-Text]
[Non-Text]
[Non-Text]
[Non-Text]
[Non-Text]
[Non-Text]
[Non-Text]
[Non-Text]
[Non-Text]
[Non-Text]
[Non-Text]
[Non-Text]
[Non-Text]
[Non-Text]
[Non-Text]
The Ground Truth image displays a single, solid horizontal line. According to Rule 2 (UNDERSCORE & LINE RULES), if the GT contains lines used for stylistic emphasis or as background (like ruled paper), the OCR result must ignore them. The line in the GT is clearly a stylistic or background line, not a placeholder for text. Therefore, the OCR should not have output any underscores. Outputting `____` constitutes an error under Rule 2, as it hallucinates placeholder symbols where none are semantically intended. Hence, the OCR result is inconsistent with the Ground Truth.
[Non-Text]
[Non-Text]
[Non-Text]
[Non-Text]
[Non-Text]
[Non-Text]
[Non-Text]
[Non-Text]
[Non-Text]
[Non-Text]
[Non-Text]
[Non-Text]
[Non-Text]
(No text)
Warranty card
质保书

year warranty
一年质保
Type: VTR8110
Serial nr:
Date of purchase
购买日期
Dealer's name, address and signature
销售商名称、地址及签字
www.philips.com/welcome
This document is printed on chlorine free produced paper
Data subject to change without notice
This product was brought to the market by Speech Processing Solutions GmbH or one of its affiliates, further referred to in this document as SPS, which is the manufacturer of the product. SPS is the warrantor in relation to the product with which this booklet was packaged.
For China only
只限中国地区
Printed in China


© 202 Speech Processing Solutions GmbH. 版权所有文档版本1.2.202/01/29
Register your product and get support at www.philips.com/welcome

- 目录
- 提示
- 17.2 取下背夹
- 19 胸针的佩戴方式
- 19.1 佩戴胸针
- 19.2 取下胸针
- 20 常见问题
- I WELCOME
- 1.1 PRODUCT HIGHLIGHTS
- 2 IMPORTANT
- 2.1 SAFETY
- NOTE
- 2.2 HEARING SAFETY
- 2.3 LEGAL RESTRICTIONS ON RECORDING
- 3 YOUR DIGITAL RECORDER
- 3.3 REMOTE CONTROL (OPTIONAL) OVERVIEW
- 4 GET STARTED
- 4.1 POWER ON/OFF
- 4.2 RECHARGE
- 4.3 PC CONNECTION
- 5 VIDEO RECORDING
- 6 CAMERA
- 7 VOICE RECORDING
- 8 ONE-TOUCH PLAYBACK MODE
- 9 VIDEO MODE
- 9.1 VIDEO PLAYBACK
- 10 CAMERA MODE
- II VOICE MODE
- 11.1 VOICE PLAYBACK
- 12 REMOTE CONTROL(OPTIONAL)
- 12.1 REMOTE CONTROL ENABLE/DISABLE
- 12.2 MATCHING THE REMOTE CONTROL
- 13 HDMI
- 14 EXPANDED FUNCTION
- 14.1 GPS(OPTIONAL)
- 14.3 MULTI-FUNCTION FOUNDATION(OPTIONAL)
- 14.2 WALKIE-TALKIE TRANSMITTER (OPTIONAL)
- 15 SETTINGS MODE
- 15.1 VOICE SETTINGS
- 15.1.1 RECORD TYPE
- 15.1.2 MIC SENSITIVITY
- 15.1.3 NOISE CUT
- 15.2 VIDEO SETTINGS
- 15.2.1 RESOLUTION
- 15.2.2 VIDEO QUALITY
- 15.2.3 PRE-RECORD
- 15.2.4 DELAY RECORD
- 15.3 CAMERA SETTINGS
- 15.3.1 PHOTO SIZE
- 15.3.2 PHOTO QUALITY
- 15.3.3 PHOTO RATE
- 15.3.4 PHOTO SELFTIMER
- 15.4 SYSTEM SETTINGS
- 15.4.1 LANGUAGE
- 15.4.3 DEFAULT SETTINGS
- 15.4.4 LCD BRIGHTNESS
- 15.4.5 VTR8110, SYSTEM TIME
- 15.4.6 AUTO OFF
- 15.4.7 LCD AUTO OFF
- 15.4.8 VOLUME
- 15.4.9 IN-CAR MODE
- 15.4.10 VIDEO LOOP
- 15.4.11 IN-CAR RECORDING
- 15.4.12 DURATION
- 15.4.13 KEY TONE
- 15.4.14 INDICATOR LIGHT
- 15.4.15 INFRARED SWITCH
- 15.4.16 MOTION DETECTION
- 15.4.17 EV
- 15.4.18 GPS
- 15.4.19 VTR8110 ID NUMBER
- 15.4.20 SYSTEM INFORMATION
- 16 CHANGING THE BATTERY
- 16.1 BATTERY LOADING
- 16.2 BATTERY UNLOADING
- 17.1 BACK CLIP INSTALLMENT
- 17.2 BACK CLIP UNINSTALLMENT
- 18 HOW TO WEAR THE BACK CLIP 17 HOW TO USE THE BACK
- 19 HOW TO USE THE BROOCH OF THE DEVICE
- 19.1 BROOCH INSTALLMENT
- 19.2 BROOCH UNINSTALLMENT
- 20 FAQS
- MY VIDEO TRACER CANNOT POWER ON
- INCORRECT TIME/DATE
- BLURRED PHOTO/VIDEO
- MY VIDEO TRACER DOES NOT RECORD ANYTHING
- MY VIDEO TRACER DOES NOT PLAY RECORDINGS
- MY VIDEO TRACER CRASHES
- 21 TECHNICAL PARAMETERS
- STORAGE
- DIMENSIONS AND WEIGHT
- SYSTEM REQUIREMENTS
- VOICE RECORD
- OPERATING CONDITIONS
- WARRANTY CARD
- 质保书
- WWW.PHILIPS.COM/WELCOME
Brand : PHILIPS
Model : Voice Tracer VTR8110
Category : Dictaphone