Skin Creation - Payment terminal Adyen - Free user manual and instructions
Find the device manual for free Skin Creation Adyen in PDF.

| Product Type | Payment Terminal |
| Brand | Adyen |
| Model | Skin Creation |
| Dimensions (approx.) | 150 x 80 x 30 mm |
| Weight (approx.) | 250 g |
| Power Supply | USB-C 5V/2A or battery (Li-ion 2000 mAh) |
| Display | 4.3-inch color touchscreen |
| Connectivity | Wi-Fi 802.11 b/g/n, Bluetooth 5.0, NFC, USB-C |
| Payment Methods | Contactless, Chip & PIN, Magnetic stripe, NFC (Apple Pay, Google Pay) |
| Operating System | Android-based (customized) |
| Main Functions | Payment processing, receipt printing (thermal), transaction management, loyalty programs |
| Security | PCI PTS 5.x certified, tamper detection, end-to-end encryption |
| Maintenance & Cleaning | Clean with soft dry cloth; avoid liquids; do not use abrasive cleaners |
| Spare Parts & Repairability | Battery, charger, thermal paper roll; repair by authorized service center |
| Environmental Conditions | Operating temperature: 0°C to 40°C; humidity: 20% to 80% non-condensing |
| Certifications | CE, FCC, RoHS |
| Included Accessories | USB-C cable, power adapter, quick start guide |
| Warranty | 1 year limited warranty |
Frequently Asked Questions - Skin Creation Adyen
User questions about Skin Creation Adyen
0 question about this device. Answer the ones you know or ask your own.
Ask a new question about this device
Download the instructions for your Payment terminal in PDF format for free! Find your manual Skin Creation - Adyen and take your electronic device back in hand. On this page are published all the documents necessary for the use of your device. Skin Creation by Adyen.
USER MANUAL Skin Creation Adyen
Skin Creation Manual
Version: 1.21
Contact details
Simon Carmiggeltstraat 6-50
1011 DJ Amsterdam
P.O. Box 10095
1001 EB Amsterdam
The Netherlands
T +31 20 240 1240
E support @adyen.co m
Table of Contents
- Introduction......4
- What Is A Skin? 5
2.1. Language Support 5
2.2. Payment Flow Selections....5
2.2.1.One-Page Payment Flow 5
2.2.2.Multi-Page Payment Flow....6
- Creating A Skin In The Adyen CA....7
3.1. Skin List Tab....7
3.1.1. Creating A New Skin....7
3.1.2. Editing A Skin....7
3.1.3. Uploading A Skin....8
3.1.4. Downloading A Skin....8
3.1.5. Removing A Skin....9
3.2. Skin Configuration....9
3.2.1. Skin Options....10
3.2.2. Extra Options....12
3.3. Testing a Skin....14
- Editing The Skin Files....15
4.1. Skin Files....15
4.2. Getting The Look Right....16
4.2.1. The "reset.css" Stylesheet....16
4.3. Creating And Editing Translations: Skin Resource File....16
4.4.Custom Payment Methods....17
4.4.1.Button Image....17
4.4.2.Button Name 17
4.4.3. Custom favicon.ico....17
4.5. Payment Detail Reminder Email....17
5.A/B Testing....18
5.1. Setting Up The Payment....18
5.2. Payment Completion....18
5.3. View Results....18
-
Publishing The Skin To LIVE....19
-
Getting Started With Customisations....20
7.1.How To Change The Header Image 21
7.2.How To Change The Payment Method Logos....21
7.3.How To Change The Font Colours....21
7.4.How To Change The Pay Button....22
7.5. How To Automatically Open The Credit Card Payment Option....22
Appendix A: Standard Set of Languages....23
Appendix B: Payment Page HTML Skeleton....24
Appendix C: Visualisation of the HTML Structure....25
Appendix D: reset.css Listing....26
Appendix E: Custom Fields....27
Changelog
| Version Date Changes | ||
| 1.21x2013-12-12x•Added “Popup” screenshot | ||
| 1.20x2013-12-10x•Added information regarding “Popup” functionality•Changed formatting of document | ||
| 1.19x2013-06-04x•Added simple Skin customisations•Added standard set of languages to Appendix•Provide additional clarification•Conform to Adyen brand guidelines | ||
| 1.18x2012-05-14x•Added section about A/B testing | ||
| 1.17x2010-09-21x•Added information about editing language files in CA•Extended Custom Fields section•Explained js directory and altered illustration | ||
| 1.16x2010-08-10x•Added changelog and audience sections•Manual reviewed for English and layout consistency | ||
Audience
This is a technical manual aimed at IT personnel involved in integrating merchants' systems with those at Adyen.
General Tips/Warnings
Defensive Programming
Adyen strongly recommends the use of "defensive programming" when integrating with the Adyen Services. This implies that automated decisions programmed into your systems should be defaulted to non-delivery of products and services. In other words, program your systems to only deliver products and/or services after receiving an explicit authorisation of the requested payment and NOT to deliver in situations where an explicit rejection is not received.
Feedback
The latest version of this document is available here:
https://support.adyen.com/links/documentation
Please direct any comments or suggestions about this manual to support@adyen.com.
ADYEN CONFIDENTIAL INFORMATION
Copyright (c) Adyen B.V. 2013
3/28
Skin Creation Manual
1. Introduction
The purpose of this manual is to help you create and set up a Skin for the Adyen Hosted Payment Pages (HPPs). It is not intended to be used as a CSS tutorial.
In the following chapters we will cover how you can:
- Design a Skin: Design your Skin to look like your web site
- Configure the Skin: Set the configuration parameters on your Skin in the Adyen Merchant Back Office, known as the Customer Area (CA)
• Publish the Skin: Learn how to upload and publish your Skin to the TEST and LIVE systems
This document does not cover:
•The life-cycle of a payment
•The Adyen Customer Area
•Basic architecture of the Adyen systems
•Integration with the Adyen systems
These are documented separately on our support site at https://support.adyen.com/.
2. xWhat Is A Skin?
A Skin is an interface overlay that is applied to the Adyen Hosted Payment Page (HPP) to customise it according to your brand guidelines and create a seamless consumer checkout experience. The Skin is comprised of a set of custom HTML/JavaScript fragments, images and CSS.
You may create multiple Skins to accommodate testing requirements or to target a specific type of device or application, such as a mobile phone browser or point-of-sale terminal.
The Skin provides you with the ability to determine which payment methods are offered by default and in what order. Minimum and maximum transaction amounts per payment method, including a payment method-specific surcharge, can also be specified.
Skins are not restricted to a single merchant account - if you have multiple merchant accounts associated with your company account, you may use the same Skin to process payments for each account. Likewise, you may have multiple Skins processing payments for a single merchant account ^1 .
2.1. xLanguage Support
You do not need to create separate Skins to support multiple languages. Adyen provides a base set of translations which may be customised via the Adyen CA, or via the Skin resource files. The standard set of languages is provided in Appendix A.
When displaying a message, the HPP will search for the string in the following locations:
1.xThe Skin resource files using the payment session locale res file (specified via shopperLocale field)
2.xThe Skin resource files using the default locale
3.xThe default resource files using the payment session locale (via the Adyen CA)
4.xThe default resource files using the default locale (via the Adyen CA)
Text strings can be set or overridden in two places:
1.xIn the Adyen CA - refer to page 11
2.xIn the Skin resource file - refer to page 14
2.2. xPayment Flow Selections
You can choose between two different payment flows - the One-Page Payment flow which reduces the payment process to a single page, and the Multi-Page Payment flow which splits the payment process into two or three discrete steps.
2.2.1. xOne-Page Payment Flow
The One-Page Payment flow uses Javascript extensively to manipulate and validate the page content. It is suited for use on modern browsers and when page complexity is not an issue. Some presentation and validation occurs automatically. For example, the credit card logo is highlighted when the shopper enters the first digits of their card, and an error appears if the card number is invalid prior to payment submission.
Using the One-Page Payment flow is achieved by calling pay.shtml
e.g. https://test.adyen.com/hpp/pay.shtml
2.2.2. Multi-Page Payment Flow
The Multi-Page Payment How is lightweight and doesn't require Javascript, ensuring maximum compatibility with a wide range of browsers and devices, including mobile phones and PDAs.
Using the Multi-Page Payment How is achieved by calling select.shtml
e.g. https://test.adyen.com/hpp/select.shtml
Optionally, the payment method selection page can be skipped, so the shopper starts directly on the payment details entry page. This is done by calling details.shtml instead of select.shtml. A further parameter, brandCode, should be supplied with the payment method chosen (please refer to the Integration Manual for more details).
3. xCreating A Skin In The Adyen CA
You can create, edit, upload, test, and publish your Skin in the Adyen CA.
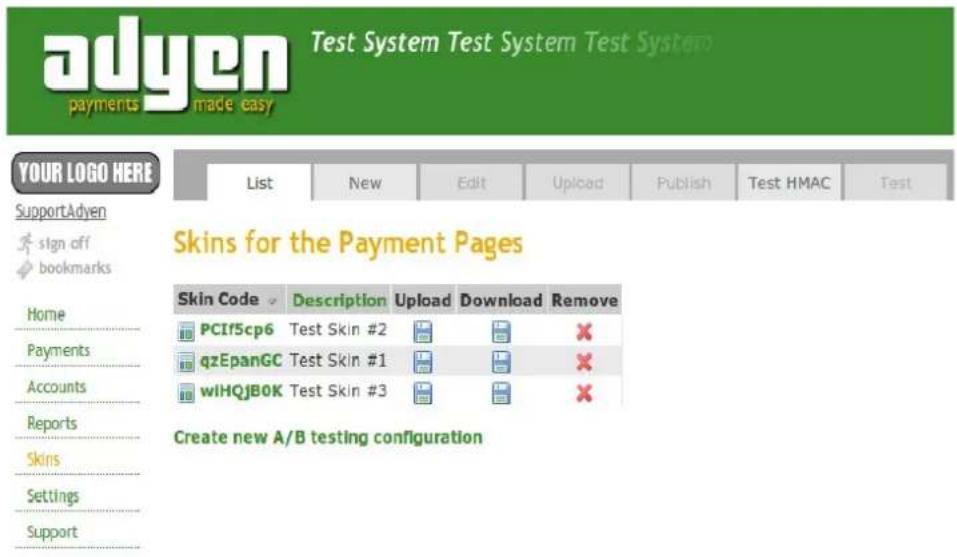
3.1. xSkin List Tab
The Skin List tab identifies all the Skins that have been created and are associated with the Company or Merchant account.
3.1.1. xCreating A New Skin
Click on the New tab and follow the instructions in section 2 below. You may further customise the Skin by manipulating the Skin files directly.
3.1.2. xEditing A Skin
You may edit a Skin by clicking on its Skin Code in the Skin List tab. This displays the Edit Skin configuration screen and populates the values that were entered when creating the Skin. The fields are editable; if a shared secret was set, the input field will be masked showing "****" rather than clear text.
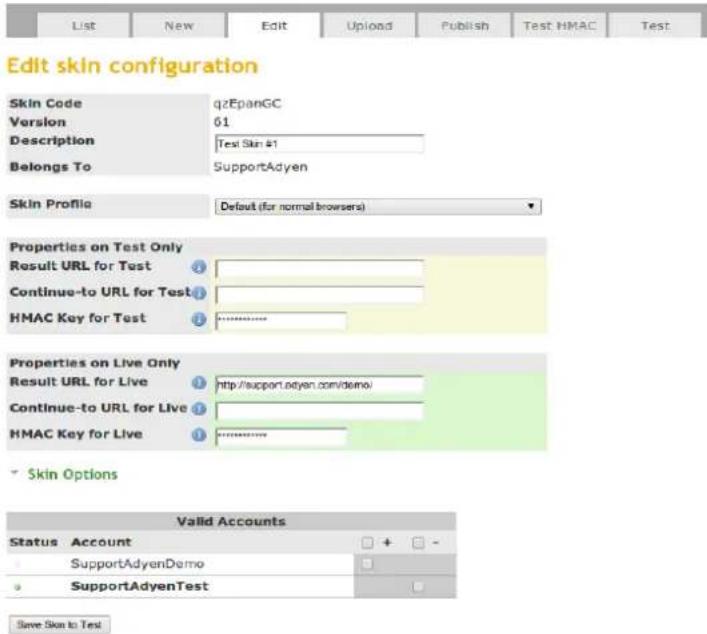
3.1.3. Uploading A Skin
Once you have modified the Skin files and saved it in a ZIP file (see chapter 4), it may be uploaded to the TEST system where it will be combined with the current UI Skin settings.

Upload Skin as ZIP file
Please select a ZIP file containing your Skin for upload. This step will not overwrite any data, and you will have a chance to review the result of your upload before publishing the Skin to the test system.
Skin Code qzEpanGC
Description Test Skin #1
Upload File Choose File No file chosen
(zip file, maximum size is 512Kb)
Submit
Click on the disc image in the Upload column. When uploading the ZIP file you will receive feedback on which files were accepted and which files were rejected. If, for instance, you attempted to upload a ZIP file with an incorrect directory structure, or that has a different SkinCode to its "root" directory, all files will be rejected. If you are satisfied that the accepted file list is correct you can confirm the result of the upload. Doing so will save the current upload with the current Skin settings to the TEST environment.
3.1.4. Downloading A Skin
Once you have created a Skin you may download the Skin to edit the files contained within it. Click on the disc image in the Download column; the system will display the Skin Code, the Description, and the File version for confirmation. Click the Download button to proceed with the download.
| List | New | Edit | Upload | Publish | Test HMAC | Test |
Download Skin
Press the download button to download this skin.
Skin Code qzEpanGC
Description Test Skin #1
Local Version 61
Download
3.1.5. Removing A Skin
If a Skin is no longer required you may delete it; the system will display the Skin Code, the Description, and the File version for confirmation. Click the Remove button to proceed with the deletion.
| List | New | Edit | Upload | Publish | Test HMAC | Test |
Remove Skin
To remove the skin, press the Remove button. After a skin is removed, it can not be restored again!
| Skin Code | qzEpanGC |
| Description | Test Skin #1 |
| Local Version | 61 |
Remove
3.2. Skin Configuration
A Skin is identified by a unique combination of eight digits and letters known as the Skin Code. It is a system generated field; in the rare instance that the randomly generated Skin Code contains an undesirable combination of characters you may generate a new Skin Code by clicking on the New tab again. Since the new Skin will not be saved until the Save Skin to Test button is pressed, you can safely repeat this a number of times.
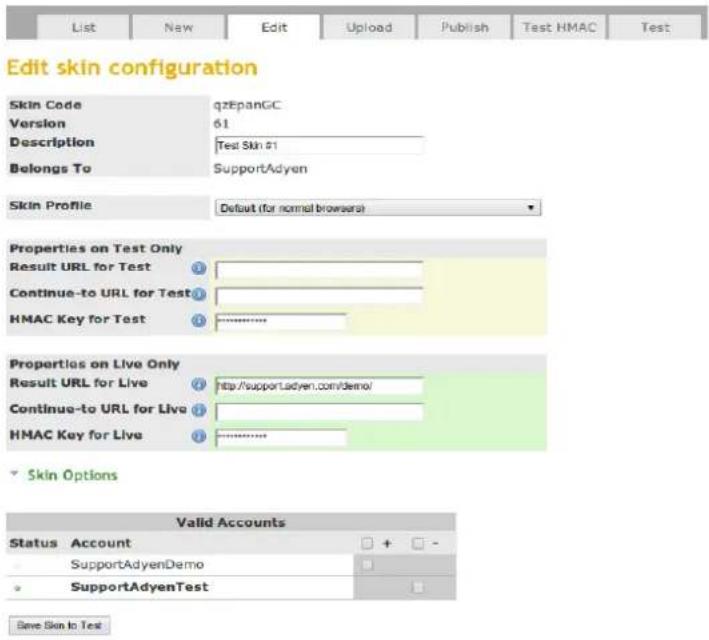
When creating a Skin you are prompted to specify the following Skin properties. The details for the LIVE environment are required when publishing the Skin to LIVE but not for initial testing within the TEST environment.
Description
A description of your Skin, to easily identify it should you have multiple Skins.
Account(s)
The merchant account(s) which will be able to process payments using the Skin.
HMAC Key
Specify the HMAC Key for each environment, the Key is used to compute the merchant signature. Please note the same Key cannot be used for both the TEST and LIVE environments (refer to Appendix B of the Adyen Merchant Integration Manual for more information).
Result URL OR Continue-to URL
The result URL is the URL where you host your payment result page. Customers will be taken to this address after they complete payment. We append parameters to the result URL to inform you of the status of the payment. Although not recommended it is possible to override the result URL on a per-payment basis. Please refer to the Adyen Merchant Integration Manual.
If the value of the result URL is not set, and if the resultURL parameter value is not passed with the Payment Request, the default Adyen result page will be used to display the payment result.
The continue-to URL is only applicable if you use the default Adyen result page to display the payment result to the customer. When the customer has seen the payment result, clicking on the Continue button will take them to this URL. Please note, payment status parameters are not appended to the Continue-to URL.
3.2.1. Skin Options
Clicking on Skin Options reveals less commonly used Skin options:
Skin Options
These less common options change the behaviour of the payment pages in certain situations.
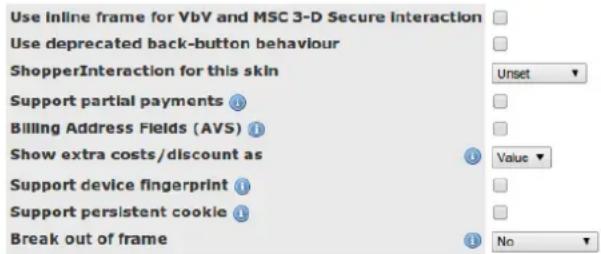
Use inline frame for VbV and MSC 3-D Secure interaction
For 3D secure payments the 3D window is iframed within the HPP.
Use deprecated back-button behaviour
The standard behaviour, when the consumer clicks the previous button on the HPP, is to redirect the consumer to the resultURL with authResult=cancelled. This option will perform the action browser minus 1, taking the consumer back to the previous page.
ShopperInteraction for this Skin
It is recommended that this option remains set to Unset, this will ensure that the system will select the correct shopper interaction to be used. In specific circumstances this setting may need to be changed, please contact the Support Team to discuss your needs.
Support partial payments
Enable partial payment for giftcards. This means that a shopper can pay a part of the transaction amount with their giftcard, the remaining amount can be paid with an other payment method.x
Billing Address Fields (AVS)
Displays the billing address input fields on the HPP for credit card payments. These will be used for AVS (address verification) in the UK, US and Canada if available. This data can be pre-populated (see the Integration manual for details).
Show extra costs/discount as
Adyen provides the ability to set a surcharge or discount per payment method. This option determines how the extra cost or discount is displayed on the payment method selection screen. "Cost" will display the extra cost (or discount) itself, e.g. "EUR 0.50 + 3.50%", or "3.50%". "Value" will display the calculated cost value, e.g. "EUR 4.50".
Break out of frame
You may decide to implement an iFrame solution, while this is supported, you should be aware that not all payment methods support iFrames, an example is iDeal.
This setting provides you with 3 options:
- Selecting No will disable breaking out of iFrames.
- Selecting Same window will open the redirect page in the same window.
- Selecting New Popup will result in the payment method redirect being opened within a popup screen. Once the shopper completes the payment flow, the popup will close and the session will continue within the iFrame.

Please note, the New Popup option is only available for a limited set of payment methods, please contact Support (support@adyen.com) for more information.
11 / 28
Skin Creation Manual
OneClick options
Use new OneClick layout
When this option is enabled the OneClick values will be displayed at the payment method itself, instead of at the top of the page. Please note, not all payment methods currently support the OneClick functionality.
OneClick Configuration
Configure which payment methods will display a 'store details' options to store the details for OneClick payments.
Airline specific options
Show airline data on payment pages
Displays the airline data fields on the HPP
Show airline fields on callcenter page
Displays the airline data fields on the callcenter page
POS specific options
Show POS fields on callcenter page
Displays the POS data fields on the callcenter page
3.2.2. Extra Options
**You must save the Skin before clicking on the any of the following settings.**
Payment Methods
The Payment Methods configuration gives you control over which payment methods will be shown by default, the order in which they are displayed, the minimum/maximum amounts that you want to accept per payment method, and if you want to charge a surcharge per payment method.

Manage Payment Methods
Skin Code qzEpanGC
Description Test Skin #1
Local Version 61
| Method | Name | Enabled | Min. Quantity | Max. Quantity | Options | Order |
| American Express | ✓ | |||||
| IDEAL | ✓ | |||||
| Electronic Direct Debit (DE) / Lastschrift (ELV) | ✓ | |||||
| VISA | ✓ |
adyen
Custom Fields
Custom fields are a powerful feature of the payment pages that allow you to add form fields to the HPP. These will be sent to you before final payment submission for approval; you may use this feature to capture any additional data or permissions that you may require, such as collecting shipping data, forcing the shopper to accept terms and conditions, or checking a validation code.
Any form field whose name attribute is prefixed with customfields. is considered to be a custom field. Custom fields are added as HTML to the page in an include file which is named customfields.txt (or a localised variant, e.g. customfields_NL.txt). See Appendix E-1 for an example.
The contents of the custom fields are sent as a SOAP Web Service request to a URL of your choice as configured using the Custom Fields link on the Edit Skin page. See Appendix E-2 for an example.
If you respond with [accepted] the payment is allowed to continue. If not, you can specify which fields failed validation and the validation messages to display. See Appendix E-3 for an example of the response. If you need to store this data you must do so at this point, the data cannot be sent to you via the Notification server.
Download Skin
Takes you to the Download Skin page as described above.
Remove Skin
Takes you to the Remove Skin page as described above.
Edit Language Files
The Adyen CA offers a visual interface in which to view and modify the text strings in the Adyen standard language set. Languages that are not part of the standard set can be added via the Skin resource file method explained in chapter 4.
With the Skin selected click the Edit Language Files link in the Extra Options section. A table is shown with the following fields:
•key
A unique identifier for the text string (e.g. button.continue).
- adyen default
The text string Adyen associates with the key (e.g. Continue).
- merchant default
The text string you associate with the key (if set); this overrides the Adyen default if set.
Set the Merchant default value for each key whose text you wish to change from the Adyen default and, when done, click the save button. It is important to ensure that you save every 5 minutes to avoid your session from timing out, resulting in a loss of any changes that have not been saved. Every time you save a new version of the Skin will be created.
For the -default- language the res/resource.properties file in the Skin will be created/updated each time you save.
To edit another language, choose its shopper locale from the Language drop-down list. A table is shown with the following fields:
•key
A unique identifier for the text string (e.g. button.continue).
- adyen default
The text string Adyen associates with the key (e.g. Continue).
• adyen [language] (e.g. adyen nl)
The text string Adyen associates with the key for the language chosen (e.g. Continue).
-merchant [language] (e.g. merchant nl)
The text string you associate with the key for the language chosen (if set). This overrides the Adyen default if set.
For each language you set merchant values for, a file called resources_[language].properties will be created in the res directory of the Skin. For example, if shopper locale nl is chosen, a file called resources_nl.properties in the res directory will be created.
Please note that language translations for new keys that Adyen introduces may not be immediately available in all languages.
Once you have completed editing the text string be sure to download the latest version of the Skin to your PC before making any further changes. This will ensure you have the updated Skin resource files.
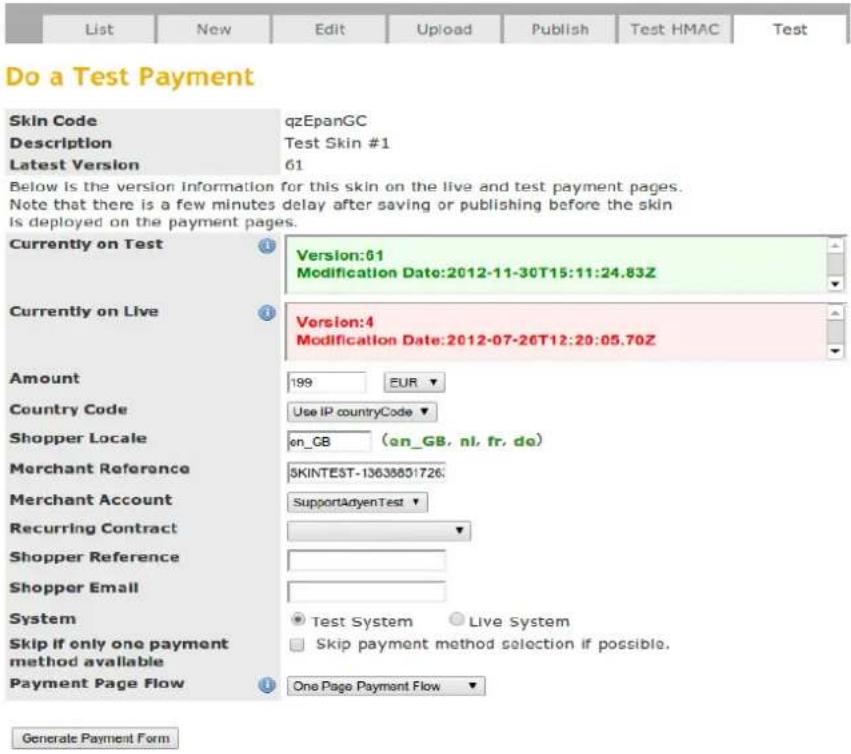
3.3. xTesting a Skin
It is possible to send a payment request to the HPP directly from the Skin editor. This is a very useful tool to quickly test the correct operation of the Skin and allows you to submit payments to the system prior to completing your integration with the HPP.
This page also shows you the versions of the Skin that are currently deployed on the TEST and LIVE HPP servers. There is always a delay between saving a Skin or publishing it to the LIVE server. When the Latest Version value corresponds with the Currently on Test or Currently on Live version, all the latest changes have been deployed to that system.
The test functionality is also useful in debugging any problems you may have with your integration since it produces a complete payment setup form against which you can compare your implementation.
4. Editing The Skin Files
This chapter covers the basics of editing the Skin files you downloaded from the Adyen CA. Adyen provides a number of example Skins should you need a reference or starting point. If your requirements are not too complex creating your Skin may simply consist of replacing a logo and one or two images.
4.1. Skin Files
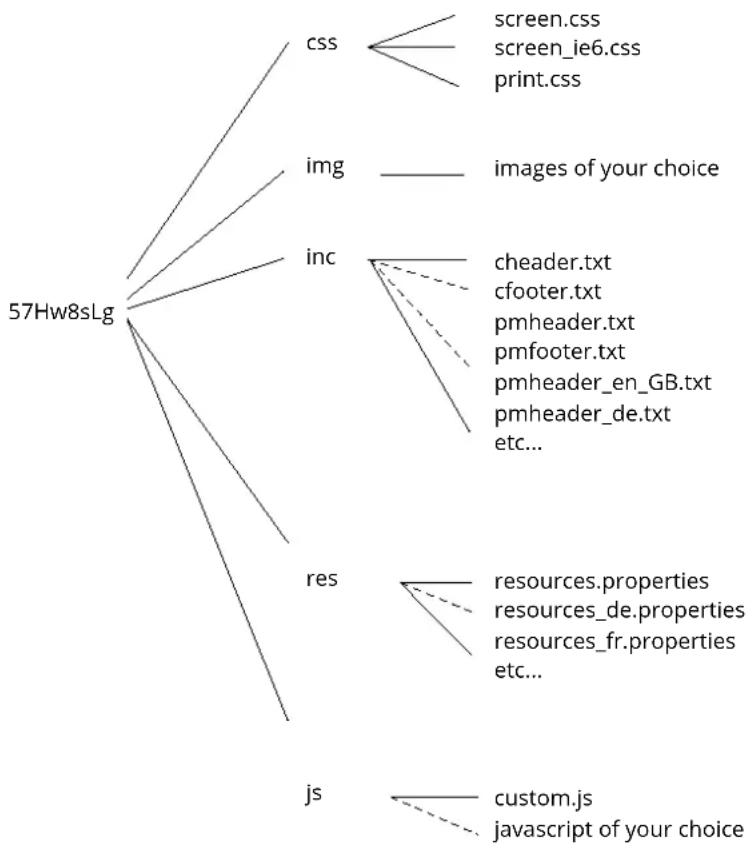
As described previously, a Skin is comprised of a number of files that are uploaded in the Adyen CA as a ZIP archive with the following structure (assuming that the SkinCode of your Skin is 57Hw8sLg):
flowchart
graph TD
    A["57Hw8sLg"] --> B["css"]
    A --> C["img"]
    A --> D["inc"]
    A --> E["res"]
    A --> F["js"]

    B --> G["screen.css"]
    B --> H["screen_ie6.css"]
    B --> I["print.css"]

    C --> J["images of your choice"]

    D --> K["cheader.txt"]
    D --> L["cfooter.txt"]
    D --> M["pmheader.txt"]
    D --> N["pmfooter.txt"]
    D --> O["pmheader_en_GB.txt"]
    D --> P["pmheader_de.txt etc..."]

    E --> Q["resources.properties"]
    E --> R["resources_de.properties"]
    E --> S["resources_fr.properties etc..."]

    F --> T["custom.js"]
    F --> U["javascript of your choice"]
The contents of the ZIP file must exactly match the layout above otherwise the file will not be accepted when uploading to the Adyen CA. File names and directory names are case sensitive and, as a rule, extra subdirectories are not allowed and filenames should be composed of simple characters ^2 .
Expected contents of each subdirectory:
•CSS
This directory contains the customised stylesheets which will be included in each page. The main stylesheet is screen.css which is valid for the media type "screen". Optionally you can also supply a print.css to format a print version of the page. The optional screen_ie6.css file is included conditionally in Microsoft Internet Explorer version 6 or lower as a workaround for some non-standard interpretations of the CSS stylesheet standard. See Appendix B for details on how the stylesheets are included in the pages.
adyen
•img
Any images referenced in the stylesheets or HTML include files can be uploaded via this directory. Filenames should be composed of simple characters.
-inc
You may provide custom HTML content such as menus, shop links, navigation, etc. This directory contains the HTML fragments that enable you to do so. If an included file is language dependent it is possible to supply an include for each language locale. For details of where these includes are inserted in the page see Appendix B.
•res
This directory contains files named resources_\$localename.properties with text overrides for the text in payment pages. The main file is resources.properties which overrides the default string (language locale en_GB). For overriding a string in French you create file resources_fr.properties. The format of the resource files, as well as the allowed overrides, are described below.
·js
This directory contains the javascript code for the Skin, any custom javascript should be added to the custom.js file which is included on each page.
4.2. xGetting The Look Right
Adyen has created a HTML framework which, when combined with the Skin files, forms the HPP. The framework was designed to provide the maximum amount of flexibility when designing and creating your layout.
Appendix B shows the HTML skeleton which generates each page and indicates where each element of the Skin files are represented. Appendix C shows a visualisation of the HTML skeleton. However when the default flow model is modified using a stylesheet virtually any layout can be created.
4.2.1. xThe "reset.css" Stylesheet
If you examine the HTML in Appendix B you will see that the first stylesheet included is reset.css. This stylesheet is always included to "nullify" the default HTML styling applied by the browser. Default styling can vary between browsers, so applying the reset.css stylesheet makes it much easier to create a layout which renders consistently across browsers. The source listing for reset.css is in Appendix D ^3 .
4.3. xCreating And Editing Translations: Skin Resource File
Skin resource files can be created manually in the Skin. This method may be used for adding languages not supported in the Adyen CA. Refer to Appendix A for the standard language set. When creating the files you state the key name and it's value, for example button.continue=continue. The set of keys (with default values) can be seen via the Adyen CA (see above) or by navigating to our support website at https://support.adyen.com/ and searching for Language Translations.
The resource files use the Latin 1 (ISO 8859-1) encoding but it is recommended that you treat them as US-ASCII only. This means that any character that is outside the US-ASCII set should be encoded in Unicode using the notation \u + UTF-16 code point. Thus “é” becomes "\u00e9" and “R” becomes "\u0158".
File names are resources.properties for the default locale (en_GB). For other languages the locale is included in the filename as resources_fr.properties for French and resources_en_US.properties for US English.
4.4. xCustom Payment Methods
Adyen offers an option to display custom payment methods on your payment page. Please see the Adyen Merchant Integration Manual for more details.
After the Support Team has configured your custom payment method you can set a custom payment method button and a custom payment method name. A custom payment method will always start with c_. For example your custom payment method is c_customPaymentMethod.
4.4.1. xButton Image
To change the button image that is displayed for a standard payment method or to add the image of your custom payment method, you must add the image file to the img directory of your Skin. You will then need to add an extra style to your screen.css file. The syntax of this style is:
.pmB
For example, if your custom payment method name is c_mycustomPayment and you have added an image file mycustomPayment.png to the img directory of your Skin, the style that you should add to your screen.css file is:
.pmBc_mycustomPayment { background-image: url("../img/mycustomPayment.png") !important; }
4.4.2. xButton Name
The button name of your custom payment method must be added to the resources.properties file. If you require specific translations for different languages these may also be added to the resource files.
The syntax for the button name is:
pm.
For example, if your custom payment method is c_mycustomPayment the entry in your resource file would be:
pm.c_mycustomPayment.buttonName=My Custom Payment Method Name
4.4.3. xCustom favicon.ico
To override the default icon which is displayed in the URL area when on the payment pages place your favicon.ico file ^4 in the img directory of the Skin. It will be picked up automatically by the payment pages.
4.5. xPayment Detail Reminder Email
Please see the Adyen Email Manual for more details about using and Skinning the payment detail reminder email.
5. A/B Testing
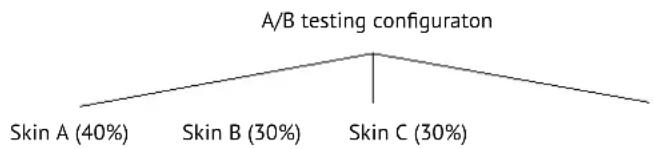
To analyse and optimise the conversion rate the Adyen HPPs support A/B testing. To create an A/B testing configuration click the Create new A/B testing configuration link on the List tab; enter the Description and HMAC key, and then click the Create New A/B configuration on TEST button. The system will generate a new wrapper Skin Code and return you to the List tab.
Once you have created an A/B testing configuration, it must be updated to set the Skins to use and the distribution of payment requests. Click the A/B testing configuration Skin Code to edit the settings as you would with a regular Skin. From the Edit A/B testing configuration screen click Configure Distribution to configure how the shoppers are distributed between the different regular Skins. The Skin Codes that are available are listed in the Deselected Skins column, select the Skin Codes that are to be used and click the --> arrow to move them to the Selected Skins column. You will note that as you add each Skin the percentage distribution appears to the right of the Skin Codes and a slide scale appears below it, so that you can adjust the distribution. There is a slider for each Skin.
flowchart
graph TD
    A["A/B testing configuraton"] --> B["Skin A (40%)"]
    A --> C["Skin B (30%)"]
    A --> D["Skin C (30%)"]
5.1. Setting Up The Payment
When you want to use A/B testing use the Skin Code and HMAC key of the A/B testing configuration to set up a payment session. When the shopper reaches the HPP the Skin Code of the A/B testing configuration is randomly replaced by one of the Skins configured within it.
5.2. Payment Completion
Due to the Skin Code of the A/B testing configuration being replaced by one of the configured Skins, once the shopper reaches the HPP the remainder of the payment session will continue as if the regular Skin Code was submitted in the payment session request. As such, the Skin Code and HMAC key of the regular Skin will be used in the result URL.
5.3. View Results
After running the A/B test for the necessary period of time you can view the results and start analysing them. This is done by navigating to the Reports menu, Conversion tab, and then selecting the Skin Comparison option in the Adyen CA.
6. Publishing The Skin To LIVE
If you are satisfied with the way the Skin operates on the TEST system you can publish the Skin to the LIVE system. Please note, the publish-to-live operation does not change any settings, it replicates the Skin as it is on the TEST environment to the LIVE environment.
Ensure that the relevant fields in the Properties on Live Only have been populated and click the Save Skin to Test button. Click the Publish tab.
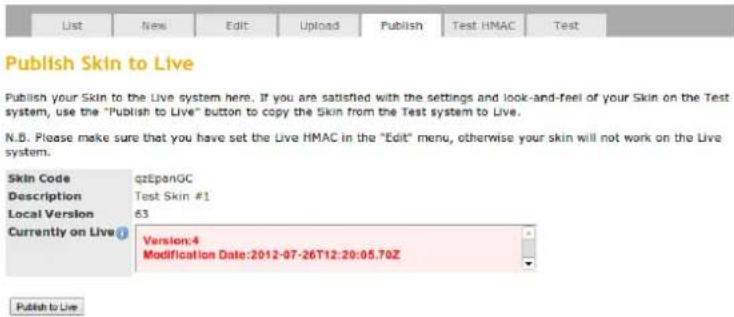
Click the Publish to Live button.
7. Getting Started With Customisations
When the Skin is generated, the default settings render as follows:

Step 1: Please select your payment method
Total payment amount EUR 1.99

Credit Card

DIRECTebanking

Lastschrift (ELV)

Bank Transfer (DE)
Once you have downloaded the Skin you can edit the files and directories to customise it; here are some quick changes that you can easily implement.
7.1. How To Change The Header Image
- Save the header image that you want to use in the img directory of the Skin files
- Update the screen.css file to reference your header image;
<h1 id="logoheader">logoheader:</h1>
{
    height: 118px;
    background: url("../img/<imageName>");
    background-position: left;
    background-repeat: no-repeat;
    background-color: white;
}
7.2. How To Change The Payment Method Logos
- Save the logos you want to use in the img directory of the Skin files
- Update the screen.css file to override the .pmB element as shown:
.pmB<paymentMethodName>
{
    background-image: url("../img/<imageName>");
    width: 400px;
    height: 42px;
    padding-left: 85px;
    text-align: left;
    margin-bottom: 6px;
    font-size: 1.1em;
    background-color: transparent !important;
}
7.3. How To Change The Font Colours
- Update the screen.css file to set the fonts you want to use:
html
{
    font-family: Arial, Helvetica, sans-serif;
    font-size: 1.1em;
}
7.4. How To Change The Pay Button
- Save the logos you want to use in the img directory of the Skin files
- Update the screen.css file to add the following line to the .paySubmit block:
.paySubmit
{
    background: url("../img/<imageName>");
    background-repeat: no-repeat;
    height: 16px;
    width: 50px;
    font-size: 0px;
    border: 0px;
}
7.5. How To Automatically Open The Credit Card Payment Option
- Open the cfooter.txt file that is saved in the inc folder of the Skin files
- Add the following script to the file and save:
</div>
<script type="text/javascript">
    if (collapsecard) {
    setTimeout(function() {
    show(collapsecard, 'completeCard.shtml', 'card', 'brandCodeUndef');
    }, 1000);
    }
</script>
Appendix A: Standard Set of Languages
| Language ShopperLocale Language ShopperLocale | |
| Chinese - Traditional zh Greek el | |
| Czech cz Hungarian hu | |
| Danish da Italian it | |
| Dutch nl Lithuanian li | |
| English - British* en_GB Norwegian | no |
| English - Canadian | en_CA |
| English - US | en_US |
| Finnish | fi |
| French | fr |
| French - Belgian fr_BE Spanish | |
| French - Canadian | fr_CA |
| French - Swiss | fr_CH |
| Frisian | fy_NL |
| German | de Ukrainian |
* British English is the default shopperLocale
Appendix B: Payment Page HTML Skeleton
<!DOCTYPE html PUBLIC "-//W3C//DTD XHTML 1.0 Strict//EN"
"http://www.w3.org/TR/xhtml1/DTD/xhtml1-strict.dtd">
<html xmlns="http://www.w3.org/1999/xhtml" xml:lang="en">
<head>
    <meta http-equiv="Content-Type" content="text/html; charset=utf-8" />
    <title>Page Title</title>
    <link rel="stylesheet" media="screen" type="text/css" href="/hpp/css/reset.css" />
    <link rel="stylesheet" media="screen" type="text/css" href="/sf/$SkinCode/css/screen.css" />
    <link rel="stylesheet" media="print" type="text/css" href="/sf/$SkinCode/css/print.css" />
    <script type="text/javascript" src="/hpp/js/default.js"></script>
    <script type="text/javascript" src="/sf/$SkinCode/js/custom.js"></script>
    <!--[if lt IE 7]>
    <link rel="stylesheet" type="text/css" href="/sf/$SkinCode/css/screen_ie6.css" />
    <!--[endif]-->
</head>
<body>
    <!--### inc/cheader_[locale].txt or inc/cheader.txt (fallback) ### -->
    <form id="pageform" action="" method="post" onsubmit="return formValidate(this);">
    <script type="text/javascript">
    //![CDATA[
    if (notNull(document.getElementById('pageform')) {
        document.getElementById('pageform').setAttribute("autocomplete", "off");
    }
    //]]>
    </script>
    <div id="content">
    <div id="pmcontent">
    <!--### inc/pmheader [locale].txt or in/pmheader.txt (fallback) ### -->
    <div class="padDiv1"></div>
    <!--========== -->
    <!-- Adyen Main Content -->
    <!--========== -->
    <div class="padDiv2"></div>
    <!--### inc/pmfooter [locale].txt or inc/pmfooter.txt (fallback) ### -->
    <!--### inc/customfields_[locale].txt or inc/customfields.txt (fallback) ### -->
    </div>
    </div>
    <div id="foot">
    <div id="footc">
    <div id="nextstep">
    <div id="nextstepc">Next Step Text</div>
    </div>
    <div id="footerb1div">
    <input onclick="" type="submit" id="mainSubmit" value="continue" class="footerB
    </div>
    <div id="footerb2div">
    <input onclick="" type="button" id="mainBack" value="previous" class="footerB
    </div>
    </div>
    </div>
    </div>
    </form>
    <!--### inc/cfooter_[locale].txt or inc/cfooter.txt (fallback) ### -->
</body>
</html>
*[locale] is the locale specified in the payment setup as shopperLocale (see Adyen Merchant Integration Manual)
Appendix C: Visualisation of the HTML Structure
include:cheader #content include:pmheader #pmcontent .paddiv1 adyen payment content .paddiv2 include:pmfooter #foot #nextstep #footerb1div #footerb2div include:cfooter Appendix D: reset.css Listing
@media screen {
    /* Don't forget to set a foreground and background color */
    /* on the 'html' or 'body' element! */
    html, body, div, span, applet, object, iframe, h1, h2, h3, h4, h5, h6, p, blockquote, pre, a, abbr, acronym, address, big, cite, code, del, dfn, em, font, img, ins, kbd, q, s, samp, small, strike, strong, sub, sup, tt, var, dd, dl, dt, li, ol, ul, fieldset, form, label, legend, table, caption, tbody, tfoot, thread, tr, th, td
    {
    margin: 0;
    padding: 0;
    border: 0;
    font-weight: inherit;
    font-style: inherit;
    font-size: 100%;
    line-height: 1;
    font-family: inherit;
    text-align: left;
    vertical-align: baseline;
    }
    a img,: link img,: visited img {
    border: 0;
    }
    table {
    border-collapse: collapse;
    border-spacing: 0;
    }
    ol, ul {
    list-style: none;
    }
    q: before, q: after, blockquote: before, blockquote: after {
    content: "";
    }
}

@media print {
    .hideforprint { display: none;}
/* Some Layout Shortcuts */
.r { text-align: right; }
.l { text-align: left; }
.fr { float: right; }
.fl { float: left; }
.b { font-weight: bold; }
.mid { vertical-align: middle; }
.red { color: #c00; }
Appendix E: Custom Fields
E-1: customfields.txt
<table id="basetable">
    <tr>
    <td>
    <div class="fieldDiv">
    <input type="checkbox" name="customfields.subscribe"
    id="customfields.subscribe" value="true" CHECKED/>Next<br />
    <input type="name" name="customfields.email" id="customfields.email" value=""/> Email address<br />
    </div>
    </td>
    </tr>
</table>
E-2: SOAP Request
<?xml version="1.0" encoding="UTF-8"?>
<soap:Envelope xmlns:soap="http://schemas.xmlsoap.org/soap/envelope"
xmlns:xsd="http://www.w3.org/2001/XMLSchema" xmlns:xsi="http://www.w3.org/2001/XMLSchema-instance">
<soap:Body>
<check xmlns="http://customfields.services.adyen.com">
<Request>
<customFields>
<CustomField>
<name>subscribe</name>
<value>true</value>
</CustomField>
<CustomField>
<name>VAT</name>
<value>NLXXXB01</value>
</CustomField>
</customFields>
<merchantAccount>YourMerchantAccount</merchantAccount>
<merchantReference>YourMerchantReference</merchantReference>
<sessionFields>
<sessionField>
<name>skinCode</name>
<value>wjCP5yTj</value>
</sessionField>
<sessionField>
<name>countryCode</name>
<value>NL</value>
</sessionField>
<sessionField>
<name>paymentAmount</name>
<value>550</value>
</sessionField>
<sessionField>
<name>currencyCode</name>
<value>EUR</value>
</sessionField>
<sessionField>
    <name>shopperEmail</name>
    <value>test@test.com</value>
</sessionField>
<sessionField>
    <name>shopperReference</name>
    <value>user1234</value>
</sessionField>
</sessionFields>
</Request>
</check>
</soap:Body>
</soap:Envelope>
E-3: SOAP Response
<?xml version="1.0" encoding="UTF-8"?>
<SOAP-ENV:Envelope xmlns:SOAP-ENV="http://schemas.xmlsoap.org/soap/envelope/"
xmlns:ns1="http://www.customfields.services.adyen.com">
<SOAP-ENV:Body>
<ns1:checkResponse>
<ns1:response>
<ns1:customFields/>
<ns1:response>[accepted]</ns1:response>
<ns1:sessionFields/>
</ns1:response>
</ns1:checkResponse>
</SOAP-ENV:Body>
</SOAP-ENV:Envelope>