L22LID628E - Television Logik - Free user manual and instructions
Find the device manual for free L22LID628E Logik in PDF.
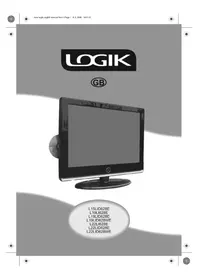


| Product Type | LCD TV with built-in DVD player |
| Brand | Logik |
| Model | L22LID628E |
| Screen Size | 22 inches (55.9 cm) |
| Resolution | 1680 x 1050 pixels |
| Contrast Ratio | 700:1 |
| Brightness | 300 cd/m² |
| Audio Output (RMS) | 2 x 1.5 W |
| Power Supply | 100-240V, 47-63 Hz, 1.5A |
| Dimensions (with stand) | 537 x 439 x 180 mm |
| Dimensions (without stand) | 537 x 394 x 80 mm |
| Net Weight | 6.9 kg |
| Gross Weight | 8.3 kg |
| Video Inputs | RF, SCART, Component (YPbPr up to 1080i), HDMI (up to 1080i), VGA (PC) |
| Audio Inputs | PC audio (3.5mm jack), RCA for Component |
| DVD Playback | Region 2, supports DVD, SVCD |
| Tuner | Analog and Digital (Freeview) TV |
| Teletext | Analog and Digital Teletext |
| Parental Control | Password-protected channel and DVD rating lock |
| Wall Mount Compatible | VESA 100 (for 22" models) |
| Accessories Included | Remote control, RF lead, AAA batteries, User Guide, Quick Start Guide |
| Cleaning Instructions | Use a dry or slightly damp cloth; do not use alcohol-based cleaners |
| Safety Warning | No user-serviceable parts; do not expose to moisture or place naked flames near the TV |
Frequently Asked Questions - L22LID628E Logik
User questions about L22LID628E Logik
0 question about this device. Answer the ones you know or ask your own.
Ask a new question about this device
Download the instructions for your Television in PDF format for free! Find your manual L22LID628E - Logik and take your electronic device back in hand. On this page are published all the documents necessary for the use of your device. L22LID628E by Logik.
USER MANUAL L22LID628E Logik
L15LID628E
L19LI628E
L19LID628E
L19LID628WE
L22LI628E
L22LID628E
L22LID628WE


Warnings
Thank you for purchasing this television. For your safety, please take time to read these instructions carefully in order to familiarise yourself with the operation of the appliance and the important safety information. We strongly recommend that this product is installed by a competent person. If in doubt, refer to the retailer or the manufacturer helpline.
Caution
This television contains no user serviceable parts. Please refer to the manufacturer or authorised repair agent in the event of malfunction. Do not remove the back cover from the television.
Warning
To reduce the risk of fire, electric shock or damage to the television, do not expose it to dust, rain or moisture, or place any objects filled with liquids on or near the television.
Do not place the television in a confined space, ensure that nothing can obstruct the ventilation openings at the rear of the television.
Do not place naked flames on or near the television.
Dispose of this television and any components including batteries in an environmentally friendly manner. If in doubt, please contact your local authority for details of recycling.
Your LCD TV should be cleaned using a dry or slightly damp cloth. You should not use an alcohol based cleaner.
Safety
For your safety, this appliance is fitted with a fused moulded 3 pin mains plug. Should the fuse need to be replaced, ensure that any replacement is of the same amperage and approved with the BSI mark.
Never try and replace the mains plug unless you have adequate qualifications and are legally authorised to do so. In the event that a replacement mains cable is required, contact the manufacturer for a suitable replacement.
Never use the television if it is damaged in any way.
Always place the television on a flat level surface avoiding anywhere which may be subject to strong vibration. Ensure the television is not placed on top of the power cable as the weight of the television may damage the cable and cause a safety hazard.
Never place mobile phones, speakers or any other device which may cause magnetic or radio interference with the television. If interference is apparent, move the device causing the interference away from the television.

Safety Warnings
Warnings
Screen Burn
A characteristic of Plasma and LCD TV Panels is that displaying the same image for a long time may cause a permanent after-image to remain on the screen. This is called screen burn. Most pictures shown on your TV will be constantly moving and fill the screen.
Examples of images that you need to watch out for are as follows (this is not an all-inclusive list):
• TV Channel Logos: e.g. Shopping channel logos and pricing displays - especially if they are bright and stationary. Moving or low-contrast graphics are less likely to cause ageing of the screen. • Picture-in-Picture and Multi Picture-in-Picture: Do not view for long periods of time using the Picture-in-Picture or Multi Picture-in-Picture functions. • Time Displays • Teletext: Do not view a stationary page for long periods of time. • TV/DVD Menus: e.g. Listings of DVD disk content. • Pause Mode: Do not leave the TV in pause mode for long periods of time, e.g. when watching DVDs or videos.
Note: To prevent screen burn if viewing any of the above for long periods of time, reduce contrast and brightness when viewing. Once burn-in occurs it will never disappear completely.


Contents
■ Chapter 1 Introducing the LCD TV
Getting Started 4 - 5
■ Chapter 2 Installing the LCD TV
Remote Control Buttons 6 - 7 TV Buttons & Source Menu 8 Inputs & Connections 9
■ Chapter 3 Using The Features
Video Menu 10 - 13 Audio Menu 14 - 15 TV Menu 16 - 18 Setup Menu 19 - 23 Parental Menu 24 Program Guide & Digital Text 25 - 26 TV Text 27 Connecting to a PC 28 - 29 Menu 30 - 31 DVD Menu 32 - 41 Wall Mounting 42 With Sky Digital 43 - 44
Troubleshooting
Frequently Asked Questions 45
Specifications
Technical Specification 47 Index
Study Warnings
Producing the LED TV
Installing the LCD TV
using the resources
Touleschooling
soulouyeds
What is included in the box

Accessories
Included with this TV are the following accessories:
1x - User Guide Book
1x - Remote control


Part No.: EMU/MAN/0001
Part No.: EMU/RMC/0002 with DVD
EMU/RMC/0003 without DVD
1x - RF lead
2x - AAA batteries


Part No.: RMU/CAB/0026
Part No.: RMU/BAT/0001
1x - Quick Start Guide
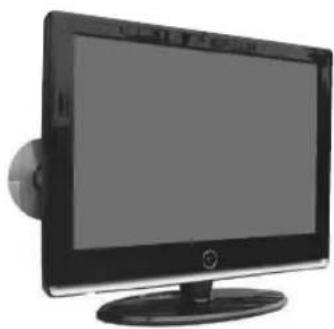
1x - TV

Part No.: EMU/QSG/0001
If you experience any problems with this Television, please contact the helpline.
Customer Support/Technical Helpline
Sky Media UK LTD
Telephone: 0870 242 6292 | Email: service@skymediauk.co.uk
Getting Started - Initial Set Up
IMPORTANT - AFTER TUNING, DO NOT PRESS ANY BUTTONS FOR 20 SECONDS SO THE CHANNEL INFORMATION CAN BE STORED.
TUNING IN TV
IMPORTANT — Please ensure the TV has reached room temperature before connecting the power for the first time.
1) Connect the mains lead to your electrical outlet and switch on the TV using the switch next to where the power cable goes into the TV.

2) Connect the RF cable supplied to the 'RF IN' on the rear of the TV and connect the other end of the cable to your TV aerial outlet.

3) Install batteries in the remote control and press the [POWER] button to turn on the TV.
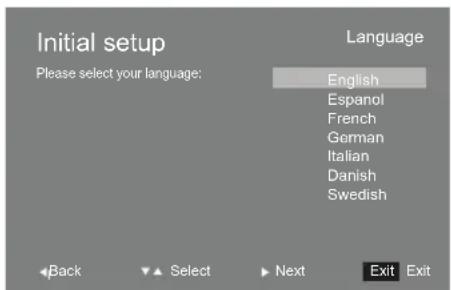
The 'Initial Set up' menu should now appear.
4) Press [OK] on the remote control.

5) Select the required language then press [OK].
Getting Started - Initial Set Up
6) Select country then press [OK].

7) Press [OK] and tuning will take place.

8) After tuning a screen will appear to confirm tuning is complete.
Press [OK] and you can now watch TV.
Important - Due to signal strength variations across the EU for Digital TV, please note that not all of the channels/services may be available in your region. Over the coming months as coverage increases, more services and channels may become available. In the event of poor reception in either Analogue TV or Digital TV (DVB) it may be necessary to install a signal 'booster' to enhance reception. For Digital/Freeview TV (DVB) you may need to upgrade your aerial to a High Gain Digital version.
Ideal set up for optimum picture
![graph TD A["Computer"] --> B["Signal Booster"] B --> C["Aerial Wall Socket"] C --> D["Aerial"] style A fill:#f9f,stroke:#333 style D fill:#bbf,stroke:#333](/content/2026/05/1129142/images/c85c85ff293a1fd30db9ea76fdbb91589c5bffb4593da013af7897e4f85d46b0.jpg)
Remote Control Buttons


DVD mode: Press to eject disc TV mode: Press to increase channel on favorite list

DVD mode: Press to play or pause DVD TV mode: Press to activate subtitles

DVD mode: Press to stop DVD TV mode: Press to open EPG

DVD mode: Press to play a DVD program in fast forward mode.

DVD mode: Press to play a DVD program in fast rewind mode.

DVD mode: Press to advance forward to the next chapter.

DVD mode: Press to replay the current program from the previous chapter.
1
Power
Switches on LCD TV when in Standby mode or vice versa
2 – These buttons only work when on an analogue TV channel (Channels 901 upwards)
TXT
Opens Teletext mode
MIX
Changes the background so you can see the channel you are watching underneath the text information
SIZE
Alters the size of the text
INDEX
Requests the index page
HOLD
Press hold on or off for current page display.
REVEAL
To reveal or hide the hidden words
SUBCODE
Sub coded page access. To switch the dialogue at the bottom of the screen
CANCEL
Cancels the action
3
NUMBER BUTTONS
Press the number buttons to select the channel and wait 2 seconds for the channel to change. Also work as alphabet buttons as required.
TIMER
Displays the current time
O
Return to the previous channel viewed
Remote Control Buttons
4
+P
Lets you change the picture mode presets between User -> Cinema -> Sport -> Vivid -> Hi-Bright -> Standard
+SH
Switch between the different present sound options Off -> Rock -> POP -> Live -> Dance -> Techno -> Classic -> Soft
VOL +/-
Press to increase/decrease the sound level
CH +/-
Press to increase/decrease the channel
Sleep
Activates the sleep mode, continue to press until required time is selected
Display
Press to display the source and channel information
5
MENU
Press to open the OSD Menu
MUTE
Press to mute the sound and press again to restore
NAVIGATION BUTTONS (◀,▶,▲,▼, OK)
Allows you to navigate the on screen menus and adjust the system settings to your preferences
SOURCE
Press to bring up the source menu
EXIT
Press to exit the OSD Menu
6
FREEZE
Press and the picture will be frozen and pushing this key again the picture will return.
ZOOM/STRETCH
Press to change the picture format of the screen
|/||
Press to switch the modes of sound processing
FAV
Press to display favorite menu.
7 – Buttons that relate to DVD features are only for use on TV with a built-in DVD player
DVD-M / Add/Erase
DVD mode: Press to enter the disc menu
TV mode: Add or erase program from favorite list
RED / SETUP
TV mode: For opening Digital Teletext and operating digital and analogue Teletext
DVD mode: Press to opening DVD OSD menu
GREEN / REPEAT
TV mode: For operating digital and analogue Teletext
DVD mode: Press to set a chapter so that it repeats
YELLOW / SUB-T
TV mode: For operating digital and analogue Teletext
DVD mode: Press to select caption when playing DVD or SVCD that has multiple captions.
BLUE / AUDIO
TV mode: For operating digital and analogue Teletext
DVD mode: During DVD or SVCD playback, press it repeatedly to select audio language.
TV Buttons & Source Menu

SIDE PANEL BUTTONS
| 1 | DVD – Eject |
| 2 | DVD – Stop |
| 3 | DVD – Play/Pause |
| 4 | Select the input source |
| 5 | Channel down |
| 6 | Channel up |
| 7 | Volume down |
| 8 | Volume up |
| 9 | OSD (On Sreen Display) Menu |

Choosing Mode/Source
To switch between the different connections is very easy.
1) Press [SOURCE] - The following will appear
Screen varies by model.
| SOURCE MENU |
| √ TV/FREEVIEW |
| DVD |
| HDMI |
| SCART |
| COMPONENT |
| PC/VGA |
2) Press [V] or [A] to select the input you require. 3) Press [OK]
Connecting HD Ready Devices
There are two options for HD.
1) By connecting via HDMI cable (not included) – this provides both HD picture and sound. 2) By connecting via Component (YPbPr) cable (not included) – this provides HD picture. Source should be set to YPbPr.
Inputs & Connections
REAR CONNECTIONS

![graph TD A["RF In"] --> B["AUDIO L/R In"] B --> C["Component"] C --> D["PC Audio"] D --> E["SCART"] E --> F["VGA (PC)"] F --> G["HDMI"] H["Use to connect to TV"] --> I["Aemia to receive analog TV or Digital Functions TV electrons"] J["Use for component connection (HD)"] --> C](/content/2026/05/1129142/images/0d2137e27f116ba227972201077f1785ac130c4f1d8799b653935091605aee2b.jpg)
| A | RF In | RF input |
| B | AUDIO L/R In | Audio input |
| C | Component | Component (YPbPr) input |
| D | PC Audio | PC Audio input |
| E | SCART | SCART input |
| F | VGA (PC) | VGA (PC) input |
| G | HDMI | HDMI input |
TV Menu Operation
VIDEO MENU
This menu lets you alter all the aspects that relate to the picture settings to enhance the viewing experience.
Selecting Picture Mode
Lets you change the picture mode presets between User -> Cinema -> Sport -> Vivid -> Hi-Bright -> Standard.
1) Press [MENU] to enter menu. 2) Press [>] to enter Video Menu. 3) Picture Mode should be highlighted. 4) Press [>] to change between the different options.

5) Press [EXIT] to exit.
Adjusting Brightness
Increase or decrease the brightness of the picture.
1) Press [MENU] to enter menu. 2) Press [>] to enter Video Menu. 3) Press [V] to highlight Brightness. 4) Press [>] to increase the brightness or [<] to decrease the brightness.
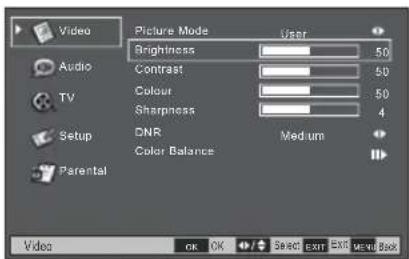
5) Press [EXIT] to exit.
TV Menu Operation
Adjusting Contrast
Adjust the balance between black & white and vivid.
1) Press [MENU] to enter the menu. 2) Press [>] to enter the Video Menu. 3) Press [V] to highlight Contrast. 4) Press [>] to make the picture more vivid or [<] to make the picture more black & white.

5) Press [EXIT] to exit.
Adjusting Colour
Increase or decrease the Red, Green & Blue which make up the picture.
1) Press [MENU] to enter the menu. 2) Press [>] to enter the Video Menu. 3) Press [V] to highlight Colour. 4) Press [>] to increase the colour or [<] to decrease the colour.

5) Press [EXIT] to exit.
TV Menu Operation

VIDEO MENU
Adjusting Sharpness
Increase or decrease the sharpness of the picture. If you have a poor signal strength you should reduce the sharpness to get a better picture.
1) Press [MENU] to enter the menu. 2) Press [>] to enter the Video Menu. 3) Press [V] to highlight Sharpness. 4) Press [>] to increase the sharpness or [<] to decrease the sharpness.

5) Press [EXIT] to exit.
Dynamic Noise Reduction
Reduces the interference in the picture. Medium -> Strong -> Auto -> Off -> Low
1) Press [MENU] to enter the menu. 2) Press [>] to enter the Video Menu. 3) Press [V] to highlight DNR. 4) Press [>] to switch between the different options.

5) Press [EXIT] to exit
TV Menu Operation
Adjusting Colour Balance
Select between the different preset colour balance options or adjust manually. User -> Cool -> Standard -> Warm
1) Press [MENU] to enter menu 2) Press [>] to enter Video Menu 3) Press [V] to highlight Colour Balance

4) Press [>] to enter menu
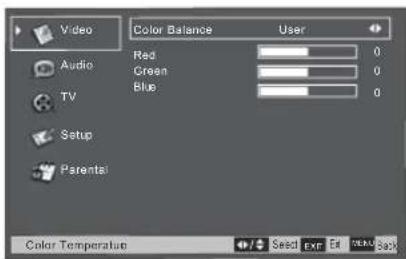
5) Press [>] to switch between the different presets or move down and adjust the red, green and blue manually. 6) Press [EXIT] to exit
TV Menu Operation
AUDIO MENU
This menu lets you alter all the aspects that relate to the audio settings to enhance the viewing experience
Adjusting Balance
To switch the sound between the left and right speakers
1) Press [MENU] to enter menu 2) Press [V] to highlight Audio Menu 3) Press [>] to enter Audio Menu 4) Balance should be highlighted 5) Press [>] to move to the right and [<] to move to the left
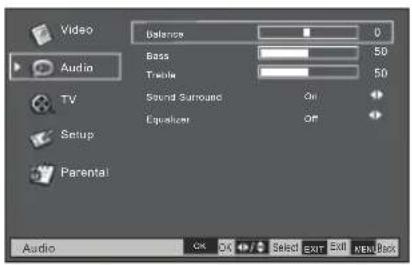
6) Press [EXIT] to exit
Adjusting Bass
To increase or decrease the low frequency part of the sound.
1) Press [MENU] to enter menu 2) Press [V] to highlight Audio Menu 3) Press [>] to enter Audio Menu 4) Press [V] to highlight Bass 5) Press [>] to increase the bass and [<] to decrease the bass
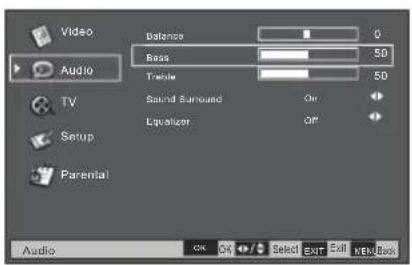
6) Press [EXIT] to exit
TV Menu Operation
Adjusting Treble
To increase or decrease the high frequency part of the sound.
1) Press [MENU] to enter menu 2) Press [V] to highlight Audio Menu 3) Press [>] to enter Audio Menu 4) Press [V] to highlight Treble 5) Press [>] to increase the treble and [<] to decrease the treble

6) Press [EXIT] to exit
Surround Sound
This provides virtual surround sound so the sound appears to be coming from around you.
1) Press [MENU] to enter menu 2) Press [V] to highlight Audio Menu 3) Press [>] to enter Audio Menu 4) Press [V] to highlight Surround Sound 5) Press [>] to switch on or off

6) Press [EXIT] to exit
Adjusting Equalizer
Switch between the different present sound options Off -> Rock -> POP -> Live -> Dance -> Techno -> Classic -> Soft
1) Press [MENU] to enter menu 2) Press [V] to highlight Audio Menu 3) Press [>] to enter Audio Menu 4) Press [V] to highlight Equalizer 5) Press [>] to switch between the different preset options

6) Press [EXIT] to exit
TV Menu Operation

TV MENU
Adjusting Country
If you are moving the TV to another country you will need to change the region. The TV's default is United Kingdom
1) Press [MENU] to enter menu 2) Press [V] to highlight TV 3) Press [>] to enter TV Menu 4) Country should be highlighted 5) Press [>] to change the country

6) Press [EXIT] to exit
Adjusting Audio Language
To change the audio language. As default the TV is set to English
1) Press [MENU] to enter menu 2) Press [V] to highlight TV 3) Press [>] to enter TV Menu 4) Press [V] to highlight Audio Language 5) Press [>] to change the language

6) Press [EXIT] to exit
TV Menu Operation
Adjusting Channels
This lets you re-tune in the channels.
1) Press [MENU] to enter menu 2) Press [V] to highlight TV 3) Press [>] to enter TV Menu 4) Press [V] to highlight Channels

Press [>] to enter channel menu

6) Press [EXIT] to exit
Channel Skip
a) Press [>] to enter channel skip b) Press [V] or [A] to select the channel you wish to skip c) Press [OK] to select d) Press [EXIT] to exit
Colour System
a) Press [<] or [>] to adjust b) Press [EXIT] to exit
Sound System
a) Press [<] or [>] to adjust b) Press [EXIT] to exit
Channel Edit (Only available when on analogue TV – channel 900 upwards)
a) Press [>] to enter Channel Edit b) You can now move the location of channels by pressing the RED button moving to location you require and press [OK] c) Press [EXIT] to exit
Analogue Channel Fine Tune (Only available when on analogue TV – channel 900 upwards)
a) Press [>] to enter Analogue Channel Fine Tune b) Press [OK] to adjust c) Press [EXIT] to exit
TV Menu Operation

TV MENU
Auto Scan
Scan for all channels based on the current settings
1) Press [MENU] to enter menu 2) Press [V] to highlight TV 3) Press [>] to enter TV Menu 4) Press [V] to highlight Auto Scan 5) Press [>] to start the search

6) After tuning, the channel edit screen will appear. Press [EXIT] to exit.
Update Scan
Every so often, new digital channels are launched or signal strength improves. You can search for these as follows.
1) Press [MENU] to enter menu 2) Press [V] to highlight TV 3) Press [>] to enter TV Menu 4) Press [V] to highlight Update Scan 5) Press [>] to start the search

6) Press [EXIT] to exit
Analogue Manual Scan
This scan is used to manually scan for a channel based on the current settings
1) Press [MENU] to enter menu 2) Press [V] to highlight TV 3) Press [>] to enter TV menu 4) Press [>] to highlight Analogue Manual Scan 5) Press [>] to enter menu 6) Move to scan up or scan down by pressing [V] 7) Press [>] to start scan.
Common Interface Slot
This lets you adjust the CI slot settings
1) Press [MENU] to enter menu 2) Press [V] to highlight TV 3) Press [>] to enter TV Menu 4) Press [V] to highlight CI 5) Press [>] to enter CI

6) Press [EXIT] to exit

TV Menu Operation
SETUP MENU
On Screen Display Language
You may wish to change the language of the OSD. The TV's default is English.
1) Press [MENU] to enter menu 2) Press [V] to highlight Setup 3) Press [>] to enter Setup Menu 4) Country should be highlighted 5) Press [>] to change the country

6) Press [EXIT] to exit
Screen mode
Lets you adjust the picture format of the screen from 4:3, Full
1) Press [MENU] to enter menu 2) Press [V] to highlight Setup 3) Press [>] to enter Setup Menu 4) Press [V] to highlight Screen Mode 5) Press [>] to change

6) Press [EXIT] to exit
TV Menu Operation
On Screen Display Transparency
This is the transparency of the On Screen menu Low -> Middle -> High.
1) Press [MENU] to enter menu 2) Press [V] to highlight Setup 3) Press [>] to enter Setup Menu 4) Press [V] to highlight OSD Transparency 5) Press [>] to change

6) Press [EXIT] to exit
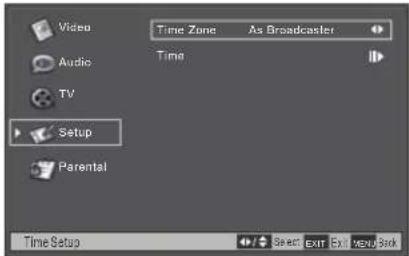
Time Setup
You may wish to set the Time
1) Press [MENU] to enter menu 2) Press [V] to highlight Setup 3) Press [>] to enter Setup Menu 4) Press [V] to highlight Time Set up

5) Press [>] to enter menu
Time can now be set automatically or manually. If you wish to set manually see the next page.
TV Menu Operation
SETUP MENU
6) Press [V] to highlight Time 7) Press [>] to enter Time menu

8) The time can now be adjusted manually by moving the time or date and altering it. 9) Press [EXIT] to exit
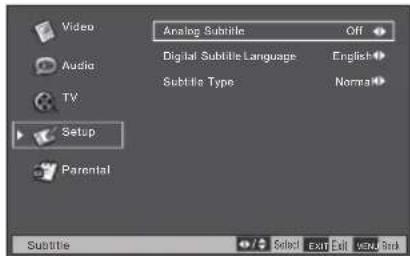
Choosing Subtitles
You may wish to have the subtitles switch on
1) Press [MENU] to enter menu 2) Press [V] to highlight Setup 3) Press [>] to enter Setup Menu 4) Press [V] to highlight Subtitle

5) Press [>] to enter menu
Analogue Subtitle
a) Press [<] or [>] to adjust b) Press [EXIT] to exit
Digital Subtitle Language
a) Press [<] or [>] to adjust
b) Press [EXIT] to exit
Subtitle Type
a) Press [<] or [>] to adjust b) Press [EXIT] to exit
6) Press [EXIT] to exit
TV Menu Operation

SETUP MENU
Digital Teletext Language
Choose the language that you would like for digital Teletext (available via the red button)
1) Press [MENU] to enter menu 2) Press [V] to highlight Setup 3) Press [>] to enter Setup Menu 4) Press [V] to highlight Digital Teletext Language 5) Press [>] to change the language

6) Press [EXIT] to exit
Decoding Page Language
If you are moving the TV to another country you will need to change this setting.
The TV's default is WEST EUR
1) Press [MENU] to enter menu 2) Press [V] to highlight Setup 3) Press [>] to enter Setup Menu 4) Press [V] to highlight Decoding Page Language 5) Press [>] to change

6) Press [EXIT] twice to exit
TV Menu Operation
SETUP MENU
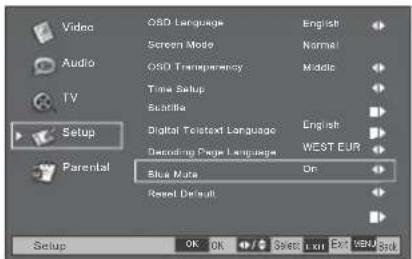
Blue Mute
Changes the background when there is no input, between clear and a blue background
1) Press [MENU] to enter menu 2) Press [V] to highlight Setup 3) Press [>] to enter Setup Menu 4) Press [V] to highlight Blue Mute 5) Press [>] to switch the blue on or off
6) Press [EXIT] to exit
Reset
You may wish to reset the menus to factory settings e.g. if you have forgotten a changed password
1) Press [MENU] to enter menu 2) Press [V] to highlight Setup 3) Press [>] to enter Setup Menu 4) Press [V] to highlight Reset 5) Press [>] to reset

6) Press [>] to highlight yes 7) Press [OK].
The TV will now reset.
TV Menu Operation
PARENTAL MENU
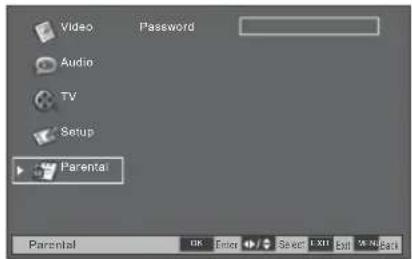
Password
You may wish to add a password so that you can lock channels. Once added, if forgotten, it can only be reset by switching the TV back to factory settings. The default password is set as 0000.
1) Press [MENU] to enter the menu. 2) Press [V] to highlight Parental. 3) Press [>] to enter the Parental Menu. 4) Password should be highlighted. 5) Enter the password, you can then block channels, inputs, programs as well as setting a new password.
6) Press [EXIT] to exit.
Electronic Program Guide & Digital Teletext

Electronic Program Guide (EPG)
The Electronic Program Guide (EPG) is available in Digital TV mode. It is a TV guide and provides information about forthcoming programmes (where supported by the broadcasted channel).
You can view the start and end time of all programs and on all channels.
It is very simple to operate.
1) Press [EPG]. The following will appear.

2) Press [>] or [<] to select the channel you wish to see information about.

3) Press [V] or [A] to move through the programs for the day highlighted. 4) Press [EPG] to exit the Electronic Program Guide (EPG).
Electronic Program Guide & Digital Teletext

Digital TV Teletext
With Digital TV (Freeview) there is also digital teletext available on some channels. Simply follow the on-screen commands. Here is an example of the BBC digital teletext service.
1) To start digital teletext, press the RED button.
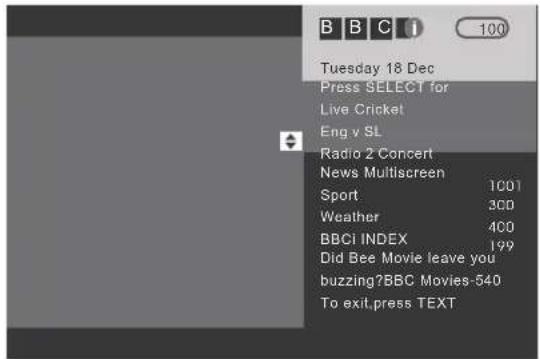
2) To select the information you require, you can scroll using [V] or [/A] and press [OK]. Alternatively, you can key in the page number, for example [3][0][0], followed by [OK].

You can then navigate using the colour buttons (Red, Green, Yellow, Blue), the [V] [/A] buttons, and numbers.
Analogue TV Teletext
Teletext is a service offered by some broadcasters.
Teletext Operation
1) Press [TXT]. After a few seconds, teletext page 100 should appear. Here is an example of BBC1.

2) You can now navigate to the page you require in a number of ways:
a) Press the page you require using the number buttons, i.e., page 02, by pressing [3][0][2]. b) Press the colour buttons; these will take you to the page indicated on screen for each colour.
3) To exit Teletext, press [TXT] at any time.
Other buttons
[SIZE] This increases or decreases the size of the text on screen. [INDEX] Some pages are more than one page long; this button displays the number of pages. [REVEAL] If there is an answer or something hidden, this will display it. [SUBCODE] Displays the sub page if it exists. [MIX] Displays the TV picture behind the text. [HOLD] This stops the pages changing when there are multi pages.
Connecting to a PC - Windows XP

IMPORTANT— Before connecting to a PC, you must ensure that the settings of the PC's output are correct for the new LCD Monitor.
You need to do the following with your old monitor connected:
1) Switch on your PC. 2) When finished booting up, right-click your mouse anywhere on the screen; the below will appear.

3) Left-click your mouse on Properties, this screen will appear

Connecting to a PC - Windows
4) Left-click on Settings, this screen will appear. Check that the screen resolution is set to a level that can be displayed by your television (refer to the technical specification for details). You can adjust the resolution by moving the slider on screen.

5) Left-click on Advanced, this screen will appear, click on the tab called 'Monitor'

6) Left-click on the drop-down for Screen refresh rate and select 60 Hertz. 7) Finally click Apply, then click Yes and the settings will be saved. 8) Turn off your PC. 9) Connect your LCD TV to your PC and switch on. 10) Switch on your PC, Windows will automatically install the LCD TV.
For Windows Vista operating system the process is very similar to the above. If you require additional support please contact the helpline.
PC Menu Operation (VGA)
VGA MENU
Automatic Configuration of Screen
Lets you automatically configure the television to be used as a computer monitor
1) Press [MENU] to enter menu 2) Press [V] to select VGA Menu 3) Press [>] to enter VGA Menu 4) Auto Adjust will be highlighted 5) Press [>] to start automatic adjustment

6) Press [EXIT] to exit
Horizontal Position
Changes the horizontal position of the picture
1) Press [MENU] to enter menu 2) Press [V] to select VGA Menu 3) Press [>] to enter VGA Menu 4) Press [V] to highlight H Position 5) Press [>] or [<] to adjust

6) Press [EXIT] to exit
PC Menu Operation (VGA)
Vertical Position
Changes the vertical position of the picture
1) Press [MENU] to enter menu 2) Press [V] to select VGA Menu 3) Press [>] to enter VGA Menu 4) Press [V] to highlight V Position 5) Press [>] or [<] to adjust

6) Press [EXIT] to exit
Phase
To adjust delay time of phase in order to reduce the noise of picture
1) Press [MENU] to enter menu 2) Press [V] to select VGA Menu 3) Press [>] to enter VGA Menu 4) Press [V] to highlight Phase 5) Press [>] or [<] to adjust

6) Press [EXIT] to exit
Clock
Alter this in order to reduce the noise within the picture
1) Press [MENU] to enter menu 2) Press [V] to select VGA Menu 3) Press [>] to enter VGA Menu 4) Press [V] to highlight Clock 5) Press [>] or [<] to adjust

6) Press [EXIT] to exit
DVD Menu Operation (DVD Models Only)

DVD BASIC PLAY
1) Press [SOURCE]

2) Select DVD 3) Press [OK] 4) Insert disc the correct way round (see image on the side of TV)
On screen will appear READING, once the disc has been accepted it will start to play. If it does not please refer to the frequently asked questions at the rear of the manual.
Within DVD Mode there is an additional menu. This can be operated in the following way.
SYSTEM SET UP
Adjusting TV System
Lets you adjust between NTSC, PAL, AUTO (Pal is default for the UK)
1) Press [SETUP] to enter menu 2) System Setup will be displayed 3) Press [V] to select TV System 4) Press [>] to enter TV System 5) Press [V] to change between NTSC, PAL, AUTO 6) Press [OK] to confirm

7) Press [SETUP] to exit
DVD Menu Operation (DVD Models Only)
Adjusting Video
Lets you adjust the video format.
1) Press [SETUP] to enter menu 2) System Setup will be displayed 3) Press [V] to select Video 4) Press [>] to enter Video 5) Press [V] to change 6) Press [OK] to confirm

7) Press [SETUP] to exit
Picture Format
Lets you adjust
1) Press [SETUP] to enter menu 2) System Setup will be displayed 3) Press [V] to select TV Type 4) Press [>] to enter TV Type 5) Press [V] to change between 4:3 PS, 4:3 LB & 16:9 6) Press [OK] to confirm

7) Press [SETUP] to exit
DVD Menu Operation (DVD Models Only)

Password
You may wish to add a password so that you can lock DVDs of a certain rating. Once added if forgotten it can only be reset by switching the TV back to factory settings. Default password is set as 0000 back to factory settings (see reset to default section).
1) Press [SETUP] to enter menu 2) System Setup will be displayed 3) Press [V] to select Password 4) Press [>] to enter Password 5) Enter the current password followed by the new one

6) Press [SETUP] to exit
DVD Ratings
You may wish lock DVD of a certain rating for example if you have small children.
1) Press [SETUP] to enter menu 2) System Setup will be displayed 3) Press [V] to select Rating 4) Press [>] to enter Rating 5) Select the rating level you would like 6) Press [OK] to confirm

7) Press [SETUP] to exit
Reset to default
You may wish to reset the menus to factory settings e.g. if you have forgotten a changed password
1) Press [SETUP] to enter the menu. 2) System Setup will be displayed. 3) Press [V] to select Reset. 4) Press [>] to enter Reset. 5) Press [OK].

6) Press [SETUP] to exit.
DVD Menu Operation (DVD Models Only)
LANGUAGE SETUP
On Screen Display Language
Lets you change the language of the On Screen Menu.
1) Press [SETUP] to enter the menu. 2) Press [>] to select Language Setup. 3) Press [V] to select OSD Language. 4) Press [>] to enter OSD Language. 5) Press [V] to select the language. 6) Press [OK] to confirm.

7) Press [SETUP] to exit.
Audio Language
Lets you change the audio language (if available on the DVD you are watching).
1) Press [SETUP] to enter the menu. 2) Press [>] to select Language Setup. 3) Press [V] to select Audio Language. 4) Press [>] to enter Audio Language. 5) Press [V] to select the language. 6) Press [OK] to confirm.

7) Press [SETUP] to exit.
DVD Menu Operation (DVD Models Only)

Subtitle Language
Lets you change the subtitle language (if available on the DVD you are watching).
1) Press [SETUP] to enter menu 2) Press [>] to select Language Setup 3) Press [V] to select Subtitle Language 4) Press [>] to enter Subtitle Language 5) Press [V] to select language 6) Press [OK] to confirm

7) Press [SETUP] to exit
Disc Menu Language
Lets you change the disc menu language (if available on the DVD you are watching)
1) Press [SETUP] to enter menu 2) Press [>] to select Language Setup 3) Press [V] to select Menu Language 4) Press [>] to enter Menu Language 5) Press [V] or [A] to select language 6) Press [OK] to confirm

7) Press [SETUP] to exit
DVD Menu Operation (DVD Models Only)
AUDIO SETUP
Key
Lets you adjust the key of the sound
1) Press [SETUP] to enter menu 2) Press [>] to select Audio Setup 3) Press [V] to select Key 4) Press [>] to enter Key 5) Press [V] or [A] to select 6) Press [OK] to confirm

7) Press [SETUP] to exit
Changing Regions
This TV/DVD player is pre-set to play Region 2 DVDs. In the event you wish to use the TV/DVD in another country that uses different region discs, please visit www.skymediauk.co.uk. Select 'product support', 'DVD region code information'
DVD Menu Operation (DVD Models Only)

VIDEO SETUP
Brightness
Increase or decrease the brightness of the picture
1) Press [SETUP] to enter menu 2) Press [>] to select Video Setup 3) Press [V] to select Brightness 4) Press [>] to enter Brightness 5) Press [<] or [>] to select required level 6) Press [OK] to confirm

7) Press [SETUP] to exit
Contrast
Increase or decrease the contrast of the picture
1) Press [SETUP] to enter menu 2) Press [>] to select Video Setup 3) Press [V] to select Contrast 4) Press [>] to enter Contrast 5) Press [<] or [>] to select required level 6) Press [OK] to confirm

7) Press [SETUP] to exit
DVD Menu Operation (DVD Models Only)
Hue
1) Press [SETUP] to enter menu 2) Press [>] to select Video Setup 3) Press [V] to select Hue 4) Press [>] to enter Hue 5) Press [<] or [>] to select required level 6) Press [OK] to confirm

7) Press [SETUP] to exit
Saturation
Alter the Red, Green & Blue which make up the picture
1) Press [SETUP] to enter the menu. 2) Press [>] to select Video Setup. 3) Press [V] to select Saturation. 4) Press [>] to enter Saturation. 5) Press [<] or [>] to select the required level. 6) Press [OK] to confirm.
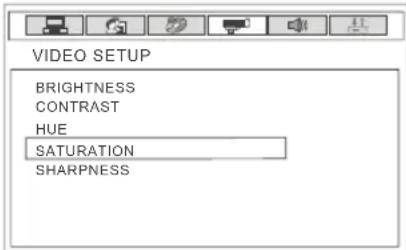
7) Press [SETUP] to exit.
Sharpness
Increase or decrease the sharpness of the picture. If you have a poor signal strength, you should reduce the sharpness to get a better picture.
1) Press [SETUP] to enter the menu. 2) Press [>] to select Video Setup. 3) Press [V] to select Sharpness. 4) Press [>] to enter Sharpness. 5) Press [<] or [>] to select the required level. 6) Press [OK] to confirm.

7) Press [SETUP] to exit.
DVD Menu Operation (DVD Models Only)

SPEAKER SETUP
Downmix
Choose between Left/Right, Stereo, and USS.
1) Press [SETUP] to enter the menu. 2) Press [>] to select Speaker Setup. 3) Press [V] to select Downmix. 4) Press [>] to enter Downmix. 5) Press [V] or [A] to select. 6) Press [OK] to confirm.

7) Press [SETUP] to exit.
Front Speakers
Select whether you wish to use either small or large front speakers, thus altering the sound.
1) Press [SETUP] to enter the menu. 2) Press [>] to select Speaker Setup. 3) Press [V] to select Front. 4) Press [>] to enter Front. 5) Press [V] or [A] to select. 6) Press [OK] to confirm.
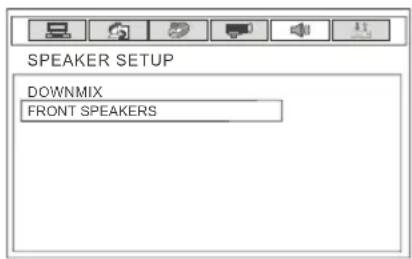
7) Press [SETUP] to exit
DVD Menu Operation (DVD Models Only)
DIGITAL SETUP
Dynamic Range
This is the difference between the quietest and loudest sounds. This setting works only with DVD discs recorded in Dolby digital.
FULL: Set this to listen with the range recorded on the disc.
4/8: Set this to listen with a range equivalent to a normal television.
2/8: Set this to listen with a smaller difference
1) Press [SETUP] to enter menu 2) Press [>] to select Digital Setup 3) Press [V] to select Dynamic Range 4) Press [>] to enter Dynamic Range 5) Press [V] or [A] to select 6) Press [OK] to confirm

7) Press [SETUP] to exit
Adjusting the Sound
Lets you change the sound between Stereo, Mono Left, Mono Right and Mixed Mono.
1) Press [SETUP] to enter menu 2) Press [>] to select Digital Setup 3) Press [V] to select Dual Mono 4) Press [>] to enter Dual Mono 5) Press [V] or [A] to select 6) Press [OK] to confirm

7) Press [SETUP] to exit
Wall Mounting
IMPORTANT— BEFORE DRILLING ANY HOLES IN THE WALL ENSURE YOU ARE NOT DRILLING WHERE THERE COULD BE ANY ELECTRIC WIRES, WATER OR GAS PIPES
15" MODELS REQUIRE A VESA 75 WALL MOUNT. 19" & 22" REQUIRE VESA 100 WALL MOUNT.

75

100
To remove the stand
1) Remove the five screws highlighted below

2) The stand will now come off
Wall Mounting the TV.
1) Remove the four screws highlighted below. 2) The wall mount can now be easily attached to the mounting holes on the rear of the TV. These holes are indicated in the picture below

Important – Ensure the length of screws included with your wall mount that secure the Wall Mount to the TV do not exceed 10 mm. Using longer screws could cause irreparable damage to the TV
Using with Sky Digital
You may wish to use your TV with Sky Digital.
There are a number of connection options, the best being connecting via SCART cable.
Connecting via SCART
1) Connect the SCART cable from the Sky Digital Box to SCART of the TV 2) Press [SOURCE] 3) Press [V] or [A] to select SCART 4) Press [OK]
The channel your Sky Digital box is displaying will now be shown on the TV.
You may wish to share your Sky Digital signal around the home by using an RF connection.
If this TV is to be connected in this way, please follow the below.
Connecting via RF
Ensure the Sky signal is switched on, before you start the below.
1) Connect the RF cable from the RF output socket of the sky/cable box to the 'RF IN' of the TV. 2) Press [MENU] to enter menu 3) Press [V] to select TV Menu 4) Press [>] to enter Menu

5) Press [V] to highlight Channel
6) Press [>] to enter Channel menu
7) Press [>] to highlight Analogue Fine Tuning
8) Select the channel you wish to use using [V]
9) Press [OK]
10) Press [>] or [<] to adjust the frequency. When you stop the channel will be saved.
Manually tune until you locate the Sky channel. If it stops press [>] again and the search will continue. (Often, the frequency required is 847.25 mhz, depending on which model of Sky Set top box)
Once tuned in it will go back to TV
Using a Sky or Universal Remote Control

USING WITH SKY DIGITAL REMOTE CONTROLS (BSKYB) OR UNIVERSAL REMOTE CONTROL
You may wish to use your Sky Digital or a universal remote control to operate some of the functions of this TV. For this you require a 'code' that needs to be programmed into your Sky Digital or universal remote control.
For codes for universal remote controls, please visit our website where you will find the very latest information and codes.
For codes for Sky/Sky+Sky HD, please note that at the point of manufacture, BSkyB have not launched the code required for this model of TV. They are due to launch a new remote control which should include the necessary code to operate the functions of the TV during 2009 (called revision 9). The launch date was not known at the time of printing this manual.
Please check our website for updates, alternatively, see below some other options of remote controls that are available.

REPLACE BOTH YOUR SKY & TV REMOTE WITH A ONE FOR ALL SKY & TV 2 IN 1 REMOTE CONTROL
The One for All remote controls shown above will operate all of the functions of the Sky box in the same way the original remote control will, in addition, they will also operate the functions of this model of TV. The One for All versions are available to purchase from the helpline/website. The original Sky remote controls are shown for comparison purposes
If you require any further information, you can contact us:
www.skymediauk.co.uk email - service@skymediauk.co.uk Tel - 0870 242 6292
Frequently Asked Questions
Question:
| I have tuned in Digital TV but I am not receiving any or all of the channels and/or the channels I receive are breaking up | 1) Check you are in an area that can receive Freeview. Visit www.freeview.co.uk or call 08701 111 270.2) Check you have a suitable aerial. Many indoor aerials will say they are digital ready, but you will not get a good signal3) Consider purchasing a signal booster, it is much cheaper than a digital aerial and cures 70% of poor signal problems.4) Failing the above for now use the analogue TV, until the signal becomes stronger in your area.For best performance we recommend using an outdoor hi-gain digital aerial. If you are receiving some digital stations first, try to connect a signal booster in between the TV and TV aerial socket |
| The sound quality is high pitched? | Go into the sound settings menu as shown earlier in the manual and increase the level of the bass and decrease the treble |
| I have inserted a disc but it is not playing | 1) Ensure you have put the disc as shown on the diagram next to the DVD loading slot.2) Ensure the disc is clean and is not scratched3) Some copied discs will not play. |
| The subtitles are switched on when I am watching a DVD | Each time you press [Subtitles] button you switch between the different languages. Off is one of the options. If you still have subtitle on, access through the DVD disc menu and switch off |
| I have connected the TV to my VCR via SCART but it is not recording | In addition to connecting via SCART, you should connect the aerial cable from the wall socket to VCR and another aerial cable from the VCR to the TV |
Solution:
Technical Specification
| L15LID628E (156/13A) | L19LI628E (19/13A) | ||
| Panel | Size (Inches) 15.6" | 19" | |
| Resolution | 1366x768 1440x900 | ||
| Contrast Ratio | 500:1 800:1 | ||
| Brightness cd/m2 | 250 300 | ||
| Input Signal | PC RGB Yes Yes | ||
| RF | 75 ohm Antenna / PAL-SECAM | ||
| Video | 1 x SCART, 1 x Component (YPbPr - 1080i) | ||
| Audio | 1 x 3.5mm jack for PC, 1 x pair RCA for YPbPr | ||
| HDMI | 1 (up to 1080i) | ||
| Speaker Output | Watts (RMS) 2 x 1.5 | 2 x 1.5 | |
| DVD player | Yes - | ||
| Power | Voltage | 100-240v 47-63Hz 1.5A | |
| Dimensions | Inc Stand TBC 472W x 398H x 180D | ||
| Exc Stand | TBC | 472W x 353H x 75D | |
| Weight | Net (Kgs) 5,5 | 6,1 | |
| Gross (Kgs) 6,5 | 7,5 | ||
| L19LID628E (19/13A) | L22LID628E (22/13A) | L22LID628E (22/13A) | ||
| L19LID628WE (19/13A) | L22LID628WE (22/13A) | |||
| Panel | Size (Inches) | 19" | 22" | 22" |
| Resolution | 1440x900 | 1680x1050 | 1680x1050 | |
| Contrast Ratio | 800:1 700:1 | 700:1 | ||
| Brightness cd/m2 | 300 300 | 300 | ||
| Input Signal | PC RGB Yes Yes | Yes | ||
| RF | 75 ohm Antenna / PAL-SECAM | |||
| Video | 1 x SCART, 1 x Component (YPbPr - 1080i) | |||
| Audio | 1 x 3.5mm jack for PC, 1 x pair RCA for YPbPr | |||
| HDMI | 1 (up to 1080i) | |||
| Speaker Output | Watts (RMS) 2 x 1.5 | 2 x 1.5 | 2 x 1.5 | |
| DVD player | Yes | - | Yes | |
| Power | Voltage | 100-240v 47-63Hz 1.5A | ||
| Dimensions | Inc Stand | 472W x 398H x 180D | 537W x 439H x 180D | 537W x 439H x 180D |
| Exc Stand | 472W x 353H x 75D | 537W x 394H x 80D | 537W x 394H x 80D | |
| Weight | Net (Kgs) 6,5 | 6,9 | 7,3 | |
| Gross (Kgs) 7,9 | 8,3 | 8,8 | ||
Index
| Analogue TV teletext 27 | Inputs and Connections | 9 | |
| Audio Language 16 | On Screen Display Language - TV | 19 | |
| Audio Language - DVD 35 | On Screen Display Language - DVD | 35 | |
| Balance | 14 | Parental Menu | 24 |
| Bass | 14 | Password - DVD mode | 34 |
| Blue Mute 23 | Password Settings | 24 | |
| Brightness - DVD mode 38 | PC Menu Settings | 30 - 31 | |
| Brightness - TV Mode 10 | Picture Format - DVD mode | 33 | |
| Channels 17 | Picture Mode | 10 | |
| Colour | 11 | Remote control buttonsand their functions | 6 - 7 |
| Colour Balance 13 | Removing the stand | 42 | |
| Common Interface Slot 9 | Reset | 23 | |
| Connecting to a PC 28 - 29 | Reset to Default - DVD mode | 33 | |
| Contrast - DVD mode 38 | Saturation - DVD mode | 39 | |
| Contrast - TV Mode 11 | Screen Mode | 19 | |
| Country | 16 | Sharpness - DVD mode | 39 |
| Decoding Page Language | 22 | Sharpness - TV Mode 12 | |
| Digital Teletext Language | 22 | Source | 8 |
| Digital TV teletext | 26 | Subtitle Language | 36 |
| Disc Menu Language | 36 | Subtitles | 21 |
| DVD basic play 32 | Surround Sound | 15 | |
| DVD Menu Operation(DVD Models Only) | 37 | Technical Specifications 46 | |
| DVD Ratings | 34 | Time Setup | 20 |
| Dynamic Noise Reduction | 12 | Treble | 15 |
| Dynamic Range | 41 | Tuning in TV | 4 - 5 |
| Electronic Program Guide | 25 | TV buttons and their functions | 8 |
| Equalizer 15 | TV System | 32 | |
| Frequently Asked Questions | 45 | Using with Sky Digital | 43 - 44 |
| Hue - DVD mode | 39 | Wall mounting the TV | 42 |
| Index | 47 | What is included in the box | 3 |


This symbol on the product or in the instructions means that your electrical and electronic equipment should be disposed at the end of its life separately from your household waste. There are separate collection systems for recycling in the EU. For more information, please contact the local authority or your retailer where you purchased the product.
Partmaster
.co.uk
Visit Partmaster.co.uk today for the easiest way to buy electrical spares and accessories.
With over 1 million spares and accessories available we can deliver direct to your door the
very next day.
Visit www.partmaster.co.uk
or call
0870 6001 338
(UK customers only)
Calls charged at National Rate.
| If you require a replacement for any of the items listed below, please quote their corresponding part numbers. | |
| rebmuNtraPtraPtnemecalpeR | |
| 1000/NAM/UMEkooBediuGresU | |
| )DVDwlo2006@MR/IME | |
| Remote control (without DVD) | EMU/RMC/0003 |
| RF dael | 620BAC/UMR |
| AAA batteries | RMU/BAT/0001 |
| Quick Start Guide | EMU/QSG/0001 |
- WARNINGS
- CAUTION
- WARNING
- SAFETY
- SAFETY WARNINGS
- SCREEN BURN
- CONTENTS
- CHAPTER 1 INTRODUCING THE LCD TV
- CHAPTER 2 INSTALLING THE LCD TV
- CHAPTER 3 USING THE FEATURES
- TROUBLESHOOTING
- SPECIFICATIONS
- WHAT IS INCLUDED IN THE BOX
- ACCESSORIES
- GETTING STARTED - INITIAL SET UP
- IMPORTANT - AFTER TUNING, DO NOT PRESS ANY BUTTONS FOR 20 SECONDS SO THE CHANNEL INFORMATION CAN BE STORED
- TUNING IN TV
- REMOTE CONTROL BUTTONS
- TV BUTTONS & SOURCE MENU
- SIDE PANEL BUTTONS
- CHOOSING MODE/SOURCE
- CONNECTING HD READY DEVICES
- INPUTS & CONNECTIONS
- TV MENU OPERATION
- VIDEO MENU
- SELECTING PICTURE MODE
- ADJUSTING BRIGHTNESS
- ADJUSTING CONTRAST
- ADJUSTING COLOUR
- ADJUSTING SHARPNESS
- DYNAMIC NOISE REDUCTION
- ADJUSTING COLOUR BALANCE
- AUDIO MENU
- ADJUSTING BALANCE
- ADJUSTING BASS
- ADJUSTING TREBLE
- SURROUND SOUND
- ADJUSTING EQUALIZER
- TV MENU
- ADJUSTING COUNTRY
- ADJUSTING AUDIO LANGUAGE
- ADJUSTING CHANNELS
- CHANNEL SKIP
- COLOUR SYSTEM
- SOUND SYSTEM
- CHANNEL EDIT (ONLY AVAILABLE WHEN ON ANALOGUE TV – CHANNEL 900 UPWARDS)
- ANALOGUE CHANNEL FINE TUNE (ONLY AVAILABLE WHEN ON ANALOGUE TV – CHANNEL 900 UPWARDS)
- AUTO SCAN
- UPDATE SCAN
- ANALOGUE MANUAL SCAN
- COMMON INTERFACE SLOT
- SETUP MENU
- ON SCREEN DISPLAY LANGUAGE
- SCREEN MODE
- ON SCREEN DISPLAY TRANSPARENCY
- TIME SETUP
- CHOOSING SUBTITLES
- ANALOGUE SUBTITLE
- DIGITAL SUBTITLE LANGUAGE
- SUBTITLE TYPE
- DIGITAL TELETEXT LANGUAGE
- DECODING PAGE LANGUAGE
- BLUE MUTE
- RESET
- PARENTAL MENU
- PASSWORD
- ELECTRONIC PROGRAM GUIDE & DIGITAL TELETEXT
- ELECTRONIC PROGRAM GUIDE (EPG)
- DIGITAL TV TELETEXT
- ANALOGUE TV TELETEXT
- TELETEXT OPERATION
- OTHER BUTTONS
- CONNECTING TO A PC - WINDOWS XP
- CONNECTING TO A PC - WINDOWS
- PC MENU OPERATION (VGA)
- VGA MENU
- AUTOMATIC CONFIGURATION OF SCREEN
- HORIZONTAL POSITION
- VERTICAL POSITION
- PHASE
- CLOCK
- DVD MENU OPERATION (DVD MODELS ONLY)
- DVD BASIC PLAY
- SYSTEM SET UP
- ADJUSTING TV SYSTEM
- ADJUSTING VIDEO
- PICTURE FORMAT
- DVD RATINGS
- RESET TO DEFAULT
- LANGUAGE SETUP
- AUDIO LANGUAGE
- SUBTITLE LANGUAGE
- DISC MENU LANGUAGE
- AUDIO SETUP
- KEY
- CHANGING REGIONS
- VIDEO SETUP
- BRIGHTNESS
- CONTRAST
- HUE
- SATURATION
- SHARPNESS
- SPEAKER SETUP
- DOWNMIX
- FRONT SPEAKERS
- DIGITAL SETUP
- DYNAMIC RANGE
- ADJUSTING THE SOUND
- WALL MOUNTING
- IMPORTANT— BEFORE DRILLING ANY HOLES IN THE WALL ENSURE YOU ARE NOT DRILLING WHERE THERE COULD BE ANY ELECTRIC WIRES, WATER OR GAS PIPES
- TO REMOVE THE STAND
- WALL MOUNTING THE TV
- USING WITH SKY DIGITAL
- CONNECTING VIA SCART
- CONNECTING VIA RF
- USING A SKY OR UNIVERSAL REMOTE CONTROL
- USING WITH SKY DIGITAL REMOTE CONTROLS (BSKYB) OR UNIVERSAL REMOTE CONTROL
- REPLACE BOTH YOUR SKY & TV REMOTE WITH A ONE FOR ALL SKY & TV 2 IN 1 REMOTE CONTROL
- FREQUENTLY ASKED QUESTIONS
- TECHNICAL SPECIFICATION
- INDEX
- PARTMASTER
- CO.UK
Brand : Logik
Model : L22LID628E
Category : Television