008-276 - Air compressor Meec Tools - Free user manual and instructions
Find the device manual for free 008-276 Meec Tools in PDF.


| Product Type | Air Compressor |
| Rated Voltage | 230 V ~ 50 Hz |
| Power Output | 1100 W |
| Max Operating Pressure | 10 bar |
| Air Tank Capacity | 5 L |
| Weight | 10.6 kg |
| Sound Pressure Level | 77 dB(A), K=3 dB(A) |
| Guaranteed Sound Power Level | 97 dB(A), K=3 dB(A) |
| Air Connection | 1/4" |
| Speed (No Load) | 3400 rpm |
| Intended Use | Powering pneumatic tools (non-professional) |
| Safety Features | Safety valve, overheating protection, automatic start/stop |
| Maintenance | Daily condensate drainage, clean intake filter, no solvents |
| Operating Temperature | +5°C to +40°C |
| Max Extension Cord Length | 5 m (1.5 mm² cross-section) |
| Duty Cycle | 25% (max 15 min per hour) |
| Power Cord Type | Earthed plug, 16 A fuse recommended |
| Accessories Included | Spiral hose, quick-couplings, blow gun |
| Storage | Upright in dry place, out of reach of children |
| Compliance | CE, Machinery Directive, EMC, RoHS |
Frequently Asked Questions - 008-276 Meec Tools
User questions about 008-276 Meec Tools
0 question about this device. Answer the ones you know or ask your own.
Ask a new question about this device
Download the instructions for your Air compressor in PDF format for free! Find your manual 008-276 - Meec Tools and take your electronic device back in hand. On this page are published all the documents necessary for the use of your device. 008-276 by Meec Tools.
USER MANUAL 008-276 Meec Tools
008276
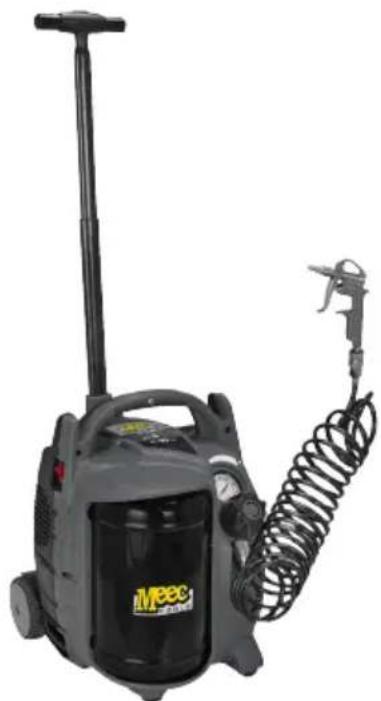

SE KOMPRESSOR
Bruksanvisning i original
Operating instructions
(Translation of the original instructions)
Important! Read the user instructions carefully before use.
Save them for future reference.
Värna om miljön!
Care for the environment!
Must not be discarded with household waste! This product contains electrical or electronic components that should be recycled. Leave the product for recycling at the designated station e.g. the local authority's recycling station.
Jula reserves the right to make changes. In the event of problems, please contact our customer service.
www.jula.com

Tillverkare/Produsent/Producenci/Manufacturer
Jula AB, Box 363, 532 24 SKARA
Distributör/Distributør/Dystrybutor/Distributor
Jula Poland Sp. z o.o., ul.
2


6

SÄKERHETSANVISNINGAR
SÄKERHETSÅTRGÄRDER
- Users must read and fully understand all the information in this manual before installing, using or maintaining this air compressor. Study the following instructions to ensure the safe use of the machine.
- The noise value measured at a distance of 4 metres corresponds to the noise level as indicated on the yellow label on the compressor, minus 20 dB.
BEFORE USE
- The compressor should be used in a suitable environment (with good ventilation and an ambient temperature of +5°C to +40°C) free from dust, acid, fumes, and explosive or flammable gas. Do not position the compressor in a damp or wet area.
• Always maintain a safe distance of at least 4 metres between the compressor and the working area. - The noise value measured at a distance of 4 metres in free field corresponds to the noise level as indicated on the yellow label on the compressor, minus 20 dB.
• Changes in colour on the compressor belt guard during painting indicate that the gap is too short. - Plug the plug into a power point with the correct voltage and frequency.
- Only use extension cords with a maximum length of 5 metres and a cross sectional area of at least 1.5 mm2 .
- It is not recommended to use extension cords of different lengths, adapters or power strips.
-
Use the I/O button to switch off the compressor.
• Always use the handle to move the compressor. -
Unplug the power cord and air hose from the compressor before moving it.
- The compressor must stand on a firm and level surface when running.
- Only use the compressor for its intended purpose. The use of the machine for other applications is not advisable. The user is personally responsible for any material damage or personal injury resulting from any such inappropriate use. The manufacturer cannot be held responsible for misuse.
- The compressor is suitable for use in dry areas. Do NOT use the compressor in areas where water jets are used.
GENERAL SAFETY INSTRUCTIONS
- Never point the air jet at other persons, animals or your own body (wear safety glasses to protect your eyes from particles that can be blown up by the air jet).
- Never point a jet of liquid from a tool that is connected to the compressor at the compressor.
- Do not use the machine if you are barefoot or if you have wet hands and feet.
- Do not pull the power cord to remove the plug from the mains supply or to move the compressor.
- Make sure the machine is not exposed to the weather and wind (rain, sun, mist or snow).
- Do not transport the compressor with a pressurised air tank.
- Do not perform any welding or mechanical work on the air tank. In the event of defects or corrosion on the air tank it must be replaced in its entirely.
- Do not allow the compressor to be used by inexperienced people. Children and animals should be kept at a safe distance from the compressor.
- This appliance is not intended for use by persons (including children) with reduced physical, sensory or mental capabilities.
Neither should people without experience and knowledge use it unless they receive assistance or instructions for use of the appliance by a person who takes responsibility for their safety.
- Keep children under supervision to make sure they do not play with the machine.
- Do not place flammable objects or objects made of nylon or fabric in the vicinity and/or on the compressor.
- Do not clean the machine with flammable liquids or solvents. Only use a damp cloth and make sure that you have removed the plug from the power socket.
- The compressor is designed to compress air. The machine must not be used for any other type of gas.
- The compressed air obtained from this machine cannot be used in the pharmaceutical sector, food sector or in healthcare without first undergoing specific treatments and cannot be used to fill oxygen tanks for diving.
- To avoid serious burn injuries, do not touch the top of the cylinder or tube during or immediately after use.
- Do not lift the compressor with the telescopic handle (G). This handle is only intended to be used to pull the unit.
FUNCTION
- To avoid overheating the electric motor the compressor runs intermittently (must not be used for more than 25% of function cycle). If the compressor pumps air for more than 25% of an hour the capacity of the compressor will be less than the pumping required by the application. Always adjust the air flow needed by the accessory or connection to the amount of air delivered by the compressor. The overheating protection on the motor trips in the event of overheating and automatically switches off the power. The motor restarts automatically when the temperature returns to normal.
- When the compressor is connected to a power source and the switch is in the ON position the compressor automatically runs this cycle.
- Do not touch moving parts.
- Keep your body, hair, clothing and jewellery away from moving parts.
- Do not use the compressor without all the guards and casing in place.
- Do not stand on the compressor.
- The compressor has a safety valve to guarantee the safe use of the machine if there is a fault on the switch.
- The red line on the pressure gauge indicates the maximum operating pressure of the tank. This does not apply to the set pressure.
- When connecting a compressed air tool to a compressed air pipe from the compressor, it is absolutely essential to cut the flow of air from the compressed air pipe.
- When using compressed air for different applications (pumping air, pneumatic tools, spray painting, cleaning with water-based detergent, etc.) the user must respect and be familiar with the applicable safety regulations for each application.
- Do not exceed the maximum pressure recommended by the manufacturer for connections or accessories used with this compressor.
- Check that the air consumption and maximum operating pressure for the tool and connecting tube (with compressor) correspond with the setting on the pressure regulator and with the performance of the compressor.
Symbols
The following symbols can be of importance for how you should use your power tool. Make sure you understand the symbols and their significance.
 | Read the instructions. |
 | Approved in accordance with the relevant EU directives. |
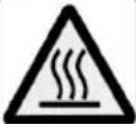 | Risk of burns. |
 | Warning – live parts. |
 | Risk of automatic start. |
 | Wear safety glasses. |
 | Wear ear protection. |
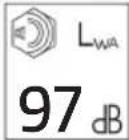 | Sound power level. |
 | Recycle as electrical waste. |
TECHNICAL DATA
| Rated voltage 230 V ~ 50 Hz |
| Output 1100 W |
| Speed (no load) 3400 rpm |
| Max. operating pressure 10 bar |
| Air tank 5 l |
| Air connection 1/4" |
| Weight 10.6 kg |
| Sound pressure level, LpA 77 dB(A), K= 3 dB(A) |
| Sound power level*, LwA 95.1 dB(A), K= 3 dB(A) |
| Sound power level**, LwA 97 dB(A), K= 3 dB(A) |
* Measured, ** Guaranteed
Always wear ear protection.
The declared values for vibration and noise, which have been measured by a standardised test method, can be used to compare different tools with each other and for a preliminary assessment of exposure. The measurement values have been determined in accordance with EN 1012:2010.
WARNING!
The actual vibration and noise level when using tools may differ from the specified maximum value, depending on how the tool is used and the material. It is therefore necessary to determine which safety precautions are required to protect the user, based on an estimate of exposure in actual operating conditions (taking into account all stages of the work cycle, e.g. the time when the tool is switched off and when it is idling, in addition to the start-up time).
DESCRIPTION
- Switch
- Pressure gauge
-
Control dial
-
Emptying valve
- Quick-coupling — Safety valve
- Lifting handle
- Telescopic handle
- Storage box for accessories
- Power cord
FIG. 1
SWITCH
The switch is the mechanism that starts and stops the compressor. When the switch is in the ON position the air is compressed until the pressure in the tank reaches the limiting value for the default operating pressure and the compressor switches off. The compressor restarts automatically when the pressure drops below the default value for pressure release.
PRESSURE GAUGE
The pressure gauge indicates the pressure in the outlet according to the setting on the control dial.
CONTROL DIAL
The control dial is used to adjust the pressure in the outlet. The pressure in the outlet increases by turning the dial clockwise, and is reduced by turning it anticlockwise.
EMPTYING VALVE
Ball valve that drains moisture from the tank when open.
QUICK-COUPLING
Simple connection between air hose and tool.
SAFETY VALVE
The safety valve is by default set to avoid over-pressure in the air tank. The value must not be adjusted or removed, this can result in serious damage. The safety valve must only be serviced and repaired by an authorised service centre.
TELESCOPIC HANDLE
Press the release button to pull out and push in the telescopic handle. The handle clicks in place in both positions.
FIG. 2
NOTE:
Do not lift the compressor with the telescopic handle. The handle is only intended to be used to pull the compressor.
USE
MAINS CONNECTION
The compressor has a power cord with an earthed plug. The plug can be plugged into an optional earthed 230V \~ 50 Hz power point with a 16 A fuse. Before using the compressor, check that the mains voltage corresponds with the data specified on the type plate. Long supply lines and extension cords cause voltage loss and can prevent the motor from starting. At temperatures below +5°C there is a risk that the motor will not have enough power to start.
APPLICATIONS
The compressor is intended to power pneumatic tools. The compressor is not intended for professional, craftsmanship or industrial use.
HOW TO USE
Check before use
- Check that the tank is empty, dry and clean.
- Check the oil level in the compressor pump.
• Make sure the intake air is dry and free from dust.
Starting the compressor
- Check that the switch is in the OFF position.
- Check that the air pressure in the tank is 0 PSI.
- Connect the air hose to the compressor.
FIG. 3
- Plug the compressor into an earthed power point.
- Switch on (ON). The switch lights up to show that the compressor is switched on. The compressor now starts and stops automatically to maintain the pressure in the tank.
- Set the pressure regulator to the required pressure for the pneumatic tool.
Switch off the compressor
Put the switch in the OFF position.
Connect the accessory to the compressor
All accessories are connected to the compressor with the spiral hose (K), which has a quick-connector.
- Press the tool onto the quick-connector on the spiral hose. The hose and tool click in place.
FIG. 4
After use
Switch off the compressor after use and empty the container with the compressed air blow gun. Release the spiral hose from the compressor by pulling back the outer ring nut (N). Pull the ring nut (P) on the coupling back to release the spiral hose from the accessory.
FIG. 5
Compressed air gun
WARNING!
- Wear safety glasses.
- Do not point the compressed air at persons or animals. Do not blow dust or dirt towards yourself or other persons.
HOW TO USE
- Connect the blow gun to the compressor.
- Adjust the pressure to a suitable value (4-8 bar).
- Point the blow gun at the surface to be cleaned and press the trigger. The flow of air can be adjusted by the pressure on the trigger.
TIPS
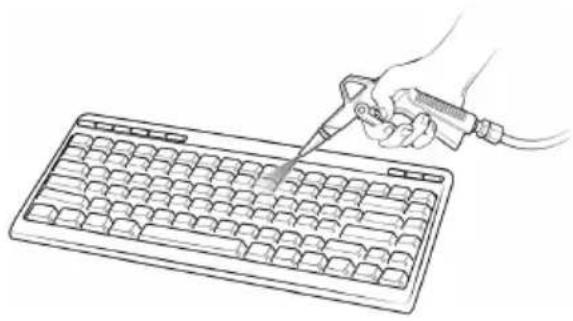
The blow gun is ideal for cleaning carpets in the home or car. It is also ideal for cleaning keyboards, electrical equipment, fridges, cameras, video cameras, glass and vacuum cleaner filters.
FIG. 6
WARNING!
Use the lowest pressure to clean sensitive appliances such as cameras, measuring equipment and other electronics.
RECOMMENDED PRESSURE
Blowing
| How to use | Operating pressure (Bar) |
| Blowing dust off objects. 8 | |
| Blowing dust off measuring equipment. | 4 |
MAINTENANCE
NOTE:
- Always pull out the plug before cleaning and maintenance.
- Wait until the compressor has cooled completely! Risk of burns.
-
Release the pressure in the container before cleaning and maintenance.
-
Do not use solvent, flammable or toxic liquid to clean the blow gun.
- Keep the safety devices free from dust and dirt. Wipe the machine with a clean cloth, or blow clean with compressed air at low pressure.
- It is recommended to clean the machine every time it has been used.
- Clean the machine at regular intervals with a damp cloth and a little soft soap. Do not use detergent or solvent. They can damage the plastic parts on the machine. Make sure that no liquid gets into the machine.
- Disconnect the hose and spray gun from the compressor before cleaning (fig. 5). Do not clean the compressor with water or solvent.
EMPTYING THE TANK
Empty any condensed water every day by opening the emptying valve (on the bottom of the pressure container).
- Check that the compressor is switched off "OFF".
- Tilt the compressor, by holding the handle, towards the emptying valve.
- Turn the emptying valve to open.
- Keep the compressor tilted to empty all the moisture.
- Close the drain valve.
NOTE:
The condensate in the pressure container contains oil residue. Recycle condensate at the local recycling centre.
STORAGE
- Pull out the plug and vent the machine and pneumatic tool. Store the compressor where it cannot be used by unauthorised persons.
- Store the compressor is a dry place, out of reach of unauthorised persons. Store the compressor upright.
TROUBLESHOOTING
See next page.
TROUBLESHOOTING
| Symptom Possible cause Proposed action | ||
| Impaired capacity. Frequent starting Low pressure value. | Intensive use or potential leakage from couplings and/or hoses. Clogged intake filter. | Replace the seals on the couplings. Clean or replace the filter. |
| The compressor stops and automatically restarts after a few minutes. | Tripping of the overheating protection due to the motor overheating. | Clean the ventilation holes in the manifold. Ventilate the room. |
| The compressor stops after a few attempts. | Tripping of the overheating protection due to the motor overheating (disconnection of connector, weak supply voltage). | Switch on the pressure switch button. Ventilate the room. Wait a few minutes and the compressor will automatically restart. |
| The compressor does not stop and the safety valve actuates. | Compressor malfunction or faulty pressure switch. | Pull out the plug and contact your service centre. |
All other types of action must be performed by an accredited service centre and with the use of original spare parts. Any modifications to the machine can put safety at risk and invalidate the warranty.

EU DECLARATION OF CONFORMITY
EU FÖRSÄKRAN OM ÖVERENSSTÄMMELSE
EU SAMSVARSERKLÆRING
DEKLARACJA ZGODNOŚCI UE

Jula AB, Box 363, SE-532 24 SKARA, SWEDEN
This declaration of conformity is issued under the sole responsibility of the manufacturer
Machinery Directive 2006/42/EC
EN 1012-1:2010, EN 60204-1:2006+A1
Electromagnetic Compatibility Directive 2014/30/EU
EM 55014-1:2017, EN 55014-2:2015
EN 61000-3-2:2014, EN 61000-3-3:2013
Outdoor Noise Directive 2000/14/EC, amended by 2005/88/EC
RoHS Directive 2011/65/EU and (EU) 2015/863
EN 50581:2012
| Measured sound power level on an equipment representative for this type: Uppmätt ljudeffektnivá på en utrustning som är representativ för denna typ: Målt lydeffektnivá for utstyr som er representativt for vedkommende type: zmierzony poziom mocy akustycznej urządzenia reprezentatywnego dla daneg o typu: | Guaranteed sound power level: Garanterad ljudeffektnivá: Garantert lydeffektnivá: Gwarantowana moc akustyczna: | Conformity assessment procedure according to 2000/14/EC: Förfarande för bedömning av överensstämmelse enligt 2000/14/EC: Framgangsmáter for samsvarsvurdering iht. 2000/14/EC: Procedura oceny zgodności na podstawie dyrektywy 2000/14/WE: |
| 95,1 dB(A) 97 dB(A) | Annex VI / Bilaga VI Vedlegg VI / Załącznik VI |
Where applicable, name and address of the notified body involved:
10156 Torino, Italy NB0477
This product was CE marked in year -19
Name and address of the person authorised to compile the technical file:
- SE KOMPRESSOR
- SÄKERHETSANVISNINGAR
- SÄKERHETSÅTRGÄRDER
- BEFORE USE
- GENERAL SAFETY INSTRUCTIONS
- FUNCTION
- SYMBOLS
- ALWAYS WEAR EAR PROTECTION
- WARNING
- DESCRIPTION
- SWITCH
- PRESSURE GAUGE
- CONTROL DIAL
- EMPTYING VALVE
- QUICK-COUPLING
- SAFETY VALVE
- TELESCOPIC HANDLE
- USE
- MAINS CONNECTION
- APPLICATIONS
- HOW TO USE
- CHECK BEFORE USE
- STARTING THE COMPRESSOR
- FIG. 3
- SWITCH OFF THE COMPRESSOR
- CONNECT THE ACCESSORY TO THE COMPRESSOR
- FIG. 4
- AFTER USE
- FIG. 5
- COMPRESSED AIR GUN
- TIPS
- FIG. 6
- RECOMMENDED PRESSURE
- MAINTENANCE
- NOTE
- EMPTYING THE TANK
- STORAGE
- TROUBLESHOOTING
- EU DECLARATION OF CONFORMITY
- EU FÖRSÄKRAN OM ÖVERENSSTÄMMELSE
- EU SAMSVARSERKLÆRING
- DEKLARACJA ZGODNOŚCI UE
Brand : Meec Tools
Model : 008-276
Category : Air compressor