
S 5148 - Air conditioner QLIMA - Free user manual and instructions
Find the device manual for free S 5148 QLIMA in PDF.


| Product Type | Wall-mounted split air conditioner |
| Model | S 5148 |
| Brand | Qlima |
| Cooling Capacity (Nominal) | 5426 W |
| Heating Capacity (Nominal) | 4126 W |
| Power Consumption (Cooling/Heating) | 1.6 kW / 1.6 kW |
| Power Supply | 220-240 V ~ 50 Hz, 1 Ph |
| Current (Cooling/Heating) | 7.1 A / 6.9 A |
| Air Flow (High/Med/Low) | 810 / 720 / 540 m³/h |
| Compressor Type | Rotary |
| Fan Speeds | 3 (Auto, Low, Med, High) |
| Temperature Range | 17°C - 30°C |
| Refrigerant / Charge | R410A / 1350 g |
| Indoor Unit Dimensions (WxHxD) | 964 x 222 x 325 mm |
| Outdoor Unit Dimensions (WxHxD) | 800 x 333 x 554 mm |
| Net Weight Indoor / Outdoor | 10.8 kg / 35.1 kg |
| Sound Pressure Indoor (High/Low) | 42 dB(A) / 24 dB(A) |
| Sound Pressure Outdoor | 56 dB(A) |
| Protection Class Indoor / Outdoor | IPX0 / IP24 |
| Fuse Rating | T20A/250VAC-T-P-HT |
| Controls | Electronic remote controller |
| Functions | Auto, Cool, Heat, Dry, Fan, Sleep, Timer, Swing, Turbo, Active Clean, Silent, Follow Me |
| Air Filter Types | Screen, Active Carbon, 3M HAF |
| Warranty | 24 months on components, 48 months on compressor |
Frequently Asked Questions - S 5148 QLIMA
User questions about S 5148 QLIMA
0 question about this device. Answer the ones you know or ask your own.
Ask a new question about this device
Download the instructions for your Air conditioner in PDF format for free! Find your manual S 5148 - QLIMA and take your electronic device back in hand. On this page are published all the documents necessary for the use of your device. S 5148 by QLIMA.
USER MANUAL S 5148 QLIMA
| DK | BRUGSANVISNING | 2 |
| GB | OPERATING MANUAL | 24 |
| N | BRUKSANVISNING | 48 |
| PL | INSTRUKCJA OBSŁUGI | 72 |
| S | BRUKSANVISNING | 98 |
Kære kunde,
(S 5125 B, S 5132 and S 5148
natural_image
Illustration of a hand holding a pen, next to a curved panel and a cylindrical device (no text or symbols)natural_image
Diagram showing a mechanical component with an inset close-up of its internal structure (no text or symbols)
FORSIGTIG
natural_image
Technical line drawing of a mechanical housing or bracket component (no text or symbols)natural_image
Diagram of a grid-patterned device with a faucet attached (no text or symbols)natural_image
Technical line drawing of a mechanical device with internal components and a separate view (no text or symbols)Nyt filter
Congratulations on the purchase of your Qlima air conditioner. You have acquired a high
quality product that, if used responsibly, will give you many years of pleasure.
Please read these instructions for use first in order to ensure the maximum life span of your air conditioner.
On behalf of the manufacturer, we provide a 24-month guarantee on all material and production defects and a 48-month guarantee on the compressor of the air conditioner.
Please enjoy your air conditioner.
Yours sincerely,
PVG Holding b.v.
Customer service department
CONTENTS
A SAFETY INSTRUCTIONS
B. PARTS NAMES
C. OPERATING TEMPERATURE
D. OPERATION WITH REMOTE CONTROL
E. MANUAL OPERATION (WITHOUT REMOTE)
F. OPTIMAL OPERATION
G. ADJUSTING AIR FLOW DIRECTION
H. HOW THE AIR CONDITIONER WORKS
I. MAINTENANCE
J. OPERATION TIPS
K. TROUBLE SHOOTING TIPS
L. GUARANTEE CONDITIONS
M. TECHNICAL DATA
READ THIS MANUAL
Inside you will find many helpful hints on how to use and maintain your air conditioner properly. You will find many answers to common problems in the chapter Troubleshooting Tips. If you review chapter K "Troubleshooting Tips" first, you may not need to call for service.
GB
25
A SAFETY INSTRUCTIONS
Install this device only when it complies with local/national legislation, ordinances and standards. This product is intended to be used as an air conditioner in residential houses and is only suitable for use in dry locations, in normal household conditions, indoors in living room, kitchen and garage. Check the mains voltage and frequency. This unit is only suitable for earthed sockets, connection voltage 220-240 V\~ / 50 Hz. The 4.8kW models must be connected directly to the supply source.

IMPORTANT
- The device MUST always have an earthed connection. If the power supply is not earthed, you may not connect the unit. The plug must always be easily accessible when the unit is connected. Read these instructions carefully and follow the instructions.
- The air conditioner contains a refrigerant and can be classified as pressurized equipment. Therefore always use an authorized air conditioning engineer for installation and maintenance of the air conditioner. The air conditioner must be inspected and serviced on an annual base by an authorized air conditioning engineer. Or the warranty might be void.
Before connecting the unit, check the following:
- The voltage supply must correspond with the mains voltage stated on the rating label.
- The socket and power supply must be suitable for the current stated on the rating label.
- The plug on the cable of the device must fit into the wall socket.
- The device must be placed and mounted on a stable surface.
GB
26
The electricity supply to the device must be checked by a recognised professional if you have any doubts regarding the compatibility.
- This device is manufactured according to CE safety standards. Nevertheless, you must take care, as with any other electrical device.
- Do not cover the air inlet and outlet grill.
- Never allow the device to come into contact with chemicals.
- Never spray the unit with or submerge in water. Turn off the unit and disconnect the power supply if water enters the indoor unit.
- Do not insert hands, fingers or objects into the openings of the unit.
- Never use an extension cable to connect the device to the electric power supply. If there is no suitable, earthed wall socket available, have one installed by a recognised electrician.
- Have any repairs and/or maintenance only carried out by a recognised service engineer or your recognised supplier. Follow the instructions for use and maintenance as indicated in the user manual of this device.
- Always remove the plug of the unit from the wall socket when it is not in use.
- Do not operate or stop the air conditioner by inserting or pulling out the power plug. Only use the dedicated buttons on the air conditioner or on the remote control.
- Do not open the air conditioner when it is in operation. Always pull out the electrical plug when opening the device.
- Always pull out the electrical plug when cleaning or servicing the air conditioner.
- Do not place gas burners, ovens and/or stoves in the airstream.
-
Do not operate the buttons or touch the air conditioner with wet hands.
-
Note that the outdoor unit produces sound when in use, this could interfere with local legislation, it is the responsibility of the user to check and to make sure the equipment is in full compliance with local legislation.
- This appliance is not intended for use by persons (including children) with reduced physical, sensory or mental capabilities, or lack of experience and knowledge, unless they have been given supervision or instruction concerning use of the appliance by a person responsible for their safety.
- Children should be supervised to ensure that they do not play with the appliance.
- It is advised to stay out of the direct air stream.
- Never drink the drain water from the air conditioner.
- Do not make any modifications to the unit.
- If the power cable is damaged it must be replaced by the manufacturer, its customer service department or persons with comparable qualifications in order to prevent danger.
- This appliance can be used by children aged from 8 years and above and persons with reduced physical, sensory or mental capabilities or lack of experience and knowledge if they have been given supervision or instruction concerning use of the appliance in a safe way and understand the hazards involved. Children shall not play with the appliance. Cleaning and user maintenance shall not be made by children without supervision.

ATTENTION!
- Never use the device with a damaged power cord, plug, cabinet or control panel.
- Failing to follow the instructions may lead to nullification of the guarantee on this device.
GB
28
Note about Fluorinated Gasses
- This air-conditioning unit contains fluorinated gasses. For specific information on the type of gas and the amount, please refer to the relevant label on the unit itself.
- Installation, service, maintenance and repair of this unit must be performed by a certified technician.
- Product uninstallation and recycling must be performed by a certified technician.
- If the system has a leak-detection system installed, it must be checked for leaks at least every 12 months.
- When the unit is checked for leaks, proper record-keeping of all checks is strongly recommended.
- This air-conditioning unit is a hermetically sealed unit that contains fluorinated gasses.
B PART NAMES
INDOOR UNIT Indoor unit
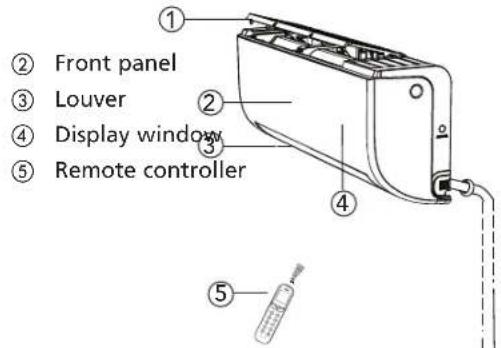
(For S 5125 B, S 5132 and S 5148 connecting

NOTE!
All the pictures in this manual and on the gift box are for explanation and indication purpose only. They may be slightly different from the air conditioner you purchased. The actual shape shall prevail.
GB
29
FUNCTION INDICATORS ON INDOOR UNIT DISPLAY PANEL

on for 3 seconds when:
- TIMER ON is set
- FRESH, SWING, TURBO, or SILENCE features are turned on
OF for 3 seconds when:
- TIMER OFF is set
- FRESH, SWING, TURBO, or SILENCE features are turned off
cF when defrosting(cooling & heating units)
df when anti-cold air feature is turned on (cooling & heating units)
5C when unit is self-cleaning (some units)
FP when freeze protection is turned on (some units)
when Wireless Control feature is activated (some units)
88 when ECO function(some units) is activated, the 88 illuminates gradually one by one as E - C - D set temperature -- E ..... in one second interval
In other modes, the unit will display your temperature setting.
In Fan and Dry mode, the unit will display the room temperature.
Cooling, heating and / or dehumidifying are effective at the following indoor and outdoor temperatures:
| Temperature\Mode | Cooling operation | Heating operation | Dehumidifying operation |
| Room temperature | 17°C - 32°C | 0°C - 30°C | 10°C - 32°C |
| Outdoor temperature | -25°C - 50°C | -25°C - 30°C | 0°C - 50°C |

CAUTION
- If air conditioner is used outside of the above conditions, certain safety protection features may come into operation and cause the unit to function abnormally.
- If the air conditioner operates in excess of a relative humidity of 80% in the room, the surface of the air conditioner may attract condensation. Please set the vertical air flow louver to its maximum angle (vertically to the floor), and set HIGH fan mode.
- For maximum effect of your air conditioner always close doors and windows when cooling or heating.
GB
30

- Always aim the remote controller towards the receiver on the indoor unit and make sure there are no obstacles in between the remote control and the receiver on the indoor unit. Otherwise the remote control signal will not be picked up by the receiver and the air conditioner will not work properly.
- The maximum distance at which the remote control will work is approximately 6 to 7 meters.

NOTE!
Keep the remote controller where its signal can reach the receiver of the unit. When you select the timer operation, the remote controller automatically transmits a signal to the indoor unit at the specified time. If you keep the remote controller in a position that hinders proper signal transmissions, a time lag of up to 15 minutes may occur.
Introduction of Function Buttons on the Remote Controller
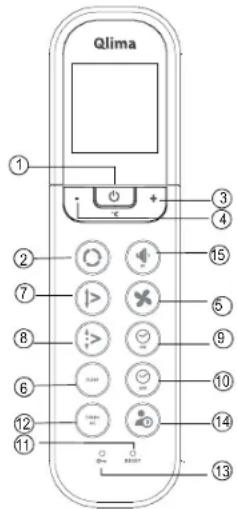
① On/off Button: Push this button to start the unit operation. Push the button again to stop the unit operation.
② Mode Button: Each time you press the button, a mode is selected in a sequence that goes from AUTO COOL DRY HEAT and FAN only as the following figure indicates:

③ + Button: Push the button to increase the indoor temperature setting to 30^ C.
④ - Button: Push the button to decrease the indoor temperature setting to 17°C.
⑤ Fan Button: This button is used for selecting Fan Speed. Each time you press the button, a fan speed is selected in a sequence that goes from AUTO, LOW, MED to HIGH, then back to Auto. When you select the AUTO or DRY mode, the fan speed will be automatically controlled and you can not set the fan speed.
⑥ SLEEP Button: Press this button to go into the Energy-Saving operation mode. Press it again to cancel. This function can only be used on COOL, HEAT and AUTO mode and maintain the most comfortable temperature for you. The unit automatically increases the set temperature by 1°C per hour (in cooling mode) or decreases the set temperature by 1°C per hour (heating mode) during the first 2 hours. The air conditioner will maintain this temperature (set temperature – or + 2 degrees) during the next 5 hours. After this period, the air conditioner will shut itself down.
⑦ Swing Button: Press the SWING button to activate the swing feature. Push the button again to stop.
⑧ Air direction Button: Press this button to change the swing angle of the louver. The swing angle of the louver is 6^ for each press. When the louver swings at a certain angle which would affect the cooling and heating effect of the air conditioner, it would automatically change the swing direction. No symbol will appear in the display area when press this button.
⑨ Timer on Button: Press this button to initiate the auto-on time sequence. Each press will increase the auto-timed setting in 30 minutes increments. When the setting time displays 10Hr, each press will increase the auto-timed setting 60 minutes increments. To cancel the auto-timed program, continue pressing the button until 0.0 is displayed.
⑩ Timer off Button: Press this button to initiate the auto-off time sequence. Each press will increase the auto-timed setting in 30 minutes increments. When the setting time displays 10Hr, each press will increase the auto-timed setting 60 minutes increments. To cancel the auto-timed program, continue pressing the button until 0.0 is displayed.
⑪ RESET Button: When you press the recessed RESET button, all current settings are cancelled and the control will return to the initial settings.
⑫ Turbo Button / Active Clean button: Push this button on COOL mode, the air conditioner goes into powerful cooling operation. Push again to cancel the TURBO function. Upon pressing this button (> 2 sec) the unit will go into the Active Clean mode. A complete process will be started to clean the internal side of the evaporator and to reduce the breeding of bacteria. When this function is activated all timer settings will be cancelled. To stop the Active Clean mode press the button (> 2 sec) again.
⑬ LOCK Button: When you press the recessed LOCK button, all current settings are locked in and the remote controller does not accept any operation except that of the LOCK. Press again to cancel the LOCK mode.
⑭ LED DISPLAY / FOLLOW ME Button: Press this button to clear the digit display in the air conditioner. The digit display in the air conditioner will reactivate itself automatically after 3 seconds, when no buttons are being pressed in this period. Press it again to activate it (Not applicable to units without this function). When pushing more than 2 seconds, the FOLLOW ME function will be activated, pushing more than 2 seconds again to disable.
⑮ Low sound button / indoor freezing prevention: Press this button to decrease the indoor sound pressure level to 21 dB(A). The indoor unit fan speed is reduced to its lowest level. Upon pressing this button (>2 seconds) the unit will go into the freezing prevention mode. The unit will overrule the indoor temperature setting and will set it to approx 8 °C. In this way preventing your home from freezing during cold periods at the lowest possible energy consumption. When this mode is selected the indoor unit display will show "FP". This button can only be operated in heating mode. To leave the Home Freezing Prevention Mode: simply press the button once again.
Names and Functions of indicators on Remote Controller
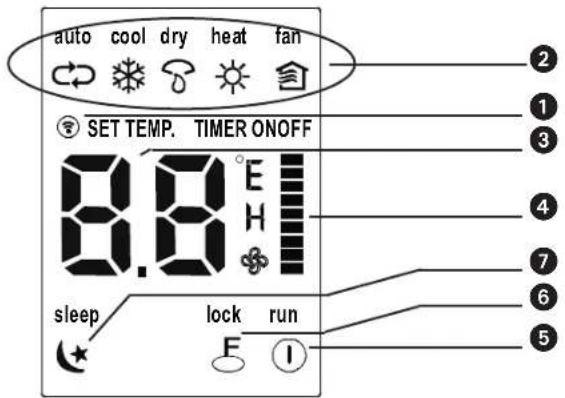
GB
32
① Transmission indicator: This transmission indicator lights when remote controller transmits signals to the indoor unit.
② Mode display: Displays the current operation mode. Including Auto ☐, Cool ☑Dry , Heat (Not applicable to cooling only models), Fan 📄.
③ Temp. / Timer display: Displays the temperature setting (17°C \~ 30°C). When you set the operating mode to FAN, no temperature setting is displayed. And if in the TIMER mode, shows the ON and OFF settings of the TIMER.
④ Fan speed display: Displays the selected fan speed, AUTO (no display), LOW ✦, MED I and HIGH I The fan speed is AUTO when the operating mode is either AUTO or DRY.
⑤ ON / OFF display: Displayed by pressing the ON / OFF button. Press the ON / OFF button again to remove.
⑥ Lock display: Displayed when LOCK mode is activated.
⑦ Sleep display: Displayed under sleeping operation. Press the SLEEP button again to remove.

NOTE!
All items are shown in the Fig. 2 for the purpose of clear presentation. But during the actual operation only the relative functional items are shown on the display panel.
Operating the Remote Controller
Install / Replace Batteries
Use two dry alkaline batteries (AAA/LR03).
Do not use rechargeable batteries.
- Remove the battery cover on the back of the Remote Control by pulling it according to the arrow direction shown on the cover.
- Insert new batteries making sure that the (+) and (-) of battery are installed correctly.
- Reattach the cover by sliding it back into position.

NOTE!
- When the batteries are removed, the remote controller erases all programming. After inserting new batteries, the remote controller must be reprogrammed.
- When replacing batteries, do not use old batteries or a different type battery. This may cause the remote controller to malfunction.
- If you do not use the remote controller for several weeks remove the batteries. Otherwise battery leakage may damage the remote controller.
- The average battery life under normal use is about 6 months.
- Replace the batteries when there is no answering beep from the indoor unit or if the Transmission Indicator light fails to appear.
- Never mix new and old batteries. Never use different battery types (e.g. alkaline and manganese dioxide) simultaneously.
AUTOMATIC Operation
When the air conditioner is ready for use (check if unit is plugged in and whether electrical power is available), switch on the power and the OPERATION indicator lamp on the display panel of the indoor unit starts flashing.
- Use the Mode select button to select AUTO.
- Push the + or - button to set the desired room temperature.
- Push the On/off button to start the air conditioner. The OPERATION lamp on the display panel of the indoor unit lights. The FAN SPEED is automatically controlled.
- Push the On/off button again to stop the unit operation.
GB
33

NOTE!
- In the AUTO mode, the air conditioner can logically choose the mode COOL, FAN and HEAT by sensing the difference between the actual ambient room temperature and the set temperature on the remote controller.
- If the AUTO mode is not comfortable for you, the desired mode can be selected manually.
COOL, HEAT, and FAN ONLY Operation
- If the AUTO mode is not comfortable, you may manually override the settings by using COOL, DRY, HEAT (HEAT PUMP units only), or FAN ONLY modes by pressing button ②.
- Push the + or - button (③ and ④) to set the desired room temperature.
- Push the Fan button ⑤ to select the FAN mode of AUTO, HIGH, MED or LOW.
- Push the On/off button ①. The operation lamp lights and the air conditioner starts to operate per your settings. Push the On/off button ① again to stop this unit operation.

NOTE!
The FAN ONLY mode cannot be used to control the temperature. In this mode, only steps 1, 3 and 4 are applicable.
DRY Operation
- Push the Mode button ② to select DRY.
- Push the + or - button (③ and ④) to set the desired temperature.
- Push the On/off button ①. The operation lamp lights and the air conditioner starts to operate in the DRY mode. Push the On/off button ① again to stop this unit operation.

NOTE!
Due to the difference of the set temperature of the unit and the actual indoor temperature, the air conditioner when in DRY mode will automatically operate many times without running the COOL and FAN mode.
TIMER Operation
Push Timer on/off button (⑨ and ⑩) to set the on and off times of the unit. The effective operation time set by the remote controller for the timer function is limited to a period of between 0.5 and less than 24 hours.
1. To set the STARTING time.
1.1 Push the Timer on button ⑨, then the remote controller display shows ON TIMER, the last set time for the starting operation and the signal "h" will be shown on the Timer display area. You are now ready to reset the time to START the operation.
1.2 Push the Timer on button ⑨ again to set desired unit start time.
1.3 After setting the Timer on, there will be half a second delay before the remote controller transmits the signal to the air conditioner.
2. To set the STOPPING time.
2.1 Push the Timer off button ⑩ and the remote controller display will show OFF TIMER and the last set time for the timer off operation in hours will be shown on the Timer display area. You are now ready to reset the time of the STOP operation.
2.2 Push the Timer off button ⑩ again to set the time you want to stop the operation.
2.3 After setting the Timer off, there will be half a second delay before the remote controller transmits the signal to the air conditioner.
GB
34


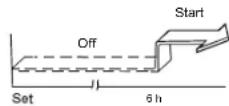
timer setting
To start the air conditioner in 6 hours.
- Press the TIMER ON button, the last setting of starting operation time and the signal "h" will show on the display area.
- Press the TIMER ON button to display "6:0h".
- Wait for one second and the digital display area will show the temperature again. The "TIMER ON" indicator remains on and this function is activated.


Combined timer
(setting both ON and OFF timers simultaneously)
(On --> Stop --> Start operation)
This feature is useful when you want to stop the air conditioner after you go to bed, and start it again in the morning when you wake up or when you return home.
Example:
To stop the air conditioner 2 hours after setting and start it again 10 hours after setting.
- Press the TIMER OFF button.
- Press the TIMER OFF button again to display 2.0h on the TIMER OFF display
- Press the TIMER ON button
-
Press the TIMER ON button again to display 10h on the TIMER ON display
-
Wait for one second and the digital display area will show the temperature again. The TIMER ON OFF indicator remains on and this function is activated.

NOTE!
- If the same time is set for both START and STOPPING settings, the stopping time will automatically increase 0.5hr (the set time displays less than 10hr) or one hour (the set time displays 10hr or more).
- To change the Timer on/off time, just press the corresponding TIMER button and reset the time.
- The setting time is relative time. That is the time set is based on the delay of the current time.

WARNING
- Keep the remote controller away from all liquids.
- Protect the remote controller from high temperatures and exposure to radiation.
- Keep the indoor receiver out of direct sunlight or the air conditioner may malfunction.
GB
35
E MANUAL OPERATION (WITHOUT REMOTE)
How to operate your unit without the remote control.
In the event that your remote control fails to work, your unit can be operated manually with the MANUAL CONTROL button located on the indoor unit. Note that manual operation is not a long-term solution, and that operating the unit with your remote control is strongly recommended.

Unit must be turned off before manual operation.

operate your unit manually:
Note the MANUAL CONTROL button on the right-hand side panel of the unit.
Press the MANUAL CONTROL button one time to activate FORCED AUTO mode.
Press the MANUAL CONTROL button again to activate FORCED COOLING mode.
- Press the MANUAL CONTROL button a third time to turn the unit off.

CAUTION
The manual button is intended for testing purposes and emergency operation only. Please do not use this function unless the remote control is lost and it is absolutely necessary. To restore regular operation, use the remote control to activate the unit.
F OPTIMAL OPERATION
To achieve optimal performance, please note the following:
- Adjust the air flow direction correctly so that it is not directly directed to people.
- Adjust the temperature to achieve the highest comfort level. Do not adjust the unit to excessive temperature levels.
- Close doors and windows otherwise the desired effect may be reduced.
- Do not put any object near air inlet or air outlet, as the efficiency of the air conditioner may be reduced and the air conditioner may stop running. Make sure there are no obstacles blocking the air flow. The air stream must be allowed to reach the entire room unhindered. Also the air stream must be allowed to reach the air conditioner unhindered.
- Clean the air filter periodically, otherwise cooling or heating performance may be reduced. It is advised to clean the filters every two weeks.
- Do not operate unit with horizontal louvre in closed position.
GB
36

G ADJUSTING AIR FLOW DIRECTION

natural_image
Illustration of a hand holding a pen, showing a curved panel being lifted by an arrow (no text or symbols)- Adjust the air flow direction properly otherwise, it might cause discomfort or cause uneven room temperatures.
- Adjust the horizontal louver using button ⑧ on the remote controller.
- Adjust the vertical louver manually.
Adjusting the horizontal Air Flow Direction (up - down)
The air conditioner automatically adjusts the horizontal air flow direction in accordance with the operating mode.
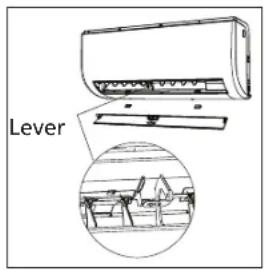
To set the horizontal air flow direction
Perform this function while the unit is in operation. Keep pressing the AIR DIRECTION button ⑧ on the remote controller to move the louver to the desired direction.
- Adjust the horizontal air flow direction to the desired direction.
- In subsequent operations, the horizontal air flow is automatically set in the direction to which you adjusted the louver by pressing the AIR DIRECTION button.
To set the vertical air flow direction (left - right)
Adjust the vertical louver manually using the lever in the middle of the vertical louver arm (depending on model). When the air conditioner is in operation and the vertical louver is in a specific position, move the lever at left (or right, depending on model) end of the air outlet to the desired position.

CAUTION!
Take care, do not touch the fan behind the vertical louvers!
To automatically swing the air flow direction (up - down)
Perform this function while the air conditioner is in operation.
- Press the SWING ⑦ button on the remote controller.
- To stop the function, press the SWING button ⑦ again. Press AIR DIRECTION ⑧ button to lock louver in desired position.

CAUTION
- The AIR DIRECTION and SWING buttons will be disabled when the air conditioner is not in operation (including when the TIMER ON is set).
- Do not operate the air conditioner for long periods with the air flow direction set downward in cooling or dry mode. Otherwise, condensation may occur on the surface of the horizontal louver causing moisture to drop.
- Do not move the horizontal louver manually. Always use the AIR DIRECTION ⑧ or SWING button ⑦. If you move this louver manually, it may malfunction during operation. If the louver malfunctions, stop the air conditioner once and restart it.
- When the air conditioner is started immediately after it was stopped, the horizontal louver might not move for approximately 10 seconds.
- Do not operate unit with horizontal louver in closed position.
GB
37
H HOW THE AIR CONDITIONER WORKS
Press Sleep button
AUTOMATIC OPERATION

COOLING

HEATING

DEHUMIDIFYING
- When you set the air conditioner in AUTO mode (button 2 on the remote controller), it will automatically select COOLING, HEATING or FAN only operation depending on what temperature you have selected and the room temperature.
will control room temperature automatically round the temperature point set by you.
- If the AUTO mode is uncomfortable, you can select desired conditions manually.
OPERATION
- When you push SLEEP button ⑥ during COOLING, HEATING or AUTO operation, the air conditioner will automatically increase (cooling) or decrease (heating) 1°C per hour. The set temperature will be steady 2 hours later and remains steady for 5 hours. After 5 hours the unit will stop. The fan speed will be automatically controlled.
- The dehumidifying mode will automatically select the dehumidifying operation based on the difference between the set temperature and the actual room temperature.
- The temperature is regulated while dehumidifying by repeatingly turning on and off of the cooling operation or fan only. The fan speed is controlled automatically.
• In normal cooling operation the air conditioner will also dehumidify the air.

NOTE
When the air conditioner is dehumidifying it is likely that the room temperature will decrease. It is therefore normal that a hygrostat will measure a higher relative humidity. The absolute humidity in the room will however be lowered, depending on the amount of moisture produced in the room (cooking, people etc).
GB
38

MAINTENANCE


WARNING
- It is necessary to stop the air conditioner and disconnect the power supply before cleaning.
• If a 4.8kW model is used, interrupt the power supply.

Cleaning the indoor unit and remote controller

CAUTION
- Use a dry cloth to wipe the indoor unit and remote controller.
- A cloth dampened with cold water may be used on the indoor unit if it is very dirty.
- The front panel of the indoor unit can be removed and cleaned with water. Then wipe it with a dry cloth.
- Do not use a chemically treated cloth or duster to clean the unit.
- Do not use benzine, thinner, polishing powder, or similar solvents for cleaning. These may cause the plastic surface to crack or deform.

natural_image
Technical line drawing of a mechanical component or housing (no text or symbols)Cleaning the filter
A clogged air filter reduces the cooling efficiency of this unit. Clean the filter once every 2 weeks.
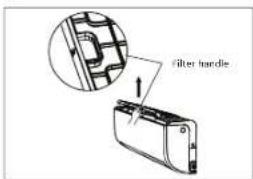
- The air filter is under the top air inlet grill.
- Grip the tab on the end of the filter, lift it up, then pull it towards yourself.
- Remove the screen filter from the indoor unit.
- Clean the screen filter once every two weeks.
-
Clean screen filter with a vacuum cleaner or water.
-
The black active carbon filter cannot be cleaned. This filter will simply not filter unpleasant odours anymore once dirty. At that moment this filter needs to be replaced by a new filter. (available at your dealer). It is advised to exchange this filter twice every season.
-
The green coloured 3M HAF filter will show clear signs of dirt on and in the filter once dirty. When dirty this filter cannot be cleaned and needs to be replaced by a new filter (available at your dealer). It is advised to exchange this filter twice every season.

natural_image
Diagram of a grid-like structure with a small mechanical component above it (no text or symbols)
natural_image
Technical line drawing of a mechanical device with internal components and a separate component (no text or symbols)New filter
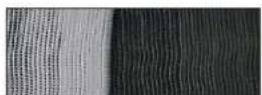
Recommended change of filter
- After replacing the active carbon filter and the 3M HAF filter in the filter holder on the screen filter, the screen filter can be replaced into the air conditioner.
- Ensure before replacing that the filter is completely dry and has no defects.
- Install the air freshening filter back into position.
- Insert the upper portion of air filter back into the unit taking care that the left and right edges line up correctly and place filter into position.
Maintenance
If you plan to idle the unit for a long time, perform the following:
- Operate the fan for about 6 hours to dry the inside of the unit.
- Stop the air conditioner and disconnect power. If a 4.8kW model is used, interrupt the power supply. Remove the batteries from the remote controller.
GB
39
- The outdoor unit requires periodic maintenance and cleaning. This should only be done by an authorized airconditioning engineer.
Checks before operation
- Check that the wiring is not broken or disconnected.
- Check that the air filter is installed.
- Check if the air outlet or inlet is not blocked after the air conditioner has not been used for a long time.

CAUTION
- Do not touch the metal parts of the unit when removing the filter. Injuries can occur when handling sharp metal edges.
- Do not use water to clean inside the air conditioner. Exposure to water can destroy the insulation, leading to possible electric shock.
- When cleaning the unit, first make sure that the power and circuit breaker are turned off.
J OPERATION TIPS
The following events may occur during normal operation.
- Protection of the air conditioner.
Compressor protection
- The compressor cannot restart for 3 minutes after it stops.
Anti-cold air
- The unit is designed not to blow cold air on HEAT mode, when the indoor heat exchanger is in one of the following three situations and the set temperature has not been reached.
A. When heating has just started.
B. Defrosting.
C. Low temperature heating.
Defrosting
- The indoor or outdoor fan stops running when defrosting.
- Frost may be generated on the outdoor unit during heat cycle when outdoor temperature is low and humidity is high resulting in lower heating efficiency of the air conditioner.
- During this condition air conditioner will stop heating operation periodically and start defrosting automatically.
-
The time to defrost may vary from 4 to 10 minutes according to the outdoor temperature and the amount of frost buildup on the outdoor unit.
-
A white mist coming out from the indoor unit.
-
A white mist may generate due to a large temperature difference between air inlet and air outlet on COOL mode in an indoor environment that has a high relative humidity.
- A white mist may generate due to moisture generated from defrosting process when the air conditioner restarts in HEAT mode operation after defrosting.
GB
40

3. Low noise of the air conditioner.
- You may hear a low hissing sound when the compressor is running or has just stopped running. This sound is the sound of the refrigerant flowing or coming to a stop.
- You can also hear a low "squeak" sound when the compressor is running or has just stopped running. This is caused by heat expansion and cold contraction of the plastic parts in the unit when the temperature is changing.
- A sound may be heard due to louver restoring to its original position when power is first turned on.
4. Dust is blown out from the indoor unit.
- This is a normal condition when the air conditioner has not been used for a long time or during first use of the unit.
5. A peculiar smell comes out from the indoor unit.
- This is caused by the indoor unit giving off smells permeated from building material, from furniture, or smoke.
6. The air conditioner turns to FAN only mode from COOL or HEAT mode.
- When indoor temperature reaches the temperature setting on air conditioner, the compressor will stop automatically, and the air conditioner turns to FAN only mode. The compressor will start again when the indoor temperature rises on COOL mode or falls on HEAT mode to the set point.
- Dripping water may generate on the surface of the indoor unit when cooling in a high relatively humidity (relative humidity higher than 80%). Adjust the horizontal louver to the maximum air outlet position and select HIGH fan speed.
8. Heating mode.
- The air conditioner draws in heat from the outdoor unit and releases it via the indoor unit during heating operation. When the outdoor temperature falls, heat drawn in by the air conditioner decreases accordingly and the heating capacity will decrease. At the same time, heat loading of the air conditioner increases due to larger difference between indoor and outdoor temperature. If a comfortable temperature cannot be achieved by the air conditioner, it is advised to use a supplementary heating device.
9. Auto-restart function.
- Power failure during operation will stop the unit completely. The air conditioner is equipped with Auto-restart feature, when the power restores, the unit restarts automatically with all the previous settings preserved by the memory function.
10. Refrigerant leak detection.
• The air conditioner is provided with a Refrigerant leak detection system.
When the outdoor unit detects a shortage of refrigerant, the air conditioner will stop and the indoor unit shows the alarm EC on the display.
When this alarm occurs, do not restart the air conditioner and contact your supplier.
K TROUBLE SHOOTING TIPS
Malfunctions and Solutions

TROUBLE
Stop the air conditioner immediately if one of the following faults occur. Disconnect the power and contact your supplier.
- Fuse blows frequently or circuit breaker trips frequently.
- Other objects or water penetrate the air conditioner.
- The remote controller won't work or works abnormally.
• Other abnormal situations.
| Issue Possible Causes | |
| Unit does not turn on when pressing ON/OFF button | The Unit has a 3-minute protection feature that prevents the unit from over- loading. The unit cannot be restarted within three minutes of being turned off. |
| The unit changes from COOL/HEAT mode to FAN mode | The unit may change its setting to prevent frost from forming on the unit. Once the temperature increases, the unit will start operating in the previ- ously selected mode again. |
| The set temperature has been reached, at which point the unit turns off the compressor. The unit will continue operating when the temperature fluctu- ates again. | |
| The indoor unit emits white mist | In humid regions, a large temperature difference between the room's air and the conditioned air can cause white mist. |
| Both the indoor and outdoor units emit white mist | When the unit restarts in HEAT mode after defrosting, white mist may be emitted due to moisture generated from the defrosting process. |
| The indoor unit makes noises | A rushing air sound may occur when the louver resets its position. |
| A squeaking sound may occur after running the unit in HEAT mode due to expansion and contraction of the unit's plastic parts. | |
| Both the indoor unit and out- door unit make noises | Low hissing sound during operation: This is normal and is caused by refrigerant gas flowing through both indoor and outdoor units. |
| Low hissing sound when the system starts, has just stopped running, or is defrosting: This noise is normal and is caused by the refrigerant gas stopping or changing direction. | |
| Squeaking sound: Normal expansion and contraction of plastic and metal parts caused by temperature changes during operation can cause squeaking noises. | |
| The outdoor unit makes noises The | The unit will make different sounds based on its current operating mode. |
| Dust is emitted from either the indoor or outdoor unit | The unit may accumulate dust during extended periods of non-use, which will be emitted when the unit is turned on. This can be mitigated by cover-ring the unit during long periods of inactivity. |
| The unit emits a bad odor | The unit may absorb odors from the environment (such as furniture, cook- ing, cigarettes, etc.) which will be emitted during operations. |
| The unit's filters have become moldy and should be cleaned. | |
| The fan of the outdoor unit does not operate | During operation, the fan speed is controlled to optimize product operation. |
| Operation is erratic, unpredictable, or unit is unresponsive | Interference from cell phone towers and remote boosters may cause the unit to malfunction. In this case, try the following:· Disconnect the power, then reconnect.· Press ON/OFF button on remote control to restart operation. |
GB
42


NOTE!
If problem persists, contact a local dealer or your nearest customer service center. Provide them with a detailed description of the unit malfunction as well as your model number.
| Problem Cause Solution | ||
| Poor Cooling Performance | Temperature setting may be higher than ambient room temperature | Lower the temperature setting |
| The heat exchanger on the indoor or outdoor unit is dirty | Clean the affected heat exchanger | |
| The air filter is dirty | Remove the filter and clean it according to instructions | |
| The air inlet or outlet of either unit is blocked | Turn the unit off, remove the obstruction and turn it back on | |
| Doors and windows are open | Make sure that all doors and windows are closed while operating the unit | |
| Excessive heat is generated by sunlight | Close windows and curtains during periods of high heat or bright sunshine | |
| Too many sources of heat in the room (people, computers, electronics, etc.) | Reduce amount of heat sources | |
| Low refrigerant due to leak or long-term use | Check for leaks, re-seal if necessary and top off refrigerant | |
| SILENCE function is activated(optional function) | SILENCE function can lower product performance by reducing operating frequency. Turn off SILENCE function. | |
| The unit is not working | Power failure Wait for the power to be restored | |
| The power is turned off Turn on the power | ||
| The fuse is burned out Replace the fuse | ||
| Remote control batteries are dead Replace batteries | ||
| The Unit's 3-minute protection has been activated | Wait three minutes after restarting the unit | |
| Timer is activated Turn timer off | ||
| The unit starts and stops frequently | There's too much or too little refrigerant in the system | Check for leaks and recharge the system with refrigerant. |
| Incompressible gas or moisture has entered the system. | Evacuate and recharge the system with refrigerant | |
| The compressor is broken Replace the compressor | ||
| The voltage is too high or too low Install a manostat to regulate the voltage | ||
| Poor heating performance | The outdoor temperature is extremely low | Use auxiliary heating device |
| Cold air is entering through doors and windows | Make sure that all doors and windows are closed during use | |
| Low refrigerant due to leak or long-term use | Check for leaks, re-seal if necessary and top off refrigerant | |
| Indicator lamps continue flashing | The unit may stop operation or continue to run safely. If the indicator lamps continue to flash or error codes appear, wait for about 10 minutes. The problem may resolve itself.If not, disconnect the power, then connect it again. Turn the unit on.If the problem persists, disconnect the power and contact your nearest customer service center. | |
| Error code appears in the window display of indoor unit:• E0, E1, E2...• P1, P2, P3...• F1, F2, F3... | ||
If the trouble has not been corrected, please contact your supplier. Be sure to inform them of the detailed malfunctions and unit model.

NOTE!
Reparation of the device should only be done by an authorized air conditioning engineer.
L GUARANTEE CONDITIONS
The air conditioner is supplied with a 48-month guarantee on the compressor and a 24-month guarantee on other components, commencing on the date of purchase. The following rules apply:
- We expressly refuse all further damage claims, including claims for collateral damage.
- Repairs to or replacement of components within the guarantee period will not result in an extension of the guarantee.
- The guarantee is invalidated if any modifications have been made, non genuine parts are fitted or repairs are carried out by third parties.
- Components subject to normal wear, such as the filter, are not covered by the guarantee.
- The guarantee is valid only when you present the original, dated purchase invoice and if no modifications have been made.
- The guarantee is invalid for damage caused by neglect or by actions that deviate from those in this instruction booklet.
- Transportation costs and the risks involved during the transportation of the air conditioner or air conditioner components shall always be for the account of the purchaser.
- Damage caused by not using suitable filters is not covered by the guarantee.
- Refrigerant loss and/or leakage because of incompetent (dis)connecting of the units and/or (dis-) connection of the units by not qualified personnel is not covered by the guarantee conditions applicable to this product. Damage to units which are mounted, connected and/or disconnected not following local law and/or legislation and/or not following the guidelines in this manual is not covered by the guarantee conditions applicable to this product.
Consult your dealer for repairs if these instructions do not provide a solution. Make sure that in the unlikely case of needed disconnection, that disconnection is always done by qualified, authorized personnel and according to your local laws and legislation.
M TECHNICAL DATA
| Model | S 5125 B S 513 | 2 S 5148 SC-JA2518 | SC-JA4818 | |||
| Type air-conditioner | Wall mounted split | Wall mounted split | Wall mounted split | Wall mounted split | Wall mounted split | |
| Cooling capacity nominal (min-max) * | W | 2668 (1172 - 3312) | 3500 (1260 - 4455) | 5426 (1905 - 6125) | 2649 (1172 - 3312) | 5314 (1905 - 6125) |
| EE Class cooling * | A++ A++ A++ | A++ A++ | ||||
| SEER* | 6.7 6.7 6.8 6 | 8 6.3 | ||||
| Heating capacity nominal (min-max) * | W 2325 | 821 - 3722) 3810 (10 | 67 - 4865) 4126 (1427 - 6741) | 2633 (821 - 3722) | 3848 (1427 - 6741) | |
| EE Class heating * | A+ A+ A+ A+ | A+ | ||||
| SCOP* | 4.1 4.2 4.2 4 | 4.2 | ||||
| Dehumidifying capacity (at 32°C/80%) ** / *** | L / 24 h | 27 | 33 | 49 | 27 | 49 |
| Power consumption cooling | kW | 0.8 1.2 1.6 0 | 8 2.0 | |||
| Power consumption heating | kW | 0.8 1.1 1.6 0 | 8 1.9 | |||
| Annual energy consumption * | kWh | 0.14 / 0.78 | 0.18 / 0.86 | 0.28 / 1.36 | 0.13 / 0.91 | 0.29 / 1.27 |
| Power supply | V / Hz / Ph | 220-240° / 50 / 1 | 220-240° / 50 / 1 | 220-240° / 50 / 1 | 220-240° / 50 / 1 | 220-240° / 50 / 1 |
| Current (nom.) cooling / heating | A | 3.5 / 3.5 | 5.0 / 4.6 | 7.1 / 6.9 | 3.5 / 3.5 | 7.1 / 6.9 |
| Max. Current | A | 9.5 10 | 13 9.5 13 | |||
| Air flow ** | m3/h | 472/360/254 | 563/497/224 | 810/720/540 | 472/360/254 | 810/720/540 |
| For rooms up to** | m3 | |||||
| Suited for regions W / A / C | W / A / C W / A | C / C | W / A | C / C W / A / C | ||
| Compressor type | Rotary | Rotary | Rotary | Rotary | Rotary | |
| Fan speeds | 3 | 3 | 3 | 3 | 3 | |
| Thermostatic range | oC | 17 - 30 | 17 - 30 | 17 - 30 | 17 - 30 | 17 - 30 |
| Controls manual / mechanic / electronic | Electronic remote | Electronic remote | Electronic remote | Electronic remote | Electronic remote | |
| Remote control Yes / No | Y | Y | Y | Y | Y | |
| Air filter type(s) | Screen, Active car-bon, 3M HAF | Screen, Active car-bon, 3M HAF | Screen, Active car-bon, 3M HAF | Screen, Active car-bon, 3M HAF | Screen, Active car-bon, 3M HAF | |
| Refrigerant type / charge | R / g | R410a / 800 | R410a / 950 | R410a / 1350 | R410a / 830 | R410a / 1480 |
| Refrigerant GWP | 2088 | 2088 | 2088 | 2088 | 2088 | |
| CO2 equivalent | tonnes | 1.67 | 1.88 | 2.82 | 1.73 | 3.09 |
| Refrigerant pipe diameter Liquid - Gas | mm | 6.35 / 9.52 | 6.35 / 9.52 | 6.35 / 9.52 | 6.35 / 9.52 | 6.35 / 9.52 |
| Normal pressure suction / discharge (max) | bar | 7 / 22 (10.5 / 34) | 7 / 22 (10.5 / 34) | 7 / 22 (10.5 / 34) | 7 / 22 (10.5 / 34) | 7 / 22 (10.5 / 34) |
| Dimensions indoor unit (w x h x d) | mm | 717x193x302 | 805x193x302 | 964x222x325 | 717x193x302 | 964x222x325 |
| Dimensions outdoor unit (w x h x d) | mm | 770x300x555 | 800x333x554 | 800x333x554 | 770x300x555 | 800x333x554 |
| Net weight indoor unit | kg | 7 | 7.7 | 10.8 | 12 | 16.4 |
| Net weight outdoor unit | kg | 27.4 | 29.1 | 35.1 | 27.7 | 35.1 |
| Gross weight indoor unit | kg | 9.3 | 10.2 | 14.2 | 16.6 | 21.2 |
| Gross weight outdoor unit | kg | 29.8 | 31.9 | 37.9 | 30.1 | 37.9 |
| Sound pressure level indoor unit **** | dB(A) | 40 | 41 | 42 | 40 | 42 |
| Sound pressure level outdoor unit **** | dB(A) | 55 | 56 | 56 | 55 | 56 |
| Sound pressure level indoor unit (low) **** | dB | 22 | 23 | 24 | 22 | 24 |
| Unit protection indoor | IP | IPX0 | IPX0 | IPX0 | IPX0 | IPX0 |
| Unit protection outdoor | IP | IP24 | IP24 | IP24 | IP24 | IP24 |
| Fuse rating | T20A/250VAC-T-P-HT | T20A/250VAC-T-P-HT | T20A/250VAC-T-P-HT | T20A/250VAC-T-P-HT | T20A/250VAC-T-P-HT |
* EN 14511 / EN14825
** To be used as indication
*** Moisture removal at 32°C, 80% RH
**** EN12102-2008

Do not dispose of electrical appliances as unsorted municipal waste, use separate collection facilities. Contact your local government for information regarding the collection systems available. If electrical appliances are disposed of in landfills or dumps, hazardous substances can leak into the groundwater and get into the food chain, damaging your health and well-being. When replacing old appliances with new once, the retailer is legally obligated to take back your old appliance for disposal at least for free of charge. Do not throw batteries into the fire, where they can explode or release dangerous liquids. If you replace or destroy the remote control, remove the batteries and throw them away in accordance with the applicable regulations because they are harmful to the environment.
Environmental information: This equipment contains fluorinated greenhouse gases covered by the Kyoto Protocol. It should only be serviced or dismantled by professional trained personnel.
This equipment contains R410A refrigerant in the amount as stated in the table above. Do not vent R410A into atmosphere: R410A, is a fluorinated greenhouse gas with a Global Warming Potential (GWP) = 2088
Internet:
For your convenience you can download the latest version of the user-, installation- and/or service manual on www.Qlima.com


natural_image
Pure vertical line with a small crosshair symbol at the center (no text or labels)


GB
47

Kjære kunde!
E MANUELL DRIFT (UTEN FJERNKONTROLL)
Slik betjener du enheten uten fjernkontrollen.

HEATING (OPPVARMING)
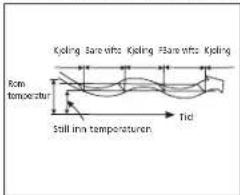
natural_image
Line drawing of a mechanical component or housing with no visible text or symbolsnatural_image
Simple line drawing of a grid-patterned object with a faucet attached (no text or symbols)natural_image
Technical line drawing of a mechanical assembly with no visible text or symbolsNytt filter

natural_image
Illustration of a hand holding a pen, showing a scroll being lifted by a fan or blade (no text or symbols present)natural_image
Technical line drawing of a mechanical housing or enclosure component (no text or symbols)
natural_image
Diagram of a metal rack with a water tap and a small object on top (no text or symbols)
natural_image
Technical line drawing of a mechanical device with internal components and a separate view showing part details (no text or symbols)natural_image
Illustration of a hand holding a pen, with a scroll and a mechanical component being lifted (no text or symbols)
natural_image
Technical line drawing of a mechanical housing or enclosure component (no text or symbols)Rengör luftfiltret

natural_image
Diagram of a metal grid device with a faucet and a small component, no text or symbols present.natural_image
Technical line drawing of a mechanical device with internal components and no visible text or symbolsNytt filter

Distributed in Europe by PVG Holding B.V.
Benötigen Sie weitere Informationen oder treten Probleme auf, besuchen Sie bitte unsere Website www.qlima.com, oder setzen Sie sich mit unserem Kundendienst in Verbindung (Telefonnummer auf www.qlima.com).
For alle yderligere oplysninger eller ved eventuelle problemer med apparatet henvises til www.qlima.com eller det lokale Kundecenter (telefonnumre findes i www.qlima.com).
(ES) Si necesita información o si tiene algún problema, visite nuestra página Web www.qlima.com, o póngase en contacto con el servicio cliente (hallará el número de teléfono en www.qlima.com).
F Si vous souhaitez obtenir des informations supplémentaires ou si vous rencontrez un problème, rendez-vous sur notre site Web (www.qlima.com) ou contactez notre service client (vous trouverez l'adresse et numéro de téléphone sur www.qlima.com).
Jos haluat huoltoapua, lisätietoja tai laitteen kanssa tulee ongelmia, tutustu verkkosivusloon osoitteessa www.qlima.com tai kysy neuvoa PVG kuluttajapalvelukeskuksesta (www.qlima.com).
(6a) If you need information or if you have a problem, please visit the our website (www.qlima.com) or contact our sales support (you find its phone number on www.qlima.com)
① Per informazioni e in caso di problemi, visitate il sito Web www.qlima.com oppure contattate il Centro Assistenza Clienti (per conoscere il numero di telefono, consultate www.qlima.com).
Hvis du trenger informasjon, eller hvis du har et problem med produktet, kan du gå til nettsidene www.qlima.com. Alternativt kan du kontakte med PVG' forbrukertjeneste (telefonnummeret i www.qlima.com).
Als u informatie nodig hebt of als u een probleem hebt, bezoek dan de onze website (www.qlima.com) of neem contact op met de afdeling sales support (adres en telefoon op www.qlima.com).
Se necessitar de informações ou se tiver problemas, visite o Web site www.qlima.com ou contacte o Centro de Assistência (número de telefone o www.qlima.com)
W przypadku problemów i w celu uzyskania szczegółowych informacji odwiedź stronę internetową Qlima dostępna pod adresem www.qlima.com lub skontaktuj się z Centrum kontaktów Qlima (www.qlima.com)
Om du behöver service eller information eller har problem med apparaten kan du besöka www.qlima.com eller kontakta Qlima kundtjänst (du hittar telefonnumret på www.qlima.com).
⑤D Če želite dodatne informacije, obiščite spletno mesto podjetja na naslovu www.qlima.com all pokličite na telefonsko (www.qlima.com).
TR Daha fazla bilgiye ihtiyaç duyarsanız veya bir sorunla karşılaşırsanız, www.qlima.com adresindeki Qlima Internet sitesini ziyaret edin veya ülkenizde bulunan Qlima müşteri merkeziyle iletişim kurun (telefon numarasını: www.qlima.com).


- FORSIGTIG
- Nyt filter
- CONTENTS
- READ THIS MANUAL
- A SAFETY INSTRUCTIONS
- IMPORTANT
- ATTENTION!
- Note about Fluorinated Gasses
- B PART NAMES
- NOTE!
- FUNCTION INDICATORS ON INDOOR UNIT DISPLAY PANEL
- CAUTION
- Introduction of Function Buttons on the Remote Controller
- Operating the Remote Controller
- Install / Replace Batteries
- AUTOMATIC Operation
- COOL, HEAT, and FAN ONLY Operation
- DRY Operation
- TIMER Operation
- To set the STARTING time.
- To set the STOPPING time.
- timer setting
- Combined timer
- Example:
- WARNING
- E MANUAL OPERATION (WITHOUT REMOTE)
- F OPTIMAL OPERATION
- G ADJUSTING AIR FLOW DIRECTION
- Adjusting the horizontal Air Flow Direction (up - down)
- To set the horizontal air flow direction
- To set the vertical air flow direction (left - right)
- CAUTION!
- To automatically swing the air flow direction (up - down)
- H HOW THE AIR CONDITIONER WORKS
- OPERATION
- NOTE
- MAINTENANCE
- Cleaning the indoor unit and remote controller
- Cleaning the filter
- Checks before operation
- J OPERATION TIPS
- Anti-cold air
- Defrosting
- Low noise of the air conditioner.
- Dust is blown out from the indoor unit.
- A peculiar smell comes out from the indoor unit.
- The air conditioner turns to FAN only mode from COOL or HEAT mode.
- Heating mode.
- Auto-restart function.
- Refrigerant leak detection.
- K TROUBLE SHOOTING TIPS
- Malfunctions and Solutions
- TROUBLE
- L GUARANTEE CONDITIONS
- M TECHNICAL DATA
- Internet:
- E MANUELL DRIFT (UTEN FJERNKONTROLL)
- Rengör luftfiltret
- Nytt filter
- Distributed in Europe by PVG Holding B.V.
Brand : QLIMA
Model : S 5148
Category : Air conditioner