802-700 - Blender Menuett - Free user manual and instructions
Find the device manual for free 802-700 Menuett in PDF.


| Product Type | Blender |
| Brand | Menuett |
| Model | 802-700 |
| Power | 700 W |
| Capacity | 1.5 L |
| Speed Settings | 2 speeds + pulse |
| Jar Material | Glass |
| Blade Material | Stainless steel |
| Dimensions (H x W x D) | 39 cm x 18 cm x 18 cm |
| Weight | 3.2 kg |
| Power Source | AC 220-240V, 50/60 Hz |
| Cord Length | 1.2 m |
| Safety Features | Overload protection, non-slip feet |
| Dishwasher Safe Parts | Jar, lid, measuring cap |
| Warranty | 2 years |
Frequently Asked Questions - 802-700 Menuett
User questions about 802-700 Menuett
0 question about this device. Answer the ones you know or ask your own.
Ask a new question about this device
Download the instructions for your Blender in PDF format for free! Find your manual 802-700 - Menuett and take your electronic device back in hand. On this page are published all the documents necessary for the use of your device. 802-700 by Menuett.
USER MANUAL 802-700 Menuett
natural_image
Black and white photo of a modern blender with clear glass body and two blades (no visible text or symbols)SE Bruksanvisning för blender
NO Bruksanvisning for blender
PL Instrukcja obsługi blendera
EN Operating instructions for blender
SE - Bruksanvisning i original
EN - Operating instructions (Translation of the original instructions)
Jula reserves the right to make changes. In the event of problems, please contact our service department.
www.jula.com
Tillverkare/ Produsent / Produenci/ Manufacturer
Jula AB, Box 363, 532 24 SKARA
Importör/ Importør/ Importer/ Importer
Care for the environment!
Must not be discarded with household waste! This product contains electrical or electronic components that should be recycled. Leave the product for recycling at the designated station e.g. the local authority's recycling station.
SVENSKA....5
SÄKERHETSANVISNINGAR....5
TEKNISKA DATA....6
BESKRIVNING 7
HANDHAVANDE 7
UNDERHÅLL 10
NORSK 11
SIKKERHETSANVISNINGER 11
TEKNISKE DATA 12
BESKRIVELSE....13
BRUK....13
VEDLIKEHOLD 16
POLSKI 17
ZASADY BEZPIECZEŃSTWA 17
DANE TECHNICZNE 18
OPIS 19
OBSŁUGA 19
KONSERWACJA 22
ENGLISH 23
SAFETY INSTRUCTIONS....23
TECHNICAL DATA....24
DESCRIPTION 25
USE 25
MAINTENANCE 28
SÄKERHETSANVISNINGAR
natural_image
Technical line drawing of a car interior frame with no text or symbols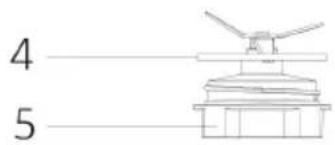


natural_image
Line drawing of a kitchen pot with lid and handle, showing top-down view with arrow indicating component (no text or symbols)natural_image
Line drawing of a kitchen appliance with a lid and handle, showing a black arrow pointing to the lid (no text or symbols)natural_image
Line drawings of a kitchen blender with a side panel, showing front, side, and top views (no text or symbols)natural_image
Technical line drawing of a car interior frame with no text or symbols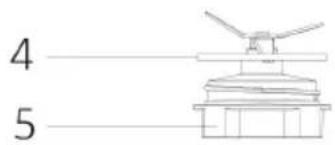


natural_image
Line drawing of a kitchen appliance with lid and handle, showing a drop in interior (no text or symbols)natural_image
Line drawing of a kitchen appliance with a lid and handle, showing a black arrow pointing to the lid (no text or symbols)natural_image
Line drawings of a kitchen blender with a side panel, showing front, side, and top views (no text or symbols)natural_image
Technical line drawing of a car interior frame with no text or symbols


natural_image
Line drawing of a kitchen pot with lid and handle, showing top-down view with arrow indicating component (no text or symbols)natural_image
Line drawing of a kitchen grater with a lid and handle, showing a black arrow pointing to the lid (no text or symbols)natural_image
Line drawings of a kitchen blender with a side panel, showing front, side, and top views (no text or symbols)Read the operating instructions carefully before use.
Save them for future reference.
• Always follow these basic safety instructions when using electrical appliances.
- Read all the instructions carefully before use.
- Check that the mains voltage corresponds to the rated voltage on the type plate.
- Do not allow the power cord to hang over the edge of a table or worktop, or to come into contact with hot surfaces.
- Do not use the appliance if it is damaged or not working properly, or if the power cord or plug are damaged. Take the appliance to an authorised service centre to be checked, repaired or adjusted.
- A damaged power cord must be replaced by an authorised service centre, or other qualified personnel, to ensure safe use.
- Keep the appliance under careful supervision when it is used by, or near children.
- Avoid contact with moving parts.
- Keep your hands and utensils away from the jug when the appliance is in use, otherwise there is a risk of serious personal injury and/or material damage. A rubber scraper or the equivalent can be used, but only when the appliance is not running.
- Do not use accessories other than those recommended or sold by the appliance manufacturer. The use of other accessories can result in fire, electric shock and/or personal injury.
- Unplug the power cord when the appliance is not in use, and before replacing parts or cleaning. Switch off with the power switch and unplug the power cord. Do not pull the power cord to unplug the plug.
- Never put the blades on the motor unit without the jug correctly in place first – risk of personal injury.
- The appliance is not intended to be used by persons (children or adults) with any form of functional disorders, or by persons who do not have sufficient experience or knowledge on how to use it, unless they have received instructions concerning the use of the appliance from someone who is responsible for their safety.
- Keep children under supervision to make sure they do not play with the appliance.
- Never leave the appliance unattended when switched on.
- Switch off the appliance, unplug the power cord, and wait until all moving parts have completely stopped before removing the jug from the motor unit.
- Never run the appliance without the lid properly in place.
- Only use the appliance on a dry, stable and level surface.
- Do not place the appliance on, or near hot surfaces.
- Do not use the appliance outdoors.
- Never use the appliance for anything other than its intended purpose.
- Switch off the appliance, unplug the power cord, and wait until all moving parts have completely stopped before the appliance is left unattended, and before assembling/dismantling and/or cleaning.
- Do not allow children to use the appliance. Store the appliance and its power cord out of the reach of children.
- The appliance does not contain any parts that can be repaired by the user. Servicing should only be carried out by qualified service personnel.
TECHNICAL DATA
| Rated voltage 230 V | ~50 Hz |
| Output | 500 W |
| Volume 1.5 l | |
| Max temperature 80°C | |
| Cord length 1.1 m | |
| Weight 1.7 kg |
DESCRIPTION

natural_image
Technical line drawing of a car interior frame with no text or symbols


- Measuring cup
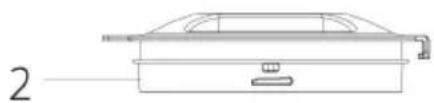
- Lid
- Jug
-
Seal
-
Blade unit
- Motor unit
- Speed control
USE
Intended use
The blender is only intended for household use. It is not intended for professional use.
Before using for the first time
- Unpack the blender.
- The jug, with measuring cup, lid, seals and blade unit are fitted on the motor unit.
Remove and clean all the parts except for the motor unit according to the instructions. -
Allow the parts to dry before replacing them.
-
Place the jug upside down on a flat surface. Hold the handle of the jug and place the seal and blade unit on the bottom of the jug Fasten the blade unit in the bottom of the jug by turning it anticlockwise until it resists.
-
Turn the jug with the opening upwards. Place the seal round the bottom edge of the lid and put the lid on the jug. Place the measuring cup in the hole in the middle of the lid by aligning the pins on the side of the cup with the slots in the lid, and turn the cup clockwise until it resists.
-
Put the jug with the lid and blade unit on the motor unit.

IMPORTANT: Do not attempt to twist the jug when fitting it on the motor unit.
Use
- Clean/peel the food to be mixed and cut into small pieces.
- Put the ingredients in the jug. Some liquid should usually be added for the blender to work smoothly. The total amount must not exceed the MAX mark on the jug.
- Fit the lid firmly, with the cup inserted, on the jug.
- Plug the plug into the mains.
- Turn the speed control to a suitable mode.

P-Pulse mode
0 - 0ff
1 - Low speed
2 – High speed
-
For short or sensitive mixing, keep the speed control in P mode for a few seconds and then release. The control automatically returns to O mode. Repeat until the required consistency is obtained.
-
While the appliance is working you can remove the cup and add ingredients through the opening in the lid.

natural_image
Technical line drawing of a kitchen fan with lid and handle, showing two views (no text or symbols)Put the ingredients in the jug before fastening the lid. While the blender is working the cup can be removed and ingredients added through the opening in the lid.
-
Keep one hand firmly on the lid if you are crushing ice or processing hard foodstuffs.
-
Turn the control to 0 mode when you have obtained the right consistency.
NOTE:
- Do not put food hotter than 80^ C in the jug.
- Do not run the blender continuously for more than 3 minutes. Allow it to cool for at least 10 minutes before using it again.
- The blender can be stopped at any time by turning the speed control to 0 mode.
IMPORTANT:
- For best results, add some liquid to the jug before the food.
- The appliance is not suitable for whisking eggs or cream, mashing potatoes, mincing meat or kneading dough, or for pressing juice from fruit or vegetables.
- Never put bones, large pieces of frozen food or hard food such as swedes in the jug, this can damage the appliance.
- Do not put more than 6 ice cubes in the jug to crush ice. When the appliance is running you can add more ice cubes through the opening in the lid.
MAINTENANCE
IMPORTANT:
Never immerse the power cord, plug or the blender in water or any other liquid – risk of electric shock.
- Switch off the blender, unplug the power cord and wait until all moving parts have completely stopped before cleaning.
- Clean the jug immediately after use. Dried scraps are more difficult to remove.
NOTE: Do not use abrasive detergents or sharp implements.
- Pour a little hot water with washing-up liquid into the jug and keep the speed control in P mode for a few seconds. Pour out the water.
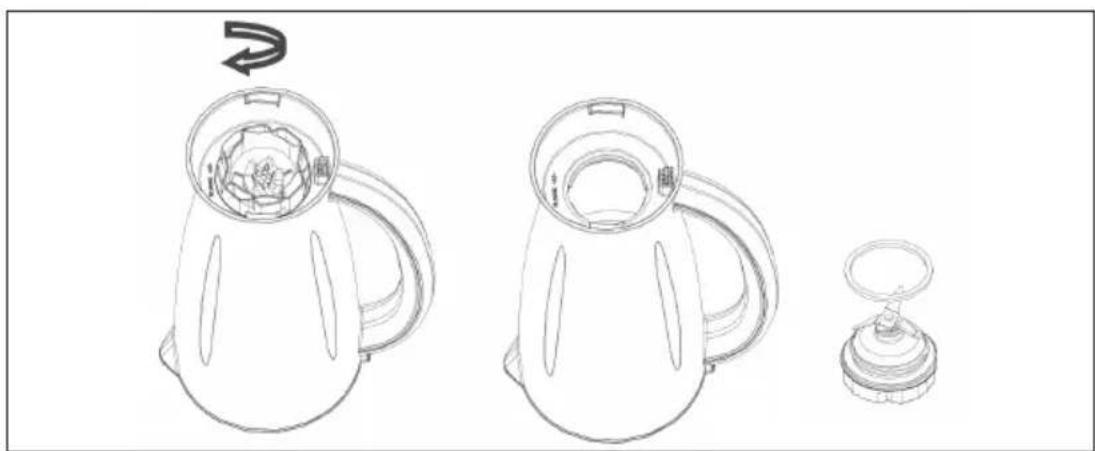
- Remove all loose parts. Lift the jug from the motor unit and turn the blade unit clockwise to release it and the seal from the bottom of the jug. Remove the seal from the lid.
natural_image
Line drawings of a kitchen blender with a side panel, showing front, side, and top views (no text or symbols)- Wash the cup, lid, seal and jug by hand, or in a dishwasher (max 70°C). Allow to dry.
- Clean the blade unit with a brush, hot water and washing-up liquid, and rinse well under running water. Do not touch the blades – risk of cut injuries. Allow to dry upside down, out of the reach of children.
- Wipe the motor unit with a damp cloth and wipe dry. Stains can be removed with a cloth moistened with water and mild detergent. If the appliance gets wet unplug the power cord immediately and wipe dry with a soft, lint-free cloth
- Care for the environment!
- SVENSKA....5
- NORSK 11
- POLSKI 17
- ENGLISH 23
- SÄKERHETSANVISNINGAR
- Read the operating instructions carefully before use.
- DESCRIPTION
- USE
- Intended use
- Before using for the first time
- IMPORTANT: Do not attempt to twist the jug when fitting it on the motor unit.
- NOTE:
- IMPORTANT:
- MAINTENANCE
Brand : Menuett
Model : 802-700
Category : Blender