GSM909 - Mobile Phone BOSCH - Free user manual and instructions
Find the device manual for free GSM909 BOSCH in PDF.

User questions about GSM909 BOSCH
0 question about this device. Answer the ones you know or ask your own.
Ask a new question about this device
Download the instructions for your Mobile Phone in PDF format for free! Find your manual GSM909 - BOSCH and take your electronic device back in hand. On this page are published all the documents necessary for the use of your device. GSM909 by BOSCH.
USER MANUAL GSM909 BOSCH
D Bosch Telecom GmbH
Produktbereich Endgeräte
Kleyerstr. 94,
60326 Frankfurt/Main,
Tel. (0180) 5 2214 92
Fax (0180) 5 2214 93
B N.V. Robert Boach S.A.
Rue Henri Genesseatraat 1,
10 70 Bruxelles / Brussel
Tel. 0800 · 94 495
DK Robert Boach A/S
Telegrafvej 1, 2750 Ballerup,
Tel. 44 8989 89
F Robert Boach (France) S.A.
B.P. 170, 32 Avenue Michelet,
93404 Saint Ouen,
Tel. (0) 1 4010 70 07
GR Robert Bosch S.A.
162 Kfissou, 12131 Peristeri, Athens,
Tel. (301) 57 01286
NL Robert Boach BV Neptunusstraat 71, 2132 JP Hoofddorp. Tel. 0800-0224372
GB Robert Bosch Ltd.
Sales Communication Equipment
P.O.Box 98
Uxbridge, Middlesex UB9 5HJ
Tel. 0345 585220
Robert Bosch
Industriale e Commerciale S.P.A.
Via M.A. Colonna 35, 20149 Milano,
Tel. (3 92) 36 96-1
N Robert Boech AS
Postboks 629, 1411 Kolbon,
Tel. 66817000
S Robert Bosch Aktiebolag Box 1154, 164 26 Kiata, Tel. (8)7501500
P Robert Bosch Lda.
Av. Infante D. Henrique, Lotes 1E, 2E,
Apartado 8058, 1801 Liaboa Codex,
Tel. (3511)8500000
E Robert Bosch ESPAÑA SA
Hemanos García Noblejas, 19
28037 Madrid
Tel. (34) 91 408 1700
A Robert Bosch AG
Postsch 146, 1110 Wien.
Tel. (4 31) 7 9722-0
CH Robert Bosch AG
Industriestr. 31, 8112 Otelfingen.
Tel. (411)8471414
TR Bosch Sanayi ve Ticaret A.S.
Ahi Evran cad No. 4,
Polaris Plaza/Kat 22
Maslak/Istanbul
Tel. (0212) 3 35 06 73
H Robert Boech Kft.
Postfach 405,1519 Budapest
Tel. (361)2698340
FIN Oy Hedoy Ab Telecom
Lauttasaasrentie 50,
00200 Helsinki
Tel. (90) 68 281
IRL Beaver Distribution Ltd.
Greenhills Road, Tallaghl, Dublin 24,
Tel. (35 31) 4 515211
L Central Import Export Corporation Zone Industrielle. Rue des Jones, 1818 Howard, Tel. (2) 40 30 60
SGP Robert Bosch Pte Ltd
38c Jalan Pemimpin,
Singapore 57180,
Tel. 3 50 54 52
ZA Robert Bosch (Pty) Ltd.
Private Bag X118. Randjespark,
Midrand 1685
Rep. of South Africa.
Tel. (011) 651-9600
http://www.bosch-telecom.de
BOSCH
7910.2300 GB / 10.89

User Guide GB
PRECAUTIONS

For your safety
Please pay special attention to the following simple guidelines. Breaking the rules may be dangerous or illegal.

In-car safety
Do not use your mobile phone when driving a vehicle except from in emergency cases. Always park the vehicle and take the ignition before using the phone.

Interference with other electronics
Mobile phones may interfere with other nearby electronics if these are not sufficiently protected from radio signals. Do not use your mobile phone near telephones, televisions, radios, personal computers, etc.

Risk of explosion
Don't use your mobile phone at petrol stations, fuel depots, chemical plants, etc. Always switch off your telephone before entering such areas, and observe any restrictions, regulations and rules.

Aircraft safety
The use of mobile telephones in an aircraft may be dangerous to the operation of the aircraft and is illegal. Switch off your mobile phone before boarding an aircraft. Before using your mobile phone near an aircraft, consult the crew.

Blasting
Don't use your mobile phone where blasting is in progress. Observe any restrictions, regulations and rules.

Medical electronics
Mobile telephones may interfere with the functionality of inadequately protected medical devices. Consult your physician or the manufacturer of the medical device if in doubt. Always switch off your mobile phone before visiting a hospital and observe the local regulations and rules.

Radiation
As with other mobile radio transmitting equipment, users are advised that for satisfactory operation of the equipment and for the safety of personnel, it is recommended that no part of the human body should be allowed to come too close to the antenna during operation of the equipment.

Children
A mobile telephone is not a toy. Keep the phone in a safe place out of children's reach. Children may harm themselves or others and they may damage the phone.

Electrical safety
This mobile telephone is intended for use when supplied with power from MA 1000, MA 1001, MA 1002, or MA 1003 chargers. The use of any other battery charging equipment will invalidate any approval given to this apparatus as well as the manufacturer's warranty.

Batteries
Batteries may explode if incinerated. To prevent any injury or burn please observe that the battery terminals never get in contact with conducting objects or are short circuited.
IMPORTANT NOTICE
CONTENTS
This telephone is designed for use in both GSM 900 and GSM 1800 networks. Handover between the two types of network takes place automatically and seamlessly.
Introduction
Making a call
Enter phone number. Press CALL
Answering a call
The telephone rings. Press ANSWER
Ending a call
Press END
Back to standby mode
Press EXIT
The telephone automatically returns to stand-by mode when no key has been pressed for 60 seconds.
SIM card limitations
Network operators offer different kinds of services and different kinds of SIM cards. Please contact your network operator for further details.
Depending on your type of SIM card some features described in this user guide may not be available to you or may not be operated in the way described. Where a feature relates to the network you will see this symbol in the user guide.
The memory capacity of your SIM card may differ from one type of card to another.
Clock
In order to activate the clock you must set the time and date. See page 34 for more information.
Batteries
Never dispose of old batteries in your household refuse. Return them to the place of purchase or take them to a recycling centre so that they may be disposed of in an environmentally friendly manner.
Accessories
The use of other types of chargers, batteries or any accessories other than those recommended for use with this telephone will invalidate any approval given to this apparatus as well as the manufacturer's warranty on the telephone.
Care of your phone
Do not try to open the phone as this might damage vital parts. The phone contains no components which can be repaired by the user. Any repair requires expertise and should be carried out only by an authorized service centre.
To clean your phone, wipe over with a soft cloth. Do not use alcohol or other solvents as these will harm your phone.
Do not use your mobile phone in high humidity environments or where the temperature falls below -10^ or exceeds +55^ C.
Precautions ...... Page 3
Important notice ...... Page 4
Keypad functions ...... Page 6
Display symbols ...... Page 7
Before you start ...... Page 8
Making your first call ..... Page 10
Options
when in conversation ..... Page 12
Phone book ...... Page 14
Phone book editing ..... Page 15
Alternative phone books ... Page 17
List menu system ...... Page 18
Outgoing calls ...... Page 19
Answered calls ...... Page 19
Missed calls Page 20
Events Page 21
Messages ...... Page 23
Setup menu system ...... Page 26
Call divert ...... Page 28
Call barring Page 30
Call waiting Page 31
Supplementary
network services ...... Page 31
Tones setup Page 32
Phone setup ...... Page 33
Message setup ...... Page 36
Phone book setup ...... Page 37
Call timers and charge ..... Page 38
Security Page 38
Calculator Page 40
Accessories ...... Page 41
Index Page 47
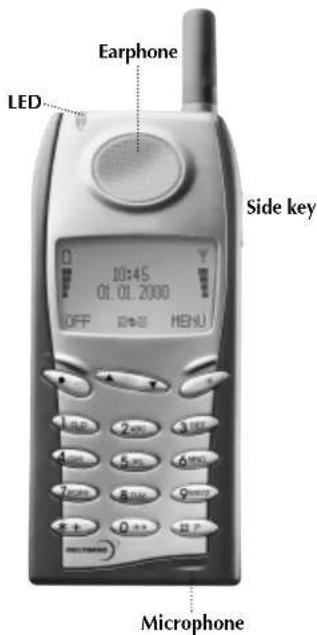
KEYPAD FUNCTIONS
DISPLAY SYMBOLS
LED (Status indicator)
Slow green flash: Your phone is in contact with a network.
Fast green flash: Indicates an incoming call or that an event is occurring.
Slow red flash: Your phone cannot get in contact with a network.
Fast red flash: The battery needs recharging.

On/off key
Press the key for one second to switch your telephone on or off.

Function keys with text line in display
The function of each key varies according to whether you are in standby, menu or conversation mode. The text line at the bottom of the display will inform you of the actual function of each key at any time. By pressing the left-hand function key briefly the time and date will be visible on the display.

Arrow keys
In standby mode: Scroll through menus, phone book, lists, events, messages etc. In conversation mode: Volume up/down.

Side key
Same function as the arrow keys.

Voice mail key
Quick access to your voice mail.

Key
Inserts the "+" before international phone numbers.

Last outgoing call
Press for one second and the call is initiated automatically.

Key
Inserts a pause between the main number and the extension number.

Battery level indicator
See page 8 for more information.

Signal strength indicator
The stronger the signal (more signal bars displayed), the better the radio connection.

List menu indicator

Phone book indicator

ll indicators

Shows you that there are more functions up or down which you can access. Also used for scrolling through the list menus.

Indicates which key to press to increase and decrease the volume level.

Speech call indicator

Fax call indicator

Data call indicator
SMS message indicators

There is a new message for you.

On: There are still unread messages. Flashing: The SMS memory is full.

Voice mail indicator
i
Indicates that there is a voice mail for you.

Call divert indicator
On: All calls to your mobile telephone are diverted to another telephone number. Flashing: Check the status of your call diverts.
Event indicators

▲)
An event is occurring.


There is a missed event.

The event is recurring.

One or more events will occur today.

Microphone off indicator

Volume level indicator
Indicates volume level when adjusting.

Ring volume off indicator

All-tones-off indicator
See page 32 for more information.

Calculator
Survey of arithmetic operations in the calculator menu.
Display and keypad backlighting
The backlight switches on automatically when you press a key. In standby mode the light will automatically switch off if no key is pressed for 10 seconds.
BEFORE YOU START
BEFORE YOU START
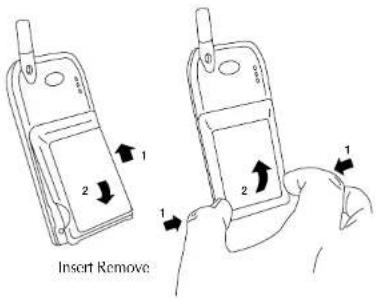
Insert rechargeable battery
When changing the battery your phone should always be switched off.
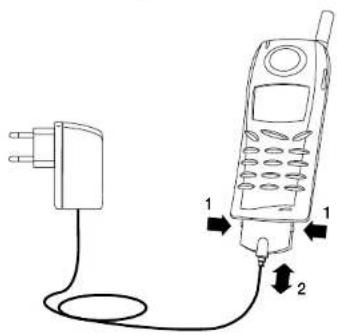
Charge the battery
The battery supplied with this telephone is completely discharged. The telephone will initiate charging as soon as you have inserted the charger plug. The battery takes 1 to 5 hours to become fully charged depending on type and size of the battery. If for some reason the telephone does not start charging, you should pull out the charger plug and insert it again.
To obtain optimum battery performance in daily use, wait until the battery is completely discharged, before recharging to full capacity.
Battery level indicator
During charging the battery symbols will flash on and off one after another continuously from the bottom of the display up. When the battery is fully charged all 4 symbols are permanently displayed as long as the phone is switched on.
4 batteries: Battery is fully charged.
1-3 batteries: Battery is partly discharged.
0 batteries: Battery needs recharging. You have limited conversation time left. At the same time the phone will emit a short warning tone and the LED on top of the phone will emit a fast red flash.
If you insert another battery, this should be fully charged in order to read out the battery capacity accurately.
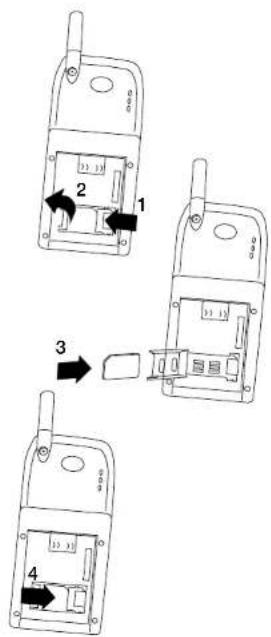
Insert SIM card
Before you can make a call on your mobile phone you have to insert the SIM card.
Should you have forgotten to insert the SIM card the telephone will ask you to do so.
Before inserting the SIM card into the phone please make sure that any plastic remains from the frame punching have been removed.
Switch off your phone and remove the battery if attached on the phone.
- Open the SIM card holder by sliding the catch to the left.
- Lift the holder.
- Insert the SIM card with its cut corner pointing up and left.
- Close the holder and slide the catch back into place.
- Insert the battery.
- Switch on the telephone.
The phone will display a welcome greeting.
- Enter PIN code, if requested, and confirm by pressing OK
The telephone will now start searching for your home network. When connection is successfully established, the name of your network operator will be displayed.
If the telephone cannot get in touch with your home network it will start searching for another co-operating network.
If the phone cannot establish contact with any network at all and you attempt to make a call, the display will show please redial later.
MAKING YOUR FIRST CALLMAKING YOUR
Selection of language
The display language of your phone is normally the national language of the country in which you purchased your SIM card. If this is not the case the display language will be English. You have the option of choosing between different languages.
If by mistake you select a language which you don't understand you can return to your own language by pressing the following keys: * # 0000 #
- Press MENU
- Press 31
- Select language using
- Confirm by pressing OK
- Press EXIT

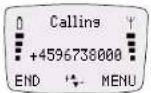
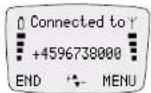
Making your first call
- Enter the phone number you want to call.
- Press CALL to make the call.
- Press END to end the call.
If you call a phone number which is diverted to another phone number, the display will show the phone number to which you are connected and not the one entered by you.
International calls
When making an international call, enter "+" by pressing the *key for one second and then enter the relevant national code number before the telephone number (e.g. +45 for Denmark).
Phone numbers with extension number
Extension numbers can be dialled by entering a pause between the main number and the extension number. To enter a pause, press the #key for one second until the pause code P appears on the display.
Emergency calls
In most cases emergency calls can be made with or without a SIM card. To make an emergency call without a SIM card just enter the worldwide mobile phone emergency number 112, press SOS and confirm by pressing CALL.
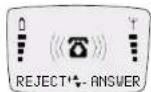
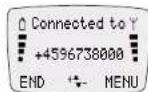
Answering a call
- Press ANSWER when the phone rings.
- Press END to end the call.
Use the arrow keys and to increase and decrease the speaker volume.
OPTIONS WHEN IN CONVERSATION
KEYPAD LOCK
Muting the microphone
While having a call, you may wish to have a private conversation with someone else. You will hear everything your caller says but you cannot be heard by the caller.
To switch off the microphone:
-
Press MENU
-
Select Microphone off
To return to your telephone conversation:
-
Press MENU
-
Select Microphone on
Your telephone supports the following network options: Having more than one conversation at a time, placing calls on hold, switching between calls, joining calls and transferring a conversation to another phone number.
How to proceed
-
Press MENU when in conversation.
-
Select using other
Microphone off
Hold call
Continue call
Switch calls
Drop active
Join calls
Private
Drop held
Transfer call
Phone book
Send message
- Confirm by pressing OK
Note: The status of the call determines which menu items are visible and available for you to select.
Putting a call on hold
You can make a second call without having to end a call that is currently active. Key in the second phone number and press CALL.
The first call will automatically be put on hold. Please be aware that you can only have one call on hold at a time. You can also put calls on hold manually by selecting Hold call.
Continuing a call
When you want to retrieve the call put on hold, just select Continue call.
Switching between calls
If you select Switch calls, the active call will be put on hold and the call on hold will now be active. In this way you can switch between your conversations.
Ending an active call while another is on hold
An active call can be ended by selecting Drop active. The held call will remain on hold and you have to retrieve it to continue conversation.
Joining calls
If you have an active call and a call on hold at the same time, you can select Join calls to enable all of you to speak together.
Having a private call while others are on hold
If you have joined all calls and want to have a private conversation with one of the callers, select Private. The other calls will be put on hold.
Ending a call put on hold
You can end the call put on hold by selecting Drop held.
Transferring a call
If you have an active call and a call on hold, you can connect the two by selecting
Transfer call. In that way, the two parties can talk together while you withdraw from the conversation.
Calling a number in the phone book
During a conversation you can make a new call to a number stored in your phone book by selecting Phone book.
Sending an SMS message
If you want to send a message to a third party select Send message.
How to lock the keypad
To avoid making calls accidentally you can lock the keypad.
-
Press MENU
-
Press #
If you try to activate one of the keys, the display will tell you that the keypad is locked.
How to unlock the keypad
The keypad lock is automatically disabled
– during an incoming call until you have finished your conversation
- when the telephone is placed in the handsfree car installation kit
-
Press UNLOCK
-
Press #
PHONE BOOK EDITINGPHONE BOOK
You can store names and telephone numbers in a phone book. The entries are stored on the SIM card and the number of entries is dependent on the capacity of the SIM card.
The length of a name or a telephone number depends on your SIM card.
There are several characters available on each key, as shown in the table below. Press once to get the first character, twice to get the second character, and so on. When you need a space between two characters, press #
Holding down one of the keys for one second will give you the option of lower case. Just press the key again for one second to return to upper case.
| 1.0D | 1...‘’!j2&%£¥@ | 7PORS | PQRS7BΠΦΨΣpqrss7B |
| 2ABC | ABC2AÄÄÄCabc2æÄÄÄ | 8TUV | TUV8ÜΘtuV8üü |
| 3DEF | DEF3ÉΔdaí3è | 9WXYZ9Ewxyz9 | |
| 4GH | GHI4Γghi4i | *+ | *+ |
| 5JKL | IK15Ajk15 | 0→ | 0-/()=<-> |
| 6MNO | MNO6OÑOΩmno6øñòò | #P | Space # |
How to edit a name and a phone number
Press CLEAR briefly - one character will be deleted
Press CLEAR for one second – the entire display will be deleted
How to store a name and a telephone number
If you enter the phone number with the help of "+" followed by the national code you can use your phone book abroad without having to think about international codes.
-
Enter the phone number.
-
Press ▼
-
Enter name and press OK
The telephone will suggest that the name/number should be stored under the first vacant location number.
- Confirm the location number by pressing OK
How to select your own location number
If you do not want to store the entry under the suggested location number, you can select a number of your own choice. Store frequently used numbers in location numbers 1 to 9 so that you can speed dial them by pressing only one key (see page 1.5).
-
Store telephone number and name as described previously in steps 1. to 3.
-
Press CLEAR and enter a location number of your own choice (up to 3 digits).
-
Confirm by pressing OK
If you choose a location number that is occupied, the phone will give you the option of overwriting the existing entry. If you do not want to overwrite the existing entry, press EXIT and the location number suggested will be visible again.
Voice mail number
If you have a voice mail number stored in your phone book this should be stored under location 1. On some networks this has already been done by the operator. Contact your network operator for further details on how to activate your voice mail.
How to find a name and a telephone number
- Press ▼
- Enter one or more letters of the name you wish to find.
- The name and telephone number will be displayed.
If there is more than one name matching the entered letters, use the arrow keys to scroll through to find the required name.
If there is no name to match the entered letters, the display gives you the best match in the phone book.
- Press CALL to make the call.
When making a call the name will be shown on the display. If the entry has no name the telephone number will be displayed.
Speed dialling
It is possible to make calls to any number stored in the phone book more easily by using the location number (up to 3 digits).
To be able to use the speed dialling function it must be switched on (see page 3.3).
- Press the location number for one second.
If the location number consists of more than 1 digit, press the first digit(s) and hold the last digit for one second.
- The call will automatically be initiated.
How to edit a name or a telephone number
- Press ▲ enter the List menu system,
- Select Phone book and press SELECT
- Select Edit entry and press OK
- Enter one or more letters of the entry you wish to edit or select it by using ▼
- Press EDIT
- Change the number using CLEAR
- Enter the correct phone number.
- Confirm the change by pressing OK
- Change name and location number in the same way, if necessary.
How to delete a name and a telephone number
- Press ▲ enter the List menu system.
- Select Phone book and press SELECT
- Select Delete entry and press OK
- Enter one or more letters of the entry you wish to delete or select it by using ▼
- Press DELETE
- Reconfirm by pressing OK
PHONE BOOK STATUS / PREFIX TELEPHONE NUMBERS
How to see the status of your phone book
The telephone can display the total number of locations on your SIM card and inform you how many of these are free.
-
Press ▲ enter the List menu system.
-
Select Phone book and press SELECT
-
Select Status and press OK
Prefix telephone numbers
In your phone book you can store prefix phone numbers and add additional digits to these. A useful feature if for instance you often call a company with a switchboard with direct dialling facility.
How to enter a prefix telephone number
- Enter the prefix digits of the telephone number.
- Hold down the -key for approx. 2 seconds, and you will see a W on the display.
- Repeat, holding down the #key for each character you wish to add to the prefix number.
- Press ▼
- Enter name and location number and press OK
How to call a prefix telephone number
-
Press ▼
-
Find the number you wish to call in your phone book.
- Press CALL
- Enter the actual digits to replace the W
- The call will automatically be initiated.
ALTERNATIVE PHONE BOOKS
Depending on your SIM card you may have different alternative phone books. These phone books will be visible in the phone display only if they are available and enabled.
Information numbers
Numbers stored in this phone book typically give information about taxis, airports, hotels, weather, news, etc. Your network operator defines the numbers stored in this phone book and the contents cannot be changed by you.
Fixed numbers
With the help of this alternative phone book you can restrict the use of your phone only to numbers stored in this special phone book. This telephone book operates in exactly the same way as your ordinary phone book.
However, in order to be able to make such a phone book you need to have a PUK2 code from your network operator and to use a PIN2 code of your own choice.
See on page 37 under Phone book setup how to make use of fixed numbers.
Service numbers
This phone book contains customer care, hotline service numbers, etc. Your network operator defines the numbers stored in this phone book and the contents cannot be changed by you.
Barred numbers
In this phone book you can store numbers to which you do not allow any calls. This phone book operates in exactly the same way as your ordinary phone book.
In order to be able to make such a phone book you also need to have a PUK2 code from your network operator and to use a PIN2 code of your own choice.
See page 37 under Phone Book Setup how to make use of barred numbers.
Own numbers
Some networks offer the possibility of having more than one phone number on the same SIM card. For instance one for normal conversations, one for fax and one for data transmission.
This sub menu operates in the same way as the ordinary phone book menu giving you the possibilities of finding, adding, editing and deleting the entries.
OUTGOING CALLS / ANSWERED CALLSLIST MENU S
Information about outgoing, answered, missed calls and events as well as SMS messages are automatically stored in lists:
Outgoing calls
• View names/phone numbers of your latest outgoing calls
Answered calls
• View names/phone numbers of your latest answered calls
Missed calls
• View names/phone numbers of your latest calls received but not answered
Phone book
• Find, add, edit or delete entries
- Phone book status
Information number phone book
• Find entries
Fixed number phone book
• Find, add, edit or delete entries
• Phone book status
Service number phone book
• Find entries
Barred number phone book
• Find, add, edit or delete entries
• Phone book status
Own numbers
• Find, add, edit or delete entries
Events
• View, edit or delete events
- Add a new event
- Event status
Missed events
• View unacknowledged events
Messages
- Inbox for received point-to-point messages
- Outbox for sent point-to-point messages
- Favourite messages
- Send messages
- Read broadcast messages
How to access
the List menu system
- Press ▲
- Select the menu you want to access
by using - Confirm by pressing SELECT/OK
- Select the sub menu you want to access
using and press SELECT/OK
Back to standby mode
While you are in menu mode, pressing EXIT
briefly will bring you one level up in the system. Holding EXIT will always bring you to the
standby mode.
The telephone automatically returns to standby mode when no key has been pressed for 60
seconds.
Outgoing calls
Your phone has memory for your last 10 dialled telephone numbers. If the dialled number is one of those stored in your phone book, then the associated name will appear on the display.
How to see the list of last outgoing calls
- Press ▲ enter the List menu system.
- Select Outgoing calls and press OK
- Scroll through the telephone numbers.
- When the telephone number you wish to redial is displayed, press SELECT
- Press CALL to initiate the call.
Shortcut to your last outgoing call
However, to use this facility you must enter the Phone setup menu and select
Speed dialling on (see page 33).
- Just press 0 for one second and the call is initiated automatically.
Who is calling?
Calling Line Identification (CLI) is a network feature whereby the phone numbers of callers to your phone are shown on your phone's display. If your caller is one of the entries that you have stored in your phone book, then his name will appear on your display.
To enable the telephone to identify the calls it is a condition that the network supports Calling Line Identification.
Answered calls
Your phone remembers the last 10 calls your phone has received.
How to see the list of answered calls
- Press ▲ enter the List menu system.
- Select Answered calls and press OK
- Scroll through the telephone numbers.
- When the telephone number you wish to redial is displayed, press SELECT
- Press CALL to initiate the call.
Missed calls
Your phone remembers the last 10 incoming calls which you did not answer. If the caller is one of the entries that you have stored in your phone book, then his name will appear on your display.
The display will tell you how many missed calls your phone has received. If, for instance, there are 15 missed calls the standby display will show (《8》)·15.
As the telephone registers only identified calls in the list, the number of missed calls shown on the display and the number of phone numbers actually listed may be different.
Immediate access to the list of missed calls
- Press ▲
- Scroll through the telephone numbers using ▼ or ▲
- When the telephone number you wish to dial is displayed, press SELECT
- Press CALL to initiate the call.
How to see the list of missed calls at a later moment
As soon as you have used the list, either to make a call or to view numbers, the symbol will disappear from the display. However, the list will always be available through the List menu system.
- Press ▲ enter the List menu system.
- Select Missed calls and press OK
The telephone number will be deleted from the list as soon as you have called it, but you can always find it again in the list of last outgoing calls.
How to copy a phone number from one of the lists into your phone book
- Press ▲ enter the List menu system.
- Select the actual menu and the phone number you wish to copy into your phone book.
- Confirm by pressing SELECT
- Press ▼ access your phone book,
- Give the number a name and a location number and press OK
How to delete call information
You can delete all entries stored in the Outgoing, Answered and Missed calls lists. Select the sub menu Delete call information in the Phone book setup menu and select the list which you want to delete.
Events
Your phone acts as a calendar enabling you to keep a check on different events such as meetings, phone calls to be made, birthdays, etc. The calendar is active even though your telephone is switched off.
How to add a new event
- Press ▲ enter the List menu system.
- Select Events and press SELECT
- Select New event and press SELECT
You can now choose from the following different event types:
Custom setup
(Recurring
- if set by you
Standard alarm
(Not recurring)
1 hour notice
(Not recurring)
Wake up alarm
(Not recurring)
Birthday
(Recurs every year)
In Custom setup you can define any setting according to your own wishes. The options available are: Set date, set start and end time, enter event text, set recurring frequency, select tone volume and pattern, and define advance notice for the event.
As a minimum you will always have to enter date and start time (if you want to change the ones displayed). The cursor will always stand to the left of the digit/letter to be entered or corrected. Use the arrow keys to move the cursor. ▲ moves to the left, ▶ the right. Confirm your entry by pressing OK, and the event is automatically saved.
The settings of the last 4 event types are predefined by the manufacturer, but you can always change the settings. See under How to edit or delete an event on page 22 for more information.
How to be notified of occurring events
When an event is occurring you will see this symbol and display, the phone will
emit a ringing tone (if activated - see page 32) and the LED on top of the phone will flash green. The event text will be shown on the display. The phone will continue ringing for one minute if you don't acknowledge the event. Press DELETE/OK to do so.
The event is automatically deleted unless you have selected that you don't want it to be deleted. See page 35 for more information.
How to postpone an event
If you do not have the time to see an event at the moment it occurs, you can postpone it. Press REMIND. The event will recur after 10 minutes.
How to see stored events
- Press ▲ enter the List menu system.
- Select Events and press SELECT
- Select List events and press OK
Each date under which one or more events are stored will now be listed, indicated by the name of the day of the week and date. Use the arrow keys to scroll through the dates. After being highlighted for 2 seconds, the times of the first two events under the selected date will be listed. Press SELECT, and after further 2 seconds the text of the first stored event will be shown on the display. Use the arrow keys to scroll through the events.
A recurring event will be marked by ⬆ the left of the starting time.
EVENTS
MESSAGES
How to edit or delete an event
- Follow steps 1 to 3 and proceed as described on page 21 to select the event you want to edit or delete.
- Press SELECT twice.
- Press OPTION
- Select Edit event or Delete event and press OK
Selecting Edit event you will get the possibility of editing the date, the start and end time of the event, the event text, the recurring frequency, the tone volume and pattern, and the advance notice for the event.
- Confirm your corrections by pressing OK
Select Delete event to delete the event. If the event is recurring you will be asked to confirm that you really want to delete it.
How to see the status of your events
Select Status under Events in the List menu. The display will show you how many events you have stored and indicate in percentage how much capacity you have left. If the display shows 0 in both lines, please check that your time and date settings are up-dated.
Missed events
If an event occurs and you don't acknowledge it by pressing DELETE/OK you will see this symbol on the display ( )event recurs after 10 minutes. The phone will repeat this sequence 3 times. The digit alter the symbol indicates the number of missed events.
If an event occurs while your phone is turned off, this symbol will be displayed .((▲))
When you turn on your phone, you will see this symbol on the display (▲)
How to see the list of missed events
- Press ▲
Use the arrow keys to scroll through the dates of the missed events. After 2 seconds the receipt times of missed events of the highlighted date will be listed. Press SELECT. After 2 seconds the text of the first missed event of the date will be displayed. If this event is not the one you want to see use the arrow keys to scroll through the list of missed events.
Press OK when you have read the event. It will then automatically be deleted from the Missed event list, but you can always find it again under List events in the List menu system.
How to see the list of missed events at a later moment
Having accessed the list of missed events as described above, the 60-100 will disappear from the display. However, the list will always be available through the List menu system.
- Press ▲ enter the List menu system.
- Select Missed events and press OK
Short Message Services (SMS)
Your phone can receive and send short text messages via the network. On some networks you have to subscribe to this facility.
There are two types of messages: point-to-point messages which you can both receive and send, and cell broadcast messages which you can only receive.
Point-to-point messages
A new incoming message will be indicated by the SMS indicator on the standby display, as well as by a message tone (if enabled – see page 32). The display will also inform you how many new messages there are for you.
How to read a new message
- Press ▲ access the messages.
The display will show date and time of receipt of each individual message.
- Select the message you want to read by means of ▼ and▲onfirm by pressing SELECT
The phone number of the message sender will be displayed in front of the message. You can now scroll through the message by using the arrow keys.
The message is automatically stored in the inbox if you do not delete it.
In addition to reading the message, you can either
- delete it
- send a reply
- forward it to another phone number
- edit it before sending
- extract a phone number, if any, from the message to call or to store in your phone book
-
call back to the sender
-
Press OPTION
-
Select the option you wish to enter and confirm by pressing OK
- The display will guide you through the next steps.
When a message has been read it will be indicated by a v to the left of the date of receipt.
The SMS indicator remains on the standby display as long as there are unread messages.
Delete messages
If the SMS indicator is flashing, it indicates that the message memory is full.
You can delete all messages stored either in the Inbox or the Outbox at the same time.
- Enter the sub menu Delete messages
- Confirm by pressing OK
MESSAGESMESSAGES
How to read a message again
- Press ▲ enter the List menu system.
- Select Messages and press SELECT
- Select Inbox by pressing OK
- Scroll through the list of messages and confirm your choice by pressing SELECT
How to send a message
Before you can send a message you have to enter your network operator's telephone number for this special service. Contact your network operator to obtain this number. On page 36 you can see how you enter this special phone number and how to select validity period, transmission format etc. once for all. If you do not specify these parameters in the Setup menu system you will be asked for a specification each time you wish to send a message.
- Press ▲ enter the List menu system.
- Select Messages and press SELECT
- Select New message by pressing OK
Start entering your message using the keypad in the same way as you enter a name or a telephone number in the phone book. Moves the cursor to the left, moves the cursor to the right. Delete unwanted characters by pressing CLEAR.
If you want to use the #ymbol in your SMS message press the #key briefly twice.
-
End your message by pressing OK
-
Select whether you wish to
Send message
at once or whether you wish to
Save message
for sending it later on.
- Confirm your choice by pressing SELECT
Having selected Send message the phone will ask for a phone number to send the message to. Either enter a phone number or select one from your phone book using ▼
The message is automatically stored in Outbox under Messages in the List menu system if you have selected
Save outsoins messages on in the Message setup menu (see page 36).
Favourite messages
Your phone contains a list of frequently used messages, e.g.
The meetings .. is moved to .. You only need to insert name, place or time in the empty spaces. You may also add or delete words, as required.
- Press ▲ enter the List menu system.
- Select Messages and press SELECT
- Select Favourites and press OK
- Select the message you want to use and confirm by pressing SELECT
The cursor automatically points at the first empty space. Once you have filled this in, you can move the cursor to the next empty space simply by pressing NEXT. The cursor can also be moved forward and backward by pressing ▼▲ respectively.
- Complete the message by pressing OK
- Send the message, or save it for later use.
How to edit an old message
- Press ▲ enter the List menu system.
- Select Messages and press SELECT
- Select Inbox, Outbox or Favourites by pressing OK
- Select the message you wish to edit and confirm by pressing SELECT
- Press OPTION
- Select Edit message and press OK
A digit between the scroll indicators on the display indicates the number of the individual messages.
Cell broadcast messages
To select whether you want the cell broadcast option to be on or off you must enter the Message setup menu and select Broadcast setup (see page 37).
These are general messages broadcast to a group of telephones and are available to network subscribers only. Cell broadcast messages are typically local weather and traffic reports, stock market prices, sports results etc. If you have selected Roaming, i.e. if you are abroad and connected to a foreign network (see page 30), you may be able to receive cell broadcast messages from other networks, too.
The messages are transmitted in numbered channels and in general each channel will contain information of the same type. Cell broadcast messages may be sent out in different languages.
Contact your network operator for further details.
Cell broadcast channel list
To be able to receive cell broadcast messages you have to set up a list of the channels from which you want to receive information. See page 37 for how to set up this list and to specify what kind of information you wish to receive.
How to read a cell broadcast message
A cell broadcast message is scrolled twice on the display at the time of reception. If you don't see it at that time, you can read it via the List menu system by pressing ▲selecting
Messages and then Broadcasts.
The display will show the Broadcast ID number and you can thus identify the kind of message received. Messages are read in exactly the same way as Point-to-point messages. A read message will be marked by v'.
In addition to reading the message, you can either
- delete it
-store it on your SIM card - forward it to another phone number
-
extract a phone number, if any, from the message to call or to store in your phone book
-
Press OPTION
- Select the option you wish to enter and confirm by pressing OK
- The display will guide you through the next steps.
A cell broadcast message will be deleted when you switch off your telephone – even if the message has not been read.
SETUP MENU SYSTEM
SETUP MENU SYSTEM
The setup menu system offers you the possibility of setting the individual sub menus and options according to your own personal wishes.
Network services (Menu 1)
11 Call divert
12 Call barring
13 Call waiting
14 Closed user group
15 Outgoing call identification
16 Line selection
17 Calling name presentation
Tones setup (Menu 2)
21 Ring tone
22 Trembler (optional extra)
23 Message tone
24 Broadcast tone
25 Key tone
26 Factory settings
Phone setup (Menu 3)
7 31 Selection of language
32 Dial setup
33 Selection of network
34 Power saving function
35 Car kit options
36 Edit welcome greeting
37 Time & date setting
38 Event auto delete
39 Factory settings
Message setup (Menu 4)
41 Setup for sending Point-to-point messages
42 Setup for receiving Cell broadcast messages
43 Delete messages
Phone book setup (Menu 5)
51 Fixed dialling on/off
52 Barred dialling on/off
53 Phone book sorting
54 Delete all entries stored in the lists
(Outgoing, Answered, Missed)
Call timers and charge (Menu 6)
61 View duration and cost of last call
62 View duration and cost of total calls
63 Reset call timers and call charge
64 Display call timer and credit during
conversation
65 Call charge
Security (Menu 7)
71 PIN code
72 SIM card lock
73 Change network password
74 Encryption indication
75 Line lock
(4-1)
i
Calculator (Menu 8)
Applications (Menu 9)
The availability of this menu depends on your SIM card. If available it will always appear as the first menu when you press MENU, The options and the menu title in this special menu are defined by your network operator. The menu allows you to set up a dialogue between you, your SIM card and your network operator.
(4-9)
How to access the Setup menu system
-
Press MENU
-
Select the menu you want to access using ▼
-
Confirm by pressing SELECT
-
Select the sub menu you want to access using ▼
-
Confirm by pressing SELECT
Back to standby mode
While you are in menu mode, holding EXIT will always bring you to the standby mode.
The telephone automatically returns to standby mode when no key has been pressed for 60 seconds.
Menu numbers
On the right hand side in the first line of the display you will always see the number of the menu and sub menu in which you are operating. This is indicated by up to 6 digits.
Example: 62
6 = Menu 6: Call timers and charge
2 = Sub menu 2; View total calls
A v before the sub menu/option number indicates the option you have selected.
Shortcut to the setup menu system
As you get more familiar with the Setup menu system, you will probably find it easier to access some of the menus simply by pressing the menu code number.
For example, to see the duration of your total calls:
-
Press MENU
-
Press 62
CALL DIVERT
CALL DIVERT
You have the option of diverting all calls or choosing to divert incoming calls only if unanswered. The unanswered calls option diverts calls
- if you are busy
- if you do not reply
- if there is no contact
Registration
To enable a call divert you must register it first. You will be asked to specify whether you want the call divert function to apply to all services, speech, data services, fax services or message services (SMS).
Deactivation/activation
You may not be able to make use of the deactivate and activate options. In that case you must cancel a call diversion by selecting Cancel. Next time you want your incoming calls diverted, select Register.
Calls can be diverted to a telephone number stored in your phone book or to any other number. Access your phone book by pressing enter a phone number via the keypad.
If you have chosen to have all calls diverted, the call divert indicator will be visible on the standby display.
If you wish to suspend your calls being diverted for a time, select Deactivate. All registrations will remain in the network, so next time you wish to divert your calls to the same number, simply select Activate.
Validity time
If you have selected
Divert if unanswered
or
Divert if no reply
you can specify that a period of time must elapse before the call is diverted. This period can be from 5 to 30 seconds at intervals of 5 seconds.
It is always possible to see the status of the activated call diversions by selecting Status. Registered call diversions can be cancelled individually or can all be cancelled at once by selecting Cancel all.
How to activate call divert for all calls
- Press MENU
- Select Network services by pressing SELECT
- Confirm by pressing SELECT once more to indicate that you want access to the call divert menu.
- Select using ▼
Divert all calls
Register
- All services
- Speech
- Data services
- Fax services
- Message services
Number
Activate
Deactivate
Status
Cancel
Status
Cancel all (call diverts)
- Confirm your choice by pressing OK
If you want to activate a call divert on the basis of
Divert if unanswered
Divert if busy
Divert if no reply
Divert if no contact
just follow the procedure described above giving you the same options.
CALL BARRING
You can set up call barring for different types of outgoing and incoming calls to restrict the use of your phone.
You have to activate the type of call barring you wish to set up. You are asked to specify whether you want the call barring to apply for all services, speech, data services, fax services or message services (SMS).
When setting up or cancelling any call barring, you will be asked to enter your 4-digit password provided by your network operator.
You can always see the status of the actually activated call barring by selecting Status.
Outgoing call barring
Select All calls if you want to bar all outgoing calls. Select International if you want to bar international calls only. Select Roamins if you want outgoing calls to be barred when you are connected to a foreign network – this still leaves you the possibility of making calls to your home country.
Calls to Emergency Services (see page 11) can still be made even if all outgoing calls are barred.
-
Press MENU
-
Select Network services by pressing SELECT
-
Select Call barrins using ▼ and confirm by pressing SELECT
-
Select using ▼
Outgoing calls
All calls
Activate
- All services
- Speech
Data services
- Fax services
- Message services
Status
Cancel
Status
Cancel all (call barrings)
- Confirm your choice by pressing OK
If you want to activate call barring for
International calls
Roaming calls
just follow the procedure described above giving you the same options.
Call barring of incoming calls is activated and cancelled in exactly the same way covering the sub menus
All calls
Roaming calls
CALL WAITING /
SUPPLEMENTARY NETWORK SERVICES
Incoming call barring
Select All calls if you want to bar all incoming calls. Select Roaming if you want incoming calls to be barred only when you are connected to a foreign network.
Cancelling call barrings
Call barrings can be cancelled individually or by selecting Cancel all.
Call waiting
During a conversation your telephone can notify you that a new call is waiting. This is indicated by a special ringing tone in the earphone. To activate this function just select Activate in the Call waiting option.
If you want to answer the new call press ANSWER
The active call will be put on hold automatically. See page 12 for further details on how to handle multi-party calls.
If you do not want to answer the call, press REJECT instead. You can have the new call diverted to, for example, your telephone answering service. See page 28 for how to set up a call divert.
If you do not want to be disturbed by new incoming calls you can disable the function by selecting Cancel in the Call waiting option.
You can always see whether Call waiting is activated or not by selecting Status.
Closed user group
This is a network feature by which the use of your telephone is restricted to certain phone numbers within a group defined by the network operator and the owner of the SIM card. You may be a member of different groups. Each group has its own ID number. The network defines which group is your default user group. You have the
option of calling outside the group – perhaps at a higher charge.
Outgoing call identification
You can select whether you want your phone number to be shown or not at the next outgoing call. In Network Service select the option
Outsoins call identification, then Show info for next call and confirm your choice by pressing OK.
Line selection
Some network operators offer Alternate Line Service. This allows you to have two separate speech lines and phone numbers on the same telephone.
i
Calling name presentation
Some networks offer the possibility of showing the name of your caller even though his number isn't stored in your phone book. To find out whether this service is available or not you must select the option Calling name presentation and then Status.
Unstructured supplementary services (USSD)
On some networks you have the possibility of sending unstructured supplementary service strings. An USSD service string should always be terminated by pressing the #key.
In order to be able to send USSD service strings you must enter the Phone setup menu and select Speed dialling off. Pressing the relevant keys 0 to 9 for one second will lead you to the alpha mode enabling you to enter letters and digits instead of only digits.
Contact your network operator for further information on these supplementary services.
TONES SETUP
PHONE SETUP
How to adjust tones
- Press MENU
- Select Tones setup using ▼
- Confirm by pressing SELECT
- Select using other
Rinsing tone
Trembler (Optional extra)
Message tone
Broadcast tone
Key tone
Factory settings
- Confirm by pressing SELECT
- Select the volume or pattern you want to change using ▼
- Confirm by pressing OK
Ringing volume level and ringing tones
You can adjust the ringing volume level and select the ringing tones according to your surroundings and preferences.
Ringing volume levels are high, medium, low, escalating and off. The LED on top of the phone will emit a fast green flash to indicate an incoming call. If the ringing tone is set to off you will see the symbol on the standby display.
You have the option of selecting between 27 different ringing tone patterns.
The selected ringing tone will sound at the relevant ringing volume level when making your selection.
You can disable all kinds of tones by pressing MENU and then *in that case the symbol will be seen in the display. Just press MENU and * again to revert to your original settings.
Trembler
If you have a trembler battery you can select whether the trembler should be active or not at an incoming call or SMS message and an occurring event.
Message tone
Your telephone can alert you to the arrival of a SMS message by means of different alert tones.
Keypad tone
To help you keep check on your dialling, the phone can be set to give 8 different tone patterns following every key pressed.
Factory settings
You can always return to the original tones setup of your phone. The phone is set up by the manufacturer as follows:
Ringing volume
level: Loud
Ringing tone: British
Trembler: Off
Message tone: Simple
Broadcast tone: Discreet 1
Key tone: 3
This menu offers you the possibility of setting some of the telephone's options according to your own personal wishes.
How to set up options
- Press MENU
- Select Phone setup using ▼
- Confirm by pressing SELECT
- Select using either
Language
Dial setup
Network selection
Power saving
Car kit
Greeting
Time & date
Event auto delete
Factory settings
- Confirm by pressing SELECT
- Make your selection using ▼
- Confirm by pressing OK
Language selection
The display language of your phone is normally the national language of the country in which you purchased your SIM card. If this is not the case the display language will be English. You have the option of choosing between different languages. (See page 10 for how to select language).
Dial setup
Automatic redial
If the phone number you are calling is busy or your call is not answered, you can let your phone make up to 10 automatic redial attempts. A special redialling success tone sounds when the attempt is successful. To cancel the auto redialling attempts just press the left function key.
Speed dialling
To speed dial using your location numbers, you have to select Speed dialling on. If you do not want to make use of this feature, select
Speed dialling off.
Any key answer
You can answer an incoming call by pressing any key you like except for the left function key and the arrow keys if you select
Any key answer on.
Incoming call setup (fax/data)
Do not enter this menu unless you are using your phone for fax and data communications! Fax and data capability will require a separate data interface kit (optional). The menu settings are explained in the user guide supplied with this kit.
Network selection
When you wish to use your phone abroad, you have to select a foreign network. This can be done either manually or by letting your telephone do it for you automatically.
In the automatic mode, your phone will automatically try to reach your home network first, then, alternatively to find another available network stored in a preferred list made by you (see page 34).
In the manual mode, the phone will always start searching for the network with which it was in contact when it was switched off. If the phone cannot locate this network it will present some alternative networks on the display, and you can then select one manually.
You can select any network from the list, but your phone can get in contact only with cooperating networks (Roaming). The telephone can get into contact with other networks but only for emergency calls.
Your dealer or network operator can tell you which networks are co-operating.
Preferred list
The list of networks on your SIM card defines the order of preference in which your phone will select a network in automatic mode. Network operators offer different services and call charges; therefore it may be beneficial for you to make a preferred list of your own. Enter the individual networks in your own order of preference and store them on your SIM card. To do this, you must access the Selection of net-work sub menu, select the Set preferred list option and use ▼ select the empty location in which you want to store the new network. Pressing EDIT will give you a list of available net-works. Scroll through the list using ▼When you see a network you wish to store in your preferred list, just press OK. If you select a currently used location and press EDIT, the former occupant can be deleted when you enter the new one. Just press EXIT to leave the list as it was.
Once a network is stored in the preferred list, you can always see the country and network code of the actual network by pressing EDIT in the Set preferred list option.
Power saving
To save your battery and thus increase both conversation and standby times you can select whether you want the display contents to be visible or not in standby mode. Select Display remains on if you want it to be visible, and Display switches off if you want it not to be visible. The display will switch off after 3 minutes in standby mode.
In standby mode the display and keypad backlight will always switch off after 10 seconds if your telephone is set to Backlight on. However, you have the option of having the backlight switched off permanently by selecting Backlight off.
Car kit installation
This option is only effective if the phone is connected to a handsfree car kit. See page 41 for more information.
Welcome greeting
You can change the welcome greeting of your phone according to your own wishes. Delete the old message by holding CLEAR, enter the new greeting via the keypad and confirm by pressing OK.
Time & date
The current time and date will be shown in the standby display after 3 seconds if you have selected these to be shown. To do so just select Show time on and Show date on. You can set both time and date and any corrections are made by using the arrow keys. ▲oves the cursor to the left. ▼oves the cursor to the right.
Entering the Time format option you can set the clock to either 12 or 24 hours. In the option Date format you have the choice of specifying the sequence in which you want the date to be shown, e.g. date, month and year.
However, if one of the following symbols are shown in the standby display, time and date will not be visible:

Just press the left-hand function key briefly to have time and date displayed for 5 seconds.
As long as the clock is active, all Outgoing. Answered and Missed calls plus events will be time/date stamped. The same applies for the messages stored in your in- and outbox.
Note: If your phone has been without power for more than 8 hours you should set the time and date function again. Otherwise you may risk that all functions using the time and date feature may not be active.
Event auto delete
Your phone will automatically delete an event as soon as it has occurred. However, a recurring event will not be deleted in this way. You must then enter the List menu system. If you don't want the event to be deleted automatically select Event auto delete off: In that case the right function key text will be OK when the event occurs.
Factory settings
You can always return to the original setup of your phone. The phone is set up by the manufacturer as follows:
Language: Automatic
Dial setup: Autoredial ofí
Speed dialling on
Any key answer off
Incoming call setup:
Next call type: Speech
All call type: Speech
Network: Automatic
Power saving: Display on
Backlight on
Car kit: Auto answer of
Auto power off automatic
Greeting: Welcome
Time & date: Show time on
Show date on
Time format: 24 hours
Date format:
day, month, year
(dd.mm.yyyy)
Event auto delete: On
MESSAGE SETUP
MESSAGE SETUP / PHONE BOOK SETUP
Send message setup
Before you can send a message, your network operator's telephone number and name for this special service have to be entered. However, many network operators have already stored this information for you on your SIM card. In that case you just have to press OK in the Service centre option in order to activate it.
If the above-mentioned information is not stored on your SIM card, you have to proceed in the following way:
- Press MENU
- Select Message setup using ▼ and confirm by pressing SELECT
- Select Send message setup
- Select Service centre
- Confirm by pressing SELECT
- Select Add service centre and press OK
- Enter the SMS operator telephone number and confirm by pressing OK. Remember to add "+" and national code before the number.
- Enter the name of your network operator and confirm again by pressing OK
- Press OK
- The menu returns to Service centre Press SELECT and then OK
- Now the name and the phone number of the service centre that you have set up will be displayed. Press SELECT
The number will automatically be used for sending all future messages.
Having stored a service centre number, you have the option of adding another service centre, dele-
ting a service centre or editing the number of an existing service centre by pressing and confirm your choice by pressing OK.
The option of storing more than one service centre number may not be available with all SIM cards.
If for some reason your message cannot be delivered, it will remain with your SMS operator for a period of time specified by you under Validity period.
Under the option Teleservice you can specify in what format you want your messages to be sent – for instance select Text message if you want to send it to another mobile telephone.
For messages that have to be sent via several service centres to reach the recipient, some networks offer the feature of sending a reply, if any, back to you through the same chain of service centres. To keep this possibility open, you must enter the Send message setup option and select Reply Path on.
If you want confirmation from the network operator that your message has been received by the person you want to send it to, you must enter the Send message setup option and select
Confirmation on. If the message has not been received you will get the information that it is either queued or not delivered.
You can select whether your messages should be stored automatically in the Outbox after having been sent or not. Select
Save outsoins messages on if you want to store your messages, and select Save outsoins messages off if you want them to be deleted after having been sent. Selecting the latter option leaves you more memory for incoming messages.
Broadcast setup
To set up the list covering the kind of information you wish to receive, select the option
Broadcast channels. The display will show you various locations in which you can store the individual channels. Pressing EDIT will give you a range of different kinds of information. Use ▼ scroll through the possibilities and confirm your choice by pressing SELECT. The selected kind of information is now stored in the channel list. Proceed in the same way if you want to receive other kinds of information.
Some network operators offer cell broadcast messages in different languages. Select the option
Broadcast language and confirm your choice by pressing OK.
You can select whether you want the cell broadcast option to be on or off by selecting
Broadcast settings and using ☑ select whether the function should be on or off.
Fixed dialling
In order to enable you to make use of fixed dial-ling numbers stored in an alternative phone book defined by you, select Fixed dialllins on. Having selected Fixed dialllins on your ordinary phone book will not be visible on the display and can thus not be accessed, but, of course, it will remain on your SIM card and can be accessed again by selecting
Fixed dialllings off.
Barred dialling
If you have a barred dialling phone book on your SIM card you must select
Barred dialllins on to enable it. Having selected Barred dialllins on any attempt to make a call will make the phone compare the dialled number with the numbers stored in this special phone book. If the dialled number is stored in the Barred numbers phone book the call will be refused.
To enable the fixed dialling and the barred dialling phone books you have to enter your PIN2 code.
Phone book sorting
You have the option of selecting whether you want your phone book sorted by name or by location.
Delete call information
You can delete all entries stored in the Outgoing. Answered and Missed calls lists. Select the sub menu Delete call information and select the list which you want to delete.
SECURITY
SECURITYCALL TIMERS
Call timers and charge
Your telephone can display the actual duration and cost of an ongoing conversation if you so wish. It can also show you the duration and cost of the last call and all calls made with your SIM card since the timer was last reset. However, the call charge feature must be supported by your network.
In order to be able to see the cost in the display you have to enter a unit price and the actual currency. You can also enter a maximum call charge limit, so that when this maximum has been reached no more phone calls can be made. The telephone will inform you about the remaining call charge balance.
To enter or change call charge and currency you will be requested to enter your PIN2 code.
How to see timers
- Press MENU
- Select Call timers and charge using ▼
- Confirm by pressing SELECT
- Select using other
Last call
Total calls
Reset timers and charge
Display timer and credit
(on display)
Call charge
- MAXIMUM
-unit price
currency
remaining
- Confirm by pressing OK
PIN code
To prevent misuse of your SIM card, e.g. if it is lost or stolen, you can select a PIN code to be entered each time you switch on the phone.
The PIN code is a 4 to 8-digit number of your own choice, which you can change any time you like.
If you enter an invalid PIN code three times, your SIM card will be blocked and to unblock it you have to enter the PIN Unlocking Key (PUK) code supplied by your network operator. This procedure prevents unauthorized person from working out your PIN code by repeatedly entering different combinations of numbers.
The display will inform you how many tries you have left before the SIM card is blocked. If you enter an invalid PUK code 10 times, your SIM card will be permanently blocked and you have to contact your network operator.
Some SIM cards use a PIN2 code for accessing special functions. Contact your network operator for further information on PUK2 and PIN2 code.
How to enable, disable and change PIN codes
- Press MENU
- Select Security using ▼
- Confirm by pressing SELECT
- Select using other
PIN code
-PIN code on
-PIN code off
-PIN code change
- Change PIN
Change PIN2
SIM lock
- SIM lock on
- SIM lock off
Network Password
Encryption indication
Encryption indication on
Encryption indication off
Line lock
- Line lock on
-Line lock off
- Confirm your choice by pressing OK
How to change password
If you subscribe to a call barring service your network operator will have supplied you with a 4-digit password. If you want to change this, select Network Password in the Security menu.
Encryption indication
If you connect to a network which does not support encryption, you will get a warning in the display when trying to make a call. You have the option of turning off this network warning by selecting Encryption indication off in the security menu.
Line lock
If you have Alternate Line Service on your phone, you can restrict the outgoing use to only one of these lines. Select Line lock on in the security menu and enter a 4 to 8 digit lock code of your own choice. To shift back to the other line you have to enter this code.
SIM lock
You can link your telephone and your SIM card together. This means that if, for instance, your phone is stolen it cannot be used together with another SIM card. To enable this feature just select
SIM lock on and enter an 6 to 16-digit code of your own choice. For your own sake remember to write down this code to be able to deactivate
the lock at a later time. You have 10 attempts before the phone is blocked.
CALCULATOR
ACCESSORIES
You can use your mobile phone as an ordinary calculator.
How to use the calculator
-
Press MENU
-
Select Calculator using ▲
-
Confirm by pressing OK
Your telephone now acts as a normal calculator. The equal-sign (=) is found on the right hand function key.
Hold down the relevant key for one second to get the desired arithmetic operation.
Key Operation
1 Addition (+)
2 Multiplication (*)
3 Square function (x -)
4 Subtraction (-)
5 Division (1)
6 Square root (v)
7 Percentage (%)
8 Fractions (1/x)
9 Exponent (E)
* M+ or decimal point (press briefly)
0MC
# MR or -/+ (neg./pos.) (press briefly)
Quick survey
By pressing you get access to a survey of what arithmetic operation is placed on what key.
An arithmetic operation can then be selected directly from the survey by pressing the assigned key briefly.
Calculation examples
5 plus 2
Press 5, hold down 1 for one second, press 2 and press = (7)
8 divided by 4
Press 8, hold down 5 for one second, press 4 and press = (2)
Square root of 8
Press 8 and hold down 6 for one second (2.8284271)
15 per cent of 60
Press 6, 0, hold down 2 for one second, press 1, 5, hold down 7 for one second (9)
-5.2 times 10,000
Press 5, *, 2, ‡, hold down 2 for one second, press 1, hold down 9 for one second, press 4 and finally = (-52000)
As soon as a figure is stored in the memory this will be indicated on the display by an M. You can access the memory by pressing ☑ the -ke# (MR).
The memory is reset each time you switch off your phone.
Back to standby mode
Press CLEAR and hold down EXIT for one second.
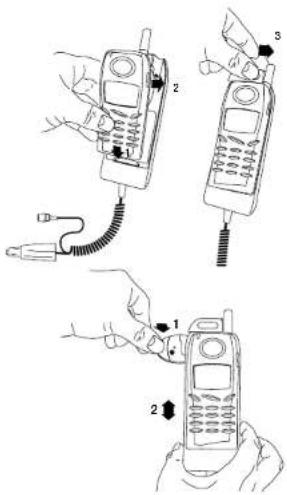
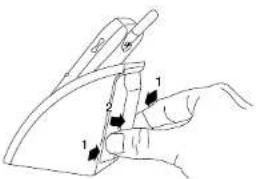
Professional Handsfree Car Kit
Remove the rubber plug covering the antenna hole on the back of the handset.
When placing the phone in the cradle, make sure that the antenna catch is open (slider in left hand side position). When the phone is in place, move the slider to the right hand side for locked position.
When your phone is placed in the cradle, it will switch on automatically with the car ignition. You can select whether you want the telephone to switch off automatically with the car ignition after a delay of 1 hour or whether you want to switch it off manually.
If you have selected
Switch off automatically
and want to switch your telephone off while the ignition is still on, you must do so manually.
The display and keypad backlighting on your phone will switch on and off automatically with the car ignition. While the phone is switched on and placed in the cradle the backlighting will remain on continuously.
The battery will be automatically recharged as necessary.
How to make a handsfree call
- Enter the phone number you wish to call or retrieve it from the phone book.
- Press CALL to let the conversation take place via the external speaker and microphone.
- Press END to end your call.
How to receive a handsfree call
-
Press ANSWER when the phone rings.
-
Press END to end your call.
By selecting Car kit auto answer on you can set your telephone to answer a call automatically after 5 seconds. This option is only effective when the car ignition is on.
If you have selected Any key answer on in the Phone setup menu you can, of course, answer the call by pressing any key.
If you want to switch from handsfree mode to normal mode, just lift the handset and cradle as one complete unit – and back again for returning to handsfree. The switching is performed automatically.
GSM 909 Executive
The GSM 909 Executive is based on the combination of the GSM 909 DUAL or GSM 909 DUAL S and an Executive handset. Placed on the dashboard or in the rear of the car, the full sized ergonomic handset can be used as a normal car phone or as a tool for handsfree conversation. When leaving the car you simply take your GSM 909 DUAL/ DUAL S with you. Without changing the SIM card you can use the Executive handset when you are in the car and the GSM 909 DUAL/ DUAL S when you are out and about. Please refer to separate user guide supplied with the kit.
Voice controlled handsfree car kit
This car kit enables you to make calls just by saying the name of the person you want to call. Please refer to separate user guide supplied with the kit.

ACCESSORIESACCESSORIES
Basic Car Kit
Remove the rubber plug covering the antenna hole on the back of the handset.
When placing the phone in the cradle, make sure that the antenna catch is open (slider in left hand side position). When the phone is in place, move the slider to the right hand side for locked position.
The cradle connects to the car's cigar lighter plug and external antenna.
The battery will be automatically recharged as necessary.
When your phone is switched on and placed in the cradle, the backlighting will remain on.
An external antenna must be connected, since the handset antenna is disconnected when the phone is placed in the cradle.
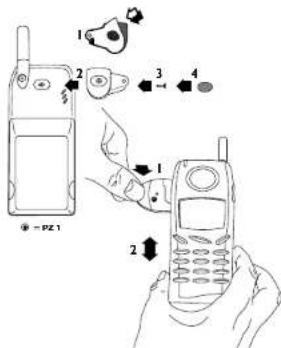
Simple Car Holder
Using the Simple Car Holder will require a special knob to be fitted on the back of your phone. The necessary parts come with the package.
How to fit the knob:
Remove the label from the back of the phone. The knob can now be fitted by means of a screwdriver. Place the new label to cover the screw.
ACCESSORIES
ACCESSORIES
Desktop charger
The desktop charger is powered by means of the charger supplied with your telephone.
When you place the telephone in the desktop charger you have to make sure that the battery symbols on the display start flashing. The battery takes 1 to 5 hours to become fully charged depending on type and size of the battery. During charging the battery symbols on the display of your telephone will flash on and off one after another. When the battery is fully charged all 4 symbols are permanently displayed.
A spare battery can be attached for charging on the back of the desktop charger. The LED indicator on the front will show a red light during charging and a green light when the spare battery is fully charged. The indicator will be off when there is no spare battery attached.

natural_image
Line drawing of a vintage mobile phone with keypad and antenna (no text or symbols)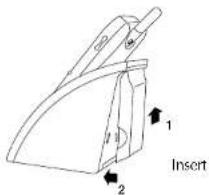
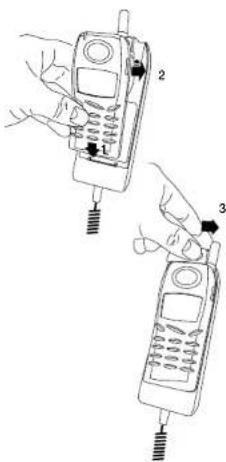
Remove
Headset
How to make a handsfree call
- Enter the phone number you wish to call or retrieve it from the phone book.
- Press CALL to let the conversation take place via the external speaker and microphone.
- Press END to end your call.
How to receive a handsfree call
- Press ANSWER when the phone rings.
- Press END to end your call.
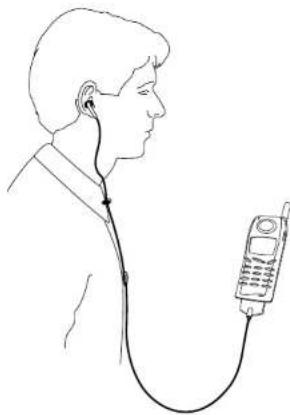
natural_image
Line drawing of a person's profile wearing earphones connected to a mobile phone (no text or symbols)Belt clip
The necessary parts for fitting the belt clip to your phone comes with the package.
How to fit the belt clip:
Remove the label from the back of the phone. Place the small plastic part in the hole with the plane surface turning towards yourself. The belt clip can now be fitted by means of a screwdriver. Place the new label to cover the screw.
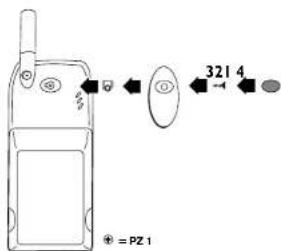

INDEXACCESSORIES
Data Interface
Your phone can be connected to your PC or laptop computer for data and fax communication. Please refer to separate user guide supplied with the kit.
Other accessories
Vibra-Alarm 400 mAh Li-ION battery
Vibra-Alarm 650 mAh Li-ION battery
Light 650 mAh Li-ION battery
Light 750 mAh NiMH battery
High Power 1800 mAh Li-ION battery
Travel Charger
Cigarlighter Charger 12/24 V
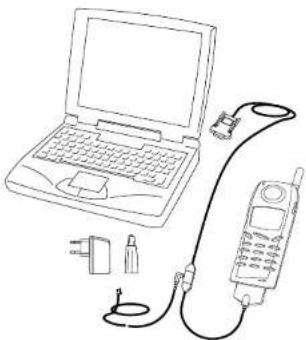
natural_image
Line drawing of a laptop connected to a mobile phone with attached plug and cable (no text or symbols)Accessories 41
Alternative phone books 17
Answered calls 19
Answering a call 4, 11
Any key answer 33
Auto answer 41
Automatic delete, events 35
Automatic redial 33
Automatic switch off 41
Barred numbers 17
Basic car kit 43
Battery 8
Battery level indicator 8
Before sending messages 23
Before you start 8
Belt clip 45
Broadcast channel list 37
Broadcast language 37
Broadcast setup 37
Calculator 40
Call barring 30
Call divert 28
Call timers/charge 37
Call waiting 31
Calling name presentation 31
Car kit installation 41
Clock 34
CLI 19
Closed user group
Confirmation 36
Continuing calls 12
Currency/Call charge .38
Data/fax transmission 33
Data interface 46
Date & time 34
Delete all messages 23
Delete a name/number 15
Delete call information 37
Desktop charger
Display 7
Duration of last call 38
Duration of total calls 38
Edit an old message 25
Edit a name/number 15
Emergency calls 11
Encryption indication 39
Events 21
Event auto delete 35
Extension numbers 11
Factory settings
- telephone 35
- tones 32
Find a name-number 15
Fixed numbers 17
Creeing 34
Gecing 54 GSM 909 Executive 42
Gom 305 ELECARE 12
Headset 45
Important notice 4
Incoming call setup 33
Information numbers 17
International calls 10
Inning a little
Joining calls 13
Kevpad 6
Keypad lock 13
Keypad tone 32
Language 10
Language 16 Line lock 39
Line selection 31
List menu system 18
Location numbers 14
Making a cell 4.10
Making a call 4,10 Maximum cell charge 28
Maximum Can Charge 36 Menu numbers 27
Merlo numbers 27 Moscanas
- cell broadcast 25
- favourites 24
- point-to-point 23
Message setup
-cell broadcast 37
- point-to-point 36
Message tones 32
Missed calls 20
Missed events 22
Muting the microphone 12
Network password 39
Network selection 33
Options in conversation 12
Options in conversion 12 Outgoing calls 19
Outgoing call identity 31
Own numbers 17
Plumour level 14
Phone book 14 Phone book writing 27
Phone book sorting 37 Phone book status 16
Phone book status 16 Phone setup 22
PIN code 38
PIN2 code 38
Power saving 34
Precautions 3
Preferred list 3.4
Prefix telephone numbers 16
Private calls 13
Professional handsfree
car kit 41
PUK code 38
PUK2 code 38
Putting a call on hold 12
Reading a message
-cell broadcast 25
- point-to-point 23
Remaining call charge 38
Reset Timers 38
Kinging tones 32
Save outgoing messages 36
Security 38
Selection of language 10
Selection of network 33
Sending a new message 24
Service centre (SMS) 36
Service numbers 17
Setup menu system 26
SIM card 9 SIM card limitations 4
SIM card limitations 4 SIM lock 20
SIMTICK 39 Simple car holder 43
Simple car holder 4.9 Speed dialling 15
Store a name/number 14
Supplementary network
supplementary network services 31
Switching calls 13
Time & date 34
Tones setup 32
Transferring calls 13
Trembler 32
Unit price 20
Unit price 38 US\$D 21
U.S.S.D. 31
Voice controlled
handsfree car kit 42
Voice mail 15
Volume control 7
Welcome greeting 34
BOSCH EASY SETS
Accessories for Bosch mobile phones

GSM 909 DUAL S

natural_image
Close-up of a person holding a phone to their ear, no visible text or symbolsFor the car
| GSM 909 Executive | 112 |
| Voice Controlled Handsfree Car Kit | 106 |
| Professional Handsfree Car Kit | 107 |
| Basic Car Kit | 108 |
| Simple Car Holder | 109 |
| Cigarlighter Charger 12V/24V | 104 |
For the computer
| Data Interface | 202 |
| For charging | |
| Desktop Charger | 313 |
| Travel Charger - EU | 301 |
| Travel Charger - UK | 302 |
| Travel Charger - AUS | 303 |
| Travel Charger - US | 304 |
For power
| Light 650 mAh Li-Ion battery | 510 |
| Vibra-Alarm 400 mAh Li-Ion battery | 511 |
| Vibra-Alarm 650 mAh Li-Ion battery | 512 |
| Light 750 mAh NiMH battery | 513 |
| High Power 1800 mAh Li-Ion battery | 514 |
Outfit
| Headset | 701 |
| Belt clip | 707 |
"Manufactured and sold under U.S. Patent Nos. 4.675,863, 4.777,633,
4,785,450, 4,811,420 (including related divisional, continuations and
foreign counterparts) licensed from InterDigital Technology Corporation.*
