
EKI-5728I-AE - Switch Advantech - Free user manual and instructions
Find the device manual for free EKI-5728I-AE Advantech in PDF.

| Product Type | Industrial Unmanaged Ethernet Switch |
| Model | EKI-5728I-AE |
| Brand | Advantech |
| Ports | 8 x 10/100/1000Base-T(X) RJ45 + 2 x Combo SFP Slots |
| Operating Temperature | -40 to 75°C |
| Power Input | 12-48 VDC (redundant, dual power inputs) |
| Power Consumption | Max 9.6 W |
| Dimensions (W x D x H) | 50 x 100 x 120 mm |
| Weight | 0.45 kg |
| Mounting | DIN Rail, Wall Mount |
| Protection Class | IP30 |
| Standards | IEEE 802.3, 802.3u, 802.3ab, 802.3z, 802.3x |
| EMI/EMS | CE, FCC Class A, EN 61000-6-2/4 |
| Safety | UL 61010, EN 60950-1 |
| Shock & Vibration | IEC 60068-2-27, IEC 60068-2-6 |
| MAC Address Table | 8K entries |
| Jumbo Frame | Up to 9.6 KB |
| Switching Capacity | 20 Gbps |
| Maintenance | Clean with dry cloth; check cable connections periodically |
| Spare Parts & Repairability | No user-serviceable parts; contact Advantech support for RMA |
Frequently Asked Questions - EKI-5728I-AE Advantech
User questions about EKI-5728I-AE Advantech
0 question about this device. Answer the ones you know or ask your own.
Ask a new question about this device
Download the instructions for your Switch in PDF format for free! Find your manual EKI-5728I-AE - Advantech and take your electronic device back in hand. On this page are published all the documents necessary for the use of your device. EKI-5728I-AE by Advantech.
USER MANUAL EKI-5728I-AE Advantech
Chapter 1 Product Overview
1.1. Supported Models 1
1.2. Specifications 2
1.3. Hardware Views 8
1.3.1 Front View....8
1.3.2 Rear View 24
1.3.3 Top View....28
1.3.4 Bottom View....31
1.4. Packing List 33
Chapter 2 Switch Installation
2.1. Installation Guidelines 35
2.1.1 Connecting Hardware 35
2.2. Verifying Switch Operation 35
2.3. Installing the Switch.... 36
2.3.1 DIN Rail Mounting....36
2.3.2 Wall-Mounting....37
2.4. Installing and Removing SFP Modules 39
2.4.1 Installing SFP Modules 40
2.4.2 Removing SFP Modules 41
2.5. Connecting the Switch to Ethernet Ports.... 42
2.5.1 RJ45 Ethernet Cable Wiring 42
2.6. Power Supply Installation 43
2.6.1 Overview....43
2.6.2 Considerations....43
2.6.3 Grounding the Device 44
2.6.4 Wiring a Relay Contact 45
2.6.5 Wiring the Power Inputs....45
Chapter 3 Configuration Utility
3.1. Overview 49
3.2. Enabling ProView Function 49
3.3. Installing the Configuration Utility 50
3.4. Utility Menu Map 53
3.5. Menu Bar 54
3.5.1 View Menu 54
3.5.2 Management Menu....56
3.5.3 Help Menu 56
3.6. Tool Bar....57
3.7. TreeView 57
3.8. Information Panel 57
3.9. Status Bar 57
3.10. Configuration Area.... 57
Chapter 4 Managing Switch
4.1. Discovering Switches 59
4.1.1 First Time Installation....59
4.1.2 Discovering Switches....61
4.1.3 Group Management....62
4.1.4 Configuring the System....67
4.2. Modbus/TCP Mapping....70
4.2.1 Modbus/TCP Mapping Table 71
Federal Communication Commission Interference Statement
For further certification information, please go to www.advantech.com
Declaration of Conformity
CE
This product has passed the CE test for environmental specifications when shielded cables are used for external wiring. We recommend the use of shielded cables. This kind of cable is available from Advantech. Please contact your local supplier for ordering information.
This product has passed the CE test for environmental specifications. Test conditions for passing included the equipment being operated within an industrial enclosure. In order to protect the product from being damaged by ESD (Electrostatic Discharge) and EMI leakage, we strongly recommend the use of CE-compliant industrial enclosure products.
FCC Class A
This equipment has been tested and found to comply with the limits for a Class A digital device, pursuant to part 15 of the FCC Rules. These limits are designed to provide reasonable protection against harmful interference when the equipment is operated in a commercial environment. This equipment generates, uses, and can radiate radio frequency energy and, if not installed and used in accordance with the instruction manual, may cause harmful interference to radio communications. Operation of this equipment in a residential area is likely to cause harmful interference in which case the user will be required to correct the interference at his own expense.
Warnings for Class 1 Division 2
The following statements are required to appear for Class 1 Division 2 requirements
These devices are open-type devices that are to be installed in an enclosure with tool removable cover/door that is suitable for the environment.
WARNING -This equipment is suitable for use in Class I, Division 2, Groups A, B, C, and D or non-hazardous locations only.
WARNING - EXPLOSION HAZARD - Do not connect or disconnect equipment unless power has been removed or the area is known to be non-hazardous."
WARNING - EXPLOSION HAZARD - Substitution of any components may impair suitability for Class I, Division 2."
ATEX Directive 94/9/EC (as amended relating to Group II, Category 3 locations)

Standard: EN 60079-0:2012+A11:2013; EN 60079-15:2010
Conditions of safe use:
- The equipment shall only be used in an area of not more than pollution degree 2, as defined in IEC 60664-1.
- The equipment shall be installed in an enclosure that provides a degree of protection not less than IP 54 in accordance with EN 60079-15 and accessible only by the use of a tool.
- Transient protection shall be provided that is set at a level not exceeding 140 % of the peak rated voltage value at the supply terminals to the equipment.
Safety Instructions
- Read these safety instructions carefully.
- Keep this user manual for later reference.
- Disconnect this equipment from any AC outlet before cleaning. Use damp cloth. Do not use liquid or spray detergents for cleaning.
- For plug-in equipment, the power outlet socket must be located near the equipment and must be easily accessible.
- Keep this equipment away from humidity.
- Put this equipment on a reliable surface during installation. Dropping it or letting it fall may cause damage.
- The openings on the enclosure are fo air convection. Protect the equipment from overheating. DO NOT COVER THE OPENINGS.
- Make sure the voltage of the power source is correct before connecting the equipment to the power outlet.
- Position the power cord so that people cannot step on it. Do not place anything over the power cord.
- All cautions and warning on the equipment should be noted.
- If the equipment is not used for a long time, disconnect it from the power source to avoid damage by transient over voltage.
- Never pour any liquid into an opening. This may cause fire or electrical shock.
- Never open the equipment. For safety reasons, the equipment should be opened only by qualified service personnel.
- If one of the following situations arises, get the equipment checked by service personnel:
- The power cord or plug is damaged.
- Liquid has penetrated into the equipment.
- The equipment has been exposed to moisture.
- The equipment does not work well, or you cannot get it to work according to the user manual
- The equipment has been dropped and damaged.
- The equipment has obvious signs of breakage.
- Instructions for installation in a pollution Degree 2 environment or equivalent statement.
- PoE requirements:
This product was in-door used and not connected to outside plant, so user manual shall have the description as below or equivalent: "The equipment is to be connected only to PoE networks without routing to the outside plant."
- Do NOT LEAVE THIS EQUIPMENT IN AN ENVIRONMENT WHERE THE STORAGE TEMPERATURE MAY GO BELOW -40°C(-40°F) OR ABOVE 75°C(167°F) THIS COULD DAMAGE THE EQUIPMENT. THE EQUIPMENT SHOULD BE IN A CONTROLLED ENVIRONMENT.
Product Warranty (5 years)
Company Address:
Advantech warrants to you, the original purchaser, that each of its products will be free from defects in materials and workmanship for five years from the date of purchase.
This warranty does not apply to any products which have been repaired or altered by persons other than repair personnel authorized by Advantech, or which have been subject to misuse, abuse, accident or improper installation. Advantech assumes no liability under the terms of this warranty as a consequence of such events.
Because of Advantech's high quality-control standards and rigorous testing, most of our customers never need to use our repair service. If an Advantech product is defective, it will be repaired or replaced at no charge during the warranty period. For out-of-warranty repairs, you will be billed according to the cost of replacement materials, service time and freight. Please consult your dealer for more details.
If you think you have a defective product, follow these steps:
- Collect all the information about the problem encountered. (For example, CPU speed, Advantech products used, other hardware and software used, etc.) Note anything abnormal and list any on screen messages you get when the problem occurs.
-
Call your dealer and describe the problem. Please have your manual, product, and any helpful information readily available.
-
If your product is diagnosed as defective, obtain an RMA (return merchandise authorization) number from your dealer. This allows us to process your return more quickly.
- Carefully pack the defective product, a fully-completed Repair and Replacement Order Card and a photocopy proof of purchase date (such as your sales receipt) in a shippable container. A product returned without proof of the purchase date is not eligible for warranty service.
- Write the RMA number visibly on the outside of the package and ship it prepaid to your dealer.
Conventions

Warning signs are used to identify immediate hazards for property damage, injury or death.

CAUTION SIGNS ARE USED WARN AGAINST POTENTIAL HAZARDS OR TO CAUTION AGAINST UNSAFE PRACTICES.

Note signs are used to provide additional information for the device or settings.
Copyright
Copyright © 2015 Advantech Inc. All rights reserved. No part of this publication may be reproduced, adapted, stored in a retrieval system, translated into any language, or transmitted in any form or by any means without the written permission of the manufacturer.
Technical Support and Assistance
- Visit the Advantech web site at www.advantech.com/support where you can find the latest information about the product.
- Contract your distributor, sales representative, or Advantech's customer service center for technical support if you need additional assistance. Please have the following information ready before you call:
• Product name and serial number
• Description of your peripheral attachment
• Description of your software (operating system, version, application software, etc.)
• A complete description of the problem
• The exact wording of any error messages
Regional Service & Customization Centers
| China | Taiwan | Netherlands | Poland | USA/ Canada |
| Kunshan | Taipei | Eindhoven | Warsaw | Milpitas, CA |
| 86-512-5777-5666 | 886-2-2792-7818 | 31-40-267-7000 | 48-22-33-23-740 / 41 | 1-408-519-3898 |
Worldwide Offices
| Greater China | Asia Pacific | Europe | Americas | ||||
| China | Japan | Toll Free | 00800-2426-8080 | North America | |||
| Toll Free | 800-810-0345 | Toll Free | 0800-500-1055 | Germany | Toll Free | 1-888-576-9668 | |
| Beijing | 86-10-6298-4346 | Tokyo | 81-3-6802-1021 | Munich | 49-89-12599-0 | Cincinnati | 1-513-742-8895 |
| Shanghai | 86-21-3632-1616 | Osaka | 81-6-6267-1887 | Hilden / D’dorf | 49-2103-97-885-0 | Milpitas | 1-408-519-3898 |
| Shenzhen | 86-755-8212-4222 | Irvine | 1-949-420-2500 | ||||
| Chengdu | 86-28-8545-0198 | Korea | France | ||||
| Hong Kong | 852-2720-5118 | Toll Free | 080-363-9494 | Paris | 33-1-4119-4666 | Brazil | |
| Seoul | 82-2-3663-9494 | Toll Free | 0800-770-5355 | ||||
| Saude-São Paulo | 55-11-5592-5355 | ||||||
| Taiwan | Singapore | Italy | |||||
| Toll Free | 0800-777-111 | Singapore | 65-6442-1000 | Milano | 39-02-9544-961 | Mexico | |
| Neihu | 886-2-2792-7818 | Toll Free | 1-800-467-2415 | ||||
| Xindian | 886-2-2218-4567 | Mexico City | 52-55-6275-2777 | ||||
| Taichung | 886-4-2378-6250 | Malaysia | Benelux & Nordics | ||||
| Kaohsiung | 886-7-229-3600 | Toll Free | 1800-88-1809 | Breda | 31-76-5233-100 | ||
| Kuala Lumpur | 60-3-7725-4188 | ||||||
| Penang | 60-4-537-9188 | UK | |||||
| Reading | 44-0118-929-4540 | ||||||
| Indonesia | Poland | ||||||
| Jakarta | 62-21-769-0525 | Warsaw | 48-22-33-23-740 / 41 | ||||
| Thailand | Russia | ||||||
| Bangkok | 66-2-248-3140 | Toll Free | 8-800-550-01-50 | ||||
| Moscow | 7-495-232-1692 | ||||||
| India | |||||||
| Toll Free | 1-800-425-5070 | ||||||
| Pune | 91-20-39482075 | ||||||
| Bangalore | 91-80-2545-0206 | ||||||
| Australia | 1300-308-531 | ||||||
| Toll Free | 61-3-9797-0100 | ||||||
| Melbourne | 61-2-9476-9300 | ||||||
| Sydney | |||||||
About This Manual
This user manual is intended to guide professional installers in installing and configuring the ProView Series Ethernet Switches. It includes technical specifications, software utility introduciton, as we as procedures for the use of the software utility to self-manage the devices.
Product Overview
Chapter 1
1.1. Supported Models
Standard Models:
Table 1-1. Standard Models
| EKI-5525S EKI-5525M EKI-5525S-ST | |
| EKI-5525M-ST EKI-5524SS EKI-5524MM | |
| EKI-5524SS-ST EKI-5524MM-ST EKI-5525 | |
| EKI-5725 EKI-5728 EKI-5729F | |
| EKI-5725FP EKI-5528 EKI-5526 | |
| EKI-5726 EKI-5726F EKI-5629C | |
| EKI-5626C EKI-5624P EKI-5729P |
Wide Temperature Models:
Table 1-2. Wide Temperature Models
| EKI-5525SI EKI-5525MI EKI-5525SI-ST | ||
| EKI-5525MI-ST EKI-5524SSI | EKI-5524MMI | |
| EKI-5524SSI-ST | EKI-5524MMI-ST | EKI-5525I |
| EKI-5725I | EKI-5728I | EKI-5729FI |
| EKI-5725FPI | EKI-5528I | EKI-5526I |
| EKI-5726I | EKI-5726FI | EKI-5629CI |
| EKI-5626CI | EKI-5624PI EKI-5729PI | |
1.2. Specifications
Table 1-3. Specifications
| Specifications Description | |
| Interface I/O Port | |
| Power Connector 6-pin screw Terminal Block (including relay) | |
Table 1-3. Specifications (Continued)
| Specifications Description | ||
| Physical Enclosure | Metal Shell | |
| Protection Class IP30 | ||
| Installation DIN-Rail and Wall-Mount | ||
| Dimensions(W x H x D) | EKI-5525S/EKI-5525SI: 27mm x 120mm x 84mmEKI-5525M/EKI-5525MI: 27mm x 120mm x 84mEEKI-5525S-ST/EKI-5525SI-ST: 27mm x 120mm x 84mEEKI-5525M-ST/EKI-5525MI-ST: 27mm x 120mm x 84mEEKI-5524SS: 28.5mm x 120mm x 85.3mEEKI-5524SSI: 28.5mm x 120mm x 85.3mEEKI-5524MM/EKI-5524MMI: 28.5mm x 120mm x 85.3mEEKI-5524SS-ST/EKI-5524SSI-ST: 28.5mm x 120mm x 85.3mEEKI-5524MM-ST/EKI-5524MMI-ST: 28.5mm x 120mm x 85.3mEEKI-5525/EKI-5525I: 27mm x 120mm x 84mEEKI-5725/EKI-5725I: 27mm x 120mm x 84mEEKI-5728/EKI-5728I: 43mm x 120mm x 84mEEKI-5729F/EKI-5729FI: 43mm x 120mm x 84mEEKI-5725FP/EKI-5725FPI: 74mm x 152mm x 105mEEKI-5528/EKI-5528I: 43mm x 120mm x 84mEEKI-5526/EKI-5526I: 74mm x 120mm x 84mEEKI-5726/EKI-5726I: 74mm x 120mm x 84mEEKI-5726F/EKI-5726FI: 74mm x 120mm x 84mEEKI-5629C/EKI-5629CI: 74mm x 120mm x 84mEEKI-5626C/EKI-5626CI: 74mm x 120mm x 84mEEKI-5624P/EKI-5624PI: 74mm x 152mm x 105mEEKI-5729P/EKI-5729PI: 74mm x 152mm x 105mm | |
| LED Display System | LED PWR1, PWR2, P-Fail, Loop detectionPoE (only for EKI-5725FP/EKI-5725FPI) | |
| Port LED Link / Speed / ActivityPoE (only for EKI-5725FP/EKI-5725FPI, EKI-5624P/EKI-5624PI and EKI-5729P/EKI-5729PI) | ||
| Environment Operating Temperature | • Wide Temperature: -40°C ~ 75°C (-40°F ~ 167°F)• Standard Temperature:• Non PoE Models: -10°C ~ 60°C (14°F ~ 140°F)• PoE Models: -25°C ~ 60°C(-4°F ~ 140°F) | |
| Storage Temperature | -40°C ~ 85°C (-40°F ~ 185°F) | |
| Ambient Relative Humidity | 10 ~ 95% (non-condensing) | |
| Switch Properties | MAC Address • EKI-5525S/EKI-5525SI: 2K entries• EKI-5525M/EKI-5525MI: 2K entries• EKI-5525S-ST/EKI-5525SI-ST: 2K entries• EKI-5525M-ST/EKI-5525MI-ST: 2K entries• EKI-5524SS/EKI-5524SSI: 2K entries• EKI-5524MM/EKI-5524MMI: 2K entries• EKI-5524SS-ST/EKI-5524SSI-ST: 2K entries• EKI-5524MM-ST/EKI-5524MMI-ST: 2K entries• EKI-5525/EKI-5525I: 2K entries• EKI-5725/EKI-5725I: 2K entries• EKI-5728/EKI-5728I: 8K entries• EKI-5729F/EKI-5729FI: 8K entries• EKI-5725FP/EKI-5725FPI: 2K entries• EKI-5528/EKI-5528I: 8K entries• EKI-5526/EKI-5526I: 8K entries• EKI-5726/EKI-5726I: 8K entries• EKI-5726F/EKI-5726FI: 8K entries• EKI-5629C/EKI-5629CI: 8K entries• EKI-5626C/EKI-5626CI: 8K entries• EKI-5624P/EKI-5624PI: 2K entries• EKI-5729P/EKI-5729PI: 8K entries | |
| Switch Properties | Switching Bandwidth | EKI-5525S/EKI-5525SI: 1 GbpsEKI-5525M/EKI-5525MI: 1 GbpsEKI-5525S-ST/EKI-5525SI-ST: 1 GbpsEKI-5525M-ST/EKI-5525MI-ST: 1 GbpsEKI-5524SS/EKI-5524SSI: 1.2 GbpsEKI-5524MM/EKI-5524MMI: 1.2 GbpsEKI-5524SS-ST/EKI-5524SSI-ST: 1.2 GbpsEKI-5524MM-ST/EKI-5524MMI-ST: 1.2 GbpsEKI-5525/EKI-5525I: 1 GbpsEKI-5725/EKI-5725I: 10 GbpsEKI-5728/EKI-5728I: 16 GbpsEKI-5729F/EKI-5729FI: 20 GbpsEKI-5725FP/EKI-5725FPI: 10 GbpsEKI-5528/EKI-5528I: 1.6 GbpsEKI-5526/EKI-5526I: 3.2 GbpsEKI-5726/EKI-5726I: 32 GbpsEKI-5726F/EKI-5726FI: 36 GbpsEKI-5629C/EKI-5629CI: 5.6 GbpsEKI-5626C/EKI-5626CI: 7.2 GbpsEKI-5624P/EKI-5624PI: 4.8GbpsEKI-5729P/EKI-5729PI: 20Gbps |
| Power Power Consumption | EKI-5525S/EKI-5525SI: 2.8 wattsEKI-5525M/EKI-5525MI: 2.8 wattsEKI-5525S-ST/EKI-5525SI-ST: 2.8 wattsEKI-5525M-ST/EKI-5525MI-ST: 2.8 wattsEKI-5524SS/EKI-5524SSI: 4 wattsEKI-5524MM/EKI-5524MMI: 4 wattsEKI-5524SS-ST/EKI-5524SSI-ST: 4 wattsEKI-5524MM-ST/EKI-5524MMI-ST: 4 wattsEKI-5525/EKI-5525I: 2 wattsEKI-5725/EKI-5725I: 2 wattsEKI-5728/EKI-5728I: 5.2 wattsEKI-5729F/EKI-5729FI: 6.8 wattsEKI-5725FP/EKI-5725FPI: 89 wattsEKI-5528/EKI-5528I: 3.6 wattsEKI-5526/EKI-5526I: 3.84 wattsEKI-5726/EKI-5726I: 8 wattsEKI-5726F/EKI-5726FI: 9.6 wattsEKI-5629C/EKI-5629CI: 5.8 wattsEKI-5626C/EKI-5626CI: 8.2 wattsEKI-5624P/EKI-5624PI: 60 wattsEKI-5729P/EKI-5729PI: 65 watts | |
| Power Input | 12V ~ 48V (8.4V ~ 52.8V), redundant dual inputs24V ~ 48V (16.8V ~ 62.4V): only for EKI-5725FP/EKI-5725FPI12V ~ 24V (9V ~ 36V): only for EKI-5624P/EKI-5624PI and EKI-5729P/EKI-5729PI | |
| Certifications | Safety | IEC/EN 60950-1, UL508UL61010-1+UL61010-2-201 (Only for EKI-5729P/EKI-5729PI, EKI-5624P/EKI-5624PI and EKI-5725FP/EKI-5725FPI)Class 1 Division 2, IECEx , ATEX |
| EMC | CE, FCCe-Mark (Only for EKI-5728/EKI-5728I, EKI-5729F, EKI-5729FI) | |
| EMI EN 55011/ 550 | 22 Class A, EN 61000-6-4, FCC Part 15 Subpart B Class A | |
| EMS | EN 55024/ EN 61000-6-2EN 61000-4-2 (ESD) Level 3EN 61000-4-3 (RS) Level 3;EN 61000-4-4 (EFT) Level 3EN 61000-4-5 (Surge) Level 3;EN 61000-4-6 (CS) Level 3EN 61000-4-8 (Magnetic Field) Level 3 | |
| Shock IEC 60068-2 | -27 | |
| Freefall IEC 60068 | -2-32 | |
| Vibration IEC 60068 | -2-6 | |
1.3. Hardware Views
1.3.1 Front View
The following view applies to EKI-5525, EKI-5525I, EKI-5725 and EKI-5725I.
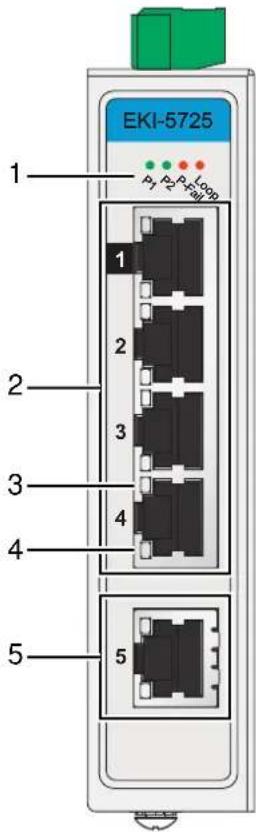
Figure 1-1. Front View
Table 1-4. Front View
| No. | Item Description | |
| 1 | System LED panel See “System LED Panel” on page 22 for further details. | |
| 2 | ETH port EKI-5525/EKI-5525I: Four 10/100BaseT(X) ports.EKI-5725/EKI-5725I: Four 10/100/1000BaseT(X) ports.Port numbers in black are designated for port based Quality of Service (QoS) functionality. | |
| 3 | LNK/ACT LED Link activity LED. | |
| 4 | Speed LED | Gigabit Ethernet:Green: 1000MMamber: 100MOff: 10MFast Ethernet:Amber: 100MOff: 10M |
| 5 | ETH port EKI-5525/EKI-5 | 525I: One 10/100BaseT(X) port.EKI-5725/EKI-5725I: One 10/100/1000BaseT(X) port. |
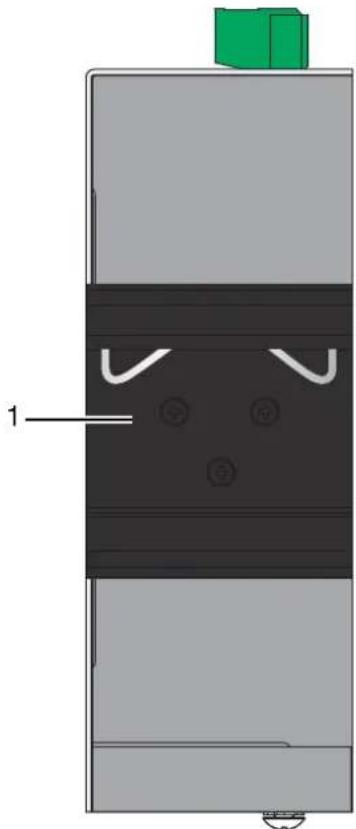
The following view applies to EKI-5528, EKI-5528I, EKI-5728 and EKI-5728I.

Figure 1-2. Front View
Table 1-5. Front View
| No. | Item Description | |
| 1 | System LED panel See “System LED Panel” on page 22 for further details. | |
| 2 | ETH port EKI-5528/EKI-5528I: Eight 10/100BaseT(X) ports.EKI-5728/EKI-5728I: Eight 10/100/1000BaseT(X) ports.Port numbers in black are designated for port based Quality of Service (QoS) functionality. | |
| 3 | LNK/ACT LED Link activity LED. | |
| 4 | Speed LED | Gigabit Ethernet:Green: 1000MMamber: 100MOff: 10MFast Ethernet:Amber: 100MOff: 10M |
The following view applies to EKI-5729F and EKI-5729FI.
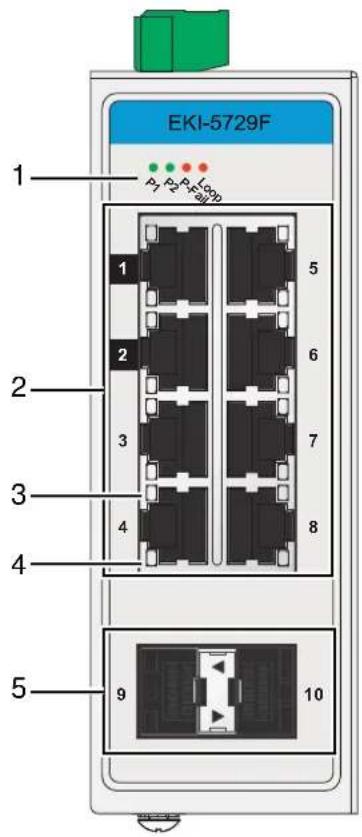
Figure 1-3. Front View
Table 1-6. Front View
| No. | Item Description | |
| 1 | System LED panel See “ | System LED Panel” on page 22 for further details. |
| 2 | ETH port Eight 10/100/1000BaseT(X) ports. | Port numbers in black are designated for port based Quality of Service (QoS) functionality. |
| 3 | LNK/ACT LED Link activity LED. | |
| 4 | Speed LED Gigabit Ethernet: | Green: 1000MAmber: 100MOff: 10M |
| 5 | ETH port Two 100/1000Base-FX SFP ports. | |
The following view applies to EKI-5525S, EKI-5525SI, EKI-5525M and EKI-5525MI.
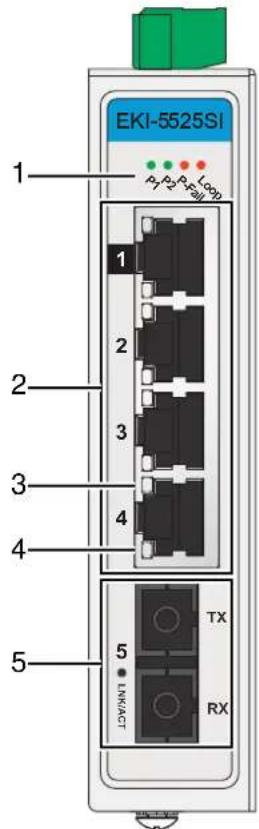
Figure 1-4. Front View
Table 1-7. Front View
| No. | Item Description | |
| 1 | System LED panel See “System LED Panel” on page 22 for further details. | |
| 2 | ETH port Four RJ45 ports. | Port numbers in black are designated for port based Quality of Service (QoS) functionality. |
| 3 | LNK/ACT LED Link activity LED. | |
| 4 | Speed LED Fast Ethernet:Amber: 100MOff: 10M | |
| 5 | SC port EKI-5525S/EKI-5525SI: One SC (single mode) portEKI-5525M/EKI-5525MI: One SC (multi mode) port | |
The following view applies to EKI-5525S-ST, EKI-5525SI-ST, EKI-5525M-ST and EKI-5525MI-ST.
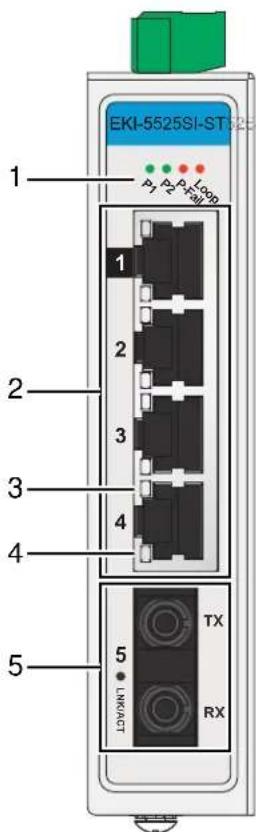
Figure 1-5. Front View
Table 1-8. Front View
| No. | Item Description | |
| 1 | System LED panel See “System LED Panel” on page 22 for further details. | |
| 2 | ETH port Four RJ45 ports. | Port numbers in black are designated for port based Quality of Service (QoS) functionality. |
| 3 | LNK/ACT LED Link activity LED. | |
| 4 | Speed LED Fast Ethernet:Amber: 100MOff: 10M | |
| 5 | ST port EKI-5525S-ST/E | KI-5525SI-ST: One ST (single mode) port.EKI-5525M-ST/EKI-5525MI-ST: One ST (multi mode) port. |
The following view applies to EKI-5524SS, EKI-5524SSI, EKI-5524MM and EKI-5524MMI.
Figure 1-6. Front View
Table 1-9. Front View
| No. | Item Description | |
| 1 | System LED panel See “System LED Panel” on page 22 for further details. | |
| 2 | ETH port Four RJ45 ports. | Port numbers in black are designated for port based Quality of Service (QoS) functionality. |
| 3 | LNK/ACT LED Link activity LED. | |
| 4 | Speed LED Fast Ethernet:Amber: 100MOff: 10M | |
| 5 | ST port EKI-5524SS/EKI-5524SSI: Two SC (single mode) ports.EKI-5524MM/EKI-5524MMI: Two SC (multi mode) ports. | |
The following view applies to EKI-5524SS-ST, EKI-5524SSI-ST, EKI-5524MM-ST and EKI-5524MMI-ST.
Figure 1-7. Front View
Table 1-10. Front View
| No. | Item Description | |
| 1 | System LED panel See “System LED Panel” on page 22 for further details. | |
| 2 | ETH port Four RJ45 ports. | Port numbers in black are designated for port based Quality of Service (QoS) functionality. |
| 3 | LNK/ACT LED Link activity LED. | |
| 4 | Speed LED Fast Ethernet:Amber: 100MOff: 10M | |
| 5 | ST port EKI-5524SS-ST/EKI-5524SSI-ST: Two ST (single mode) ports.EKI-5524MM-ST/EKI-5524MMI-ST: Two ST (multi mode) ports. | |
The following view applies to EKI-5526, EKI-5526I, EKI-5726 and EKI-5726I.
Figure 1-8. Front View
Table 1-11. Front View
| No. | Item Description | |
| 1 | System LED panel See “System LED Panel” on page 22 for further details. | |
| 2 | ETH port EKI-5526/EKI-5526I: Sixteen 10/100BaseT(X) ports.EKI-5726/EKI-5726I: Sixteen 10/100/1000BaseT(X) ports.Port numbers in black are designated for port based Quality of Service (QoS) functionality. | |
| 3 | LNK/ACT LED Link activity LED. | |
| No. Item Description | ||
| 4 Speed LED Fast Ethernet: | Amber: 100MOff: 10M | |
The following view applies to EKI-5629C and EKI-5629CI.
Figure 1-9. Front View
Table 1-12. Front View
| No. | Item Description | |
| 1 | System LED panel See “System LED Panel” on page 22 for further details. | |
| 2 | ETH port Eight 10/100BaseT(X) ports. Port numbers in black are designated for port based Quality of Service (QoS) functionality. | |
| 3 | LNK/ACT LED Link activity LED. | |
| 4 | Speed LED Fast Ethernet: • Amber: 100M • Off: 10M | |
| 5 | ETH port Two 10/100/1000BaseT(X) ports. | |
| 6 | ETH port Two 100/1000 | Base-FX SFP ports. |
The following view applies to EKI-5626C and EKI-5626CI.
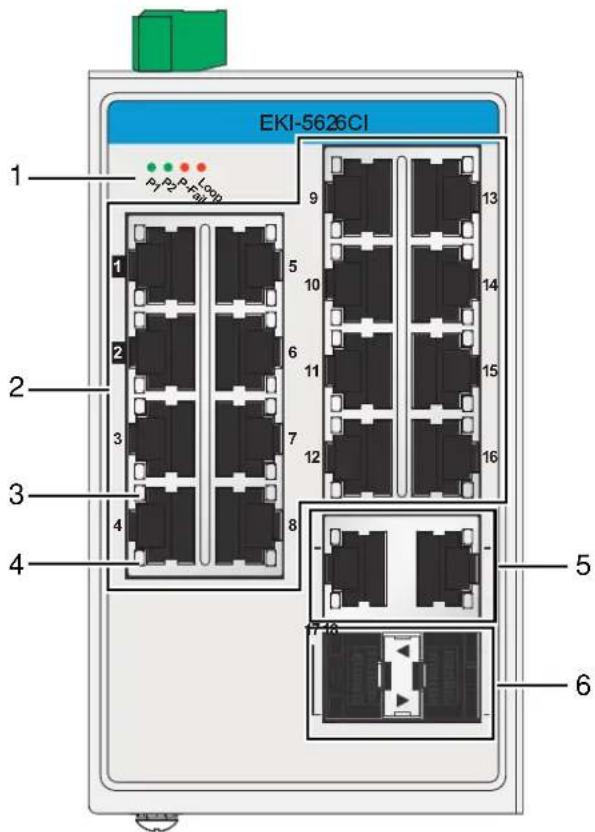
Figure 1-10. Front View
Table 1-13. Front View
| No. | Item Description | |
| 1 | System LED panel See “System LED Panel” on page 22 for further details. | |
| 2 | ETH port Sixteen 10/100 | BaseT(X) ports. |
| Port numbers in black are designated for port based Quality of Service (QoS) functionality. | ||
| 3 | LNK/ACT LED Link activity LED. | |
| 4 | Speed LED Fast Ethernet: | Amber: 100MOff: 10M |
| 5 | ETH port Two 10/100/1000 | BaseT(X) ports. |
| 6 | ETH port Two 100/1000 | Base-FX SFP ports. |
The following view applies to EKI-5726F and EKI-5726FI.
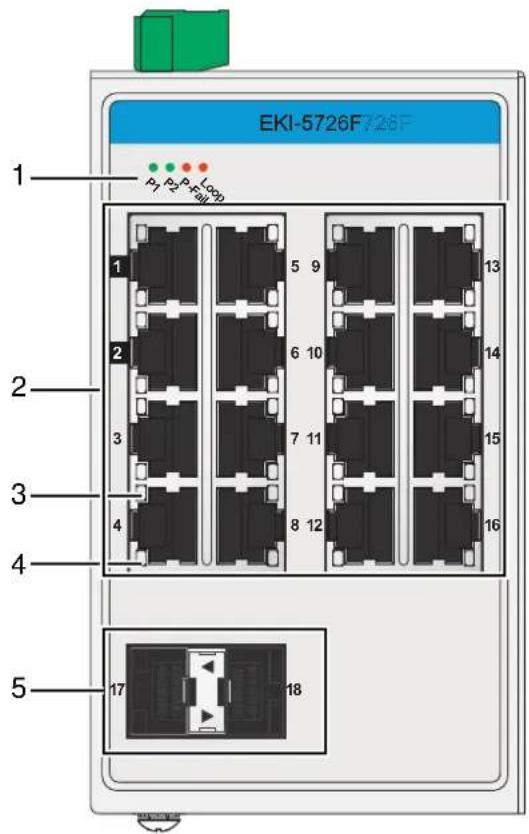
Figure 1-11. Front View
Table 1-14. Front View
| No. | Item Description | |
| 1 | System LED panel See “System LED Panel” on page 22 for further details. | |
| 2 | ETH port Sixteen 10/100/1000BaseT(X) ports. Port numbers in black are designated for port based Quality of Service (QoS) functionality. | |
| 3 | LNK/ACT LED Link activity LED. | |
| 4 | Speed LED Gigabit Ethernet: Green: 1000M Amber: 100M Off: 10M | |
| 5 | ETH port Two 100/1000Base-FX SFP ports. | |
The following view applies to EKI-5725FP and EKI-5725FPI.
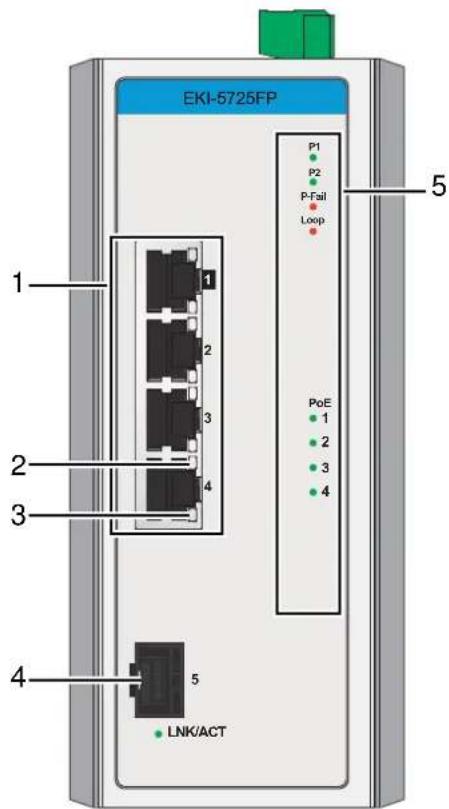
Figure 1-12. Front View
Table 1-15. Front View
| No. | Item Description | |
| 1 | ETH port Four 10/100/1000BaseT(X) with PoE ports. | |
| 2 | LNK/ACT LED Link activity LED. | |
| 3 | Speed LED Gigabit Ethernet:Green: 1000MMamber: 100MOff: 10M | |
| 4 | ETH port One 100/1000Base-FX, SFP port. | |
| 5 | System LED panel See “System LED Panel (only for EKI-5725FP/EKI-5725FPI, EKI-5624P/EKI-5624PI and EKI-5729P/EKI-5729PI)” on page 23 for further details. | |
The following view applies to EKI-5624P and EKI-5624PI.
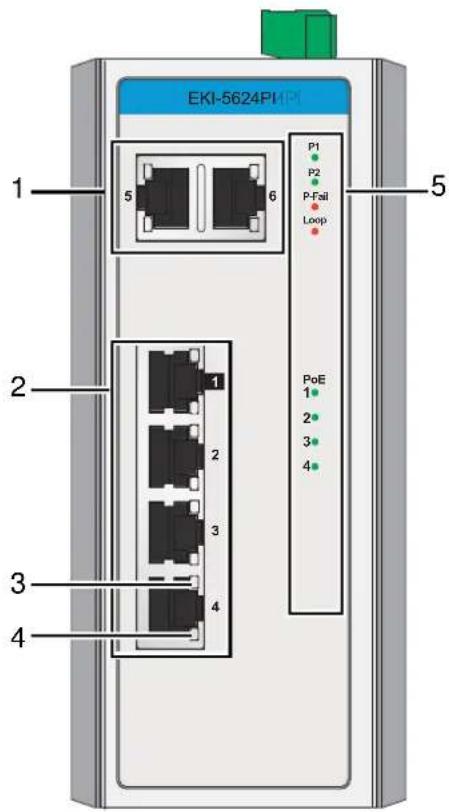
Figure 1-13. Front View
Table 1-16. Front View
| No. | Item Description | |
| 1 | ETH port Two 10/100/1000BaseT(X) ports. | |
| 2 | ETH port Four 10/100BaseT(X) with PoE ports. | |
| 3 | LNK/ACT LED Link activity LED. | |
| 4 | Speed LED Fast Ethernet:Amber: 100MOff: 10M | |
| 5 | System LED panel See “System LED Panel (only for EKI-5725FP/EKI-5725FPI, EKI-5624P/EKI-5624PI and EKI-5729P/EKI-5729PI)” on page 23 for further details. | |
The following view applies to EKI-5729P and EKI-5729PI.
Figure 1-14. Front View
Table 1-17. Front View
| No. | Item Description | |
| 1 | ETH port Two 10/100/1000BaseT(X) ports. | |
| 2 | ETH port Eight 10/100/1000BaseT(X) with PoE ports. | |
| 3 | LNK/ACT LED Link activity LED. | |
| 4 | Speed LED Gigabit Ethernet:Green: 1000MMamber: 100MOff: 10M | |
| 5 | System LED panel See “System LED Panel (only for EKI-5725FP/EKI-5725FPI, EKI-5624P/EKI-5624PI and EKI-5729P/EKI-5729PI)” on page 23 for further details. | |
System LED Panel
Figure 1-15. System LED Panel
Table 1-18. System LED Panel
| No. | LED Name LED Color Description | ||
| 1 | PW1 LED Solid green | Powered up. | |
| Off Powered down or not installed. | |||
| 2 | PW2 LED Solid green | Powered up. | |
| Off Powered down or not installed. | |||
| 3 | P-Fail Solid red When | PW1 or PW2 is disconnected, the LED lights. | |
| Off When PW1 and PW2 is connected, the LED is off. | |||
| 4 | Loop Solid red When | loop detected, the LED lights. | |
| Off No loop detected. | |||
System LED Panel (only for EKI-5725FP/EKI-5725FPI, EKI-5624P/EKI-5624PI and EKI-5729P/EKI-5729PI)
Figure 1-16. System LED Panel
Table 1-19. System LED Panel
| No. | LED Name LED Color Description | ||
| 1 P | W1 LED Solid green | Powered up. | |
| Off Powered down or not installed. | |||
| 2 P | W2 LED Solid green | Powered up. | |
| Off Powered down or not installed. | |||
| 3 P | -Fail Solid red When | PW1 or PW2 is disconnected, the LED lights. | |
| Off When PW1 and PW2 is connected, the LED is off. | |||
| 4 Loop Solid red When loop detected, the LED lights. | |||
| 5 PoE (depending the PoE ports) | Solid green PoE activated. | ||
| Off PoE non-working. | |||
| SFP (only for EKI-5725FP/EKI-5725FPI) | Solid green SFP activated. | ||
| Blinking Data is being transmitted. | |||
| Off SFP non-working. | |||
1.3.2 Rear View
The following view applies to EKI-5525S, EKI-5525SI, EKI-5525M, EKI-5525MI, EKI-5525S-ST, EKI-5525SI-ST, EKI-5525M-ST, EKI-5525MI-ST, EKI-5525, EKI-5525I, EKI-5725 and EKI-5725I.
natural_image
Diagram of a vertical mechanical or electrical component with labeled parts (no readable text or symbols)Figure 1-17. Rear View
Table 1-20. Rear View
| No. | Item Description | |
| 1 | DIN-Rail mounting plate | Mounting plate used for the installation to a standard DIN rail. |
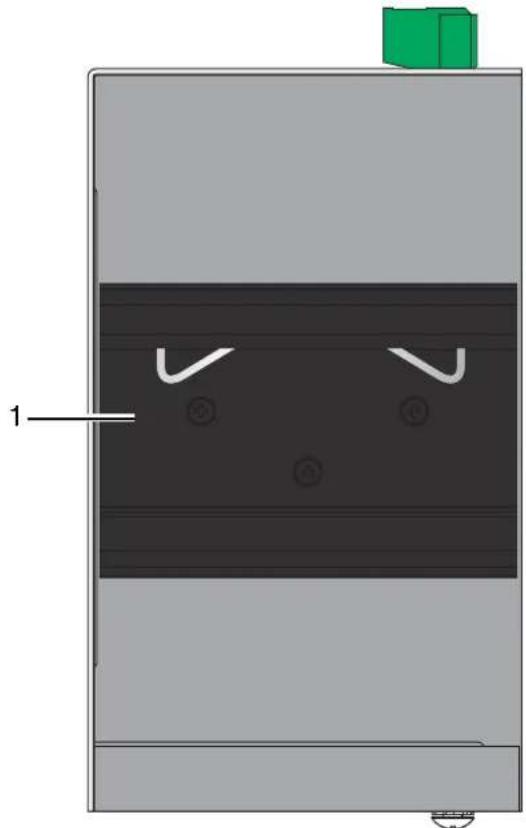
The following view applies to EKI-5728, EKI-5728I, EKI-5729F, EKI-5729FI, EKI-5528, EKI-5528I, EKI-5524SS, EKI-5524SSI, EKI-5524MM, EKI-5524MMI, EKI-5524SS-ST, EKI-5524SSI-ST, EKI-5524MM-ST and EKI-5524MMI-ST.
natural_image
Diagram of a mechanical or electrical component with layered structure and labeled part '1' (no readable text or symbols)Figure 1-18. Rear View
Table 1-21. Rear View
| No. | Item Description | |
| 1 | DIN-Rail mounting plate | Mounting plate used for the installation to a standard DIN rail. |
The following view applies to EKI-5526, EKI-5526I, EKI-5629C, EKI-5629CI, EKI-5626C, EKI-5626CI, EKI-5726, EKI-5726I, EKI-5726F and EKI-5726FI.
natural_image
Diagram of a mechanical or electrical component with labeled parts and internal features (no readable text or symbols)Figure 1-19. Rear View
Table 1-22. Rear View
| No. | Item Description | |
| 1 | DIN-Rail mounting plate | Mounting plate used for the installation to a standard DIN rail. |
The following view applies to EKI-5725FP, EKI-5725FPI, EKI-5624P, EKI-5624PI, EKI-5729P and EKI-5729PI
natural_image
Diagram of a vertical industrial or mechanical device with internal components and mounting holes (no text or symbols)Figure 1-20. Rear View
Table 1-23. Rear View
| No. | Item Description | |
| 1 | DIN-Rail mounting plate | Mounting plate used for the installation to a standard DIN rail. |
1.3.3 Top View
The following view applies to EKI-5525S, EKI-5525SI, EKI-5525M, EKI-5525MI, EKI-5525S-ST, EKI-5525SI-ST, EKI-5525M-ST, EKI-5525MI-ST, EKI-5525, EKI-5525I, EKI-5725 and EKI-5725I.
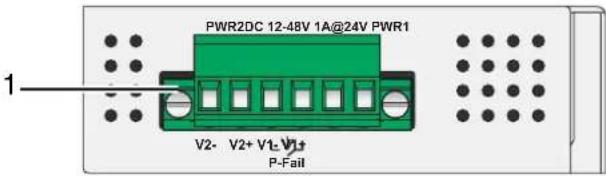
Figure 1-21. Top View
Table 1-24. Top View
| No. | Item Description | |
| 1 | Terminal block Connect cabling for power and alarm wiring. | |
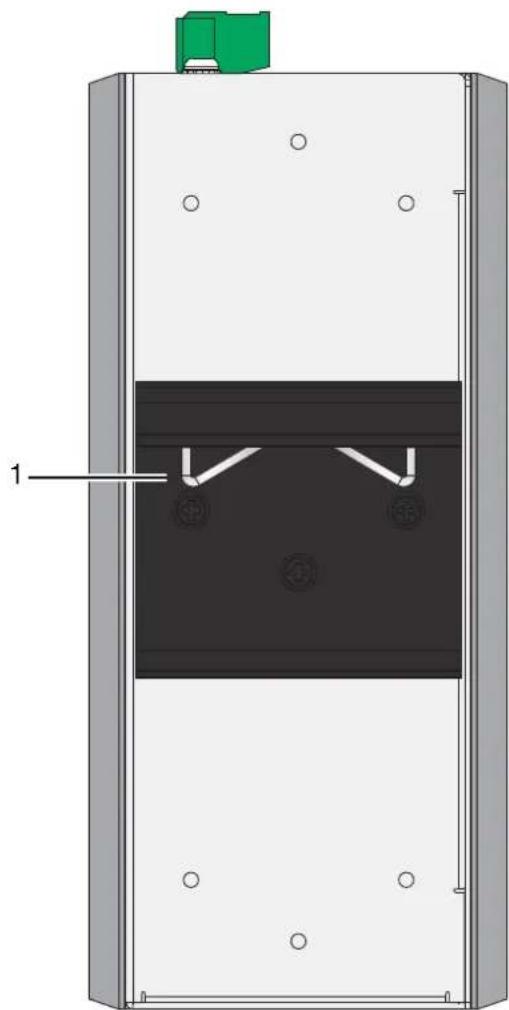
The following view applies to EKI-5728, EKI-5728I, EKI-5729F, EKI-5729FI, EKI-5528, EKI-5528I, EKI-5524SS, EKI-5524SSI, EKI-5524MM, EKI-5524MMI, EKI-5524SS-ST, EKI-5524SSI-ST, EKI-5524MM-ST and EKI-5524MMI-ST.
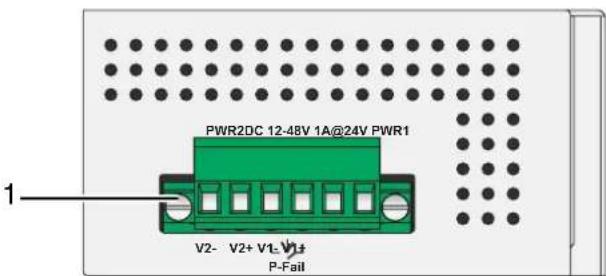
Figure 1-22. Top View
Table 1-25. Top View
| No. | Item Description | |
| 1 | Terminal block Connect cabling for power and alarm wiring. | |
The following view applies to EKI-5526, EKI-5526I, EKI-5629C, EKI-5629CI, EKI-5626C and EKI-5626CI.
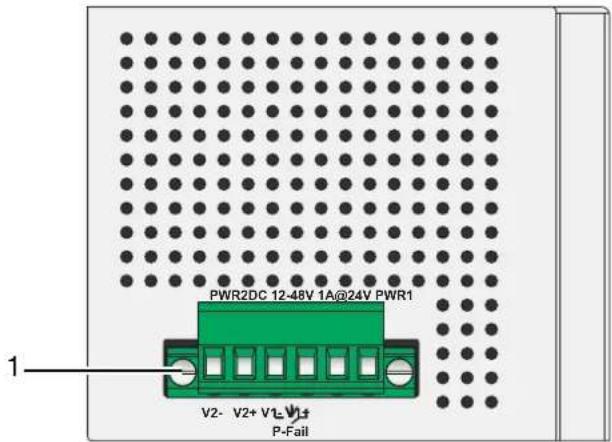
Figure 1-23. Top View
Table 1-26. Top View
| No. | Item Description | |
| 1 | Terminal block Connect | cabling for power and alarm wiring. |
The following view applies to EKI-5726, EKI-5726I, EKI-5726I and EKI-5726FI.
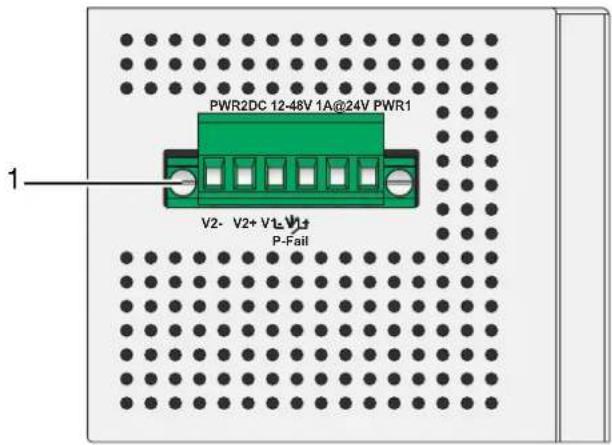
Figure 1-24. Top View
Table 1-27. Top View
| No. | Item Description | |
| 1 | Terminal block Connect cabling for power and alarm wiring. | |
The following view applies to EKI-5725FP and EKI-5725FPI.
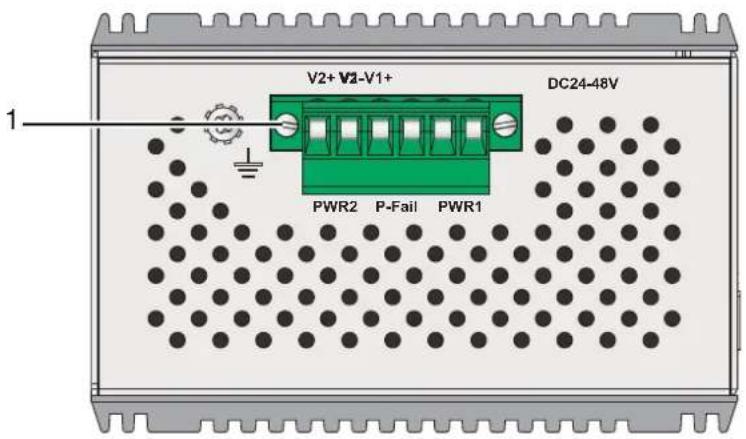
Figure 1-25. Top View
Table 1-28. Top View
| No. | Item Description | |
| 1 | Terminal block Connect | cabling for power and alarm wiring. |
The following view applies to EKI-5624P, EKI-5624PI, EKI-5729P and EKI-5729PI.
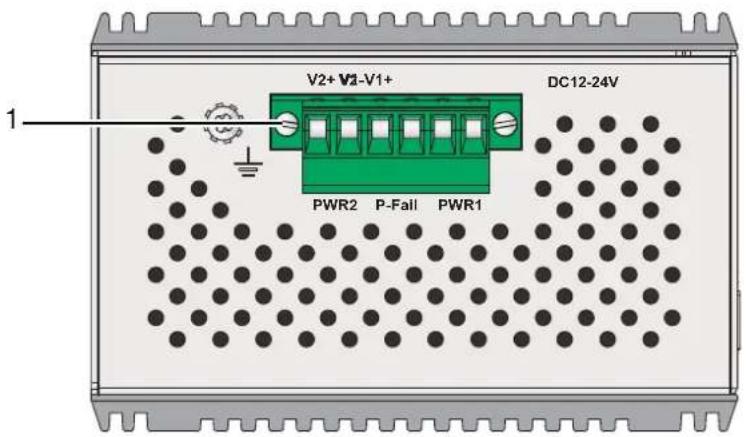
Figure 1-26. Top View
Table 1-29. Top View
| No. | Item Description | |
| 1 | Terminal block Connect cabling for power and alarm wiring. | |
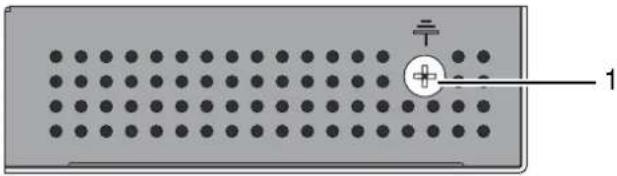
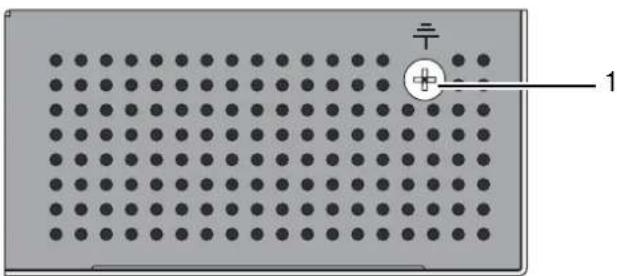
1.3.4 Bottom View
The following view applies to EKI-5525S, EKI-5525SI, EKI-5525M, EKI-5525MI, EKI-5525S-ST, EKI-5525SI-ST, EKI-5525M-ST, EKI-5525MI-ST, EKI-5525, EKI-5525I, EKI-5725 and EKI-5725I.
natural_image
Diagram of a grid-patterned panel with a central circular component and a labeled pin (no text or symbols beyond the label)Figure 1-27. Bottom View
Table 1-30. Bottom View
| No. | Item Description | |
| 1 | Ground terminal Screw | terminal used to ground chassis. |
The following view applies to EKI-5728, EKI-5728I, EKI-5729F, EKI-5729FI, EKI-5528, EKI-5528I, EKI-5524SS, EKI-5524SSI, EKI-5524MM, EKI-5524MMI, EKI-5524SS-ST, EKI-5524SSI-ST, EKI-5524MM-ST and EKI-5524MMI-ST.
natural_image
Grid of black dots on a gray background with a small circular symbol and number 1 pointing to the right edge (no text or labels)Figure 1-28. Bottom View
Table 1-31. Bottom View
| No. | Item Description | |
| 1 | Ground terminal Screw | terminal used to ground chassis. |
The following view applies to EKI-5526, EKI-5526I, EKI-5629C, EKI-5629CI, EKI-5626C, EKI-5626CI, EKI-5726, EKI-5726I, EKI-5726F and EKI-5726FI.

natural_image
Grid of black dots on a gray background with a small circular symbol and number 1 pointing to the top-right corner (no text or symbols within the grid)Figure 1-29. Bottom View
Table 1-32. Bottom View
| No. | Item Description | |
| 1 | Ground terminal Screw terminal used to ground chassis. | |
The following view applies to EKI-5725FP, EKI-5725FPI, EKI-5624P, EKI-5624PI, EKI-5729P and EKI-5729PI.
natural_image
Diagram of a rectangular electronic component with evenly spaced dots, no text or symbols presentFigure 1-30. Bottom View
1.4. Packing List
The product package you have received should contain the following items. If any of them are not included or damaged, please contact your local vendor for support.
• 1 x Industrial Ethernet Switch
• 1 x Wall-mounting Bracket
• 1 x DIN-Rail mounting Bracket and Screws
• 1 x EKI Device Configuration Utility CD-ROM
- 1 x Startup Manual
Switch Installation
Chapter 2
2.1. Installation Guidelines
The following guidelines are provided to optimize the device performance. Review the guidelines before installing the device.
- Make sure cabling is away from sources of electrical noise. Radios, power lines, and fluorescent lighting fixtures can interfere with the device performance.
- Make sure the cabling is positioned away from equipment that can damage the cables.
- Operating environment is within the ranges listed range, see "Specifications" on page 2.
- Relative humidity around the switch does not exceed 95 percent (noncondensing).
- Altitude at the installation site is not higher than 10,000 feet.
- In 10/100 and 10/100/1000 fixed port devices, the cable length from the switch to connected devices can not exceed 100 meters (328 feet).
- Make sure airflow around the switch and respective vents is unrestricted. Without proper airflow the switch can overheat. To prevent performance degradation and damage to the switch, make sure there is clarity at the top and bottom and around the exhaust vents.
2.1.1 Connecting Hardware
In this instruction, it will explain how to find a proper location for your Modbus Gateways, and how to connect to the network, hock up the power cable, and connect to the EKI-5000 Series.
2.2. Verifying Switch Operation
Before installing the device in a rack or on a wall, power on the switch to verify that the switch passes the power-on self-test (POST). To connect the cabling to the power source see “Power Supply Installation” on page 43.
At startup (POST), the System LED blinks green, while the remaining LEDs are a solidy green. Once the switch passes POST self-test, the System LED turns green. The other LEDs turn off and return to their operating status. If the switch fails POST, the System LED switches to an amber state.
After a successful self-test, power down the switch and disconnect the power cabling.
The switch is now ready for installation on its final location.
2.3. Installing the Switch
2.3.1 DIN Rail Mounting
The DIN rail mount option is the quickest installation option. Additionally, it optimizes the use of rail space.
The metal DIN rail kit is secured to the rear of the switch. The device can be mounted onto a standard 35mm (1.37") x 75 mm (3") height DIN rail. The devices can be mounted vertically or horizontally. Refer to the following guidelines for further information.

A corrosion-free mounting rail is advisable.
When installing, make sure to allow for enough space to properly install the cabling.
Installing the DIN-Rail Mounting Kit
- Insert the top back of the mounting bracket over the DIN rail.
- Push the bottom of the switch towards the DIN rail until it snaps into place.
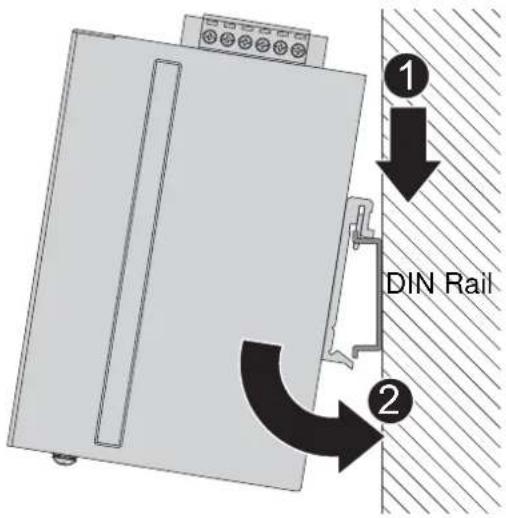
Figure 2-1. Installing the DIN-Rail Mounting Kit
Removing the DIN-Rail Mounting Kit
- Push the switch down to free the bottom of the plate from the DIN rail.
- Rotate the bottom of the device towards you and away from the DIN rail.
- Once the bottom is clear of the DIN rail, lift the device straight up to unhook it from the DIN rail.
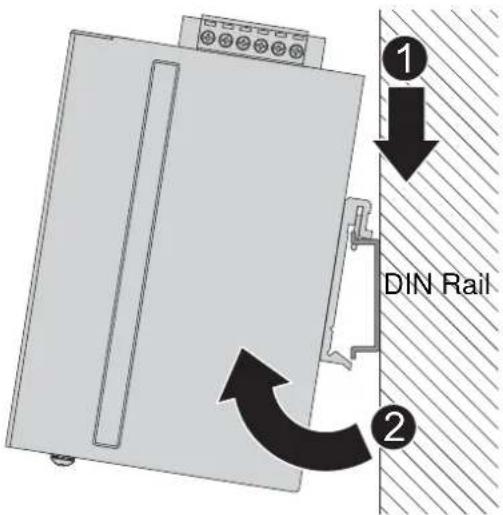
Figure 2-2. Removing the DIN-Rail
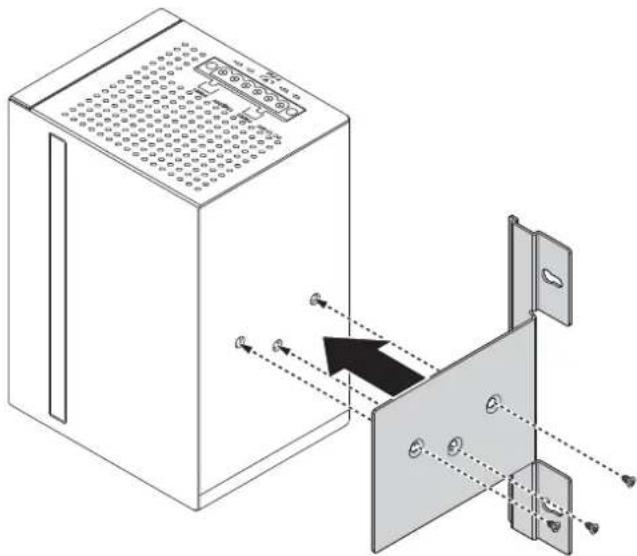
2.3.2 Wall-Mounting
The wall mounting option provides better shock and vibration resistance than the DIN rail vertical mount.

When installing, make sure to allow for enough space to properly install the cabling.
Before the device can be mounted on a wall, you will need to remove the DIN rail plate.
- Rotate the device to the rear side and locate the DIN mounting plate.
- Remove the screws securing the DIN mounting plate to the rear panel of the switch.
- Remove the DIN mounting plate. Store the DIN mounting plate and provided screws for later use.
-
Align the wall mounting plates on the rear side. The screw holes on the device and the mounting plates must be aligned, see the following illustration.
-
Secure the wall mount plates with M3 screws, see the following figure.
natural_image
Diagram of a server rack with ventilation grilles and an open door, showing internal components and connection arrows (no text or symbols)Figure 2-3. Installing Wall Mount Plates
Once the wall mounting plates are secure on the device, you will need to attach the wall screws (x3).
- Locate the installation site and place the switch against the wall, making sure it is the final installation location.
- Use the wall mount plates as a guide to mark the locations of the screw holes.
- Drill four holes over the four marked locations on the wall, keeping in mind that the holes must accommodate wall sinks in addition to the screws.
- Insert the wall sinks into the walls.
- Insert the screws into the wall sinks. Leave a 2 mm gap between the wall and the screw head to allow for wall mount plate insertion.

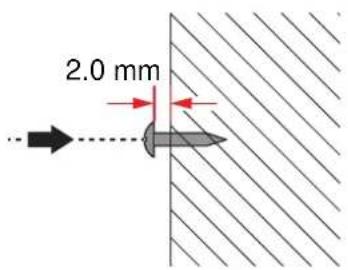
Figure 2-4. Securing Wall Mounting Screws

- Make sure the screws dimensions are suitable for use with the wall mounting plate.
-
Do not completely tighten the screws into the wall. A final adjustment may be needed before fully securing the wall mounting plates on the wall.
-
Align the wall mount plate over the screws on the wall.
-
Install the wall mount plate on the screws and slide it forward to lock in place, see the following figure.
natural_image
Diagram of a server rack unit with an open door and internal panel, showing no text or symbolsFigure 2-5. Wall Mount Installation
- Once the device is installed on the wall, tighten the screws to secure the device.
2.4. Installing and Removing SFP Modules
Up to two fiber optic ports are available (dependent on model) for use in the switch. Refer to the technical specifications for details.
The Gigabit Ethernet ports on the switch are 100/1000Base SFP Fiber ports, which require using the 100M or 1G mini-GBIC fiber transceivers to work properly. Advantech provides completed transceiver models for different distance requirement.
The concept behind the LC port and cable is quite straight forward. Suppose that you are connecting devices I and II; contrary to electrical signals, optical signals do not require a circuit in order to transmit data. Consequently, one of the optical lines is used to transmit data from device I to device II, and the other optical line is used transmit data from device II to device I, for full-duplex transmission.
Remember to connect the Tx (transmit) port of device I to the Rx (receive) port of device II, and the Rx (receive) port of device I to the Tx (transmit) port of device II. If you make your own cable, we suggest labeling the two sides of the same line with the same letter (A-to-A and B-to-B, as shown below, or A1-to-A2 and B1-to-B2).

This is a Class 1 Laser/LED product. To avoid causing serious damage to your eyes, do not stare directly into the Laser Beam.
2.4.1 Installing SFP Modules
To connect the fiber transceiver and LC cable, use the following guidelines:
- Remove the dust plug from the fiber optic slot chosen for the SFP transceiver.
natural_image
Technical illustration of a mechanical component with a magnified inset showing internal structure (no text or symbols)Figure 2-6. Removing the Dust Plug from an SFP Slot

Do not remove the dust plug from the SFP slot if you are not installing the transceiver at this time. The dust plug protects hardware from dust contamination.
- Position the SFP transceiver with the handle on top, see the following figure.
- Locate the triangular marking in the slot and align it with the bottom of the transceiver.
- Insert the SFP transceiver into the slot until it clicks into place.
- Make sure the module is seated correctly before sliding the module into the slot. A click sounds when it is locked in place.

Figure 2-7. Installing an SFP Transceiver

If you are attaching fiber optic cables to the transceiver, continue with the following step. Otherwise, repeat the previous steps to install the remaining SFP transceivers in the device.
- Remove the protective plug from the SFP transceiver.

Do not remove the dust plug from the transceiver if you are not installing the fiber optic cable at this time. The dust plug protects hardware from dust contamination.
- Insert the fiber cable into the transceiver. The connector snaps into place and locks.
natural_image
Technical illustration of a mechanical assembly with stairs and a directional arrow (no text or symbols)Figure 2-8. Attaching a Fiber Optic Cable to a Transceiver
- Repeat the previous procedures to install any additional SFP transceivers in the switch. The fiber port is now setup.
2.4.2 Removing SFP Modules
To disconnect an LC connector, use the following guidelines:
- Press down and hold the locking clips on the upper side of the optic cable.
- Pull the optic cable out to release it from the transceiver.
natural_image
Diagram of a mechanical device with directional arrows indicating flow or movement (no text or symbols present)Figure 2-9. Removing a Fiber Optic Cable to a Transceiver
- Hold the handle on the transceiver and pull the transceiver out of the slot.
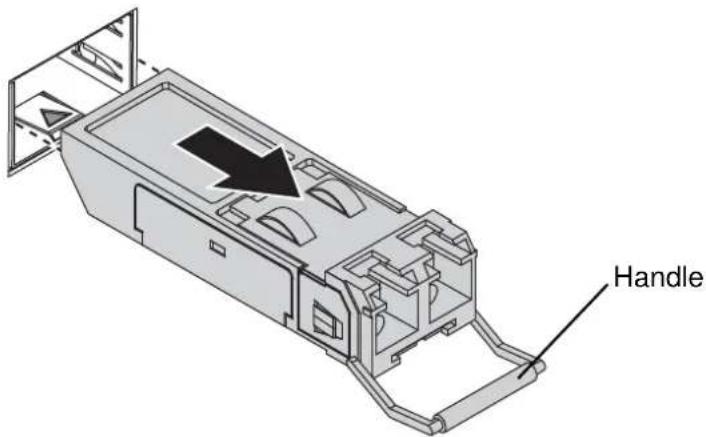
Figure 2-10. Removing an SFP Transceiver

Replace the dust plug on the slot if you are not installing a transceiver. The dust plug protects hardware from dust contamination.
2.5. Connecting the Switch to Ethernet Ports
2.5.1 RJ45 Ethernet Cable Wiring
For RJ45 connectors, data-quality, twisted pair cabling (rated CAT5 or better) is recommended. The connector bodies on the RJ45 Ethernet ports are metallic and connected to the GND terminal. For best performance, use shielded cabling. Shielded cabling may be used to provide further protection.
Table 2-1. RJ45 Ethernet Wiring for Reference
| Straight-thru Cable Wiring Cross-over Cable Wiring | |||
| Pin 1 Pin 1 Pin 1 | Pin 3 | ||
| Pin 2 Pin 2 Pin 2 | Pin 6 | ||
| Pin 3 Pin 3 Pin 3 | Pin 1 | ||
| Pin 6 Pin 6 Pin 6 | Pin 2 | ||
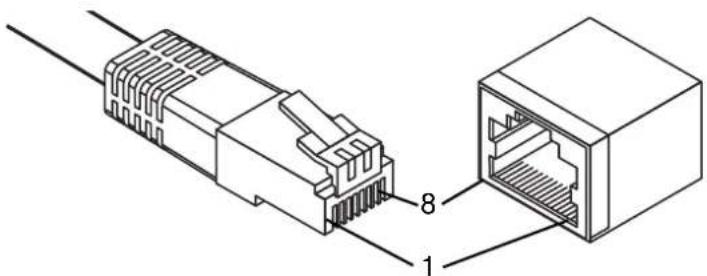
natural_image
Diagram of a RJ4 network connector showing internal structure with labeled pins (no text or symbols beyond labels)Figure 2-11. Ethernet Plug & Connector Pin Position
Maximum cable length: 100 meters (328 ft.) for 10/100/1000BaseT.
2.6. Power Supply Installation
2.6.1 Overview

POWER DOWN AND DISCONNECT THE POWER CORD BEFORE SERVICING OR WIRING THE SWITCH.

Do not disconnect modules or cabling unless the power is first switched off. The device only supports the voltage outlined in the type plate. Do not use any other power components except those specifically designated for the switch device.

Disconnect the power cord before installation or cable wiring.
The switches can be powered by using the same DC source used to power other devices. A DC voltage range of 12 to 48 VDC must be applied between the V1+ terminal and the V1-terminal (PW1), see the following illustrations. A Class 2 power supply is required to maintain a UL60950 panel listing. The chassis ground screw terminal should be tied to the panel or chassis ground. A redundant power configuration is supported through a secondary power supply unit to reduce network down time as a result of power loss.
EKI-5000 Series support 12 and 48 VDC. Dual power inputs are supported and allow you to connect a backup power source.
Single DC Power Redundant DC Power
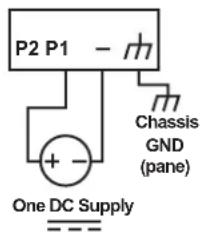
Figure 2-12. Power Wiring for EKI-5000 Series
2.6.2 Considerations
Take into consideration the following guidelines before wiring the device:
- The Terminal Block (CN1) is suitable for 12-24 AWG (3.31 - 0.205 mm ^2 ). Torque value 7 lb-in.
- The cross sectional area of the earthing conductors shall be at least 3.31 mm ^2 .
- Calculate the maximum possible current for each power and common wire. Make sure the power draw is within limits of local electrical code regulations.
- For best practices, route wiring for power and devices on separate paths.
-
Do not bundle together wiring with similar electrical characteristics.
-
Make sure to separate input and output wiring.
- Label all wiring and cabling to the various devices for more effective management and servicing.

Routing communications and power wiring through the same conduit may cause signal interference. To avoid interference and signal degradation, route power and communications wires through separate conduits.
2.6.3 Grounding the Device

Do not disconnect modules or cabling unless the power is first switched off. The device only supports the voltage outlined in the type plate. Do not use any other power components except those specifically designated for the switch device.

Before connecting the device properly ground the device. Lack of a proper grounding setup may result in a safety risk and could be hazardous.

Do not service equipment or cables during periods of lightning activity.

Do not service any components unless qualified and authorized to do so.

Do not block air ventilation holes.
Electromagnetic Interference (EMI) affects the transmission performance of a device. By properly grounding the device to earth ground through a drain wire, you can setup the best possible noise immunity and emissions.

Figure 2-13. Grounding Connection
By connecting the ground terminal by drain wire to earth ground the switch and chassis can be ground.

Before applying power to the grounded switch, it is advisable to use a volt meter to ensure there is no voltage difference between the power supply's negative output terminal and the grounding point on the switch.
2.6.4 Wiring a Relay Contact
The following section details the wiring of the relay output. The terminal block on the EKI-5000 Series is wired and then installed onto the terminal receptor located on the EKI-5000 Series.
Figure 2-14. Terminal Receptor: Relay Contact
The terminal receptor includes a total of six pins: two for PWR1, two for PWR2 and two for a fault circuit.
2.6.5 Wiring the Power Inputs

Do not disconnect modules or cabling unless the power is first switched off. The device only supports the voltage outlined in the type plate. Do not use any other power components except those specifically designated for the switch device.

POWER DOWN AND DISCONNECT THE POWER CORD BEFORE SERVICING OR WIRING THE SWITCH.
There are two power inputs for normal and redundant power configurations. The power input 2 is used for wiring a redundant power configuration. See the following for terminal block connector views.
Figure 2-15. Terminal Receptor: Power Input Contacts
To wire the power inputs:
Make sure the power is not connected to the switch or the power converter before proceeding.
- Loosen the screws securing terminal block to the terminal block receptor.
- Remove the terminal block from the switch.
Figure 2-16. Removing a Terminal Block
- Insert a small flat-bladed screwdriver in the V1+/V1- wire-clamp screws, and loosen the screws.
- Insert the negative/positive DC wires into the V+/V- terminals of PW1. If setting up power redundancy, connect PW2 in the same manner.
- Tighten the wire-clamp screws to secure the DC wires in place.
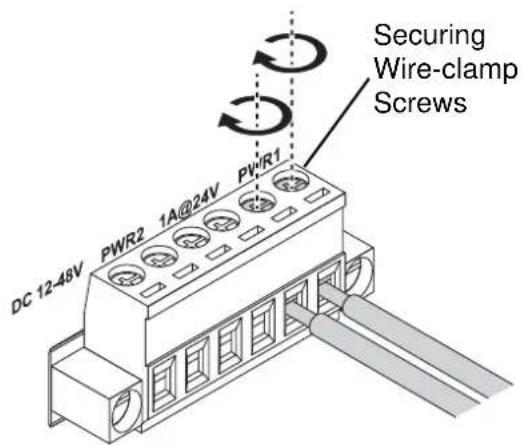
Figure 2-17. Installing DC Wires in a Terminal Block
- Align the terminal block over the terminal block receptor on the switch.
-
Insert the terminal block and press it in until it is flush with the terminal block receptor.
-
Tighten the screws on the terminal block to secure it to the terminal block receptor. If there is no gap between the terminal block and the terminal receptor, the terminal block is seated correctly.
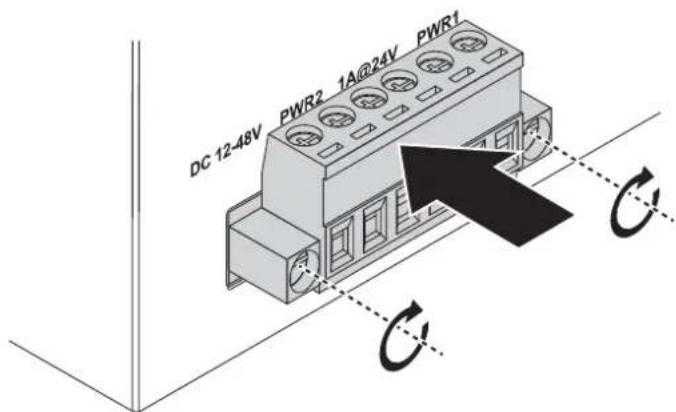
Figure 2-18. Securing a Terminal Block to a Receptor
Configuration Utility
Chapter 3
3.1. Overview
This section describes the installation procedures for the Advantech EKI Device Configuration Utility.
The Configuration Utility is the software tool for setting up and monitoring the EKI-5000 Series.
3.2. Enabling ProView Function
The configuration of a ProView switch can be accessed by using EKI Device Configuration Utility. To install the software utility see “Installing the Configuration Utility” on page 50.
The ProView features for the device must be enabled. The following guidelines allow you to enable and disable the ProView features.

Microsoft Windows 7 is used as a reference for the development of the following guidelines. The following navigation references may differ depending on your operating system.
To fully access all the available options in the Configuration Utility, administrative privileges are required. Without the use of administrative privileges, some functions of the Configuration Utility are not accessible.
Before continuing further, any devices selected for configuration must be connected and powered on, see "Installation Guidelines" on page 35.
- From your Windows desktop, locate the Start button to open the Start Menu.
- Navigate to All Programs > EKI Device Configuration Utility.
- Locate Advantech EKI Device Configuration Utility and right-click on it. From the pop-up menu, select Run as Administrator. See your network administrator to obtain the privileges required.
- A security screen displays, select Yes to continue.
- Select Search Again to detect any connected devices. Once a device is detected, it is listed under the EKI Device listing in the Tree View.
- Select the device to configure by clicking on it.
-
Select System tab to bring up the Enable ProView Features field. Before a device can be configured, the ProView feature must be enabled.
-
Click the Enable ProView Features radio button and click Apply to configure the device.
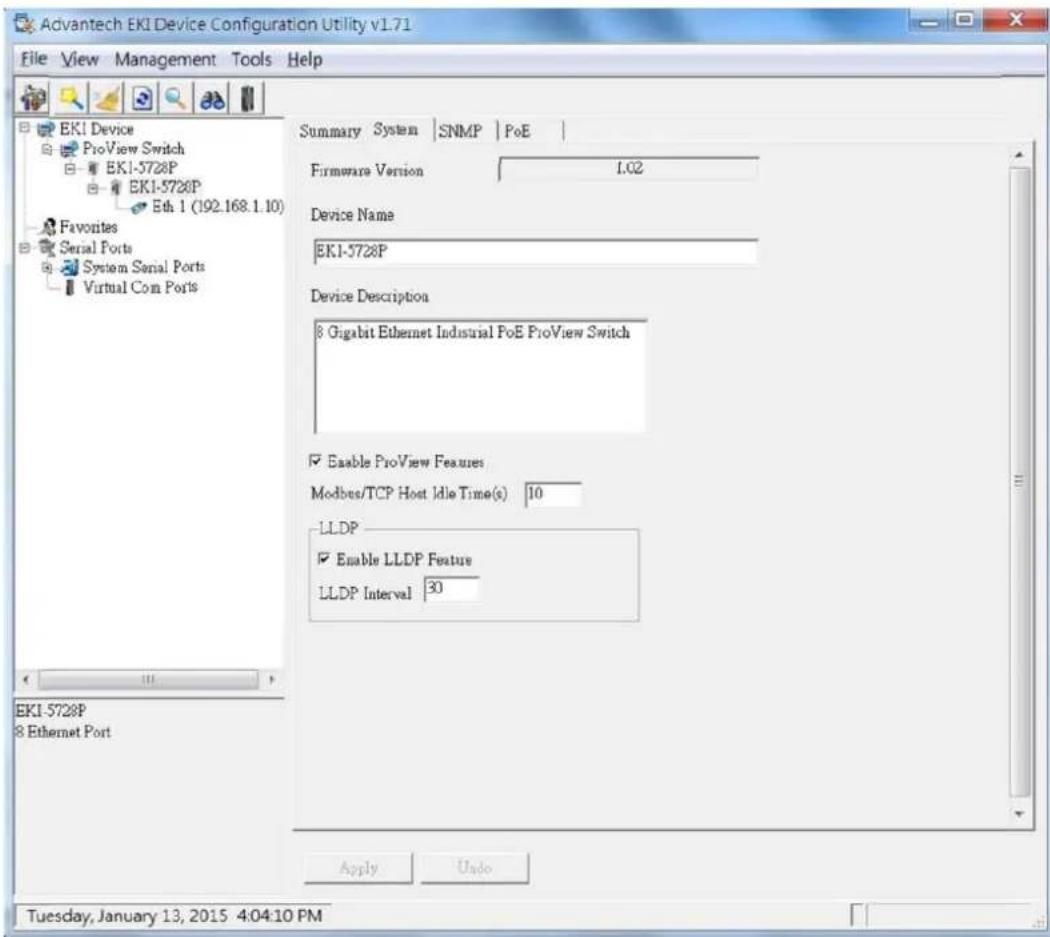
Figure 3-1. Enabling ProView Features
The ProView function is enabled and the switch can be configured.
3.3. Installing the Configuration Utility

Microsoft .NET Framework version 2.0 or greater is required for this application.
- Insert the Advantech EKI Device Configuration Utility CD-ROM into the CD-ROM drive (whereas E:\ is the drive name of your CD-ROM) on the host PC.
- Use Windows explorer or the Windows Run command to execute the setup program, the path for the setup program on the CD-ROM is as follows:
E:\EKI_Device_Configuration_Utility_v1.70.exe
-
If there is an existing COM port mapping utility on the host PC, remove it at this time. A system reboot may be necessary before continuing the installation.
-
Once the InstallShield Wizard screen displays, click Next to proceed with the installation.
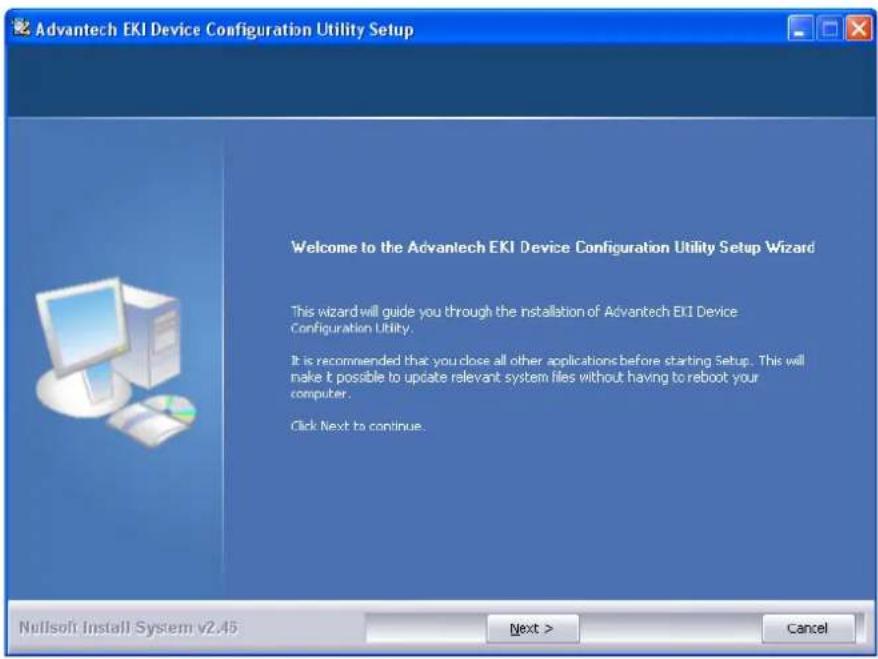
Figure 3-2. InstallShield Wizard 1 of 4
- The Software License Agreement displays, press I Agree to continue or Cancel to stop the installation.
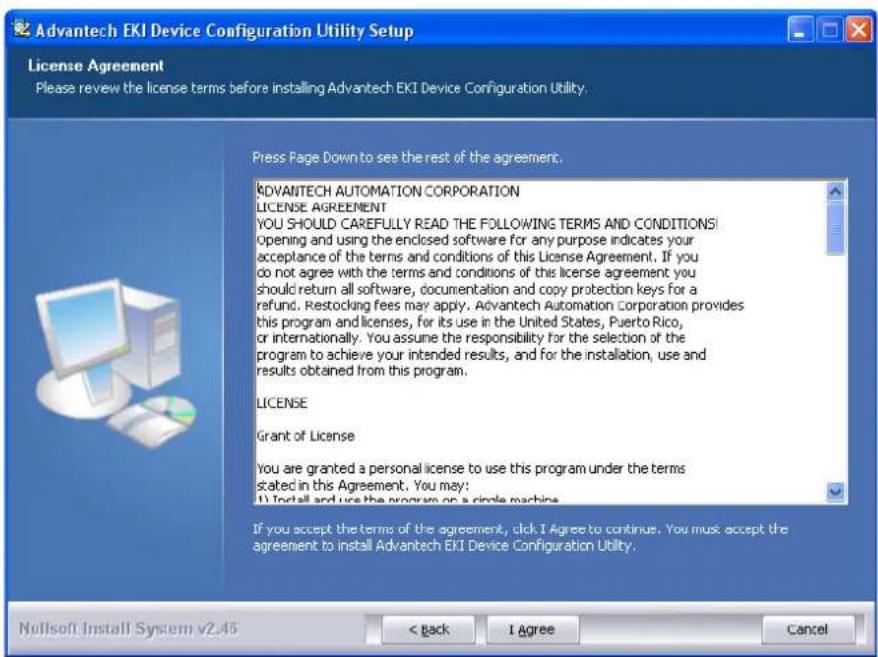
Figure 3-3. InstallShield Wizard 2 of 4
The InstallShield continues and a status screen displays. The default installation path is C:\Program Files\EKI Device Configuration Utility.
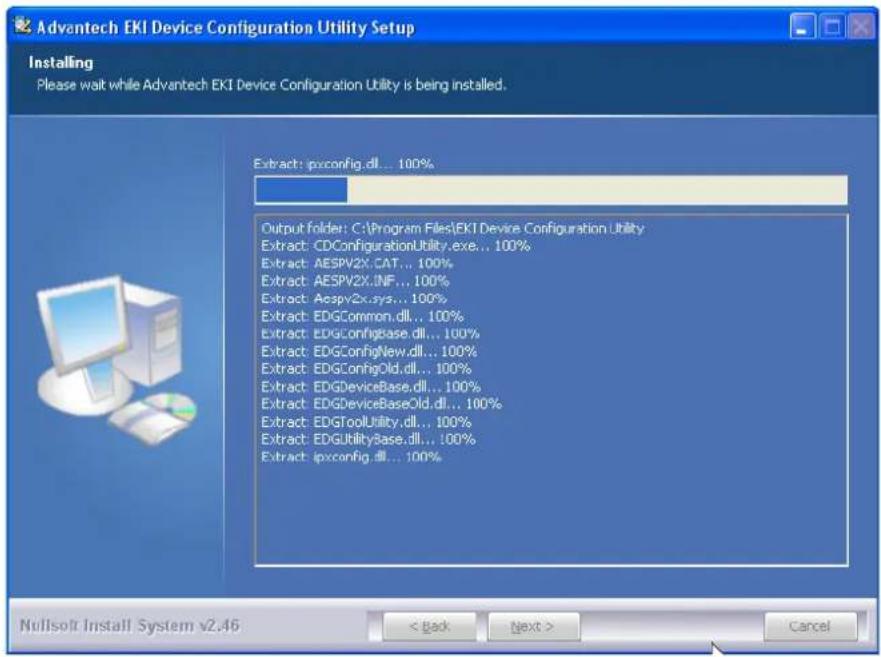
Figure 3-4. InstallShield Wizard 3 of 4
- Once the installation of the package is finished a Configuration Utility Setup screen displays. Click Finish to conclude the process and exit the InstallShield Wizard.
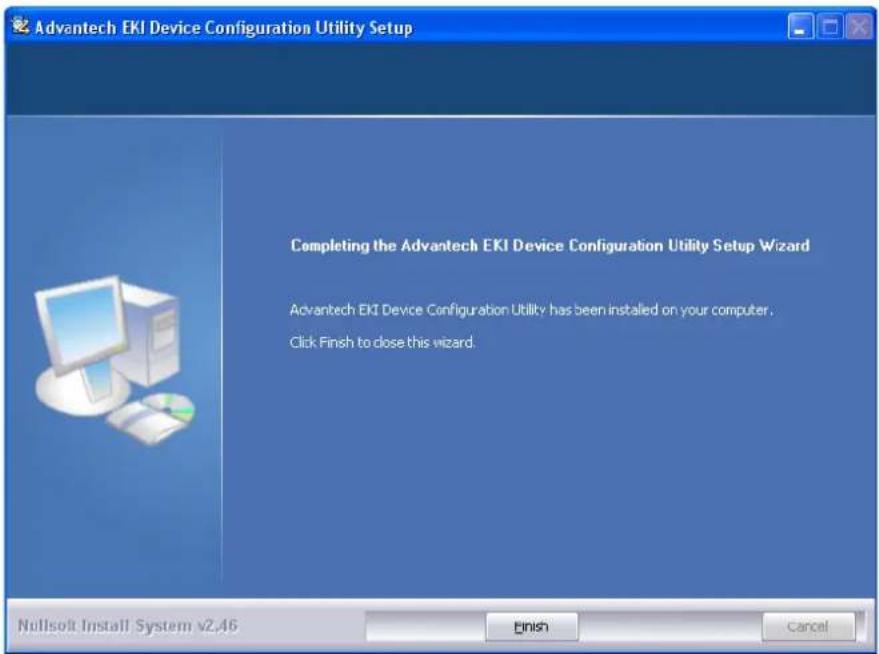
Figure 3-5. InstallShield Wizard 4 of 4
3.4. Utility Menu Map
The EKI Configuration Utility can be installed on different operating systems, however, Windows 7 is the recommended version.
Click Start > All Programs > EKI Device Configuration Utility > Advantech EKI Device Configuration Utility. The EKI Device Configuration Utility screen appears, see the following figure.
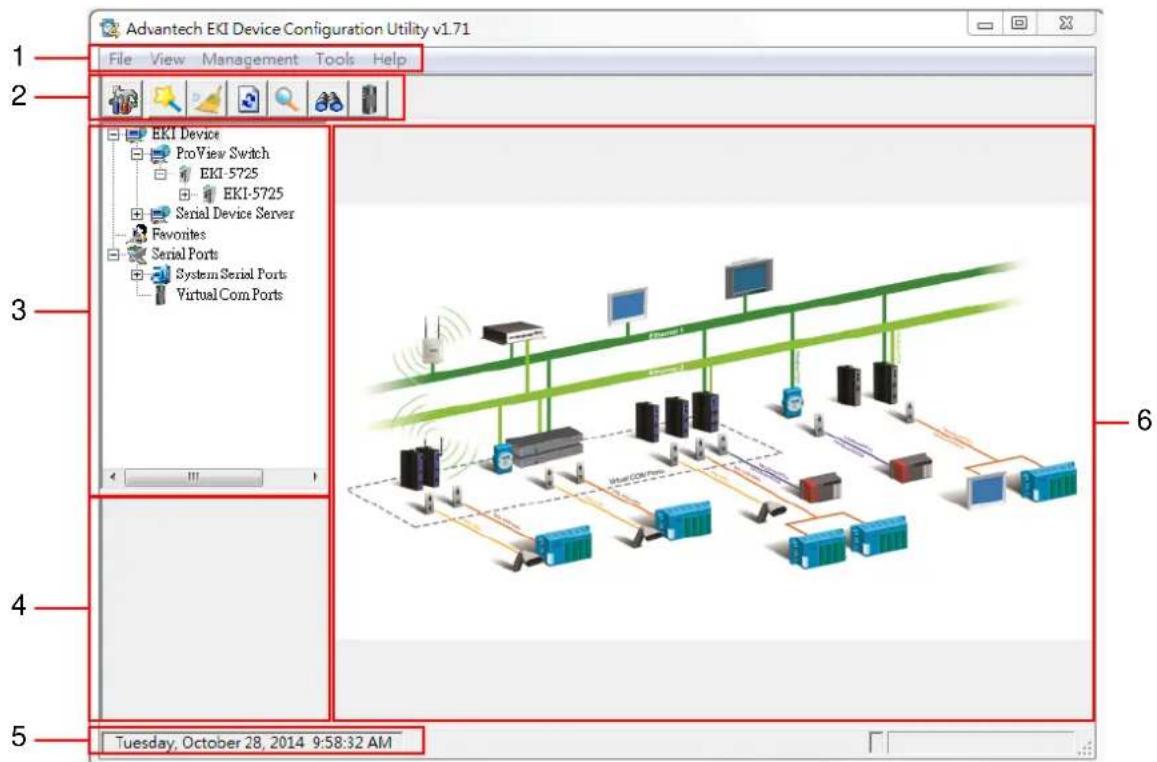
Figure 3-6. Configuration Utility Overview
Table 3-1. Configuration Utility Overview
| No Item Description | ||
| 1 | Menu Bar Displays File, View, Management, Tools and Help. | |
| 2 | Tool Bar Useful management functions' shortcuts. | |
| 3 | Tree View All devices will be searched and listed in this area. You can arrange different favorite group and virtual COM ports. | |
| 4 | Information Panel | Click on the devices or move cursor to the devices, the related information is shown in this area. |
| 5 | Status Bar Displays the current time. | |
| 6 | Configuration Area | Click on the items on the TreeView Area, the configuration page displays in this area. |
3.5. Menu Bar
3.5.1 View Menu
Utility Settings
Click View > Settings to configure utility settings.
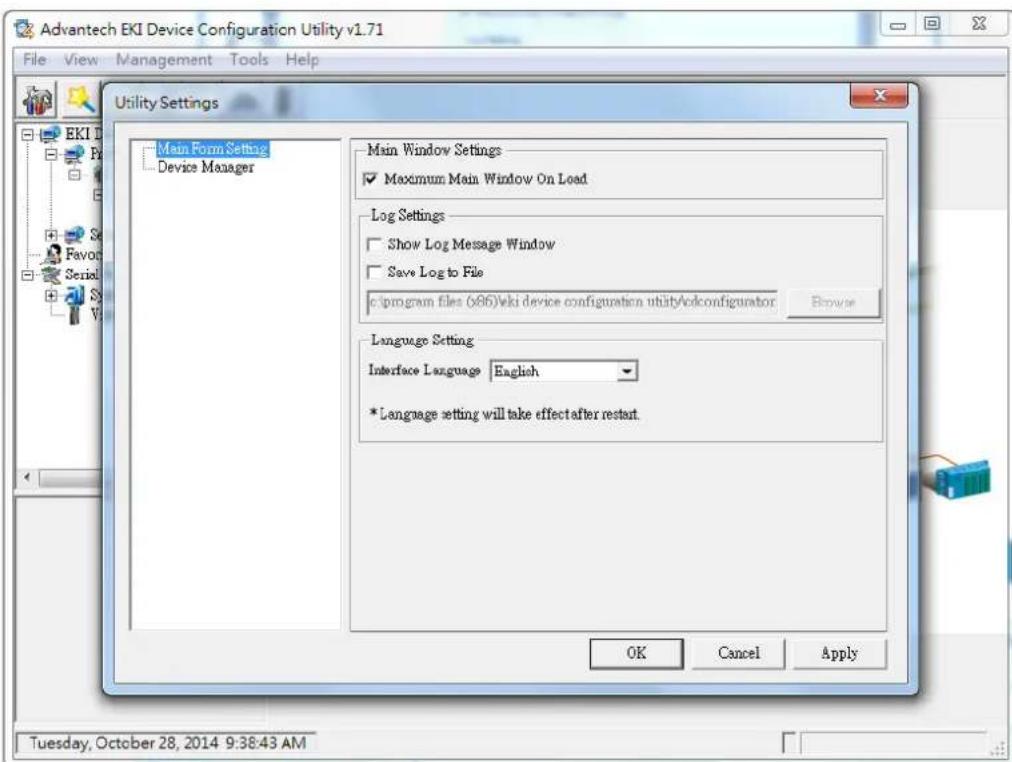
Figure 3-7. View > Settings > Main Form Setting
Table 3-2. Utility Settings > Main Form Setting
| Item Description | |
| Main Window Settings | |
| Maximum Main Window On Load | Check the box to enable the limiting of main windows on-load to the maximum value. |
| Log Settings | |
| Show Log Message Window | Check the checkbox to show the log message. |
| Save Log to File Check the | checkbox to save log to file. |
| Browse | Click Browse to choose a file to save. |
| Language Settings | |
| Interface Language Click the | drop-down menu to select an interface language: Traditional Chinese, Simplified Chinese or English. |
| Item Description | |
| OK Click OK to save and exit the utility setting. | |
| Cancel | Click Cancel to discard the changes. |
| Apply Click Apply to save the utility setting. | |
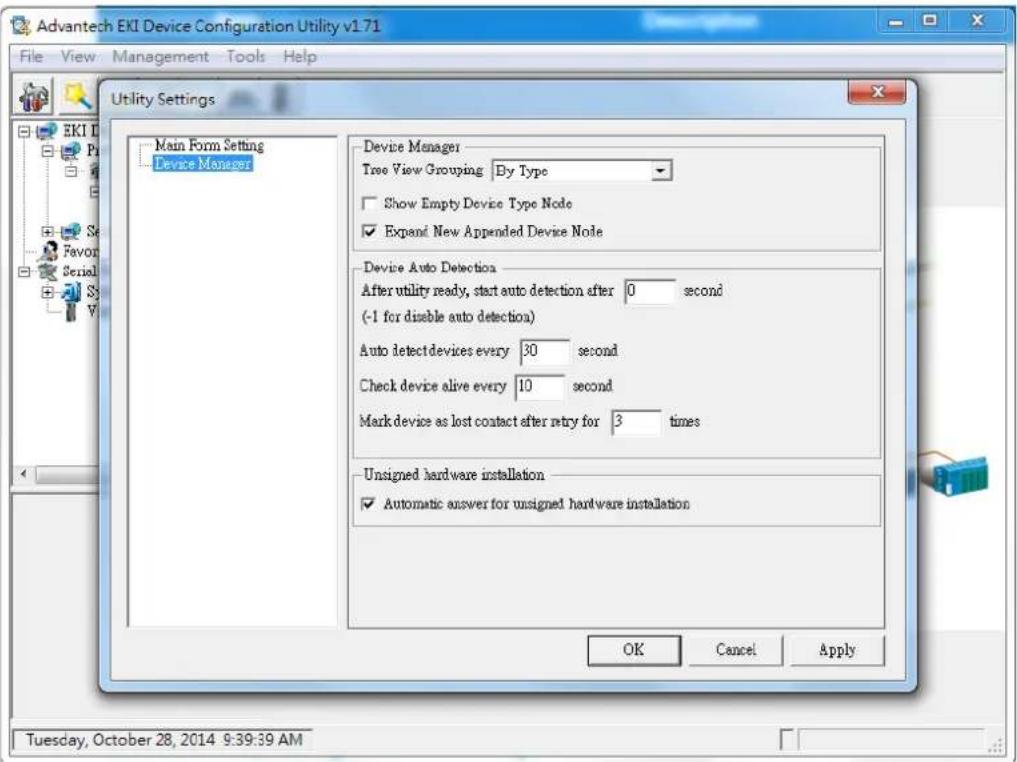
Figure 3-8. View > Settings > Device Manager
Table 3-3. Utility Settings > Device Manager
| Item Description | |
| Device Manager | |
| Tree View Grouping Click the drop-down menu to enable or disable grouping. | |
| Show Empty Device Type Node | Check the checkbox to show empty device type node or not. |
| Expand New Appended Device Node | Check the checkbox to expand a new appended device node or not. |
| Device Auto Detection | |
| After utility ready, start auto detection after X second | Enter a value to specify the time to auto detection time (-1 means disable auto detection). |
| Auto detect devices every X second | Enter a value to specify the time to auto detect devices. |
| Item Description | |
| Check device alive every X second | Enter a value to specify the time to check device alive. |
| Mark device as lost contact after retry for X times | Enter a value to specify the time to mark device as lost contact. |
| Unsigned Hardware Installation | |
| Automatic answer for unsigned hardware installation | Check the checkbox to enable or disable answer automatically for unsigned hardware installation. |
| OK | Click OK to save and exit the utility setting. |
| Cancel Click Cancel to discard the changes. | |
| Apply | Click Apply to save the utility setting. |
3.5.2 Management Menu
Table 3-4. Management
| Item Description | |
| Configuration Wizard Start the software wizard (setup assistant) to leads you through the VCOM configuration process for device server product. | |
| Clear Device List and Search Again | Clear all device list and re-search devices. |
| Search Again Re-search devices. | |
| Add IP Address to Favorite Add one device to Favorites. | |
| Search for a Range of IP Addresses | Add a group of device to Favorites. |
| Manual Direct Mapping Virtual COM Port | Click to add a target by selecting a Device Type and inputting the IP address, physically connecting the serial device server to the network is not required. |
3.5.3 Help Menu
Table 3-5. Help
| Item Description |
| Check Utility Update Select to update configuration utility. |
| About Select to show the information about the configuration utility. |
3.6. Tool Bar
The tool bar is a list of shortcuts for the most frequently used menu functions. Icons are provided for each function. By clicking on the icon, the most frequently used functions can be accessed.
Table 3-6. Tool Bar
| Icon Item | Description | |
 | Utility Settings Refer to | “Utility Settings” on page 54. |
 | Configuration Wizard | Refer to “Management Menu” on page 56. |
 | Clear Device List and Search Again | Refer to “Management Menu” on page 56. |
 | Auto Search (Search Again) | Refer to “Management Menu” on page 56. |
 | Add IP Address to Favorite | Refer to “Management Menu” on page 56. |
 | Search for a Range of IP Addresses | Refer to “Management Menu” on page 56. |
 | Manual Direct Mapping Virtual COM Port | Refer to “Management Menu” on page 56. |
3.7. TreeView
The TreeView configuration area displays the selected device's configurable settings. From this area you can directly group devices in the favorite's list. See "Utility Menu Map" on page 53.
3.8. Information Panel
The Information Panel area displays the selected device's related information. See "Utility Menu Map" on page 53.
3.9. Status Bar
The Status Bar area displays the current time. See "Utility Menu Map" on page 53.
3.10. Configuration Area
The Configuration Area displays correlating information from selected menu items within the TreeView area. See "Utility Menu Map" on page 53.
Managing Switch
Chapter 4
4.1. Discovering Switches
4.1.1 First Time Installation
Enabling ProView Function
See "Enabling ProView Function" on page 49 for further information.
Configuring Network Settings
EKI Device Configuration Utility provides two ways to configure network settings: DHCP + Auto IP Settings or Static Settings.
DHCP + Auto IP Settings
- Select Ethernet under the desired device.
- Click the drop-down menu to select DHCP + Auto-IP.
- Click Apply to confirm the settings.

Figure 4-1. Selecting Networking Setting
Static Settings
- Select Ethernet under the desired device.
- Click the drop-down menu to select Static IP.
- Enter the IP Address, Subnet Mask and Gateway.
4. Click Apply to confirm the settings.
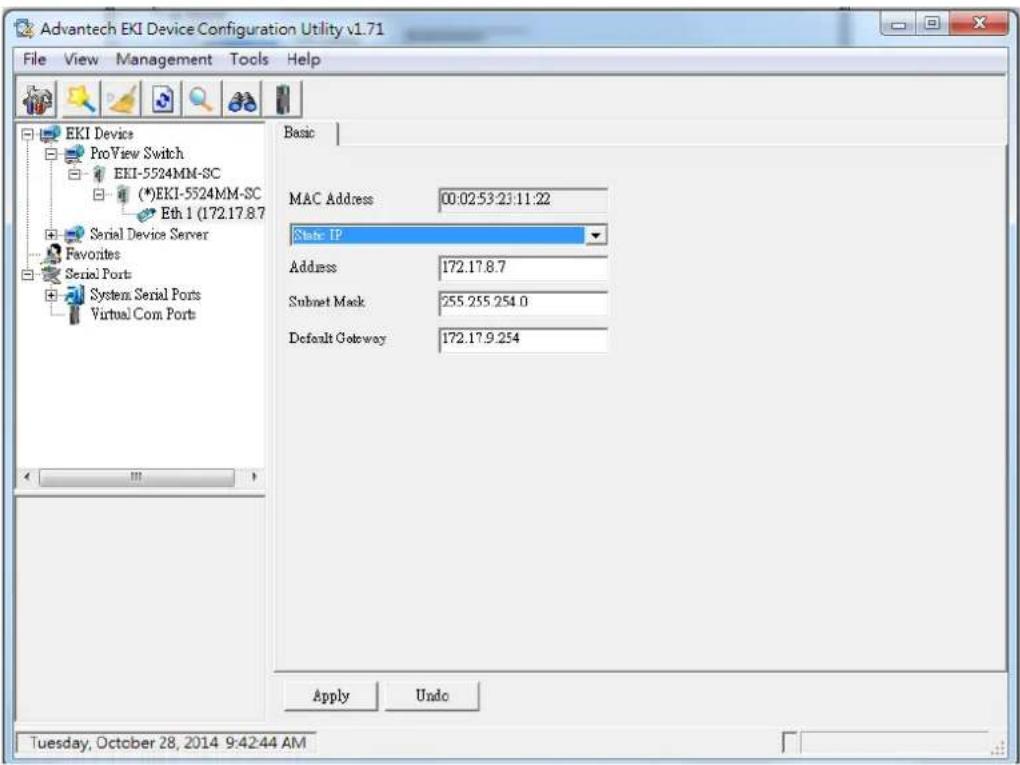
Figure 4-2. Configuring a Static IP Setting
4.1.2 Discovering Switches
Auto Search
Only devices within the same network domain can be listed through the search function. Once a device is listed, the features and configuration details are accessible by clicking on the device name.
Figure 4-3. Auto Searching Screen
To search for a device:
- From the Tool Bar, click the Search Again button.

Figure 4-4. Selecting Search Again

Access to the utility's full function list requires administrator privileges.
Clearing Device List and Search Again
The search list can be cleared for a new search request by clicking the Clearing Device List and Search Again 📋 button. The function clears the listing of the devices. You can use the Search function again to detect any devices connected to the network domain.
4.1.3 Group Management
Creating Groups
Groups are best used to identify a set of devices with a common characteristic and to better organize the device pool.
To create a favorite group, please follow the instructions as follows:
- Right-click Favorite to display the settings.
- Select Create Group to enter group name.
3. Enter a group name and click OK.
Figure 4-5. Adding a Group
The group is created and is available in the Favorite's List.
Favorite's List
A favorite's list is simple a way to organize the available devices by a category.
There are three ways to create a favorite's list: selecting a device, selecting an IP address, and selecting an IP address range. The following guidelines allow you to create a favorite's list.
Adding a Device
-
Right-click a desired device to display the settings menu.
-
Select Add to Favorite.
Figure 4-6. Adding a Switch to Favorites
In the event that there are existing groups, you can select the specific favorite group to include the selected device.
Adding an IP Address
- From the Tool Bar, click the Add IP Address to Favorite button.
- Enter an IP address.
- Click OK to add the IP address into the favorites list
Figure 4-7. Add Favorite
In the event that there are existing groups, you can select the specific favorite group to include the selected IP address.
Adding an IP Address Range
- From the Tool Bar, click the Search for a Range of IP Addresses 🔒 button.
- Enter a starting and ending IP address range.
- Click OK to add the range into the favorites list.
Figure 4-8. Add Favorite
In the event that there are existing groups, you can select the specific favorite group to include the selected IP address range.
4.1.4 Configuring the System
Changing Device Name
- Select the device to configure by clicking on it.
- In the Configuration Area, select System tab.
- Locate the Device Name field, and enter a device name.
- Click Apply to configure the device.
Figure 4-9. Changing Device Name
The device name is changed.
Setting Modbus/TCP Idle Time
- Select the device to configure by clicking on it.
- In the Configuration Area, select the System tab.
- Locate the Modbus/TCP Host Idle Time(s) field.
- Enter a variable representing the idle time for the Modbus/TCP host function. ProView provides the following information to SCADA through Modbus/TCP.
- Vendor Name
-
Production Name
-
Firmware Version
- Ethernet MAC Address
- IP Address
- Port Status
- Port Speed
- Flow Control
- Port Description
- Link Up Counter
- PoE Status
- Tx Packets Counter
- Rx Packets Counter
- Tx Error Packets Counter
- Rx Error Packets Counter
5. Click Apply to configure the function.
Figure 4-10. Setting Modbus/TCP Idle Time
The Modbus/TCP idle time is now set.
Setting LLDP
- Select the device to configure by clicking on it.
- In the Configuration Area, select the System tab.
- Under LLDP, check Enable LLDP Feature to enable the LLDP feature. This feature is used by the device to advertise its identity, capabilities, and neighbors throughout the network.
- Enter a variable representing the idle time for sending of LLDP information.
Setting Networks Parameters
For setting networks parameters, see "Configuring Network Settings" on page 59.
Setting SNMP
- Select the device to configure by clicking on it.
- In the Configuration Area, select SNMP tab.
The Basic and Community settings are listed for configuration.
- In the SNMP Basic Settings selection, enter a contact and location in the respective fields.
- In the SNMP Community Settings selection, the read-only and read-write strings are required.
- In the SNMP Trap Setting selection, enter the IP address of the SNMP trap server.
Figure 4-11. Setting SNMP
Setting PoE
- Select the device to configure by clicking on it.
- In the Configuration Area, select the PoE tab.
- Select the radio-box next to the target port then click on it to check and enable the PoE function on that port. To disable the PoE function on the port, click on the radio-box to unselect it.
-
Click Refresh to update the PoE status for each port. Each port displays the current enabled or disabled state in addition to the following information.
-
Voltage (V)
- Current (mA)
- Power (W)
• Temperature (Celsius)
Figure 4-12. Setting Modbus/TCP Idle Time
4.2. Modbus/TCP Mapping
The data map addresses of Advantech switches shown in the following table start from Modbus address 30001 for function code 4.
In the given example, the address offset 0x1000 (hex) equals Modbus address 34097, while the address offset 0x1100 (hex) equals Modbus address 34353.
The information given by the Advantech is shown in hex mode.
4.2.1 Modbus/TCP Mapping Table
Table 4-1. Modbus/TCP Mapping Table
| Catalog Name Data Type Inter- | pretation | Address Offset (Hex) | Address 3X | Description | |||
| System Info | Vendor ID = 0x‘13FE | 1 word 16 | bits HEX 0x | 0000 3000 | Vendor ID = 0x13FE | ||
| Unit ID = 0xFF | 1 word | 16 bits | HEX | 0x0001 | 30002 | Unit ID = 0xFF | |
| Product Code | 1 word 16 | bits HEX 0x | 0002 3000 | 3 Product Code | |||
| Catalog | Name | Data Type | Interpretation | Address Offset (Hex) | Address 3X | Description | |
| System Info | Vendor Name = "Advantech" | 16 words | 32 chars | ASCII | 0x0010 | 30017 | Vendor Name = "Advantech"Word 0 Hi byte = 'A'Word 0 Lo byte = 'd'Word 1 Hi byte = 'v'Word 1 Lo byte = 'a'Word 2 Hi byte = 'n'Word 2 Lo byte = 't'Word 3 Hi byte = 'e'Word 3 Lo byte = 'c'Word 4 Hi byte = 'h'Word 4 Lo byte = '\0' |
| Product Name = "EKI-xxxx" | 16 words | 32 chars | ASCII 0x0020 | 30033 Product Name = "EKI-xxxx"Word 0 Hi byte = 'E'Word 0 Lo byte = 'K'Word 1 Hi byte = 'l'Word 1 Lo byte = '-'Word 2 Hi byte = 'x'Word 2 Lo byte = 'x'Word 3 Hi byte = 'x'Word 3 Lo byte = 'x'Word 4 Hi byte = '\0' | |||
| Firmware Version | 2 words | 32 bits | HEX | 0x020A | 30523 | Firmware VersionWord 0 Hi byte = majorWord 0 Lo byte = minorWord 1 Hi byte = releaseWord 1 Lo byte = build | |
| Ethernet MAC Address | 3 words | 48 bits | HEX | 0x020E 305 | 27 Ethernet MAC Address | Ex: MAC = 00-19-CB-01-02-03Word 0 Hi byte = 0x00Word 0 Lo byte = 0x19Word 1 Hi byte = 0xCBWord 1 Lo byte = 0x01Word 2 Hi byte = 0x02Word 2 Lo byte = 0x03 | |
| System Info | Revision Number | 16 words | 32 chars | ASCII | 0x0211 | 30530 | Product Name = "YYY.xxxxx"Word 0 Hi byte = 'Y'Word 0 Lo byte = 'Y'Word 1 Hi byte = 'Y'Word 1 Lo byte = '.'Word 2 Hi byte = 'x'Word 2 Lo byte = 'x'Word 3 Hi byte = 'x'Word 3 Lo byte = 'x'Word 4 Hi byte = 'x'Word 4 Hi byte = '\0' |
| IP Address 2 | words 32 bits | HEX 0x04 | 00 31025 | IP Address | Ex: IP = 192.168.1.1Word 0 Hi byte = 0xC0Word 0 Lo byte = 0xA8Word 1 Hi byte = 0x01Word 1 Lo byte = 0x01 | ||
| Port Info | Port Status | 1 word | 16 bits | HEX | 0x1000 ~ 0x101F | 34097 ~ 34128 | Port Status0x0000: Link down0x0001: Link up0xFFFF: No port |
| Port 1 Status | 1 word 16 | bits HEX 0x | 1000 34097 | ||||
| Port 2 Status | 1 word | 16 bits | HEX | 0x1001 | 34098 | ||
| Port 3 Status | 1 word 16 | bits HEX 0x | 1002 34099 | ||||
| Port 4 Status | 1 word | 16 bits | HEX | 0x1003 | 34100 | ||
| Port 5 Status | 1 word 16 | bits HEX 0x | 1004 34101 | ||||
| Port 6 Status | 1 word | 16 bits | HEX | 0x1005 | 34102 | ||
| Port 7 Status | 1 word 16 | bits HEX 0x | 1006 34103 | ||||
| Port 8 Status | 1 word | 16 bits | HEX | 0x1007 | 34104 | ||
| Port 9 Status | 1 word 16 | bits HEX 0x | 1008 34105 | ||||
| Port 10 Status | 1 word | 16 bits | HEX | 0x1009 | 34106 | ||
| Port 11 Status | 1 word 16 | bits HEX 0x | 100A | 34107 | |||
| Port 12 Status | 1 word | 16 bits | HEX | 0x100B | 34108 | ||
| Catalog Name Data Type | Inter- | pretation | Address Offset (Hex) | Address 3X | Description | ||
| Port Info Port | 13 Status | 1 word 16 | bits HEX 0x | 100C 34109 | |||
| Port 14 Status | 1 word 16 | bits HEX 0x | 100D 34110 | ||||
| Port 15 Status | 1 word 16 | bits HEX 0x | 100E 34111 | ||||
| Port 16 Status | 1 word 16 | bits HEX 0x | 100F 34112 | ||||
| Port 17 Status | 1 word 16 | bits HEX 0x | 1010 34113 | ||||
| Port 18 Status | 1 word 16 | bits HEX 0x | 1011 34114 | ||||
| Port 19 Status | 1 word 16 | bits HEX 0x | 1012 34115 | ||||
| Port 20 Status | 1 word 16 | bits HEX 0x | 1013 34116 | ||||
| Port 21 Status | 1 word 16 | bits HEX 0x | 1014 34117 | ||||
| Port 22 Status | 1 word 16 | bits HEX 0x | 1015 34118 | ||||
| Port 23 Status | 1 word 16 | bits HEX 0x | 1016 34119 | ||||
| Port 24 Status | 1 word 16 | bits HEX 0x | 1017 34120 | ||||
| Port 25 Status | 1 word 16 | bits HEX 0x | 1018 34121 | ||||
| Port 26 Status | 1 word 16 | bits HEX 0x | 1019 34122 | ||||
| Port 27 Status | 1 word 16 | bits HEX 0x | 101A 34123 | ||||
| Port 28 Status | 1 word 16 | bits HEX 0x | 101B 34124 | ||||
| Port 29 Status | 1 word 16 | bits HEX 0x | 101C 34125 | ||||
| Port 30 Status | 1 word 16 | bits HEX 0x | 101D 34126 | ||||
| Port 31 Status | 1 word 16 | bits HEX 0x | 101E 34127 | ||||
| Port 32 Status | 1 word 16 | bits HEX 0x | 101F 34128 | ||||
| Catalog | Name | Data Type | Interpretation | Address Offset (Hex) | Address 3X | Description | |
| Port Info Port Speed 1 word | 16 bits HEX | 0x1100 ~ | 0x111F | 34353 ~ 34384 | Port Speed0x0000: 10M-Half0x0001: 10M-Full0x0002: 100M-Half0x0003: 100M-Full0x0004: 1000M-Half0x0005: 1000M-Full0xFFFF: No port | ||
| Port 1 Speed | 1 word | 16 bits | HEX | 0x1100 | 34353 | ||
| Port 2 Speed | 1 word 16 bits | HEX 0x1 | 101 34354 | ||||
| Port 3 Speed | 1 word | 16 bits | HEX | 0x1102 | 34355 | ||
| Port 4 Speed | 1 word 16 bits | HEX 0x1 | 103 34356 | ||||
| Port 5 Speed | 1 word | 16 bits | HEX | 0x1104 | 34357 | ||
| Port 6 Speed | 1 word 16 bits | HEX 0x1 | 105 34358 | ||||
| Port 7 Speed | 1 word | 16 bits | HEX | 0x1106 | 34359 | ||
| Port 8 Speed | 1 word 16 bits | HEX 0x1 | 107 34360 | ||||
| Port 9 Speed | 1 word | 16 bits | HEX | 0x1108 | 34361 | ||
| Port 10 Speed | 1 word 16 bits | HEX 0x1 | 1109 34362 | ||||
| Port 11 Speed | 1 word | 16 bits | HEX | 0x110A | 34363 | ||
| Port 12 Speed | 1 word 16 bits | HEX 0x1 | 110B 34364 | ||||
| Port 13 Speed | 1 word | 16 bits | HEX | 0x110C | 34365 | ||
| Port 14 Speed | 1 word 16 bits | HEX 0x1 | 110D 34366 | ||||
| Port 15 Speed | 1 word | 16 bits | HEX | 0x110E | 34367 | ||
| Port 16 Speed | 1 word 16 bits | HEX 0x1 | 110F 34368 | ||||
| Port 17 Speed | 1 word | 16 bits | HEX | 0x1110 | 34369 | ||
| Port 18 Speed | 1 word 16 bits | HEX 0x1 | 1111 34370 | ||||
| Port 19 Speed | 1 word | 16 bits | HEX | 0x1112 | 34371 | ||
| Catalog Name Data Type | Inter- | pretation | Address Offset (Hex) | Address 3X | Description | ||
| Port Info Port 20 Speed | 1 word 16 | bits HEX 0x | 1113 34372 | ||||
| Port 21 Speed | 1 word | 16 bits | HEX | 0x1114 | 34373 | ||
| Port 22 Speed | 1 word 16 | bits HEX 0x | 1115 34374 | ||||
| Port 23 Speed | 1 word | 16 bits | HEX | 0x1116 | 34375 | ||
| Port 24 Speed | 1 word 16 | bits HEX 0x | 1117 34376 | ||||
| Port 25 Speed | 1 word | 16 bits | HEX | 0x1118 | 34377 | ||
| Port 26 Speed | 1 word 16 | bits HEX 0x | 1119 34378 | ||||
| Port 27 Speed | 1 word | 16 bits | HEX | 0x111A | 34379 | ||
| Port 28 Speed | 1 word 16 | bits HEX 0x | 111B 34380 | ||||
| Port 29 Speed | 1 word | 16 bits | HEX | 0x111C | 34381 | ||
| Port 30 Speed | 1 word 16 | bits HEX 0x | 111D 34382 | ||||
| Port 31 Speed | 1 word | 16 bits | HEX | 0x111E | 34383 | ||
| Port 32 Speed | 1 word 16 | bits HEX 0x | 111F 34384 | ||||
| Flow Control | 1 word | 16 bits | HEX | 0x1200 ~ 0x121F | 34609 ~ 34640 | Flow Control0x0000: Off0x0001: On0xFFFF: No port | |
| Port 1 Flow Control | 1 word 16 | bits HEX 0x | 1200 34609 | ||||
| Port 2 Flow Control | 1 word 16 | bits HEX 0x | 1201 34610 | ||||
| Port 3 Flow Control | 1 word 16 | bits HEX 0x | 1202 34611 | ||||
| Port 4 Flow Control | 1 word 16 | bits HEX 0x | 1203 34612 | ||||
| Port 5 Flow Control | 1 word 16 | bits HEX 0x | 1204 34613 | ||||
| Catalog | Name | Data Type | Inter-preta-tion | Address Offset (Hex) | Address 3X | Description | |
| Port Info Port | 6 Flow Control | 1 word | 16 bits | HEX | 0x1205 | 34614 | |
| 7 Flow Control | 1 word 16 | bits HEX 0x | 1206 34615 | ||||
| 8 Flow Control | 1 word | 16 bits | HEX | 0x1207 | 34616 | ||
| 9 Flow Control | 1 word 16 | bits HEX 0x | 1208 34617 | ||||
| 10 Flow Control | 1 word | 16 bits | HEX | 0x1209 | 34618 | ||
| 11 Flow Control | 1 word 16 | bits HEX 0x | 120A 34619 | ||||
| 12 Flow Control | 1 word | 16 bits | HEX | 0x120B | 34620 | ||
| 13 Flow Control | 1 word 16 | bits HEX 0x | 120C 34621 | ||||
| 14 Flow Control | 1 word | 16 bits | HEX | 0x120D | 34622 | ||
| 15 Flow Control | 1 word 16 | bits HEX 0x | 120E 34623 | ||||
| 16 Flow Control | 1 word | 16 bits | HEX | 0x120F | 34624 | ||
| 17 Flow Control | 1 word 16 | bits HEX 0x | 1210 34625 | ||||
| 18 Flow Control | 1 word | 16 bits | HEX | 0x1211 | 34626 | ||
| 19 Flow Control | 1 word 16 | bits HEX 0x | 1212 34627 | ||||
| 20 Flow Control | 1 word | 16 bits | HEX | 0x1213 | 34628 | ||
| 21 Flow Control | 1 word 16 | bits HEX 0x | 1214 34629 | ||||
| 22 Flow Control | 1 word | 16 bits | HEX | 0x1215 | 34630 | ||
| 23 Flow Control | 1 word 16 | bits HEX 0x | 1216 34631 | ||||
| 24 Flow Control | 1 word | 16 bits | HEX | 0x1217 | 34632 | ||
| 25 Flow Control | 1 word 16 | bits HEX 0x | 1218 34633 | ||||
| Catalog | Name | Data Type | Interpretation | Address Offset (Hex) | Address 3X | Description | |
| Port Info Port | 26 Flow Control | 1 word 16 | bits HEX 0x | 1219 34634 | |||
| 27 Flow Control | 1 word 16 | bits HEX 0x | 121A 34635 | ||||
| 28 Flow Control | 1 word 16 | bits HEX 0x | 121B 34636 | ||||
| 29 Flow Control | 1 word 16 | bits HEX 0x | 121C 34637 | ||||
| 30 Flow Control | 1 word 16 | bits HEX 0x | 121D 34638 | ||||
| 31 Flow Control | 1 word 16 | bits HEX 0x | 121E 34639 | ||||
| 32 Flow Control | 1 word 16 | bits HEX 0x | 121F 34640 | ||||
| Description | 20 words | 40 chars ASCII 0x1400 | ~0x166C | 35121 ~35741 | Port DescriptionPort Description = "100RX,RJ45."Word 0 Hi byte = '1'Word 0 Lo byte = '0'Word 1Hi byte = '0'Word 1 Lo byte = 'R'Word 2 Hi byte = 'X'Word 2 Lo byte = ','Word 3 Hi byte = 'R'Word 3 Lo byte = 'J'Word 4 Hi byte = '4'Word 4 Lo byte = '5'Word 5 Hi byte = '.'Word 5 Lo byte = '\0' | ||
| Port 1 Description | 20 words | 40 chars | ASCII | 0x1400 | 35121 | ||
| Port 2 Description | 20 words | 40 chars ASCII 0x1414 | 35141 | ||||
| Port 3 Description | 20 words | 40 chars | ASCII | 0x1428 | 35161 | ||
| Port 4 Description | 20 words | 40 chars ASCII 0x143C | 35181 | ||||
| Port 5 Description | 20 words | 40 chars | ASCII | 0x1450 | 35201 | ||
| Catalog Name Data Type | Inter- | pretation | Address Offset (Hex) | Address 3X | Description | ||
| Port Info Port 6 Description | 20 words | 40 chars ASCII 0x1464 | 35221 | ||||
| Port 7 Description | 20 words | 40 chars ASCII 0x1478 | 35241 | ||||
| Port 8 Description | 20 words | 40 chars ASCII 0x148C | 35261 | ||||
| Port 9 Description | 20 words | 40 chars ASCII 0x14A0 | 35281 | ||||
| Port 10 Description | 20 words | 40 chars ASCII 0x14B4 | 35301 | ||||
| Port 11 Description | 20 words | 40 chars ASCII 0x14C8 | 35321 | ||||
| Port 12 Description | 20 words | 40 chars ASCII 0x14DC | 35341 | ||||
| Port 13 Description | 20 words | 40 chars ASCII 0x14F0 | 35361 | ||||
| Port 14 Description | 20 words | 40 chars ASCII 0x1504 | 35381 | ||||
| Port 15 Description | 20 words | 40 chars ASCII 0x1518 | 35401 | ||||
| Port 16 Description | 20 words | 40 chars ASCII 0x152C | 35421 | ||||
| Port 17 Description | 20 words | 40 chars ASCII 0x1540 | 35441 | ||||
| Port 18 Description | 20 words | 40 chars ASCII 0x1554 | 35461 | ||||
| Port 19 Description | 20 words | 40 chars ASCII 0x1568 | 35481 | ||||
| Port 20 Description | 20 words | 40 chars ASCII 0x157C | 35501 | ||||
| Port 21 Description | 20 words | 40 chars ASCII 0x1590 | 35521 | ||||
| Port 22 Description | 20 words | 40 chars ASCII 0x15A4 | 35541 | ||||
| Port 23 Description | 20 words | 40 chars ASCII 0x15B8 | 35561 | ||||
| Port 24 Description | 20 words | 40 chars ASCII 0x15CC | 35581 | ||||
| Port 25 Description | 20 words | 40 chars ASCII 0x15E0 | 35601 | ||||
| Catalog | Name | Data Type | Interpretation | Address Offset (Hex) | Address 3X | Description | |
| Port Info Port 26 Description | 20 words | 40 chars ASCII 0x15F4 | 35621 | ||||
| Port 27 Description | 20 words | 40 chars ASCII 0x1608 | 35641 | ||||
| Port 28 Description | 20 words | 40 chars ASCII 0x161C | 35661 | ||||
| Port 29 Description | 20 words | 40 chars ASCII 0x1630 | 35681 | ||||
| Port 30 Description | 20 words | 40 chars ASCII 0x1644 | 35701 | ||||
| Port 31 Description | 20 words | 40 chars ASCII 0x1658 | 35721 | ||||
| Port 32 Description | 20 words | 40 chars ASCII 0x166C | 35741 | ||||
| Link Up Counter | 1 word 16 | bits HEX 0x | 1700 ~ | 0x171F | 35889 ~ 35920 | Link Up CounterEx: port link up counter = 13Received MODBUS response: 0x000D | |
| Port 1 Link Up Counter | 1 word 16 | bits HEX 0x | 1700 35889 | ||||
| Port 2 Link Up Counter | 1 word 16 | bits HEX 0x | 1701 35890 | ||||
| Port 3 Link Up Counter | 1 word 16 | bits HEX 0x | 1702 35891 | ||||
| Port 4 Link Up Counter | 1 word 16 | bits HEX 0x | 1703 35892 | ||||
| Port 5 Link Up Counter | 1 word 16 | bits HEX 0x | 1704 35893 | ||||
| Port 6 Link Up Counter | 1 word 16 | bits HEX 0x | 1705 35894 | ||||
| Port 7 Link Up Counter | 1 word 16 | bits HEX 0x | 1706 35895 | ||||
| Port 8 Link Up Counter | 1 word 16 | bits HEX 0x | 1707 35896 | ||||
| Port 9 Link Up Counter | 1 word 16 | bits HEX 0x | 1708 35897 | ||||
| Port 10 Link Up Counter | 1 word 16 | bits HEX 0x | 1709 35898 | ||||
| Port 11 Link Up Counter | 1 word 16 | bits HEX 0x | 170A 35899 | ||||
| Port Info Port | 12 Link Up Counter | 1 word 16 | bits HEX 0x | 170B 35900 | |||
| Port 13 Link Up Counter | 1 word 16 | bits HEX 0x | 170C 35901 | ||||
| Port 14 Link Up Counter | 1 word 16 | bits HEX 0x | 170D 35902 | ||||
| Port 15 Link Up Counter | 1 word 16 | bits HEX 0x | 170E 35903 | ||||
| Port 16 Link Up Counter | 1 word 16 | bits HEX 0x | 170F 35904 | ||||
| Port 17 Link Up Counter | 1 word 16 | bits HEX 0x | 1710 35905 | ||||
| Port 18 Link Up Counter | 1 word 16 | bits HEX 0x | 1711 35906 | ||||
| Port 19 Link Up Counter | 1 word 16 | bits HEX 0x | 1712 35907 | ||||
| Port 20 Link Up Counter | 1 word 16 | bits HEX 0x | 1713 35908 | ||||
| Port 21 Link Up Counter | 1 word 16 | bits HEX 0x | 1714 35909 | ||||
| Port 22 Link Up Counter | 1 word 16 | bits HEX 0x | 1715 35910 | ||||
| Port 23 Link Up Counter | 1 word 16 | bits HEX 0x | 1716 35911 | ||||
| Port 24 Link Up Counter | 1 word 16 | bits HEX 0x | 1717 35912 | ||||
| Port 25 Link Up Counter | 1 word 16 | bits HEX 0x | 1718 35913 | ||||
| Port 26 Link Up Counter | 1 word 16 | bits HEX 0x | 1719 35914 | ||||
| Port 27 Link Up Counter | 1 word 16 | bits HEX 0x | 171A 35915 | ||||
| Port 28 Link Up Counter | 1 word 16 | bits HEX 0x | 171B 35916 | ||||
| Port 29 Link Up Counter | 1 word 16 | bits HEX 0x | 171C 35917 | ||||
| Port 30 Link Up Counter | 1 word 16 | bits HEX 0x | 171D 35918 | ||||
| Port 31 Link Up Counter | 1 word 16 | bits HEX 0x | 171E 35919 | ||||
| Catalog | Name | Data Type | Inter-preta-tion | Address Offset (Hex) | Address 3X | Description | |
| Port Info Port | 32 Link Up Counter | 1 word 16 | bits HEX 0x | 171F 35920 | |||
| PoE Voltage 1 | word 16 bits | HEX 0x1800 ~ | 0x181F | 36145 ~ 36176 | PoE Voltage (V)Ex: poe voltage = 5Received MODBUS response: 0x0005 | ||
| Port 1 PoE Voltage | 1 word 16 | bits HEX 0x | 1800 36145 | ||||
| Port 2 PoE Voltage | 1 word 16 | bits HEX 0x | 1801 36146 | ||||
| Port 3 PoE Voltage | 1 word 16 | bits HEX 0x | 1802 36147 | ||||
| Port 4 PoE Voltage | 1 word 16 | bits HEX 0x | 1803 36148 | ||||
| Port 5 PoE Voltage | 1 word 16 | bits HEX 0x | 1804 36149 | ||||
| Port 6 PoE Voltage | 1 word 16 | bits HEX 0x | 1805 36150 | ||||
| Port 7 PoE Voltage | 1 word 16 | bits HEX 0x | 1806 36151 | ||||
| Port 8 PoE Voltage | 1 word 16 | bits HEX 0x | 1807 36152 | ||||
| Port 9 PoE Voltage | 1 word 16 | bits HEX 0x | 1808 36153 | ||||
| Port 10 PoE Voltage | 1 word 16 | bits HEX 0x | 1809 36154 | ||||
| Port 11 PoE Voltage | 1 word 16 | bits HEX 0x | 180A 36155 | ||||
| Port 12 PoE Voltage | 1 word 16 | bits HEX 0x | 180B 36156 | ||||
| Port 13 PoE Voltage | 1 word 16 | bits HEX 0x | 180C 36157 | ||||
| Port 14 PoE Voltage | 1 word 16 | bits HEX 0x | 180D 36158 | ||||
| Port 15 PoE Voltage | 1 word 16 | bits HEX 0x | 180E 36159 | ||||
| Port 16 PoE Voltage | 1 word 16 | bits HEX 0x | 180F 36160 | ||||
| Port 17 PoE Voltage | 1 word 16 | bits HEX 0x | 1810 36161 | ||||
| Port Info Port | 18 PoE Voltage | 1 word 16 | bits HEX 0x | 1811 36162 | |||
| Port 19 PoE Voltage | 1 word 16 | bits HEX 0x | 1812 36163 | ||||
| Port 20 PoE Voltage | 1 word 16 | bits HEX 0x | 1813 36164 | ||||
| Port 21 PoE Voltage | 1 word 16 | bits HEX 0x | 1814 36165 | ||||
| Port 22 PoE Voltage | 1 word 16 | bits HEX 0x | 1815 36166 | ||||
| Port 23 PoE Voltage | 1 word 16 | bits HEX 0x | 1816 36167 | ||||
| Port 24 PoE Voltage | 1 word 16 | bits HEX 0x | 1817 36168 | ||||
| Port 25 PoE Voltage | 1 word 16 | bits HEX 0x | 1818 36169 | ||||
| Port 26 PoE Voltage | 1 word 16 | bits HEX 0x | 1819 36170 | ||||
| Port 27 PoE Voltage | 1 word 16 | bits HEX 0x | 181A 36171 | ||||
| Port 28 PoE Voltage | 1 word 16 | bits HEX 0x | 181B 36172 | ||||
| Port 29 PoE Voltage | 1 word 16 | bits HEX 0x | 181C 36173 | ||||
| Port 30 PoE Voltage | 1 word 16 | bits HEX 0x | 181D 36174 | ||||
| Port 31 PoE Voltage | 1 word 16 | bits HEX 0x | 181E 36175 | ||||
| Port 32 PoE Voltage | 1 word 16 | bits HEX 0x | 181F 36176 | ||||
| PoE Current | 1 word | 16 bits | HEX | 0x1820 ~ 0x183F | 36177 ~ 36208 | PoE Current (mA)Ex: poe current = 13Received MODBUS response: 0x000D | |
| Port 1 PoE Current | 1 word 16 | bits HEX 0x | 1820 36177 | ||||
| Port 2 PoE Current | 1 word 16 | bits HEX 0x | 1821 36178 | ||||
| Port 3 PoE Current | 1 word 16 | bits HEX 0x | 1822 36179 | ||||
| Catalog Name Data Type | Inter- | pretation | Address Offset (Hex) | Address 3X | Description | ||
| Port Info Port 4 PoE Current | 1 word 16 | bits HEX 0x | 1823 36180 | ||||
| Port 5 PoE Current | 1 word 16 | bits HEX 0x | 1824 36181 | ||||
| Port 6 PoE Current | 1 word 16 | bits HEX 0x | 1825 36182 | ||||
| Port 7 PoE Current | 1 word 16 | bits HEX 0x | 1826 36183 | ||||
| Port 8 PoE Current | 1 word 16 | bits HEX 0x | 1827 36184 | ||||
| Port 9 PoE Current | 1 word 16 | bits HEX 0x | 1828 36185 | ||||
| Port 10 PoE Current | 1 word 16 | bits HEX 0x | 1829 36186 | ||||
| Port 11 PoE Current | 1 word 16 | bits HEX 0x | 182A 36187 | ||||
| Port 12 PoE Current | 1 word 16 | bits HEX 0x | 182B 36188 | ||||
| Port 13 PoE Current | 1 word 16 | bits HEX 0x | 182C 36189 | ||||
| Port 14 PoE Current | 1 word 16 | bits HEX 0x | 182D 36190 | ||||
| Port 15 PoE Current | 1 word 16 | bits HEX 0x | 182E 36191 | ||||
| Port 16 PoE Current | 1 word 16 | bits HEX 0x | 182F 36192 | ||||
| Port 17 PoE Current | 1 word 16 | bits HEX 0x | 1830 36193 | ||||
| Port 18 PoE Current | 1 word 16 | bits HEX 0x | 1831 36194 | ||||
| Port 19 PoE Current | 1 word 16 | bits HEX 0x | 1832 36195 | ||||
| Port 20 PoE Current | 1 word 16 | bits HEX 0x | 1833 36196 | ||||
| Port 21 PoE Current | 1 word 16 | bits HEX 0x | 1834 36197 | ||||
| Port 22 PoE Current | 1 word 16 | bits HEX 0x | 1835 36198 | ||||
| Port 23 PoE Current | 1 word 16 | bits HEX 0x | 1836 36199 | ||||
| Catalog | Name | Data Type | Interpretation | Address Offset (Hex) | Address 3X | Description | |
| Port Info Port | 24 PoE Current | 1 word 16 | bits HEX 0x | 1837 36200 | |||
| 25 PoE Current | 1 word 16 | bits HEX 0x | 1838 36201 | ||||
| 26 PoE Current | 1 word 16 | bits HEX 0x | 1839 36202 | ||||
| 27 PoE Current | 1 word 16 | bits HEX 0x | 183A 36203 | ||||
| 28 PoE Current | 1 word 16 | bits HEX 0x | 183B 36204 | ||||
| 29 PoE Current | 1 word 16 | bits HEX 0x | 183C 36205 | ||||
| 30 PoE Current | 1 word 16 | bits HEX 0x | 183D 36206 | ||||
| 31 PoE Current | 1 word 16 | bits HEX 0x | 183E 36207 | ||||
| 32 PoE Current | 1 word 16 | bits HEX 0x | 183F 36208 | ||||
| Power 1 | word 16 bits | HEX 0x1840 ~ | 0x185F | 36209 ~ 36240 | PoE Power (W)Ex: poe power = 10Received MODBUS response: 0x000A | ||
| 1 PoE Power | 1 word 16 | bits HEX 0x | 1840 36209 | ||||
| 2 PoE Power | 1 word 16 | bits HEX 0x | 1841 36210 | ||||
| 3 PoE Power | 1 word 16 | bits HEX 0x | 1842 36211 | ||||
| 4 PoE Power | 1 word 16 | bits HEX 0x | 1843 36212 | ||||
| 5 PoE Power | 1 word 16 | bits HEX 0x | 1844 36213 | ||||
| 6 PoE Power | 1 word 16 | bits HEX 0x | 1845 36214 | ||||
| 7 PoE Power | 1 word 16 | bits HEX 0x | 1846 36215 | ||||
| 8 PoE Power | 1 word 16 | bits HEX 0x | 1847 36216 | ||||
| 9 PoE Power | 1 word 16 | bits HEX 0x | 1848 36217 | ||||
| Catalog Name Data Type | Inter- | pretation | Address Offset (Hex) | Address 3X | Description | ||
| Port Info Port | 10 PoE Power | 1 word 16 | bits HEX 0x | 1849 36218 | |||
| Port 11 PoE Power | 1 word 16 | bits HEX 0x | 184A 36219 | ||||
| Port 12 PoE Power | 1 word 16 | bits HEX 0x | 184B 36220 | ||||
| Port 13 PoE Power | 1 word 16 | bits HEX 0x | 184C 36221 | ||||
| Port 14 PoE Power | 1 word 16 | bits HEX 0x | 184D 36222 | ||||
| Port 15 PoE Power | 1 word 16 | bits HEX 0x | 184E 36223 | ||||
| Port 16 PoE Power | 1 word 16 | bits HEX 0x | 184F 36224 | ||||
| Port 17 PoE Power | 1 word 16 | bits HEX 0x | 1850 36225 | ||||
| Port 18 PoE Power | 1 word 16 | bits HEX 0x | 1851 36226 | ||||
| Port 19 PoE Power | 1 word 16 | bits HEX 0x | 1852 36227 | ||||
| Port 20 PoE Power | 1 word 16 | bits HEX 0x | 1853 36228 | ||||
| Port 21 PoE Power | 1 word 16 | bits HEX 0x | 1854 36229 | ||||
| Port 22 PoE Power | 1 word 16 | bits HEX 0x | 1855 36230 | ||||
| Port 23 PoE Power | 1 word 16 | bits HEX 0x | 1856 36231 | ||||
| Port 24 PoE Power | 1 word 16 | bits HEX 0x | 1857 36232 | ||||
| Port 25 PoE Power | 1 word 16 | bits HEX 0x | 1858 36233 | ||||
| Port 26 PoE Power | 1 word 16 | bits HEX 0x | 1859 36234 | ||||
| Port 27 PoE Power | 1 word 16 | bits HEX 0x | 185A 36235 | ||||
| Port 28 PoE Power | 1 word 16 | bits HEX 0x | 185B 36236 | ||||
| Port 29 PoE Power | 1 word 16 | bits HEX 0x | 185C 36237 | ||||
| Catalog | Name | Data Type | Interpretation | Address Offset (Hex) | Address 3X | Description | |
| Port Info Port | 30 PoE Power | 1 word 16 | bits HEX 0x | 185D 36238 | |||
| 31 PoE Power | 1 word 16 | bits HEX 0x | 185E 36239 | ||||
| 32 PoE Power | 1 word 16 | bits HEX 0x | 185F 36240 | ||||
| Temperature | 1 word 16 | bits HEX 0x | 1860 ~ | 0x187F | 36241 ~ 36272 | PoE Temperature (C)Ex: poe temperature = 32Received MODBUS response: 0x0020 | |
| 1 PoE Temperature | 1 word 16 | bits HEX 0x | 1860 36241 | ||||
| 2 PoE Temperature | 1 word 16 | bits HEX 0x | 1861 36242 | ||||
| 3 PoE Temperature | 1 word 16 | bits HEX 0x | 1862 36243 | ||||
| 4 PoE Temperature | 1 word 16 | bits HEX 0x | 1863 36244 | ||||
| 5 PoE Temperature | 1 word 16 | bits HEX 0x | 1864 36245 | ||||
| 6 PoE Temperature | 1 word 16 | bits HEX 0x | 1865 36246 | ||||
| 7 PoE Temperature | 1 word 16 | bits HEX 0x | 1866 36247 | ||||
| 8 PoE Temperature | 1 word 16 | bits HEX 0x | 1867 36248 | ||||
| 9 PoE Temperature | 1 word 16 | bits HEX 0x | 1868 36249 | ||||
| 10 PoE Temperature | 1 word 16 | bits HEX 0x | 1869 36250 | ||||
| 11 PoE Temperature | 1 word 16 | bits HEX 0x | 186A 36251 | ||||
| 12 PoE Temperature | 1 word 16 | bits HEX 0x | 186B 36252 | ||||
| 13 PoE Temperature | 1 word 16 | bits HEX 0x | 186C 36253 | ||||
| 14 PoE Temperature | 1 word 16 | bits HEX 0x | 186D 36254 | ||||
| 15 PoE Temperature | 1 word 16 | bits HEX 0x | 186E 36255 | ||||
| Catalog Name Data Type Inter- | pretation | Address Offset (Hex) | Address 3X | Description | |||
| Port Info Port 16 PoE Temperature | 1 word 16 | bits HEX 0x | 186F 36256 | ||||
| Port 17 PoE Temperature | 1 word 16 | bits HEX 0x | 1870 36257 | ||||
| Port 18 PoE Temperature | 1 word 16 | bits HEX 0x | 1871 36258 | ||||
| Port 19 PoE Temperature | 1 word 16 | bits HEX 0x | 1872 36259 | ||||
| Port 20 PoE Temperature | 1 word 16 | bits HEX 0x | 1873 36260 | ||||
| Port 21 PoE Temperature | 1 word 16 | bits HEX 0x | 1874 36261 | ||||
| Port 22 PoE Temperature | 1 word 16 | bits HEX 0x | 1875 36262 | ||||
| Port 23 PoE Temperature | 1 word 16 | bits HEX 0x | 1876 36263 | ||||
| Port 24 PoE Temperature | 1 word 16 | bits HEX 0x | 1877 36264 | ||||
| Port 25 PoE Temperature | 1 word 16 | bits HEX 0x | 1878 36265 | ||||
| Port 26 PoE Temperature | 1 word 16 | bits HEX 0x | 1879 36266 | ||||
| Port 27 PoE Temperature | 1 word 16 | bits HEX 0x | 187A 36267 | ||||
| Port 28 PoE Temperature | 1 word 16 | bits HEX 0x | 187B 36268 | ||||
| Port 29 PoE Temperature | 1 word 16 | bits HEX 0x | 187C 36269 | ||||
| Port 30 PoE Temperature | 1 word 16 | bits HEX 0x | 187D 36270 | ||||
| Port 31 PoE Temperature | 1 word 16 | bits HEX 0x | 187E 36271 | ||||
| Port 32 PoE Temperature | 1 word 16 | bits HEX 0x | 187F 36272 | ||||
| Packet Info | Tx Packets Counter | 4 words 64 | bits HEX 0x2000 ~ | 0x207C | 38193 ~ 38317 | Tx PacketsEx: port 1 Tx Packet Amount = 11223344Received MODBUS response: 0xAB4130Word 0 = 0x0000Word 1 = 0x0000Word 2 = 0x00ABWord 3 = 0x4130 | |
| Port 1 Tx Packets | 4 words 64 | bits HEX 0x2000 38193 | |||||
| Port 2 Tx Packets | 4 words 64 | bits HEX 0x2004 38197 | |||||
| Port 3 Tx Packets | 4 words 64 | bits HEX 0x2008 38201 | |||||
| Port 4 Tx Packets | 4 words 64 | bits HEX 0x200C 38205 | |||||
| Port 5 Tx Packets | 4 words 64 | bits HEX 0x2010 38209 | |||||
| Port 6 Tx Packets | 4 words 64 | bits HEX 0x2014 38213 | |||||
| Port 7 Tx Packets | 4 words 64 | bits HEX 0x2018 38217 | |||||
| Port 8 Tx Packets | 4 words 64 | bits HEX 0x201C 38221 | |||||
| Port 9 Tx Packets | 4 words 64 | bits HEX 0x2020 38225 | |||||
| Port 10 Tx Packets | 4 words 64 | bits HEX 0x2024 38229 | |||||
| Port 11 Tx Packets | 4 words 64 | bits HEX 0x2028 38233 | |||||
| Port 12 Tx Packets | 4 words 64 | bits HEX 0x202C 38237 | |||||
| Port 13 Tx Packets | 4 words 64 | bits HEX 0x2030 38241 | |||||
| Port 14 Tx Packets | 4 words 64 | bits HEX 0x2034 38245 | |||||
| Port 15 Tx Packets | 4 words 64 | bits HEX 0x2038 38249 | |||||
| Packet Info | Port 16 Tx Packets | 4 words 64 | bits HEX 0x203C 38253 | ||||
| Port 17 Tx Packets | 4 words 64 | bits HEX 0x2040 38257 | |||||
| Port 18 Tx Packets | 4 words 64 | bits HEX 0x2044 38261 | |||||
| Port 19 Tx Packets | 4 words 64 | bits HEX 0x2048 38265 | |||||
| Port 20 Tx Packets | 4 words 64 | bits HEX 0x204C 38269 | |||||
| Port 21 Tx Packets | 4 words 64 | bits HEX 0x2050 38273 | |||||
| Port 22 Tx Packets | 4 words 64 | bits HEX 0x2054 38277 | |||||
| Port 23 Tx Packets | 4 words 64 | bits HEX 0x2058 38281 | |||||
| Port 24 Tx Packets | 4 words 64 | bits HEX 0x205C 38285 | |||||
| Port 25 Tx Packets | 4 words 64 | bits HEX 0x2060 38289 | |||||
| Port 26 Tx Packets | 4 words 64 | bits HEX 0x2064 38293 | |||||
| Port 27 Tx Packets | 4 words 64 | bits HEX 0x2068 38297 | |||||
| Port 28 Tx Packets | 4 words 64 | bits HEX 0x206C 38301 | |||||
| Port 29 Tx Packets | 4 words 64 | bits HEX 0x2070 38305 | |||||
| Port 30 Tx Packets | 4 words 64 | bits HEX 0x2074 38309 | |||||
| Port 31 Tx Packets | 4 words 64 | bits HEX 0x2078 38313 | |||||
| Port 32 Tx Packets | 4 words 64 | bits HEX 0x207C 38317 | |||||
| Catalog | Name | Data Type | Interpretation | Address Offset (Hex) | Address 3X | Description | |
| Packet Info | Rx Packets Counter | 4 words 64 | bits HEX 0x2100 | ~0x217C | 38449 ~ 38573 | Rx PacketsEx: port 1 Rx Packet Amount = 11223344Received MODBUS response: 0xAB4130Word 0 = 0x0000Word 1 = 0x0000Word 2 = 0x00ABWord 3 = 0x4130 | |
| Port 1 Rx Packets | 4 words 64 | bits HEX 0x2100 38449 | |||||
| Port 2 Rx Packets | 4 words 64 | bits HEX 0x2104 38453 | |||||
| Port 3 Rx Packets | 4 words 64 | bits HEX 0x2108 38457 | |||||
| Port 4 Rx Packets | 4 words 64 | bits HEX 0x210C 38461 | |||||
| Port 5 Rx Packets | 4 words 64 | bits HEX 0x2110 38465 | |||||
| Port 6 Rx Packets | 4 words 64 | bits HEX 0x2114 38469 | |||||
| Port 7 Rx Packets | 4 words 64 | bits HEX 0x2118 38473 | |||||
| Port 8 Rx Packets | 4 words 64 | bits HEX 0x211C 38477 | |||||
| Port 9 Rx Packets | 4 words 64 | bits HEX 0x2120 38481 | |||||
| Port 10 Rx Packets | 4 words 64 | bits HEX 0x2124 38485 | |||||
| Port 11 Rx Packets | 4 words 64 | bits HEX 0x2128 38489 | |||||
| Port 12 Rx Packets | 4 words 64 | bits HEX 0x212C 38493 | |||||
| Port 13 Rx Packets | 4 words 64 | bits HEX 0x2130 38497 | |||||
| Port 14 Rx Packets | 4 words 64 | bits HEX 0x2134 38501 | |||||
| Port 15 Rx Packets | 4 words 64 | bits HEX 0x2138 38505 | |||||
| Catalog Name Data Type Inter- | pretation | Address Offset (Hex) | Address 3X | Description | |||
| Packet Info | Port 16 Rx Packets | 4 words 64 | bits HEX 0x213C 385 | 09 | |||
| Port 17 Rx Packets | 4 words 64 | bits HEX 0x2140 385 | 13 | ||||
| Port 18 Rx Packets | 4 words 64 | bits HEX 0x2144 385 | 17 | ||||
| Port 19 Rx Packets | 4 words 64 | bits HEX 0x2148 385 | 21 | ||||
| Port 20 Rx Packets | 4 words 64 | bits HEX 0x214C 385 | 25 | ||||
| Port 21 Rx Packets | 4 words 64 | bits HEX 0x2150 385 | 29 | ||||
| Port 22 Rx Packets | 4 words 64 | bits HEX 0x2154 385 | 33 | ||||
| Port 23 Rx Packets | 4 words 64 | bits HEX 0x2158 385 | 37 | ||||
| Port 24 Rx Packets | 4 words 64 | bits HEX 0x215C 385 | 41 | ||||
| Port 25 Rx Packets | 4 words 64 | bits HEX 0x2160 385 | 45 | ||||
| Port 26 Rx Packets | 4 words 64 | bits HEX 0x2164 385 | 49 | ||||
| Port 27 Rx Packets | 4 words 64 | bits HEX 0x2168 385 | 53 | ||||
| Port 28 Rx Packets | 4 words 64 | bits HEX 0x216C 385 | 57 | ||||
| Port 29 Rx Packets | 4 words 64 | bits HEX 0x2170 385 | 61 | ||||
| Port 30 Rx Packets | 4 words 64 | bits HEX 0x2174 385 | 65 | ||||
| Port 31 Rx Packets | 4 words 64 | bits HEX 0x2178 385 | 69 | ||||
| Port 32 Rx Packets | 4 words 64 | bits HEX 0x217C 385 | 73 | ||||
| Packet Info | Tx Error Packets Counter | 2 words 32 | bits HEX 0x2200 ~ | 0x223E | 38705 ~ 38767 | Tx Error PacketsEx: port 1 Tx Packet Amount = 11223344Received MODBUS response: 0xAB4130Word 0 = 0x00ABWord 1 = 0x4130 | |
| Port 1 Tx Error Pack-ets | 2 words 32 | bits HEX 0x2200 38705 | |||||
| Port 2 Tx Error Pack-ets | 2 words 32 | bits HEX 0x2202 38707 | |||||
| Port 3 Tx Error Pack-ets | 2 words 32 | bits HEX 0x2204 38709 | |||||
| Port 4 Tx Error Pack-ets | 2 words 32 | bits HEX 0x2206 38711 | |||||
| Port 5 Tx Error Pack-ets | 2 words 32 | bits HEX 0x2208 38713 | |||||
| Port 6 Tx Error Pack-ets | 2 words 32 | bits HEX 0x220A 38715 | |||||
| Port 7 Tx Error Pack-ets | 2 words 32 | bits HEX 0x220C 38717 | |||||
| Port 8 Tx Error Pack-ets | 2 words 32 | bits HEX 0x220E 38719 | |||||
| Port 9 Tx Error Pack-ets | 2 words 32 | bits HEX 0x2210 38721 | |||||
| Port 10 Tx Error Pack-ets | 2 words 32 | bits HEX 0x2212 38723 | |||||
| Port 11 Tx Error Pack-ets | 2 words 32 | bits HEX 0x2214 38725 | |||||
| Port 12 Tx Error Pack-ets | 2 words 32 | bits HEX 0x2216 38727 | |||||
| Catalog Name | Data Type | Inter- | pretation | Address Offset (Hex) | Address 3X | Description | |
| Packet Info | Port 13 Tx Error Pack-ets | 2 words 32 | bits HEX | 0x2218 387 | 29 | ||
| Port 14 Tx Error Pack-ets | 2 words 32 | bits HEX | 0x221A 387 | 31 | |||
| Port 15 Tx Error Pack-ets | 2 words 32 | bits HEX | 0x221C 387 | 33 | |||
| Port 16 Tx Error Pack-ets | 2 words 32 | bits HEX | 0x221E 387 | 35 | |||
| Port 17 Tx Error Pack-ets | 2 words 32 | bits HEX | 0x2220 387 | 37 | |||
| Port 18 Tx Error Pack-ets | 2 words 32 | bits HEX | 0x2222 387 | 39 | |||
| Port 19 Tx Error Pack-ets | 2 words 32 | bits HEX | 0x2224 387 | 41 | |||
| Port 20 Tx Error Pack-ets | 2 words 32 | bits HEX | 0x2226 387 | 43 | |||
| Port 21 Tx Error Pack-ets | 2 words 32 | bits HEX | 0x2228 387 | 45 | |||
| Port 22 Tx Error Pack-ets | 2 words 32 | bits HEX | 0x222A 387 | 47 | |||
| Port 23 Tx Error Pack-ets | 2 words 32 | bits HEX | 0x222C 387 | 49 | |||
| Port 24 Tx Error Pack-ets | 2 words 32 | bits HEX | 0x222E 387 | 51 | |||
| Port 25 Tx Error Pack-ets | 2 words 32 | bits HEX | 0x2230 387 | 53 | |||
| Port 26 Tx Error Pack-ets | 2 words 32 | bits HEX | 0x2232 387 | 55 | |||
| Catalog Name Data Type Inter- | pretation | Address Offset (Hex) | Address 3X | Description | |||
| Packet Info | Port 27 Tx Error Pack-ets | 2 words 32 | bits HEX 0x2234 38757 | ||||
| Port 28 Tx Error Pack-ets | 2 words 32 | bits HEX 0x2236 38759 | |||||
| Port 29 Tx Error Pack-ets | 2 words 32 | bits HEX 0x2238 38761 | |||||
| Port 30 Tx Error Pack-ets | 2 words 32 | bits HEX 0x223A 38763 | |||||
| Port 31 Tx Error Pack-ets | 2 words 32 | bits HEX 0x223C 38765 | |||||
| Port 32 Tx Error Pack-ets | 2 words 32 | bits HEX 0x223E 38767 | |||||
| Rx Error Packets Counter | 2 words 32 | bits HEX 0x2300 ~ | 0x233E | 38961 ~ 39023 | Rx Error Packets Ex: port 1 Rx Packet Amount = 11223344 Received MODBUS response: 0xAB4130 Word 0 = 0x00AB Word 1 = 0x4130 | ||
| Port 1 Rx Error Pack-ets | 2 words 32 | bits HEX 0x2300 38961 | |||||
| Port 2 Rx Error Pack-ets | 2 words 32 | bits HEX 0x2302 38963 | |||||
| Port 3 Rx Error Pack-ets | 2 words 32 | bits HEX 0x2304 38965 | |||||
| Port 4 Rx Error Pack-ets | 2 words 32 | bits HEX 0x2306 38967 | |||||
| Port 5 Rx Error Pack-ets | 2 words 32 | bits HEX 0x2308 38969 | |||||
| Port 6 Rx Error Pack-ets | 2 words 32 | bits HEX 0x230A 38971 | |||||
| Catalog Name | Data Type | Inter- | pretation | Address Offset (Hex) | Address 3X | Description | |
| Packet Info | Port 7 Rx Error Pack-ets | 2 words 32 | bits HEX | 0x230C 389 | 73 | ||
| Port 8 Rx Error Pack-ets | 2 words 32 | bits HEX | 0x230E 389 | 75 | |||
| Port 9 Rx Error Pack-ets | 2 words 32 | bits HEX | 0x2310 389 | 77 | |||
| Port 10 Rx Error Pack-ets | 2 words 32 | bits HEX | 0x2312 389 | 79 | |||
| Port 11 Rx Error Pack-ets | 2 words 32 | bits HEX | 0x2314 389 | 81 | |||
| Port 12 Rx Error Pack-ets | 2 words 32 | bits HEX | 0x2316 389 | 83 | |||
| Port 13 Rx Error Pack-ets | 2 words 32 | bits HEX | 0x2318 389 | 85 | |||
| Port 14 Rx Error Pack-ets | 2 words 32 | bits HEX | 0x231A 389 | 87 | |||
| Port 15 Rx Error Pack-ets | 2 words 32 | bits HEX | 0x231C 389 | 89 | |||
| Port 16 Rx Error Pack-ets | 2 words 32 | bits HEX | 0x231E 389 | 91 | |||
| Port 17 Rx Error Pack-ets | 2 words 32 | bits HEX | 0x2320 389 | 93 | |||
| Port 18 Rx Error Pack-ets | 2 words 32 | bits HEX | 0x2322 389 | 95 | |||
| Port 19 Rx Error Pack-ets | 2 words 32 | bits HEX | 0x2324 389 | 97 | |||
| Port 20 Rx Error Pack-ets | 2 words 32 | bits HEX | 0x2326 389 | 99 | |||
| Catalog Name Data Type Inter- | pretation | Address Offset (Hex) | Address 3X | Description | |||
| Packet Info | Port 21 Rx Error Pack-ets | 2 words 32 | bits HEX 0x2328 390 | 01 | |||
| Port 22 Rx Error Pack-ets | 2 words 32 | bits HEX 0x232A 390 | 03 | ||||
| Port 23 Rx Error Pack-ets | 2 words 32 | bits HEX 0x232C 390 | 05 | ||||
| Port 24 Rx Error Pack-ets | 2 words 32 | bits HEX 0x232E 390 | 07 | ||||
| Port 25 Rx Error Pack-ets | 2 words 32 | bits HEX 0x2330 390 | 09 | ||||
| Port 26 Rx Error Pack-ets | 2 words 32 | bits HEX 0x2332 390 | 11 | ||||
| Port 27 Rx Error Pack-ets | 2 words 32 | bits HEX 0x2334 390 | 13 | ||||
| Port 28 Rx Error Pack-ets | 2 words 32 | bits HEX 0x2336 390 | 15 | ||||
| Port 29 Rx Error Pack-ets | 2 words 32 | bits HEX 0x2338 390 | 17 | ||||
| Port 30 Rx Error Pack-ets | 2 words 32 | bits HEX 0x233A 390 | 19 | ||||
| Port 31 Rx Error Pack-ets | 2 words 32 | bits HEX 0x233C 390 | 21 | ||||
| Port 32 Rx Error Pack-ets | 2 words 32 | bits HEX 0x233E 390 | 23 | ||||
- Chapter 1 Product Overview
- Chapter 2 Switch Installation
- Chapter 3 Configuration Utility
- Chapter 4 Managing Switch
- Federal Communication Commission Interference Statement
- Declaration of Conformity
- CE
- FCC Class A
- Warnings for Class 1 Division 2
- Safety Instructions
- Product Warranty (5 years)
- Conventions
- Copyright
- Technical Support and Assistance
- About This Manual
- Product Overview
- Chapter 1
- Supported Models
- Specifications
- Hardware Views
- Front View
- System LED Panel
- System LED Panel (only for EKI-5725FP/EKI-5725FPI, EKI-5624P/EKI-5624PI and EKI-5729P/EKI-5729PI)
- Rear View
- Top View
- Bottom View
- Packing List
- Switch Installation
- Chapter 2
- Installation Guidelines
- Connecting Hardware
- Verifying Switch Operation
- Installing the Switch
- DIN Rail Mounting
- Installing the DIN-Rail Mounting Kit
- Removing the DIN-Rail Mounting Kit
- Wall-Mounting
- Installing and Removing SFP Modules
- Installing SFP Modules
- Removing SFP Modules
- Connecting the Switch to Ethernet Ports
- RJ45 Ethernet Cable Wiring
- Power Supply Installation
- Overview
- Considerations
- Grounding the Device
- Wiring a Relay Contact
- Wiring the Power Inputs
- Configuration Utility
- Overview
- Enabling ProView Function
- Installing the Configuration Utility
- Utility Menu Map
- Menu Bar
- View Menu
- Utility Settings
- Management Menu
- Help Menu
- Tool Bar
- TreeView
- Information Panel
- Status Bar
- Configuration Area
- Managing Switch
- Chapter 4
- Discovering Switches
- First Time Installation
- Enabling ProView Function
- Configuring Network Settings
- DHCP + Auto IP Settings
- Static Settings
- Click Apply to confirm the settings.
- Discovering Switches
- Auto Search
- Clearing Device List and Search Again
- Group Management
- Creating Groups
- Enter a group name and click OK.
- Favorite's List
- Adding a Device
- Adding an IP Address
- Adding an IP Address Range
- Configuring the System
- Changing Device Name
- Setting Modbus/TCP Idle Time
- Click Apply to configure the function.
- Setting LLDP
- Setting Networks Parameters
- Setting SNMP
- Setting PoE
- Modbus/TCP Mapping
- Modbus/TCP Mapping Table
Brand : Advantech
Model : EKI-5728I-AE
Category : Switch