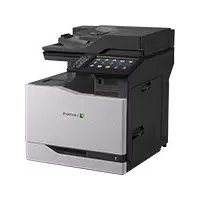
Smart Card Authentication - Multifunction Printer LEXMARK - Free user manual and instructions
Find the device manual for free Smart Card Authentication LEXMARK in PDF.


| Product Type | Smart Card Authentication Module |
| Brand | Lexmark |
| Model | Smart Card Authentication |
| Compatible Devices | Lexmark printers and MFPs |
| Authentication Methods | Smart card (contact/contactless), PIN |
| Supported Card Types | ISO 7816, ISO 14443, Common Access Card (CAC), Personal Identity Verification (PIV) |
| Connectivity | USB (internal or external reader) |
| Software Requirements | Lexmark Markvision Enterprise, embedded solutions |
| Power Source | USB bus-powered or printer internal power |
| Dimensions (Reader Module) | Approx. 100 x 60 x 20 mm |
| Weight | Approx. 100 g |
| Operating Temperature | 10°C to 35°C |
| Storage Temperature | -20°C to 60°C |
| Humidity | 10% to 80% non-condensing |
| Security Features | Encrypted communication, certificate-based, FIPS 140-2 compliant options |
| Maintenance | Firmware updates via Lexmark website; clean reader contacts with dry cloth |
| Spare Parts / Repairability | Reader module replaceable; no user-serviceable parts inside |
| Warranty | 1 year limited warranty |
Frequently Asked Questions - Smart Card Authentication LEXMARK
User questions about Smart Card Authentication LEXMARK
0 question about this device. Answer the ones you know or ask your own.
Ask a new question about this device
Download the instructions for your Multifunction Printer in PDF format for free! Find your manual Smart Card Authentication - LEXMARK and take your electronic device back in hand. On this page are published all the documents necessary for the use of your device. Smart Card Authentication by LEXMARK.
USER MANUAL Smart Card Authentication LEXMARK
Installation and Configuration Guide
PKI Installation and Configuration Guide
Edition: June 2008
The following paragraph does not apply to any country where such provisions are inconsistent with local law: LEXMARK INTERNATIONAL, INC., PROVIDES THIS PUBLICATION “AS IS” WITHOUT WARRANTY OF ANY KIND, EITHER EXPRESS OR IMPLIED, INCLUDING, BUT NOT LIMITED TO, THE IMPLIED WARRANTIES OF MERCHANTABILITY OR FITNESS FOR A PARTICULAR PURPOSE. Some states do not allow disclaimer of express or implied warranties in certain transactions; therefore, this statement may not apply to you.
This publication could include technical inaccuracies or typographical errors. Changes are periodically made to the information herein; these changes will be incorporated in later editions. Improvements or changes in the products or the programs described may be made at any time.
Comments about this publication may be addressed to Lexmark International, Inc., Department F95/032-2, 740 West New Circle Road, Lexington, Kentucky 40550, U.S.A. In the United Kingdom and Eire, send to Lexmark International Ltd., Marketing and Services Department, Westhorpe House, Westhorpe, Marlow Bucks SL7 3RQ. Lexmark may use or distribute any of the information you supply in any way it believes appropriate without incurring any obligation to you. Kingdom and Eire, call +44 (0)8704 440 044. In other countries, contact your point of purchase.
References in this publication to products, programs, or services do not imply that the manufacturer intends to make these available in all countries in which it operates. Any reference to a product, program or service is not intended to state or imply that only that product, program, or service may be used. Any functionally equivalent product, program, or service that does not infringe any existing intellectual property right may be used instead. Evaluation and verification of operation in conjunction with other products, programs, or services, except those expressly designated by the manufacturer, are the user's responsibility.
ImageQuick, Optra, Lexmark, and Lexmark with diamond design are trademarks of Lexmark International, Inc. registered in the United States and/or other countries.
Other trademarks are the property of their respective owners.
© Copyright 2007-2008 Lexmark International, Inc. All rights reserved.
UNITED STATES GOVERNMENT RIGHTS
This software and any accompanying documentation provided under this agreement are commercial computer software and documentation developed exclusively at private expense.
PKI Installation and Configuration Guide
Lexmark Software License Agreement
PLEASE READ CAREFULLY BEFORE INSTALLING AND/OR USING THIS SOFTWARE: This Software License Agreement ("License Agreement") is a legal agreement between you (either an individual or a single entity) and Lexmark International, Inc. ("Lexmark") that, to the extent your Lexmark product or Software Program is not otherwise subject to a written software license agreement between you and Lexmark or its suppliers, governs your use of any Software Program installed on or provided by Lexmark for use in connection with your Lexmark product. The term "Software Program" includes machine-readable instructions, audio/visual content (such as images and recordings), and associated media, printed materials and electronic documentation.
BY USING AND/OR INSTALLING THIS SOFTWARE, YOU AGREE TO BE BOUND BY ALL THE TERMS AND CONDITIONS OF THIS LICENSE AGREEMENT. IF YOU DO NOT SO AGREE, DO NOT INSTALL, COPY, DOWNLOAD, OR OTHERWISE USE THE SOFTWARE PROGRAM. IF YOU DO NOT AGREE WITH THE TERMS OF THIS LICENSE AGREEMENT, PROMPTLY RETURN THE PRODUCT UNUSED AND REQUEST A REFUND OF THE AMOUNT YOU PAID. IF YOU ARE INSTALLING THIS SOFTWARE PROGRAM FOR USE BY OTHER PARTIES, YOU AGREE TO INFORM THE USERS THAT USE OF THE SOFTWARE PROGRAM INDICATES ACCEPTANCE OF THESE TERMS.
1 STATEMENT OF LIMITED WARRANTY. Lexmark warrants that the media (e.g., diskette or compact disk) on which the Software Program (if any) is furnished is free from defects in materials and workmanship under normal use during the warranty period. The warranty period is ninety (90) days and commences on the date the Software Program is delivered to the original end-user. This limited warranty applies only to Software Program media purchased new from Lexmark or an Authorized Lexmark Reseller or Distributor. Lexmark will replace the Software Program should it be determined that the media does not conform to this limited warranty.
2 DISCLAIMER AND LIMITATION OF WARRANTIES. EXCEPT AS PROVIDED IN THIS LICENSE AGREEMENT AND TO THE MAXIMUM EXTENT PERMITTED BY APPLICABLE LAW, LEXMARK AND ITS SUPPLIERS PROVIDE THE SOFTWARE PROGRAM "AS IS" AND HEREBY DISCLAIM ALL OTHER WARRANTIES AND CONDITIONS, EITHER EXPRESS OR IMPLIED, INCLUDING, BUT NOT LIMITED TO, TITLE, NON-INFRINGEMENT, MERCHANTABILITY AND FITNESS FOR A PARTICULAR PURPOSE, AND ABSENCE OF VIRUSES, ALL WITH REGARD TO THE SOFTWARE PROGRAM. This Agreement is to be read in conjunction with certain statutory provisions, as that may be in force from time to time, that imply warranties or conditions or impose obligations on Lexmark that cannot be excluded or modified. If any such provisions apply, then to the extent Lexmark is able, Lexmark hereby limits its liability for breach of those provisions to one of the following: replacement of the Software Program or reimbursement of the price paid for the Software Program.
3 LICENSE GRANT. Lexmark grants you the following rights provided you comply with all terms and conditions of this License Agreement:
a Use. You may Use one copy of the Software Program. The term "Use" means storing, loading, installing, executing, or displaying the Software Program. If Lexmark has licensed the Software Program to you for concurrent use, you must limit the number of authorized users to the number specified in your agreement with Lexmark. You may not separate the components of the Software Program for use on more than one computer. You agree that you will not Use the Software Program, in whole or in part, in any manner that has the effect of overriding, modifying, eliminating, obscuring, altering or de-emphasizing the visual appearance of any trademark, trade name, trade dress or intellectual property notice that appears on any computer display screens normally generated by, or as a result of, the Software Program.
b Copying. You may make one (1) copy of the Software Program solely for purposes of backup, archiving, or installation, provided the copy contains all of the original Software Program's proprietary notices. You may not copy the Software Program to any public or distributed network.
c Reservation of Rights. The Software Program, including all fonts, is copyrighted and owned by Lexmark International, Inc. and/or its suppliers. Lexmark reserves all rights not expressly granted to you in this License Agreement.
d Freeware. Notwithstanding the terms and conditions of this License Agreement, all or any portion of the Software Program that constitutes software provided under public license by third parties ("Freeware") is licensed to you subject to the terms and conditions of the software license agreement accompanying such Freeware, whether in the form of a discrete agreement, shrinkwrap license, or electronic license terms at the time of download. Use of the Freeware by you shall be governed entirely by the terms and conditions of such license.
4 TRANSFER. You may transfer the Software Program to another end-user. Any transfer must include all software components, media, printed materials, and this License Agreement and you may not retain copies of the Software Program or components thereof. The transfer may not be an indirect transfer, such as a consignment. Prior to the transfer, the end-user receiving the transferred Software Program must agree to all these License Agreement terms. Upon transfer of the Software Program, your license is automatically terminated. You may not rent, sublicense, or assign the Software Program except to the extent provided in this License Agreement.
5 UPGRADES. To Use a Software Program identified as an upgrade, you must first be licensed to the original Software Program identified by Lexmark as eligible for the upgrade. After upgrading, you may no longer use the original Software Program that formed the basis for your upgrade eligibility.
6 LIMITATION ON REVERSE ENGINEERING. You may not alter, reverse engineer, reverse assemble, reverse compile or otherwise translate the Software Program, except as and to the extent expressly permitted to do so by applicable law for the purposes of interoperability, error
PKI Installation and Configuration Guide
correction, and security testing. If you have such statutory rights, you will notify Lexmark in writing of any intended reverse engineering, reverse assembly, or reverse compilation. You may not decrypt the Software Program unless necessary for the legitimate Use of the Software Program.
7 ADDITIONAL SOFTWARE. This License Agreement applies to updates or supplements to the original Software Program provided by Lexmark unless Lexmark provides other terms along with the update or supplement.
8 LIMITATION OF REMEDIES. To the maximum extent permitted by applicable law, the entire liability of Lexmark, its suppliers, affiliates, and resellers, and your exclusive remedy shall be as follows: Lexmark will provide the express limited warranty described above. If Lexmark does not remedy defective media as warranted, you may terminate your license and your money will be refunded upon the return of all of your copies of the Software Program.
Other Notices
This product includes software developed by the OpenSSL Project for use in the OpenSSL Toolkit. See http://www.openssl.org/ for more information.
This product includes software developed by:
Copyright (c) 2002 Juha Yrjölä. All rights reserved.
Copyright (c) 2001 Markus Friedl.
Copyright (c) 2002 Olaf Kirch
Copyright (c) 2003 Kevin Stefanik
Redistribution and use in source and binary forms, with or without modification, are permitted provided that the following conditions are met:
-
Redistributions of source code must retain the above copyright notice, this list of conditions and the following disclaimer.
-
Redistributions in binary form must reproduce the above copyright notice, this list of conditions and the following disclaimer in the documentation and/or other materials provided with the distribution.
THIS SOFTWARE IS PROVIDED BY THE AUTHOR ``AS IS'' AND ANY EXPRESS OR IMPLIED WARRANTIES, INCLUDING, BUT NOT LIMITED TO, THE IMPLIED WARRANTIES OF MERCHANTABILITY AND FITNESS FOR A PARTICULAR PURPOSE ARE DISCLAIMED. IN NO EVENT SHALL THE AUTHOR BE LIABLE FOR ANY DIRECT, INDIRECT, INCIDENTAL, SPECIAL, EXEMPLARY, OR CONSEQUENTIAL DAMAGES (INCLUDING, BUT NOT LIMITED TO, PROCUREMENT OF SUBSTITUTE GOODS OR SERVICES; LOSS OF USE, DATA, OR PROFITS; OR BUSINESS INTERRUPTION) HOWEVER CAUSED AND ON ANY THEORY OF LIABILITY, WHETHER IN CONTRACT, STRICT LIABILITY, OR TORT (INCLUDING NEGLIGENCE OR OTHERWISE) ARISING IN ANY WAY OUT OF THE USE OF THIS SOFTWARE, EVEN IF ADVISED OF THE POSSIBILITY OF SUCH DAMAGE.
PKI Installation and Configuration Guide
Table of Contents
Lexmark Software License Agreement ...... ii
Other Notices ....iii
1 Background Information.... 1
2 Installing the Firmware and Applications.... 2
2.1 Firmware Update 2
2.2 Smartcard Driver.... 3
2.3 PKI Applications....6
3 Configuring the Basic MFP Settings 9
3.1 Date and Time....9
3.2 TCP/IP Settings....10
3.3 Email Server Setup 12
3.4 Address Book Setup.... 14
3.5 Auto-Logout.... 18
3.6 Certificate Management.... 19
4 Configuring PKI/AD Authentication....22
4.1 General Settings 23
4.2 Custom LDAP Settings.... 26
4.2.1 Adding a New Configuration.... 27
4.2.2 Editing an Existing Configuration.... 29
4.2.3 Removing an Existing Configuration 30
5 Configuring PKI/AD Standard Applications.... 31
6 Configuring PKI/AD Email 34
7 Configuring PKI/AD Scan to Network.... 38
7.1 General Settings....39
7.2 Fileshare Settings 41
7.2.1 Adding a New Fileshare....42
7.2.2 Editing an Existing Fileshare.... 44
7.2.3 Removing an Existing Fileshare.... 45
8 Troubleshooting 46
8.1 Login Issues 46
8.2 LDAP Issues 48
8.3 Scan To Email Issues 50
8.4 Scan To Network Issues....51
PKI Installation and Configuration Guide
1 Background Information
This document assumes you have read and completed the Pre-Installation Guide for the Lexmark PKI-Enabled MFP. If not, please consult that guide before continuing with the installation.
Numerous mentions will be made throughout this document to the information that was gathered using that document.
Before proceeding with the install, make sure the following has taken place:
- The MFP has been unboxed and setup as according to the end-user manual.
- The MFP has been assigned an IP Address and is connected to the LAN.
- You can use the web browser to navigate to the MFP's webpage. This can be done by entering the MFP's IP Address in the address bar of the web browser.
Once this has been verified for each MFP that will be PKI-enabled, you are ready to proceed.
2 Installing the Firmware and Applications
The PKI application support comes in three parts:
- PKI/AD Firmware
- Smartcard Driver
- PKI Applications
All three need to be installed in order to activate PKI support. The SmartCard Reader cannot be installed on the MFP prior to completing all the steps in this section.
2.1 Firmware Update
NOTE: Installing the PKI/AD Firmware will remove any previously installed embedded solutions. However, any settings that have already been configured for the device itself will be kept and used with the new firmware.
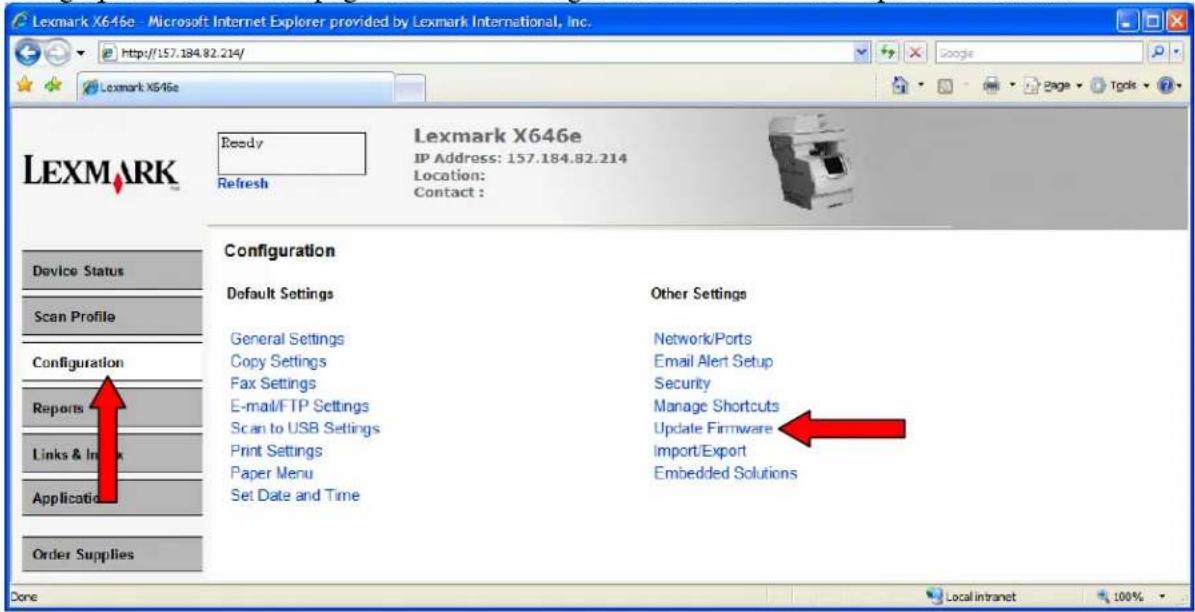
- Bring up the MFP's web page and click Configuration and then click Update Firmware.
- Browse to the location of the firmware file. Click Submit. See the table below for filename that corresponds to your MFP model.
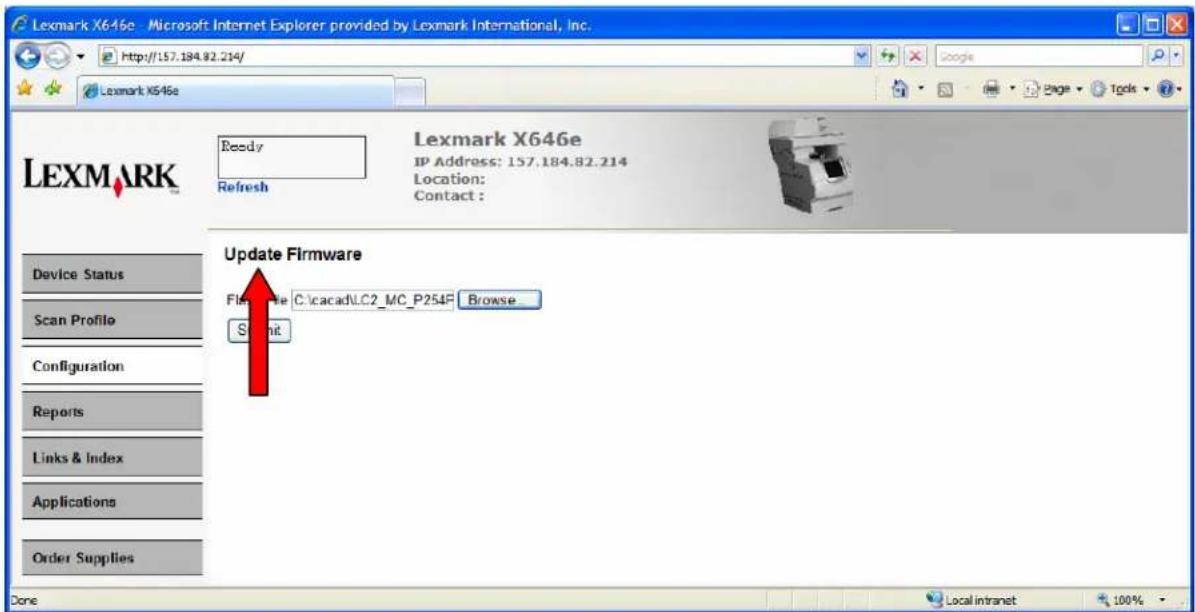
| MFP Model Firmware File | ||
| X644 and X646 | LC2_MC_P254P | Ah1_full.fls |
| X85x | LC2_BE_P248PA | h1_full.fls |
| X782 | LC2_TO_P077PA | h1_full.fls |
| X94x | LC_BR_P065PA | h1_full.fls |
| T64x + X4600 | LC2_TI_P249PA | h1_full.fls |
- The file will take a few minutes to upload and for the MFP to be updated. Wait for the update to complete and then refresh the web page. NOTE: The MFP should not be powered off while the update is in progress.
2.2 Smartcard Driver
After the firmware has been updated, the Smartcard Driver compatible with the type of cards being used must be installed.
- Bring up the MFP's web page and click Configuration and then click Embedded Solutions.

- One Embedded Solution (PKI/Active Directory Application) is automatically installed when the PKI/AD firmware is installed. Click the Install button.
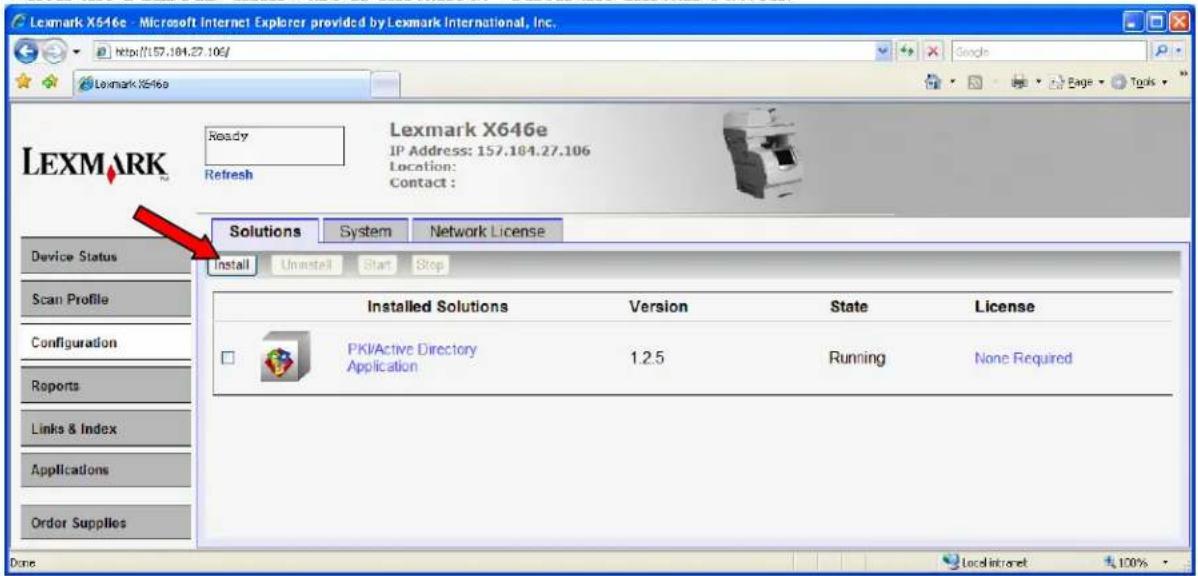
- Browse to the Smartcard Driver solution file and click Start Install. See the table below for filename that corresponds to supported card types.

| Card Type Solution File | |
| CAC / DOD scif-cac-2_0_0.fls |
- Wait for the install to complete and then click Return.

- There should now be two embedded solutions installed on the MFP.
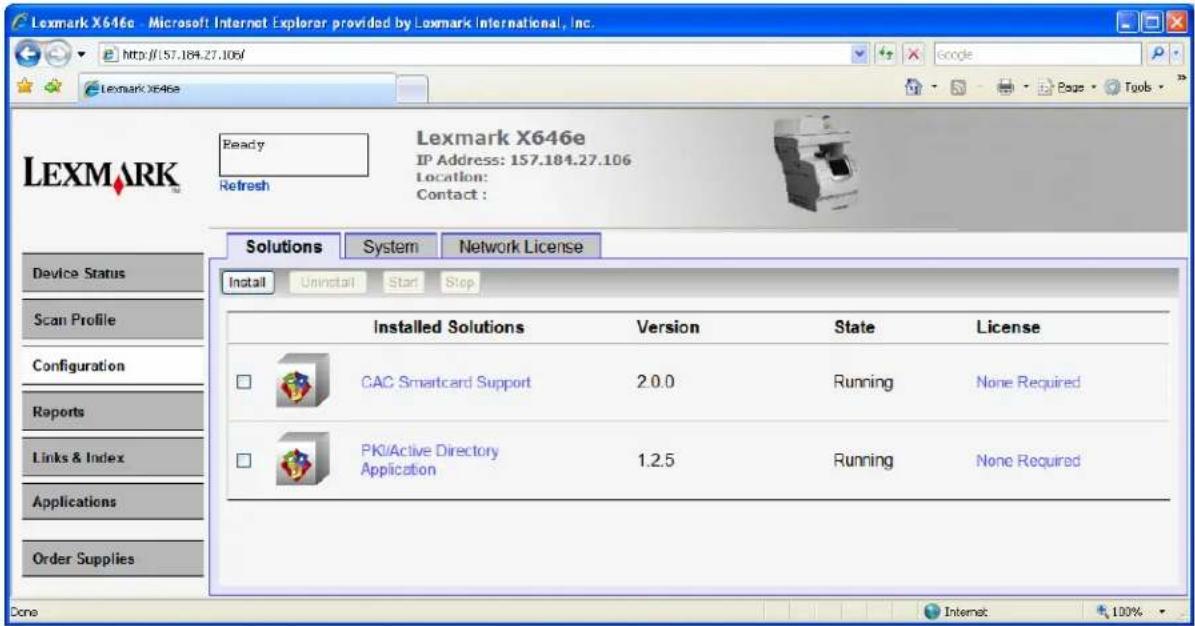
Note: The Name and Version of the Smartcard Driver Application displayed here may differ from what is displayed on your MFP.
2.3 PKI Applications
Once the firmware and Smartcard Driver have been installed, the application files can then be installed.
- Continuing from the previous install step for the Smartcard Driver, click Install.

- Browse to the PKI Authentication Application solution file, pkiad-2_0_0.fls, and click Start Install.

- Wait for the install to complete and then click Return.

- Repeat steps 1 – 3 to install each of the following PKI applications. If a particular function will not be used, it does not need to be installed.
| PKI Function Solution File | |
| User Authorization for Copy, Fax, and/or FTP pkistdapps-2_0_0.fls | |
| Scan to Email pkiemail-2_0_0.fls | |
| Scan to Network pkinetworkscan-2_0_0.fls | |
- The list of installed solutions should now include all or some of the following:

3 Configuring the Basic MFP Settings
This section describes the process for using the information obtained in the Pre-Installation Guide to configure the basic MFP Settings. Even if this device has been previously setup, follow through these steps to make sure all settings necessary for the PKI capability to function correctly have been configured.
3.1 Date and Time
In order to login in to perform a Kerberos login, the date and time must be within 5 minutes of the date and time of the Domain Controller. The time can be set manually on the device or it can be acquired from a time server.
- Click Configuration and then click Set Date and Time.

Pre-Installation Section 2.3
2. The Date and Time screen is displayed.

If setting the time manually: If using a Time Server:
- Set the Time Zone
- Set the Time Zone
- Set the Date & Time in the format shown
- Leave Set Date & Time blank
- Set DST Mode to Automatic
- Set DST Mode to Automatic
- Set Daylight Savings to Yes
- Set Daylight Savings to Yes
- Set Time Server to None
- Set Time Server to IP
- Leave Time Server Name blank
- Set Time Server Name
3. Click Submit.
3.2 TCP/IP Settings
While not explicitly part of the PKI Application Setup, it is a good idea to verify all necessary TCP/IP Settings are configured.
- Click Configuration and then click Network/Ports.
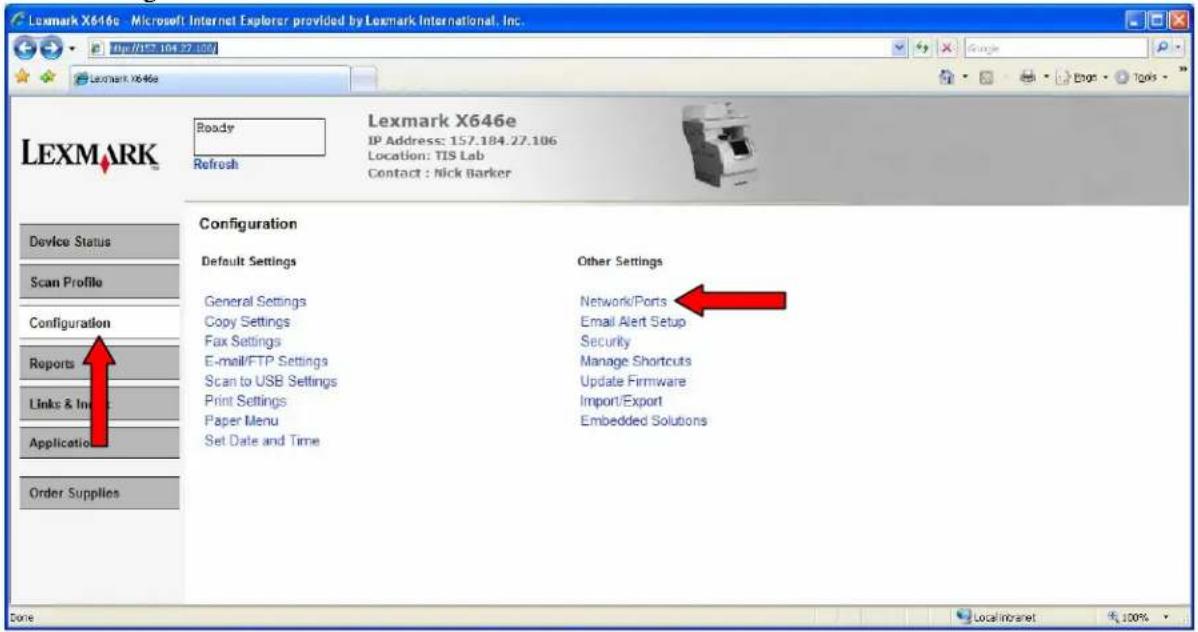
- Click TCP/IP.

Pre-Installation Section 2.4
- Check the value in the Domain Name field. Set it to the value listed in Pre-Installation Section 2.4, Item 1. If there are any other values given in Items 2 to 4, add them to the Domain Search Order; multiple domain names should be separated by a comma.
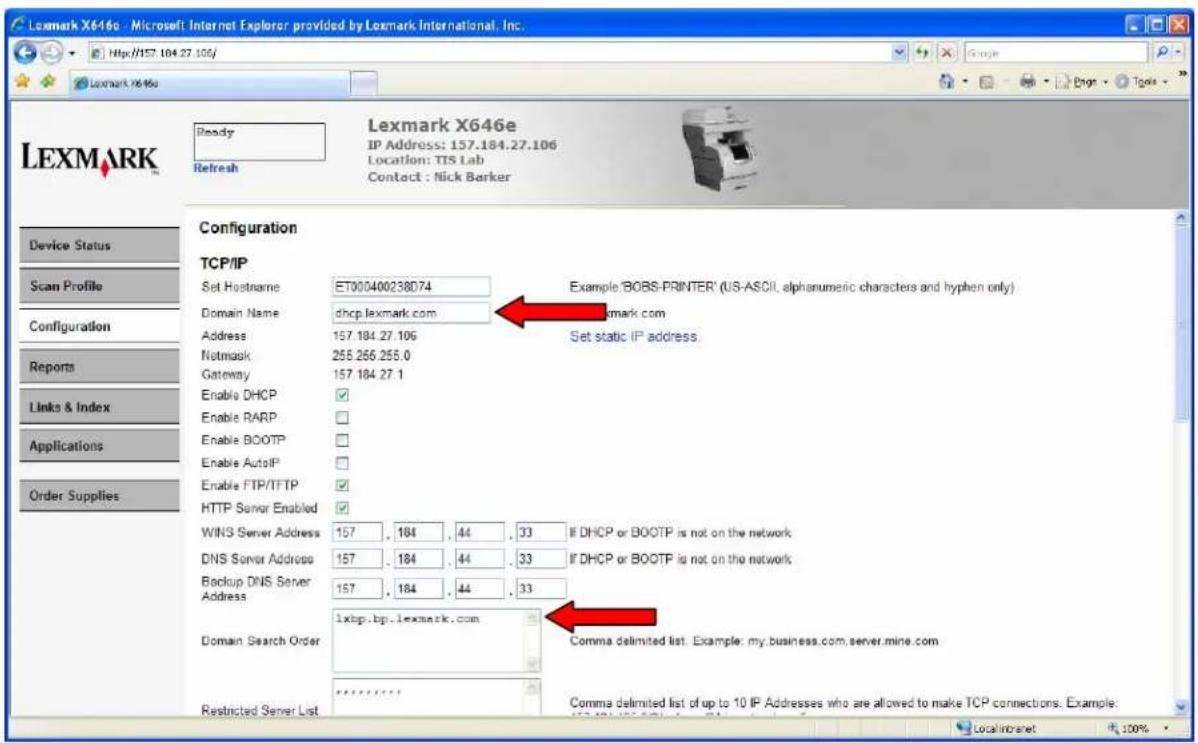
Pre-Installation Section 2.2
-
If using a Static IP Address, also check the WINS and DNS Server Address and make sure there is a valid value specified for each. If a backup DNS Server is available, set that value as well.
-
If any changes were made, click Submit to apply the new values.
3.3 Email Server Setup
If Scan to Email is to be allowed on this device, the Email Server settings must be configured; otherwise, this section can be skipped.
- Click Configuration and then click Network/Ports.

- Click Email Server Setup.

Pre-Installation Section 5.2
3. The Email Server Setup screen is displayed.

Fill in the Primary SMTP Gateway and Port. If available, fill in the Secondary SMTP Gateway and Port. Provide a default email subject and message. The Reply Address is not necessary since it will be set to the logged in user's email address.
- Review any of the other settings and then click Submit.
3.4 Address Book Setup
The Address Book Setup serves as the default LDAP setup for the MFP. Configuring this allows for searching the global address book when sending an email and allows the PKI Applications to lookup information such as the home directory of the logged in user.
- Click Configuration and then click Network/Ports.

- Click Address Book Setup.

Pre-Installation Section 2.5, items 1–7
3. The Address Book Setup page is displayed.

The following fields need to be filled in:
| Field Corresponding Pre-Inst | allation Guide Section 4.2 Item |
| Server Address | Item 1 (Use the hostname rather than the IP address) |
| Server Port | Item 2 |
| Use SSL/TLS | Item 3 |
| LDAP Certificate Validation | Item 4 |
| Use GSSAPI | Not used; leave unchecked. |
| Mail Attribute | Item 6 |
| Fax Number Attribute | Not used; leave the default value. |
| Search Base | Item 5 |
| Search Timeout | Item 7 |
| Displayed Name | This is the combination of LDAP attributes used to display the “friendly” name for the email address. The default value of longest cn or (givenName + sn) is usually ok. |
| Max Search Results | Item 8 |
4. Click Submit once all answers have been provided.
Pre-Installation Section 2.5, item 8
- If using the user's credentials to connect to the LDAP server, no other changes are necessary. If connecting anonymously or using a service account, then return to the Address Book Setup Screen and click MFP Credentials.

Pre-Installation Section 2.5, item 8
- The MFP Credentials page is displayed.

If connecting anonymously, check the Anonymous LDAP Bind. If connecting using a service account, uncheck the Anonymous LDAP Bind option and provide the MFP's Distinguished Name and Password. The Kerberos settings are not used. Click Submit.
3.5 Auto-Logout
- Click Configuration and then click Security.

Pre-Installation Section 3.4.1
2. Set the Auto "Log out" delay value.

3. Click Submit.
Pre-Installation Sections 2.5 item 3, 3.2.2.1.1, 8.1, 8.2, & 8.3
3.6 Certificate Management
Certificates are needed for SSL support in LDAP lookups and for Domain Controller verification. All certificates needed by the device must be in PEM (Base64) format and combined into one file. Since the certificates are in PEM format, they can easily be cut-and-paste into a single file such as:
----BEGIN CERTIFICATE----
MIIE1jCCA76gAwIBAgIQY6sV0KL3tIhBtlr4gHG85zANBgkqhkiG9w0BAQUFADBs
...
l3DTbPe0mnIbTq0iWqKEaVnelvvaDt52iSpEQyevwgUcHD16rFy+sOnCaQ==
----END CERTIFICATE----
----BEGIN CERTIFICATE----
MIIE1zCCA7+gAwIBAgIQZWAEBZ+h+L5AKmbyl9hgSzANBgkqhkiG9w0BAQUFADBn
...
l3DTbPe0mnIbTq0iWqKEaVnelvvaDt52iSpEQyevwgUcHD16rFy+sOnCaQ==
----END CERTIFICATE----
- Click Configuration and then click Security.
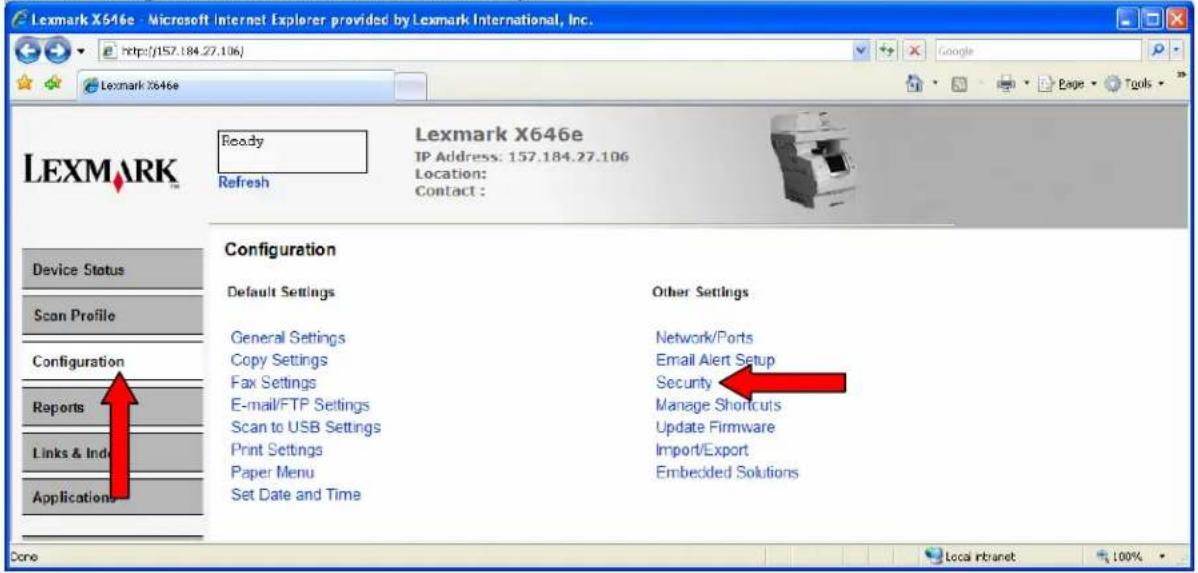
- Click Certificate Management.
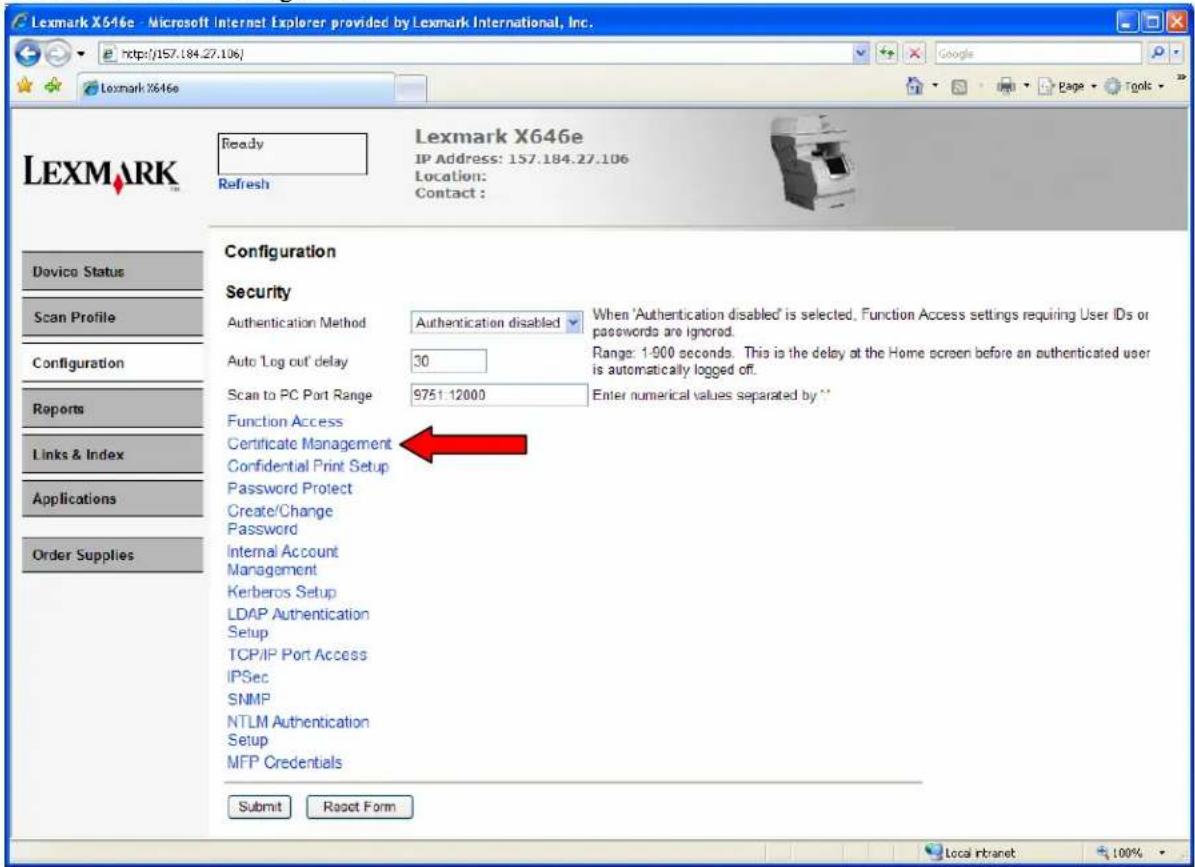
3. Click Install a New Certificate Authority Certificate.

4. Browse to the file containing the certificates and then click Submit.

4 Configuring PKI/AD Authentication
This application is required for the PKI-enabled MFP. This section details the configuration steps.
- Click Configuration and then click Embedded Solutions.

- Select the PKI/AD Authentication solution by clicking its name.

4.1 General Settings
After selecting PKI/AD Authentication from the Embedded Solutions list, click the Configure tab.

The following table lists each setting and the corresponding Pre-Installation Section/Item that contains the value needed for that field.
| Setting Corresponding Pre-Installation Guide Section/Item | |
| User Validation Mode | Section 3.2 |
| DC Validation Mode | Section 3.2.2.1.1 |
| OCSP Responder URL | Section 3.2.2.1.1 Item 1The format should be http://: . Separate multiple URLs with a comma. |
| OCSP Proxy URL | Section 3.2.2.1.1 Item 2The format should be http://: . Only one value is allowed. |
| OCSP Responder Certificate | Section 3.2.2.1.1 Item 4 |
| OCSP Responder Timeout | Section 3.2.2.1.1 Item 3 |
| Use MFP Kerberos Setup | Section 3.2.2 Item 2If “One Kerberos Realm” is selected, uncheck this box; the next three settings should be filled in. Otherwise, check this box and the following three settings are not needed. |
| Kerberos Realm | Section 3.2.2 Item 2 |
| Kerbeos KDC | Section 3.2.2 Item 1If there are multiple KDCs, enter them all here separated by a comma. |
| Kerberos Domain | The default value of “mil,.mil” should be sufficient. If Manual Login is allowed, other values may be neededhere. |
| Disable Reverse DNS Lookups | Section 3.2.2 Item 3 |
| Use KDC for LDAP Server | Section 3.2.2 Item 4 |
| Login Screen Text | Section 3.1.3 Item 1 |
| Login Screen Image | Section 3.1.3 Item 2 |
| Logout Behavior | Section 3.4.2 |
| Allow Copy Without Card | Section 3.1.1 |
| Allow Fax Without Card | Section 3.1.2 |
| Logon Type | Section 3.1.4 |
| Manual Login Default Domain | Section 3.2.2.2 Item 1This domain should be added to the Kerberos Domains listed above. |
| Manual Login Search Attribute | Section 3.2.2.2 Item 2 |
| Manual Login Code Page | Section 3.2.2.2 Item 3 |
| Display MFP Info | Section 3.1.5 |
| Display Printer Status | Section 3.1.6 |
| MFP Default Card Lookup Field | Section 3.2.2.1.2 Item 1 |
| MFP Default Search Attribute | Section 3.2.2.1.2 Item 2 |
| Enable User Authorization | Section 3.3 Item 1 |
| User Authorization Lookup | Section 3.3 Item 2 |
| Device Authorization | Section 3.3 Item 3 |
| Authorization List | Section 3.3 Item 4 |
4.2 Custom LDAP Settings
If you have defined a custom LDAP configuration that differs from the MFP's Default LDAP Configuration, continue with this section; otherwise, it can be skipped. After selecting PKI/AD Authentication from the Embedded Solutions list, click the LDAP Configuration tab.
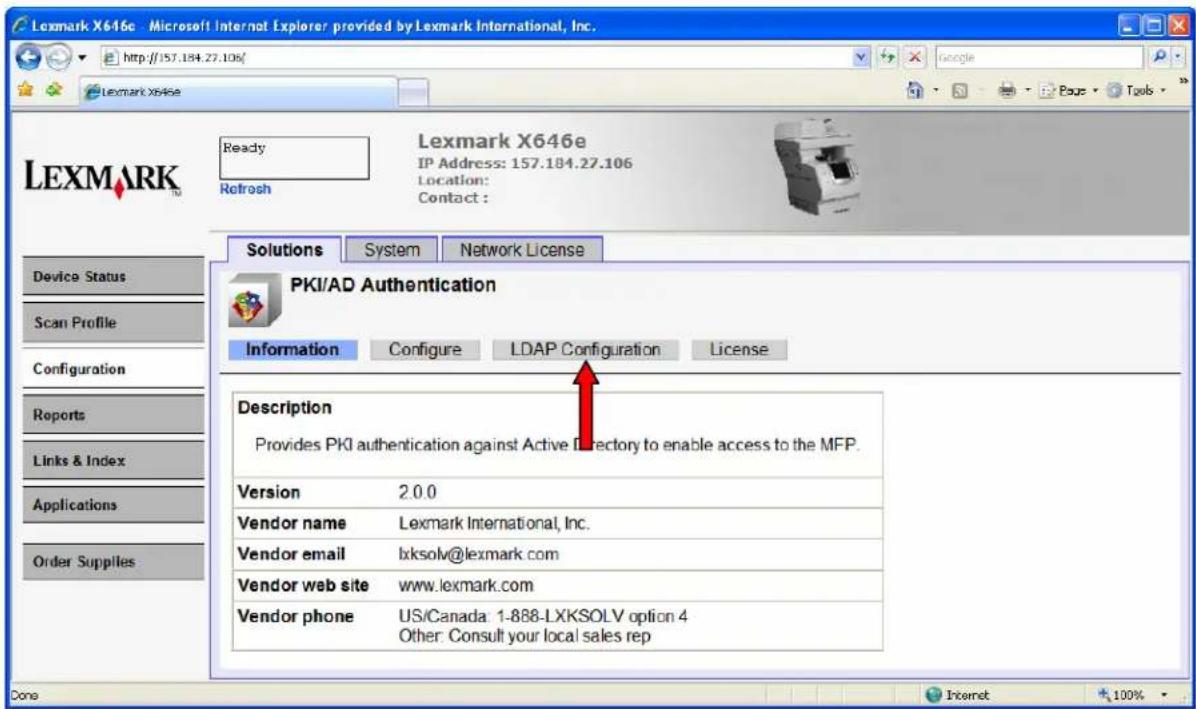
4.2.1 Adding a New Configuration
1. Click New to create a new LDAP Configuration.

2. The LDAP Configuration page is displayed.

Referring to section 7 of the Pre-Installation Guide, use the following table to configure the settings.
| Setting Corresponding Pre-Installation Guide Section/Item | |
| Configuration | Configuration 1 uses Section 8.1; Configuration 2 uses Section 8.2; Configuration 3 uses Section 8.3 |
| Use KDC for LDAP Server | Item 1 |
| Server Address | Item 2 |
| Server Port | Item 3 |
| Use SSL/TLS | Item 4 |
| LDAP Certificate Validation | Item 5 |
| Card Lookup Field | Item 6 |
| Search Attribute | Item 7 |
| Search Base | Item 8 |
| Authentication | Item 9 |
| MFP Distinguished Name | Item 9Only Used if Authentication is set to MFP User ID. |
| MFP Password | Item 9Only Used if Authentication is set to MFP User ID. |
-
Click Apply.
-
Repeat for each custom configuration that needs to be created. A maximum of three configurations can be created; and each must be named a different configuration.
4.2.2 Editing an Existing Configuration
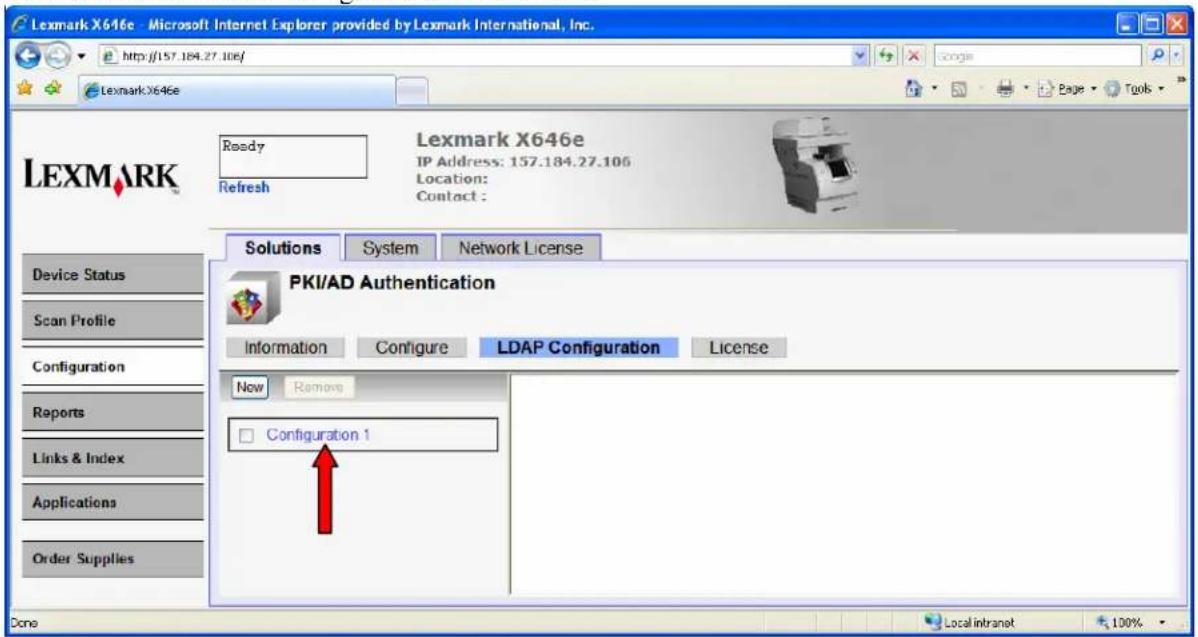
- Click the name of the Configuration to be edited.
-
The LDAP Configuration page for that configuration will be displayed.
-
Make any changes and then click Apply.
4.2.3 Removing an Existing Configuration
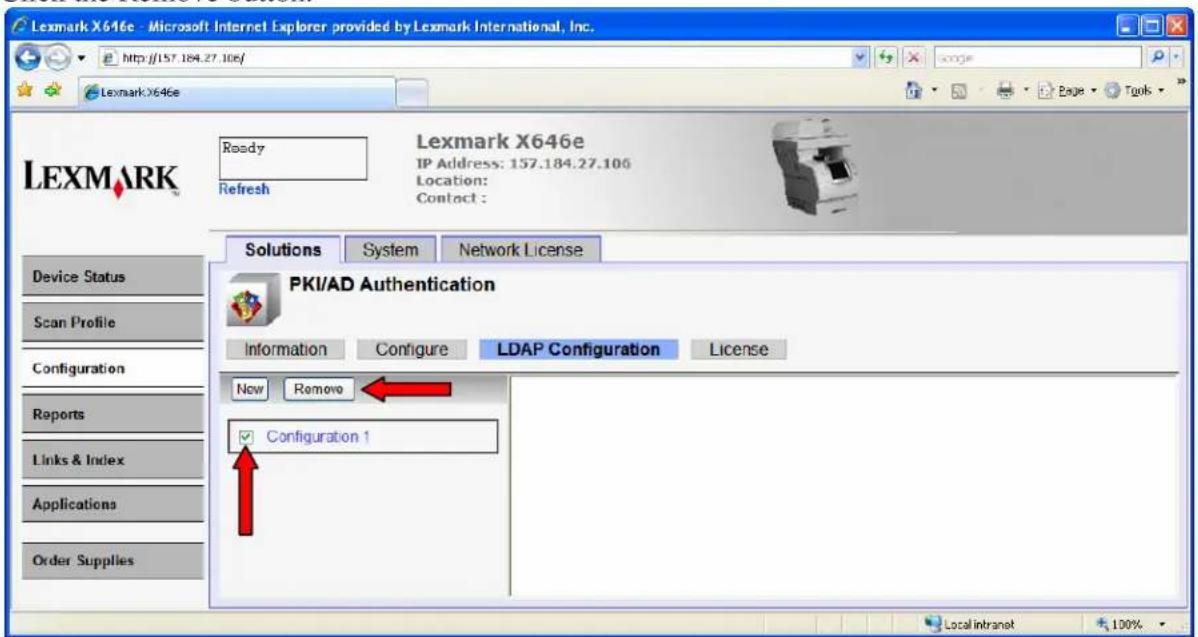
- Check the box next to the configuration to be removed.
- Click the Remove button.
5 Configuring PKI/AD Standard Applications
This application is only used if User Authorization is enabled for Copy, Fax, or FTP. You can skip this section if this application has not been installed.
- Click Configuration and then click Embedded Solutions.

- Select the PKI/AD Standard Apps solution by clicking its name.
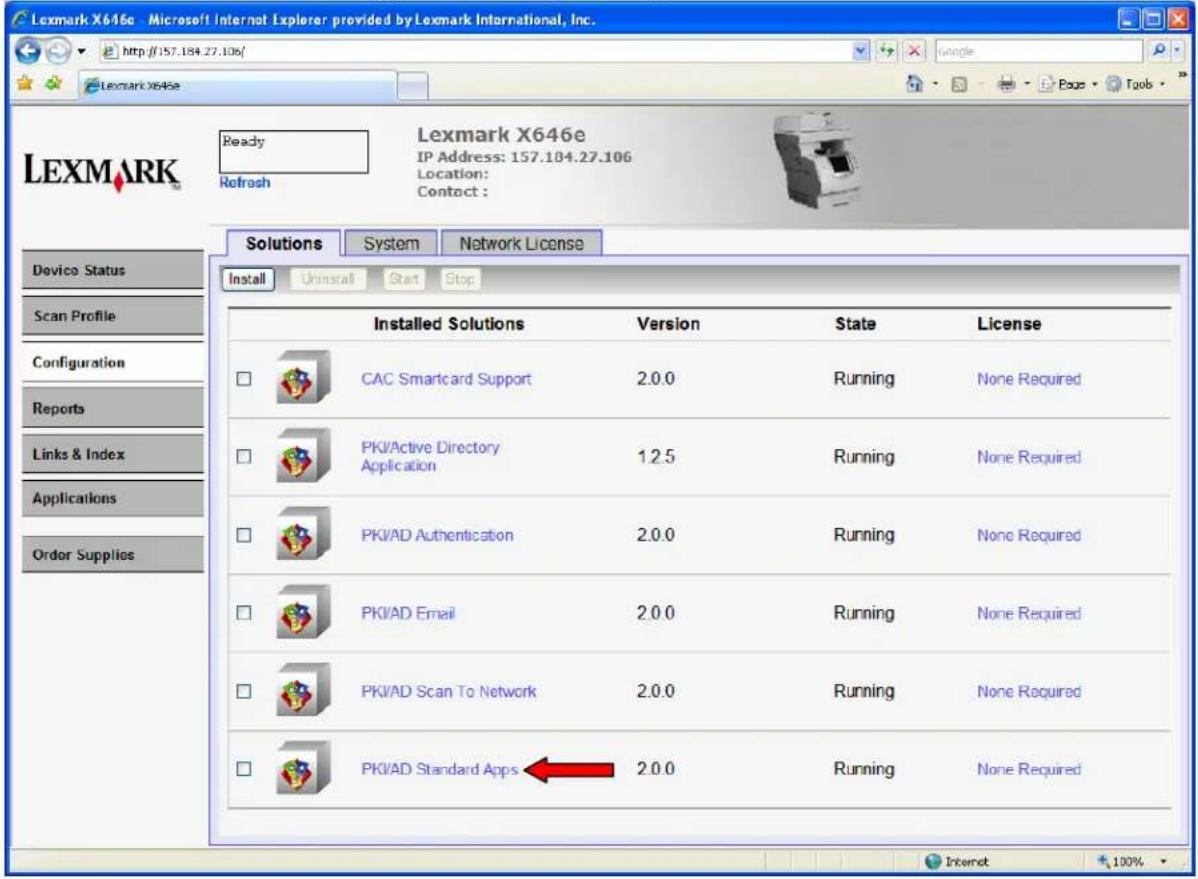
3. Click the Configure Tab.
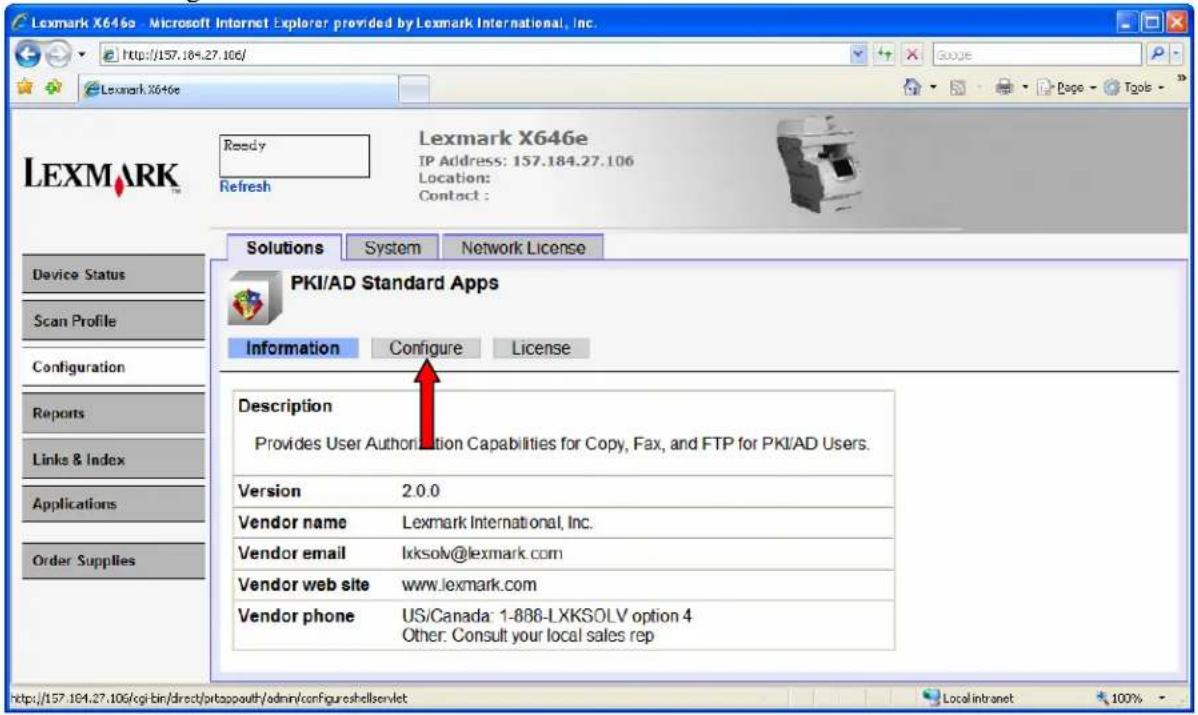
- The following table lists each setting and the corresponding Pre-Installation Section/Item that contains the value needed for that field.
| Setting Corresponding Pre-Installation Guide Section/Item | |
| Copy Authorization | Section 4.1 Item 1 |
| Copy Authorization List | Section 4.1 Item 2 |
| Fax Authorization | Section 4.2 Item 1 |
| Fax Authorization List | Section 4.2 Item 2 |
| FTP Authorization | Section 4.3 Item 1 |
| FTP Authorization List | Section 4.3 Item 2 |
6 Configuring PKI/AD Email
This application is only used if Scan to Email is enabled. You can skip this section if this application has not been installed.
- Click Configuration and then click Embedded Solutions.
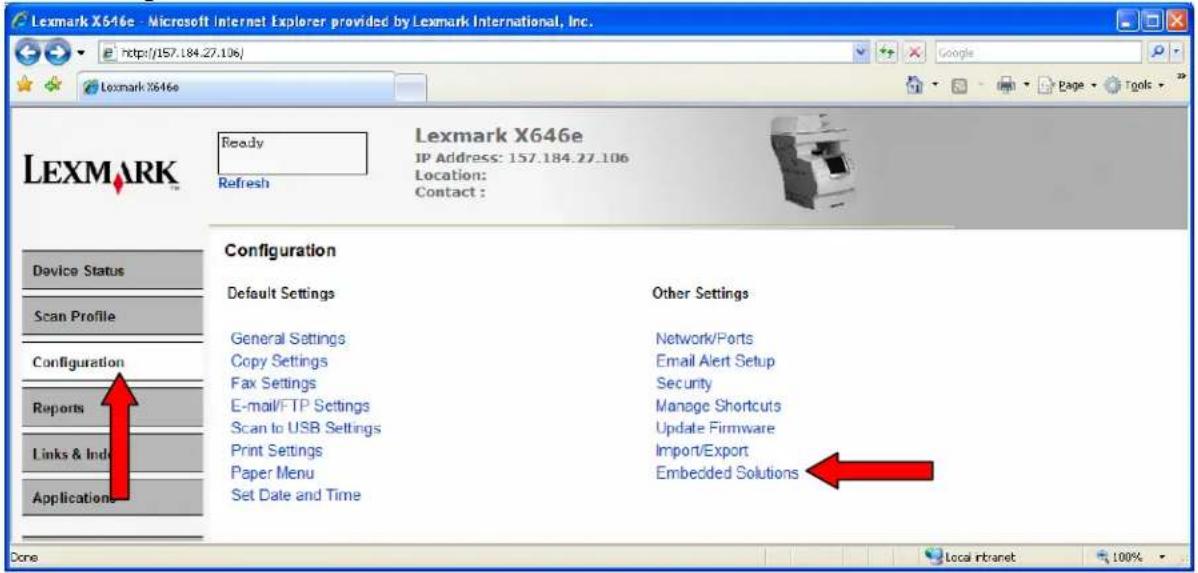
- Select the PKI/AD Email solution by clicking its name.

3. Click the Configure Tab.

- The following table lists each setting and the corresponding Pre-Installation Section/Item that contains the value needed for that field.
| Setting Corresponding Pre-Installation Guide Section/Item | |
| Email Authorization | Section 5.1 Item 1 |
| Email Authorization List | Section 5.1 Item 2 |
| SMTP Server Authentication | Section 5.2 Item 2 |
| Device Userid | Section 5.2 Item 2Only used if Authentication set to Device |
| Device Password | Section 5.2 Item 2Only used if Authentication set to Device |
| User Can Change Subject | Section 5.3 Item 1 |
| User Can Change Message | Section 5.3 Item 2 |
| User Can Change Scan Options | Section 5.3 Item 3 |
| User Can Send Multiple Emails | Section 5.3 Item 4 |
| From Address | Section 5.4 |
| LDAP-From Email Address | If Card Email Address is chosen, this option is not used; otherwise, see Section 5.4.2 Item 2^ |
| To Address | Section 5.5 Item 1 |
| Limit Destinations | Section 5.5 Item 2 |
| Send Email To User | Section 5.5 Item 3 |
| Address Book Lookup | Section 5.5 Item 4 |
| Sign Email | Section 5.6.1 Item 1 |
| Encrypt Email | Section 5.6.2 Item 1 |
| Require Email to be Signed or Encrypted | Section 5.6.3 (after table) |
| Signing Method | Section 5.6.1 Item 2 |
| Signing Algorithm | SHA1 – only algorithm currently supported |
| Non-Repudiation Required for Signing | Section 5.6.1 Item 3 |
| Sign and Encrypt Method | Section 5.6.2 Item 2 |
| Encryption Algorithm | Triple DES – only algorithm currently supported |
| LDAP – Primary Certificate | Section 5.6.2 Item 3 |
| LDAP – Alternate Certificate | Section 5.6.2 Item 3 |
7 Configuring PKI/AD Scan to Network
This application is only used if Scan to Network is enabled. You can skip this section if this application has not been installed.
- Click Configuration and then click Embedded Solutions.
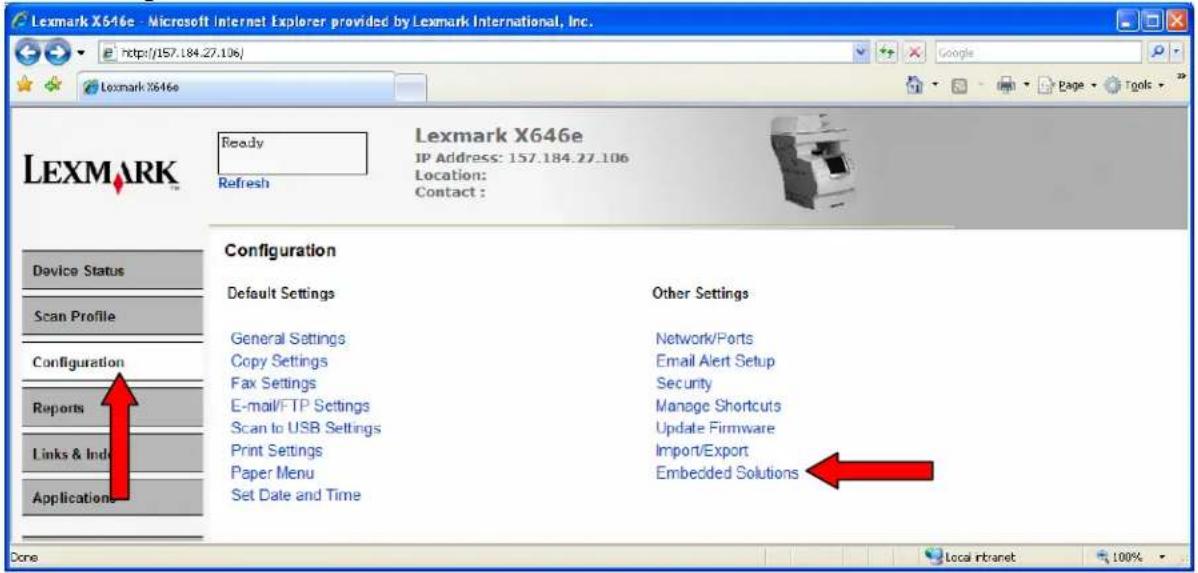
- Select the PKI/AD Scan To Network solution by clicking its name.

7.1 General Settings
After selecting PKI/AD Scan To Network from the Embedded Solutions list, click the Configure tab.

The following table lists each setting and the corresponding Pre-Installation Section/Item that contains the value needed for that field.
| Setting Corresponding Pre-Installation Guide Section/Item | |
| Button Text | Section 6.1 Item 1 |
| Up Icon | To use a different icon, contact Lexmark to get a “blank” button to be used as the base. |
| Down Icon | To use a different icon, contact Lexmark to get a “blank” button to be used as the base. |
| Scan To Network Authorization | Section 6.1 Item 2 |
| Authorization List | Section 6.1 Item 3 |
7.2 Fileshare Settings
After selecting PKI/AD Scan To Network from the Embedded Solutions list, click the File Shares tab to define one or more fileshares that users can access. At least one fileshare must be defined or the user will see an error that this feature has not yet been configured.

7.2.1 Adding a New Fileshare
1. Click New to create a new Fileshare.

2. The Fileshare Configuration page is displayed.

3. Use the following table to configure the settings.
| Setting Corresponding Pre-Installation Guide Section/Item | |
| File Share Authorization | Section 6.2 Item 1 |
| Authorization list | Section 6.2 Item 2 |
| Display Name | Section 6.2 Item 3 |
| UNC Path | Section 6.2 Item 4 |
| Replacement Value | If the UNC Path does not have a “%u”, this setting can be skipped; otherwise, see Section 6.2 Item 5 |
| Replacement Lookup | If the Replacement Value is not LDAP Lookup, this setting can be skipped; otherwise see Section 6.2 Item 5 |
| LDAP – Replacement Attribute | If the Replacement Value is not LDAP Lookup, this setting can be skipped; otherwise see Section 6.2 Item 5 |
| Default Filename | Section 6.2 Item 6 |
| Allow User to Rename File | Section 6.2 Item 7 |
| Append Timestamp to Filename | Section 6.2 Item 8 |
| Remove “$” from Fileshare Name | Section 6.2 Item 9 |
| Create Directory | Section 6.2 Item 10 |
-
Click Apply.
-
Repeat for each fileshare that needs to be created. There is no limit to the number of fileshares that can be created.
7.2.2 Editing an Existing Fileshare
- Click the name of the Fileshare to be edited.

-
The Fileshare Configuration page for that configuration will be displayed.
-
Make any changes and then click Apply.
7.2.3 Removing an Existing Fileshare
- Check the box next to the fileshare to be removed.
- Click the Remove button.

8 Troubleshooting
This section details some of the common issues that occur when setting up the PKI-enabled MFP. Please review these and possible causes/resolutions prior to contacting the Lexmark Solutions HelpDesk.
8.1 Login Issues
| Error Message/Symptom Possible Cause/Resolution | |
| Unsupported USB Device | Cause: A supported SmartCard reader has been installed prior to the PKI firmware and applications being installed.Resolution: Remove the reader and complete section 2 of this guide. The reader cannot be installed until the firmware and applications have been installed.Cause: A non-supported SmartCard reader is attached. Only the OmniKey reader shipped with the MFP is supported.Resolution: Removed the unsupported reader and attach the OmniKey reader. |
| MFP is at the Welcome Screen and not locked out | Cause: The SmartCard Driver or PKI/AD Authenticatin solution is not installed.Resolution: Perform step 1 in section 2.2. Look at the list of installed solutions. If the SmartCard Driver is not installed, complete section 2.2. If the PKI/AD Authentication solution is not installed, complete section 2.3.Cause: The SmartCard Driver solution is not running.Resolution: Perform step 1 in section 2.2. Look at the list of installed solutions. If the SmartCard Driver status is not “Running”, check the box next to that solution and click Start.Cause: The PKI/AD Authentication solution is not running.Resolution: Perform step 1 in section 2.2. Look at the list of installed solutions. If the PKI/AD Authentication solution status is not “Running”, check the box next to that solution and click Start. |
| Login screen does not appear when the card is inserted | Cause: The card is not recognized by the reader.Resolution: Contact Lexmark Solutions HelpDesk for further assistance. |
| KDC and MFP clocks are different | Cause: The date and time on MFP are not within 5 |
| beyond an acceptable range; check the MFP's date and time. | minutes of each other.Resolution: Verify the date and time on the MFP; see section 3.1. Be sure the time zone and daylight savings time settings are correct. |
| Kerberos configuration file has not been uploaded. | Cause: The PKI/AD Authentication solution is configured to use the MFP Kerberos setup but no Kerberos file was uploaded.Resolution: See section 4.1 If the Kerberos settings are provided in the PKI/AD Authentication are provided in the settings, uncheck the “Use MFP Kerberos Setup” checkbox and click apply.Resolution: If a Kerberos file really needs to be used, click “Configuration | Security | Kerberos Setup”. Browse to the Kerberos file and click submit. A reboot will be required. |
| The Domain Controller Issuing Certificate has not been installed. | Cause: No certificate has been installed on the MFP.Resolution: See section 3.6. If you install the wrong certificate, the error message on the device will provide the name of the certificate needed. |
| The Domain Controller Issuing Certificate (“name of certificate”) has not been installed. | Cause: The certificate specified in the error message is needed to validate the domain controller.Resolution: See the PKI Pre-Installation Guide for information on obtaining the certificate. See section 3.6 for information on installing the certificate. |
| The KDC did not respond within the required time. | Cause: The hostname or IP address of the KDC is not correct.Resolution: Verify the hostname or IP address and check against the value in the PKI/AD Authentication solution or Kerberos file.Cause: The KDC is not currently available.Resolution: Multiple KDCs can be specified in the PKI/AD Authentication solution or Kerberos file; this will typically resolve this issue.Cause: Port 88 is blocked by a firewall.Resolution: This is the Kerberos Port and is used by the MFP to communicate with the KDC. The port must be opened between the MFP and KDC in order for authentication to work. |
| User's Realm was not found in the Kerberos Configuration File. | Cause: This error occurs during a manual login and indicates the Windows domain is not specified in the Kerberos Configuration file.Resolution: If using the PKI/AD Authentication solution for the Kerberos settings, add theWindows domain in lower case to the Kerberos Domain setting. For example, if the user's domain is “x.y.z”, set the Kerberos Domain to “mil,.mil.x.y.z”.Resolution:If using a Kerberos Configuration File, add a mapping to the “domain_realm” section, the maps from the lower case windows domain to the uppercase realm – similar to the existing mapping for the mil domain. |
| Realm on the card was not found in the Kerberos Configuration File. | Cause:This error occurs during a card login and indicates the Kerberos Realm referred to does not exist in the Kerberos Configuration File.Resolution:The PKI/AD Authentication solutions' Kerberos settings cannot be used to support multiple Kerberos Realms. Refer to the PKI Pre-Installation Guide for creating a Kerberos Configuration File.Resolution:A Kerberos Configuration File is already being used; the “realms” section of the configuration file needs to be updated to include the missing realm. |
| Client (“name”) unknown. | Cause:The KDC being used to authenticate the user does not know the User Principal Name (12345678@mil) specified in the error message.Resolution:Verify the KDC specified in the Kerberos settings is the correct one to be using. |
| Login hangs for a long time at “Getting User Info...” | Cause:The LDAP lookup is taking a long time to complete.Resolution:See the LDAP Troubleshooting section below. |
| User is almost immediately logged out after logging in. | Cause:The “Auto Log-Out” timeout is set too short.Resolution:See section 3.5 to configure this setting. |
8.2 LDAP Issues
| Error Message/Symptom Possible Cause/Resolution | |
| LDAP lookups (at “Getting User Info” during login or searching the address book) take a long time and then fail | Cause: The user’s credentials are being used to connect to the LDAP server but the hostname for the LDAP server was not used.Resolution: When the user’s credentials are used to connect to the LDAP server, the hostname of the LDAP server must be used instead of the IP address. Check the LDAP configuration.Cause: Port 389 (non-SSL) or Port 636 (SSL) isblocked by a firewall.Resolution: These ports are used by the MFP to communicate with the LDAP Server and must be open in order for LDAP lookups to work.Cause: Reverse DNS lookup are disabled on the network.Resolution: The MFP uses reverse DNS lookups to verify IP addresses. If these lookups are disabled on the network, check the Disable Reverse DNS Lookups option in the PKI/AD Authentication solution settings.Cause: The LDAP search base is too broad in scopeResolution: Narrow the LDAP search base to the lowest possible scope that will include all necessary users. |
| LDAP lookups (searching address book, getting user's email address, getting user's home directory) fail almost immediately | Cause: The user's credentials are being used to connect to the LDAP server but IP address for the LDAP server was used.Resolution: When the user's credentials are used to connect to the LDAP server, the hostname of the LDAP server must be used instead of the IP address.Cause: Port 389 is being used but the LDAP Server requires SSL to be used.Resolution: Change the LDAP Port to 636; check the Use SSL/TLS checkbox; change the LDAP Certificate Verification to “Never”.Cause: The LDAP search base is incorrect.Resolution: Correct the LDAP search base to be the lowest possible scope that will include all necessary users.Cause: The LDAP attribute being searched for is not correct.Resolution: Verify the LDAP attributes for email addresses and/or the user's home directory is correct. |
8.3 Scan To Email Issues
| Error Message/Symptom Possible Cause/Resolution | |
| Email cannot be sent because an error occurred trying to get your email address. | Cause: Using manual login and the From Email Address is configured to come from the card.Resolution: If manual login is allowed, the From Email Address must come from LDAP since a card may not (or can not) be used. Modify the PKI/AD Email settings to get the From Address from LDAP.Cause: The LDAP lookup failed.Resolution: See section 8.2 above. |
| Email cannot be sent because you are not authorized to perform this function. | Cause: User authorization is enabled for email and the user is not in an Active Directory group that is authorized to use this function.Resolution: This is not an error; if this user needs access to email, the authorization list needs to be expanded to include an Active Directory group that includes this user. |
| The email cannot be sent because a valid digital signature could not be found on your card. | Cause: The user is required or chose to digitally sign the email but a certificate valid for signing emails was not found on the card.Resolution: An email can only be signed if a certificate valid for signing is on the card. By default, the non-repudiation option is required for the signing certificate. If your certificates do not have this, this can be disabled in the PKI/AD Email solution settings. |
| The email cannot be sent because it cannot be digitally signed when a manual login is performed. | Cause: Emails can only be digitally signed if the user logs in with a card.Resolution: Set the email signing option in the PKI/AD Email solution settings to Disabled or Prompt User; instruct users that perform a manual login to not choose the signing option. |
| Email cannot be sent. Unable to find valid encryption certificate for “email address”. | Cause: The encryption certificate for the specified email address was not found in the LDAP Directory specified by the Address Book Lookup in the PKI/AD Email solution settings.Resolution: The encryption certificate is required for each recipient of the email. Encrypted emails can only be sent to those recipients that are in the global address book. |
| Unable to send email. | Cause: SMTP Server Authentication is set to Anonymous but the SMTP Server only allows an authenticated user to send email.Resolution: Change the SMTP Server Authentication option in the PKI/AD Email solution settings to User Credentials.Resolution: Add the IP Address of the MFP as an SMTP Relay.Cause: SMTP Server Authentication is set to User Credentials but the SMTP Server was specified used an IP Address.Resolution: In order to use the User Credentials for sending email, the SMTP Server must be specified using the hostname. See section 3.3.Cause: SMTP Server Authentication is set to User Credentials but the SMTP Server reports GSSAPI is not supported.Resolution: Change the SMTP Server Authentication option in the PKI/AD Email solution settings to Anonymous.Cause: Port 25 is blocked so the MFP is unable to connect to the SMTP server.Resolution: Access to port 25 is required in order for the MFP to communicate with the SMTP Server. |
8.4 Scan To Network Issues
| Error Message/Symptom Possible Cause/Resolution | |
| You are not authorized to use this feature. | Cause:User authorization is enabled for Scan To Network and the user is not in an Active Directory group that is authorized to use this function.Resolution:This is not an error; if this user needs access to Scan to Network, the authorization list needs to be expanded to include an Active Directory group that includes this user. |
| This feature is not available because no fileshares have been configured by the system administrator. | Cause:The PKI/AD Scan to Network solution has been installed but no Fileshare destinations have been defined.Resolution:See section 7.2.1 for adding fileshares. |
| This feature is not available because you are not authorized to scan to any of the available file shares. | Cause:All fileshares that have been defined have user authorization enabled and this user is not in Active Directory group that is authorized for any of the defined shares.Resolution:This is not an error; if this user needsaccess to any of the defined fileshares, the authorization list for the fileshare needs to be expanded to include an Active Directory group that includes this user. |
| An LDAP error occurred trying to retrieve the selected file share destination. | Cause: The LDAP lookup failed.Resolution: See section 8.2 above.Cause: The LDAP lookup succeeded but the attribute chosen for the replacement value does not exist or has no value.Resolution: See section 7.2.2 for editing an existing fileshare. |
| No UNC Path has been defined for this destination. | Cause: The UNC Path option for the Fileshare was not defined.Resolution: See section 7.2.2 for editing an existing fileshare. |
| The scanned file size and saved file size do not match. | Cause: After the file is scanned, the number of bytes scanned is compared to size of the file written, and they are not the same.Resolution: This typically means the fileshare is full or the user has reached their disk quota. Check the free space / disk quota on the fileshare. |
| User does not have read access to the file share; unable to verify the file size. | Cause: After the file is scanned, the number of bytes scanned is compared to the size of the file written to insure no error occurred. The user does not have read access to the fileshare so the file size cannot be determined.Resolution: The user needs to be given read access to the fileshare. |
| Invalid filename specified. | Cause: An invalid character was included as part of the filename provided by the user.Resolution: The user cannot include the following characters in the filename: |, <, >, \, /, *, ?, :, :, or ^. |
| An error occurred connecting or writing to the File Share. | Cause: The UNC Path used the IP address of the file server.Resolution: In order to connect to the fileshare using the user's credentials, the hostname of the file server must be used. See section 7.2.2 for editing an existing fileshare.Cause: The hostname of the file server could not be resolved to an IP Address.Resolution: If the hostname was not a fully qualified domain name, then MFP has to use its domain search order to determine the appropriate domain name to append to the hostname. See section 3.2 item 3.Cause: Port 445 is blocked by a firewall.Resolution: The MFP uses port 445 to communicate with the file server and transfer the file. This port must be open in order to use Scan to Network. |
| The network share name does not exist on the specified file server. | Cause: The MFP connected to the file server but the share name does not exist.Resolution: Verify the share name is correct and that the user has read/write access to that share.Cause: The share name is correct but ends in a “”.Resolution: Toggle the Remove “” from fileshare name setting available in the fileshare configuration. See section 7.2.2 for editing an existing fileshare. |
LEXMARK™
Lexmark and Lexmark with diamond design are trademarks of Lexmark International, Inc., registered in the United States and/or other countries.
© 2007 – 2008 Lexmark International, Inc.
740 West New Circle Road
Lexington, KY 40550
- PKI INSTALLATION AND CONFIGURATION GUIDE
- UNITED STATES GOVERNMENT RIGHTS
- LEXMARK SOFTWARE LICENSE AGREEMENT
- OTHER NOTICES
- TABLE OF CONTENTS
- LEXMARK SOFTWARE LICENSE AGREEMENT ...... II
- OTHER NOTICES ....III
- 1 BACKGROUND INFORMATION
- 2 INSTALLING THE FIRMWARE AND APPLICATIONS
- 2.1 FIRMWARE UPDATE
- 2.2 SMARTCARD DRIVER
- 2.3 PKI APPLICATIONS
- 3 CONFIGURING THE BASIC MFP SETTINGS
- 3.1 DATE AND TIME
- THE DATE AND TIME SCREEN IS DISPLAYED
- CLICK SUBMIT
- 3.2 TCP/IP SETTINGS
- 3.3 EMAIL SERVER SETUP
- THE EMAIL SERVER SETUP SCREEN IS DISPLAYED
- 3.4 ADDRESS BOOK SETUP
- THE ADDRESS BOOK SETUP PAGE IS DISPLAYED
- THE FOLLOWING FIELDS NEED TO BE FILLED IN
- CLICK SUBMIT ONCE ALL ANSWERS HAVE BEEN PROVIDED
- 3.5 AUTO-LOGOUT
- SET THE AUTO "LOG OUT" DELAY VALUE
- 3.6 CERTIFICATE MANAGEMENT
- CLICK INSTALL A NEW CERTIFICATE AUTHORITY CERTIFICATE
- BROWSE TO THE FILE CONTAINING THE CERTIFICATES AND THEN CLICK SUBMIT
- 4 CONFIGURING PKI/AD AUTHENTICATION
- 4.1 GENERAL SETTINGS
- 4.2 CUSTOM LDAP SETTINGS
- 4.2.1 ADDING A NEW CONFIGURATION
- CLICK NEW TO CREATE A NEW LDAP CONFIGURATION
- THE LDAP CONFIGURATION PAGE IS DISPLAYED
- 4.2.2 EDITING AN EXISTING CONFIGURATION
- 4.2.3 REMOVING AN EXISTING CONFIGURATION
- 5 CONFIGURING PKI/AD STANDARD APPLICATIONS
- CLICK THE CONFIGURE TAB
- 6 CONFIGURING PKI/AD EMAIL
- 7 CONFIGURING PKI/AD SCAN TO NETWORK
- 7.1 GENERAL SETTINGS
- 7.2 FILESHARE SETTINGS
- 7.2.1 ADDING A NEW FILESHARE
- CLICK NEW TO CREATE A NEW FILESHARE
- THE FILESHARE CONFIGURATION PAGE IS DISPLAYED
- USE THE FOLLOWING TABLE TO CONFIGURE THE SETTINGS
- 7.2.2 EDITING AN EXISTING FILESHARE
- 7.2.3 REMOVING AN EXISTING FILESHARE
- 8 TROUBLESHOOTING
- 8.1 LOGIN ISSUES
- 8.2 LDAP ISSUES
- 8.3 SCAN TO EMAIL ISSUES
- 8.4 SCAN TO NETWORK ISSUES
- LEXMARK™
Brand : LEXMARK
Model : Smart Card Authentication
Category : Multifunction Printer