AFX3 - Uncategorized MARMITEK - Free user manual and instructions
Find the device manual for free AFX3 MARMITEK in PDF.

User questions about AFX3 MARMITEK
0 question about this device. Answer the ones you know or ask your own.
Ask a new question about this device
Download the instructions for your Uncategorized in PDF format for free! Find your manual AFX3 - MARMITEK and take your electronic device back in hand. On this page are published all the documents necessary for the use of your device. AFX3 by MARMITEK.
USER MANUAL AFX3 MARMITEK
natural_image
Pure electrical circuit lines without any symbolsCE
General installation and user manual for X-10™

ATTENTION Read carefully!
Please read these user instructions completely and carefully before using the Marmitek X-10 modules. You must observe the instructions regarding the safety, installation and operation of the modules used in the Marmitek home automation system. These installations and operating instructions are an integral part of this product. They contain important instructions regarding the installation and operation of Marmitek built-in modules (incorporate to be called Marmitek X-10 modules) & components.
Keep these user instructions in a safe place In addition to these general user instructions, one or more supplementary user instructions apply to each specific Marmitek X-10 module. We recommend that you have the Marmitek system installed, connected, assembled and programmed by a trained and certified Marmitek installer.
16
home automation modules & components
Guarantee terms
We guarantee the reliability of the Marmitek X-10 modules & components supplied by us for the duration of two years after installation; this date must be proven in writing, e.g. with an invoice. Marmitek offers a two-year guarantee against material and/or construction defects on all Marmitek X-10 modules supplied. This guarantee covers free repair or replacement (at Marmitek's discretion) of any defects found in the Marmitek X-10 modules, which can be proven to be the result of production errors, faulty construction, materials or defective workmanship on our part.
The guarantee covers:
- The replacement or free repair (at Marmitek's discretion) of faulty Marmitek X-10 modules.
- The guarantee must be registered with the supplier from whom you obtained the product within one year after installation. The supplier must notify Marmitek in writing of the defects found.
- Faulty Mannitek X-10 modules must sit all times be returned (through the supplier from whom the Mannitek X-10 modules were obtained) and they become Mannitek's property.
- Shipment and transport costs incurred in returning the faulty Marmitek X-10 modules will not be reimbursed.
- The guarantee does not cover costs associated with the inspection, removal and return etc. of faulty Marmitek X-10 modules or the reinstallation of repaired or replacement Marmitek X-10 modules.
17

General installation and user manual for X-10 ^TM home automation modules & components
natural_image
Pure electrical circuit lines without any symbolsCE
General installation and user manual for X-10™
Marmitek X-10 does not guarantee, neither does it accept responsibility for, malfunctioning of and/or whatever damage or consequential damage to any products that are directly or indirectly connected to the Marmitek X-10 module. Marmitek accepts no responsibility whatsoever for any additional claims (see also Limitation of liability further in this manual).
There is no entitlement to guarantee for the Mamitek X-10 modules or the entitlement to guarantee will become void in the following cases/situations:
- Damage or defects to the Marmitek X-10 modules arising from faulty installation, connection or damage arising from non-compliance or insufficient compliance with the instructions and stipulations in the manuals provided.
- Incorrect operation or damage arising from negligence or unlawful use of the product (such as application outside the housing sector).
- Incorrect maintenance, handling and application or use of Marmitek X-10 modules and components and when modifications or repairs are carried out on them by third parties without the express permission of Marmitek. Insofar as the principal has installed the Marmitek X-10 modules and components himself, a condition of this guarantee is that the product has been installed correctly.
18
home automation modules & components
■ Connection of the Marmitek X-10 module to the wrong mains voltage.
- Opening of the Marmitek X-10 module's housing (with the exception of types RFIX and IRIX that may be opened for installation purposes).
- Modification or repair of the Marmitek X-10 module or wiring or any attempt to do so.
- The Marmitek X-10 module becomes defective as a result of connecting potential to the potential-free connecting wires of the Marmitek X-10 module.
- Defects resulting from rough handling of the Marmitek X 10 module or
- Defects caused by using the wrong fuses or ongoing fuses.
Limitation of liability
Except in the event of liability arising from the law, Marmitek is not liable for direct damage, material damage or damage to persons, including consequential damage.
Marmitek is not liable for any indirect damage, immaterial damage or consequential damage whatsoever, including but not limited to loss of revenue, damage caused by interruption to production, loss of profits, pure pecuniary damage etc.
19
Area of application for XANURA home automation
Marmitek is a home automation system that has been designed to be used exclusively in the housing sector. The area of application for Marmitek X-10 modules must therefore remain restricted to residential buildings and the housing sector. It is not permitted to use Marmitek X-10 modules in the open air or in humid environments. The system is exclusively intended for use under the following environmental conditions:
X-10 ^TM home automation
Power supply 230 Vdc, 50 Hz
Minimum ambient temperature 0 °C
Maximum ambient temperature 40 °C [°C]
Atmospheric pressure 06 pKa - 106 pKa
Relatives air humidity (non-condensingal 30 to 90%)
[1] Lamontes X-13 nodules are suitable for use in residential environments at ambient temperatures normally not exceeding 35 °C, exclusively reaching 40 °C.
[1-5] The maximum read for dim and switch actuators also depends on the ambient temperature. Please carefully read the instructions for load reduction of dim and switch actuators before using the Marchick X 10 modules. This instruction are enclosed with the dim and switch actuators.
20
Instructions for installation & connection of modules
Before starting the installation
Before installing a module, you must make sure that the module is suitable for the intended application. If in doubt, contact a qualified installer, specialist or the manufacturer for advice.
21
Instructions for installation & connection of modules
General installation and connection instructions

PLEASE NOTE: Disregarding the following instructions can considerably shorten the service life of the Marmitek X-10 modules and will render the guarantee void! It is recommended to use a certified installer.
1 Use of modules to be restricted to the housing sector
2 Always disconnect the power before installing modules
3. Install in function box or distribution box (or box with
comparable propertal, covered with a cover plate or switching device.
4 Make sure the live and neutral connections are correct.
5 One module per junction box/distribution box
6 The temperature of the module in the box used may increase by a max. of 10 °C.
7 Never cover modules with insulation material
B. Pay attention to the proximity of heat sources
9 Prevent potential free connecting wires from coming into contact with live components (insulate live components)
10 Do not use objects or force during installation
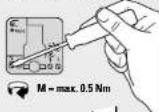
11 Tightening torque for screws - max. 0.5 Km
12 Keep modules accessible for programming and maintenance
- Always switch the power off before installing the module.
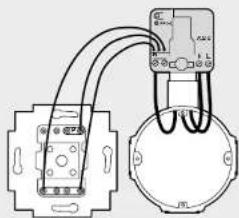
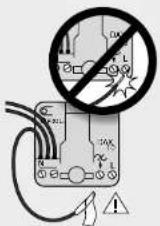
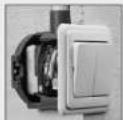
- If the live and neutral wires are connected to the module in reverse, 230V will be released on one of the module's potential free connecting wires! Make sure that the live and neutral wires are connected correctly to ensure your safety and the safety of others, see Figure 1.
Figure 1
- Current: the live wire [2] to the L side of the Memittel X-10 module, and the neutral wire [3] to one of the neutral terminals.
- Current the other series (central) [4] of the Marmick O 10 months to the series of the wall series.
- Current the dimensional output of the Marchok X 13 module (5) in the two centres of the well market
23
Instructions for installation & connection of modules
- Marmitek built in modules must be installed in a junction box or distribution box.
- Other enclosures comparable to junction boxes and distribution boxes are permitted as long as they meet the following criteria:
- In these enclosures, the Mermitek built-in module and other built-in components or equipment should not cause a
temperature increase within the enclosure that exceeds 10 °C
■ Thermal properties at least equal to those of a junction box/distribution box.
■ Flame resistance at least equal to that of a junction box/distribution box.
- Only one Marmitek X-10 module to
be installed per junction
boxdistribution box. Besides one
Martilex X-10 module, no other
heat generating components may
be installed in the same junction
Box. The installation of several Memorial X-12 version in a circle
Marinex X 10 modules in a single
junction box can lead to the Magnetix X10 mputus
Mannaner X-10 modules
Mainfunctioning or becoming prematurely defective.
22
24
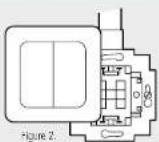
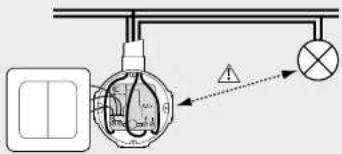
- The junction box or distribution box fitted with a Marmitek X-10 module must be covered with a switching device or cover plate. It must not be used without a cover plate, see Figure 2.
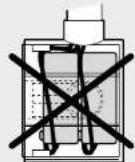
- Never cover Marmitek X-10 modules with insulation material because this can restrict heat dissipation.
- The connecting wires of Marmitek X-10 modules with interface functionality are potential-free. If the connecting wires come into contact with live components, this can lead to irreparable damage to the module. To prevent unconnected wires from coming into contact with live parts, these wires must be insulated with insulating tape or terminals.
Instructions for installation & connection of modules
- The Marmitek X-10 module may not be installed too close to a host source (such as a lamp, built-in spotlight or radiator). The ambient temperature at the module may not be greater than 35°C.
- Never use any instruments or force when installing the Marmitek X-10 modules. The Marmitek X-10 modules contain fragile electronics that can become defective or cause malfunctioning as a result of an excessive mechanical load. We recommend that the Marmitek X-10 modules be installed against the rear wall of the junction box and that the installation wing be placed around the Marmitek X-10 module. If there are junctions in the junction box, you are advised to place them in front of the Marmitek X-10 module.

- When tightening the screws of the Marmitek X-10 modules, the tightening torque may not exceed 0.5 Nm. If the torque is higher, the terminals may break off. If one of the terminals breaks off, the Marmitek X-10 module may no longer be used.
- Marmitek X 10 modules must remain accessible at all times for programming and maintenance or service.
Max. torque for screw terminals


custy standards
When applicable, the Maratek X-10 modules and devices are component with the industry standards written in directive 2C1755pE1 (9a-S), are directive 2C1755pE1 (9a-H) directed
Covariate
Vermink's a trademark of Fortune B.V. All rights reserved. Copyright and all other terms, rights in the context (including but not limited to model numbers, software, audio, video, tex, and photographs) exists with Vermink B.V. Any use of the Content, but without limitation, distribution, reproduction, modification, display or transmission without the prior written consent of Vermink is only published. All copyright and other proprietary notices shall be retained or all reproduced.


2021-2012