
CSB-77CN - Hand blender CUISINART - Free user manual and instructions
Find the device manual for free CSB-77CN CUISINART in PDF.


| Type | Hand Blender |
| Brand | Cuisinart |
| Model | CSB-77CN |
| Power | 400 W |
| Voltage | 220-240 V |
| Frequency | 50/60 Hz |
| Shaft Material | Stainless Steel |
| Speed Settings | Variable with trigger |
| Attachments Included | Blending shaft, whisk, chopper (optional) |
| Cord Length | 1.5 m |
| Weight | 1.2 kg |
| Dimensions (H x W x D) | 38 x 8 x 8 cm |
| Dishwasher Safe Parts | Yes (shaft and attachments) |
| BPA Free | Yes |
| Color | White/Black |
| Safety Feature | Auto shut-off when overheated |
| Warranty | 3 years |
Frequently Asked Questions - CSB-77CN CUISINART
User questions about CSB-77CN CUISINART
0 question about this device. Answer the ones you know or ask your own.
Ask a new question about this device
Download the instructions for your Hand blender in PDF format for free! Find your manual CSB-77CN - CUISINART and take your electronic device back in hand. On this page are published all the documents necessary for the use of your device. CSB-77CN by CUISINART.
USER MANUAL CSB-77CN CUISINART
切碎/切塊機配件
保修
三年有限保修



食譜
Yukon Gold土豆和烤蒜湯
When using an electrical appliance, basic safety precautions should always be followed including the following:
1. READ ALL INSTRUCTIONS.
-
To protect against electrical shock, do not put the motor body, cord or electrical plug of this Smart Stick hand blender in water or other liquid. The detachable blending shaft of this appliance has been designed for immersion into water or other liquids. Never submerge any other portion of this unit. If Smart Stickhand blender falls into liquid, unplug the unit and remove it from the liquid immediately.
-
This unit is not intended for use by people (including children) with reduced physical, sensory or mental capabilities, or by persons who lack experience or knowledge, unless they are supervised or have been given instructions beforehand on the use of the unit by a person responsible for their safety. Children should be supervised to make sure they do not treat the unit like a toy.
-
Unplug from outlet when not in use, before putting on or taking off parts, and before cleaning. To unplug, grasp plug and pull from electrical outlet. Never pull cord.
-
Avoid contacting moving parts.
-
During operation keep hands, hair, clothing, as well as spatulas and other utensils away from attachments and any mixing container, to reduce risk of injury to persons, and/or damage to the appliance. A spatula may be used, but must be used only when the unit is not operating.
-
Do not operate any appliance with a damaged cord or plug, or after the appliance has malfunctioned or has been dropped or damaged in any way or is not operating properly.
-
Remove detachable shaft from the blender before washing the blades or shaft.
-
Blades are SHARP. Handle carefully when removing, inserting or cleaning.
-
When mixing liquids, especially hot liquids, use a tall container or make small quantities at a time to reduce spillage, splattering and possibility of injury from burning.
-
To reduce the risk of injury, never place chopper/grinder attachment cutting blade on base without first putting prep bowl properly in place.
-
Be certain the chopper/grinder attachment cover is securely locked in place before operating appliance. Do not attempt to remove cover until blade has stopped rotating.
-
Check prep bowl for presence of foreign objects before using.
-
The use of attachments or accessories not recommended by Cuisinart® may cause fire, electrical shock, or risk of injury.
-
Do not use outdoors, or use for other than intended use.
-
Do not let any cord hang over the edge of the table or counter. Do not let cord contact hot surfaces, including stovetop.
- Make sure the appliance is off, the motor has stopped completely, and the appliance is unplugged from outlet before putting on or taking off attachments, and before cleaning.
- To reduce the risk of fire or electrical shock, do not operate any heating appliance beneath the mounting unit.
- Maximum rating of 200W is based on the chopper/grinder attachment that draws the greatest power.
SAVE THESE INSTRUCTIONS FOR HOUSEHOLD USE ONLY
TaBle of CoNTeNT
Important Safeguards.... 27
Introduction 29
Unpacking Instructions 29
Features and Benefits 29
Tips and Hints 30
Whisk Tips 32
Diagram 31
Assembly 33
Blending Attachment 33
Chopper/ Grinder Attachment 33
Reversible Blade 34
Whisk Attachment 36
Operation 37
Blending 37
Whisking. 37
Chopping/Grinding.... 37
Cleaning 38
Frequent Uses for Chopper/Grinder 38
Warranty 41
Recipes. 43
INTRODUCTION
This Cuisinart® Smart Stick Hand Blender is designed to handle a variety of basic tasks, like blending, mixing, chopping, grinding, whipping, pureeing – even processing bread crumbs – to give you time for more creative culinary undertakings! The elegant brushed stainless steel body houses a powerful motor, and the handy “stick” design lets you blend in a pot, bowl, or pitcher. Operation is easy and cleanup is quick. What could be better?
UNPACKING INSTRUCTIONS
Place the package containing the Cuisinart® Smart Stick Hand Blender on a sturdy surface. Unpack the Smart Stick Hand Blender from its box by removing the upper protective insert. Gently slide the unit from the box. Remove all support materials from the box (see page 32 for diagram) and replace the upper insert. Save packaging for possible repacking of the unit.
Note: The blending blade is extremely sharp. Use caution when removing and unpacking the storage stand. The blending blade is stored in the storage stand.
Before using the Cuisinart® Smart StickHand Blender for the first time, we recommend that you wipe the unit with a clean, damp cloth to remove any dirt or dust. Dry it thoroughly with a soft absorbent cloth. Handle carefully; wash each individual blade attachment, mixing container and detachable shaft by hand or in the dishwasher. Dry thoroughly before use. Read all instructions completely for detailed operating procedures.
FEATURES AND BENEFITS
-
One Touch On/Off Button: Allows you to activate the hand blender at the touch of a button. Simply press and hold down on the toggle switch to blend or pulse. Once the button is released, blending will stop.
-
Comfort Handle: The handle allows you to control the Smart Stick hand blender with ease.
-
Motor Body Housing
-
Detachable Shaft: By pressing the release button on the back of the unit, the shaft will detach for easy cleaning.
-
Blending Attachment with Stainless Steel Blade and Blade Guard: This attachment easily snaps into the motor body housing. The stainless steel blade is partially covered by a stainless steel housing that keeps splashing to a minimum.
-
Whisk Attachment: Whisk attachment snaps into the motor body housing. This attachment is great for whipping cream, egg whites and other delectable treats.
-
Chopper/Grinder Attachment: Chop, mince and grind with the Cuisinart® Chopper/Grinder attachment. Chopper/Grinder attaches
to the blender motor body in place of the blender shaft or whisk attachment.
- Mixing/Measuring Cup (Not shown on page 32): 2-cup (500 ml) mixing beaker is microwave and dishwasher safe. Use this container to blend drinks, shakes, salad dressings and more. Designed for easy gripping and drip-free pouring.
TIPS AND HINTS
- Liquid should come within an inch (2.5 cm) of where the shaft attaches to the motor housing.
- Some spices may scratch the chopper/grinder attachment.
- When using with a nonstick cooking surface, be careful not to scratch the coating with the Smart Stick hand blender.
- Do not immerse motor body housing, chopper/grinder cover, or whisk gearbox in water or any other liquid.
- Cut most solid foods into 1/2 ” (1.25 cm) cubes for easy blending. Suggestion: use chopper/grinder for chopping and grinding solid foods.
- Pour liquid ingredients into the Mixing/Measuring Cup container first, unless recipe instructs otherwise.
- To avoid splashing, don't turn the Smart Stick hand blender on until the blade is beneath the surface of the mixture and do not pull the Smart Stick hand blender out of the mixture while blender is running.
- Do not let Smart Stick hand blender stand in a hot pot on stove while not in use.
- Do not put fruit pits, bones, or other hard material into the blending mixture, as these are liable to damage the blades.
- Do not fill mixing containers too full. The level of mixture will rise when blending, and can overflow.
- Adding liquids that are warm, not cold, facilitates blending solids with liquids.
- For recipes calling for ice, use crushed ice (not whole cubes) for best results.
- Using a gentle up-and-down motion is the best way to blend and incorporate ingredients uniformly.
- To avoid spatter, turn the Smart Stickhand blender off and let the blade stop completely before lifting the unit out of the mixture you are processing.
- To whip air into a mixture, always hold the blade just under the surface.
- To make a soup creamy in texture, use the Smart Stickhand blender to purée the soup solids to the desired consistency using a gentle up-and-down motion right in the saucepan.
You can quickly change your soup into a thick and creamy blend.
17. If you are making a dip or spread, it is not necessary to process completely into a smooth purée; leave some texture for interest.
18. When making compound butters, remove the butter from the refrigerator and let it come to room temperature before blending the ingredients.
19. The Smart Stick hand blender is perfect for frothing milk for cap-puccino or lattes.
20. Use the Smart Stick hand blender to make smooth gravies and pan sauces.
21. For best results when adding celery to a recipe, use a vegetable peeler to remove tough outer strings from the celery before slicing.
WHISK TIpS
Use the whisk attachment for beating heavy cream or egg whites. It may also be used for whisking eggs for scrambled eggs or fluffy omelets.
BEATING EGG WHITES
When beating egg whites use a very clean metal or glass bowl, never plastic. Plastic can contain hidden oils and fats that can ruin the delicate egg white foam. To help stabilize the egg whites add 1/8 teaspoon (1 ml) of cream of tartar per egg white prior to beating them. (If using a copper bowl omit the cream of tartar). Beat the egg whites until soft peaks form that do not droop over. Beating the egg whites longer causes them to dry out and become even less stable. When adding sugar to beaten egg whites add it slowly when soft peaks just begin to form and then continue beating to form soft peaks that don't droop over.
BEATING HEAvy CREAM
When beating heavy cream, if possible and time allows, use a chilled bowl, and chill the whisk attachment. The best shaped bowl for whipping cream is one that is deep with a rounded bottom. The cream should come out of the refrigerator just before whipping. Hold the Whisk attachment so that it is just skimming the surface, and whip until the cream begins to thicken and develop some body; then immerse the whisk totally into the cream. Whipped cream may be used at either soft or firm peaks depending on preference. It may be flavoured as desired. For best results, whip cream just before using. If it must be whipped ahead, add a whipped cream stabilizer such as Oetker®'s Whip It™.
Oetker® is a registered trademark owned by Dr. August Oetker Nahrungsmittel, KG, LP.
DIAGRAM

ASSEMBLy BLENDING ATTACHMENT
- Align the motor body with the blending attachment and slide the pieces together until you hear and feel the pieces click together. It may be helpful to press the release button when assembling.

CHOppER/GRINDER ATTACHMENT

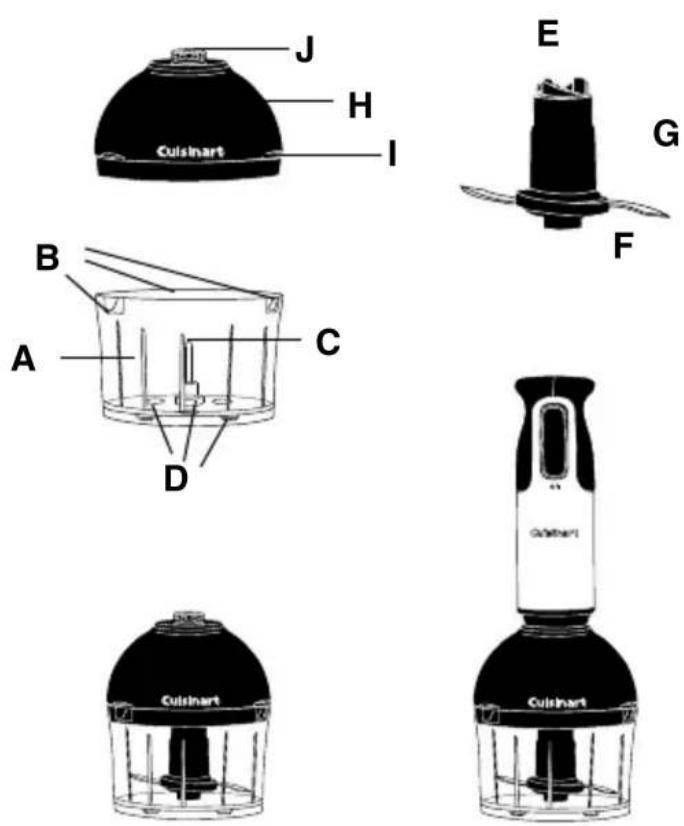
A. Chopper/Grinder Prep Bowl
B. Cover Slots (3) for Attaching Cover
C. Metal Blade
Assembly Shaft
D. Rubber Feet
E. Blade Assembly
F. Blade Ring
G. Plastic Blade Sheath
H. Chopper/Grinder Cover
I. Lift Tabs
J. Chopper/ Grinder Spline
REvERSIBLE BLADE
The Cuisinart® Smart Stick Hand Blender chopper/grinder attachment is equipped with a reversible blade. This blade is sharp on one side and blunt on the other. The blade is attached to a plastic ring which slides over the blade assembly shaft, so it can be easily turned over to select the appropriate blade. A guide for proper blade selection follows in the section, Frequent Uses for Chopper/Grinder (page 39.)
Before you process any food, assemble the parts.
- Place the prep bowl on a flat, dry, stable surface. It should be close to an electrical outlet of the same voltage as stated on the rating plate on the Smart Stick Hand Blender.
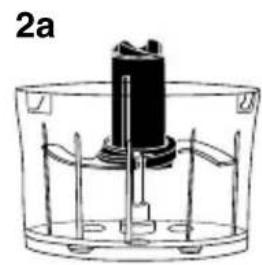
- The metal blade assembly shaft is attached to the bottom of the prep bowl. If not already in place, slide the fully assembled blade assembly over the top of the blade assembly shaft.
a. Putting together the blade assembly:
Connect the blade ring (F) to the plastic blade sheath (G). Line up the blade ring opening with the plastic sheath. Let the blade ring slide to the bottom of the plastic sheath. HOLD THE BLADE RING BY THE CENTRAL HUB HOLDING RIBS (grips)(K) ONLY. DO NOT TOUCH THE RAZOR-SHARP BLADES.

Note these important features of the blade ring. The blade ring can be placed over the plastic blade sheath in two different ways:
If you hold it this way (A), you will see the word “Sharp” on the blade. Assemble the blade this side up to use the sharp edge. (See the section on processing food for information about when to use the sharp edge.)
A. SHARp SIDE

If you hold it this way (B), you will see no writing on the blade.
Assemble the blade this side up to use the blunt edge.
(See the section on processing food, for information about when to use the blunt edge.)

BLUNT SIDE UP
There are notches (C) on opposite sides of the interior of the hub. These fit over ridges on the sides of the plastic blade sheath.

Pick up the blade ring by its hub holding ribs (grips) and line up the notches in the interior of the blade ring hub with the ridges on the sides of the plastic blade sheath. Let the blade ring slide down to the bottom of the plastic blade sheath. The lower blade should almost touch the bottom of the prep bowl.
Lift the prep bowl, holding it firmly from the bottom. Pick up the blade ring by its hub holding ribs (grips) and turn it very slightly clockwise. This locks it in place on the plastic blade sheath and prevents it from sliding up during processing.
-
Connect the Smart StickHand Blender motor body to the top of the chopper/grinder attachment cover. Align the spline in the chopper/grinder cover's drive shaft with the ribbed opening on the underside of the motor body. When aligned properly, slide the two pieces together until you feel and hear a slight click. It may be helpful to press the rubber release button when sliding these pieces together.
-
With the Smart Stick hand blender in place, locate the chopper/grinder cover and place it on top of

the prep bowl.
a. Be sure that the 3 ridges at the top of the blade assembly line up with the 3-arm propeller gear in the underside of the chopper/grinder cover, and that the cover is seated all around the top of the prep bowl.
b. To properly seat the cover, you must line up the three molded pins from the cover with the 3 slots at the top of the prep bowl. Rotate cover counterclockwise to secure it to the prep bowl. Rotate the cover until the pins are in the far left position in the slots.

4a. Inside View of Chopper/Grinder Cover
![graph TD A["Top Step"] --> B["Bottom Step"] B --> C["Downward Arrow"] C --> D["Right Arrow"] style A fill:#f9f,stroke:#333 style B fill:#ccf,stroke:#333](/content/2026/05/1121370/images/b92c07c07b81999d9dd4a95f97266ebdc1c86c32c0e246dce72523aef5fef66b.jpg)
4b.

inside View of Prep Bowl
- Plug the power cord of the Smart StickHand Blender into an electrical outlet.
- Place one hand on the cover of the chopper/grinder attachment, while gripping the Smart Stick Hand Blender motor body handle with the other. Press the ON/OFF button with your fingers to start the motor and run the chopper/grinder. To turn the unit off, remove your fingers from the ON/OFF button.
- WHEN THE BLADE STOPS MOVING, unplug the Smart Stick Hand Blender, remove the motor body from the chopper/grinder cover, and remove the cover from the prep bowl.
WHISK ATTACHMENT
- Align the end of the whisk with the small opening of the whisk gearbox.
- Push end into opening until it locks into position.
- Align the motor body with the assembled whisk attachment and slide the pieces together until you hear and feel the pieces click together. It may be helpful to press the release button when assembling.

OpERATION
BLENDING
Blending & Mixing
The specially designed blade is for mixing and stirring all kinds of foods, including salad dressings, powdered drink products, and sauces.
It is ideal for combining dry ingredients, and can be used to emulsify mayonnaise, too.
This blade mixes and stirs while adding only a minimum of air to your mixture. A gentle up-and-down motion is all you need to make the most flavourful, full-bodied liquid recipes. Be careful never to remove the Cuisinart® Smart Stick Hand Blender from the liquid while in operation.
- Insert the blending attachment into the motor body. (See Assembly for Blending Attachment, page 33.)
- Plug electrical cord into an electrical wall socket.
- Place blending shaft into mixture that will be blended.
- Press and hold the On/Off button. The Smart Stickhand blender will continue to run as long as the switch is pressed in. To turn Smart Stick hand blender OFF, release the On/Off button and the motor will stop.
- Do not hold the button On for longer than 50 seconds at a time.
- Unplug immediately after use.
WHISKING
- Insert the whisk attachment into the motor body. (See Assembly for Whisk Attachment, page 36.)
- Plug electrical cord into an electrical wall socket.
- Place the whisk into mixture that will be blended.
- Press and hold the On/Off button. The Smart Stickhand blender will continue to run as long as the switch is pressed in. To turn Smart Stick hand blenderOFF, release the On/Off button and the motor will stop.
- Do not hold the button On for longer than 20 seconds at a time.
- Unplug immediately after use.
CHOppING AND GRINDING
processing Food
- Place the prep bowl firmly on a flat sturdy surface like a counter-top. Be sure the blade is assembled to use the blade edge that is appropriate for the food to be processed.
- Place food in the prep bowl. Be sure the food is cut in small
pieces, and the bowl is not overloaded.
- Place the chopper/grinder cover on top of the prep bowl. Be sure the cover is properly seated.
- Press the ON/OFF button on the Smart Stick Hand Blender.
- Do not operate the chopper/grinder attachment for longer than 15 seconds at a time.
Note: Due to the powerful motor provided with this unit, Cuisinart® recommends using one hand to support the chopper/grinder during operation.
- When you have finished processing the food, stop the machine by taking your fingers off the ON/OFF button.
- WHEN THE BLADE STOPS MOVING, remove the Smart Stick Hand Blender motor body from the chopper/grinder cover, and remove the cover from the chopper/grinder.
- Unplug the unit.
- Carefully remove the blade assembly, holding it by the gripping ridges on the plastic sheath. NEVER TOUCH THE BLADE ITSELF.
- Remove food with the spatula.
Note: Do not operate the Chopper/Grinder attachment without food contents in the prep bowl.
CLEANING
SMART STICK HAND BLENDER
Always clean the motor body and blending shaft thoroughly after using.
Remove the blending shaft from the motor body. Clean the motor body only with a sponge or damp cloth. Do not use abrasive cleaners which could scratch the surface. To clean the blending shaft, wash by hand in hot water using mild detergent.
Never immerse the motor body in water.
CHOPPER/GRINDER ATTACHMENT
To simplify cleaning, rinse the prep bowl, cover and blade immediately after use, so that food won't dry onto them. Wash blade ring, plastic sheath, and prep bowl in warm soapy water. Rinse and dry.
Wipe the underside of the chopper/grinder cover with a sponge or damp cloth to remove any food. Do not submerge the cover in water or place in the dishwasher. Wash the blade carefully. Avoid leaving it in soapy water where it may disappear from sight.
If you have a dishwasher, you can wash the prep bowl blade assembly on the upper shelf. Insert the Prep Bowl upside down.
Put the blade in the cutlery basket. Unload the dishwasher carefully
to avoid contact with the sharp blade. Wipe the motor body and top of the cover with a damp sponge or cloth. Dry it immediately. Never submerge the motor body or the cover in water or other liquid.
The chopper/grinder attachment is intended for HOUSEHOLD USE ONLY. Any service, other than cleaning and normal user maintenance, should be performed by an authorized Cuisinart® Service Representative.
WHISK ATTACHMENT
To clean your whisk attachment, simply release the attachment from the motor body housing. Once the whisk is removed, detach the metal whisk from the gearbox by pulling pieces apart. To clean the gearbox, simply wipe with a damp cloth. To clean the metal whisk, wash with warm, soapy water or place in the dishwasher. Do not submerge the gearbox in water or any other liquid.
FREQUENT USES FOR CHOPPER GRINDER
| Ingredient Comments | |
| Baby foods (always consult pediatrician or family physician for appropriate food recommendations) | Place small amounts of cooked foods into chopper/grinder bowl. Add small amount of appropriate liquid. Use pulse action to chop, then continuous-hold action to blend. |
| Bread crumbs – fresh or dry (day old) | Pulse to chop, then process until desired consistency is reached. |
| Hard Cheese (Asiago, Locatelli, Parmesan, Romano, etc.) (Not recommended for softer cheeses unless making dip or dressing.) | Cut into 1⁄4 inch (0.6 cm) pieces. Pulse to chop, then process until desired consistency is reached, no more than 1 ounce (30 g) at a time. |
| Chocolate Cut into 1⁄2 inch (1.25 cm) | pieces; may chill in freezer for 3 minutes before chopping. Pulse to chop, then process, no more than 1 ounce (30 g) at a time, until desired texture is reached. |
| Creamy Dressings/Dips Place ing | redients in chopper grinder bowl; do not cover or spill on stem. Use pulse action to chop, then continuous-hold action to blend as needed to desired consistency. |
| Garlic Peel cloves, up to 6 cloves | Pulse to chop. |
| Ginger root (fresh) Peel, cut into 1/2 inch (1.25 cm) pieces. Pulse to chop, 1/2 ounce (15g) at a time. | |
| Herbs, fresh 1/2 cup (125 ml); must be clean and dry. Pulse to chop. | |
| Nuts Shelled, toast first for best | flavour. Pulse to chop, then process up to 1/2 cup (125 ml) at a time, until desired chop is reached from coarse to fine. May be processed to nut butter stage. |
| Onion Peel, cut into 1/2 inch (1.25 cm) pieces. Pulse to chop, up to 1/2 cup (125 ml) at a time, until desired chop is reached. | |
| Vegetables (cooked) Cut into 1/2 inch (1.25 cm) pieces and cook until fork tender. Pulse to chop, up to 1/2 cup (125 ml) at a time. May need to add cooking liquid, stock or milk to process to a vegetable purée. Not recommended for mashed potatoes. | |
| Vegetables (uncooked) Peel as ne | needed, cut into 1/2 inch (1.25 cm) pieces. Peel celery with vegetable peeler to remove tough strings. Chop / process up to 1/2 cup (125 ml) at a time. |
| Meat (Beef, Pork) 8.8 oz or 250 g | cut into 1/2 inch (1.25 cm) pieces. |
WARRANTY
Limited Three-Year Warranty
This Cuisinart® Appliance is guaranteed for consumer use for three year. Please fill in and return the Warranty Registration as instructed or log into www.conair-asia.com to register. This guarantee is no longer valid in case of alteration or repair by any unauthorized persons and only covers defects under normal use from the date of purchase.
If your product does not perform satisfactorily because of defects in materials or manufacture, it will be repaired or replaced under guarantee through the Cuisinart® Service Centre. Cuisinart® reserves the right to amend terms and specifications without prior notice. To obtain service under this warranty, please send in registration within one month of purchase through either one of the following ways.
ON-LINE REGISTRATION
Please log on to www.conair-asia.com.
BY MAIL
Please complete and send the warranty card and the copy of purchase receipt or any other proof of purchase to one of the Cuisinart® Service Centre listed in this Instruction Booklet within one month.
OUT OF GUARANTEE
Call Cuisinart® Service Centre in your region as listed in this Instruction Booklet for details of repair service. Or email to us at email_asia@conair.com with your name, contact telephone number and email address and details of the fault.
Cuisinart® SERVICE CENTRE
Conair International Trading Ltd.
Shenzhen Main Office
Room 202, A Building, Xin Zhu Yuan, Nong Lin Road, Futian District, Shenzhen, China. Tel: (86) 0755-8302 2778 Fax: (86) 0755-8302 2558
Guangzhou Liaison Office
Unit C, 2/F., 255 Dong Feng Road (W) Guangzhou, china Tel: (86) 020-020-8360 4071 Fax: (86) 020-8351 7779
Shanghai Liaison Office
Room 2404, ShenXin Building, No.200 East Ning Hai Road, Shanghai, China. Tel: (86) 021-5150 9048 Fax: (86) 021-5150 9049 Toll Free Customer Service Hotline: 800-830-6364 E-mail: email_asia@conair.com
Website: www.Cuisinart®.com.hk
Manufacturer : Conair Far East Limited Address: 35/F., Standard Chartered Tower, Millennium City, 388 Kwun Tong Road, Kwun Tong, Kowloon, Hong Kong. Tel : (852) 2751 4604
Recipes SMOOTHIES AND DRINKS
Blueberry Banana Antioxidant Smoothie
Makes 2 cups (500 ml)
1 cup (250 ml) frozen blueberries
1 small (4½ ounces [125 g]) banana, sliced
3/4 cup (175 ml) soy milk or fat free milk
14 grams soy protein powder (or soy protein isolate)
1 teaspoon (5 ml) flax seed oil
1-2 teaspoons (5 - 10 ml) honey (optional)
Place blueberries, banana, soy milk, protein powder, flax seed oil and honey, if using, in mixing beaker. Insert the Cuisinart® Smart Stick Hand Blender, making sure the protective guard is submerged. Blend, using a gentle up-and-down motion until ingredients are combined, about 30 seconds.
Nutritional information per cup (250 ml) (made without honey): Calories 159 (17% from fat) • carb. 26g • pro. 9g • fat 3g • sat. fat 0g • chol. 0mg • sod. 12mg • calc. 89mg • fiber 4g
Strawberry Kiwi Smoothie
Makes one 14-ounce (400 ml) smoothie
1 cup (250 ml) frozen strawberries, partly thawed
1 kiwi, peeled, cut into eighths
1/2 cup (125 ml) fat free vanilla yogurt
1/2 cup (125 ml) fat free milk
1 tablespoon (15 ml) honey
Place ingredients in the mixing beaker. Insert the Cuisinart® Smart Stick Hand Blender, making sure the protective guard is submerged. Blend, using a gentle up-and-down motion until ingredients are well combined, about 30 seconds.
Nutritional information per smoothie: Calories 286 (2% from fat) • carb. 63g • pro. 11g • fat 1g • sat. fat 0g • chol. 4mg • sod. 133mg • calc. 371mg • fiber 6g
Frozen Coffee Frappé
Makes one 12-ounce (340 ml) beverage
3/4 cup (175 ml) coffee ice cream or ice milk
1/3 cup (75 ml) strongly brewed coffee (may use espresso), chilled
2 tablespoons (30 ml) fat free milk
Place ingredients in mixing beaker. Insert Cuisinart® Smart Stick Hand Blender, making sure the protective guard is submerged. Blend, using an up-and-down motion until ingredients are well combined, about 20 to 30 seconds.
For a thicker milkshake:
Fill mixing beaker with coffee ice cream up to the 1 1/2 -cup (375 ml) mark. Add 1/2 cup (125 ml) brewed coffee and 2 tablespoons (30 ml) of fat free milk. Blend using the same technique as above.
For a Mudslide variation:
Add 1 tablespoon (15 ml) each of Irish cream liqueur and Kahlúa ® .
Nutritional information per shake: Calories 428 (44% from fat) • carb. 51g • pro. 9g • fat 22g • sat. fat 13g • chol. 90mg • sod. 209mg • calc. 343mg • fiber 0g
Kahlúa ® is a registered trademark owned by the Kahlua Company.
Peach Margarita
Makes 2 cups (500 ml)
1 cup (250 ml) frozen peaches
1 cup (250 ml) citrus juice (orange, lime, lemon in any combination)
1/3 cup (75 ml) good quality tequila
1/2 tablespoon (7 ml) Triple Sec or Grand Marnier
1-2 teaspoons (5 - 10 ml) granulated sugar
Place all ingredients in mixing beaker. Insert the Cuisinart® Smart Stick Hand Blender, making sure the protective guard is submerged. Blend, using an up-and-down motion until ingredients are combined, about 30 seconds.
Nutritional information per serving (one cup): Calories 177 (0% from fat) • carb. 25g • pro. 1g • fat 0g • sat. fat 0mg • chol. 0mg • sod. 2mg • calc. 9mg • fiber 2g
Red Raspberry Lemonade
This tangy, refreshing lemonade makes a perfect punch for any occasion.
Makes 10 cups (2.5 L) lemonade
1 12-ounce (340 g) package frozen raspberries (no sugar added), thawed
1 1/2 cups (375 ml) superfine sugar
1½ cups (375 ml) fresh lemon juice (or lime juice for Red Raspberry Limeade)
7 cups (1.75 L) cold water or sparkling water, seltzer or club soda
Place the raspberries in the mixing beaker. Place the Cuisinart® Smart Stick Hand Blender in the mixing beaker, making certain the protective guard is submerged in the raspberries. Blend, using a gentle up-and-down motion, moving the blender from the bottom to just under the top of the raspberries, until the raspberries are blended and completely puréed. Press raspberry purée through a fine mesh strainer (chinois) using a wooden spoon or spatula. There will be about 1 cup (250 ml) purée.
Place raspberry purée in a large pitcher with the sugar. Insert the Smart Stick hand blender in the mixture, making certain the protective guard is submerged in the mixture. Blend, using a gentle up-and-down motion, until the sugar is completely dissolved, about 1 minute. Add the lemon juice and blend again until completely mixed, about 15 seconds.
To serve, add chilled water to raspberry-lemon mixture. Serve over ice and garnish with a sprig of fresh mint, a thin slice of lemon, and some fresh raspberries.
Nutritional information per serving (one cup [250 ml]): Calories 160 (0% from fat) • carb. 42g • pro. 0g • fat 0g • sat. fat 0g • chol. 0mg • sod. 3mg • calc. 9mg • fiber 2g
Curried Cauliflower Soup
Makes 5 cups (1.25 L)
1 tablespoon (15 ml) olive oil
4 ounces (115 g) leeks, washed and trimmed, dark green parts removed, sliced
1 teaspoon (5 ml) curry powder
1/4 teaspoon (1 ml) turmeric
1/2 teaspoon (2 ml) kosher salt
1 head of cauliflower [about 1 3/4 pounds(795 g)] cut into small florets
3½ ounces (100 g) red potato peeled and cut into 1/2 inch (1.25 cm) cubes
1/2 cup (125 ml) white wine
3½ cups (875 ml) chicken stock or vegetable stock
1 teaspoon (5 ml) lemon or lime juice
Place a 4-quart (4 L) saucepan over medium heat and add olive oil. Add leeks and “sweat” for about 6–8 minutes until very soft. Add curry powder, turmeric, and salt to leek mixture and cook for about 1–2 minutes.
Add cauliflower florets and potato. Stir to coat with spices and cook for another 5 minutes to soften slightly. Add white wine and increase heat to bring to a boil.
Reduce the wine until there is a scant amount left. Add stock just to cover. Bring to a boil and then reduce heat to medium low. Simmer for about 25 minutes or until the vegetables are very soft.
Insert the blender into the saucepan, making sure the protective guard is submerged. Blend, using an up-and-down motion until ingredients are well combined, about 45–50 seconds. Add lemon juice. Taste and adjust seasoning accordingly.
Nutritional information per 1/2 cup (125 ml) serving:
Calories 71 (22% from fat) • carb. 10g • pro. 4g • fat 2g
- sat. fat 0g • chol. 0mg • sod. 350mg • calc. 39mg • fiber 3g
Green Chile Sauce
Makes 2 1/4 cups (550 ml)
1½ pounds (750 g) Anaheim or green New Mexican chiles
1 small onion [approximately 3 1/4 ounce (90 g)], cut into quarters
1 large garlic clove, peeled
1 jalapeño pepper [approximately 1/2 ounce (14 g)], cut in half, seeds and stem removed
1 tablespoon (15 ml) unsalted butter
1 tablespoon (15 ml) flour
1½ cups (375 ml) chicken stock
3/4 teaspoon (4 ml) kosher salt
Preheat oven to 450° F ( 230° C). Place peppers on a baking sheet and roast until very dark and skin is coming away from the pepper, about 30 minutes. Place roasted peppers in a mixing bowl and cover with plastic wrap in order for the skins to loosen about 15 minutes.
Insert the blade assembly in the prep bowl. Place the onion, garlic, and jalapeño in the prep bowl and pulse approximately 8 times to a rough chop.
Peel the cooled peppers, discarding all skin, seeds, and stems. Place in prep bowl and pulse 6 times to chop.
Place a 3½ quart (3.3 L) sauté pan over medium heat and add the butter. Add the onion, garlic and jalapeño mixture and sauté for about 4–5 minutes until soft. Stir in chopped chiles and cook for another minute. Add flour and stir and cook for 2 minutes. Add stock and bring to a boil. Add salt and reduce to a simmer for about 25 minutes. Insert the blender into the saucepan, making sure the protective guard is submerged. Blend, using an up-and-down motion until ingredients are well combined, about 40–60 seconds, until the sauce reaches desired consistency.
Nutritional information per 1/4 cup (50 ml) serving:
Calories 39 (35% from fat) • carb. 5g • pro. 1g • fat 2g
- sat. fat 1g • chol. 3mg • sod. 476mg • calc. 59mg • fiber 1g
Makes about 5 cups (1.25 L)
2 teaspoons (10 ml) extra virgin olive oil
1 onion (5 to 6 ounces [145 - 170 g]), peeled and cut into
1/2-inch (1.25 cm) pieces
1 carrot (2 ounces [60 g]), peeled and cut into
1/2-inch (1.25 cm) pieces
1 rib celery, trimmed and cut into 1/2-inch (1.25 cm) pieces
2 cloves garlic, peeled
1 teaspoon (5 ml) dried basil
1 roasted red bell pepper, cut into 1-inch (2.5 cm) pieces
1/3 cup (75 ml) dry white wine (such as vermouth)
2 tablespoons (30 ml) tomato paste
2 cans (15 ounces [425g]) recipe-ready diced tomatoes with juices
1/2 teaspoon (2 ml) kosher salt
1/4 teaspoon (1 ml) freshly ground black pepper
In a 3-quart (3 L) saucepan, heat the olive oil over medium heat. Add the onion, carrot, celery, garlic, and basil. Cover loosely and cook until the vegetables are softened but not browned, 6 to 8 minutes. Stir in the roasted red pepper, wine, tomato paste, tomatoes, salt and pepper. Bring to a boil, then reduce heat and simmer for 35 to 40 minutes, loosely covered. Uncover and simmer for 15 to 20 minutes longer to thicken. Turn off heat and let stand 5 minutes.
Insert the Cuisinart® Smart Stick Hand Blender into the saucepan, making sure the protective guard is submerged. Blend, using an up-and-down motion until ingredients are well combined, about 30 to 60 seconds, until the sauce reaches desired consistency.
Nutritional analysis per 1/2-cup (125 ml) serving:
Calories 47 (17% from fat) • carb. 8g • pro. 1g • fat 1g • sat. fat 0g
- chol. 0mg • sod. 194mg • calc. 26mg • fiber 2g
Garden Vegetable Tomato Sauce
Makes 4 cups (1 L)
1 tablespoon (15 ml) olive oil
4 ounces (125 g) yellow onion cut into quarters
2 garlic cloves, peeled and crushed
3½ ounces (100 g) red pepper, cut into 1-inch (2.5 cm) pieces
3 ounces (85 g) eggplant, peeled and cut into 1-inch (2.5 cm) pieces
3 ounces (85 g) zucchini, cut into 1-inch (2.5 cm) pieces
3 ounces (85 g) summer squash, cut into 1-inch (2.5 cm) pieces
1 small carrot, peeled and cut into 1/2 inch (1.25 cm) pieces
1/4 cup (50 ml) dry white wine
1 sprig fresh thyme
3/4 teaspoon (4 ml) salt
1 28-ounce (875 g) can diced tomatoes
Insert the blade assembly in the prep bowl. Place the onion in the prep bowl and pulse approximately 8 times to a rough chop.
Heat the olive oil in a 3-quart (3 L) saucepan over medium heat. Add the chopped onion and the crushed garlic cloves to the pan and reduce heat to low. One at a time, place the remaining vegetables in the prep bowl and chop with 8 even pulses and then add to the pan, stirring between each addition. After carrot is added, stir and allow vegetables to cook over low heat for about 15 minutes. Add white wine and reduce wine to 1 tablespoon. Add thyme, salt, and tomatoes. Simmer for 25 minutes longer.
Insert the blender into the saucepan, making sure the protective guard is submerged. Blend, using an up-and-down motion until ingredients are well combined, about 50–60 seconds.
Nutritional information per 1/4 cup (50 ml) serving:
Calories 60 (25% from fat) • carb. 9g • pro. 2g • fat 2g
- sat. fat 0g • chol. 0mg • sod. 351mg • calc. 29mg • fiber 3g
pARSNIp & SWEET pOTATO pURÉE
This creamy side dish goes well with rack of lamb or roast turkey.
Makes 3 cups (750 ml) / 6 half-cup (125 ml) servings
11/2 pounds (750 g) parsnips, peeled and cut into
3/4- to 1-inch (1.9 - 2.5 cm) pieces
1/2 pound (227 g) sweet potato, peeled and cut into
3/4- to 1-inch (1.9 - 2.5 cm) pieces
1 small onion (3 ounces [90 g]), peeled and cut into
3/4- to 1-inch (1.9 - 2.5 cm) pieces
1/2 teaspoon (2 ml) kosher salt
1/2 cup (125 ml) half-and-half or light cream
2 tablespoons (30 ml) unsalted butter, cut into 1/2-inch pieces, room temperature
1/8 teaspoon (0.5 ml) freshly ground white pepper
Place parsnips, sweet potato, and onion pieces in a 3-quart (3 L) nonreactive saucepan and cover with water by 1 inch (2.5 cm). Add 1/4 teaspoon (1 ml) of the salt to the water. Bring to the boil over high heat, then reduce heat to medium-high and simmer until vegetables are tender, about 10 to 15 minutes.
When vegetables are tender, remove from heat. Drain and return to cooking pan. Add half-and-half and butter. Insert the Cuisinart® Smart Stick Hand Blender into the cooked vegetables, making certain the protective guard is submerged in the vegetables. Blend, using a gentle up-and-down motion, moving the Smart Stick hand blender through the pan, until ingredients are well blended, smooth and creamy, about 50 to 60 seconds. Season with the remaining 1/4 teaspoon (1 ml) salt and the white pepper. Serve hot. If not serving immediately, transfer purée to a double boiler and keep warm over simmering water.
Tips:
Change the flavor by adding a few cloves of peeled fresh garlic or slices of fresh peeled ginger to the water when cooking.
Make a heart-healthy version by substituting chicken or vegetable stock for the half-and-half, and extra virgin olive oil for the butter (do not add fresh ginger to this version).
Nutritional information per 1/2-cup (125 ml) serving:
Calories 170 (21% from fat) • carb. 33g • pro. 2g • fat 4g • sat. fat 2g
- chol. 10mg • sod. 81mg • calc. 52mg • fiber 6g
Mushroom Gravy
A flavourful gravy when you have no roast to start with.
Makes about 5 cups (1.25 L)
1/4 cup (50 ml) dried porcini mushrooms
3 tablespoons (45 ml) unsalted butter
1 medium onion, about 4-5 ounces (115 - 145 g), sliced
1 clove garlic, peeled and smashed
8 ounces (227 g) white mushrooms, cleaned and sliced
21/2 tablespoons (37.5 ml) unbleached flour
1/4 cup (50 ml) plus 2 tablespoons (30 ml) sherry
8 ounces (227 g)cremini (baby portobello) mushrooms, cleaned, stems removed, and sliced
4 cups (1 L) chicken or vegetable stock
1/8 teaspoon (0.5 ml) kosher salt
1/8 teaspoon (0.5 ml) dried thyme
Place dried porcini mushrooms in a heatproof bowl. Cover with boiling water and let stand for 30 minutes. After 30 minutes, drain mushrooms, strain (through a sieve lined with a coffee filter) and reserve cooking liquid. Chop the mushrooms and reserve.
Place 2 tablespoons (30 ml) of the butter in a 3-quart (3 L) sauté pan over medium heat. When butter has melted, add onions and garlic. Sauté lightly until onions have softened, about 8 minutes. Add fresh white mushrooms in 2 batches. Stir mushrooms over medium-high heat until lightly browned, about 6 to 7 minutes. Reduce heat to medium-low and stir in 2 tablespoons (30 ml) of the flour. Continuously stir mixture for about a minute. Add 1/4 cup (50 ml) sherry and scrape the bottom of the pan of all that has stuck to it. If needed, add 1/2 cup (125 ml) of the stock to scrape anything that remains. Pour mixture out into a bowl to reserve. Wipe out pan and add the remaining tablespoon of butter.
Sauté the cremini mushrooms until lightly browned. Stir in chopped porcini. Add remaining half tablespoon (7 ml) of flour and stir for about a minute. Stir in 2 tablespoons (30 ml) of sherry, dislodging any flavourful brown bits that remain on bottom of pan. Add one-half cup (125 ml) of the stock if necessary. Add the reserved cooked mushrooms, salt, thyme, 1/2 cup (125 ml) mushroom soaking liquid, and remaining stock to the sauté pan. Bring mixture to a boil and then reduce to a simmer. Simmer for about 20 to 30 minutes.
Insert the Cuisinart® Smart Stick Hand Blender into the mixture making certain the protective guard is submerged. Carefully blend using a circular motion, mov-
ing the blender over the surface of the pan and through the gravy. Serve immediately or store sealed in refrigerator for up to 5 days.
Nutritional information per 1/3-cup (75 ml) serving:
Calories 49 (44% from fat) • carb. 4g • pro. 2g • fat 2g • sat. fat 1g
- chol. 6mg • sod. 147mg • calc. 5mg • fiber 1g
pOpOvERS
Change the flavour by adding grated cheese, spices or herbs.
Makes 6 popovers
3/4 cup (175 ml) all-purpose flour
3/4 cup (175 ml) reduced-fat milk or evaporated fat free milk
2 large eggs
1 tablespoon (15 ml) unsalted butter, melted and cooled
1/2 teaspoon (2 ml) salt
cooking spray or melted unsalted butter
Place the ingredients in mixing beaker. Place the Cuisinart® Smart Stick Hand Blender in the mixing beaker, making certain the protective guard is submerged in the liquid. Blend, using a gentle up-and-down motion, moving the blender from the bottom to just under the top of the batter, until the batter is blended and completely homogenous, smooth and creamy. Cover and let rest for 30 to 40 minutes.
Preheat the oven to 450° F (232C). Spray 6 muffin cups ( 1/2 -cup [125 ml] size) with nonstick cooking spray, or brush with melted unsalted butter.
Divide the batter evenly among the prepared cups. `Bake in the preheated oven (450°F [232°C]) for 20 minutes. Do not peek or disturb, or the popovers might fall. Lower the heat to 375°F (190°C), and bake for 20 minutes longer. Remove from the pans, prick with a fork to allow steam to escape and prevent from becoming soggy. Serve immediately. For drier popovers, return to hot (but turned-off) oven for 10 minutes after pricking.
Nutritional analysis per popover:
124 calories (28% from fat) • carb. 16g • pro. 6g • fat 4g • sat. fat 2g
- chol. 76mg • sod. 114mg • calc. 104mg • fiber 0g
EASy CREAMy GUACAMOLE
Use as a dip, sauce, topping or side dish.
Makes about 1 cup (250 ml)
1 avocado, ripe, peeled, seeded, cut into 3/4-inch (1.9 cm) pieces
2 tablespoons (30 ml) fresh lemon or lime juice
1/2 clove garlic, peeled and smashed
1/2 teaspoon (7 ml) kosher salt or to taste
Place all ingredients in mixing beaker. Insert Cuisinart®Smart Stick Hand Blender, pressing blade into the avocado pieces, and process until mixture begins to soften, about 15 to 20 seconds. Continue processing with a gentle up-
and-down motion until desired texture is reached, about 20 to 30 seconds longer. Transfer to a decorative bowl to serve with tortilla chips. If not serving immediately, cover with a sheet of plastic wrap placed directly on the guacamole to prevent browning, and refrigerate until ready to serve.
Nutritional information per serving (2 tablespoons [30 ml]): Calories 77 (80% from fat) • carb. 3g • pro. 1g • fat 7g • sat. fat 1g • chol. 0mg • sod. 89mg • calc. 5mg • fiber 3g
DRESSINGS
BASIC vINAIGRETTE
Use this basic vinaigrette as a guide and change your vinegar/oil flavours to come up with varying combinations to create exciting salads. You can add other flavours such as crushed or roasted garlic, chopped shallots, fresh or dried herbs, sun-dried tomatoes, honey, lemon juice, or flavoured vinegars.
Makes 1 cup (250 ml)
1/4 cup (50 ml) wine vinegar
1 tablespoon (15 ml) Dijon mustard
3/4 cup (175 ml) salad or olive oil
kosher salt and freshly ground pepper to taste
Place all ingredients in the mixing beaker. Process on low speed until combined, about 10 to 15 seconds. Keep unused portions in an airtight container in the refrigerator up to 2 weeks.
Nutritional analysis per tablespoon (15 ml): Calories 91 (98% from fat) • carb. 0g • pro. 0g • fat 10g • sat. fat 1g • chol. 0mg • sod. 23mg • calc. 0mg • fiber 0g
MAyONNAISE
Make quick mayonnaise in just minutes.
Makes about 11/4 cups (300 ml)
1/4 cup (50 ml) pasteurized liquid egg product (such as EggBeaters®)
1 tablespoon (15 ml) fresh lemon juice
1/2 tablespoon (7 ml) Dijon mustard
1 cup (250 ml) vegetable oil
1/4 teaspoon (1 ml) kosher salt
1/4 teaspoon (1 ml) ground white pepper
Place all ingredients in mixing beaker in order listed. Insert Cuisinart® Smart Stick Hand Blender holding blade against bottom of beaker and process until mixture begins to thicken, about 15 to 20 seconds. Continue processing with a gentle up-an-down motion until thick, about 20 to 30 seconds longer.
MANGO SALSA
Mango Salsa is excellent served over grilled fish such as salmon, tuna, swordfish or scallops, and grilled chicken, duck or pork tenderloin. It can also be served like traditional tomato salsa with tortilla chips.
Makes 1 cup(250ml)
1/4 red bell pepper (about 1 ounce[30g]), cut in 1/2-inch(2.5cm) pieces (1/4 cup)
1 small clove garlic, peeled
1/2 jalapeño pepper, stemmed and seeded, cut in 1/2-inch (2.5cm) pieces
1/2 small red onion (about 1 1/2 ounces [45g]), peeled, cut in 1/2-inch pieces
1 mango (12-14 ounces [375-440g]), peeled and pitted, cut in 1/2-inch(2.5cm) pieces
11/2 tablespoons fresh cilantro leaves
2 teaspoons fresh lime juice
11/2 teaspoons rice vinegar (may use raspberry or white balsamic vinegar)
1/2 teaspoon honey
Insert the blade assembly in the prep bowl. Place the red bell pepper pieces in the prep bowl and use the pulse to coarsely chop, 6–8 pulses.
Transfer to a 1-quart bowl and reserve. Add the garlic, jalapeño pepper and onion to the prep bowl, pulse 5 to 10 times to chop. Remove and add to chopped red pepper. Add mango and cilantro to prep bowl and pulse until mango reaches desired chopped consistency, about 10 to 20 pulses.
Transfer to the bowl with the chopped red pepper and reserve. Stir in the lime juice, vinegar, and honey. Cover and let sit for 30 minutes to allow the flavors to blend. If not using immediately, cover and refrigerate.
Mango Salsa is best when served the day it is prepared, but may be prepared up to one day ahead. Remove from the refrigerator 30 minutes before serving for best flavor.
Nutritional information per 1/4 cup serving:
Calories 45 (3% from fat) • carb. 12g • pro. 1g • fat 0g
- sat. fat 0g • chol. 0mg • sod. 28mg • calc. 11mg • fiber 1g
pEACHES & CREAM
Serve this simple dessert well chilled in stemmed goblets for an elegant presentation.
Makes 8 servings
2 tablespoons unsalted butter
4 tablespoons sugar, divided
1 pound(450g) fresh peaches, peeled, pitted and sliced
1 strip lemon zest 2 x 1/2 inch(1.25cm)
8 ounces(250g) mascarpone
1 tablespoon vanilla extract
In a Cuisinart® 2-quart saucier, melt butter and 2 tablespoons of the sugar over medium-low heat, stirring until golden and caramel in color, about 5 to 8 minutes. Add peaches and zest, cover loosely and cook over low heat until peaches are tender, about 15 minutes. Remove and discard zest strip. Insert Cuisinart® Smart Stick Hand Blender making certain protective guard is submerged and process, using a gentle up-anddown motion, moving the blender through the pan until smooth, about 1 minute. Transfer to a bowl, let cool, then cover and chill. Place the mascarpone, remaining sugar and vanilla in a medium bowl.
Insert Smart Stick hand blender making sure the protective guard is submerged and process, about 20 seconds. Scrape bowl and process about 1 minute longer. Chill until ready to use.
Spoon peach mixture and whipped mascarpone mixture into goblets in alternate layers. Keep chilled until ready to serve. May be garnished with fresh raspberries, toasted sliced almonds or a mint leaf.
Nutritional analysis per serving:
Calories 204 (70% from fat) carb. 13g • pro. 2g • fat 16g • sat. fat 9g
- chol. 43mg • sod. 15mg • calc. 44mg • fiber 1g
Chocolate Pistachio Macaroons
Makes about 30 cookies
3/4 cup (175 ml) granulated sugar
1/2 cup (125 ml) shelled pistachios, unsalted
1/4 cup (50 ml) Dutch processed cocoa
4 large egg whites
1 cup (250 ml) mini chocolate morsels
Preheat oven to 325°F (160°C). Line two 15 x 11½-inch (38 x 30 cm) baking sheets with parchment paper.
Insert the blade assembly in the prep bowl. Place 1/4 cup (50 ml) of the sugar and the pistachios in the prep bowl and process for 30–40 seconds until finely ground. Add cocoa and pulse 6 times to incorporate.
Place egg whites in a glass or stainless mixing bowl. Insert the blender fitted with the whisk attachment and beat whites. After 1½ minutes add the remaining ½ cup (125 ml) of sugar. Whites should reach firm peaks after 3 minutes.
Fold the pistachio and cocoa mixture into the egg whites in three increments with a rubber spatula. Gently fold in the chocolate morsels, taking care not to deflate.
Drop the batter in spoonfuls [2 tablespoons (30 ml)] onto the prepared baking sheets. Bake in preheated 325° F ( 160° C) oven for 35–40 minutes, until the cookies lift easily from the baking sheet and cookie bottoms are smooth.
Transfer the parchment with the cookies from the hot pan to a cool surface. Peel off the paper and store in airtight container once cooled.
Nutritional information per macaroon:
Calories 76 (38% from fat) • carb. 11g • pro. 1g • fat 3g
- sat. fat 1g • chol. 0mg • sod. 11mg • calc. 4mg • fiber 2g
Roasted Pepper Tapenade
Makes 1 cup (250 ml)
1 small garlic clove, peeled
1 12-ounce (375 g) jar of roasted peppers, drained, cut into 1-inch (2.5 cm) pieces
1/2 sun-dried tomato (oil packed)
2 tablespoons (30 ml) green pimento-stuffed olives, drained
1/2 teaspoon (2 ml) fresh thyme
1/2 teaspoon (2 ml) extra virgin olive oil pinch salt pinch pepper
Insert the blade assembly in the prep bowl. Place garlic in the prep bowl and process for 10–15 seconds; scrape bowl.
Add remaining ingredients to prep bowl pulse evenly 10–15 times to reach desired consistency. Season to taste. Serve with crackers or crostini.
Nutritional information per 1/4 cup (50 ml) serving:
Calories 50 (42% from fat) • carb. 5g • pro. 1g • fat 2g
- sat. fat 0g • chol. 0mg • sod. 481mg • calc. 16mg • fiber 1g
White Bean Spread
Makes 1¼ cups (300 ml)
1 small garlic clove, peeled
6 fresh sage leaves
1/2 ounce (14 g) tomato
1 can [19 ounces (540 g)] of cannellini beans (or other white beans), rinsed and drained
2 teaspoons (10 ml) extra virgin olive oil
1/2 teaspoon (2 ml) kosher salt fresh ground pepper to taste
Insert the blade assembly in the prep bowl. Place garlic in the prep bowl and process for 30 seconds. Add sage and pulse 4 times. Add tomato and pulse 4 times. Add remaining ingredients to prep bowl pulse evenly 6–10 times to reach desired consistency. Season to taste. Serve with crackers or as a topping for bruschetta. For a smoother spread, add 2–4 tablespoons (30-60 ml) water and process until smooth and creamy.
Nutritional information per 1/4 cup (50 ml) serving:
Calories 120 (15% from fat) • carb. 20g• pro. 6g • fat 2g
- sat. fat 0g • chol. 0mg • sod. 239mg • calc. 67mg • fiber 4g
NoTeS:
NoTeS:
NoTeS:
产品保修卡
尊敬的客户,
Thank you for your purchase of CUISINART products. This warranty card is an important proof for warranty service. Please complete it earnestly. Thanks!
We warranty that under normal use, if the quality or parts of your CUISINART product should prove to be defective within 3 years from your purchase date, our CUISINART Consumer Service Center will repair or replace it at our option, without charge to you. To obtain warranty service, please complete and send the warranty card and purchase proof copies to any of our CUISINART Consumer Service Center listed in the Instruction Book WITHIN ONE MONTH.
Please fill in the following information:
Name: Mr./Miss/Ms.____ Zip Code: ____
Address :
Tel: Email:
Product Name: ____
Model NO.:
Store of Purchase:
Purchase Date: ____
Warranty Terms:
- Your CUISINART product has been manufactured to the strictest specifications and has been designed for use with authorized CUISINART accessories and replacement parts. This warranty expressly excludes any defects or damages caused by accessories, replacement parts or repair service other than those which have been authorized by CUISINART.
- This warranty does not cover any damage caused by accident, misuse, shipment or other than ordinary household use.
• This warranty excludes all incidental and consequential damages. - In addition to return of warranty card, the consumer has to maintain the original proof of purchase in order to obtain the warranty benefits. In the event that you do not have proof of purchase date, the purchase date for purposes of this warranty will be the date of manufacture.
Cuisinart®
S A V O R T H E


The image contains only a stylistic horizontal line, which must be ignored according to the rules. According to Rule 2, such lines must be ignored and not represented by underscores or any other character in the OCR output.
Therefore, the corrected OCR text is:
[Empty String]
Cuisinart® offers an extensive assortment of top quality products to make life in the kitchen easier than ever. Try some of our other countertop appliances and cookware, and Savor the Good Life.
Cuisinart®
□□□□□□□□□□□□
www.cuisinart.com.hk
- 切碎/切塊機配件
- 保修
- 三年有限保修
- 食譜
- YUKON GOLD土豆和烤蒜湯
- READ ALL INSTRUCTIONS
- SAVE THESE INSTRUCTIONS FOR HOUSEHOLD USE ONLY
- TABLE OF CONTENT
- INTRODUCTION
- UNPACKING INSTRUCTIONS
- FEATURES AND BENEFITS
- TIPS AND HINTS
- WHISK TIPS
- BEATING EGG WHITES
- BEATING HEAVY CREAM
- ASSEMBLY BLENDING ATTACHMENT
- CHOPPER/GRINDER ATTACHMENT
- REVERSIBLE BLADE
- WHISK ATTACHMENT
- OPERATION
- BLENDING
- BLENDING & MIXING
- WHISKING
- CHOPPING AND GRINDING
- PROCESSING FOOD
- NOTE: DUE TO THE POWERFUL MOTOR PROVIDED WITH THIS UNIT, CUISINART® RECOMMENDS USING ONE HAND TO SUPPORT THE CHOPPER/GRINDER DURING OPERATION
- NOTE: DO NOT OPERATE THE CHOPPER/GRINDER ATTACHMENT WITHOUT FOOD CONTENTS IN THE PREP BOWL
- CLEANING
- SMART STICK HAND BLENDER
- FREQUENT USES FOR CHOPPER GRINDER
- WARRANTY
- LIMITED THREE-YEAR WARRANTY
- ON-LINE REGISTRATION
- BY MAIL
- OUT OF GUARANTEE
- CUISINART® SERVICE CENTRE
- SHENZHEN MAIN OFFICE
- GUANGZHOU LIAISON OFFICE
- SHANGHAI LIAISON OFFICE
- WEBSITE: WWW.CUISINART®.COM.HK
- RECIPES SMOOTHIES AND DRINKS
- BLUEBERRY BANANA ANTIOXIDANT SMOOTHIE
- STRAWBERRY KIWI SMOOTHIE
- FROZEN COFFEE FRAPPÉ
- FOR A THICKER MILKSHAKE
- FOR A MUDSLIDE VARIATION
- PEACH MARGARITA
- RED RASPBERRY LEMONADE
- CURRIED CAULIFLOWER SOUP
- GREEN CHILE SAUCE
- GARDEN VEGETABLE TOMATO SAUCE
- 3/4 TEASPOON (4 ML) SALT
- 1 28-OUNCE (875 G) CAN DICED TOMATOES
- PARSNIP & SWEET POTATO PURÉE
- MUSHROOM GRAVY
- POPOVERS
- EASY CREAMY GUACAMOLE
- DRESSINGS
- BASIC VINAIGRETTE
- MAYONNAISE
- MANGO SALSA
- PEACHES & CREAM
- CHOCOLATE PISTACHIO MACAROONS
- ROASTED PEPPER TAPENADE
- MAKES 1 CUP (250 ML)
- WHITE BEAN SPREAD
- NOTES
- 产品保修卡
- PLEASE FILL IN THE FOLLOWING INFORMATION
- WARRANTY TERMS
- CUISINART®
Brand : CUISINART
Model : CSB-77CN
Category : Hand blender