
Explore 7 E7TB1-50CW - Blender ELECTROLUX - Free user manual and instructions
Find the device manual for free Explore 7 E7TB1-50CW ELECTROLUX in PDF.


| Product Type | Blender |
| Brand | Electrolux |
| Model | Explore 7 E7TB1-50CW |
| Colour | White |
| Rated Voltage | 220-240 V |
| Rated Frequency | 50-60 Hz |
| Power Consumption | 1000 W |
| Jar Capacity | 1.5 L |
| Jar Material | Glass |
| Number of Speed Settings | 5 |
| Pulse Function | Yes |
| Ice Crush Function | Yes |
| Stainless Steel Blades | Yes |
| Dishwasher Safe Parts | Jar, lid, blade assembly |
| Non-Slip Feet | Yes |
| Cord Length | 1.2 m |
| Weight | 3.5 kg |
| Product Dimensions (W x D x H) | 20 x 18 x 40 cm |
| Safety Lock | Yes |
| Overload Protection | Yes |
| Spare Parts Available | Jar, blade assembly, lid |
| Repairability Index | 8/10 |
Frequently Asked Questions - Explore 7 E7TB1-50CW ELECTROLUX
User questions about Explore 7 E7TB1-50CW ELECTROLUX
0 question about this device. Answer the ones you know or ask your own.
Ask a new question about this device
Download the instructions for your Blender in PDF format for free! Find your manual Explore 7 E7TB1-50CW - ELECTROLUX and take your electronic device back in hand. On this page are published all the documents necessary for the use of your device. Explore 7 E7TB1-50CW by ELECTROLUX.
USER MANUAL Explore 7 E7TB1-50CW ELECTROLUX
natural_image
White bowl filled with blueberries (no text or symbols visible)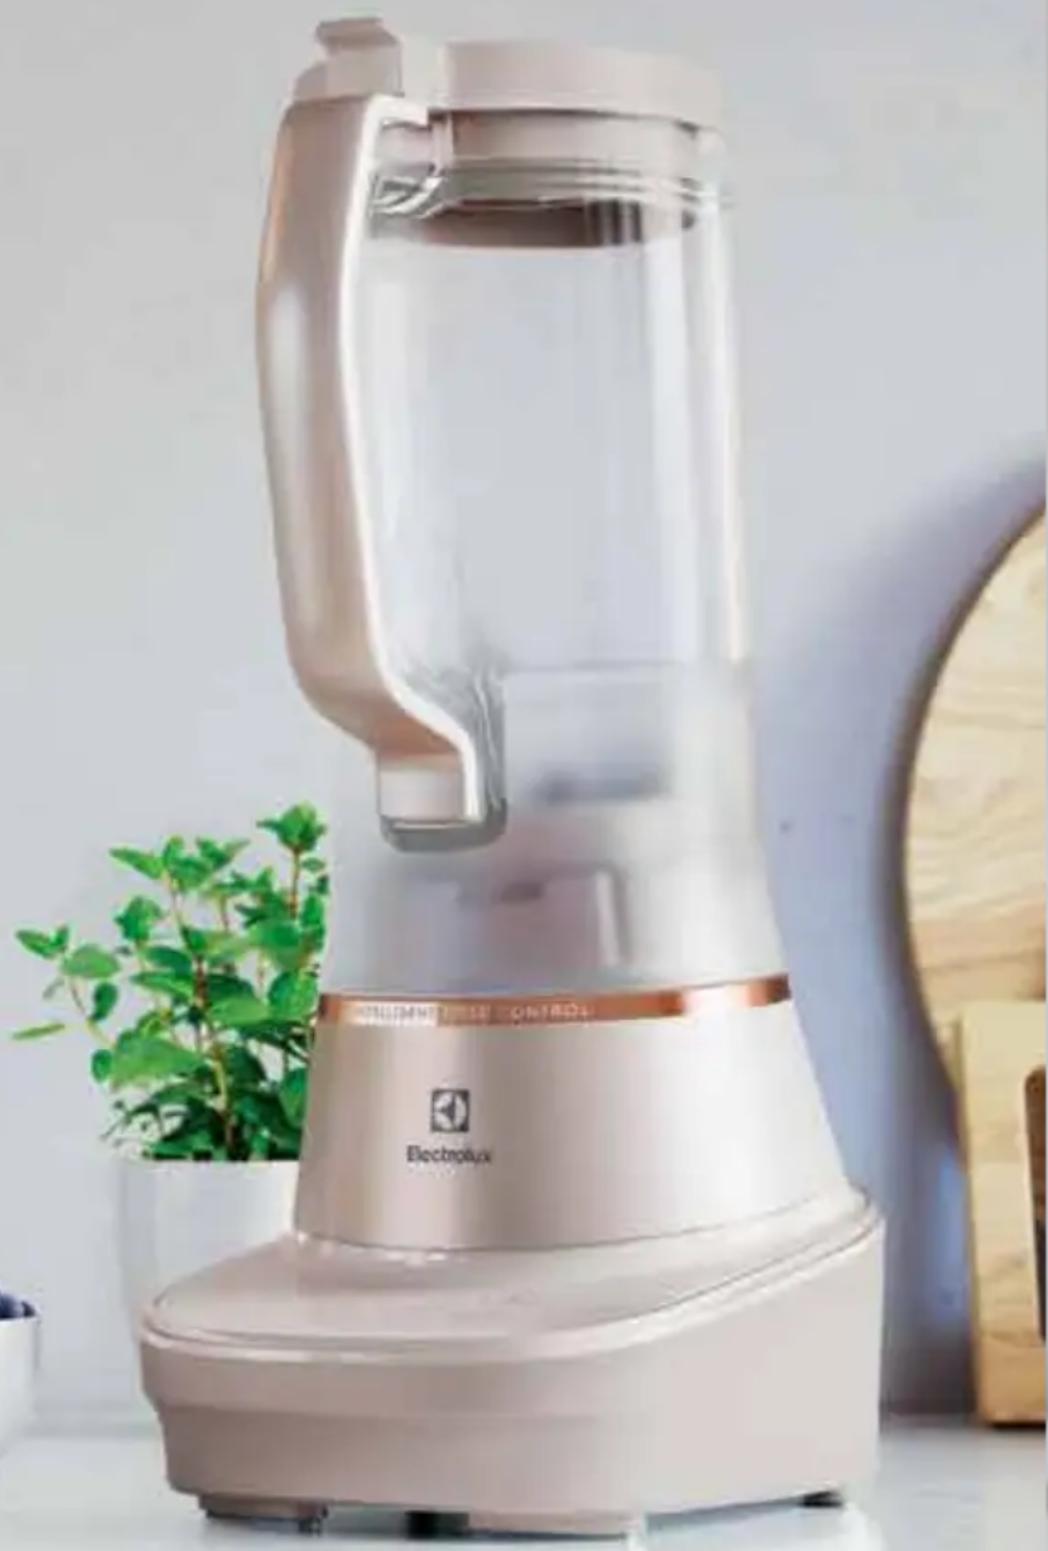
natural_image
Exterior view of a modern kitchen blender with a transparent handle and control panel, placed beside a potted plant (no signage)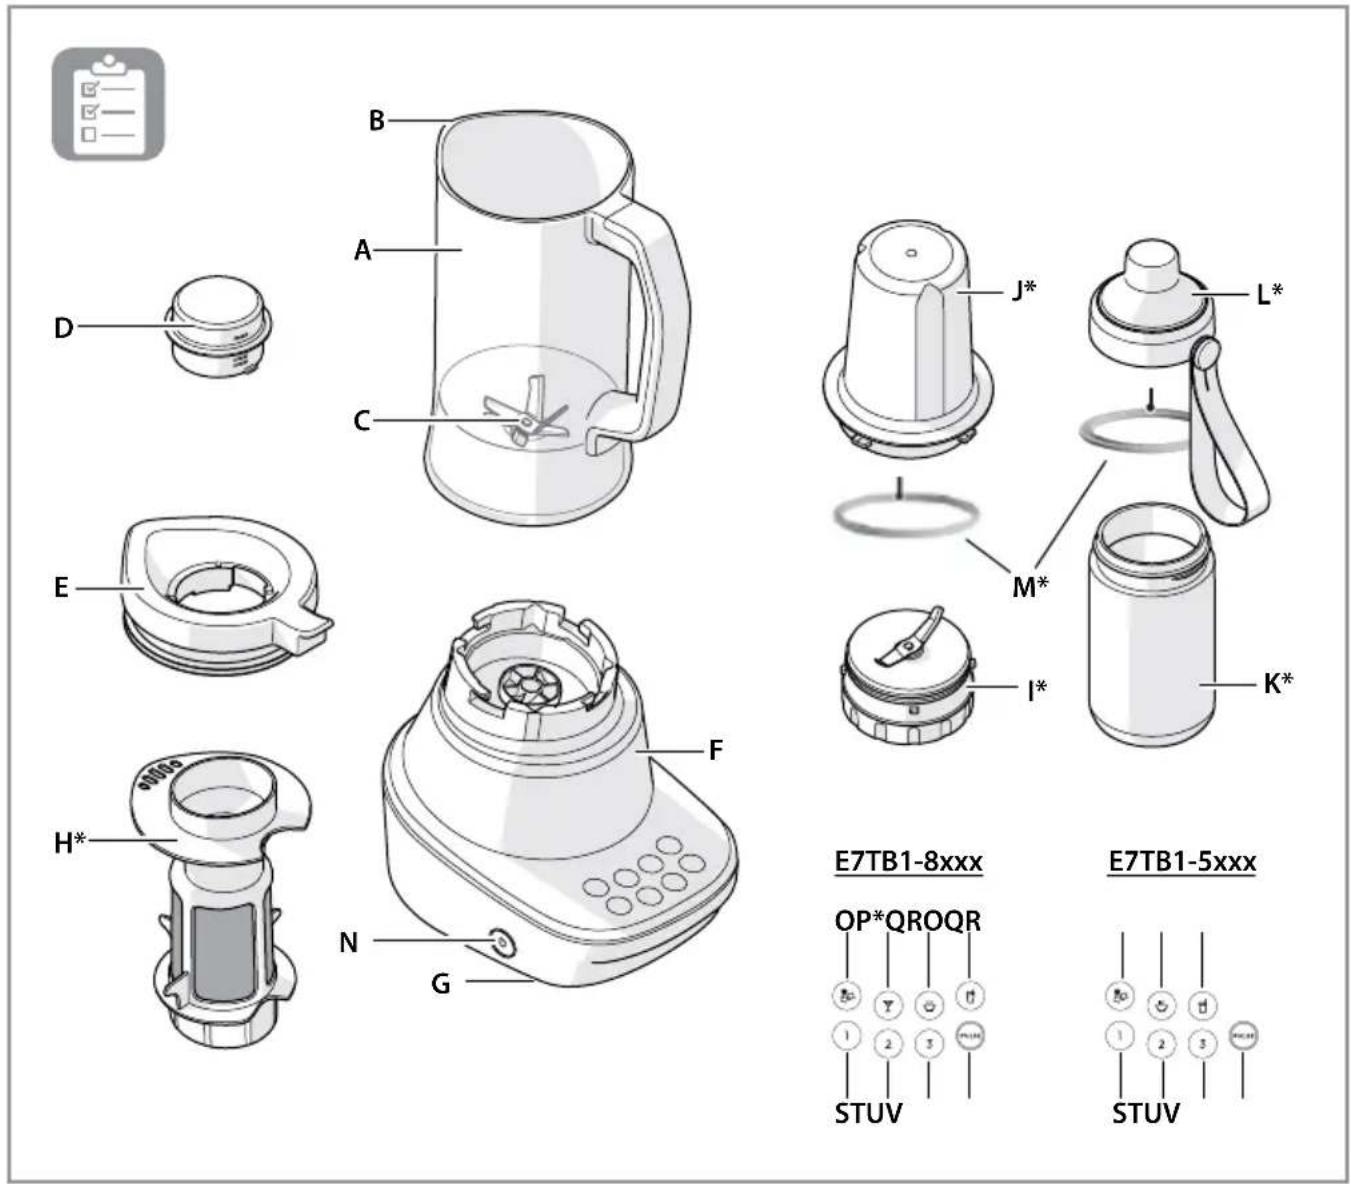

natural_image
Illustration of various kitchen appliances including a blender, keyboard, sink, and showerhead (no text or symbols present)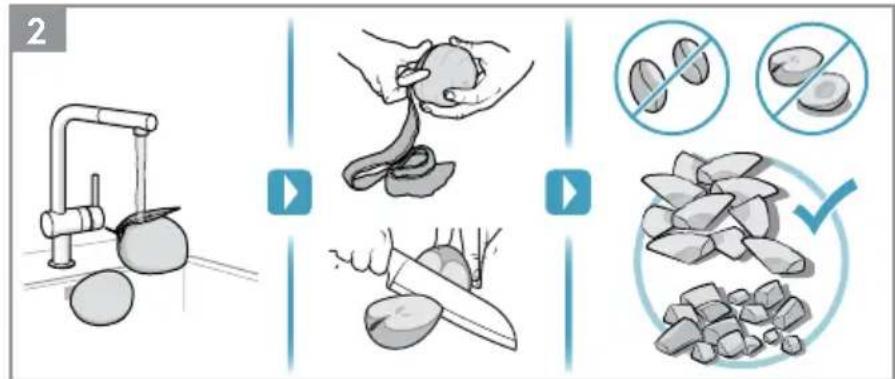
natural_image
Illustration of a blender being placed into a tray with a lid, showing the process (no text or symbols)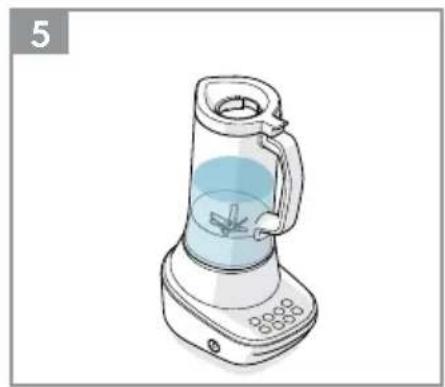
natural_image
Illustration of a digital kitchen blender with a water-filled glass and control panel (no text or symbols)

natural_image
Illustration of a portable blender with a hand holding a leaf, accompanied by a prohibition symbol (no text or labels present)

flowchart
graph TD
    A["PULSE"] --> B["1"]
    B --> C["2"]
    C --> D["3"]
    D --> E["•"]
    E --> F["•"]
    F --> G["•"]
    style A fill:#99ccff,stroke:#333
    style B fill:#99ccff,stroke:#333
    style C fill:#99ccff,stroke:#333
    style D fill:#99ccff,stroke:#333
    style E fill:#6666cc,stroke:#333
    style F fill:#6666cc,stroke:#333
    style G fill:#6666cc,stroke:#333

natural_image
Illustration of a blender with two views showing internal components (no text or symbols)

flowchart
graph TD
    A["Fluid Injection"] --> B["Filter"]
    B --> C["Recyclin"]
    C --> D["Storage"]
    D --> E["Recyclin"]
    E --> F["Storage"]
    style A fill:#f9f,stroke:#333
    style B fill:#ccf,stroke:#333
    style C fill:#cfc,stroke:#333
    style D fill:#fcc,stroke:#333
    style E fill:#cff,stroke:#333
    style F fill:#ffc,stroke:#333

16

natural_image
Illustration of a water tap with a glass container filled with liquid and a pipe outlet (no text or symbols)17

natural_image
Illustration of a portable electric device with a plug and cable, accompanied by a prohibition symbol (no text or labels)
natural_image
Illustration of various household appliances including a kettle, thermos, and accessories (no text or symbols)Thank you for choosing an Electrolux product. In order to ensure the best results, always use original Electrolux accessories and spare parts. They have been designed especially for your product. This product is designed with the environment in mind. All plastic parts are marked for recycling purposes.
INSTRUCTION MANUAL
Graphics and drawings in this manual are solely for illustration purposes and are subject to variations from actual product.
Read all instructions carefully before using the appliance for the first time.
Keep this manual for future reference.
COMPONENTS
A. Jug
B. Spout
C. Blade assembly (not removable)
D. Measuring cup
E. Lid with filler hole
F. Blender base with cord storage
G. Non-slip feet
H. Filter*
I. Multi-chopper blade assembly*
J. Multi-chopper jar*
K. Take away bottle*
L. Drinking lid with carry handle*
M. Rubber seal*
N. ON/OFF button
Control panel (touch button interface)
O. Ice Crush button
P. Drink button*
Q. Soup button
R. Smoothie button
S. "Speed 1" button
T. "Speed 2" button
U. "Speed 3" button
V. PULSE button
*Certain models only
PICTURE PAGE 2-4
SAFETY ADVICE
- Remove and safely discard any packaging materials before using the appliance.
- This appliance is not intended for use by persons (including children) with reduced physical, sensory or mental capabilities, or lack of experience and knowledge, unless they have been given supervision or instruction concerning the use of the appliance by a person responsible for their safety.
- Keep the appliance and its power cord out of reach of children. Children should be supervised to ensure that they do not play with the appliance.
- Cleaning and maintenance should not be performed by children unless they are supervised.
- The appliance can only be connected to a power supply which voltage and frequency comply with the specifications on the rating plate.
- Never use or pick up the appliance if the power cord is damaged and/or the housing is damaged.
- If the appliance or its power cord is damaged, it must be replaced by Electrolux or its service agent in order to avoid hazard.
- Do not immerse the appliance, its power cord or plug in water or any other liquid.
- Do not use or place the appliance near the edge of the table or counter, near hot gas, stove, electric burner or heated oven.
• Always place the appliance on a flat, level and dry surface. - Always switch off the appliance and disconnect it from the power supply if it is left unattended and before changing of the accessories, cleaning or maintenance.
- The blades and inserts are very sharp. Danger of injury. Care shall be taken when changing accessories, after use and during cleaning and maintenance.
- Never touch the blades or inserts with your hand or with any utensils while the appliance is plugged in and/or during operation.
- Do not attempt to remove the blade assembly.
- Keep hands and utensils away from the appliance during operation to avoid the risk of severe injury to persons or damage to the appliance.
-
Ensure that the appliance is switched off before removing the jug from the motor base.
-
Do not operate the appliance without food or liquid in the jug.
- Never operate the appliance without the lid.
- Do not use the appliance continuously for more than 7 minutes when processing heavy load.
- The jug cannot be used for blending or grinding hard and dry substances, except for ice cubes. Use the multi-chopper to grind hard and dry substances (Eg. nuts, candy, rice etc...)
- Be careful if hot liquid is poured into the appliance as it can be ejected out of the appliance due to a sudden steaming.
- Never process boiling liquids (max 90°C).
- Do not exceed the maximum filling volume as indicated on the appliance.
- Do not use this appliance to stir paint. Danger, could result in an explosion!
- Do not let the power cord come into contact with hot surfaces or hang over the edge of a table or counter.
- Never use accessories or parts made by other manufacturers not recommended or sold by Electrolux as it may cause a risk of injury to persons.
• This appliance is for indoor use only. - This appliance is intended for domestic use only. Electrolux will not accept any liability for possible damage caused by improper or incorrect use.
- If the appliance is left on without using any speed or programs, it will automatically switch off after 5 minutes.
- CAUTION: In order to avoid a hazard due to inadvertent resetting of the thermal cut-out, this appliance must not be supplied through an external switching device, such as a timer, or connected to a circuit that is regularly switched on and off by the utility.
GETTING STARTED
Before using your appliance for the first time: Remove all packing material such as plastics, stickers or tags that may be attached to the housing, bowls or attachments. Clean the appliance and accessories, see instructions: "Cleaning and Care".
2 Prepare the ingredients: Rinse ingredients thoroughly. Cut the ingredients into 4 to 6 pieces and remove any hard or large seeds. Remove any thick peel from the fruit or vegetables.
3 Place the jug on the blender base. The jug can only be placed on the base with the handle towards the user interface. Rotate it clockwise until it clicks into position. (The jug can only be placed in one position). When locked, the symbol ∨ on the jar should be aligned with the symbol ∧ on the blender base. Put the ingredients in the jug. (Do not exceed the maximum level as indicated on the jug.)
4 Close the lid. Insert the measuring cup by rotating clockwise until it clicks into position. (You can add ingredients through the filler hole. Never remove the measuring cup or the lid while running the product.)
Caution! Never run the blender empty. When processing hot liquids, see step 5.
5 Processing hot liquids: We recommend to allow hot liquids to cool down (max 90 °C) before filling the jug. Fill the jug only half full and start processing on low speed. The blender jug can become very warm – take care to protect your hands and to ventilate steam out through the filler hole. Always replace the lid before use.
6 Start the blender: Plug into mains. Press the ON/OFF-button (N), The buttons will light up illuminating the display. Press the speed 1, 2, or 3 button, to select your desired processing speed.
7 Caution! Keep hands and utensils out of the blending jug while blending.
Caution! Never run the blender empty, running the blender empty can cause overheating and damage the product.
8 You have preset speeds (1, 2, 3), dedicated recipe programs, and Pulse mode to choose from.
The selected speed or recipe program will light up. The blender will operate until the program is finished. To stop any program manually, press any button.
9 You can give the ingredients a quick mix to get to your desired consistency with the Pulse function. Press the PULSE button(V) to go into Pulse mode. The PULSE and the speed buttons start blinking. Press 1, 2, or 3 to pulse at different speeds.
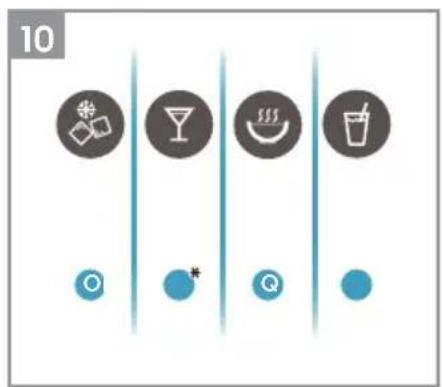
10 The product comes with a variety of recipe programs. You can choose between a number of recipes which are Ilce crush (O), Drink* (P), Soup (Q), Smoothie (R)(*depending on the model). The blender will stop automatically when the program is ready.
Attention! After 5 seconds of inactivity, the blender goes into sleep mode. In order to wake up the blender, press any button. You can continue working with the blender.
USING THE MULTI-CHOPPER\* (\* CERTAIN MODELS ONLY)
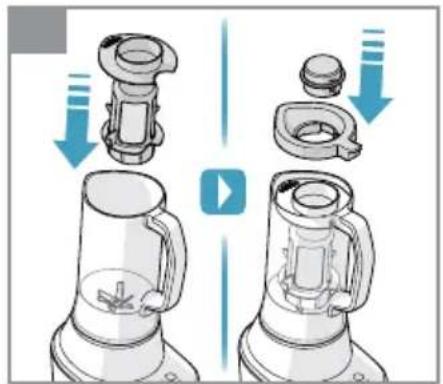
11 Turn the multi-chopper (J) upside down, with the open end facing upwards. Carefully remove the blade assembly (I) by rotating it clockwise. Fill the multi-chopper jar with the desired ingredients. Do not fill more than half full. Fasten the multi-chopper blade assembly (I) on the open end of the jar by rotating anti-clockwise.
Turn the multi-chopper the right way up and lock into place on the blender base by rotating clockwise.
Note: When locked, the symbol V on the grinder blade assembly should be aligned with the symbol ∧ on the blender base.
Caution! The blades are very sharp!
USING THE FILTER\* (\* CERTAIN MODELS ONLY)
12 To make juice: Insert the filter (H) into the jug. Place the filter in the jug with the wide part facing up. Align the ridge inside the blender jar with the cut out at the bottom of the filter to fit the filter correctly. Add fruits in the filter (do not use the blender to mash large seeds such as those in plums or avocados). Fasten the lid with the measuring cup and start juicing.
13 Pour your freshly prepared blend into the take away bottle (K) and fasten with the drinking lid with carry handle (L).
Note: Take away bottle cannot be used to blend directly!
USING THE COOLING STICK\* (\* CERTAIN MODELS ONLY)
14 The cooling stick keeps your smoothies cool for longer. Unscrew the cap of the cooling stick (W) and fill it with tap water. Screw the cap back on the cooling stick and place it in the freezer until the water freezes.
15 Place the frozen cooling stick in the blend bottle. Pour your freshly prepared blend into the take away bottle (K) and fasten with the drinking lid with carry handle (L). The cooling stick can be cleaned in a dishwasher.
CLEANING AND CARE
To avoid crazing of the jug, always rinse the jug with only clean water right after usage. This is to prevent acids or essential oils from the ingredients that may attack the plastic material. After rinsing the jug, it can be washed by hand with detergent, or placed into the dishwasher for cleaning.
Avoid leaving the ready dishes (e.g. soup, smoothie, juice) in the jug for a long time, especially when acidic ingredients (e.g. lime, lemon) is processed.
Always rinse the jug thoroughly with only clean water before placing it to the dishwasher.
However, if crazing would appear, the effect is purely cosmetic and it does not have any impact the integrity of the jug.
16 Quick cleaning: Pour warm water into the jug, add a few drops of detergent.
Mix water and detergent by pressing the PULSE button then speed 3 button a couple of times. Finally, rinse the jug under running water.
17 Thorough cleaning of the blender base and interface: Switch off the blender and unplug the power cord. Wipe the blender base with a damp cloth.

Warning! Never immerse the blender base, plug, or cord in water or any other fluid.
18 Thorough cleaning of the jug: Note! The Blade assembly is not removable. Remove the lid and measuring cup. Rinse the blade assembly in water and detergent.
Caution! Handle carefully, the blades are very sharp!

All parts, except for the blender base are dishwasher safe.
Enjoy your new Electrolux product!
RECIPES
When using the multi-chopper to chop ingredients like onions and shallots, cut the ingredients into cubes no bigger than 2.5 cm to get the best result. Ingredients with tough textures such as carrot and celery are not recommended for chopping.
| MAXIMUM PROCESSING TIME MAXIMUM CAPACITY | |
| 7 min 1500 ml | |
| RECOMMENDED BLENDING SPEED | |||||
| Recipe Ingredients Quantity Time Speed | setting | ||||
| Pureeing raw vegetables | Carrots 20-160 g | 30 s | 3 (Max speed) | ||
| Potatoes 20-160 g | |||||
| Onions 20-160 g | |||||
| Water | 40-320 | g | |||
| Strawberries margaritas (Cocktail) | Tequila 240 ml | Program set |  | ||
| Triple sec | 60 | ml | |||
| Frozen strawberries | 225 | g | |||
| Frozen Lemonade concentrate | 145 g | ||||
| Ice cubes | 150 | g | |||
| Pineapple-apricots Smoothie | Pineapple in slices | 250 | g | ≤ 120 s | 3 (Max speed) |
| Dried Apricots | 40 | g | |||
| Yoghurt | 300 g | ||||
| Soup | Carrots 600 g | ≤ 60 s | 3 (Max speed) | ||
| Water | 900 ml | ||||
| Raspberries Smoothie | Frozen raspberries | 250 | g | Program set |  |
| Banana (1⁄2 pcs) | 50 | g | |||
| Water | 50 | g | |||
| Yoghurt | 300 g | ||||
| Milkshake | Milk | 150-300 | ml | Program set |  |
| Vanilla Ice cream | 150-300 | ml | |||
| Banana | 1⁄4 - 1⁄2 | pcs | |||
| Chocolate syrup | 30-60 | g | |||
| Potato leek soup | Potatoes 200 g | Program set |  | ||
| Leek | 200 | g | |||
| Water | 600 g | ||||
| Pancake (Batters) | Wheat flour 150 g | Program set | [gzwk] | ||
| Salt 1 pinch | |||||
| Eggs 3 pcs | |||||
| Milk 250 ml | |||||
| Water | 140 ml | ||||
| Butter | 50 | g | |||
| Chunky guacamole | Firm-ripe avocados | 2 | pcs | Pulse + 1 | |
| Red onion | 1 pcs | ||||
| Fresh cilantro leaves | 1/4 | cup | |||
| Fresh lime juice | 1 and 1 1/2 | tbsp | |||
| Salt 1 pinch | |||||
| Mushroom soup | Butter | 30 | g | Program set | [86w8] |
| Onion | 60 | g | |||
| Button mushroom | 200 g | ||||
| Chicken stock | 450 ml | ||||
| Salt and pepper | 1 pinch | ||||
| Sherry | 25 | ml | |||
| Chunky pesto | Fresh basil | 48 | g | ≤ 30 s | 3 (Max speed) |
| Olive oil | 108 g | ||||
| Pine nuts | 16 | g | |||
| Minced garlic | 10 | g | |||
| Salt 6 g | |||||
| Grated Parmesan cheese 50 | g | ||||
| Grated Romano cheese | 30 | g | |||
| Butter | 42 | g | |||
| Soybean milk (with filter) | Soaked soybean | 160 g | ≤ 60 s | 3 (Max speed) | |
| Water | 600 ml | ||||
| Semi-smooth hummus | Canned chickpeas | 200 g | Pulse + 2 | ||
| Lemon juice | 2 | tbsp | |||
| Garlic cloves, crushed | 2 | pcs | |||
| Ground cumin | 1 tsp | ||||
| Salt 1 pinch | |||||
| Tahini (sesame seed paste) | 1 tbsp | ||||
| Water | 4 tbsp | ||||
| Extra virgin olive oil | 2 | tbsp | |||
| Paprika | 1 tsp | ||||
MULTI-CHOPPER FUNCTION
| Maximum volume for multi-chopper jar: 400 ml Maximum dry grinding time: 30 s | |||
| Ingredients | Maximum Quantity Time Speed setting | ||
| Coffee 60 g 20 seconds 3 | |||
| Dry shrimp 50 g 10 seconds ON + 3 seconds OFF (2 times) 3 | |||
| Dry chili 50 g 10 seconds ON + 3 seconds OFF (2 times) 3 | |||
| Fresh chili | 50 g 10 seconds ON + 3 seconds OFF (2 times) 3 | ||
| Pepper corn | 120 g 10 seconds ON + 3 seconds OFF (2 times) 3 | ||
| Dry anchovy 50 g 10 seconds ON + 3 seconds OFF (2 times) 3 | |||
| Raw rice 120 g 10 seconds On+ 3 seconds OFF (2 times) 3 | |||
| Five spice | 50 g 10 seconds ON + 3 seconds OFF (2 times) 3 | ||
| Garlic | 60 g | 5 seconds ON + 3 seconds OFF (2 times) | 3 |
| Nuts | 100 g | 10 seconds | 2 |
| Almonds | 100 g | 10 seconds | 2 |
| Onions | 150 g | 5 seconds ON + 3 seconds OFF (until ready) | 2 |
| Beef | 100 g | 20 seconds | 3 |
TROUBLESHOOTING
| SYMPTOM | CAUSE | SOLUTION |
| The blender does not switch on. | Jug/base are not fixed properly. | Check if all the components are in correct position. Note! the jug can only be placed on the base with handle towards the user interface. |
| The ON/OFF-button is not pressed. | Press the ON/OFF button to switch on the blender. The control panel will illuminate when the blender is switched on. | |
| The motor has overheated. The display is blinking. | Allow the appliance to cool down for at least 10 minutes and all the buttons will lit up again. | |
| The plug is not properly connected to the power outlet. | Check the connection of the plug to the outlet or try another outlet. | |
| Power outage. | Wait until power outage is over. | |
| Functional problem. | Contact authorized service. | |
| SYMPTOM CAUSE SOLUTION | ||
| The motor stalls during operation If the motor stalls, | switch off the blender immediately, unplug the appliance and let it cool for at least 10 minutes. | |
| Ingredients are too large. Cut all firm fruits and vegetables into pieces no larger than 1.8 cm^2 to 2.5 cm^2 . | ||
| Wrong ingredients. The appliance intended use is production of beverages. Add fruits, vegetables or similar. Never mix ingredients such as dough, mashed potatoes, meat or similar. | ||
| If the appliance is still not working, please contact Electrolux Customer Service. | ||
DISPOSAL
Recycle the materials with the symbol ⬆. Put the packaging in applicable containers to recycle it. Help protect the environment and human health and to recycle waste of electrical and electronic appliances.
Do not dispose appliances marked with the symbol ■ with the household waste. Return the product to your local recycling facility or contact your municipal minice.
CUSTOMER CARE AND SERVICE
When contacting Service, ensure that you have the following data available: Model, PNC, Serial Number. The information can be found on the rating plate.
Due to the Electrolux policy of continual product development; specifications, colours, and details of our products and those mentioned in this manual are subject to change without notice.
Electrolux Korea limited
9F, Pine Avenue B,
100 Euljiro, Jung-gu, Seoul, Korea 04551
Korea
Tel: +82 2 6020-2200
Fax: +82 2 6020-2271-3
Customer Care Services : +82 1566-1238
Email: homecare.krh@electrolux.com
Website: www.electrolux.co.kr
INDONESIA
Electrolux Philippines, Inc.
10th Floor. W5th Avenue Building
5th Avenue Corner 32nd Street
Bonifacio Global City,
Taguig Philippines 1634
Trunkline: +63 2 737 4756
Domestic Toll Free: 1 800 10 845 care 2273
Customer Care Services: +63 2 845 care 2273
Email: wecare@electrolux.com
Website: www.electrolux.com.ph
THAILAND
Electrolux Thailand Co Ltd
Electrolux Building
14th Floor 1910 New Petchburi Road
Bangkapi, Huay Kwang
Bangkok 10310
Thailand
Tel: +66 2 725 9100
Fax: +66 2 725 9299
Customer Care Services: +66 2 725 9000
Email: customercarethai@electrolux.com
Website: www.electrolux.co.th
VIETNAM
Electrolux Vietnam Ltd
Floor 9th, A&B Tower
76 Le Lai Street
Ben Thanh Ward - District 1
Ho Chi Minh City
Vietnam
Tel: +84 8 3910 5465
Fax: +84 8 3910 5470
Customer Care Services: 1800-58-8899
Email: vncare@electrolux.com
Website: www.electrolux.vn
MALAYSIA
Electrolux Home Appliances Sdn Bhd
Lot C6, No. 28, Jalan 15/22,
Taman Perindustrian Tiong Nam,
40200 Shah Alam, Selangor
Malaysia
Customer Care Services Tel: +60 3 5525 0800
Customer Care Services Fax: +60 3 5524 2521
Email: malaysia.customercare@electrolux.com
Website: www.electrolux.com.my
SINGAPORE
Electrolux SEA Pte Ltd
1 Fusionopolis Place, Galaxis
07-10 (West Lobby)
Singapore 138522
Customer Care Services: +65 6727 3699
Fax: +65 6727 3611
Email: customer-care.sin@electrolux.com
Website: www.electrolux.com.sg
AUSTRALIA
Electrolux Home Products Pty Ltd
ABN 51 004 762 341
163 O'Riordan Street, Mascot, NSW 2020, Australia
Customer Service Phone: 1300 365 305
Website: www.electrolux.com
NEW ZEALAND
Electrolux Small Appliances
A division of Electrolux (NZ) Limited
3-5 Niall Burgess Road, Mt. Wellington, Auckland,
New Zealand
Phone: (09) 9573 2220
Customer Service Phone: 0508 730 730
Website: www.electrolux.com
HONG KONG
大昌貿易行有限公司
電器維修中心
香港九龍灣啟祥道20號
大昌行集團大廈5樓
natural_image
Abstract geometric design with two white petal-like shapes on a dark blue background (no text or symbols)
natural_image
Close-up of wooden hand and plate pieces (no text or symbols visible)- INSTRUCTION MANUAL
- COMPONENTS
- PICTURE PAGE 2-4
- SAFETY ADVICE
- GETTING STARTED
- USING THE MULTI-CHOPPER\* (\* CERTAIN MODELS ONLY)
- USING THE FILTER\* (\* CERTAIN MODELS ONLY)
- USING THE COOLING STICK\* (\* CERTAIN MODELS ONLY)
- CLEANING AND CARE
- Enjoy your new Electrolux product!
- RECIPES
- DISPOSAL
- CUSTOMER CARE AND SERVICE
- INDONESIA
- THAILAND
- VIETNAM
- MALAYSIA
- SINGAPORE
- 07-10 (West Lobby)
- AUSTRALIA
- NEW ZEALAND
- HONG KONG
Brand : ELECTROLUX
Model : Explore 7 E7TB1-50CW
Category : Blender