
Micro Mecha Congee RK401170 - Rice cooker TEFAL - Free user manual and instructions
Find the device manual for free Micro Mecha Congee RK401170 TEFAL in PDF.


| Product Type | Rice Cooker |
| Brand | Tefal |
| Model | Micro Mecha Congee RK401170 |
| Capacity (uncooked rice) | Up to 10 cups (1500 g) for white rice; up to 5.5 cups (900 g) for other types |
| Functions | Rice cooking, Quick cooking, Soup cooking, Steam cooking, Congee cooking, Keep Warm |
| Delayed Start | 2 to 15 hours preset |
| Keep Warm Duration | Up to 24 hours |
| Bowl Material | Non-stick coated removable inner bowl |
| Accessories | Measuring cup, plastic spoons (x2), steam basket, spoon support, condensation collector |
| Control Panel | Touch keys: PRESET, RICE/STEAM, CONGEE, KEEP WARM/CANCEL, SOUP/TIMER, QUICK; LED indicators |
| Safety Features | Micro pressure valve, auto shut-off, steam vent |
| Cleaning | Bowl, steam basket, spoons dishwasher safe; outer body and lid wipe with damp cloth |
| Power Supply | 220-240 V, 50/60 Hz (estimated typical) |
| Power Consumption | Approximately 700-800 W (estimated) |
| Dimensions (approx.) | 25 x 25 x 25 cm (10 x 10 x 10 in) |
| Weight (approx.) | 2.5 - 3 kg (5.5 - 6.6 lb) |
| Repairability | Spare parts may be available; contact Tefal support |
Frequently Asked Questions - Micro Mecha Congee RK401170 TEFAL
User questions about Micro Mecha Congee RK401170 TEFAL
0 question about this device. Answer the ones you know or ask your own.
Ask a new question about this device
Download the instructions for your Rice cooker in PDF format for free! Find your manual Micro Mecha Congee RK401170 - TEFAL and take your electronic device back in hand. On this page are published all the documents necessary for the use of your device. Micro Mecha Congee RK401170 by TEFAL.
USER MANUAL Micro Mecha Congee RK401170 TEFAL
natural_image
Exterior view of a white Tefal rice cooker with control panel and display (no visible text or symbols on body)www.groupeseb.com

natural_image
Hand pressing down on a mechanical component, enclosed in a circular frame with a red arrow indicating rotation (no text or symbols)Fig.1 Fig.2 Fig.3 Fig.4
natural_image
Diagram showing a curved object with red arrows indicating direction, no text or symbols present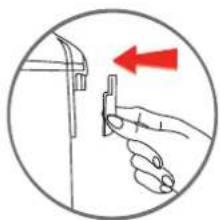
natural_image
Illustration of a hand holding a tool with a red arrow indicating direction (no text or symbols)
natural_image
Diagram of a mechanical component with a red arrow indicating direction, no text or symbols present


natural_image
Illustration of hands using a kitchen appliance to press a pot (no text or symbols visible)Fig.5Fig.6Fig.7Fig.8


natural_image
Illustration of a hand holding a tool, with a red arrow indicating direction (no text or symbols)


natural_image
Illustration of hands cleaning a container with a red downward arrow (no text or symbols)Fig.13 Fig.14 Fig.15 Fig.16

natural_image
Illustration of hands cleaning a kitchen sink with a bowl and faucet (no text or symbols)Fig.17 Fig.18 Fig.19 Fig.20

natural_image
Illustration of a hand using a tool to clean or wash the surface of a kitchen sink (no text or symbols)
natural_image
Illustration of a hand using a tool to clean or wash the surface of a kitchen sink (no text or symbols)
natural_image
Illustration of hands cleaning a kitchen sink with a faucet (no text or symbols)
natural_image
Illustration of hands cleaning a kitchen sink with a faucet (no text or symbols)
natural_image
Illustration of a hand washing a circular basin with a lid, no text or symbols presentDescription
-
Steam basket
-
Graduation for water and rice
-
Removable non-stick bowl
-
Measuring cup
-
Spoon support
-
Spoons
-
Power cord
-
Lid opening button
-
Lid Handle
-
Micro pressure valve
-
Lid
-
Condensation collector
-
Control box
a. Display of finishing time and the condition of keep warm.
b. Keep warm indicator light (red)
c. Soup cooking indicator light (red)
d. Quick cooking indicator light (red)
e. "PRESET" key
f. Rice/Steam cooking indicator light (red)
g. Congee cooking indicate light (red)
h. "RICE/STEAM" key
i. "CONGEE" key
j. "KEEP WARM/CANCEL" key
k. "SOUP/TIMER" key
I. "QUICK" key
-
Hotplate
-
Sensor
Before the first use
Unpack the appliance
- Remove the appliance from the packaging and unpack all the accessories and printed documents.
- Open the lid by pressing the opening button located on the handle – Fig. 1.
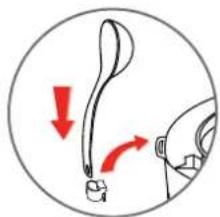
- Install the spoon support: insert the plastic hook of the support in the hole located under product ring, and slide it downwards – Fig. 2. Make sure the micro pressure valve is correctly in position - Fig. 3.
Read the instructions and carefully follow the operating method.
Clean the appliance
- Remove the non-stick bowl.
- Clean the bowl and the micro Wipe the outside of the appliance and the metal parts of the lid with a damp cloth.
- Dry off carefully.
Using your rice cooker
For all 5 functions
- Carefully wipe the outside of the bowl (especially the bottom). Make sure that there are no foreign residues or liquid underneath the bowl and on the hotplate – Fig. 4.
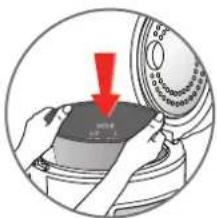
- Place the bowl into the appliance – Fig. 5, making sure that it is correctly positioned.
- Slightly rotate the bowl between the bottom of the bowl and the hotplate.
- Check that the condensat install it by pushing firmly into the groove – Fig. 6.
- Close and lock the lid.
- Plug in the appliance.
- Do not switch on the appliance until a completed.
Never place your hand on the steam vent during cooking, as there is a danger of burns.
If you wish to change the selected cooking menu of and i re c t error, press "CANCEL" key and choose the menu you want.
Rice Cooking
Measuring the ingredients - Max capacity of the bowl
EN
- The graduated markings on the these are used for measuring the amount of water when cooking rice – Fig. 7.
- The plastic cup provided with states the quantity of rice required for the number of servings. 1 level measuring cup of rice weighs about 150g .
- The table below gives a guide recommend using ordinary rice rather than 'easy cook' type rice which tends to give a stickier rice and may adhere to the base. With other types of rice, such as brown or wild rice, the quantities of water need adjustment see the table below.
- To cook 1 cup of white rice (cup of white rice and then add 1 1/2 measuring cup of water. With some types of rice it is normal for a little rice to stick on the base when cooking 1 cup of rice. To cook other quantity of white rice, refer to cooking guide below.
- The maximum quantity of water inside the bowl – Fig. 7. Depending of the type of rice, quantities of water may need adjustment. See the tabel below.
- Rinse the rice thoroughly before cooki
COOKING GUIDE FOR WHITE RICE -10 CUPS
| Measuring cups of white rice | Weight of white rice | Water level in the bowl (+ the rice) | Serves | Approximative cooking time* | |
| Rice cooking | Quick cooking | ||||
| 2 | 300 g | 2 cup mark | 3per.-4per. | 39 min | 35 min |
| 4 | 600 g | 4 cup mark | 5per.-6per. | 39 min | 35 min |
| 6 | 900 g | 6 cup mark | 8per.-10per. | 42 min | 37 min |
| 8 | 1200 g | 8 cup mark | 11per.-14per. | 46 min | 42 min |
| 10 | 1500 g | 10 cup mark | 13per.-17per. | 52 min | 48 min |
COOKING GUIDE FOR WHITE RICE - 5,5 CUPS
| Measuring cups of white rice | Weight of white rice | Water level in the bowl (+ the rice) | Serves | Approximative cooking time* | |
| Rice cooking | Quick cooking | ||||
| 2 | 300 g | 2 cup mark | 3per.-4per. | 39 min | 35 min |
| 4 | 600 g | 4 cup mark | 5per.-6per. | 39 min | 35 min |
| 5,5 | 900 g | 5,5 cup mark | 8per.-10per. | 42 min | 37 min |
- Rinse the rice thoroughly before cooki
COOKING GUIDE FOR OTHER TYPES OF RICE
| Type of rice | Measuring cup of rice | Weight of white rice | Water level in the bowl (+ the rice) | Serves | Approximative cooking time* | |||
| Rice cooking | Quick cooking | |||||||
| 5,5 cups | 10 cups 5,5 | cups 10 cups | ||||||
| Round white rice (Italian rice - often a stickler rice) | 4 | 600 g | 4 cup mark | 5per.-6per. | 40 min | 41 min | 36 min | 37 min |
| Wholegrain Brown rice | 4 | 600 g | 4,5 cup mark | 5per.-6per. | 47 min | 40 min | 43 min | 36 min |
| Wild rice | 4 | 400 g | 3,5 cup mark | 4per.-5per. | 42 min | 39 min | 38 min | 35 min |
| Risotto rice (Arborio type) | 4 | 600 g | 4 cup mark | 4per.-5per. | 38 min | 41 min | 34 min | 37 min |
| Glutinous rice | 4 | 620 g | 4 cup mark | 5per.-6per. | 41 min | 36 min | 37 min | 32 min |
| Brown rice | 4 | 570 g | 4,5 cup mark | 5per.-6per. | 45 min | 42 min | 41 min | 38 min |
| Japanese rice | 4 | 580 g | 4 cup mark | 5per.-6per. | 41 min | 34 min | 37 min | 30 min |
| Fragrant rice | 4 | 640 g | 4 cup mark | 5per.-6per. | 41 min | 36 min | 37 min | 32 min |
*The rice cooker will automatically determine the exact cooking time depending on the quantity of water and rice placed in the bowl.
Note: When using risotto rice for milk rice pudding or dessert puddings follow the proportions in the recipe book as more water is needed.
When cooking milk rice pudding, use Arborio risotto rice instead of pudding rice, as it cooks quicker and gives better results. Follow the instructions in the recipes. Do not cook the rice directly in milk as it will froth up and boil up through the lid.
Cooking with delayed start
- It is possible to delay the time for starting cooking. Take the rice cooking mode as the example.
Cooking with delayed start is for all cooking modes.
- Place the ingredients in the bowl and plugged in the appliance, briefly press the "PRESET" key—Fig. 8, press again to select the finished cooking time you want. Then press the "RICE/STEAM" key – Fig. 9. The red "RICE/STEAM" indicate light flashes for 5 seconds. After 5 seconds the light remains steady and the cooking automatically starts.
- For instance: it is 8 a.m, I would like my rice is ready at 6 p.m which means I want my rice is ready after 10 hours, I have to press "PRESET" key until "10" shows on the display, then press the "RICE/STEAM" key and wait the "RICE/STEAM" indicate light remains steady.
- When cook finished, it will turn to keep warm automatically, the "KEEP WARM" indicate light is on, display shows "b"—Fig. 11.
- You can delay cooking for 2 hours minimum and 15 hours maximum.
Rice and Quick cooking
The rice cooker itself determines the exact cooking time depending on the quantity of water and ingredients placed in the bowl (see cooking table above for a guide to times).
When the volume of water has been absorbed by the rice, the appliance stops the cooking process automatically and passes into the "KEEP WARM" mode (the red "KEEP WARM" indicate light comes on).
The cooking times given in the tables are only approximate and for your guidance.
- Place the appliance on a flat, stable, heat-resistant work surface away from water splashes and any other sources of heat.
- Pour the required quantity of rice into the bowl using the measuring cup provided. Then fill with cold water up to the corresponding "CUP" mark printed in the bowl (See cooking guide above) – Fig. 7.
- Close the lid.
Note: Always add the rice first otherwise you will have too much water.
- Check that the appliance is plugged in. Briefly press on the "RICE/STEAM" key – Fig. 9. The red "RICE/STEAM" indicate light flashes for 5 seconds. After 5 seconds the light remains steady and the cooking automatically starts.
- For the rice cooking: it will stew rice for 14 minutes when the water evaporated out and system begin to count down 14 minutes.
- For the quick cooking: Briefly press on the "QUICK" key—Fig. 10. The red "quick "QUICK" indicate light flashes for 5 seconds. After 5 seconds the light remains steady and the cooking automatically starts. It will stew rice for 10 minutes when the water evaporated out and system begin to count down 10 minutes.
- When stewing finished, it will turn to keep warm automatically, the "KEEP WARM" indicate light is on, display shows "b"-Fig. 11.
• After each use empty and clean the condensation collector.
Some recommendations for best results when cooking rice
- Measure out the rice and rinse it thoroughly under running water in a sieve for a long time (except for risotto rice which should not be rinsed). Then place the rice in the bowl together with the corresponding quantity of water.
- Make sure that the rice is well distributed around the whole surface of the bowl, in order to allow even cooking.
-
Add salt to your personal taste if required.
-
Water may be substituted to stock. If using stock, there is the risks of rice browning a bit in the bottom.
- Do not open the lid during cooking as steam will escape and this will affect the cooking time and the taste.
- On completion of cooking, when the "KEEP WARM" indicate light is on, stir the rice and then leave it in the rice cooker for a few minutes longer in order to get perfect rice with separate grains.

Soup Cooking
To cook soup
If you wish to change the selected cooking time for soup in the event of an error, press "CANCEL" key. Select soup cooking mode again and then the cooking time. The red "SOUP" indicate light flashes for 5 seconds. After 5 seconds the light remains steady and the cooking automatically starts.
- Place the ingredients in the "SOUP/TIMER" key – Fig. 12. When the red "SOUP" indicate light flashes, you can press the "SOUP/TIMER" key – Fig. 12 to select a cooking time. If you don't select a cooking time after 5 seconds, the light stops and remains steady; the cooking time of the appliance is automatically programmed to 70 minutes and the appliance begins cooking.
- Select the cooking time: the minutes minimum and 95 minutes maximum for the soup cooking mode. Choose the time you like while the red "SOUP" indicate light is flashing. Press repeatedly on the timer key to increase the cooking time. The time increases in 5 minutes increments from 40 minutes up to 95 minutes maximum.
- When the red "SOUP" light remains steady, the cooking process begins
- When cook finished, the "KEEP WARM" indicate light is on, display shows "b" – Fig. 11.
Steam cooking (for vegetables, fish, etc.)
Measuring the ingredients
- The maximum quantity of water in the bowl should not exceed the maximum CUP mark shown in "CUP" on the bowl – Fig. 7. Exceeding this level may cause overflows during use.
• The water should be lower than the steam basket.
Preparation
- Pour water into the bowl, never exceed the maximum CUP mark.
- Place the steam basket in the bowl – Fig. 13.
- Add the ingredients in the steam basket.
To steam cook
- Place the ingredients in the steam basket and plugged in the appliance, press the "RICE/STEAM" key – Fig. 9. The "RICE/STEAM" indicate light flashed after 5 seconds, the light remains steady, and the cooking automatically starts.
- When cook finished, it will turn to keep warm automatically, the "KEEP WARM" indicate light is on, display shows "b"-Fig. 11.
- You can adjust the cooking time as you want, just press the "CANCEL" key to stop cooking.
Congee cooking
To cook congee
- Place the ingredients in the bowl and plugged in the appliance, press the "CONGEE" key – Fig. 14. The red "CONGEE" indicate light flashes. After 5 seconds, the light stops flashing and remains steady; the appliance begins cooking.
- When cook finished, the "KEEP WARM" indicate light is on, display shows "b"-Fig. 11.
- You can adjust the cooking time as you want, just press the "CANCEL" key to stop cooking.
- You can adjust the water according to your water for a cup of rice.
Automatic keep warm function
On completion of cooking, irrespective of the cooking mode chosen, the appliance passes automatically to the "KEEP WARM" function. The red "KEEP WARM" indicate light comes on and display show "b". The food is thus kept warm and ready to serve. The fuction will last 24 hours. Be careful that keep warm long time would affect the quality of rice. To switch off this function, press "CANCEL".
On completion of cooking
- Open the lid.
- Serve the food using the plastic spoon supplied with the appliance and reclose the lid.
- The food remaining in the bowl will keep warm for any second servings.
- Don't forget to press "CANCEL" key after keep warm.
The escaping steam is very hot.
Cleaning and Maintenance
Condensation collector
- The condensation collector should be emptied and cleaned after each use.
- To remove the collector, pres Fig. 15.
- To put the plastic cover back, push firmly into the groove.
Bowl, steam basket, condensation collector, micro pressure valve and the steam basket.
- When clean the micro-pressure valve, please remove it from the lid – Fig. 16 and open it by rotating in the direction of “open”–Fig. 16.
After cleaning it, please wipe dry it and meet the two triangle in the two parts together – Fig. 16, and rotate it in the direction of “close” until you heard “ka”, then put it back to the lid of the rice cooker. - Use hot water, washing up liquid and a sponge to clean the bowl – Fig. 17, the condensation collector – Fig. 18, the micro computer valve – Fig. 19, the spoons and the cup. Scouring powders and metal sponges are not recommended.
- If food has stuck to the bottom, allow the bowl to soak for a while before washing it.
- Dry the bowl carefully.
- Do not immerse the appliance in water, nor pour water into it, only into the bowl.
Cleaning in a dishwasher
EN
Any brown marks and scratches that may appear after many hours use are not a problem. We guarantee that the non stick coating
COMPLIES WITH THE RULES on materials suitable for contact with food.
You can also wash the bowl, the steam basket and the spoons in the bottom shelf of the dishwasher. For the bowl, carefully follow the instructions below:
- When putting the bowl into the machine, be careful not to damage the non-stick coating on the dish washer racks.
- After being washed several t it recommended to wipe the whole of the inner surface of the bowl with a little vegetable oil on some paper towel.
- Make sure you put the bowl b c
Taking care of the non-stick bowl
- To keep the non stick quality of the bowl for as long as possible, it is recommended not to cut food in it.
- Use plastic or wooden utensils and not metal ones when stirring or serving food to avoid damaging the bowl surface.
- To avoid any risk of corrosion, do not pour vinegar into the bowl.
- The colour of the bowl surface may change after using for the first time or after longer use. This change in colour is due to the action of steam and water and does not have any effect on the use of the Rice Cooker, nor is it dangerous for your health. It is perfectly safe to continue using it.
— Cleaning and care of the other parts of the appliance
- Clean the outside of the Rice Cooker, the inside of the lid – Fig. 20 and the cord with a damp cloth and wipe dry. Do not use abrasive products.
- Do not use water to clean the heat sensor.
目錄
-
蒸盤
-
水和米刻度
-
可拆式不黏塗層內鍋
4.量杯
-
湯勺支架
-
湯勺
-
電源線
-
開蓋接鈕
9.煲蓋手挽
-
微压阀
-
促盖
-
露水收集器
-
控制面板
a. 完成時間顯示和保溫狀態
b. 保温指示燈(紅色)
c. 烘湯指示燈(紅色)
d. 快煮指示燈(紅色)
e. “預設” 鏈
f.煮飯/蒸煮指示燈(紅色)
g. 健粥指示燈(紅色)
h. “飯/蒸煮”鍵
i. “粥”键
j. “保溫/取消” 鍵
k. “湯/時間掣” 錢
-
“快煮”键
-
發熱板
-
感感器
初次使用前
電飯煲開封
- 清洗微壓閥時,請將微壓閥從煲蓋上取下 Fig.16 ,


- Description
- Before the first use
- Unpack the appliance
- Clean the appliance
- Using your rice cooker
- For all 5 functions
- Rice Cooking
- Measuring the ingredients - Max capacity of the bowl
- EN
- Cooking with delayed start
- Rice and Quick cooking
- Some recommendations for best results when cooking rice
- Soup Cooking
- To cook soup
- Steam cooking (for vegetables, fish, etc.)
- Measuring the ingredients
- Preparation
- To steam cook
- Congee cooking
- To cook congee
- Automatic keep warm function
- On completion of cooking
- Cleaning and Maintenance
- Condensation collector
- Bowl, steam basket, condensation collector, micro pressure valve and the steam basket.
- Cleaning in a dishwasher
- Taking care of the non-stick bowl
- — Cleaning and care of the other parts of the appliance
- 目錄
- 初次使用前
- 電飯煲開封
Brand : TEFAL
Model : Micro Mecha Congee RK401170
Category : Rice cooker