
HR4 - Audio Ocean Way Audio - Free user manual and instructions
Find the device manual for free HR4 Ocean Way Audio in PDF.


| Type | Active Studio Monitor |
| Model | HR4 |
| Brand | Ocean Way Audio |
| Woofer Size | 4 inches (custom design) |
| Tweeter Size | 1 inch silk dome |
| Amplifier Type | Class A/B |
| Power Output | 50W per channel |
| Crossover Frequency | 2.5 kHz |
| Frequency Response | 50 Hz – 20 kHz (±3dB) |
| Max SPL | 105 dB peak |
| Inputs | XLR and 1/4" TRS balanced |
| Controls | Volume control, power switch |
| Cabinet | MDF with internal bracing |
| Dimensions (W x H x D) | 200 x 250 x 200 mm |
| Weight | 4.5 kg (each) |
| Power Supply | 100-240V, 50/60Hz |
| IEC Power Connector | Standard |
| Warranty | 5 years |
| Accessories Included | Power cord, user manual |
| Placement | Desk or stand, vertical or horizontal |
| Cleaning | Wipe with a dry, soft cloth |
| Safety Notices | Do not expose to rain or moisture |
| Spare Parts Availability | Contact Ocean Way Audio support |
Frequently Asked Questions - HR4 Ocean Way Audio
User questions about HR4 Ocean Way Audio
0 question about this device. Answer the ones you know or ask your own.
Ask a new question about this device
Download the instructions for your Audio in PDF format for free! Find your manual HR4 - Ocean Way Audio and take your electronic device back in hand. On this page are published all the documents necessary for the use of your device. HR4 by Ocean Way Audio.
USER MANUAL HR4 Ocean Way Audio
Manual of Operations Ocean Way Audio HR4 (2-Way) and HR4S (3-Way) Sound System
natural_image
3D-printed geometric object with a metallic central cutout and a label reading 'OCEANWAY RLOD' (no other text or symbols visible)Contents
1) HR4 Description
3) Inputs and Controls
4) Input selectors & Legends
5) HR4S & S12A / Physical Setup
6) Signal Flow 2-Way & 3-Way
7) S12A Description
8) Specifications
9) Warranty
10) Maintenance
2) Safety Instructions and Warnings! (please read carefully)
1) High Resolution HR4
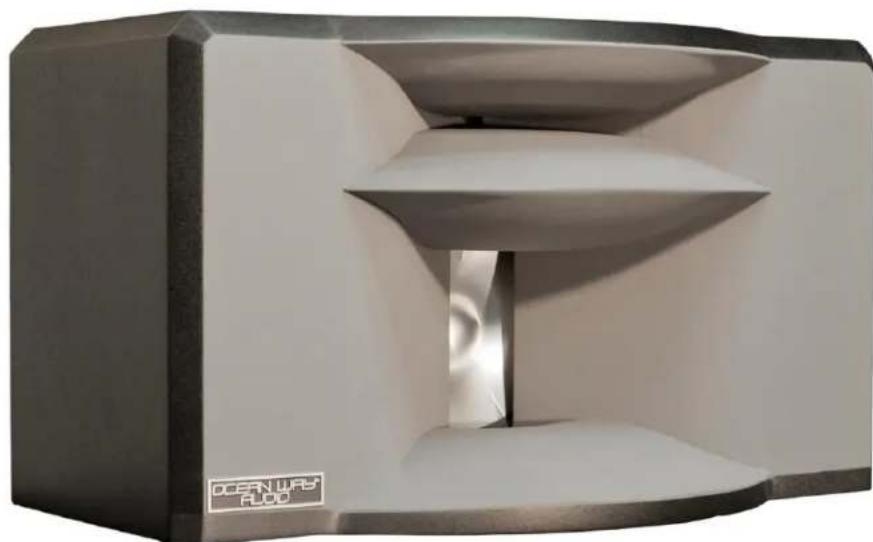
The Ocean Way Audio HR4/HR4S Reference Monitor is an accurate, wide-dynamic-range, sound-delivery system for the professional listening environment. It is 25.5" wide and features an integrated 2-way dual-horn, directivity-control loudspeaker that can be placed as a pair in any environment to provide an exceptionally-accurate and revealing stereo monitoring experience.
At the heart of the acoustic design is HR4's dual/hybrid waveguide system. Its unique design was engineered utilizing 3D modeling and then CNC machined from composite materials. This accurate process allows for the creation of geometrically-complex surfaces that are accurately-matched for delivering detailed imaging. As a result, the HR4 delivers a stunning 100 x 40 degree dispersion pattern over a very wide audio range. An exceptionally wide "sweet-spot" is revealed with rich detail across a broad area of the listening spectrum. The consistency of its stereo image, even at the far corners of the room, is achieved due to the highly consistent directivity response of the speaker system. This is often a delightful surprise to the listener in light of what is available today.
The HF driver is a high-definition silk fabric dome design with excellent mechanical linearity. The LF driver is a geometrically reinforced aluminum cone with a vented cast-aluminum chassis yielding optimum strength and high-power linearity. Combined with a rock-solid wood/composite cabinet, the system is voiced to provide an undetectable crossover transition between the drivers. Our two-way, self-powered design delivers an unprecedented level of performance allowing for flexibility of placement in the room with a matched uniform frequency response of 35 Hz to 25 kHz.
For those who wish to achieve even greater SPL, we offer a 3-Way version with dual 12" sub-bass cabinets – entitled HR4S. HR4S delivers 25 Hz to 25kHz @ 118 db.
We carefully select and match each set of components getting them as close as possible to achieve our high performance standards. Our process could easily be compared to building a fine musical instrument.

2) Safety Instructions and Warnings
Read the information for use
Please keep this user manual in a safe place during the lifetime of the product.
Heed all warnings.
▶ Follow all instructions.
Do not use this product near water (for example, in damp rooms or near a swimming pool).
Clean only with dry cloth.
Do not cover the heat sink. Install in accordance with the user manual.
Do not install near any heat sources such as radiators, heat registers, stoves, or other apparatus that produce heat.
Protect the power cord from being walked on, pinched or damaged in any other way. Pay particular attention to plugs and the point where they exit from the Amplifier Unit.
The Amplifier Unit can only be disconnected from the power supply by removing the plug, which must be freely accessible at all times. Unplug this Amplifier Unit during lightning storms or when unused for long periods of time.
Refer all servicing to qualified service personnel.
Servicing
Do not attempt to service this product yourself. As opening or removing covers may expose you to dangerous voltage or other hazards, the amplifier may only be opened by qualified personnel. Please refer to your dealer/distributor.
Servicing and Replacement Parts
All service and repair work must be carried out by an authorized dealer/distributor. When replacement parts are required, please ensure that the dealer/distributor only uses replacement parts specified by the manufacturer. The use of unauthorized replacement parts may result in injury and/or damage through fire or electric shock or other electricity -related hazards.
Ventilation and heat sink
The heat sink is provided to ensure reliable operation of the Amplifier Unit and to protect it from overheating. The heat sink must not be blocked or covered. This product should not be installed unless proper ventilation is provided or manufacturer's instructions have been adhered to.
Water and Moisture
Do not use this product near water (for example, in damp rooms or near a swimming pool).
Cleaning
Unplug the Amplifier Unit from the wall outlet before cleaning. Do not use liquid or aerosol cleaners.
Power -Cord Protection
Power supply cords should be routed so that they are not likely to be walked on or pinched by items placed upon them or against them, paying particular attention to cords and plugs, and the point where they exit from the Amplifier Unit.
Lightning
For added protection of the product during lightning storms, or when it is left unattended and unused for long periods of time, unplug it from the wall outlet. This will prevent damage to the product due to lightning and power-line surges. Disconnection from the mains power supply can only be achieved by removing the plug from the mains socket and by external disconnection of all poles from the mains.
Accessories
Do not place this product on an unstable cart, stand, tripod, bracket, or table. The product may fall, causing serious injury, and serious damage to the product.
Connecting
When you connect this speaker to other equipment, turn off the power and unplug all of the equipment from the supply source. Failure to do so may cause an electric shock and serious personal injury. Read the user's manual of the other equipment carefully and follow the instructions when making the connections.
Sound Volume
Reduce the system volume to minimum before you turn on the amplifier to prevent sudden high levels of sound which may cause hearing or speaker damage.
Precautions when connecting to MAINS IN
When mounting or connecting the product always disconnect it from mains. Only connect the product to an appropriate AC circuit and outlet, according to the requirements indicated on the rating plate. If a power cut occurs while the amplifier is switched on, it will restart automatically once the power supply has been restored. All settings prior to the loss of power will be maintained. IMPORTANT: Always connect the Product to mains through the MAINS IN connector on the Amplifier Unit.
DO NOT REMOVE MAINS CONNECTOR GROUND, IT IS ILLEGAL AND DANGEROUS.
AC power 115/230v switch
Make sure to correctly configure with the correct voltage for your country.



3) Inputs and Controls HR4
Master Volume
The Master Volume allows trimming the speaker input gain when desired.


4) Input Selection and Legends
HR4
LED 1 – when illuminated indicates preset selected requires an analog signal LED2 – when illuminated indicates preset selected requires an AES-EBU digital signal LEDS 3 & 4 - will be illuminated or dark in combinations specified in the legend above To indicate which of the 4 presets is currently active.

Preset 1 – default preset the speaker is shipped with. It is an analog input 2-way (full range) configuration. Use Analog In XLR. (LED 1 on, LED 3 & 4 off).
Preset 2- Is an analog 3-way (85Hz 4 ^th order L-R high pass filter) for use with a sub-woofer. Use Analog In XLR (LED 1 on, LED 3 off / LED 4 on).
Preset 3 – Is an AES-EBU digital left input with 2-way response. Use Digital In XLR (LED 2 on, LED 3 on / LED 4 off).
Preset 4 – Is an AES-EBU digital right input with 2-way response. Use Digital In XLR

Selecting Presets

Using a small diameter blunt tool (i.e. plain end of a cotton swab), depress the LED Selector pushbutton for a short (1/2 second or less) duration. Each press will toggle the LEDs into different flashing sequences that will match the legend above. When the desired sequence is flashing, depress the switch for a full second. This will load that program and the LEDs will change from flashing to full illumination.
N.B. A long push (1 sec or more) without first being preceded by a short push will toggle the input from its alternate state (analog to digital or visa-versa). You'll see LED 1 or LED 2 change to their opposite state to indicate this. Avoid doing this unintentionally. Begin with short pushes to toggle through the 4 preset options and use the long push to select the desired preset.

5) HR4S & S12A / Physical Setup

natural_image
Exterior view of a modern black speaker with a multi-tiered top-mounted stand (no visible text or symbols)HR4 & S12A Sub-Bass Combine forming HR4S
(Stand not included or required)
Some consoles will not afford a safe support the HR4, and we generally recommend using the Sound Anchor ADJ2 for this. The HR4 is easily positioned on the ADJ2 platform and can be rotated safely as its center of gravity falls well within the platform's generous footprint. In most cases, the stand's base will probably need to be positioned parallel to the console's "legs" and the HR4 rotated to best horizontal aim. More on this follows.

natural_image
3D rendering of a control console with multiple monitors and control panels, set on a wooden floor against a clear sky (no text or symbols visible)
Achieving wideband stereo sound is deceptively simple; you must be able to hear the full range of two speakers. The HR4 represents a breakthrough in modern stereo studio monitor technology. It employs advanced, full-spectrum directivity-control as compared to the typical compact direct-radiator monitor which exhibits narrow HF "beaming". While most compact monitors establish a "sweet spot" between them, the HR4 establishes a wide-area Stereo-Zone™ in a wide area.
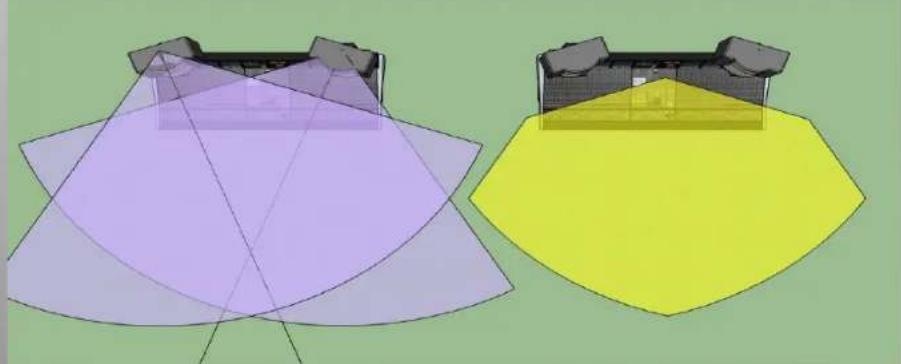
The HR4 can easily be aimed to establish a truly accurate Stereo-Zone™ for multi-person listening. For example, we have plotted, below, the 100 degree horizontal pattern of the HR4 in an overhead plan-view with a typical console. Speaker centers are about 72" apart. You can see where the individual HR4 sound-fields overlap; this defines a wide area where you can hear full-band stereophonic sound. In this case, we chose an inward aiming of 20 degrees. If the pair were aimed more inward, the stereo-zone narrows. Aiming more outward, the Stereo-Zone™ widens but the result is more sound impacting the sides of the studio environment, changing the overall sound of the space. It is up to the HR4 owner or studio designer to choose what works best. Often this is a matter of listening and achieving the most acceptable aesthetic sound (always our first recommendation). A 20 degree inward aiming angle is a good place to start, nice wide field at the console and also for anyone behind or off to the sides (two or three persons can work at once on a mix and hear the full stereo sound): Below is a graphical depiction showing (below right) the location of the stereo zone in yellow, which is simply the mutual overlap zone of the two HR4's.
natural_image
Two abstract geometric shapes with overlapping purple and yellow polygons, no text or symbols present
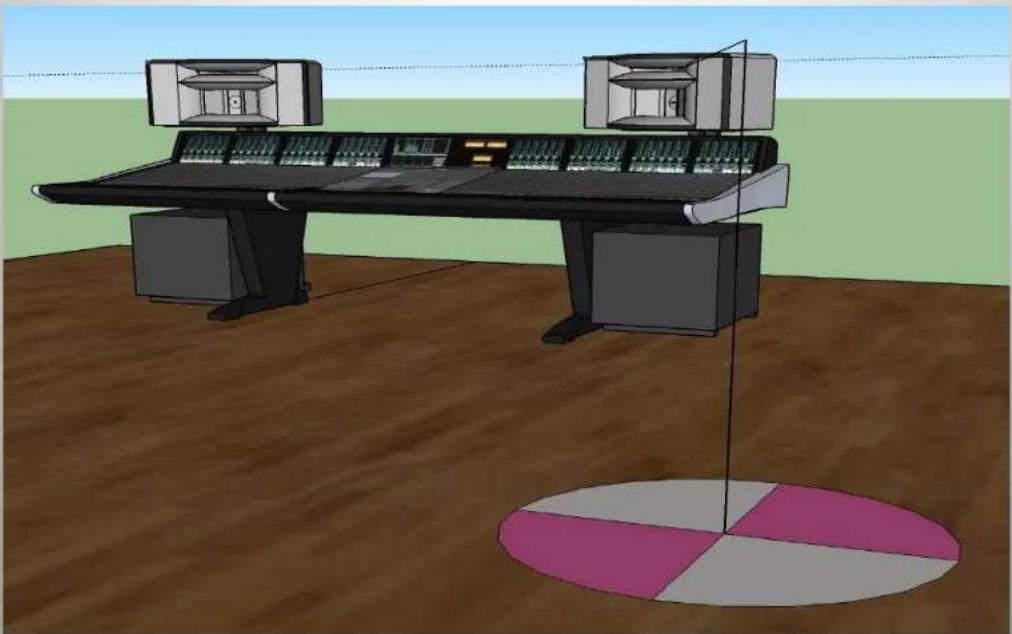
The HF horizontal pattern of the HR4 (S) is largely controlled by the HF horn walls. There is a very easy on-site test for aiming: If you can see the little "dot" or circle at the entrance to both HF horns, you will be in the stereo-zone. You can set up your HR4's this way by just visual inspection. Below is a depiction of a location at the fringe of the stereo zone:
natural_image
3D rendering of a control room with two large consoles and multiple monitors, set on a wooden floor with a circular pie chart at the bottom (no text or symbols visible)
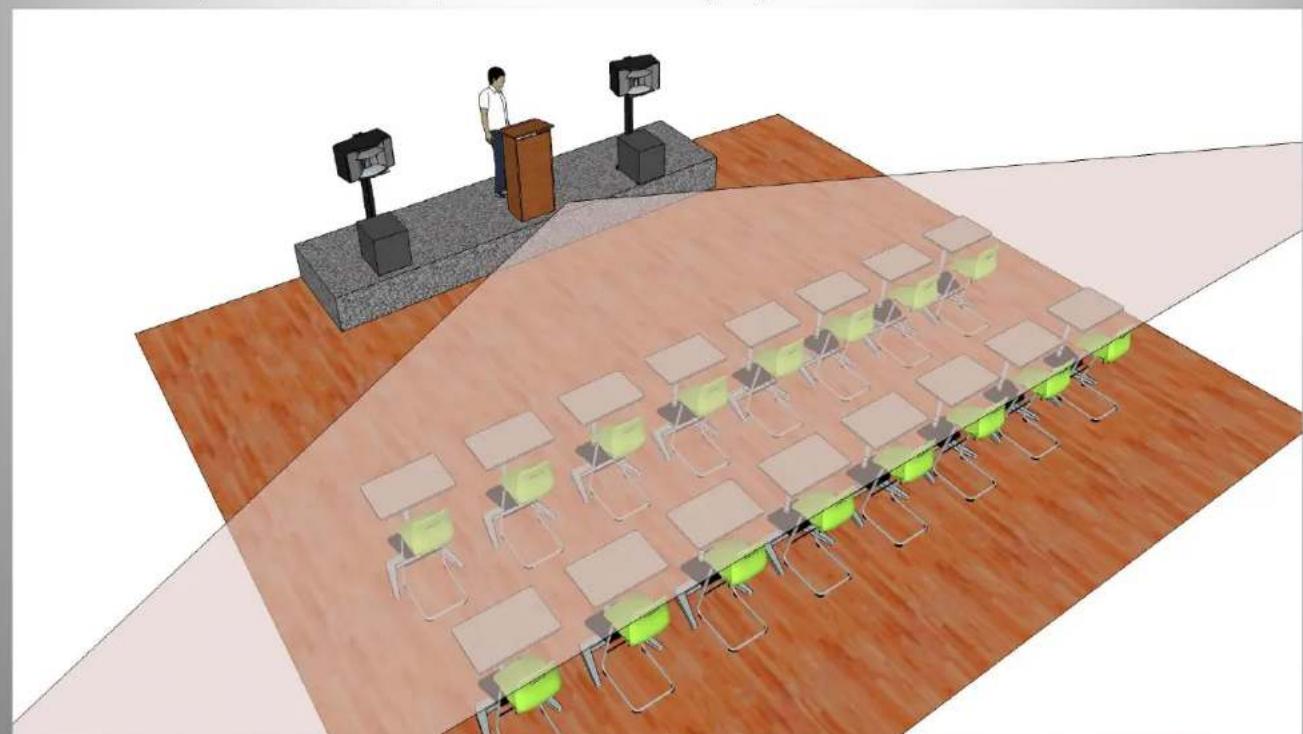
HR4 & HR4S are perfect for any teaching environment. Its 100 degree dispersion pattern allows everyone to hear the full stereo mix in great detail. Below, an almost zero-aiming-angle achieves a wide Stereo-Zone for a classroom.
natural_image
3D rendering of a classroom with green desks, speakers at podiums, and a person standing on stage (no text or symbols visible)OCEANWAYAUDIO 2011 N. SAN HERNANDI REVO, BARRICK, CALIFORNIA 51304
6) Signal Flow 2-Way & 3-Way
The HR4 is configured as a 2-way system with no programmed roll-off in the low end response. There is a factory preset installed that will allow the speaker's low frequency response to be extended by adding a sub-bass cabinet. Ocean Way Audio offers the S12A subwoofer which has been matched to create a balanced system response.
Select Preset 2 - (LED 1 on, LED 3 off / LED 4 on).

7) Inputs and Controls S12A
The Power Switch (toggle) has three positions.
1.) In the left most position the unit is powered OFF.
2.) In the center position the unit is in Auto mode. It can be powered on uniting the 12V trigger inputs or by feeding audio into the input XLR. In the absence of either it will enter STANDBY mode with the red LED illuminating.
When the trigger is activated or audio is supplied it will power up and the green LED will illuminate.
3.) The right most position is will power up to ON with the green LED illuminating. It will remain ON in this position.
The Voltage auto selects between 100v and 240v-115W 50/60HZ


Inputs and Controls S12A
GAIN is the volume control. A suggested starting position is 12 o'clock when matched with HR5 speakers. Adjust up
or down to suit positioning in your room. (Closer to a wall or a corner on the floor will increase the low frequency response.
LF Adjust incorporated a LF shelf @ 45 Hz +/- 5 db in 1 db increments
Crossover switch selects frequencies from 60 / 65 / 70 / 75 / 80 / 85 / 90 / 95 / 100 / 110 / 120hz
Delay adjusts from 0 to 20 ms.
12V trigger (AC or DC) will turn the unit on and off when power switch is in center (Auto) position. The jacks are paralleled to daisy chain to other auto powered products. With switch in center position and no trigger utilized, the unit will power ON when audio is sent to the input XLRs.
Balanced XLR IN & OUT jacks are paralleled and a direct feed through. Signal does not go through any electronics.
8) Specifications
| Tech Specs HR4 | |
| Powered YES. Accepts analog/digital inputs 2 | 4 bit / 192 kHz |
| Driver Configuration 2-way, compression-driven horns/waveguides | |
| 3-Way version available Yes | |
| HF Driver Size / Amp 1" / 125watts | |
| LF Driver Size / Amp 8" / 125watts | |
| AES3 Digital Inputs Yes | |
| Horizontal / Vertical directivity control 100 / | 40 degrees |
| Frequency Range 2-way 35Hz > 25kHz | |
| Maximum Peak SPL 2-way 116 db | |
| Enclosure Type Sealed | |
| Dimentions H 14" x W 25.5" x D 14" / 57lbs | |
| Tech Specs HR4S | |
| HR4S 3-Way, One Sub-Bass per channel | 12" Driver / 800watts per channel |
| Frequency Range | 3-Way 25Hz > 25kHz |
| S12A - Sub-Base | H 18" x W 18" x D 21.5" / 76 lbs |
| Maximum Peak SPL | 3-Way 118 db |
9) Warranty
Ocean Way Audio speakers are under limited warranty as described in the following conditions.
- Warranty period starts as of date of purchase from the authorized dealer.
- OWA reserves the right to request original purchase receipt as proof of the date of purchase.
- Electronic components and cabinetry are warranted for a period of two (2) years against manufacturing defect, covering parts and labor for necessary repairs.
- Speaker driver components are warranted for a period of one (1) year against manufacturing defect.
- The manufacturer's warranties are limited to physical defects in the materials, parts and workmanship used in making the product.
- Misuse, incorrect installation, handling, repairs or modifications performed by unauthorized persons, abnormal conditions, damage due to accidents such as power surges, water, fire, or any other are excluded from any warranty claims.
- OWA warrants all service repairs and replacements for 180 days from the date of return to the customer/owner.
Technical Support and Service
For warranty service and assistance, contact the original authorized dealer/distributor to arrange for return and/or repair of the product. OWA will strive to satisfy all service requests in the fastest manner possible. Under the warranty, OWA will repair, or at its discretion, replace the product at no charge, provided it is returned (postage paid) to an authorized OWA service center. Any shipping or duties incurred are the customer's responsibility. Products should be returned suitably packaged to protect from shipping damage, or in their original packaging. OWA shall be the sole and final authority to determine the validity of all warranty issues. All non-warranty repairs for current products will be charged according to the service repair pricing schedule. Repair prices will either be based on a flat fee for repair or replacement, or will be estimated depending on the repair deemed necessary.
10) Maintenance
Exterior surfaces of this product may be cleaned using a non-abrasive lint-free cloth lightly damped with water. Disconnect the mains power cable when cleaning to avoid risk of electric shock.
Do not use alcohol or ammonia based cleaners.
Driver active surfaces will not require cleaning as they are deep-set inside horn expansions

About Ocean Way
It all started with speakers. Ocean Way Recording began in 1968, as a showcase for Allen's custom monitors.
Allen needed impressive sounding material for his speakers so he began to record music that sounded dramatic! The studio business boomed and he met the demand with many rooms in several locations. At the peak of the studio business, Allen designed and owned four recording studio complexes.
Five time Grammy® Award winning Allen Sides has personally recorded over 1,000 albums, many of which have become audiophile classics. He has worked with the finest and most famous artists of the last four decades. Albums recorded in Allen's studios have sold over a billion copies. Allen's hearing capabilities enables our engineers to translate every sonic nuance, bringing a new dimension and understanding to what is possible in high-end speaker design. His ears are our final design tool.
Ocean Way Hollywood
Ocean Way Nashville
Ocean Way Record One
Ocean Way St. Barts

natural_image
Interior view of a vintage audio workstation with multiple control panels, consoles, and speakers (no visible text or labels)
natural_image
Interior view of a large audio control room with multiple audio equipment and red carpet (no visible text or labels)
natural_image
Interior view of a video studio with audio workstation, multiple monitors, and control panels (no visible text or symbols)
natural_image
Interior of a dimly lit audio studio with a vinyl record, keyboard, and monitor (no visible text or symbols)Through-out the history of Ocean Way Studios, we built the monitor systems for all the control rooms and private studios for selected elite cliental.
These many accomplishments, paved the way for
Ocean Way Audio
The HR Series delivers "the" sound of Ocean Way Studios in a free standing design.
Engineering speaker systems for professionals; incorporating 45 years of award winning experience

- Manual of Operations Ocean Way Audio HR4 (2-Way) and HR4S (3-Way) Sound System
- Contents
- 1) High Resolution HR4
- 2) Safety Instructions and Warnings
- Servicing
- Servicing and Replacement Parts
- Ventilation and heat sink
- Water and Moisture
- Cleaning
- Power -Cord Protection
- Lightning
- Accessories
- Connecting
- Sound Volume
- Precautions when connecting to MAINS IN
- DO NOT REMOVE MAINS CONNECTOR GROUND, IT IS ILLEGAL AND DANGEROUS.
- 3) Inputs and Controls HR4
- Master Volume
- 4) Input Selection and Legends
- HR4
- Selecting Presets
- 6) Signal Flow 2-Way & 3-Way
- 7) Inputs and Controls S12A
- Inputs and Controls S12A
- 8) Specifications
- 9) Warranty
- 10) Maintenance
- Do not use alcohol or ammonia based cleaners.
- About Ocean Way
- Ocean Way Audio
Brand : Ocean Way Audio
Model : HR4
Category : Audio