
DRV-A210 - Camera KENWOOD - Free user manual and instructions
Find the device manual for free DRV-A210 KENWOOD in PDF.


| Product Type | GPS Integrated Dashboard Camera |
| Model Number | DRV-A210 |
| Brand | Kenwood |
| Power Requirements | 5V / 2A; 12-24V DC (car power cable input) |
| Current Consumption | 320 mA |
| Sensor Resolution | 2.0M Pixel (1920 x 1080 effective) |
| Lens Type / Angle / Aperture | 6G / 136° / F1.8 |
| Recording Resolution | FHD 1920 x 1080 @ 30fps (default); also 720P 60fps |
| Screen Size | 2.7-inch LCD color screen |
| Screen Resolution | 960 x 240 pixels RGB |
| Dimensions (W x H x D) | 88 mm x 51 mm x 37.5 mm (3-7/16" x 2" x 1-1/2") |
| Weight | 78 g (2.8 oz) |
| Supported SD Cards | microSDXC/SDHC, 8 GB to 128 GB, Class 10 recommended |
| File Format | H.264 (MP4) for video; JPEG for photo |
| Key Features | GPS, G-Sensor, Parking Mode, Quick Release Magnetic Mount, Automatic Start/Stop, Built-in Microphone & Speaker |
| Cleaning Instructions | Wipe with dry silicone cloth; for lens, use soft cloth dampened with water |
| Safety Precautions | Do not operate while driving; install away from airbags; keep lens clean |
| Accessories Included | Dashboard camera, suction mount, adhesive mount, cigar lighter adapter cable, USB cable, cable clips, 16 GB microSD card |
Frequently Asked Questions - DRV-A210 KENWOOD
User questions about DRV-A210 KENWOOD
0 question about this device. Answer the ones you know or ask your own.
Ask a new question about this device
Download the instructions for your Camera in PDF format for free! Find your manual DRV-A210 - KENWOOD and take your electronic device back in hand. On this page are published all the documents necessary for the use of your device. DRV-A210 by KENWOOD.
USER MANUAL DRV-A210 KENWOOD
GPS Integrated Dashboard Camera
INSTRUCTION MANUAL
JVCKENWOOD Corporation
- Updated information (the latest Instruction Manual, etc.) is available from https://www.kenwood.com/cs/ce/.
Contents
Before Use 01
Dashboard Camera Function Guide 01
Precautions for Use 02
Accessories 09
Key Features 09
Parts Name and Functions .... 10
Installation and Connection ....13
Initial Settings 17
Basic Operation ....19
Settings 29
Connection with Computer 31
Using the Desktop Software ....32
Troubleshooting 42
Appendix 44
Specifications 47
Before Use
- The screen images and operation examples in this document were created for explaining the operating procedures.
- There may be screen images that differ from the actual screens or examples of operations not actually performed.
Disclaimer
- Please note that JVCKENWOOD shall not be responsible for any damages suffered by the customer or a third party as a result of incorrectly using this product, a failure during use of this product, or other trouble, or due to the use of this product, unless such liability is acknowledged by law.
Copyrights
- Recorded video, image, and audio content cannot be used for other than personal enjoyment without the consent of the copyright holder as specified in the Copyright Act.
- Please note that the recording of an event such as a show, performance, or exhibition may be restricted even when doing so for personal enjoyment.
Dashboard Camera Function Guide
With new technology readily available, JVCKENWOOD has developed an easy to use dashboard camera for everyday use. The device allows its user to record files in 1 / 3 / 5 minute lengths. These files are easy to download to your desktop or laptop.
In most instances, the video files are easily played on your mobile device.
While most cameras traditionally use the entire capacity of the SD card until it is removed, the device automatically deletes the oldest file to create space for the new video.
Dashboard camera offers three modes:
- Video Mode: Video mode will set to default when the device is active.
- Photo Mode: The device setting takes still photographs.
- Playback Mode: Users can view all previously recorded videos and photos taken.
FEATURES:
Automatic Start/Stop Technology:
Maintain full focus on the road! The vehicles ignition will let the device turn on while connected to your vehicles 12 V outlet or cigarette lighter socket. When the vehicle is turned off, the device will automatically shut down, preserving the device power for those moments you are not connected to permanent power.
The device lets users adjust camera settings to get the perfect shot. For a great photo every time, here are a few tips from the designers:
- Reduce the amount of sky in the picture. By adjusting the device towards the road, the automatic exposure compensation will be focused on the road and not the light from the sky.
- Position the device in the center of the dash. If you place the device behind the rearview mirror, you will avoid all distractions from the road.
- Remove any objects that will obstruct your shot such as the protective lens cover. Clear vision will allow you to record everything in one shot.
Precautions and notices
Warning! Do not operate the device while driving. Using this product does not change the requirement for a driver to take full responsibility for his or her behavior. This responsibility includes observing all traffic rules and regulations in order to avoid accidents, personal injury or property damage.
- For your own safety, do not operate the controls of the product while driving.
- A window mount is needed when using the device in a car. Make sure that you place the device in an appropriate place, so as not to obstruct the driver's view or deployment of airbags.
- Make sure that no object is blocking the camera lens and no reflective material is placed near the lens. Please keep the lens clean.
- If the car's windscreen is tinted with a coating, this may impact the recording quality.
- Connect the charger to a proper power source. The voltage requirements are found on the product case and/or packaging.
- Do not use the charger if the cord becomes damaged.
- Do not attempt to service the unit. There are no serviceable parts inside. Replace the unit if it is damaged or exposed to excess moisture.
Caring for your device
Taking good care of your device will ensure trouble-free operation and reduce the risk of damage.
- Keep your device away from excessive moisture and extreme temperatures.
- Avoid exposing your device to direct sunlight or strong ultraviolet light for extended periods of time.
- Do not place anything on top of your device or drop objects on your device.
- Do not drop your device or subject it to severe shock.
- Do not subject your device to sudden and severe temperature changes. This could cause moisture condensation inside the unit, which could damage your device. In the event of moisture condensation, allow the device to dry out completely before use.
- The screen surface can easily be scratched. Avoid touching it with sharp objects. Nonadhesive generic screen protectors designed specifically for use on portable devices with LCD panels may be used to help protect the screen from minor scratches.
- Never clean your device with the power on. Use a soft, lint-free cloth to wipe the screen and the exterior of your device.
- Do not use paper towels to clean the screen.
- Never attempt to disassemble, repair or make any modifications to your device. Disassembly, modification or any attempt at repair could cause damage to your device and even bodily injury or property damage and will void any warranty.
- Do not store or carry flammable liquids, gases or explosive materials in the same compartment as your device, its parts or accessories.
- To discourage theft, do not leave the device and accessories in plain view in an unattended vehicle.
• Overheating may damage the device.
Precautions for installation
- Install the device in a position where it will not block the front view of the driver (position where hidden by the rear-view mirror).
• Install the device so that it is within the wiping range of the wiper.
• Install the device in a position where it will not interfere with the movement of the rear-view mirror.
• Take care not to install the device over the vehicle inspection sticker or other sticker.
• Take care not to install the device where it will interfere with driving or airbag operation. - When installing the device in a vehicle equipped with a driving support system, check the instruction manual of the vehicle and then select an installation position that will not interfere with the driving support system.
- If the device is installed incorrectly, event recording or parked recording may not work correctly.
- Refer to "Installation and Connection" for the loosening of fixing knob, installation orientation, installation angle, and other information and then install the device correctly.
- Do not install the device near a digital terrestrial television antenna or an electrical component.
- Doing so may reduce television receiver sensitivity or cause flickering and noise.
- When selecting a position for the suction mount, make sure it's on a glass surface that is smooth and free of paint.
- Before mounting, clean the area with a dry/clean cloth and add a small amount of moisture to the windshield. This allows a stronger bond to form between the glass and the suction mount.
- When fixing the device with the adhesive mount, use a commercially available cleaning cloth or the like to wipe off all dirt and grease on the mounting surface. If the device is re-affixed or mounted using, for example, general-purpose double-sided tape, the adhesion strength may weaken and cause the device to fall.
- After mounting the device, leave it for 24 hours before use to enable the mounting strength of the adhesive mount to improve. Failing to do so may result in the adhesion of the adhesive mount becoming weak and the device falling.
• Fix the cord in place with tape or the like so that it does not interfere with driving.
Precautions for use
- Do not block the camera lens, get dirt on it, or place a reflective object near it.
- When LED traffic lights are recorded, video in which they appear to be flickering or flashing may be recorded. JVCKENWOOD assumes no responsibility with regard to the distinguishing or recording of traffic lights.
If coating is used on the windshield of the vehicle, recording quality may be affected.
- There is no guarantee that the device can record video in all conditions.
Cleaning the device
- When the device is dirty, wipe it with a dry silicone cloth or other soft cloth. If the device is very dirty, remove the dirt with a cloth with neutral cleaner on it then wipe off the cleaner. Wiping the device with a hard cloth or using a volatile substance such as thinner or alcohol may cause scratches, deformation, deterioration or other damage.
- When the lens is dirty, gently wipe it with a soft cloth dampened with water. Rubbing the lens strongly with a dry cloth may cause scratches.
If you notice a problem with the device
If you notice a problem with the device, first refer to "Troubleshooting" (P. 42) and check whether there is a way to resolve the problem.
If the device does not return to normal after the reset, turn off the power of the device and then contact your dealer or nearest JVCKENWOOD service center.

Information on Disposal of Old Electrical and Electronic Equipment and Batteries (applicable for countries that have adopted separate waste collection systems)
Products and batteries with the symbol (crossed-out wheeled bin) cannot be disposed of as household waste.
Old electrical and electronic equipment and batteries should be recycled at a facility capable of handling these items and their waste by products.
Contact your local authority for details in locating a recycle facility nearest to you.
Proper recycling and waste disposal will help conserve resources while preventing detrimental effects on our health and the environment.

Declaration of Conformity with regard to the RE Directive 2014/53/EU
Declaration of Conformity with regard to the RoHS Directive 2011/65/EU
Manufacturer:
JVCKENWOOD Corporation
3-12, Moriyacho, Kanagawa-ku, Yokohama-shi,
Kanagawa 221-0022, JAPAN
EU Representative:
JVCKENWOOD Europe B.V.
Amsterdamseweg 37, 1422 AC UITHOORN, THE NETHERLANDS
Hereby, JVCKENWOOD declares that the radio equipment DRV-A201 is in compliance with Directive 2014/53/EU. The full text of the EU declaration of conformity is available at the following internet address:
Français
Before you get started, check you have everything below.

natural_image
Six different product icons arranged horizontally: a camera, a mechanical device, cable, a pen, a stand, and stacked bricks (no text or labels visible)Dashboard Camera Suction mount Cigar Lighter
(with 16GB microSD card)
Adapter Cable
USB Cable Adhesive Mount Cable Clips
* Product appearance may differ slightly to that shown above.
Key Features
- 2.7" LCD Color Screen
We developed a screen that perfectly fits your camera, without any loss of resolution. This design allows you to use the playback feature, instantly letting you view the shot you just captured.
- Quick Release Magnetic Mount
We know how difficult it is to maintain focus with movement. We developed a mount that is uniquely designed for easy attaching and removing so you can focus on capturing the perfect shot.
- G sensor/File Protection
The dashboard camera's built-in sensor detects an outside force, forcing the device to save what has been just recorded. The file can also be manually saved. By pressing our easy to access button around the screen, you are able to save an individual file.
- Automatic Start/Stop Tech
The dashboard camera comes with built-in sensors that automatically turn the device on and off with the vehicle.
- Built-In Microphone & Speaker
A built-in microphone and speaker come standard. The feature also works with the device's playback feature.
- GPS Data
Dashboard camera is able to record your location and speed while filming with the magnetic GPS mount.
- Parking Mode
The dashboard camera has a parking mode, but a unique feature enables the device to automatically record 30 seconds of video if there is any physical movement of the vehicle. This feature requires hardwire kit CA-DR1030(optional accessory) to permanent power.
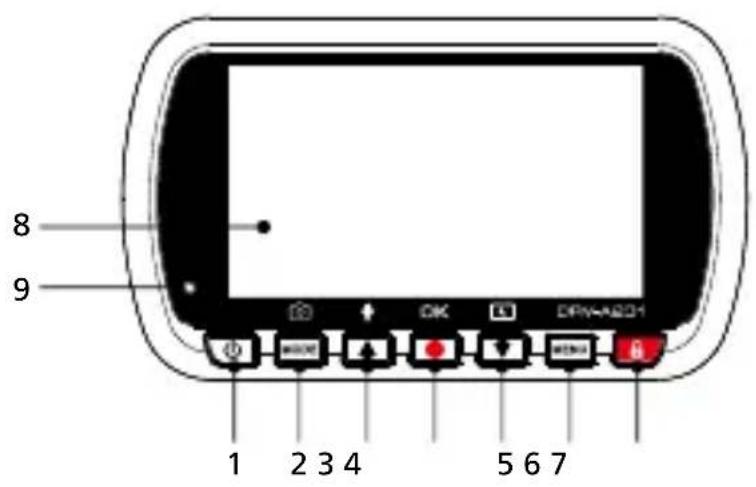
1. Power Button
Press and hold the button for 3 seconds to turn the device on/off.
2. Mode/Screen Shot Button
Mode
This button allows you to navigate between video, photo and playback modes.
Screen Shot
While you are recording in video mode, press the button and you will be able to take a screenshot of the current frame.
3. Up/Mute Button
Up
Navigate up within menus or go to the previous file in playback mode.
Mute
Turn on or off the audio recording function while in video mode.
4. Record/OK Button
Record
In Video mode, press to start or stop recording.
In Photo mode, press to take a photo.
OK
The confirm button used to select options in menus.
5. Down/Screen Off Button
Down
Navigate down within menus or go to the next file in playback mode.
Screen Off
Turn on/off the LCD screen.
6. Menu Button
Press this button to open the menu of the current mode. Press this button twice to enter the general setting menu.
7. File Protect Button
Simply press the button to protect the current video file from overwriting.
Note:
- If the button is pressed within the first third of a video clip, the previous clip will also be protected.
- If the button is pressed within the final third of a video clip, the next clip will also be protected (if recording continues).
8. Screen
The device is equipped with a standard 2.7" LCD color screen to let you view.
9. Status LED Indicator
Red: Power On Red (Flashing): Recording Blue: Charging
10. Connector Port
Attach the magnetic connector to the connector port.
11. Speaker
System sound and recorded footage sound.

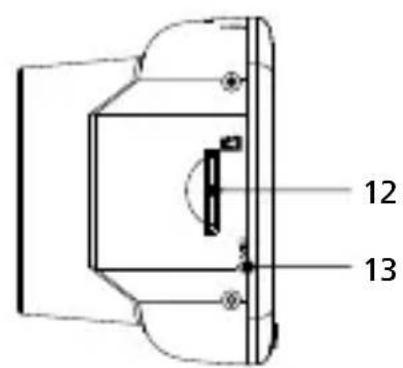
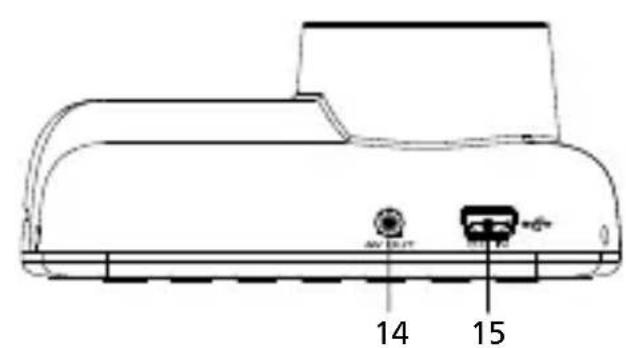

12. microSD Card Slot
Insert your microSD card here. Push your memory card into the slot until you hear a click.
(microSD card is inserted into microSD Card Slot at the factory shipment condition)
Insert Your microSD Card Into The Device
The device is designed to allow a standard microSD card to record your footage. Before installing, make sure the gold end of the card is facing the LCD screen. Once it's aligned with the slot, push the card in and listen for the CLICK that will confirm it is secure.
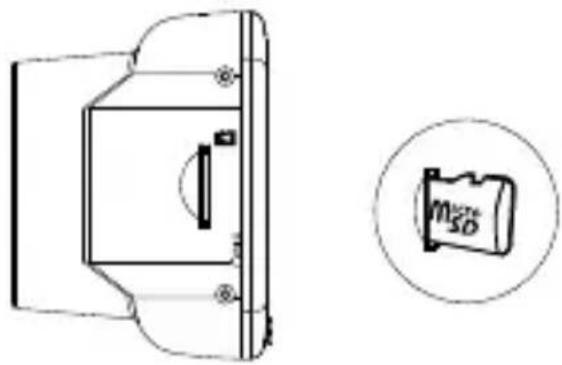
natural_image
Technical line drawing of a mechanical component with a circular inset showing a labeled component (no text or symbols present)TIP:
- If you cannot hear the CLICK, take a small coin by the edge and push on the outside end of the card until the sound is made.
- Remember: DO NOT REMOVE OR INSERT THE MEMORY CARD WHILE THE DEVICE IS TURNED ON.
- The device will power off automatically when you insert or remove the SD card.
13. Microphone
Built-in microphone for audio recording.
14. AV Output
The device can be connected to other screen by using the AV cable. (commercially available)
15. DC-IN/Data transfer Port
By connecting the device with the supplied cigar lighter adapter cable you are able to charge the device. This will also be utilized to let you connect the USB cord to your computer. You can either connect the cigar lighter adapter cable with the device or magnetic connector.
16. Reset Button
On the rare occasions the device has a problem, use the reset button to shut down the device. Simply press the reset until the device turns off and the device will automatically turn on.
Installation and Connection
Recommended installation position
• Install the device in a position where it will not block the front view of the driver (position where hidden by the rear-view mirror).
• Install the device so that it is within the wiping range of the wiper.
- Mounting the device to the center of the windshield behind the rear-view mirror will facilitate optimal video recording.

natural_image
Simple line drawing of a car's front wheel and side wheel (no text or symbols)Left-hand Drive

natural_image
Simple line drawing of a car's front wheel and side wheel (no text or symbols)Right-hand Drive
Caution
When passing the power cord through the front pillar or another part, observe the points below when performing the wiring work.
- Wire the power cord farther forward or farther rearward than the airbag so that it does not interfere with the airbag.
- In the case of a vehicle in which the front pillar cover is fixed in place with special clips or the like, the clips may need to be replaced after you remove the front pillar cover. For how to remove the front pillar cover, the availability of replacement parts and other information, contact the vehicle dealer.
- Fix the power cord in place with commercially available soft tape or the like so that it does not interfere with driving.
1.
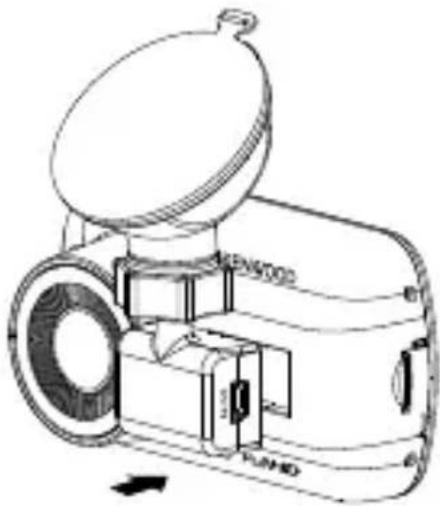
1.1 CONNECT THE DEVICE TO THE MAGNETIC MOUNT
Attach the device onto (e) the magnetic connector on the mount.
Make sure you align the device within the connector port for proper installation.
natural_image
Line drawing of a vintage digital camera with a lid and external components (no text or symbols)1.2 REPLACE THE SUCTION MOUNT WITH THE ADHESIVE MOUNT:

There are two types of mounts included in the package. One is a suction-cup and the other is an adhesive type. The suction mount makes it easier to attach and detach from the windshield while the adhesive mount provides more solid support for the camera.
The magnetic connector is already installed on the suction mount. If you prefer using the adhesive mount, please follow the guide below:
How to use the Adhesive Mount:
i. Loosen the (c) locking ring on the suction mount and pull the (e) magnetic connector out.
ii. Next, loosen the (c) locking ring from the adhesive mount, and plug the (e) magnetic connector into the adhesive mount.
iii. Clean the installation area on the windshield and peel off the plastic covering. Adhere it to the windshield.

2. ATTACH THE MOUNT TO THE WINDSHIELD & START RECORDING
Remove the protective plastic film and select a position on the windshield where it won't distract you. Then, put the suction mount in place.
Release the (b) locking lever from the mount by pulling down on it. Hold the suction mount in place and press against the window. While holding it in place, pull the (b) locking lever back to lock the mount

natural_image
Line drawing of a handheld device with a circular lens and control panel (no text or symbols)3. ADJUST THE ANGLE
Loosen the (c) locking ring and adjust the device to the angle you want. When you find the perfect angle, remember to tighten the (c) locking ring again.
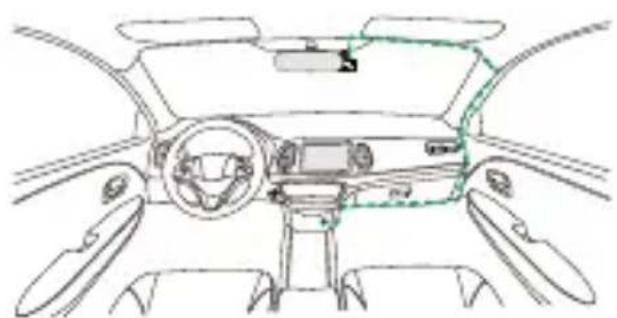
4. CONNECTING TO CIGAR LIGHTER SOCKET
Connect the cigar lighter adapter cable that is in the package to your vehicle's 12 V outlet. The provided cable clips can help you keep the power cable neat.
natural_image
Line drawing of a car interior showing dashboard, steering wheel, and dashboard (no text or symbols)12-24V DC

natural_image
Line drawing of a car interior showing dashboard, steering wheel, and dashboard (no text or symbols)12-24V DC
Plug the cigar lighter adapter cable into the (d) power socket of the mount or the device. This will allow the device to begin charging.

natural_image
Technical line drawing of a GPS RAND instrument with no visible text or symbols! Caution
Before performing the connection work, first check that the engine key is removed and then be sure to disconnect the negative terminal of the battery to prevent a short-circuit accident.
THE FIRST-TIME SETUP
When connecting the power, the device will turn on and display the first-time setup guide below.
- Select the Language

- Select the Country and Time Zone


- Set the Time and Date

- Select the Speed Unit

TIP:
You can reset the settings either by operating inside of the SETUP MENU, or by restoring defaults.
From now on, the device will automatically turn on and start recording once power has been made available from the 12 V outlet. Just start the vehicle and start driving!
- If there is no 12 V outlet or cigar lighter socket for your vehicle, use the included USB power cord.
- DO NOT wire the device directly to the car cigar lighter socket or any 12 V outlet. Doing so will result in permanent damage to the device.
- The device has a hardwire kit CA-DR1030(optional accessory)
that will directly connect to your vehicle's fuse box. This will allow you to have your 12 V outlet available for other use.
Please read carefully and follow the instructions below to help you operate the device safely.
-Video Mode
The following information will help you better understand the icons in VIDEO MODE and their relative functions. Some icons show up only when corresponding functions are activated.

- Mode: Indicates the device is in video mode.
- Resolution: Displays the current resolution.
- G Sensor: The current sensitivity level of G-Sensor.
- Video Length: The duration of each video clip.
- Exposure: Indicates the current exposure level settings.
- GPS: If this icon flashes, it indicates the device is locating GPS signal.
When the GPS signal is found, the icon will stop flashing and remain stable on the screen. - Recording Duration: This will indicate the length of the current recording.
- Parking Mode Sensor: Indicates the parking mode sensor is on.
- File Protection: Indicates the current video clip is protected.
- Date: Displays current date.
- Time: Displays current time.
- Microphone: When the audio recording function is off, there will be a red line across the icon.
- Power Status: Indicates if the device is charging or not.
The device's default settings have been set for you to use the device without needing to change the settings.
If you need to make adjustments to the settings, the following instructions will help you.
-Video Menu
Access the VIDEO MENU by pressing the MENU button while in VIDEO MODE.
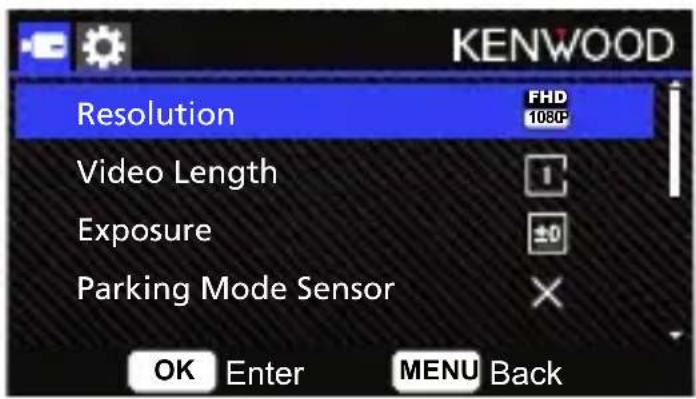
Use the UP and DOWN buttons to select setting options and press the OK button to enter the sub-menu.
Once you access the sub-menu, highlight the desired setting and press the OK button to confirm your selection and to return to the VIDEO MENU.
Press the MENU button twice to return to video mode.
TIP:
- You are not able to access the device menu while the camera is recording.
• Resolution: Choose the video resolution.
OPTIONS: 1080P 30fps (default)/ 720P 60fps
Note: 720P 60fps resolution setting, the angle of the image will be smaller and darker than 1080P 30fps.
- Video Length: Set the length for each individual video clip. The video recorded by the device will be split and stored as individual video clips. The loop recording function will automatically overwrite the oldest and non-protected video clip when the memory card is full.
OPTIONS: 1 Minute (default)/3 Minutes/5 Minutes
- Exposure: Adjust exposure levels settings.
OPTIONS: +2/+1/0 (default)/-1/-2
- Parking Mode Sensor: Parking mode function will be available after turning on the parking mode sensor and connecting the hardwire kit CA-DR1030(optional accessory) to the permanent power.
OPTION: On/Off (default)
If the device does not detect any vibration more than 5 minutes, it will turn off the device itself automatically and enter the parking mode.
Once the device detects any vibration in the parking mode, it will turn on the device automatically and record the video for 30 seconds. In this duration, if the device detects any other vibration, it will extend recording for 30 seconds until there is no vibration at all and turn off the device back to the parking mode.
If the device detects the constant vibration more than 15 seconds, it will assume that the driver is driving the car and automatically switch from Parking Mode to Normal Mode.
- G Sensor: G sensor is the sensor that can detect forces. When it senses any forces, it will protect the current file automatically. Adjust the sensitivity of G sensor here. OPTIONS: High/Medium (default)/Low/Off
- GPS: Turn the GPS function ON or OFF. OPTIONS: On (default)/Off
- Speed Units: Adjust the unit for speed data. OPTIONS: MPH (default)/KMH
- Screen Saver: the device has a function to let the screen shut down after a period of inactivity. Press any button to re-activate the display. OPTIONS: Off (default)/30 Seconds/2 Minutes Note: When Parking Mode is activated, after 2 minutes of recording, LCD Display will automatically turn off. (Parking mode LCD display time setting: N/A)
- KENWOOD Stamp: Turn the KENWOOD logo stamp ON or OFF on the recorded files. OPTIONS: On (default)/Off
- Time & Date Stamp: Turn ON or OFF the date stamp mark on the recorded files. OPTIONS: On (default)/Off
- Information Stamp: Turn the Information stamp including the acceleration, speed data on the recorded files ON or OFF. OPTIONS: On (default)/Off
- License Plate Stamp: Input your license plate number to put your license plate stamp on the recorded files.
NOTE: When you are in the SETUP MENU -> Restore Defaults, you will be able to restore all the settings to the device's default settings.
-Photo Mode
While in VIDEO MODE, press the MODE button to enter PHOTO MODE. In PHOTO MODE, you are able to take stationary photos.
The following instructions will explain the icons in PHOTO MODE. Some icons show up only when corresponding functions are activated.
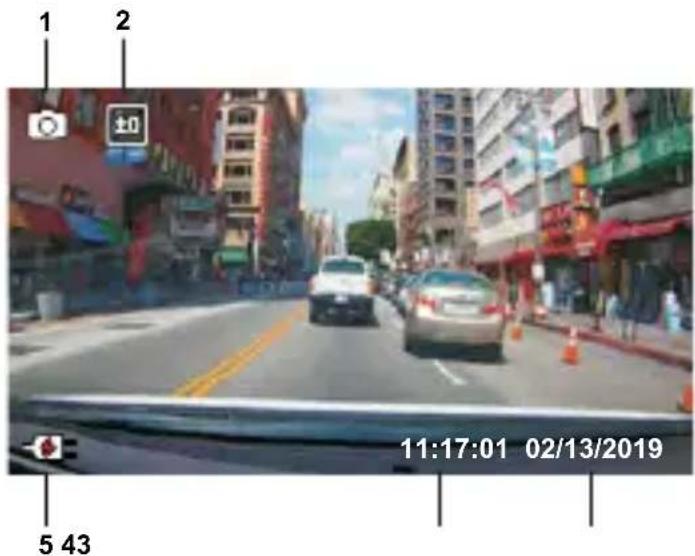
- Mode: Indicates when the device is in photo mode.
- Exposure: Indicates the current exposure level settings.
- Date: Displays current date.
- Time: Displays current time.
- Charging Indicator: Indicates if the device is charging or not.
-Photo Menu
Access the PHOTO MENU by pressing the MENU button while in PHOTO MODE.

Use the UP and DOWN buttons to select setting options and press the OK button to enter the sub-menu.
Press the MENU button twice to return to PHOTO MODE.
- Exposure: Adjust exposure levels settings. OPTIONS: +2/+1/0(default)/-1/-2
- Time & Date Stamp: Turn ON or OFF the date stamp mark on the photos. OPTIONS: On (default)/Off
NOTE: When you are in the SETUP MENU -> Restore Defaults, you will be able to restore all the settings to the device's default settings.
-Playback Mode
While in PHOTO MODE, press the MODE button to enter PLAYBACK MODE In PLAYBACK MODE, you are able to review the videos and photos you have stored.
DIRECTORIES
Press the UP or DOWN buttons to navigate through the menu.
Protected: The directory for all protected videos.
Video: The directory for all unprotected videos.
Note: If the video file is protected under the playback mode, the file will move in the protected folder.
Photo: The directory for all photos.

VIDEO FILES
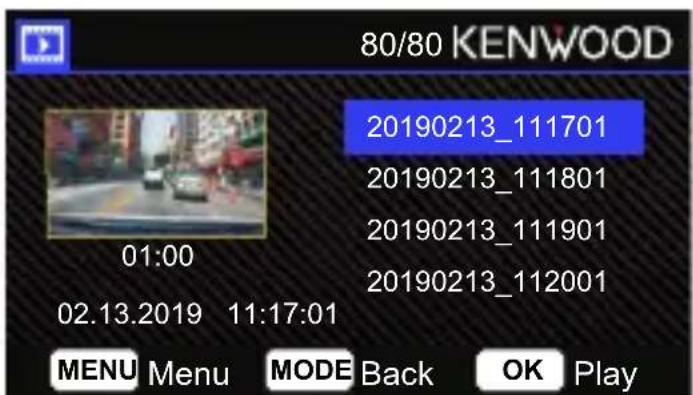
Use the UP and DOWN buttons to select the video file and press the OK button to play. Use the Protect button to protect/unprotect the video file, the file will be moved to Protect/Video folder immediately.
Video file name: The format of the video file name is yyyymmdd_hhmmss. For example, 20190111_111701 mean this file was taken at January 11, 2019, 11:17:01.
The following instructions will explain the icons in Video File.

KENWOOD Stamp: Logo, can be turned on/off in VIDEO MENU Time & Date Stamp: Date, Time, can be turned on/off in VIDEO MENU Information Stamp: Accelerator Data, Speed, Latitude & Longitude, can be turned on/off in VIDEO MENU

- Mode: Indicates when the device is in PLAYBACK MODE.
- File Type: Indicates the file type is protected.
- Playback Progress: Displays the current playback time.
- Date & Time: Indicates the date and time of the recorded file.
- Playback Controls: Use the device buttons as instructed below.

OK: PLAY/PAUSE.

MENU: DELETE or PROTECT the video.

UP: REWIND.

DOWN: FAST FORWARD.

MODE: STOP playing video and go back to Video/Protected directory.
- Charging Indicator: Indicates if the device is charging or not.
- Protected File: Indicates the selected file is protected.
PHOTO FILES

Use the UP and DOWN buttons to select the Photo file and press the OK button to play. Use the Protect button to protect/unprotect the photo file.

- Mode: Indicates when the device is in PLAYBACK MODE.
- File Type: Indicates the file type is photo.
- Date & Time: Indicates the date and time of the recorded file.
- Playback Controls: Use the device buttons as instructed below.

UP: Previous file

DOWN: Next file
- Charging Indicator: Indicates if the device is charging or not.
DELETING FILES
Highlight the DELETE option and press the OK button.
TIP: PROTECTED FILES CANNOT BE DELETED.

You will have the following options:

Once selected, follow the on-screen instructions to delete the current file.

Once selected, follow the on-screen instructions to delete All files.
PROTECTING/UNPROTECTING FILES
Highlight the PROTECT/UNPROTECT option and press the OK button.

You will have the following options:

Select Protect File, follow the on-screen instructions to protect the current file.

Select Unprotect File, follow the on-screen instructions to unprotect the current file.

To Protect All Files, select the option then follow the on-screen instructions to Protect All files in the current folder.
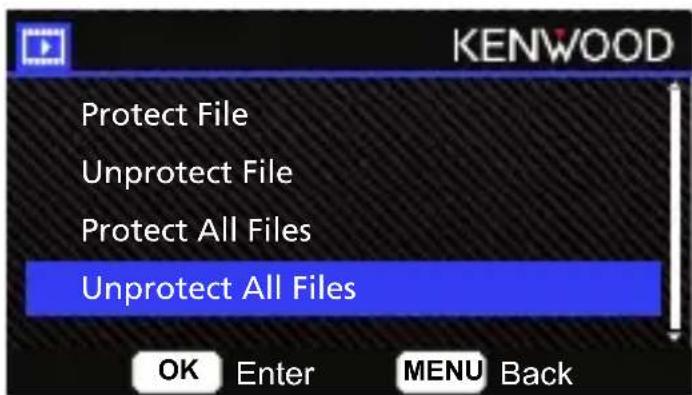
Select Unprotect All Files, follow the on-screen instructions to Unprotect All files in the current folder.
Access the SETUP MENU by pressing the MENU button twice.
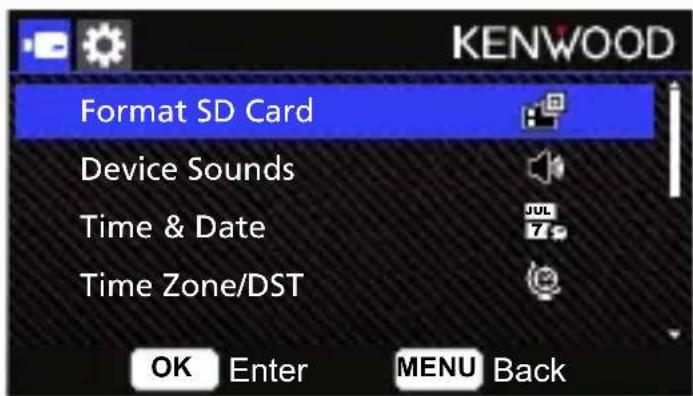
Use the UP and DOWN buttons to select setting options and press the OK button to enter the sub-menu.
Once you access the sub-menu, highlight the desired setting and press the OK button to confirm your selection and to return to the SETUP MENU.
Press the MENU button to return to the current mode.
Note: The default settings have been selected for great image quality and ease of operation. Under most circumstances, you don't need to change the settings.
Note: The setup menu cannot be accessed while the camera is recording.
- Format SD Card: Format the memory card. Formatting will remove ALL the files in the card.
OPTIONS: Yes/No
• Device Sounds: Adjust the button beep sound and voice recording.
OPTIONS:
Beep: On (default)/Off
Audio Rec: On (default)/Off
- Time & Date: Adjust the TIME and DATE as required by using use the UP and DOWN buttons to set the value. Press the OK button to save the setting and press the MENU button to return to the SETUP MENU.
• Time Zone/DST: Select the time zone setting.
OPTIONS: -12/-11/-10/-9/-8/-7/-6/-5/-4/-3.5/-3/-2.5/-2/-1/GMT/
+1/+2/+3/+4/+5/+6/+7/+8/+9/+10/+11/+12
• Language: Select a preferred language.
OPTIONS: English (default)/Deutsche/Français/Nederlands/Italiano / Español / Português/Pусский/ Polska /Česky/Română
• Country: Select a country and time zone setting.
OPTIONS: United States/Canada / Russia / Spain/Germany / France/Italy / Netherlands/Belgium/Poland / Czech / Romania/United Kingdom/Others
• Image Reversal:
Rotate the video image and the screen 180 degrees.
OPTIONS: On/Off(default)
- Restore Defaults: Reset all the settings to the factory default.
- System Info: Displays the firmware version, card info, and GPS satellite signal. OPTIONS:
System Info: Displays the firmware version.
Card Info: Displays the memory card information.
Satellite Signal: The count of how many satellite signals the device is receiving.
NOTE: Make sure the Dash Cam is not recording. Press and Hold the File Protect button for 3 seconds on the device to enter the System Info.

Connection with Computer
When you use the provided USB cable to connect the device to your computer, the LCD screen will show two available options.
- USB Storage
- Dash Cam
Use the UP and DOWN buttons to select the necessary function, and press the OK button to continue.
USB STORAGE
When you have connected the device to the computer, the device will operate as a card reader. Your computer will have a pop up of a new drive for you to browse all the video and photo files.
Note: The device is a "Read Only" device. If you want to copy/delete/edit the files, remove the SD card and use another card reader to connect your computer.
Remember to always turn off the device before disconnecting it from your computer.
DASH CAM
When you choose this option, the device will turn on and work normally while the device is being charged.
Note: Remember to always turn off the device before disconnecting it from your computer.
"KENWOOD VIDEO PLAYER" is a desktop software for displaying video recorded with the device.
System Requirements for "KENWOOD VIDEO PLAYER"
OS: Microsoft Windows 10, Windows 8.1, Windows 7* (except for the Windows 10 Mobile, Windows RT)
*Windows 7 Service Pack 1 must be installed.
*Microsoft Visual C++ must be installed.
* DirectX XAudio2 must be installed(Windows 7 and older version).
OS: Apple Mac OS X 10.11 (El Capitan) or later
Microsoft, Windows, and DirectX are registered trademark or trademark of Microsoft Corporation in the US and other countries.
Macintosh, Mac are trademarks of Apple Inc., registered in the U.S. and other countries.
Installing the Software
Install the software in a computer environment in which you have administrator's rights.
-
Download the installer from https://www.kenwood.com/cs/ce/
-
Install according to the on-screen instructions.
Playback:

- Video time line :
Drag the Video time line bar to Rewind or Forward to cue Video, Speed and G-Sensor date.
- Video play control buttons :
Available options from left to right are stop, last clip, last frame, play, next frame next clip.
Available hot keys for individual options are
(1) Play / Pause: space
(2) Stop: esc
(3) Last frame: left
(4) Next frame: right
(5) Next clip: N
(6) Last clip: B
- Full screen display :
Toggle to fit the image to the entire screen.
- Hot key: Alt + Enter
- Video volume adjustment :
Drag this to change the audio volume.
- Default volume: 100%
- Digital zoom in / out :
Roll the mouse wheel forward/backward on the video area or drag this to change the zoom in/out.
- Video play speed :
Click to speed up / down videos on the main screen.
Available speed options may range from one quater to quadruple to original one.
-Default speed : 1X
- Share Button :
Click to open different sharing options.
- Video edit mode :
Click to open the video edit function window.
- Screen shot :
Click to capture the current image displayed on the main screen and save the file in a given space.
-Default location : installation root directory /Snapshot.
- Speed :
Display the speed of the car in the video when it was recorded. You may change the UOM of speed under Setup → Speed Unit.
(Function available on the device with built-in GPS)
-Unit of measure (UOM) option : Imperial Unit or Metric Unit
-Default unit of measure : MPH
- G-sensor data :
Display the G-data of the vehicle in the video when it was recorded.
- Chart of G-sensor data :
Display the G-data of the vehicle in the video when it was recorded.
- Video shot on :
Display date and time of the video when it was recorded.
- Latitude :
Display the latitude of the video where it was recorded.
(Function available on the device with built-in GPS)
- Longitude :
Display the longitude of the video where it was recorded.
(Function available on the device with built-in GPS)
- Driving direction :
Display the direction of the video where it was recorded.
(Function available on the device with built-in GPS)
- Average Speed :
Display the average speed of the video where it was recorded.
(Function available on the device with built-in GPS)
- Max Speed :
Display the max speed of the video where it was recorded.
(Function available on the device with built-in GPS)
- Google Maps :
Display the location of the video where it was recorded.
(Function available on the device with built-in GPS)
- Add the file / Remove the file :
Click the "Add" key to display the "add file" window. Click the "Remove" key to erase the selected files from the play list.
- File group / File ungroup :
You may group multiple files into the playlist then play them in one file and link the data of each file to display in data table. For example, adding 5 1-minute length files into one group will end up with a 5 minutes display time shown in the data table. The name of a group is a string of the name of the first file suffixed with the number of files in the group. That is, for a group of 5 files with the first name "20180925_191823", the name of the group is "20180925_191823(5)".
- Video playlist :
A video thumbnail will show in this table after the videos added in the list.
How to Edit the Video:
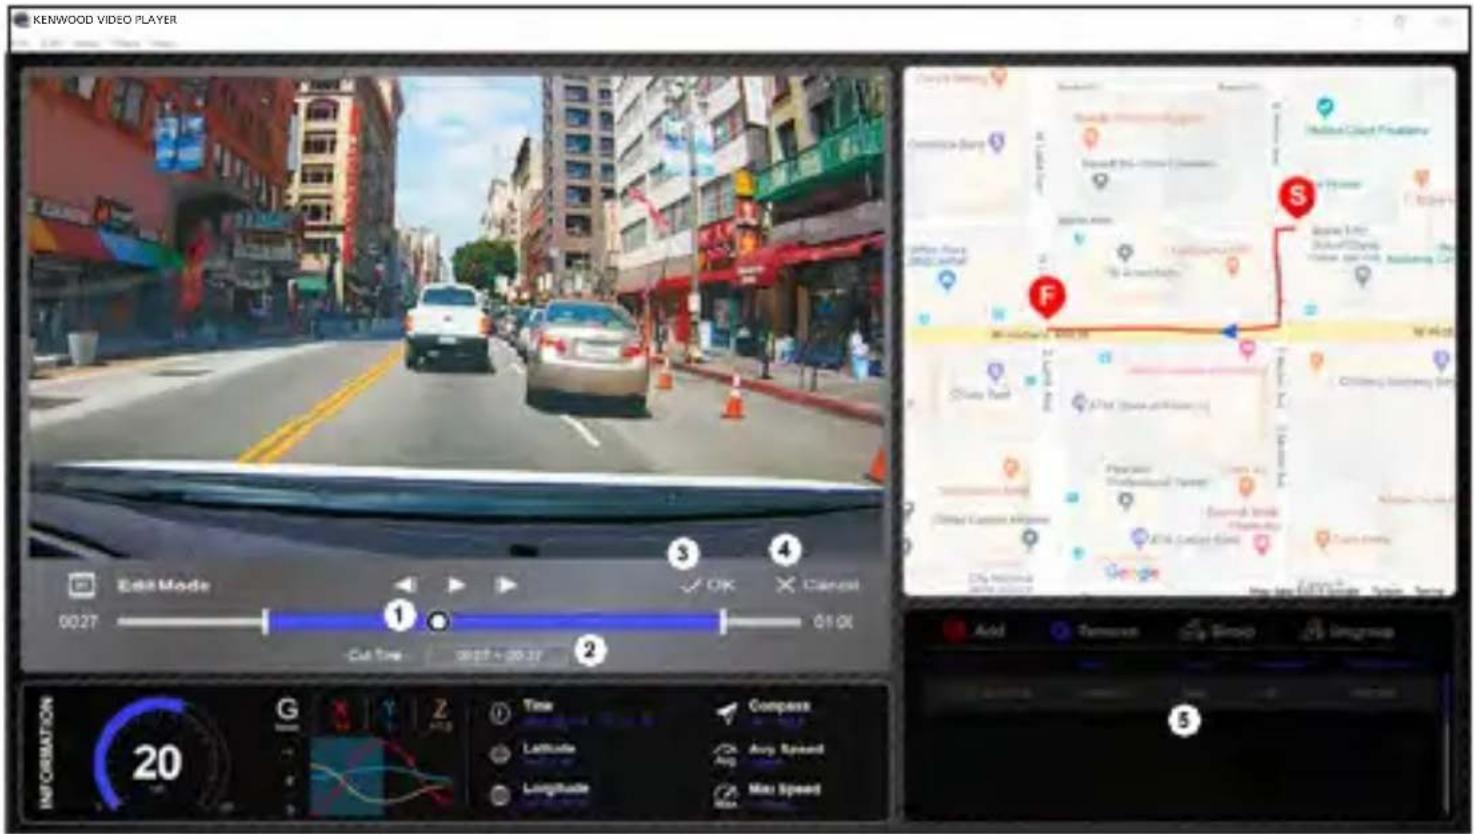
- Edit the timeline of the video by moving the white block on the timeline to set up the edit scope of video.
- Edit scope of the video. You may input a number to change the size of this scope.
- Confirm and click to validate the current work and proceed with the next step.
- Click to exit the video edit mode.
- The software system bar and video playlist stop functioning in video edit mode.

-
Remove audio file: Check to remove the audio file of the exported video.
-
Remove the GPS and G-sensor data: Check to remove the GPS and G-sensor file of the exported video.
-
Image export: Select the target storage location of the image file and its name. Default location: installation root directory / Edit video

1. Image processing:
Proceed with image processing once the image export options are setup.
2. Export status (1):
The image file export progress is presented as a percentage symbol "%" and is synced with item 3.
3. Export status (2):
The image file export progress is presented by a frame being filled with layered colors ink and synced with item 2. The export is finished once the frame is fully inked in layered colors.

1. OK:
Click to go back to the play mode page.
2. Open folder:
Click to open folders with image files saved in there.

1. Retry:
Click to export the image file again with the previous settings.
2. Cancel:
Click to abort image file export and go back to the video edit page.

1. Yes:
Click to go back to the play mode page.
2. No:
Click to abort image file export and go back to the video edit page.
-Share Mode

Click Share → Share Videos in the software system bar at the top of the window or the community sharing icon in the interface to display the sharing window.
- To share the current video:
When two files are playing, the one with the active speaker icon will be shared.
- To share the non-current video:
Click and open the file selection window.
- Next step:
Click to go to the next step.

1. Select a community platform:
You can select just one community platform and the one being selected will be circled in layered colors.
2. Select the privacy mode:
You can select the privacy mode of Public, Private, and Unlisted when you upload the video.
3. Upload title:
The title item will define the name of the video when you upload the video, you can select the Auto: "DD/MM/YYYY (default) – Dash Cam – KENWOOD VIDEO PLAYER" or define the title by yourselves.
4. Last step:
Click to go back to the last step.
5. Next step:
Click to go to the next step.

- File upload failure:
This page displays if an upload failed or there is a server connection timeout.
- Last step:
Click to go back to the last step.

1. Connect to community platform:
The message "Connecting to Social Media..... Please Wait." displays when a connection is being initiated. Your default browser will display and connect to the selected community platform. You are required to bundle your account ID with the platform for connection the first time only (no longer needed once bundled).
2. Cancel:
Click to go back to the last step.
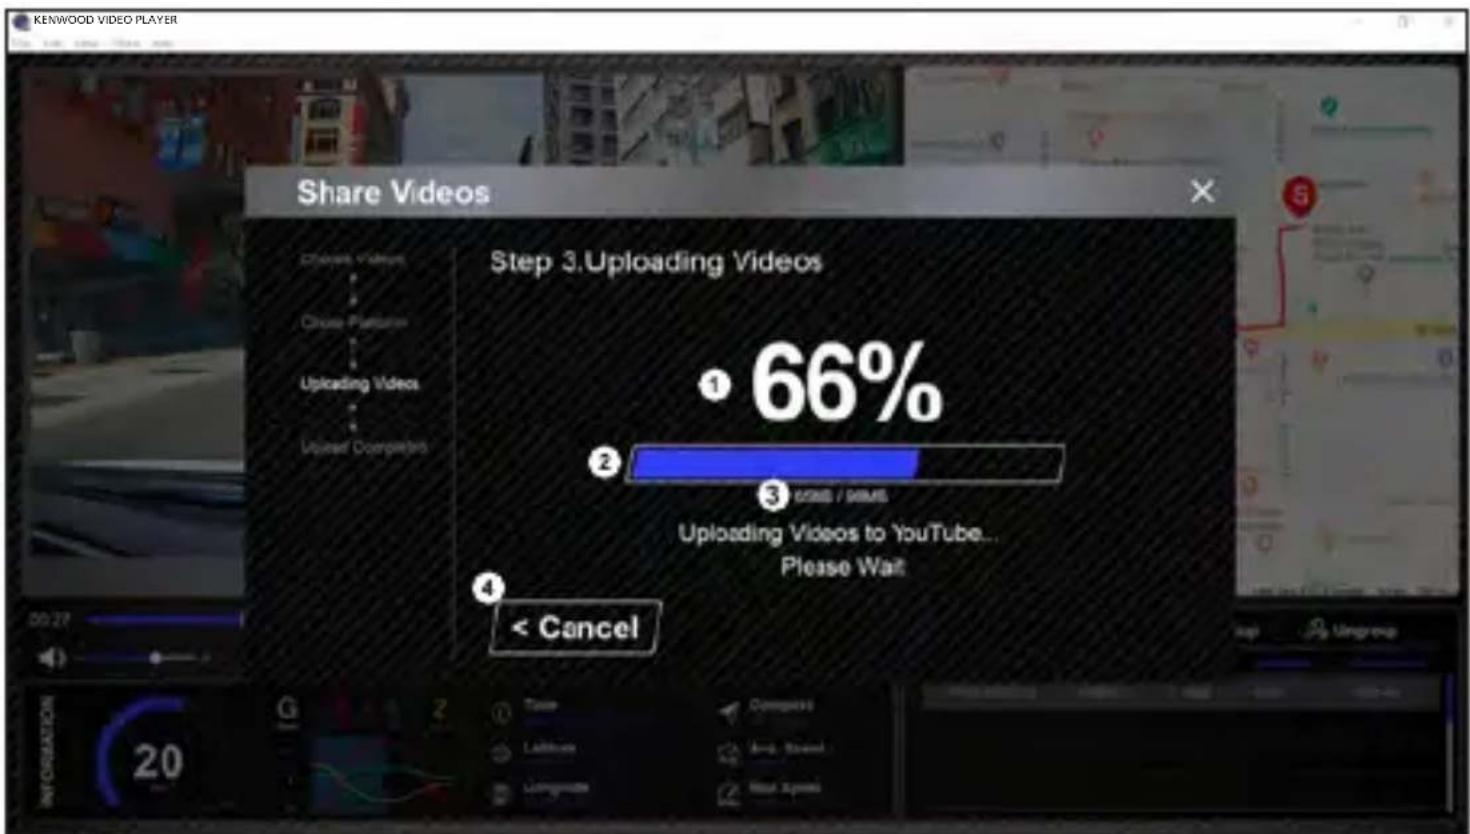
- Upload status (1):
The file upload progress is presented as a percentage symbol "%" and synced with item 2.
- Upload status (2):
The file upload progress is presented by a frame being filled with layered colors ink and synced with item 1. The file is uploaded successfully once the frame is fully inked in layered colors.
- Upload progress:
The former number is the MB uploaded and the latter is the total for the upload.
- Cancel:
Click to go back to the last step.
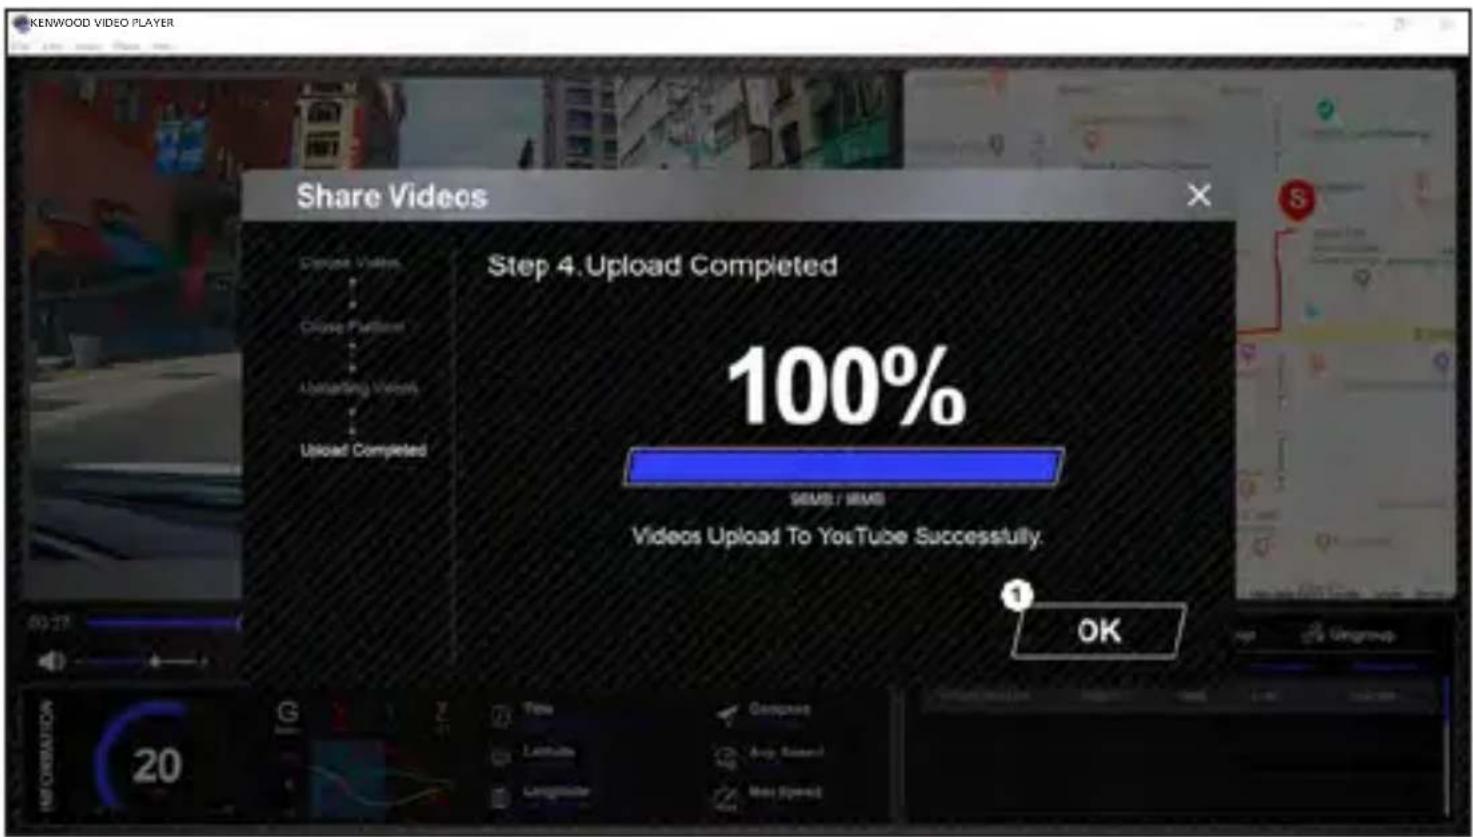
1. Confirm:
Click to go back to play mode information.
Troubleshooting
| Blurred Image (Video) | The device comes with a protective lens cover for the camera lens, be sure to remove it. Wipe the lens with a soft cloth until any debris/stains are removed. Clean your vehicles windshield where the camera is placed. |
| Unable to insert SD card | Make sure the metal portion of the memory card faces the screen side. Once inserted, push the card until a CLICK sound is heard. |
| SD card does not release from the devices | The device releases the SD Card by pressing the SD card forward. By applying the pressure on the SD card, a small click sound will be made.If you are unable to remove the SD card, use the edge of a small coin to push forward until the click sound is made. |
| Video files can not be played | The device video files are recorded in .mp4 format.These files may not be played on your computer if you do not have a suitable video player installed. |
| Video files jump when they are being played | The memory card that the device recommends for best quality is the Class 10 SD Card.If your computer does not recognize the video files, try another computer to view the recorded video. Copy the video file on to the computer and allow for the computer video player rather than the device Playback feature. |
| The photos come out blurry | Be sure to hold the device still while you take your photo.Reminder: The photo is not taken unless you have heard the shutter click. Also make sure the protective lens cover is removed and the lenses are clean. |
| The total video recording time is only a few minutes long | You may have a small amount of available space left for your SD card. Back up all the files you need from the SD card.Only AFTER you back up all the files you need, format the SD card with the device. |
| I cannot save my video files to my computer through the USB storage feature | The functions have been optimized to work properly with both Windows and Mac computers. Please reboot your computers. Make sure the device is connected properly. |
| The suction cup does not attach to the surface | Be sure the protective film on the suction cup has been removed. Before you place it, make sure the surface is clean and smooth. Wipe down the surface and add a small amount of moisture to the suction cup to allow for a stronger bond.Do not apply on a non-smooth surface or an area with paint. |
| The device shuts down on its own | Auto power off function will turn off the device automatically after it loses its power supply. Make sure the device is connected properly to the car power cable. |
| The device does not charge in my car | If your cigar lighter adapter cable is not working properly with your device, check your car's power fuses. Also check your power cord and replace it if there is an issue. |
| SD Card is not letting me view my files | Try some different card readers and computers to see if any of them can view the files. If none of them work, the files are probably damaged. Use the device to format the memory card.(WARNING: formatting the memory card will remove all the files saved), We recommend the branded memory cards with Class 10. Note: You must format the SD card with the device for first time use. |
| I cannot delete the file on the device | Be sure the file you are trying to delete is unprotected. If the file is protected, please follow the instruction on page 28 to unprotect the file first, and then delete the file. |
| My screen turns off after I just turned it on | The screen saver function turns off the screen after a period of inactivity. If you want to turn off this function, go to SETUP menu -> Screen Saver, and turn it off. |
| The message "Please Format SD Card" appears on my screen | The device requires formatting the SD card if the card is used on the device for the first time. Please format the SD card in the SETUP menu. |
| The device does not charge Be sure | The power cord is connected properly. When the device is being charged, the blue LED indicator will illuminate. |
| A "Card Error" message appears on my device | This indicates that the SD card is not properly formatted to your device. Please remove the files you would like to keep on to your computer, and perform a "Format SD Card" procedure to allow your memory card to function properly with the device. |
| A "Card Full" message appears on my device | When this message appears, your SD card is at full capacity. Reminder: When you have protected files, you limit the use of your memory card. Delete unnecessary files to allow maximum use of your memory card. |
| The device always turn on by itself. | The parking mode function will automatically start recording a 30 second video clip and turn off when external forces are detected. If you want to turn off this function, go to SETUP menu -> Parking Mode Sensor, and turn it off. |
| I press the MENU button but nothing happens | Reminder: The device will not let you access the menu while it is recording. To access the menu, stop recording and the MENU feature will be accessible. |
| When I download files from the KENWOOD website a malicious software message appears | If this message appears, simply adjust your browser settings and allow for the download to proceed. Once complete, reset your browser security to protect your computer. |
| Unresolved Issues | If you continue to have problems with your device, please reset your device to default settings in the setup menu and begin the process over again. If these problems remain, Please contact your store of purchase or a service center. |
Appendix
About the monitor screen
- Do not subject the screen section to strong shocks. Doing so could damage the screen.
- Do not let direct sunlight shine on the screen. Leaving the screen with direct sunlight shining on it for long periods of time will increase the temperature and could damage the screen.
- Extremely high or low temperatures could cause the display to operate slowly or darken, or result in residual images. This is due to the properties of liquid crystal displays and is not a malfunction. Normal operation will return once the temperature in the car returns to normal.
- There may be small dots on the screen. This is a phenomenon typical of liquid crystal displays and is not a malfunction.
- Due to the properties of liquid crystal displays, the display may be hard to see depending on the angle at which it is viewed, but this is not a malfunction.
About SD Cards
• Cards supported by this device
| Standard | microSDXC |
| Capacity 8 GB | to 128 GB |
| Speed Class Class | 10 |
| File System ex | FAT/FAT32 |
- Up to the Class 10 speed class is supported.
Precaution for using SD cards
- When using a commercially available SD card, also check the instructions supplied with the SD card.
- Be sure to format (initialize) an SD card with the device before use.
- SD cards have a product lifespan, such as the number of times that writing can be performed. It is recommended to replace the SD card with a new one regularly depending on the usage conditions.
- When inserting and removing an SD card, confirm the orientation, do not bend it, and do not apply a strong force or impact to it.
- Do not directly touch the contact part with a hand or metal. The stored data may be damaged or lost due to static electricity.
- Be sure to back up (copy) the required files in the SD card to a computer or other device. The saved data may be lost due to the usage conditions of the SD card. Please note that JVCKENWOOD cannot compensate for any damages arising from the loss of saved files.
Requests Regarding Disposal or Transferring Ownership of an SD Card
Using the SD card format and deletion functions of this device or formatting with a function of a computer just changes the file management information and does not completely delete the data in a SD card. We recommend either physically destroying the actual SD card or using commercially available PC data deletion software or the like to completely delete the data in the SD card before disposal or transfer of ownership. Manage the data in SD cards at your own responsibility.
Important Notices Regarding Trademarks and Software
- microSDXC logo is a trademark of SD-3C LLC.
- Microsoft, Windows and DirectX are registered trademark or trademark of Microsoft Corporation in the US and other countries.
• Macintosh, Mac are trademarks of Apple Inc., registered in the U.S. and other countries. - ©2019 Google LLC All rights reserved. Google Maps™ is registered trademarks of Google LLC.
Important Notice Concerning the Software
About Open Source Software included in the Desktop Software
The KENWOOD VIDEO PLAYER includes certain open source or other software originating from third parties that is subject to the GNU Lesser General Public License version 2.1 (LGPLv2.1) and different copyright licensees, disclaimers and notices. The source code of software licensed under LGPLv2.1 and different copyright licenses, disclaimers and notices are distributed at the website below, http://www.kenwood.com/gpl.
- FFmpeg
This software uses libraries from the FFmpeg project (http://ffmpeg.org/) under the LGPLv2.1 License: GUN Lesser General Public License (LGPL) version 2.1
• NSIS
This software's installer is made using NSIS (http://nsis.sourceforge.net) which is licensed under zlib/libpng license.
Specifications
| Model Number / Name DRV- | A201 / GPS Integrated Dashboard Camera |
| Power Requirements | 5V / 2A; 12-24V DC |
| Power Supply (Car power cable) | Input: 12-24V DCOutput: 5V DCFuse Type: 32mm/2A |
| Current Consumption | 320mA |
| Sensor Resolution | 2.0M Pixel |
| LensType/Angle/Aperture | 6G / 136° / F1.8 |
| Recording Resolution | FHD 1920 x 1080 @ 30fps (default) |
| Screen Size | 2.7" |
| Screen Resolution | 960 (W) X 240 (H) pixels x RGB |
| Screen Ratio | 16:9 |
| Card Reader | microSDXC / SDHC, up to 128GB |
| SD Card (Recommended Type) | microSDXC/SDHC card 8GB to 128GB supported,Class 10 recommended for best results use a recognized brand |
| SD Card Recorded File Capacity (based on default settings) | 8GB microSD = 60 mins (1 minute x 60 recordings)16GB microSD = 120 mins (1 minute x 120 recordings)32GB microSD = 240 mins (1 minute x 240 recordings)64GB microSD = 480 mins (1 minute x 480 recordings)128GB microSD = 960mins (1 minute x 960 recordings) |
| Recording Format | H.264(MP4) |
| Unit Dimensions | 3-7/16" x 2" x 1-1/2" / 88mm x 51mm x 37.5mm |
| Unit Weight | 2.8oz / 78g |
- Contents
- Before Use
- Disclaimer
- Copyrights
- Dashboard Camera Function Guide
- FEATURES:
- Precautions and notices
- Caring for your device
- Precautions for installation
- Precautions for use
- Cleaning the device
- If you notice a problem with the device
- Français
- Key Features
- - 2.7" LCD Color Screen
- - Quick Release Magnetic Mount
- - G sensor/File Protection
- - Automatic Start/Stop Tech
- - Built-In Microphone & Speaker
- - GPS Data
- - Parking Mode
- Power Button
- Mode/Screen Shot Button
- Mode
- Screen Shot
- Up/Mute Button
- Up
- Mute
- Record/OK Button
- Record
- OK
- Down/Screen Off Button
- Down
- Screen Off
- Menu Button
- File Protect Button
- Screen
- Status LED Indicator
- Connector Port
- Speaker
- microSD Card Slot
- Insert Your microSD Card Into The Device
- TIP:
- Microphone
- AV Output
- DC-IN/Data transfer Port
- Reset Button
- Installation and Connection
- Recommended installation position
- Caution
- CONNECT THE DEVICE TO THE MAGNETIC MOUNT
- REPLACE THE SUCTION MOUNT WITH THE ADHESIVE MOUNT:
- How to use the Adhesive Mount:
- ATTACH THE MOUNT TO THE WINDSHIELD & START RECORDING
- ADJUST THE ANGLE
- CONNECTING TO CIGAR LIGHTER SOCKET
- ! Caution
- THE FIRST-TIME SETUP
- -Video Mode
- -Video Menu
- -Photo Mode
- -Photo Menu
- -Playback Mode
- DIRECTORIES
- VIDEO FILES
- PHOTO FILES
- DELETING FILES
- PROTECTING/UNPROTECTING FILES
- Connection with Computer
- USB STORAGE
- DASH CAM
- System Requirements for "KENWOOD VIDEO PLAYER"
- Installing the Software
- Playback:
- How to Edit the Video:
- Image processing:
- Export status (1):
- Export status (2):
- OK:
- Open folder:
- Retry:
- Cancel:
- Yes:
- No:
- -Share Mode
- Select a community platform:
- Select the privacy mode:
- Upload title:
- Last step:
- Next step:
- Connect to community platform:
- Confirm:
- Troubleshooting
- Appendix
- About the monitor screen
- About SD Cards
- Precaution for using SD cards
- Requests Regarding Disposal or Transferring Ownership of an SD Card
- Important Notices Regarding Trademarks and Software
- Important Notice Concerning the Software
- About Open Source Software included in the Desktop Software
- - FFmpeg
- • NSIS
Brand : KENWOOD
Model : DRV-A210
Category : Camera