TBH630BL - Range hood Tricity Bendix - Free user manual and instructions
Find the device manual for free TBH630BL Tricity Bendix in PDF.


| Product Type | Range Hood (Chimney Style) |
| Brand | Tricity Bendix |
| Model | TBH630BL |
| Width | 60 cm |
| Height | Adjustable, approx. 60-120 cm (chimney) |
| Depth | 50 cm |
| Weight | Approx. 15 kg |
| Power Supply | 220-240 V, 50 Hz |
| Maximum Power | 200 W |
| Motor Type | Single motor, 3 speeds |
| Extraction Rate | Max. 600 m³/h |
| Noise Level | 50-65 dB (depending on speed) |
| Control Type | Touch control panel |
| Lighting | 2 x 3 W LED lights |
| Filter Type | Aluminum grease filters (washable) |
| Carbon Filter Option | Yes, for recirculation mode (sold separately) |
| Ducting | 150 mm diameter, top or rear outlet |
| Recirculation Mode | Possible with carbon filter |
| Cleaning | Grease filters: dishwasher safe; exterior: damp cloth |
| Safety Features | Auto shut-off, thermal cut-out, child lock |
| Spare Parts Availability | Filters, LED modules, control board (contact service) |
| Installation Type | Wall-mounted, above hob |
| Color | Black |
| Energy Efficiency Class | B (typical) |
Frequently Asked Questions - TBH630BL Tricity Bendix
User questions about TBH630BL Tricity Bendix
0 question about this device. Answer the ones you know or ask your own.
Ask a new question about this device
Download the instructions for your Range hood in PDF format for free! Find your manual TBH630BL - Tricity Bendix and take your electronic device back in hand. On this page are published all the documents necessary for the use of your device. TBH630BL by Tricity Bendix.
USER MANUAL TBH630BL Tricity Bendix
Thank you for buying a Tricity Bendix product.
To enable you to use your appliance effectively and safely, please read this instruction book carefully before using the appliance and retain for future reference. If you require guidance in the use of the appliance or require further information on Tricity Bendix Products, please contact our Customer Care Department.
Customer Care Department
Tricity Bendix
55-77 High Street
Slough
Berkshire Tel: 08705 950950
SL1 1DZ Fax: 01753 538972
To register ownership, please ensure you complete and return the guarantee card supplied with the appliance.
For the User
Important Safety Information
Your Appliance
Operating Instructions
The Controls
To Operate
Extraction
Recirculation
Maintenance and Cleaning
External Cleaning
Synthetic Paper Grease Filter
To Replace the Synthetic Paper Grease Filter
Charcoal Filters (Optional Extra)
To Remove/Replace the Charcoal Filter
Changing the Light Bulb
Something Not Working
Service and Spare Parts
Guarantee Conditions
For the Installer
Installation Instructions
Technical Information
Electrical Connections
Electrical Requirements
Electrical Connection
Installing the Cooker Hood
Installation Requirements
Ducting
Clearance Height
Unpacking
Wall Fitting
Venting
To Fit the Ducting
Recirculation
Fitting the Cooker Hood to the Wall
Service Force Centres
To register ownership, please ensure you complete and return the guarantee card supplied with the appliance.
Guide to use the instruction book
The following Symbols will be found in the text to guide you through the instruction book

Safety instructions

Step by step instructions
IMPORTANT SAFETY INFORMATION
These warnings are provided in the interests of your safety. Ensure that you understand them all before installing or using this appliance. Your safety is of paramount importance. If you are unsure about any of the meanings of these warnings contact the Customer Care Department.
■ Installation
- Any installation work must be undertaken by a qualified electrician or a competent person.
- This hood must be installed in accordance with the installation instructions and all measurements must be adhered to.
- If the cooker hood is installed for use above a gas appliance then the provision for ventilation must be in accordance with the Gas Safety Codes of Practice BS.6172, BS.5440 and BS.6891 (Natural Gas) and BS.5482 (LP Gas) 1994, the Gas Safety (Installation & Use) Regulations, the Building Regulations issued by the Department of the Environment, the Building standards (Scotland) (Consolidated) Regulations issued by the Scottish Development Department.
- The fan motor of this cooker hood incorporates a cut-out device which will operate if the cooker hood is installed below the minimum height recommended under section ‘Clearance Height’, or if the motor becomes overheated. If the cut-out device is activated, switch off the fan motor and allow the cooker hood to cool. The cut-out device will reset itself when the fan motor has cooled significantly.
- It is dangerous to alter the specifications or modify this product in any way.
- When installed between adjoining wall cabinets the wall cabinets must not overhang the hob.
- If the room where the hood is to be used contains a fuel burning appliance such as a central heating boiler then its flue must be of the room sealed or balanced flue type.
- If other types of flue or appliances are fitted ensure that there is an adequate supply of air to the room.
- The ducting system for this appliance must not be connected to any existing ventilation system which is being used for any other purpose.
- Do not install above a cooker with a high level grill.
■ Child Safety
- This appliance is designed to be operated by adults. Children should not be allowed to tamper with the controls or play with the appliance.
■ During Use
• This product is for domestic use only.
- Never leave frying pans unattended during use as over-heated fats and oils might catch fire.
- Never do flambé cooking under this cooker hood.
- Do not leave naked flames under the hood.
■ Maintenance and Service
- This appliance can be a hazard if the synthetic paper and charcoal filters are not replaced as recommended.
- Under no circumstances should you attempt to repair the appliance yourself. Repairs carried out by inexperienced persons may cause injury or more serious malfunction. Refer to your local Tricity Bendix Service Centre. Always insist on genuine spare parts.
YOUR APPLIANCE

OPERATING INSTRUCTIONS
This cooker hood is designed to extract unpleasant odours from the kitchen, it will not extract steam.
To obtain the best performance it is advisable to switch on the hood a few minutes before you start cooking and leave it running for approximately 15 minutes after finishing.
The cooker hood controls are located on the right hand side, in the front fascia panel.
The Controls
Fan ON/OFF/Speed Control
Position 0 - Off
Position 1 - Low
Position 2 - Normal
Position 3 - Boost
Light ON/OFF control
0 - Off
1 - On
To Operate
Select the required fan speed and light if required.
Extraction
The contaminated air enters the hood passing through the grease filter and out through the ducting into the atmosphere.
Recirculation
In the recirculation mode contaminated air is passed through the charcoal filter (optional extra) to be purified and recirculated into the kitchen through a recirculation grille.

When the ducting position is selected the charcoal filter is not required.
Never do flambé cooking under this cooker hood.
Take extra care when frying and never leave frying pans unattended during use as overheated fats and oils might catch fire.
Do not leave naked flames under the cooker hood.
Ensure heating areas on your hob are covered with pots and pans when using the hob and cooker hood simultaneously.
MAINTENANCE AND CLEANING

Before carrying out any maintenance or cleaning isolate the cooker hood from the mains supply.
The cooker hood must be kept clean, a build up of grease or fat can be a fire hazard.
External Cleaning
Wipe the cooker hood frequently with warm soapy water using a mild detergent.

Always wear protective gloves when cleaning the hood.
Never use scouring pads or abrasive cleaners.
Never use excessive amounts of water when cleaning particularly around the control panel.
Synthetic Paper Grease Filter
This filter cannot be washed and must be replaced at least every 2 months.

The synthetic paper grease filter cannot be cleaned.
It must not be washed.

To Replace the Synthetic Paper Grease Filter
- Open the glass visor.
- Press inwardly on the two slide catches as illustrated in (A) and the grille will open from the front.
- Slide the right edge of the grille forward until it clears the guide and then unhook the left hinge pin.
- Carefully ease out the metal wire retaining clips as illustrated in (B).
- Clean the metal grille and clips before replacing the filter.


Handle the wire clips with care and keep away from children as they have sharp points.
Charcoal Filter (Optional Extra)
The charcoal filter cannot be cleaned.
The filter should be replaced at least every three months or more frequently if the hood is used more than three hours per day.

To Remove/Replace the Charcoal Filter
- Remove the metal inlet grille.
- Carefully twist the plastic disc anticlockwise, while holding the charcoal filter securely.
- Clean the metal inlet grille and motor support before replacing the charcoal filter.
Changing the Light Bulb
If a lamp fails to function check that the bulb is screwed into the holder.
If bulb failure has occurred then it should be replaced with a 220-240V 40W clear cylindrical shape bulb with a small E14 screw thread.
Charcoal filters, grease filters and light bulbs can be obtained from your local Service Centre.

This appliance can be a fire hazard if the grease and charcoal filters are not cleaned and replaced as recommended.

natural_image
Illustration of a hand holding a circular object, enclosed in a circular frame (no text or symbols)SOMETHING NOT WORKING
| Symptom | Solution |
| The cooker hood will not start | Check the hood is connected to the electricity supply.Make sure the switch is in the ‘ON’ position. |
| The cooker hood is not working effectively | The fan speed is set high enough for the taskThe grease filter is clean.The kitchen is adequately vented to allow the entry of fresh air.If set up for recirculation, check that the charcoal filter is still effective.If set up for extraction, check that the ducting and outlets are not blocked. |
| The cooker hood has switched off during operation | The safety cut-out device has been tripped.Turn off the hob and then wait for the device to reset. |
If after all these checks, the fault persists, contact your local Tricity Bendix Service Centre, quoting the model and serial number.
Please note that it will be necessary to provide proof of purchase for any in-guarantee service calls.
In-guarantee customers should ensure that the above checks have been made as the engineer will make a charge if the fault is not a mechanical or electrical breakdown.
SERVICE AND SPARE PARTS
If you require an engineer or spare parts contact your local Service Centre by telephoning:
08705 929929
Your telephone call will be routed to your local Tricity Bendix Service Centre. The addresses are listed in the back of the book.
For general assistance with your appliance or for further information on Tricity Bendix products please contact our Customer Care Department.
Customer Care Department,
Tricity Bendix
55-77 High Street
Slough
Berkshire SL1 1DZ
Tel: 08705 950950
GUARANTEE CONDITIONS
We, Tricity Bendix, undertake that if within twelve months of the date of the purchase this Tricity Bendix built-in appliance or any part thereof is proved to be defective by reason only of faulty workmanship or materials, the company will, at our option repair or replace the same FREE OF ANY CHARGE for labour, materials or carriage on condition that:
- The appliance has been correctly installed and used only on the electrical supply stated on the rating plate.
- The appliance has been used for normal domestic purposes only, and in accordance with the manufacturer's operating and maintenance instructions.
- The appliance has not been serviced, maintained, repaired, taken apart or tampered with by any person not authorised by us.
- All service work under this guarantee must be undertaken by Tricity Bendix Service Centres.
- Any appliance or defective part replaced shall become the property of this company.
Home visits are made between 8.30am and 5.30pm Monday to Friday. Visits may be available outside these hours in which case a premium will be charged.
EXCLUSIONS
This Guarantee does not cover:
- Damage or calls resulting from transportation, improper use or neglect, the replacement of any light bulbs or removable parts of glass or plastic.
- Costs incurred for calls to put right appliances improperly installed or calls to appliances outside the United Kingdom.
- Appliances found to be in use within a commercial environment, plus those which are the subject of rental agreements.
- Products of Tricity Bendix manufacture which are not marked by Tricity Bendix.
This guarantee is in addition to your statutory and legal rights.
TRICITY BENDIX EUROPEAN GUARANTEE
If you should move to another country within Europe then your guarantee moves with you to your new home subject to the following qualifications:
- The guarantee starts from the date you first purchased your product.
- The guarantee is for the same period and to the same extent for labour and parts as exists in the new country of use for this brand or range of products.
- This guarantee relates to you and cannot be transferred to another user.
- Your new home is within the European Community (EC) or European Free Trade Area.
- The product is installed and used in accordance with our instructions and is only used domestically, i.e. a normal household.
Before you move please contact your nearest Customer Care Centre, listed below, to give them details of your new home. They will then ensure that the local Service Organisation is aware of your move and able to look after you and your appliances.
France Senlis +33 (0)3 44 62 22 22
Germany Nurnberg +49 (0)911 323 2600
Italy Pordenone +39 (0)1678 47053
Sweden Stockholm +46 (0)20 78 77 50
UK Slough +44 (0)1753 219898
INSTALLATION INSTRUCTIONS

It is dangerous to alter the specifications or attempt to modify this product in any way.
Technical Information
DIMENSIONS HEIGHT: 15cm
WIDTH: 60cm
DEPTH: 48cm
DEPTH WITH VISOR OPEN: 53cm
Note: CE Marking certifies that this appliance complies with the requirements laid down in EEC directive 89:336. (Electromagnetic compatibility) and subsequent modifications and Low Voltage directive 72/23/E.
ELECTRICAL CONNECTIONS

WARNING: DOUBLE INSULATED-DO NOT EARTH
Electrical Requirements
Any permanent electrical installation must comply with the latest I.E.E. Regulations and local Electricity Board regulations. For your own safety this should be undertaken by a qualified electrician e.g. your local Electricity Board, or a contractor who is on the roll of the National Inspection Council for Electrical Installation Contracting (NICEIC).
Electrical Connection
Before connecting to the mains supply ensure that the mains voltage corresponds to the voltage on the rating plate inside the cooker hood.
This appliance is fitted with a 2 core mains cable and must be permanently connected to the electricity supply via a double-pole switch having 3mm minimum contact gap on each pole. A Switched Fuse Connection Unit to BS.1363 Part 4, fitted with a 3 A fuse is a recommended mains supply connection accessory to ensure compliance with the Safety Requirements applicable to fixed wiring instructions.
This appliance conforms to BS.800: 1988 and EEC Directive No. 78 308 regarding suppression of radio and television interference.
INSTALLING THE COOKER HOOD
Please ensure that when the appliance is installed it is easily accessible to an engineer in the event of a breakdown.

All installations must comply with the local authorities requirements for the discharge of exhaust air.
Incorrect installation may affect the safety of this cooker hood.
Installation Requirements

Before installation check the wall to which the cooker hood is to be fitted for electric cables, water pipes or gas.
If it is necessary to fix the hood to a hollow construction plaster or partition board structure then it should be sufficiently reinforced to be quite rigid in the area of the cooker hood keyhole fixing screws, and the appropriate rawl plugs used for this type of fixing (not supplied).
Ducting
The ducting must be fire retardant 100mm (4ins) in diameter and the length should be no more than:
3 metres with one 90° bend
2 metres with two 90° bends
Bends of more than 90^ will reduce the efficiency of the hood and reduce the airflow.
Clearance Height
The cooker hood is designed to be fitted over a cooking appliance at the clearance heights stated, providing the maximum output of the appliance beneath does not exceed the maximums quoted in the Technical Specifications.
If the output of the appliance below the cooker exceeds the maximum output quoted, please refer to the cooker manufacturer's installation instructions.
Clearance Height
A minimum clearance height of 650mm (25 1/2") is required when installed above a built-in electric hob, or 700mm (27 1/2") when installed above a built-in gas hob.
A minimum clearance height of 685mm (27") is required when installed above a slot-in electric oven, or 787mm (30 1/2 ") when installed above a slot-in gas oven.
When installed between adjoining wall cabinets, the wall cabinets must not overhang the hob and the distance between the underside of the cabinet and the worktop must be 420mm. If the height of the wall cabinet is less than 420mm a gap of 50mm must be maintained either side of the hob.

This cooker hood must not be installed above a cooking appliance with a high level grill.
Unpacking
The fittings supplied to install this cooker hood can be found with the instruction book inside the packaging and consists of the following:
Wall/suspended fixing template
Plastic rawl plugs (4)
Ducting spigot 100mm (4")
Fixing screws (4)
Wall Fitting
The cooker hood is fitted to the wall using the keyhole slots in the back of the hood.
- Mark the position on the wall for the two 8mm dia screw holes (A) as illustrated in the drawing opposite at 568mm.
- Check that the hole distances are correct and are level using a spirit level.
- At this stage it is important to allow 25mm (1") clear space above the cooker hood to enable it to be hooked onto the screws and for subsequent removal for decorating or servicing.
- Insert the screws and tighten to a distance of 5mm.

A: Built-in Electric Hob: 650mm minimum clearance
B: Built-in Gas hob: 700mm minimum clearance
C: Slot-in Electric Cooker: 685mm minimum clearance
D: Slot-in Gas Cooker: 787mm minimum clearance

Venting
The hood is more effective when used in the extraction setting (ducted to the outside). Venting kits may be purchased through your retailer or DIY store, and must be ducted to an outside vent of 100mm (4") minimum.

The ducting used must be manufactured from fire retardant material which should conform to the relevant British Standard or DIN4102-B1.
When the hood is ducted externally the charcoal filter must be removed and the slider control must be in the ducting position.

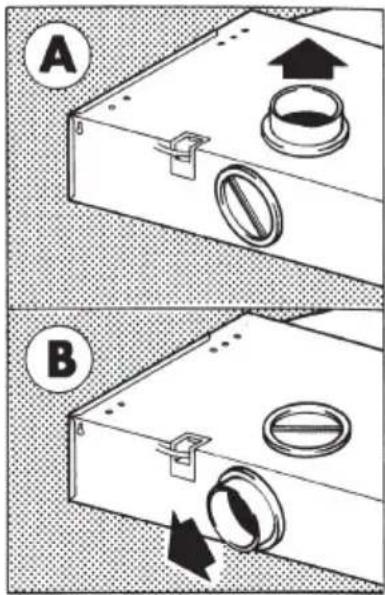
To Fit the Ducting
-
Fit the ducting spigot and blanking plate, by aligning the interlocking lugs on the fittings, with the recesses in the aperture as illustrated in (A) and (B) opposite.
-
Insert and turn anti-clockwise to lock the spigot and blanking plate into position.
Recirculation
The charcoal filter (optional extra) must be fitted for recirculation and the slider control must be in the recirculation position.

Fitting the Cooker Hood to the Wall
-
Remove the grille by pressing inwardly on the two slide catches.
-
Hinge the grille forward to free it from the guides in the side of the casing. The two keyhole slots are now visible.
-
Hook the hood onto the screws using the keyhole slots.
-
Tighten the screws to secure the hood to the wall. Ensure the cooker hood is correctly located before letting go.
-
Refit the grille onto the cooker hood
- insert the left hand hinge pin into the hole in the left hand side of the casing.
- slide the right hand hinge pin into the guide over the stop position.
- close the grille and secure using the two slide catch bolts.


natural_image
Illustration of a hand holding a circular object, enclosed in a circular frame (no text or symbols)To contact your local Tricity Bendix Service Centre telephone 08705 929 929
| CHANNEL ISLANDS | ORKNEY(M65) | Corsie Domestics7 King StreetKirkwallOrkney KW15 | NORTH EAST | ||
| GUERNSEY | Guernsey ElectricityPO Box 4Vale, GuernseyChannel Islands | GATESHEAD(M39) | Unit 356aDukesway CourtDukeswayTeam ValleyGateshead NE11 0BH | ||
| PERTH | Hydro ElectricalInveralmond HouseRuthervenfield RoadPerth PH1 3AQ | ||||
| JERSEY | Jersey Electricity CompanyPO Box 45Queens RoadSt HelierJerseyChannel Islands JE4 8NY | GRIMSBY(M42) | 15 Hainton AvenueGrimsbySouth HumbersideDN32 9AS | ||
| PERTH(OWN SALES) | Graham BeggUnit 4Airport Ind EstateWick KW1 4QS | ||||
| SCOTLAND | SHETLAND(OWN SALES) | Tait Electronic Systems LtdHolmsgarth RoadLerwickShetland ZE1 0PW | HULL(M41) | Unit 1Boulevard Industrial EstateHullHU3 4AY | |
| ABERDEEN(M05) | 54 Claremont StreetAberdeen AB10 6RA | LEEDS(M37) | 64-66 Cross Gates RoadLeedsLS15 7NN | ||
| AUCHTERMUCHY(M03) | 33a BurnsideAuchtermuchyFife KY14 7AJ | SHETLAND(OWN SALES) | Bolts Shetland Ltd26 North RoadLerwickShetland ZE1 0PE | NEWTON AYCLIFFE(M45) | Unit 16Gurney WayAycliffe Industrial EstateNewton AycliffeDL5 6UJ |
| BLANTYRE(M07) | Unit 5Block 2Auchenraith Ind EstateRosendale WayBlantyre G72 0NJ | WHALSAY(OWN SALES) | Leask ElectricalHarisdaleSymbister, WhalsayShetland ZE2 9AA | SHEFFIELD(M38) | Pennine HouseRoman Ridge Ind.Roman Ridge RoadSheffield S9 1GB |
| DUMFRIES(M01) | 93 Irish StreetDumfriesScotland DG1 2 PQ | NORTHERN IRELAND | NORTH WEST | ||
| DUNOON(M67) | Brair Hill7 Hill StreetDunoonArgyll PA23 7AL | BELFAST(M27) | Owenmore HouseKilwee Business ParkUpper Dunmury LaneBelfastBT17 0HD | BIRKENHEAD(M11) | 1 Kelvin ParkDock RoadBirkenheadL41 1LT |
| GLASGOW(M04) | 20 Cunningham RoadClyde EstateRutherglenGlasgow G73 1PP | CARDIFF(M28) | WALESGuardian Industrial EstateClydesmuir RoadTremorfaCardiffCF2 2QS | CARLISLE(M10) | Unit 7James Street WorkshopsJames StreetCarlisleCumbria CA2 5AH |
| INVERNESS(M06) | Unit 3BSmithton Ind EstateSmithtonInverness IV1 AJ | ISLE OF MAN(M64) | South Quay Ind EstateDouglasIsle of Man | ||
| ISLE OF ARRAN(OWN SALES) | Arran DomesticsUnit 4 The Douglas CentreBrodickIsle of Arran KA27 8AJ | CLYWD(M14) | Unit 6-7 Coed - ParcAbergele RoadRhuddianClwydWalesLL18 5UG | LIVERPOOL(M15) | Unit 1Honeys Green PrecinctHoneys Green LaneLiverpoolL12 9JH |
| ISLE OF BARRA(OWN SALES) | J Zerfah244 BruernishIsle of BarraWestern Islands HS9 5QY | DYFED(M77) | West Wales ApplianceServiceMaes Y CoedHigh MeadLlanybydderCarmarthenshireSA40 9UL | MANCHESTER(M09) | Unit BCentral Industrial EstateSt Marks StreetBoltonBL3 6NR |
| ISLES OF BUTE | Walker EngineeringGlenmhorUpper Serpentine RoadRothesayIsle of Bute PA20 9EH | HAVERFORDWEST(M75) | Ark AppliancesCromlech LodgeAmblestonHaverfordwestPembrokeshireSA62 5DS | PRESTON(M13) | Unit 250Dawson PlaceWalton SummitBamber BridgePrestonLancashire PR5 8AL |
| ISLE OF LEWIS | ND Macleod16 James StreetStornowayIsle of Lewis PA87 2QW | ||||
| KELSO(M08) | 2-8 Wood MarketKelsoBorders TD5 7AX | OSWESTRY(M17) | Plas FfynnonWarehouseMiddleton RoadOswestrySY11 2PP | STOCKPORT(M16) | Unit 20 Haigh ParkHaigh AvenueStockportSK4 1QR |
To contact your local Tricity Bendix Service Centre telephone 08705 929 929
| MIDLANDS | LONDON & EAST ANGLIA | SUNBURY(M63) | Unit 1aThe SummitHanworth RoadHanworth Ind EstateSunbury on ThamesTW16 5D | ||
| BIRMINGHAM(M18) | 66 Birch Road EastWyrley Road Ind EstateWiltonBirminghamB6 7DB | BECKENHAM(M79) | 11a Gardener Ind EstateKent House LaneBeckenhamKent BR3 1QZ | ||
| CHELMSFORD(M47) | Hanbury RoadWidford Ind EstateChelmsfordEssexCM12 3AE | ||||
| BOURNE(M44) | Manning Road Ind EstatePinfold RoadBournePE10 9HT | SOUTH EASTASHFORD(M58) | Unit 2Bridge Road Business EstBridge RoadAshfordKent TN2 1BB | ||
| BRIDGNORTH(M72) | 1 Underhill StreetBridgnorthSalopWV16 4BB | COLINDALE(M53) | Unit 14Capitol ParkCapitol WayColindaleLondon NW9 0EQ | ||
| GLOUCESTER(M23) | 101 Rycroft StreetGloucesterGL1 4NB | ELTHAM(M78) | 194 Court RoadMottinghamElthamLondon SE9 4EW | ||
| HEREFORD(M31) | Unit 3Bank BuildingsCattle marketHarefordHE4 9HX | ENFIELD(M49) | 284 Alma RoadEnfieldLondonEN3 7BB | ||
| HIGHAM FERRERS(M51) | 30 High StreetHigham FerrersNorthantsNN10 8BB | GRAVESEND(M57) | Unit B4Imperial Business EstateGravesendKentDA11 0DL | ||
| ILKESTON(M43) | Unit 2Furnace RoadIlkeston DE7 5EP | HARPENDEN(M46) | Unit 4Riverside EstateColdharbour LaneHarpendenAL5 4UN | ||
| LEICESTER(M22) | Unit 7Oaks Ind EstateCoventry RoadNarboroughLeicestershireLE0 5GF | LEITCHWORTH(M50) | 16-17 Woodside Ind EstWorks RoadLetchworthHertsSG6 1LA | ||
| LINCOLN(M40) | Unit 8Stonefield ParkClifton StreetLincolnLN5 8AA | LONDON(M76) | 2/4 Royal LaneYiewsleyWest DraytonMiddlesexUB7 8DL | ||
| NEWCASTLEUNDER LYME(M12) | 18-21 Croft RoadBrampton Ind EstateNewcastle under LymeStaffordshireST5 0TW | MAIDENHEAD(M60) | Reform RoadMaidenheadBerkshireSL6 8BY | ||
| NUNEATON(M21) | 19 Ptarmigan PlaceTownsend DriveNuneatonCV11 6RX | MOLESEY(M61) | 10 Island Farm AvenueWest MoleseySurreyKT8 2UZ | ||
| REDDITCH(M20) | 13 Thornhill RoadNorth Moons MoatRedditchWorcestershireB98 9ND | NEWBURY(M24) | 9 Pipers CourtBerkshire DriveThatchamBerkshireRG19 4ER | ||
| TAMWORTH(M19) | Unit 3Sterling ParkClaymoreTamworthB77 5DO | IPSWICH(M48) | Unit 2BElton Park Business CentreHadleigh RoadIpswichIP2 0DD | ||
| WORCESTER(M73) | Unit 1Northbrook CloseGregorys Mill Ind EstateWorcesterWR3 8BP | NORWICH(M52) | 2b Trafalgar StreetNorwichNR1 3HN | ||
TRICITY BENDIX
- For the User
- Important Safety Information
- Your Appliance
- Operating Instructions
- Maintenance and Cleaning
- Something Not Working
- Service and Spare Parts
- Guarantee Conditions
- For the Installer
- Installation Instructions
- Electrical Connections
- Installing the Cooker Hood
- Service Force Centres
- Guide to use the instruction book
- ■ Installation
- ■ Child Safety
- ■ During Use
- ■ Maintenance and Service
- The Controls
- To Operate
- Extraction
- Recirculation
- External Cleaning
- Synthetic Paper Grease Filter
- To Replace the Synthetic Paper Grease Filter
- Charcoal Filter (Optional Extra)
- To Remove/Replace the Charcoal Filter
- Changing the Light Bulb
- 929929
- EXCLUSIONS
- This Guarantee does not cover:
- TRICITY BENDIX EUROPEAN GUARANTEE
- Electrical Requirements
- Electrical Connection
- Installation Requirements
- Ducting
- Clearance Height
- Unpacking
- Wall Fitting
- Venting
- To Fit the Ducting
- Fitting the Cooker Hood to the Wall
Brand : Tricity Bendix
Model : TBH630BL
Category : Range hood