
TFB105MD - Household Fan Vivax - Free user manual and instructions
Find the device manual for free TFB105MD Vivax in PDF.


| Product Type | Bladeless Tower Fan with Air Purifier |
| Model | TFB105MD |
| Working Voltage | 24V DC (adapter input: 100-240V AC, 50/60Hz) |
| Rated Power | 33W |
| Noise Level | ≤61 dB |
| Adapter Output | 24V, 1.5A |
| Filter Type | HEPA filter + Pre-filter (model FQ150CJ-2) |
| Filters Included | 2 HEPA filters |
| Fan Speeds | 10 levels |
| Operating Modes | Normal, Sleep, Ion (Plasmacluster), AI Smart |
| Timer | 1-12 hours (scheduled on/off) |
| Oscillation | Yes (swing function) |
| Remote Control | Yes (2 x AAA batteries, not included) |
| Control Panel | Touch buttons with LED display |
| Auto Shutdown | After 15 hours of inactivity |
| Intelligent Memory | Remembers last settings (except timer) after power off |
| Screen-Off Function | Auto dim after 30 seconds of inactivity |
| Dimensions (Approx.) | Height: 105 cm, Base Diameter: 25 cm |
| Weight (Approx.) | 5 kg |
| Material | Plastic |
| Safety Features | Overheat protection, safety cut-out |
| Maintenance | Clean pre-filter every 2 weeks, replace HEPA filter every 6 months |
| Usage | Indoor, domestic use only |
Frequently Asked Questions - TFB105MD Vivax
User questions about TFB105MD Vivax
0 question about this device. Answer the ones you know or ask your own.
Ask a new question about this device
Download the instructions for your Household Fan in PDF format for free! Find your manual TFB105MD - Vivax and take your electronic device back in hand. On this page are published all the documents necessary for the use of your device. TFB105MD by Vivax.
USER MANUAL TFB105MD Vivax
natural_image
Line drawing of a vertical cylindrical device with a rectangular top and base, no text or symbols presentIt is important that you read these instructions before using your product and we strongly recommend that you keep them in a safe place for future reference.
SIGURNOST I UPOZORENJA
natural_image
Illustration of a hand inserting a component into a device with a magnified inset showing the part (no text or symbols)- Izvadite predfilter.
Pritisnite i podignite predfilter s obje strane kako biste ga izvukli prema van i izvadite predfilter.

natural_image
Line drawing of a hand inserting a device into a device with a circular pattern on the cover (no text or symbols)- Uklonite zaštitni film s Hepa filtera.

natural_image
Simple line drawing of a rectangular object with a black arrow pointing to its top surface (no text or symbols)- Umetnite HEPA filter

natural_image
Illustration of a hand inserting a paper into a container with a patterned lid (no text or symbols)- Vratite predfilter
Poravnajte položaj utora na dnu i zatvorite gornju kopču u obliku slova U.
- Postavite rešetku za ulaz zraka.
natural_image
Line drawing of a hand inserting a component into a device (no text or symbols)
natural_image
Line drawing of a portable air purifier with a cooling tower and connected plug (no text or symbols)
natural_image
Line drawing of a mobile phone casing with two internal compartments (no text or symbols)AAA Baterija, 1,5 V

Baterija

- Koristite manganske ili alkalne baterija tipa "AAA". Nemojte koristiti baterije koje se mogu puniti.
- Ne smiju se miješati različite vrste baterija kao niti nove i rabljene
- Baterije moraju biti umetnute uz pravilan polaritet
- Istrošene baterije potrebno je izvaditi iz uređaja i sigurno zbrinuti
- Ako se uređaj neće koristiti dulje vrijeme, izvadite baterije
Zamjena filtera
- Filter model: FQ150CJ-2 (uključuje 2 kompleta)

- Zamijenite novi filter
natural_image
Pure technical line drawing of a mechanical component without any text, numbers, or symbolsnatural_image
Simple icon of a grid with a circular arrow, enclosed in a dashed circle (no text or symbols)natural_image
Abstract circular logo with three interlocking curved lines inside (no text or symbols)natural_image
Diagram of a plug inserted into a wall socket with an arrow indicating direction (no text or symbols)- Uklonite prašinu pomoću mekane četke i usisavača

natural_image
Line drawing of a hand holding a tablet device with four compartments (no text or symbols)- Izvadite filter

natural_image
Illustration of a hand inserting a component into a device (no text or symbols visible)natural_image
Diagram of a plug inserted into a wall socket with an arrow indicating direction (no text or symbols)TEHNIČKE SPECIFIKACIJE
| Model Radni | napon Snaga Buka | ||
| TFB-105MP | 24V 33W ≤61dB | ||
| Dijelovi Ulazni | Izlazni | |
| Adapter | 100-240V~50/60Hz 1.5A | 24V--- 1.5A |
UPUTE ZA ODRŽAVANJE
Ventilator zahtjeva minimalno povremeno održavanje. Ne pokušavajte popravljati uređaj sami. Kontaktirajtekvalificiranu servisnu osobu ukoliko je potreban servis.
natural_image
Line drawing of a vertical cylindrical device with a rectangular top and base, no text or symbols presentVažno je da pre upotrebe uređaja u potpunosti pročitate ove uputstvo i da ga sačuvate na sigurnom mestu za buduću potrebu.
SIGURNOST I UPOZORENJA
| NO. | Opis NO. Opis | ||
| 1 | Gornji poklopac 6 Adapter | ||
| 2 | Izlaz vazduha 7 Ulaz vazduha (rešetka) | ||
| 3 | Uprav. Ploča i displej 8 Predfilter | ||
| 4 | Ambijentalno svetlo | 9 | HEPA filter |
| 5 | Postolje |
UPUTSTVO ZA MONTAŽU
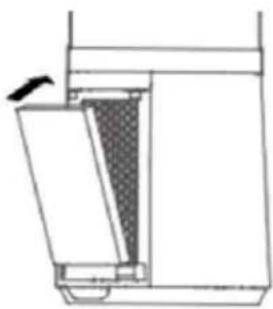
- Uklonite rešetku ulaza vazduha.
natural_image
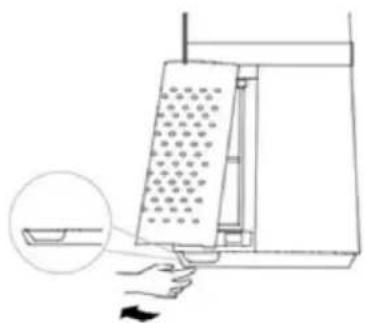
Illustration of a hand inserting a component into a device with a magnified inset showing the part (no text or symbols)- Izvadite predfilter.
natural_image
Illustration of a hand inserting a device into a machine (no text or symbols visible)3. Izvadite HEPA filter iz pakovanja i uklonite zaštitu

natural_image
Simple 3D diagram of a rectangular block with a curved arrow indicating direction (no text or symbols)5. Vratite predfilter
Poravnajte položaj žleba na dnu i zatvorite gornju kopču u obliku slova U.
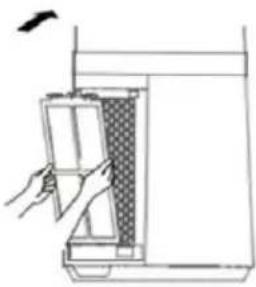
natural_image
Line drawing of a hand opening a door with a patterned lid (no text or symbols)natural_image
Line drawing of a portable air purifier with a connecting plug and cable (no text or symbols)4. Postavite HEPA filter
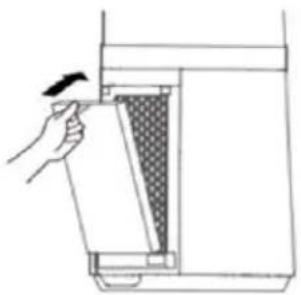
natural_image
Illustration of a hand inserting a paper into a container with a patterned lid (no text or symbols)natural_image
Line drawing of a mobile phone casing with two internal slots and a top panel (no text or symbols)AAA Baterija, 1,5 V
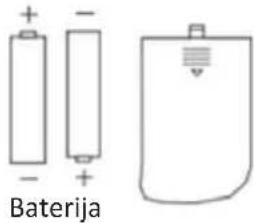
- Koristite manganske ili alkalne baterije tipa „AAA“. Nemojte koristiti baterije koje se pune.
- Ne smeju se mešati različite vrste baterija kao ni nove i korišćene.
- Baterije moraju biti postavljene tako da se polaritet poklapa kao na donjoj slici.
- Istrošene baterije potrebno je izvaditi iz uređaja i sigurno zbrinuti
- Ako se uređaj neće koristiti duže vreme, izvadite baterije
Zamena filtera
- Filter model: FQ150CJ-2 (uključuje 2 kompleta)

- Zamenite novi filter

natural_image
Pure technical line drawing of a mechanical component or assembly (no text or symbols)- Kada se na displeju prikaže oznaka za zamenu filtera, zamenite filter. Ako se filter ne zameni na vreme, obaveštenje će se pojavljivati prilikom svakog pokretanja. Za poništenje podsetnika, pritisnite taster "Mod rada" i zadržite nekoliko sekundi
natural_image
Simple icon of a grid with a circular arrow, enclosed in a dashed circular border (no text or symbols)- Zadržite pritisnut taster "Mod rada" (3 sekunde) kako biste isključili obaveštenje za zamenu filtera.

natural_image
Abstract circular logo with three interlocking curved lines inside (no text or symbols)natural_image
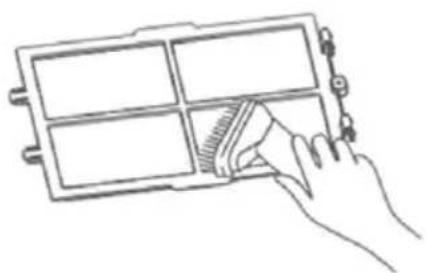
Diagram of a plug inserted into a wall socket with an arrow indicating direction (no text or symbols)- Uklonite prašinu pomoću mekane četke i usisavača
natural_image
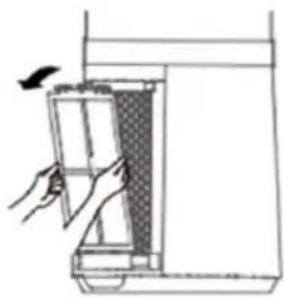
Line drawing of a hand holding a tablet with four compartments (no text or symbols)- Izvadite filter
natural_image
Line drawing of a hand inserting a component into a device (no text or symbols)- Vratite filter obrnutim redosledom i priključite uređaj na napajanje

natural_image
Illustration of a plug inserted into a wall socket with an arrow indicating direction (no text or symbols)TEHNIČKE SPECIFIKACIJE
| Model Radni | napon Snaga Buka | ||
| TFB-105MP | 24V 33W ≤61dB | ||
| Delovi Ulazni napon | Izlazni napon | |
| Adapter | 100-240V~50/60Hz 1.5A | 24V--- 1.5A |
ČIŠĆENJE I ODRŽAVANJE
natural_image
Line drawing of a vertical cylindrical device with a rectangular top and base, no text or symbols present| БР. | Опис БР. Опис | ||
| 1 | Горен капак 6 Адаптер | ||
| 2 | Излез на воздух 7 Влез на воздух (решетка) | ||
| 3 | Контролна табла и екран 8 | Предфильтер | |
| 4 | Амбиентално светло | 9 | НЕРА филтер |
| 5 | Подножје |
УПАТСТВА ЗА МОНТАЖА
natural_image
Illustration of a hand inserting a component into a device, showing a grid-patterned panel and a magnified view (no text or symbols)natural_image
Diagram of a hand inserting a component into a device (no text or symbols visible)natural_image
Simple 3D diagram of a rectangular block with a black arrow pointing to its top edge (no text or symbols)natural_image
Line drawing of a hand using a tool to lift a textured object into a container (no text or symbols)natural_image
Line drawing of a hand opening a door with a patterned lid (no text or symbols)natural_image
Line drawing of a portable air purifier with attached electrical plug (no text or symbols)natural_image
Line drawing of a mobile phone casing with two internal components (no text or symbols)natural_image
Technical line drawing of a mechanical component with a directional arrow indicating movement (no text or symbols)natural_image
Simple line icon of a grid with a circular arrow, enclosed in a dashed circular border (no text or symbols)natural_image
Abstract circular logo with three interlocking curved lines inside a circle (no text or symbols)natural_image
Diagram of a plug inserted into a wall socket with an arrow indicating direction (no text or symbols)natural_image
Line drawing of a hand holding a tablet device with four compartments (no text or symbols)natural_image
Line drawing of a hand inserting a component into a device (no text or symbols)natural_image
Illustration of a plug inserted into a wall socket with an arrow indicating direction (no text or symbols)natural_image
Line drawing of a vertical cylindrical device with a rectangular top and base, no text or symbols presentnatural_image
Illustration of a hand inserting a grid into a device (no text or symbols visible)- Hiqeni filtrin
natural_image
Line drawing of a hand inserting a component into a device (no text or symbols)natural_image
Simple 3D diagram of a rectangular object with a black arrow pointing to its side (no text or symbols)- Instalojeni filterin HEPA.
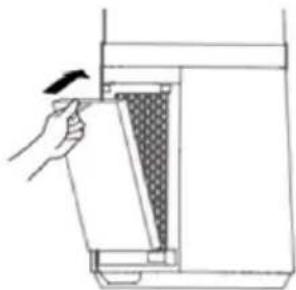
natural_image
Illustration of a hand using a tool to clean or remove a container with a textured lid (no text or symbols)- Instalojeni para-filterin.
natural_image
Line drawing of a hand inserting a device into a device with a mesh pattern (no text or symbols)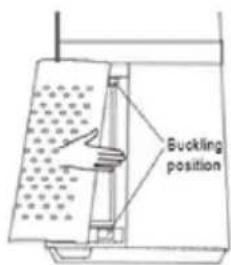
- Instalojeni Adapterin,
natural_image
Line drawing of a portable air purifier with a connecting plug and cable (no text or symbols)
natural_image
Pure technical diagram of a mechanical assembly without any text, numbers, or symbolsnatural_image
Simple icon of a document with grid and refresh arrow, enclosed in a dashed circular border (no text or symbols)natural_image
Abstract circular logo with three interlocking curved lines (no text or symbols)Pastrimi i parafilterit
natural_image
Diagram of a plug inserted into a wall socket with an arrow indicating direction (no text or symbols)-
Pastrojeni pluhurin me thithëse elektrike.
-
Hiqeni filterin/ Take out the filter

natural_image
Line drawing of a hand inserting a component into a device (no text or symbols)natural_image
Line drawing of a hand holding a tablet device with four compartments (no text or symbols)
natural_image
Diagram of a plug inserted into a wall socket with an arrow indicating direction (no text or symbols)KARAKTERISTIKAT TEKNIKE
| Modeli | Tensioni i Punës/ Working Voltage | Fuqia e ranguar/ Rated power | Zhurma/ Noise |
| TFB-105MP 24V | 33W ≤61dB— |
| Pjesët/ Parts Hyrjet | Input Daljet/ Output | |
| Adapteri | 100-240V~50/60Hz 1.5A | 24V ——1.5A |
UDHËZIME TË MIRËMBAJTJES
natural_image
Line drawing of a vertical cylindrical device with a rectangular top and base, no text or symbols presentnatural_image
Illustration of a hand inserting a component into a computer keyboard (no text or symbols visible)- Odstranite predfilter.
Pritisnite in dvignite predfilter na obeh straneh, da ga izvlečete in odstranite predfilter.

natural_image
Illustration of hands installing or adjusting a grid-patterned device into a container (no text or symbols visible)natural_image
Simple 3D diagram of a rectangular object with a curved line and an arrow pointing to its top surface (no text or symbols)4.Vstavite filter HEPA

natural_image
Illustration of a hand inserting a paper into a container with a patterned lid (no text or symbols)- Zamenjajte predfilter
Poravnajte položaj utora na dnu in zaprite zgornjo sponko v obliki črke "U".
natural_image
Line drawing of a hand inserting a component into a device (no text or symbols)
natural_image
Line drawing of a portable electric heater with a power cord and plug, no text or symbols presentnatural_image
Line drawing of a mobile phone casing with two internal compartments (no text or symbols)AAA baterija, 1,5 V

Baterija

natural_image
Pure technical diagram of a mechanical component without any text, numbers, or symbols- Ko se na zaslonu prikaže indikator zamenjave filtra, zamenjajte filter. Če filtra ne zamenjate pravočasno, se ob vsakem zagonu prikaže obvestilo. Če želite preklicati opomnik, pritisnite gumb "Delovni način" in ga držite pritisnjenega nekaj sekund

natural_image
Simple icon of a grid with an arrow and circular arrow, enclosed in a dashed circular border (no text or symbols)- Dolgo pritisnite gumb "Work Mode" (3 sekunde), da izklopite obvestilo o zamenjavi filtra.

natural_image
Abstract circular logo with three interlocking curved lines (no text or symbols)Čiščenje predfiltra
natural_image
Illustration of a plug inserted into a wall socket with an arrow indicating direction (no text or symbols)- Odstranite prah z mehko krtačo in sesalnikom

natural_image
Line drawing of a hand holding a tablet device with four compartments (no text or symbols)- Odstranite filter

natural_image
Line drawing of a hand inserting a device into a container with a bird flying nearby (no text or symbols)- Zamenjajte filter v obratnem vrstnem redu in priključite napravo na napajanje

natural_image
Diagram of a plug inserted into a wall socket with an arrow indicating direction (no text or symbols)TEHNIČNE SPECIFIKACIJE
| Model Delovna napetost Sila Hrup | |||
| TFB-105MP | 24V 33W ≤61dB | ||
| Deli Vnos Izhod | ||
| Adapter | 100-240V~50/60Hz 1,5A | 24---,5A |
NAVODILA ZA VZDRŽEVANJE
Ventilator zahteva periodično vzdrževanje. Naprave ne poskušajte popraviti sami. Če je potreben servis, se obrnite na usposobljenega serviserja.
Bladeless Electric Fan
TFB-105MP
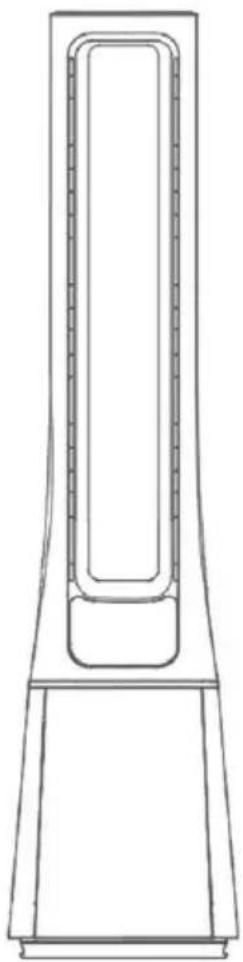
natural_image
Line drawing of a vertical cylindrical device with a rectangular top and base, no text or symbols presentIt is important that you read these instructions before using your product and we strongly recommend that you keep them in a safe place for future reference.
SAFETY AND WARNINGS
IMPORTANT: Please retain your instruction booklet for future use.
We believe that safe performance is the first priority in any consumer product. We ask that any electrical appliance that you use be operated in a sensible fashion with due care and attention placed on the following important operating instructions.
Important Safeguards for your Fan
When using any electrically powered appliance, basic safety precautions should always be followed.
Warning: To reduce the risk of fire, electrical shock or injury to person or property:
- Ensure all packing materials and labels or stickers are removed from the appliance before first use.
● Always operate the product from a power source of the same voltage, frequency and rating as indicated on the product identification plate. - This appliance is not intended for use by persons (including children) with reduced physical, sensory or mental capabilities, or lack of experience and knowledge, unless they have been given supervision or instruction concerning use of the appliance by a person responsible for their safety.
● Children should always be supervised to ensure that they do not play with the appliance. - The appliance can be used by children aged from 8 years and above and persons with reduced physical, sensory or mental capabilities, or lack of experience and knowledge, if they have been given supervision or instruction concerning the use of the appliance in a safe way and understand the hazards involved.
● Children shall not play with the appliance -
Cleaning and user maintenance shall not be made by children without supervision.
-
Close supervision is necessary when the product is used by or near children or incapacitated individuals. Do not allow children to use it as a toy.
- Do not operate the product with a damaged cord or plug, or after the product malfunctions, or has been dropped or appears damaged in any way. Return the complete product to the place of purchase for inspection or contact authorized Service centre.
- Unplug from the mains when not in use and before cleaning.
- Do not use any other accessories or attachments with this appliance.
- To protect against fire, electric shock or personal injury, do not immerse cord, plug or unit in water or any other liquids.
● Always place the unit on a flat level surface. Never leave the product unattended while in use. - Do not use the appliance with an extension cord to avoid product overloading.
- Do not leave the cord hanging over the edge of a table or worktop.
- Avoid contact between the cord and hot surfaces.
● For indoor use only. For domestic use only. - Do not use the appliance for any other than its intended use.
- This appliance should be used only as described within the instructions for use that accompany it. Please retain these instructions for future reference.
● Always ensure that your hands are dry before removing the plug from the main outlet. Never pull the plug out of the mains outlet by its cord. Close supervisions is necessary when this appliance is used by or near children and invalids. - Keep the air intake cover free of dust or fluff.
- Do not allow the air inlet to become blocked or even partially blocked. This may cause the fan to overheat. If it does overheat, the safety cut-out will cause the fan to switch off and remain inoperable until the unit has sufficiently cooled down. In this event, switch off the appliance, unplug it and let it cool down. Remove any blockage to the air inlet or outlet before resuming use. If the fan should cut out again, even when there is no blockage, contact the approved service center for examination and repair.
- Do not cover the fan or place anything over it.
- Do not place anything through the grills or into the fan.
- Do not use the fan if it is not properly and completely assembled.
- Do not use the fan without the mesh guards, as this could lead to injury. Ensure that the fan is switched off from the supply mains before removing the guard.
- Do not use the fan within 1 meter of any other electrical or electronic appliance (e.g.TV,computer,etc.) as it may cause interference.
- The installation of a residual current-operated protective device with a nominal trip current of 30mAh offers additional protection. Contact your electrician.
Caution:
- The appliance is not intended to be operated by means of an external timer or separate remote-control system.
- Make sure your hands are dry when plugging in and unplugging appliance.
- Ensure all the parts are correctly mounted before switching on the appliance.
- Do not immerse the appliance in water or any other liquid.
- Always remove the plug after use.
Important Safeguards for all Electrical appliances
- Carefully read all instructions before operating the appliance and save for future reference.
- Remove and safely discard all packing materials and promotional labels before using the appliance for the first time.
- Fully unwind the power cable before use.
- Do not let the power cord hang over the edge of a bench or table, touch hot surface or become knotted.
- To protect against electric shock, do not immerse the power cord, plug or appliance in water or any other liquid, unless it is recommended in the cleaning instructions.
- It is recommended to inspect the appliance regularly. Do not use the appliance if the supply cord, plug, connector or appliance becomes damaged in any way.
- The appliance is for household use only. Do not use this appliance for any other than its intended use. Do not use in moving vehicles or boats. Do not use outdoor. Misuse may cause injury.
- Always switch off at the power outlet and unplug at the power outlet when the appliance is not use.
- Before cleaning, always turn the appliance to the OFF position. Switch off at the power outlet and remove the power cord, if detachable, from the appliance and allow all parts to cool.
- Do not place this appliance on or near a heart source, such as a hot plate or oven.
- Never insert fingers, pencils, or any other object through the grille when fan is running.
- Disconnect fan when moving from one location to another.
- Be sure fan is on a stable surface when operating to avoid overturning.
- DO NO T use fan in window, rain may create electrical hazard.
- Indoor use only.
PRODUCT INTRODUCTION

NOTE
Pictures in the manual are for reference only, and real objects within the packaging box will prevail in the end.
Parts list
Min unit
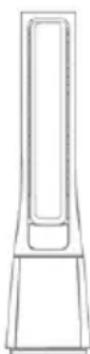

Remote Controller x1

Manual x1 HEPA Filter x2

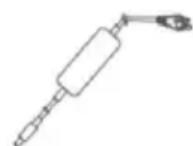
Adapter x1
Parts name

| NO. | Description | NO. | Description |
| 1 | Top cover | 6 | Adapter |
| 2 | Air outlet | 7 | Air inlet grille |
| 3 | Displ. & Contr. panel | 8 | Pre-filter |
| 4 | Ambient light of belt | 9 | HEPA filter |
| 5 | Base |
INSTALLATION INSTRUCTIONS
- Remove the air inlet grille.

natural_image
Illustration of a hand inserting a component into a device with a magnified inset showing the part (no text or symbols)- Take out the pre-filter
Press the raised part on both sides to pull it outwards, and take out the prefilter.

natural_image
Line drawing of a hand inserting a container into a device (no text or symbols)- Remove the protective film of the filter.

natural_image
Simple 3D diagram of a rectangular block with a curved arrow indicating direction (no text or symbols)- Install the HEPA filter

natural_image
Line drawing of a hand using a tool to lift a container with a textured lid (no text or symbols)- Install the pre-filter
Align the slot position at the bottom, and buckle up the upper U-shaped

natural_image
Line drawing of a hand inserting a device into a device casing (no text or symbols)- Install the air inlet grille
Align the upper two buckles and press them tightly, then press the two sides at lower part, slowly and gently buckle the air inlet grille.

- Install the adapter, Tighten the plug with socket position of the base

natural_image
Line drawing of a portable electronic device with a plug and cable, no text or symbols present- Plug power supply

It is recommended to clean the filter once every two weeks and replace it once every six months (the cleaning and replacement cycle can be adjusted according to the use environment).
CONTROL PANEL
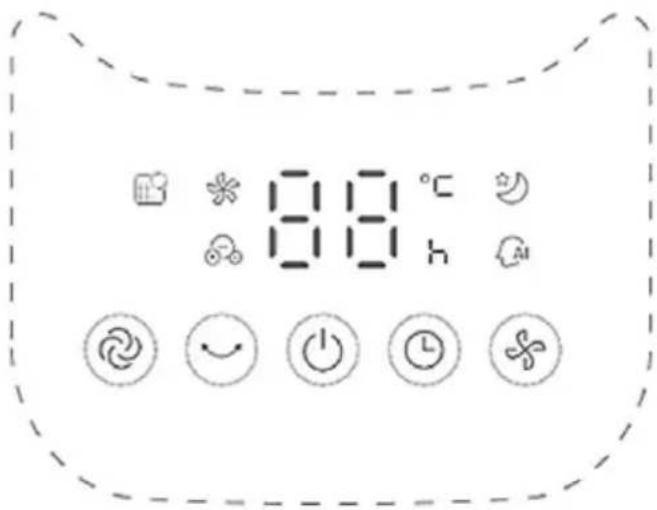
Control and display panel
| Button | Function Description |
 | Startup/Standby |
 | Touch this button to switch the wind mode among normal, plasmcluster, sleep and AI smart.(When the filter replacement reminder light is on, press and hold this button to turn off the reminder light) |
 | Touch this button to start/stop the swing. |
 | Touch this button to switch the wind speed (cycles among level 1-2-3-●●●-10-1-2). |
 | Schedule to shut down in the power-on state, and schedule to start up in the standby state; Touch this button to set the timer (the display cycles among 0-1-2-●●●-12-0h); 0h means that the timer is canceled |
 | Filter replacement reminder icon; when the icon stays on, the filter needs to be replaced; |
 | In AI smart wind mode, the indicator light is on, and the wind power is automatically adjusted according to changes in ambient temperature. |
 | This indicator light is on in sleep wind mode. Start the sleep wind function, and the fan automatically adjusts the level according to the program; there are three levels: 1, 2 and 3; you can adjust the level of the sleep wind by pressing the wind speed button. |
 | Displays the wind speed level or set timer, and displays the temperature in the wind mode. |
 | This indicator light is on in ion wind mode.In this mode, plasmcluster is turned on, and level 1~10 wind has plasmcluster. |
Additional Features and Maintenance
- Auto shutdown
There is no operation during the running of the fan, after 15 hours of continuous operation, the fan will be forced to shut down automatically.
- Intelligent memory
When the fan is turned off or powered off, it will run in the state before turning off or power off when the power is powered on again (the timing function is not memorized).
- Screen-off function
In case of no operation for 30 seconds during normal operation, the indicator light on the body will be automatically off, but the fan will continue to operate. Press the ON/OFF button to turn off the fan when the screen is off, and press the other button to restore display.
REMOTE CONTROL BUTTON DESCRIPTION
NOTE
The remote control should be normally used within 5 meters of the front of the product and 30 degrees of the deviation angle.
The battery contains many heavy metals, acids and bases, etc., which may threaten human's health; Waste batteries should be recycled separately.
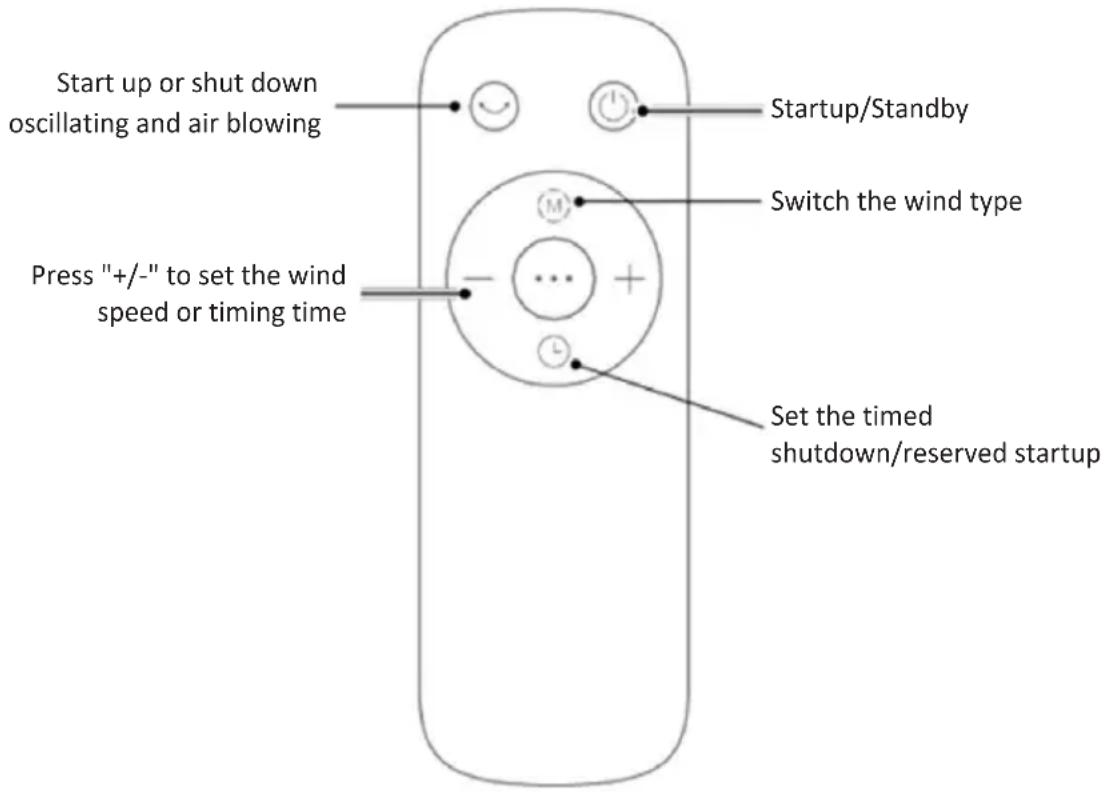
Remote control Batteries

- Use manganese or alkaline batteries of type "AAA". Do not use rechargeable batteries.
- Different type of batteries or new and used batteries are not to be mixed.
- Batteries are to be inserted with the correct polarity
- Exhausted batteries are to be removed from the appliance and safely disposed of
- If the appliance is to be stored unused for a long period, the batteries are removed
- The supply terminals are not to be short-circuited
Filter replacement
- Filter model: FQ150CJ-2 (including 2 sets)
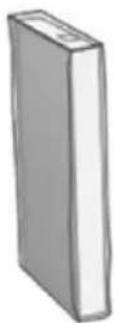
- Replace a new filter

natural_image
Pure technical line drawing of a mechanical component without any text, numbers, or symbols- When the indicator light for replacement of filter is on, the prompt that remind you of filter replacement will appear. If it is not replaced in time, the prompt will appear during each startup

natural_image
Simple icon of a grid with an arrow and circular arrow, enclosed in a dashed circular border (no text or symbols)- Long press the mode button for 3 seconds to turn off the idicator light for filter replacement.

natural_image
Abstract circular logo with three interlocking curved lines (no text or symbols)Pre-Filter cleaning
- Unplug the power cord

natural_image
Illustration of a plug inserted into a wall socket with an arrow indicating direction (no text or symbols)- Remove the dust with vacuum cleaner

natural_image
Line drawing of a hand holding a tablet device with four compartments (no text or symbols)- Take out the filter

natural_image
Line drawing of a hand inserting a component into a device (no text or symbols)- Install the machine in reverse order and plug power supply
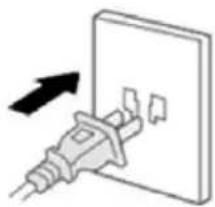
natural_image
Diagram of a plug inserted into a wall socket with an arrow indicating direction (no text or symbols)TECHNICAL SPECIFICATIONS
| Model Working Voltage Rated power Noise | |||
| TFB-105MP 24V | 33W ≤61dB= | ||
| Parts Input Output | ||
| Adapter | 100-240V~50/60Hz 1.5A | 24V ——1.5A |
The fan requires little maintenance. Do not try to fix it by yourself. Refer it to qualified service personnel if service is needed.
- Before cleaning and assembling, fan must be unplugged.
- To ensure adequate air circulation to the motor, keep vents at the rear of the motor free of dust. Do not disassemble the fan to remove dust.
- Please wipe the exterior parts with a soft cloth soaking a mild detergent.
- Do not use any abrasive detergent or solvents to avoid scratching the surface. Do not use any of the following as a cleaner: gasoline, thinner.
- Do not allow water or any other liquid into the motor housing or interior parts.
CLEANING
- Be sure to unplug from the electrical supply source before cleaning.
- Plastic parts should be cleaned with a soft cloth moisten with mild soap. Thoroughly remove soap film with dry cloth.
DISPOSAL OF ELECTRICAL AND ELECTRONIC EQUIPMENT
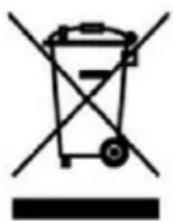
To protect our environment and to recycle the raw materials used as completely as possible, the consumer is asked to return unserviceable equipment to the public collection system for electrical and electronic. The symbol of the crossed indicates that this product must be returned to the collection point for electronic waste to feed it by recycling the best possible raw material recycling.
By ensuring this product you will prevent possible negative effects on the environment and human health, which could otherwise be caused due to improper disposal of that product. The recycling of materials from this product, you will help to preserve a healthy environment and natural resources.
For detailed information about the collection of EE products contact M SAN Grupa d.o.o. or the dealer where you purchased the product.
DISPOSAL OF WASTE BATTERIES

Check local regulations for disposal of waste batteries or call your local customer service in order to get instructions on the disposal of old and used batteries. The batteries in this product should not be disposed of with household waste. Be sure to dispose of old batteries in special places for disposal of used batteries that are found in all retail shops where you can buy batteries.
EU DECLARATON OF CONFORMITY
This device is manufactured in accordance with the applicable European standards and in accordance with all applicable Directives and Regulations.
EU declaration of conformity can be downloaded from the following link: www.msan.hr/dokumentacijaartikala

JAMSTVENI LIST HR
VIVAX
MODEL UREĐAJA
SERIJSKI BROJ
DATUM PRODAJE
BROJ RAČUNA PRODAVATELJA
POTPIS I PEČAT PRODAVATELJA
POŠTOVANI!
Zahvaljujemo na kupnji Vivax uređaja i nadamo se da ćete biti zadovoljni odabirom. Ako u jamstvenom roku bude potreban popravak proizvoda, molimo savjetujte se sa ovlaštenim prodavačem koji Vam je proizvod prodao ili nas kontaktirajte na dolje navedene brojeve i adrese. MOLIMO VAS DA PRIJE UPORABE PROIZVODA PAŽLJIVO PROČITATE UPUTE PRILOŽENE UZ PROIZVOD!
-
Ovim jamstvom M SAN Grupa kao davatelj jamstva u Republici Hrvatskoj jamči besplatan popravak istog u skladu s važećim propisima i u skladu s uvjetima opisanim u ovom jamstvenom listu. Ovim jamstvom jamčimo da će predmet ovog jamstva raditi bez pogreške uzrokovane eventualnom lošom izradom ili lošim materijalom izrade. Svi, eventualno nastali, kvarovi biti će besplatno otklonjeni u ovlaštenom servisu u jamstvenom roku.
-
UVJETI JAMSTVA Jamstveni rok počinje od dana kupnje proizvoda i traje 12 mjeseci.
-
U slučaju kvara na proizvodu koji je predmet ovog jamstva, obvezujemo se da ćemo isti popraviti u najkraćem mogućem roku, a najkasnije u roku od 45 dana. Ako se proizvod ne može popraviti ili se ne popravi u roku od 45 dana, biti će zamijenjen novim. Jamstvo će biti produženo za vrijeme trajanja popravka.
-
Jamstvo se priznaje samo uz račun o kupnji, te uz ovaj jamstveni list koji mora biti ispravno popunjen odnosno mora sadržavati datum prodaje, pečat i potpis prodavatelja.
5. JAMSTVO NE OBUHVAĆA
POTPIS I PEČAT PRODAVATELJA
POŠTOVANI!
Information requirements (EN)


- SIGURNOST I UPOZORENJA
- Zamjena filtera
- TEHNIČKE SPECIFIKACIJE
- UPUTE ZA ODRŽAVANJE
- UPUTSTVO ZA MONTAŽU
- Izvadite HEPA filter iz pakovanja i uklonite zaštitu
- Vratite predfilter
- Postavite HEPA filter
- Zamena filtera
- ČIŠĆENJE I ODRŽAVANJE
- УПАТСТВА ЗА МОНТАЖА
- Pastrimi i parafilterit
- KARAKTERISTIKAT TEKNIKE
- UDHËZIME TË MIRËMBAJTJES
- Čiščenje predfiltra
- TEHNIČNE SPECIFIKACIJE
- NAVODILA ZA VZDRŽEVANJE
- Bladeless Electric Fan
- TFB-105MP
- SAFETY AND WARNINGS
- IMPORTANT: Please retain your instruction booklet for future use.
- Important Safeguards for your Fan
- Warning: To reduce the risk of fire, electrical shock or injury to person or property:
- Caution:
- Important Safeguards for all Electrical appliances
- PRODUCT INTRODUCTION
- NOTE
- Parts list
- Min unit
- INSTALLATION INSTRUCTIONS
- CONTROL PANEL
- Additional Features and Maintenance
- - Auto shutdown
- - Intelligent memory
- - Screen-off function
- REMOTE CONTROL BUTTON DESCRIPTION
- Remote control Batteries
- Filter replacement
- Pre-Filter cleaning
- TECHNICAL SPECIFICATIONS
- CLEANING
- DISPOSAL OF ELECTRICAL AND ELECTRONIC EQUIPMENT
- DISPOSAL OF WASTE BATTERIES
- EU DECLARATON OF CONFORMITY
- JAMSTVENI LIST HR
- VIVAX
- MODEL UREĐAJA
- SERIJSKI BROJ
- DATUM PRODAJE
- BROJ RAČUNA PRODAVATELJA
- POTPIS I PEČAT PRODAVATELJA
- POŠTOVANI!
- JAMSTVO NE OBUHVAĆA
Brand : Vivax
Model : TFB105MD
Category : Household Fan