
VS-1102 - Vacuum Sealer Vivax - Free user manual and instructions
Find the device manual for free VS-1102 Vivax in PDF.


| Product Type | Vacuum Sealer |
| Brand | Vivax |
| Model | VS-1102 |
| Dimensions (L x W x H) | Approx. 40 x 20 x 10 cm |
| Weight | Approx. 2 kg |
| Power Consumption | 120 W |
| Power Supply | 220-240 V, 50/60 Hz |
| Sealing Bar Material | Stainless Steel |
| Vacuum Pump Type | Single Piston |
| Vacuum Pressure | Up to -0.8 bar |
| Sealing Width | 30 cm |
| Functions | Vacuum Seal, Pulse, Seal Only, Canister Port |
| Compatible Bags | Vivax vacuum bags and rolls (up to 30 cm wide) |
| Additional Accessories | 2 x Vacuum Bags, 1 x Roll (20 cm x 3 m) |
| Control Panel | Touch buttons with LED indicators |
| Auto Shut-off | Yes, after 30 seconds of inactivity |
| Overheat Protection | Yes, automatic shutdown |
| Cord Length | 1.2 m |
| Cleaning | Wipe exterior with damp cloth; do not immerse in water |
| Replacement Parts | Sealing gasket, vacuum pump, foam strips |
| Repair Service | Contact Vivax authorized service center |
| Certifications | CE, RoHS |
| Manual Languages | EN, MK, and others |
| Manual Pages | 88 |
Frequently Asked Questions - VS-1102 Vivax
User questions about VS-1102 Vivax
0 question about this device. Answer the ones you know or ask your own.
Ask a new question about this device
Download the instructions for your Vacuum Sealer in PDF format for free! Find your manual VS-1102 - Vivax and take your electronic device back in hand. On this page are published all the documents necessary for the use of your device. VS-1102 by Vivax.
USER MANUAL VS-1102 Vivax
natural_image
White and black VIVAX branded electronic device with control buttons (no visible text or symbols on body)natural_image
Black-and-white photo of a printer with a plastic sheet being placed on a wooden surface (no visible text or symbols)A.
Stavite otvorenu stranu vrećice na vrh donje gumene trake. Pazite pritom da vrećica ne pokriva vakumsku crpku ⑬.
B.
Zatvorite poklopac te pritom pazite da bočne poluge (mehanizam za zaključavanje) sjednu na mjesto. Pritisnite tipku "Seal Only" ili
"VAC/Seal" za zavarivanje ili vakumiranje pa zatim zavari- vanje.

natural_image
White portable printer with plastic cover placed on a wooden surface (no visible text or symbols)C.
natural_image
White portable air purifier with a bag of granular material being placed on it, no visible text or symbols.ZAVARIVANJE VREĆICA
☐ Priključite uređaj na napajanje i uključite ga.
Postavite otvoreni dio vrećice na vrh crne gume za zavarivanje ⑫, zatim zatvorite poklopac.
Pritisnite čvrsto poklopac sa obje ruke tako da poklopac potpuno nalegne i pritisnite ga čvrsto dok ne začujete dva „Klik“ zvuka.
Pritisnite tipku “Seal” (Zavarivanje) ⑧ ⑨. Kao oznaka početka zavarivanja, zavijetliti će LED oznaka ⑦. Kada se svjetlosna oznaka isključi, zavarivanje vrećice je završeno.
☐ Pritisnite tipke “Mehanizama za otvaranje poklopca” ☐ . kako bi otvorili poklopac.
PAKIRANJE NAMIRNICA U VAKUMSKU VREĆICU
- Stavite namirnice koje želite čuvati u vrećicu.
- Očistite i ispravite otvorenu stranu vrećice. Otvorena strana vrećice ne smije imati nabore.
- Vanjski rubovi vrećice moraju biti postavljeni unutar granica vakumske ploče ⑨ ali pritom pazite da vrećica ne padne na otvor vakumske crpke ⑬, kako bi spriječili propuštanje sustava vakuuma.
- Zatvorite poklopac i čvršće pritisnite obje strane poklopca na označenim bočnim mjestima dok ne začujete zvuk zaključavanja (klik).
- Pritisnite na tipku „Vacuum/Seal“⑦ za automatsko vakumiranje i zavarivanje.
- Kad ste završili, pritisnite bočne tipke za otvaranje poklopca i postupak je završen.
ČUVANJE NAMIRNICA U VAKUMSKOJ POSUDI
KORAK 1 Stavite namirnice u spremnik, poklopite ga te počnite sa vakumiranjem. Također, stavite spojnicu vakumskog adaptera na vakumsku crpku ⑬, a usisavač vakumskog adaptera na poklopac spremnika.
KORAK 2 Uključite uređaj. Pritisnite tipku „Vacuum/Seal“ ⑦. Nakon toga, spremnik će biti automatski vakumiran.
KORAK 3 Zatvorite „ventil“ na posudi da zadržite vacuum u posudi. Zatim, pritisnite bočne tipke za otvaranje poklopca Ⓐ, izva-dite spojnicu vakumske crpke Ⓔ., postupak je završen.
KORAK 4 Za otvaranje posude, otvorite „ventil“ na posudi da u posudu uđe zrak. Zatim, otvorite poklopac spremnika kako bi izvadili namirnice.
KORISNI SAVJETI
- Vrećice nemojte odviše napuniti: ostavite dovoljno prostora, naročito u blizini otvora, kako bi uspješno postavili vrećicu na ploču za vakumiranje.
- Otvoreni kraj vrećice ne smije biti mokar! Mokar rub vrećice uređaj neće dobro rastaliti i nepropusno zavariti!
- Vakumski sustav ne može zamijeniti toplinski proces konzerviranja. Pokvarljiva hrana i dalje treba biti u hladnjaku ili u zamrzivaču.
- Kako biste izbjegli nabore na vrećici kod zavarivanja većih komada, pažljivo izravnajte površinu vrećice dok ju stavljate u vakumski kanal te ju držite sve dok ne počne vakumiranje.
- Kod vakumiranja i zavarivanja predmeta oštrih rubova (suhe špagete, oštri pribor za jelo), zaštite vrećicu od mogućeg oštećenja zamotavanjem predmeta u meki apsorbirajući materijal, kao na primjer papirnati ručnik, ili možete koristiti spremnik umjesto vrećice.
-
Kod korištenja dodataka, imajte na umu da ostavite 2.5 cm prostora na vrhu spremnika.
-
Za najbolje rezultate, odmrznite voće te blanširajte povrće prije vakumiranja i zavarivanja.
- Ukoliko niste sigurni je li Vam vrećica pravilno zavarena, jednostavno ju ponovo zavarite.
- Za najbolje rezultate vakumiranja, koristite vrećice, spremnike, posude te dodatke istog proizvođača.
ČIŠĆENJE I ODRŽAVANJE
Vaš uređaj za vakumirano pakiranje čisti se vrlo jednostavno; u nastavku slijede upute:
◆ Prije čišćenja uvijek obavezno odspojite uređaj sa napajanja.
◆ Za čišćenje vanjske strane uređaja, koristite vlažnu krpu, spužvu ili pak blagi deterdžent.
◆ Unutrašnjost uređaja, odnosno ostatke hrane ili tekućine jednostavno obrišite papirnatim ubrusom.
◆ Temeljito osušite uređaj prije ponovnog korištenja.
◆ Držite uređaj na stabilnom i sigurnom mjestu, daleko od dohvata djece.
SAVJETI ZA ZAVARIVANJE S DODACIMA
Pripremanje dodataka za proces vakumiranog pakiranja. U dodatke ubrajaju se spremnici, posude i čepovi za boce.
- Uvijek ostavite barem 2.5 cm prostora između vakumiranog sadržaja i ruba spremnika.
- Obrišite rubove spremnika, posude ili boce da budu čisti i suhi.
- Spremnike i posude zatvarajte poklopcem, a bocu sa čepom.
- Kod dodataka i posuda s tipkom ventilom na poklopcu, proces vakumiranja započnite okretanjem tipke, a kada je proces vakumiranja dovršen, okrenite tipku-ventil u zatvoreni položaj (na suprotnu stranu) prije nego uklonite dodatno crijevo za vakumiranje.
RJEŠAVANJE PROBLEMA
VIVAX ČEPOVI ZA BOCU
natural_image
White and black VIMAX branded electronic device with control buttons (no visible text or symbols on body)natural_image
White and black VivaX mobile phone device with control buttons (no visible text or symbols on body)3. Indikator vrste hrane.

natural_image
Black-and-white photo of a printer with paper being placed on a wooden surface (no visible text or symbols)A.
Stavite otvorenu stranu kesice na vrh donje gumene trake. Pazite pritom da kesica ne pokriva vakumsku cev ⑬.

natural_image
White disposable water dispenser with plastic wrap, placed on a wooden surface (no visible text or symbols)B.
Zatvorite poklopac te pritom pazite da bočne poluge (mehanizam za zaključavanje) budu na mestu . Pritisnite dugme "Seal Only" ili "VAC/Seal" za zavarivanje ili vakumiranje pa zatim zavarivanje.
C.
Pritisnite “Mehanizam za otpuštanje” ①.. da biste otvorili uređaj i završili proces vakumiranja.
natural_image
White portable device with plastic bag filled with granular material, placed on dark surface (no visible text or symbols)ZAVARIVANJE KESICA
◆ Priključite uređaj na napajanje i uključite ga.
◆ Postavite otvoreni deo kesice na vrh crne gume za zavarivanje ⑫, zatim zatvorite poklopac.
◆ Pritisnite čvrsto poklopac sa obe ruke sedne i pritisnite ga čvrsto dok ne začujete dva „Klik“ zvuka.
◆ Pritisnite dugme “Seal” (Zavarivanje) ⑧. Kao oznaka početka zavarivanja, zavetliti će LED oznaka ⑦. Kada se svetlosna oznaka isključi, zavarivanje kesice je završeno.
◆ Pritisnite dugme “Mehanizama za otvaranje poklopca” ①. kako bi otvorili poklopac.
PAKOVANJE NAMIRNICA U VAKUMSKU KESICU
- Stavite namirnice koje želite čuvati u kesicu.
- Očistite i ispravite otvorenu stranu kesice. Otvorena strana kesice ne sme da ima nabore.
- Spoljni rubovi kesice moraju biti postavljeni unutar granica vakumske ploče ⑨ ali pritom pazite da kesica ne nalegne na otvor vakumske cevi ⑬, kako bi sprečili propuštanje sustava vakuuma.
- Zatvorite poklopac i čvršće pritisnite obje strane poklopca na označenim bočnim mestima dok ne začujete zvuk zaključavanja (klik).
- Pritisnite na dugme „Vacuum/Seal“ ⑦ za automatsko vakumiranje i zavarivanje.
- Kad ste završili, pritisnite bočne tastere za otvaranje poklopca ^① i postupak je završen.
ČUVANJE NAMIRNICA U VAKUMSKOJ POSUDI
KORAK 1 Stavite stvari u posudu, poklopite ju te počnite sa vakumiranjem. Također, stavite crevo-adapter između vakumske cevi ⑬ i ulaza za cev na poklopcu posude.
KORAK 2 Uključite uređaj. Pritisnite dugme „Vacuum/Seal“ ⑦. Nakon toga, posuda će se automatski vakumirati.
KORAK 3 Zatvorite „ventil“ na posudi da zadržite vacuum u posudi. Zatim, pritisnite bočne tastere za otvaranje poklopca ①, izvadite crevo-adapter sa vakumske cevi ⑬. i postupak je završen.
KORAK 4 Za otvaranje posude, otvorite „ventil“ na posudi da u posudu uđe vazduh. Zatim, otvorite poklopac posude kako bi izvadili namirnice.
KORISNI SAVETI
-
Kese nemojte previše da napunite: ostavite dovoljno prostora, naročito u blizini otvora, kako bi uspešno postavili kesu na ploču za vakumiranje.
-
Otvoreni kraj kese ne sme da bude mokar! Mokru ivicu kese uređaj će teže rastopiti i nepropusno zavariti!
-
Vakumski sistem ne može da zameni toplotni proces konzerviranja. Kvarljiva hrana i dalje treba da bude u frižideru ili u zamrzivaču.
-
Kako biste izbegli nabore na kesi kod zavarivanja većih komada, pažljivo izravnajte površinu kese dok je stavljate u vakuumski kanal i držite je sve dok ne počne vakumiranje.
-
Kod vakumiranja i zavarivanja predmeta oštrih ivica (suve špagete, srebrni pribor za jelo), zaštitite kesu od mogućeg oštećenja zamotavanjem predmeta u meki apsorbirajući materijal, kao na primer papirnate maramice ili možete da koristite posudu umesto kese.
-
Kod upotrebe dodataka, ostavite 2.5 cm prostora na vrhu posuda.
- Za najbolje rezultate, odmrznite voće i blanširajte povrće pre vakumiranja i zavarivanja.
- Ukoliko niste sigurni da li je Vam kesa pravilno zavarena, jednostavno je ponovo zavarite.
- Za najbolje rezultate vakumiranja, upotrebljavajte kese, posude i dodatke iste marke..
ČIŠĆENJE I ODRŽAVANJE
Vaš uređaj za vakumirano pakovanje vrlo jednostavno se čisti; u nastavku slijede uputstva:
◆ Pre čišćenja uvek obavezno isključite uređaj sa napajanja.
◆ Za čišćenje spoljne strane uređaja, koristite vlažnu krpu, sunder ili pak blagi deterdžent.
◆ Unutrašnjost uređaja, odnosno ostatke hrane ili tećnosti jednostavno obrišite papirnatim ubrusom.
◆ Temeljito osušite uređaj pre ponovnog korišćenja.
◆ Držite uređaj na stabilnom i sigurnom mestu, daleko od dohvata dece.
SAVETI ZA ZAVARIVANJE S DODACIMA
Pripremanje dodataka za proces vakumiranog pakovanja. U dodatke se ubrajaju se spremnici, posude i čepovi flaše.
- Uvek ostavite barem 2.5 cm prostora između vakumiranog sadržaja i ivice posude.
- Obrišite ivice posude ili boce da budu čisti i suvi.
- Posude zatvarajte poklopcem, a flašu čepom.
- Kod dodataka i posuda s dugmetom ili ventilom na poklopcu, proces vakumiranja započnite okretanjem dugmeta ili ventila, a kada je proces vakumiranja dovršen, okrenite dugme-ventil u zatvoreni položaj (na suprotnu stranu) pre nego uklonite dodatno crevo za
vakumiranje.
REŠAVANJE PROBLEMA
natural_image
White and black electronic device with a control panel and display screen (no visible text or symbols)natural_image
White and black VivaX mobile phone device with control buttons (no visible text or symbols on body)2. Копче за брзина
natural_image
Black and white photo of a printer with paper being placed on a wooden surface (no visible text or symbols)A.
natural_image
White portable printer with plastic cover on a wooden surface (no visible text or symbols)C.
natural_image
White portable air purifier with a bag of granular material being placed, no visible text or symbols on the device itself.natural_image
White and black VIVAX branded electronic device with four buttons and a display screen (no visible text or symbols on body)You are about to enjoy the freshness benefits of Vivax vacuum sealer, Vacuum Preservation System has helped millions of households keep food fresh longer in the refrigerator, freezer and pantry. The vacuum sealer system is designed to remove air and extend freshness up to 5 times longer than conventional storage methods, keep your Vivax VS-100 appliance on your worktop, and you will soon discover it's convenience and versatility.
Why need vacuum package?
Exposure to air causes food to lose nutrition and flavor, and also causes freezer bum and enables many bacteria, mold and yeast to grow, The Vivax vacuum packaging system removes air and seals in flavor and quality. You can now enjoy the benefits of a scientifically proven food storage method that keeps food fresh up to 5 times longer.
THE VACUUM SEALER SAVES TIME AND MONEY
Save much cost: With the Vivax VS-1002 you can buy in bulk or buy on sale and vacuum package your food in desired portions without wasting food.
Save more time:
Cook ahead for the week, preparing meals and saving them in vacuum sealer bags
Marinate in minutes:
Vacuum packaging opens up the pores of food so you can get that great-marinated flavor in just 20 minutes instead of overnight.
Make entertaining easy:
Make your signature dish and holiday treats in advance so you can spend quality time with your guests.
Enjoy seasonal or specialty foods:
Keep highly perishable or infrequently used items fresh longer.
Control portions for dieting:
Vacuum package sensible portions and write calories and/or fat content on the bag.
Protect non-food items:
Keep camping and boating supplies dry and organized for outings; protect polished silver from tarnishing by minimizing exposure to air.
SAFETY AND WARNINGS
IMPORTANT: Please retain your instruction booklet for future use.
We believe that safe performance is the first priority in any consumer product. We ask that any electrical appliance that you use be operated in a sensible fashion with due care and attention placed on the following important operating instructions.
When using any electrically powered appliance, basic safety precautions should always be followed.
Warning: To reduce the risk of fire, electrical shock or injury to person or property:
- Ensure all packing materials and labels or stickers are removed from the appliance before first use.
- Always operate the product from a power source of the same voltage, frequency and rating as indicated on the product identification plate.
-
Close supervision is necessary when the product is used by or near children or incapacitated individuals. Do not allow children to use it as a toy.
-
Do not operate the product with a damaged cord or plug, or after the product malfunctions, or has been dropped or appears damaged in any way. Return the complete product to the place of purchase for inspection, replacement or refund.
- Unplug from the mains when not in use and before cleaning.
- The appliance should not be used by adults or children whose lack of experience, product knowledge or disability might cause a hazard, unless they have been correctly instructed and are adequately supervised.
● Children should always be supervised to ensure that they do not play with this product. - Do not use any other accessories or attachments with this appliance.
● Always place the unit on a flat level surface. Never leave the product unattended while in use. - Do not use the appliance with an extension cord to avoid product overloading.
- Avoid contact between the cord and hot surfaces.
- For indoor use only. For domestic use only.
- Do not use the appliance for any other than its intended use.
- This appliance should be used only as described within the instructions for use that accompany it. Please retain these instructions for future reference.
● Always ensure that your hands are dry before removing the plug from the main outlet. Never pull the plug out of the mains outlet by its cord. Close supervisions is
necessary when this appliance is used by or near children and invalids.
- Keep the air intake cover free of dust or fluff.
Caution:
- The appliance is not intended to be operated by means of an external timer or separate remote-control system.
- Make sure your hands are dry when plugging in and unplugging appliance.
- Ensure all the parts are correctly mounted before switching on the appliance.
- To protect against fire, electric shock or personal injury, do not immerse cord, plug or unit in water or any other liquids.
- Always remove the plug after use.
Important Safeguards for all Electrical appliances
- Carefully read all instructions before operating the appliance and save for future reference.
- Remove and safely discard all packing materials and promotional labels before using the appliance for the first time.
- Fully unwind the power cable before use.
- Do not let the power cord hang over the edge of a bench or table, touch hot surface or become knotted.
- The appliance is not intended for use by persons (including children) with reduced physical, sensory or mental capabilities, or lack of experience and knowledge, unless they have been given supervision or instruction concerning the use of the appliance, by a
person responsible for their safety.
- It is recommended to inspect the appliance regularly. Do not use the appliance if the supply cord, plug, connector or appliance becomes damaged in any way.
- The appliance is for household use only. Do not use this appliance for any other than its intended use. Do not use in moving vehicles or boats. Do not use outdoor. Misuse may cause injury.
- Always switch off at the power outlet and unplug at the power outlet when the appliance is not use.
- Before cleaning, always turn the appliance to the OFF position. Switch off at the power outlet and remove the power cord, if detachable, from the appliance and allow all parts to cool.
- Do not place this appliance on or near a heart source, such as a hot plate or oven.
OPERATING INSTRUCTIONS
1. R lease mechanism:
Push both of these to open the appliance
2. Speed indicators

4. Cancel button:
Press this button to stop the operation of the appliance.
5. Speed setting button:
When vacuum sealing delicate items, press the Speed setting button so that the gentle speed Indicator light is illuminated, for more control. You may press the seal button 5. at any time to stop the vacuum and begin the automatic the sealing process,
Note: Appliance will default the normal speed upon pressing the power on button or when power has been interrupted.
6. Adjustable food setting button:
For optimal vacuuming and sealing of moist or juicy foods, press the Adjustable food setting button 3. until the Moist indicator light is illuminated, Choose the dry food setting for foods without liquid.
3. Food type indicators.
7. Vacuum/Seal button:
Operates the vacuum followed by the seal function
8. Seal control button:
Operates the sealing function only.
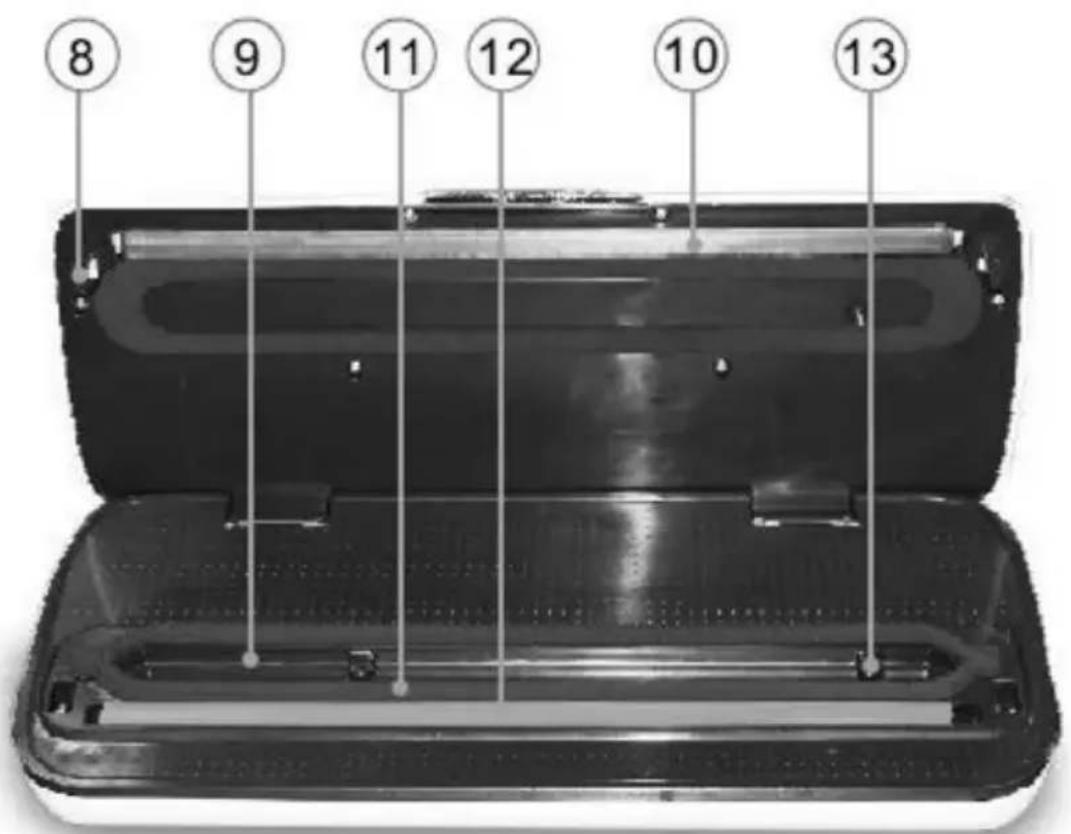
⑧ Locking mechanism:
Push this down until it clicks to lock the bag into place,
⑨ Vacuum plate:
The bag must sit within the rippled section for the vacuum, and seal to operate correctly.
⑩ Sealing bar:
Allows the bag to seal without sticking to the bar.
⑪ Airproof loop of sponge:
Airproof the vacuum area and prevent no vacuum leaking.
⑫ Sealing gasket:
Presses the bag on to the sealing bar.
⑬ Vacuum nozzle:
The bag must be placed bellow this nozzle for the vacuum to operate correctly.
OPERATION INSTRUCTIONS
natural_image
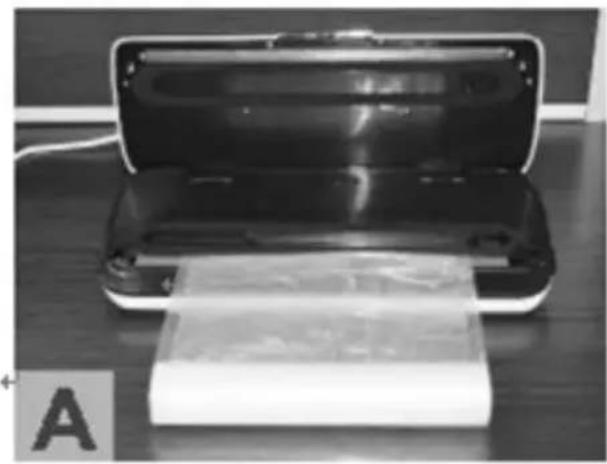
Black-and-white photo of a printer with open lid and paper roll, placed on wooden surface (no visible text or symbols)A.
Put the opening of the bag on top of the lower rubber strip, Ensure the bag does not cover the vacuum nozzle 13.
B.
Press the cover down ensuring that the locking mechanism locks into place.
Press the "Seal Only" Button or "VAC/Seal" button.

natural_image
White portable printer with plastic cover placed on a wooden surface (no visible text or symbols)C.
Press "Release Mechanism" 1 to open the appliance and the process in complete.

natural_image
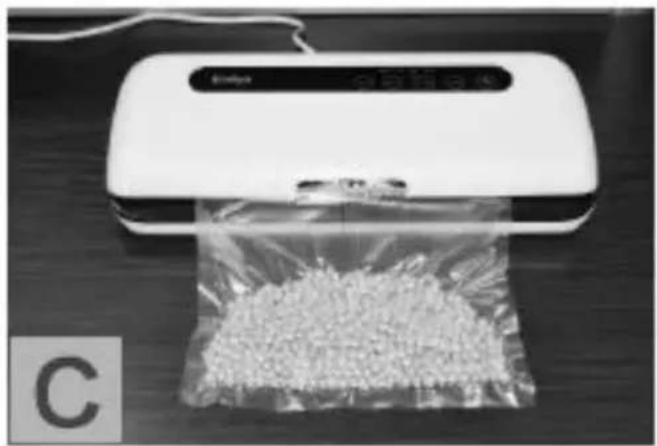
White portable air purifier with a plastic bag filled with granular material, placed on a wooden surface (no visible text or symbols)SEAL PLASTIC BAGS
◆ Plug the appliance in and switch it on.
◆ Put the opening of the bag on top of the black rubber strip ⑫., then close the cover
◆ Press the cover down heavily on both sides by the dotted areas using two hands until two click sounds heard.
◆ Press the “Seal Only” button ⑧, and you will find the LED 2. will light when the Led light disappears, the bag seal is done.
◆ Press “Release Mechanism” ①. to open the appliance and the process in complete.
PRESERVATION STUFF WITH VACUUM BAG
- Put the stuff that you want to preserve inside the bag.
- Clean and Straighten the opening of the bag, make sure to wrinkle or ripples on the panels of the opening.
- Make sure that both panels of the bag are located within the rippled Area (vacuum plate ⑨.), but below the round post which is the vacuum nozzle ⑬. to ensure no vacuum leaking.
-
Close the cover and then press heavily on both sides of the cover in the dotted
Ares until two click sounds heard. -
Press the “vacuum/seal” ⑦. button then the bag will be automatically Vacuumed and sealed.
-
Then press the “Release Mechanism ①. and the process is completed.
PRESERVATION STUFF WITH VACUUM CANISTERS
STEP 1 Put the stuff inside for canister, cover it and switch it to seal, put the tie-in of the vacuum adapter onto the vacuum nozzle ⑬., the sucker of the vacuum adapter onto the lid of the canister.
STEP 2 Plug the unit in and switch it on. Press the “vacuum / seal” button ⑦. then the canister will be automatically vacuumed.
STEP 3 Press the release mechanism ⑪., pull out the tie-in from the vacuum nozzle ⑬., and the process is completed.
STEP 4 Turn on the switch on the lid of the canister to open it, and put out the stuff.
HELPFUL HINTS
- Do not overfull the bags: leave enough length at the open end of the bag so that it can be placed on the vacuum plate easily.
- Ensure that the open end of the bag is not wet. A wet bag may be difficult to melt and seal tightly.
- Vacuum is NOT a substitute for the heat process of canning, Perishables still need to be refrigerated or frozen.
- To prevent wrinkles in a seal when vacuum sealing bulky items, gently stretch bag flat while inserting int the vacuum channel and hold until the pump begins.
- When you are vacuum sealing items with sharp edges(dry spaghetti, silverware, etc.), protect the bag from punctures by wrapping item in soft cushioning material, such as a paper towel, you may want to use a canister or container instead of a bag.
- When using accessories, remember to leave 2.5cm of space at top of canister or container.
-
Pre-freeze fruits and blanch vegetables before vacuum sealing for the best results.
-
If you are unsure whether your bag was sealed properly, simply reseal the bag.
- For best results, use same brand bags, canisters, containers and accessories.
CLEANING AND MAINTENANCE
Your vacuum preservation system is easy to clean, just observe the following steps.
◆ Always unplug the unit before cleaning.
◆ Wipe the outside of the appliance with a damp cloth or sponge and mild soap if necessary.
◆ To clean the inside of the unit ,wipe away any food or liquid with a paper towel.
◆ Dry thoroughly before using again.
◆ Keep the unit in a flat, safe place, out of the reach of children.
TIPS ON VACUUM SEALING WITH ACCESSORIES
How to prepare accessories for vacuum packing. Accessories include vacuum packing canisters, containers and bottle stoppers.
- Always leave at least 2.5cm(1 inch) of space between the contents and the rim.
- Wipe rim of canister, container or bottle to ensure it is clean and dry.
- Place lid on canister or container, or place stopper in bottle.
- For accessories with a large knob on lid, turn knob to vacuum, when the vacuum process is complete, turn the knob to closed before removing the accessory hose.
TROUBLE SHOOTING
Nothing happens when I try to vacuum package:
- Check the power cord to see if it is firmly plugged into electrical outlet.
- Examine power cord for any damage.
- Check electrical outlet is working by plugging in another position.
- Make sure the lid is closed and the latch is in the locked position.
- Make sure bag is placed correctly inside vacuum channel.
- Wait 20 seconds to allow appliance to cool off, and then try using it again.
Note: The appliance will shut off automatically if it becomes too hot.
AIR IS STILL IN THE BAG:
- Make sure the open end of bag is resting entirely inside vacuum channel. If the edge of the bag is beyond vacuum channel, bag will not seal properly.
- Examine bag for leaks. To see if your bag has a leak, seal bag with air, submerge it into water and apply pressure. Bubbles indicate a leak, use a new bag if bubbles appear.
- If you are using a custom-sized Vivax bag, check seal of bag. A wrinkle in the bag along the seal may cause leakage and allow air to re-enter, just cut bag and reseal.
- Do not attempt to make your own side seams for a Vivax bag, the bags are manufactured with special side seams, which are sealed all the way to the outer edge. Making your own side seams may cause leakage and allow air to re-enter.
AIR WAS REMOVED FROM THE BAG, BUT NOW AIR HAS RE-ENTERED.
-
Examine seal of bag. A wrinkle along the seal may cause leakage and allow air to enter, simply cut bag and reseal.
-
Sometimes moisture or food material(such as juices, grease, crumbs, powders, etc.) along seal prevents bag from sealing properly. Cut bag open, wipe top inside of bag and reseal.
- If you are vacuum packing sharp food items, bag may have been punctured, use a new bag if there is a hole. Cover sharp food items with a soft cushioning material, such as a paper towel, and reseal.
- If you are still experiencing difficulty with air in your bag, fermentation or the release of natural gases from inside the foods may have occurred, when this happens, food may have begun to spoil and should be discarded.
THE BAG MELTS:
If your bag melts, sealing strip may have become too hot, always wait at least 20 seconds for appliance to cool down before you vacuum package another item.
THE COMPLETE VIVAX SYSTEM
Get the most out of your Vivax appliance with easy-to -use Vivax bags, canister and accessories.
VIVAX BAGS AND ROLLS
The design of Vivax bags and rolls features special channels that enable the efficient and complete removal of air, the multi-ply construction makes them an especially effective barrier to oxygen and moisture, preventing freezer burn. Vivax bags and rolls come in a variety of sizes.
IMPORTANT: To avoid possible illness, do not reuse bags after storing raw meats, raw fish or greasy foods, do not reuse bags that have been microwaved or simmered.
VIVAX VACUUM PACKING CANISTERS
Vivax canisters are simple to use and ideal for vacuum packing delicate items such as muffins and baked goods, liquids and dry goods.
The canisters come in a variety of styles and sizes and can be used on the counter-top, In the refrigerator or in the pantry.
The Quick Marinator is an excellent way to marinate foods in minutes instead of hours, any Vivax canister can be used for marinating, but we recommend the or rectangular square or rectangular shapes because less marinade is needed, canisters should not be used in the freezer.
The stackable, lightweight containers are a convenient option to store make-ahead meals, leftovers and snacks.
Note: Allow hot foods to cool to room temperature before vacuum packing, otherwise contents may bubble up out of canister.
VIVAX BOTTLE STOPPER
Use Vivax bottle stoppers to vacuum package wine, non-carbonated liquids and oils, this will extend the life of the liquid and preserve the flavor, avoid using the bottle stopper on plastic bottles.
Noted: Do not vacuum package carbonated or sparkling beverages as gas removal will cause them to go flat.
| In the fridge(5±2°C) No vacuum Vivax VPS | ||
| Red meat 3-4 days 8-9 days | ||
| White meat | 2-3 days 6-8 days | |
| Fish | 1-3 days 4-5 days | |
| Cooked meat | 3-5 days 10-15 days | |
| Soft cheese | 5-7 days 20 days | |
| Hard/semi hard cheese 1-5 days 60 days | ||
| Fruits 5-7 days 14-20 days | ||
| Vegetables 1-3 days 7-10 days | ||
| Soup 2-3 days 8-10 days | ||
| Pasta/rice leftover 2-3 days 6-8 days | ||
| Cream desserts 2-3 days 8 days | ||
| Room temperature(25±2°C) | No vacuum Vivax | VPS |
| Fresh bread 1-2 days 8-10 days | ||
| biscuits 4-6 months 12 months | ||
| Uncooked pasta/rice | 5-6 months 12 months | |
| flour | 4-6 months 12 months | |
| Dry fruits | 3-4 months 12 months | |
| Ground coffee | 2-3 months 12 months | |
| Loose tea | 5-6 months 12 months | |
| Milk tea | 1-2 months 12 months | |
| In the freezer(-18±2°C) | No vacuum | Vivax VPS |
| Meat | 4-6 months 15-20 | months |
| Fish | 3-4 months 10-12 | months |
| Vegetables | 8-10 months | 8-24 months |
TECHNICAL DATA
Rated Voltage: 220V AC
Rated Frequency:50Hz
Rated Power: 100W
Sealing time: 6\~ -10 seconds
VAC/Sealing Time: 10\~ -20sec
Vacuum Power: -0.6bar(approx.)
Dimensions: L:359.5mm, W:150mm, H:76mm
INSTRUCTIONS FOR CLEANING
Should you need to clean unit:
● Unplug the unit from the power outlet.
- Wipe it down with a damp cloth and a small amount of non-abrasive cleaning agent.
● Never get the unit wet. Do not use the appliance it if it is wet.
- Clean the unit regularly. You may use a vacuum cleaner for this.
STORAGE INSTRUCTIONS
The unit should be stored in a cool, dry place.
Do not allow to be in reach of children.
DISPOSAL OF ELECTRICAL AND ELECTRONIC EQUIPMENT

To protect our environment and to recycle the raw materials used as completely as possible, the consumer is asked to return unserviceable equipment to the public collection system for electrical and electronic. The symbol of the crossed indicates that this product must be returned to the collection point for electronic waste to feed it by recycling the best possible raw material recycling.
By ensuring this product you will prevent possible negative effects on the environment and human health, which could otherwise be caused due to improper disposal of that product. The recycling of materials from this product, you will help to preserve a healthy environment and natural resources.
For detailed information about the collection of EE products contact M SAN Grupa dd or the dealer where you purchased the product.
EU DECLARATON OF CONFORMITY
This device is manufactured in accordance with the applicable European standards and in accordance with all applicable Directives and Regulations.

EU declaration of conformity can be downloaded from the following link:
www.msan.hr/dokumentacijaartiklala
POŠTOVANI!
Zahvaljujemo na kupnji Vivax uređaja i nadamo se da ćete biti zadovoljni odabirom. Ako u jamstvenom roku bude potreban popravak proizvoda, molimo savjetujte se sa ovlaštenim prodavačem koji Vam je proizvod prodao ili nas kontaktirajte na dolje navedene brojeve i adrese. MOLIMO VAS DA PRIJE UPORABE PROIZVODA PAŽLJIVO PROČITATE UPUTE PRILOŽENE UZ PROIZVOD!
JAMSTVENI LIST
VIVAX
HR
MODEL UREĐAJA
SERIJSKI BROJ
DATUM PRODAJE
BROJ RAČUNA PRODAVATELJA
POTPIS I PEČAT PRODAVATELJA
5. JAMSTVO NE OBUHVAĆA
- Ovim jamstvom M SAN Grupa kao davatelj jamstva u Republici Hrvatskoj jamči besplatan popravak istog u skladu s važećim propisima i u skladu s uvjetima opisanim u ovom jamstvenom listu. Ovim jamstvom jamčimo da će predmet ovog jamstva raditi bez pogreške uzrokovane eventualnom lošom izradom ili lošim materijalom izrade. Svi, eventualno nastali, kvarovi biti će besplatno otklonjeni u ovlaštenom servisu u jamstvenom roku.
- UVJETI JAMSTVA Jamstveni rok počinje od dana kupnje proizvoda i traje 12 mjeseci, osim za Vivax Imago televizore (CRT, LCD, PDP) za koje jamstvo traje 24 mjeseca.
- U slučaju kvara na proizvodu koji je predmet ovog jamstva, obvezujemo se da ćemo isti popraviti u najkraćem mogućem roku, a najkasnije u roku od 45 dana. Ako se proizvod ne može popraviti ili se ne popravi u roku od 45 dana, biti će zamijenjen novim. Jamstvo će biti produženo za vrijeme trajanja popravka.
- Jamstvo se priznaje samo uz račun o kupnji, te uz ovaj jamstveni list koji mora biti ispravno popunjen odnosno mora sadržavati datum prodaje, pečat i potpis prodavatelja.
- Redovnu provjeru, održavanje uz zamjenu dijelova koji se troše normalnom upotrebom, prilagođavanje ili promjene za poboljšanje proizvoda za primjenu koji nisu opisane u tehničkim uputama za korištenje, osim ako je za te preinake predočena suglasnost M SAN GRUPA d.d.
- Jamstvo se ne priznaje u sljedećim slučajevima:
POTPIS I PEČAT PRODAVCA
- Ovom izjavom o saobraznosti proizvođač proizvoda, preko KIM TEC CG d.o.o., kao uvoznika i davaoca prava u Crnoj Gori besplatan popravak istog u skladu s vazećim propisima i u skladu s uslovima opisanim u ovoj izjavi o saobraznosti. Ovom izjavom o saobraznosti istićemo da će predmet ovog prava raditi bez greške uzrokovane eventualnom lošom izradom i lošim materijalom izrade. Svi eventualno nastali kvarovi biće besplatno otklonjeni u ovlašćenom servisu u predviđenom roku za reklamaciju.
- USLOVI REKLAMACIJE: Rok za reklamaciju počinje teći od dana kupovine proizvoda i traje 24 mjeseca.
- U slučaju kvara na proizvodu koji je predmet reklamacije, obavezujemo se da ćemo isti popraviti u najkraćem mogućem roku, a najkasnije u roku od 15 dana. Ako se proizvod ne može popraviti ili se ne popravi u roku od 15 dana, biće zamijenjen novim.
- Pravo na reklamaciju se priznaje uz fiskalni račun o kupovini, ili uz ovu izjavu o saobraznosti koji mora biti ispravno popunjen odnosno mora sadržati datum prodaje, pečat i potpis prodavca.
- Davalac izjave o saobraznosti osigurava servis i rezervne djelove 7 godina od datuma kupovine.
- PRAVO NA REKLAMACIJU NE OBUHVATA
POTPIS I PEČAT PRODAVATELJA
GARANCIJSKA IZJAVA
- Ovom garancijom garantira proizvođač proizvoda, preko KIM TEC d.o.o., kao uvoznika i davatelja garancije u Republici Bosni i Hercegovini besplatan popravak istog u skladu s važećim propisima i u skladu s uvjetima opisanim u ovom garantnom listu. Ovom garancijom garantiramo da će predmet ove garancije raditi bez greške uzrokovane eventualnom lošom izradom i lošim materijalom izrade. Svi eventualno nastali kvarovi biti će besplatno otklonjeni u ovlaštenom servisu u garantnom roku.
UVJETI GARANCIJE:
Garantni rok počinje teći od dana kupnje proizvoda i traje 12 mjeseci, osim za Vivax Imago televizore (CRT, LCD, PDP) za koje jamstvo traje 24 mjeseca
- U slučaju kvara na proizvodu koji je predmet ove garancije, obavezujemo se da ćemo isti popraviti u najkraćem mogućem roku, a najkasnije u roku od 45 dana. Ako se proizvod ne može popraviti ili se ne popravi u roku od 45 dana, biti će zamijenjen novim. Ako popravak proizvoda traje duže od 10 dana, garancija se produljužuje za vrijeme trajanja popravka.
- Garancija se priznaje samo uz račun o kupnji, te uz ovaj garantni list koji mora biti ispravno popunjen odnosno mora sadržavati datum prodaje, pečat i potpis prodavatelja.
- Davalac garancije osigurava servis i rezervne dijelove 7 godina od datuma kupnje.
GARANCIJA NE OBUHVAĆA:
Kosova Electronic Service Center
Kosova Electronic Service Center
VIVAX Air Conditioners; White Goods and Small Home appliances
- A.
- B.
- C.
- ZAVARIVANJE VREĆICA
- PAKIRANJE NAMIRNICA U VAKUMSKU VREĆICU
- ČUVANJE NAMIRNICA U VAKUMSKOJ POSUDI
- KORISNI SAVJETI
- ČIŠĆENJE I ODRŽAVANJE
- SAVJETI ZA ZAVARIVANJE S DODACIMA
- RJEŠAVANJE PROBLEMA
- VIVAX ČEPOVI ZA BOCU
- Indikator vrste hrane.
- ZAVARIVANJE KESICA
- PAKOVANJE NAMIRNICA U VAKUMSKU KESICU
- KORISNI SAVETI
- SAVETI ZA ZAVARIVANJE S DODACIMA
- REŠAVANJE PROBLEMA
- Копче за брзина
- Why need vacuum package?
- THE VACUUM SEALER SAVES TIME AND MONEY
- Save more time:
- Marinate in minutes:
- Control portions for dieting:
- Protect non-food items:
- SAFETY AND WARNINGS
- IMPORTANT: Please retain your instruction booklet for future use.
- Warning: To reduce the risk of fire, electrical shock or injury to person or property:
- Caution:
- Important Safeguards for all Electrical appliances
- OPERATING INSTRUCTIONS
- R lease mechanism:
- Speed indicators
- Cancel button:
- Speed setting button:
- Adjustable food setting button:
- Food type indicators.
- Vacuum/Seal button:
- Seal control button:
- OPERATION INSTRUCTIONS
- SEAL PLASTIC BAGS
- PRESERVATION STUFF WITH VACUUM BAG
- PRESERVATION STUFF WITH VACUUM CANISTERS
- HELPFUL HINTS
- CLEANING AND MAINTENANCE
- TIPS ON VACUUM SEALING WITH ACCESSORIES
- TROUBLE SHOOTING
- AIR IS STILL IN THE BAG:
- AIR WAS REMOVED FROM THE BAG, BUT NOW AIR HAS RE-ENTERED.
- THE BAG MELTS:
- THE COMPLETE VIVAX SYSTEM
- VIVAX BAGS AND ROLLS
- VIVAX VACUUM PACKING CANISTERS
- VIVAX BOTTLE STOPPER
- TECHNICAL DATA
- INSTRUCTIONS FOR CLEANING
- Should you need to clean unit:
- STORAGE INSTRUCTIONS
- DISPOSAL OF ELECTRICAL AND ELECTRONIC EQUIPMENT
- EU DECLARATON OF CONFORMITY
- POŠTOVANI!
- JAMSTVENI LIST
- VIVAX
- HR
- MODEL UREĐAJA
- SERIJSKI BROJ
- DATUM PRODAJE
- BROJ RAČUNA PRODAVATELJA
- POTPIS I PEČAT PRODAVATELJA
- JAMSTVO NE OBUHVAĆA
- POTPIS I PEČAT PRODAVCA
- GARANCIJSKA IZJAVA
- UVJETI GARANCIJE:
- GARANCIJA NE OBUHVAĆA:
Brand : Vivax
Model : VS-1102
Category : Vacuum Sealer