
JC150FW - Juicer GORENJE - Free user manual and instructions
Find the device manual for free JC150FW GORENJE in PDF.


| Product Type | Centrifugal Juicer |
| Model | JC150FW |
| Brand | Gorenje |
| Power Consumption | 700 W |
| Dimensions (H x W x D) | 38 x 26 x 26 cm |
| Weight | 3.5 kg |
| Juice Container Capacity | 1 L |
| Pulp Container Capacity | 1.5 L |
| Feeding Chute Diameter | 75 mm |
| Material | Stainless steel micro-mesh filter, plastic body |
| Speed Settings | 2 speeds (low/high) |
| Pulp Separation | Automatic |
| Anti-Drip System | Yes |
| Safety Features | Safety locking arm, non-slip feet |
| Cleaning | Removable parts dishwasher safe (except motor base) |
| Voltage | 220-240 V, 50/60 Hz |
| Cord Length | 1.2 m |
| Spare Parts Available | Yes (filter, jug, pusher) |
Frequently Asked Questions - JC150FW GORENJE
User questions about JC150FW GORENJE
0 question about this device. Answer the ones you know or ask your own.
Ask a new question about this device
Download the instructions for your Juicer in PDF format for free! Find your manual JC150FW - GORENJE and take your electronic device back in hand. On this page are published all the documents necessary for the use of your device. JC150FW by GORENJE.
USER MANUAL JC150FW GORENJE
JC150FW
Assembly and disassembly instructions:![graph TD A["Blinker with handle"] --> B["Blender with lid"] B --> C["Processed blender"]](/content/2026/05/1100986/images/fdd1efeed8fc1b14048f2d48f281b004f241cd2b0e84b4ead4fbf732e2fba714.jpg)

- Pusher
- Lid
- Screw shaft with filter
- Juice container
- Drive unit
- Pulp and juice containers (2)
- Cleaning brushes
Important
Before using the appliance, carefully read these instructions for use and keep them for future reference.
Danger
Assembly and disassembly instructions

Assembly and disassembly instructions
![graph TD A["Step 1: Stacking a blender with a handle"] --> B["Step 2: Stacking a blender with a lid"] B --> C["Step 3: Stacking a blender with a lid"]](/content/2026/05/1100986/images/1750daee4f7269a4aa370f832511b3b5f6aa09809d0a90a49375182214e3fa46.jpg)

To disassemble, proceed in the reverse order.
Handling the appliance

After use, clean all parts with a brush.
For cleaning, avoid using metal sponges, as such aggressive materials can damage the appliance.
Do not wash the parts of the appliance in a dishwasher.
Do not wash the base under running water. For cleaning, use a dry or slightly damp cloth.
- Pusher
- Hopper
- Squeezing screw with strainer
- Bowl
- Base
- Pulp and juice container (2)
- Cleaning brush
Important
Read this user manual carefully before you use the appliance and save it for future reference.
Danger
Do not immerse the motor unit in water or any other liquid, nor rinse it under the tap.
Warning
Check if the voltage indicated on the base of the appliance corresponds to the local mains voltage before you connect the appliance.
Do not use the appliance if the plug, the mains cord or other components are damaged.
If the mains cord is damaged, you must have it replaced by Gorenje, a service centre authorised by Gorenje or similarly qualified persons in order to avoid a hazard.
This appliance is not intended for use by persons (including children) with reduced physical, sensory or mental capabilities, or lack of experience and knowledge, unless they have been given supervision or instruction concerning use of the appliance by a person responsible for their safety. Children should be supervised to ensure that they do not play with the appliance.
Never let the appliance operate unattended.
If you detect cracks in the filter or if the filter is damaged in any way, do not use the appliance anymore and contact the nearest Gorenje service centre.
Never reach into the feeding tube with your fingers or any object while the appliance is running.
Only use the pusher for this purpose.
The base weighs 3.5 kg, please lift the unit with two hands.
Do not rinse with water that is warmer than 80°C.
Caution: This appliance is intended for household use only.
Never use any accessories or parts from other manufacturers or that Gorenje does not specifically recommend. If you use such accessories or parts, your guarantee becomes invalid. Make sure all parts are correctly mounted before you switch on the appliance.
Do not disassemble while operating. Keep the base dried at all times.
Do not operate the juicer for more than 10 minutes at a time when juicing heavy loads, and let it cool down sufficiently afterwards. None of the recipes in this user manual constitute heavy loads.
Always unplug the appliance after use.
Never connect this appliance to an external timer switch or remote control system in order to avoid a hazardous situation.
This appliance is marked according to the European directive 2012/96/EU on Waste Electrical and Electronic Equipment (WEEE). This guideline is the framework for a European-wide validity of return and recycling of Waste Electrical and Electronic Equipment.
Preparing for use
Wash all detachable parts (see chapter 'Cleaning').
Underneath the bowl, there is a rubber pad which allows all the juice to only discharge from the juice ejection. Before you start making juice, the rubber pad should be placed as shown in the picture.

Assembly and disassembly instructions
![graph TD A["Shaker with lid"] --> B["Adder to blender"] B --> C["Adder to coffee maker"]](/content/2026/05/1100986/images/f0da58f18a1ef1f240ad76b91e314b875515657d899c3139eec1eb65c945ea0d.jpg)
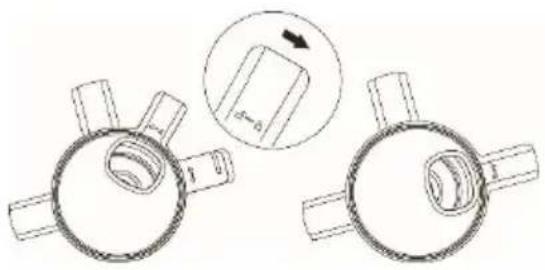
For disassembly, use the reverse order.
Using the appliance

The machine has three (3) settings
- – Starts motor: starts making juice
- – is reverse. Only when something is stuck and you need to unclog. OFF – is at center position. This allows the machine to turn off.
Please rinse everything thoroughly before putting it into the machine. After rinsing, put material into the machine using the pusher.
Please remove any hard seeds before using.
Please cut or split any hard materials such as carrot into thin slices before inputting into the machine.
After using, turn off and unplug the machine. Please dry your hands before touching the power switch.
Do not force in the fruits during juicing to prevent damage to the Auger and Micro-Mesh Filter.
Tips
Use fresh fruit and vegetables, as they contain more juice. Pineapples, beetroots, celery stalks, apples, cucumbers, carrots, spinach, melons, tomatoes, pomegranates, oranges and grapes are particularly suitable for processing in the juicer. You do not have to remove thin peels or skins.
Only remove thick peels, e.g. those of oranges, pineapples and uncooked beetroots. Also remove the white pith of citrus fruits because it has a bitter taste.
When you prepare apple juice, remember that the thickness of the apple juice depends on the kind of apple you use. The juicier the apple, the thinner the juice. Choose a kind of apple that produces the type of juice you prefer.
Apple juice turns brown very quickly. To slow down this process, add a few drops of lemon juice. Fruits that contain starch, such as bananas, papayas, avocados, figs and mangoes are not suitable for processing in the juicer. Use a food processor, blender or bar blender to process these fruits.
Leaves and leaf stalks of e.g. lettuce can also be processed in the juicer.
Drink the juice immediately after you have extracted it. If it is exposed to air for some time, the juice loses its taste and nutritional value.
Cleaning
Never use scouring pads, abrasive cleaning agents or aggressive liquids such as alcohol, petrol or acetone to clean the appliance. The appliance is easier to clean if you do so immediately after use.
Turn off and unplug the machine.
Disassemble the machine in reverse assembly order!
Use the brush to clean thoroughly after operating. Do not use metal sponge to clean, it will damage the machine.

Do not use dishwasher to clean.
Do not rinse the base with direct water, use dry towel or wet towel to clean.
Environment
Do not throw away the appliance with the normal household waste at the end of its life, but hand it in at an official collection point for recycling. By doing this, you help to preserve the environment.
Guarantee & service
If you need information or if you have a problem, please contact the Gorenje Customer Care Centre in your country (you find its phone number in the worldwide guarantee leaflet). If there is no Customer Care Centre in your country, go to your
local Gorenje dealer or contact the Service department of Gorenje domestic appliances.
For personal use only!
GORENJE WISHES YOU A LOT OF PLEASURE WHEN USING YOUR APPLIANCE
We reserve the right to any modifications!
General description
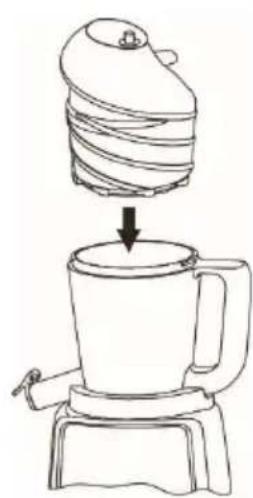


- Slider
- Hopper
- Pressing spiral with sieve
- Container
- Base
- Pulp and juice containers (2)
- Cleaning brush
Important


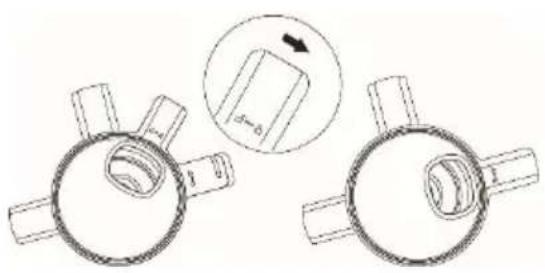
Assembly sequence
![graph TD A["Shakemaker"] --> B["Adder to blender"] B --> C["Adder to coffee maker"]](/content/2026/05/1100986/images/fd1afdcaaf294d15c4650f06cfc6893c03a765fe1454cfdb619106a1bb74e23b.jpg)


Assembly and disassembly


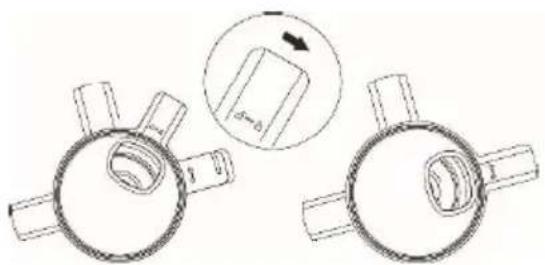


- IMPORTANT
- DANGER
- HANDLING THE APPLIANCE
- WARNING
- CAUTION: THIS APPLIANCE IS INTENDED FOR HOUSEHOLD USE ONLY
- PREPARING FOR USE
- USING THE APPLIANCE
- PLEASE CUT OR SPLIT ANY HARD MATERIALS SUCH AS CARROT INTO THIN SLICES BEFORE INPUTTING INTO THE MACHINE
- TIPS
- CLEANING
- ENVIRONMENT
- GUARANTEE & SERVICE
- GORENJE WISHES YOU A LOT OF PLEASURE WHEN USING YOUR APPLIANCE
- ASSEMBLY SEQUENCE
Brand : GORENJE
Model : JC150FW
Category : Juicer