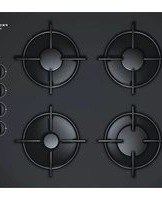
OCA652 - Oven Profilo - Free user manual and instructions
Find the device manual for free OCA652 Profilo in PDF.


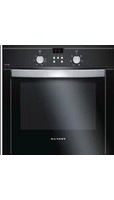
| Product Type | Built-in Electric Oven |
| Model | OCA652 |
| Brand | Profilo |
| Dimensions (H x W x D) | 595 x 595 x 570 mm |
| Weight | 35 kg |
| Power Supply | 220-240 V, 50-60 Hz |
| Rated Power | 3.0 kW |
| Energy Class | A |
| Oven Capacity | 65 L |
| Functions | Convection, Grill, Top Heat, Bottom Heat, Fan Assisted, Defrost, Pizza, Eco |
| Temperature Range | 50°C – 250°C |
| Grill Power | 2.5 kW |
| Interior Light | Yes (halogen) |
| Cleaning Type | Enamel interior, easy-to-clean |
| Display Type | LED digital display |
| Control Type | Knobs + Touch |
| Safety Features | Child lock, cool front door, automatic shut-off |
| Installation | Built-in, requires 16A socket |
| Accessories Included | Grill rack, baking tray, removable handle |
| Spare Parts Availability | Replacement parts available via Profilo service centers |
| Repairability Index | 8.0/10 |
Frequently Asked Questions - OCA652 Profilo
User questions about OCA652 Profilo
0 question about this device. Answer the ones you know or ask your own.
Ask a new question about this device
Download the instructions for your Oven in PDF format for free! Find your manual OCA652 - Profilo and take your electronic device back in hand. On this page are published all the documents necessary for the use of your device. OCA652 by Profilo.
USER MANUAL OCA652 Profilo
[en] Instruction manual
Gas hob
OCA652

OA26H6110D

OCA652E
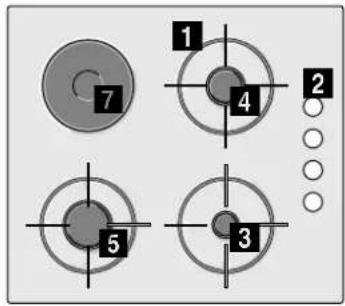
1 Pan supports
2 Control knobs
3 Auxiliary burner (up to 1 kW)
4 Semi-rapid burner (up to 1.75 kW)
5 Rapid burner (up to 3 kW)
6 Double-flame wok burner (up to 3.3 kW)
7 Electric hob 1000 W
en
Table of contents
Safety precautions ....3
Your new appliance ....5
Accessories 5
Gas burners ....5
Switching on manually ....5
Switching on automatically....5
Safety system 6
Switching off a burner....6
Power levels....6
Warnings....6
Cooking guidelines....6
Electric hob....6
Power control switch 6
Suggestions ......7
Cooking pans....7
Suitable pans....7
Precautions for use ....7
Cleaning and maintenance....8
Cleaning....8
Maintenance 8
Trouble shooting 8
Technical Assistance Service 9
Warranty conditions....9
Used appliances and packaging....9
Environmentally-friendly disposal....9
⚠ Safety precautions
Read these instructions carefully. You will only be able to use your appliance safely and effectively when you have read them. These operating and installation instructions should be retained, and passed onto the buyer if the appliance is sold.
The manufacturer is exempt from all responsibility if the requirements of this manual are not complied with.
The images shown in these instructions are for guidance only.
Do not remove the appliance from its protective packaging until it is installed in the unit. Do not switch on the appliance if it is damaged in any way. Contact our Technical Assistance Service.
This appliance is class 3 type, according to the EN 30-1-1 regulation for gas appliances: built-in appliance.
Before installing your new hob, ensure that it is being installed according to the assembly instructions.
This appliance cannot be installed on yachts or in caravans.
This appliance must only be used in well ventilated places.
This appliance is not intended for operation with an external clock timer or a remote control.
All operations relating to installation, connection, regulation and conversion to other gas types must be performed by an authorised technician, respecting all applicable regulations, standards and the specifications of the local gas and
electricity suppliers. Special attention shall be paid to ventilation regulations.
This appliance leaves the factory set to the gas type that is indicated on the specifications plate. If this needs to be changed, please consult the assembly instructions. It is recommended you contact the Technical Assistance Service to change to another gas type.
This appliance has been designed for home use only, not for commercial or professional use. This appliance is only intended for cooking purposes, not as a heating system. The warranty will only be valid if the appliance is used for the purpose for which it was designed.
Never leave the appliance unattended during operation.
Do not use lids or protective barriers for children which are not recommended by the hob manufacturer. They may cause accidents such as those due to the overheating, ignition or detachment of fragments of materials.
This appliance may be used by children 8 years old and older and by persons with reduced physical, sensory or mental capacity or a lack of experience or knowledge if they are supervised or they have been instructed about the safe use of the appliance and have understood the associated dangers.
Never let children play with the appliance. Cleaning and user maintenance must not be carried out by unsupervised children.
Risk of deflagration!
Accumulation of unburned gas in an enclosed area carries a risk of deflagration. Do not subject the appliance to draughts. These might blow out the burners. Carefully read the instructions and warnings on the operation of gas burners.
Risk of poisoning!
The kitchen will become hot and humid and combustion products produced when this gas appliance is used. Make sure the kitchen is well ventilated, particularly when the hob is in operation: either keep the natural ventilation apertures open, or install a ventilation system (extractor hood). Intense prolonged use of the appliance may require additional or more effective ventilation: open a window or increase the power of the ventilation system.
Risk of burns!
The hotplates and their immediate vicinity get very hot. Never touch the hot surfaces. Keep children under 8 years old well away from this appliance.
Risk of fire!
■ The hotplates get very hot. Do not rest inflammable objects on the hob. Do not store objects on the hob.
- Do not store or use corrosive chemicals, products which produce fumes, inflammable materials or non-food products below or near this domestic appliance.
- Fat or oil which is overheated can catch fire easily. Never leave fat or oil to heat up unattended. If oil or fats do catch fire, never use water to put the fire out. Put the fire out by covering the pan with a lid and switch off the hotplate.
Risk of injuries!
■ Sudden changes in temperature may cause breakage of the glass. While using your hob, prevent any draughts and do not spill any cold liquids on it.
- Pans which are damaged, are not the right size, hang over the edge of the hob or are not positioned correctly can cause serious injuries. Follow the advice and warnings provided relating to the cooking pans.
■ The pan may suddenly jump due to the presence of liquid between the base of the pan and the hotplate. Always ensure that the hotplate and the bottom of the pan are kept dry.
In the event of a malfunction, turn off the appliance's gas and electricity supply. For repairs, call our Technical Assistance Service.
- Do not tamper with the appliance's interior. If necessary, call our Technical Assistance Service.
If one of the control knobs will not turn, do not force it. Call the Technical Assistance Service immediately so that they can repair or replace them.
Risk of electric shock!
- Do not clean the appliance using steam cleaners.
- Cracks or breaks in the glass may carry an electrocution risk. Disconnect the fuse from the fuse box. Notify the Technical Assistance Service.
Your new appliance
Page 2 shows an overall view of your new appliance as well as the burner power.
Accessories
The following accessories can be purchased from the Technical Assistance Service:
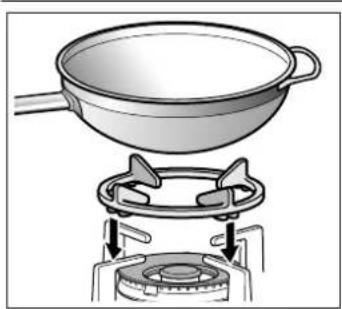
natural_image
Illustration of a cooking process showing a pan on a stove with a gas stove underneath (no text or symbols)Additional wok pan support Only for use on wok burners with pans with a round base.
The additional wok pan support should be used to prolong the appliance's useful life.
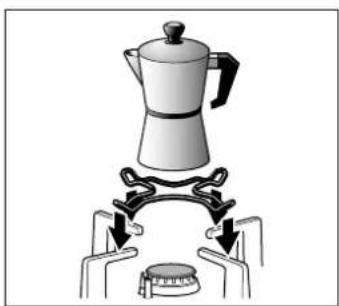
natural_image
Illustration of a kettle being heated by two hands using a stove (no text or symbols)Additional coffee maker support
Only for use on the auxiliary burner with pans which are no more than 12 cm in diameter.
The manufacturer accepts no liability if these accessories are not used or are used incorrectly.
Gas burners
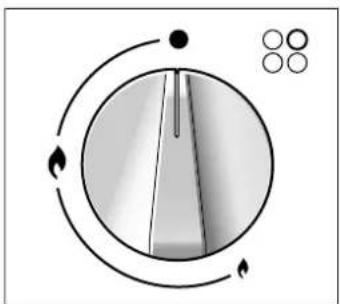
There are indications to show which burner each control knob operates.
natural_image
Diagram of a circular mechanical or electrical component with directional arrows and a separate inset showing four circles (no text or symbols)It is essential to ensure that all the burner parts and pan supports are correctly installed for the appliance to work correctly. Do not swap the burner caps around.

natural_image
Exploded view diagram of a mechanical assembly showing internal components (no text or labels)
natural_image
Technical line drawing of a mechanical device with no visible text or symbols
natural_image
Diagram of a mechanical or electrical component with curved arms and central circular element, no visible text or symbols
natural_image
Pure technical diagram of a mechanical or electrical component with no text, numbers, or symbolsSwitching on manually
- Press the chosen burner control knob and turn it anticlockwise to the required setting.
- Use any type of lighter or flame (cigarette lighter, matches, etc.) and bring it close to the burner.
Switching on automatically
If your hob can be switched on automatically (ignition sparkers):
- Press the chosen burner control knob and turn it anticlockwise to the maximum power setting. While the control knob is still pressed down, sparks are produced on all burners. The flame ignites.
- Release the control knob.
- Turn the control knob to the required setting.
If it does not come on, turn the control knob to the off setting and repeat the steps above. This time, press and hold the control knob for longer (up to 10 seconds).
Risk of deflagration!
If after 15 seconds the flame does not ignite, switch off the burner and open a nearby window or door. Wait at least one minute before trying to switch the burner back on.
Safety system
Depending on the model, your hob may have a safety system (thermocouple) that prevents the flow of gas if the burners accidentally switch off.
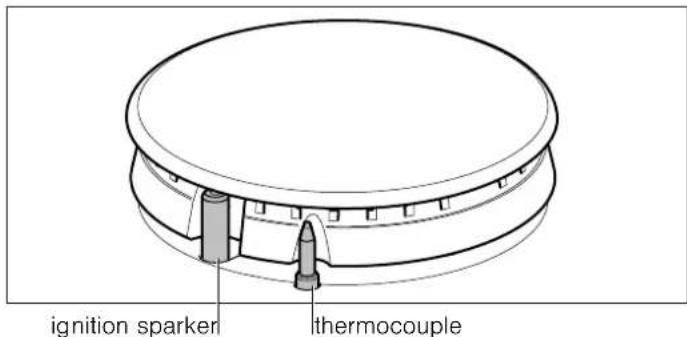
To ensure that this device is active:
- Switch on the burner as usual.
- Without releasing the control knob, press and hold it down firmly for 4 seconds after lighting the flame.
Switching off a burner
Turn the corresponding control knob clockwise to the 0 setting.
Power levels
The progressive control knobs can be used to control the power needed, from minimum to maximum power.
| Setting | ● | Control knob off |
| High flame | ♠ | Maximum capacity or aperture and electricity on |
| Low flame | ♠ | Minimum capacity or aperture |
Warnings
It is normal to hear a soft whistling noise while the burner is operating.
When first used, it is normal for the burner to give off odours. This does not pose any risk and does not indicate a malfunction. They will disappear in time.
An orange-coloured flame is normal. This is caused by the presence of dust in the atmosphere, spilt liquids, etc.
If the burner flames are accidentally blown out, switch off the burner operating control knob and do not try to relight it for at least 1 minute.
A few seconds after the burner is switched off, a sound (thud) will be produced. This is not a fault - this means that the safety device is no longer operating.
Keep the burner as clean as possible. If the ignition sparkers are dirty they will not light properly. Clean them periodically using a small non-wire brush. Bear in mind that the ignition sparkers must not suffer any serious impacts.
Cooking guidelines
Burner Very high - High Medium Low
| Wok burner Boiling, steaming, griddling, toasting, paellas, Asian food (wok). | Reheating and keeping things hot: cooked and pre-cooked dishes | ||
| Rapid burner | Escalopes, steaks, omelettes, frying | Rice, white sauce, ragout | Steaming: fish, vegetables |
| Semi-rapid burner | Steamed potatoes, fresh vegetables, vegetable stews, pasta | Reheating, keeping things hot and making tasty casse-roles | |
| Auxiliary burner | Cooking: casse-roles, rice pudding, caramel | Defrosting and slow cooking: veg-etables, fruit and frozen products | Melting: but-ter, choco-late, jelly |
Electric hob
Before using the hob for the first time, heat it up for 5 minutes, set to full power, with no pans placed on it. At this point it is normal to notice smoke and odours, but these will disappear over time. Do not operate the hobs without placing pans on top, except during this initial heating phase.
When you begin cooking, we recommend turning the control knob up to the maximum setting and then, depending on the quantity and quality of the foods being cooked, turn down the heat to a medium setting.
Taking advantage of the thermal inertia of the hob, the hob can be switched off shortly before you finish cooking. This will save energy as food will continue to cook using the heat retained in it.
Use perfectly flat, thick bottom pans of a similar size to the hotplate, never smaller.
Do not spill liquid on the hob's surface, or use wet pans on it.
If prolonged use has worn away the surface of the electric hobs, sprinkle them with a few drops of oil or other maintenance products that are widely available.
Power control switch
The electric hob is controlled by a switch, which can be used to choose the power required for the food you are cooking.

To switch on the hob:
Bearing in mind the type of cooking and the quantity of food, using the table below as a guide, turn the control knob to the left, selecting the setting for the dish you want to cook. The operating indicator will light up.
To switch off the hob:
Turn the control knob to the 0 setting. The operating indicator will go out.
Suggestions
Setting 1 and 2 heating
Setting 3 and 4 high heat and cooking
Setting 5 and 6 frying
These suggested settings are intended as a guide only. The power must be increased for:
■ large quantities of liquid
■ large quantities of food
■ cooking using pans without lids
Cooking pans
Suitable pans
| Burner Minimum pan diameter | Maximum pan diameter |
| Wok burner 22 cm 30 cm | |
| Rapid burner 22 cm 26 cm | |
| Semi-rapid burner 14 cm 20 cm | |
| Auxiliary burner 12 cm 16 cm | |
| Electric hob 14 cm 18 cm |
Precautions for use
The following advice is intended to help you save energy and prevent pan damage:


Use pans which are the right size for each burner.
Do not use small pans on large burners. The flame must not touch the sides of the pan.
Do not use damaged pans, which do not sit evenly on the hob. Pans may tip over.
Only use pans with a thick, flat base.
Do not cook without using a lid and make sure the lid is properly fitted. This wastes energy.
Always centre the pan over the burner, not to one side. Otherwise it could tip over.
Do not place large pans on the burners near the control knobs. These may be damaged by the very high temperatures.
Place the pans on the pan supports, never directly on the burner.
Make sure that the pan supports and burner caps are correctly positioned before using the appliance.

Pans should be placed on the hob carefully.
Do not strike the hob and do not place excessive weight on it.
Never use two burners or heat sources to heat one single pan.
Do not use grill pans, earthenware casserole dishes, etc. for a long period of time on maximum power.
Cleaning and maintenance
Cleaning
Once the appliance is cool, use a sponge to clean it with soap and water.
After each use, clean the surface of the respective burner parts once they have cooled down. If any residue is left (baked-on food, drops of grease etc.), however little, it will become stuck to the surface and more difficult to remove later. The holes and grooves must be clean for the flame to ignite properly.
The movement of some pans may leave metal residue on the pan supports.
Clean the burners and pan supports using soapy water and scrub with a non-wire brush.
If the pan supports are fitted with rubber rests, ensure that these are also cleaned. The rests may come loose and the pan support may scratch the hob.
Always dry the burners and pan supports completely. Water droplets or damp patches on the hob at the start of cooking may damage the enamel.
After cleaning and drying the burners, make sure the burner caps are correctly positioned on the diffuser.
Caution!
- Do not use steam cleaners. This could damage the hob.
■ Never use abrasive products, steel scourers, sharp implements, knives, etc. to remove bits of hardened food from the hob. - Do not use knives, scrapers or similar implements to clean the point where the glass meets the burner trims, the metal frames or the glass/aluminium panels, if fitted.
Maintenance
Always clean off any liquid as soon as it is spilt. This will prevent food remains from sticking to the hob surface and you will save yourself any unnecessary effort.
Never slide pans across the glass surface, as you may scratch it. In addition, try not to drop heavy or sharp objects on the glass. Never strike any part of the hob.
Grains of sand that may come from cleaning fruits and vegetables will scratch the glass surface.
Melted sugar, or foods which contain a lot of sugar which may have spilt, should be cleaned off the hotplate immediately, using the glass scraper.
Avoid spilling salt on the surface of the electric hob.
Trouble shooting
Sometimes certain faults detected can be easily resolved. Before calling the Technical Assistance Service, bear in mind the following advice:
Fault Possible cause Solution
| The general electrical sys-tem is malfunctioning. | Defective fuse. Check the fuse in the main fuse box and change it if it is damaged. | |
| The automatic safety switch or circuit breaker has tripped. | Check the main control panel to see if the auto-matic safety switch or circuit breaker has tripped. | |
| The automatic switching on function does not work. | There may be food or cleaning products stuck between the ignition sparkers and the burners. | The space between the ignition sparker and the burner must be clean. |
| The burners are wet. Dry the burner caps carefully. | ||
| The burner caps are not correctly positioned. Check that the burner caps are correctly posi-tioned. | ||
| The appliance is not earthed, is poorly connected or the earthing is faulty. | Contact the installation technician. | |
| The burner flame is not uni-form. | The burner components are not correctly posi-tioned. | Correctly place the parts on the appropriate burner. |
| The grooves on the burner are dirty. Clean the grooves on the burner. | ||
| The gas flow is not normal or there is no gas. | The gas supply is blocked by gas taps. Open all gas taps. | |
| If the gas is supplied from a gas cylinder, check that it is not empty. | Change the gas cylinder. | |
| The kitchen smells of gas. | A gas tap has been left on. Turn off the taps. | |
| Incorrect coupling of gas cylinder. Check that the coupling is sound. | ||
| Possible gas leak. Shut off the gas supply, ventilate the premises and immediately notify an authorised installation techni-cian to check and certify the installation. Do not use the appliance until ensuring that there is no gas leak in the installation or appliance itself. | ||
| The burner immediately switches off after releasing the control knob. | The control knob was not held down for long enough. | Once the burner is on, hold the control knob down a few seconds longer. |
| The grooves on the burner are dirty. Clean the grooves on the burner. | ||
Technical Assistance Service
When contacting our Technical Assistance Service, please provide the product number (E-Nr.) and production number (FD) of the appliance. This information is given on the specifications plate located on the lower section of the hob and on the label in the user manual.
Warranty conditions
In the unlikely event that the appliance is damaged or does not meet your expectations in terms of quality, please inform us as soon as possible. For the warranty to be valid, the appliance must not have been tampered with, or used inappropriately.
The applicable warranty conditions are those set out by the company's representative office in the country of purchase. Detailed information is available from retail outlets. Proof of purchase must be presented to obtain the benefits of the warranty.
We reserve the right to introduce changes.
Used appliances and packaging
If the symbol is shown on the specifications plate, bear in mind the following instructions:
Environmentally-friendly disposal
Dispose of packaging in an environmentally-friendly manner.

This appliance is labelled in accordance with European Directive 2012/19/EU concerning used electrical and electronic appliances (waste electrical and electronic equipment - WEEE). The guideline determines the framework for the return and recycling of used appliances as applicable throughout the EU.
The packaging of your appliance has been manufactured using only the materials which are strictly necessary to guarantee efficient protection during transport. These materials are 100% recyclable, thus reducing the environmental impact. You can also contribute to caring for the environment by following the advice below:
■ Dispose of the packaging in the appropriate recycling bin.
■ Before you get rid of an old appliance, make sure you disable it. Contact your local authority to find out the address of your nearest recycling centre to dispose of your appliance.
- Do not pour used oil down the sink. Collect it in a sealed container and take it to an appropriate collection point or, failing that, place it in the rubbish bin (it will end up in a controlled dump; this is probably not the best option, but it will avoid contaminating ground water)
- en
- Table of contents
- ⚠ Safety precautions
- The manufacturer is exempt from all responsibility if the requirements of this manual are not complied with.
- electricity suppliers. Special attention shall be paid to ventilation regulations.
- Risk of deflagration!
- Risk of poisoning!
- Risk of burns!
- Risk of fire!
- Risk of injuries!
- Risk of electric shock!
- Your new appliance
- Accessories
- Gas burners
- Switching on manually
- Switching on automatically
- Safety system
- Switching off a burner
- Power levels
- Warnings
- Cooking guidelines
- Electric hob
- Power control switch
- Suggestions
- Cooking pans
- Precautions for use
- Cleaning and maintenance
- Cleaning
- Caution!
- Maintenance
- Trouble shooting
- Technical Assistance Service
- Warranty conditions
- Used appliances and packaging
- Environmentally-friendly disposal
Brand : Profilo
Model : OCA652
Category : Oven