
DFU1781EN - Freezer DE DIETRICH - Free user manual and instructions
Find the device manual for free DFU1781EN DE DIETRICH in PDF.


| Product Type | Freezer |
| Brand | De Dietrich |
| Model | DFU1781EN |
| Installation Type | Freestanding |
| Capacity (Net) | Approx. 250 L |
| Energy Class | D (Energy Label Scale A to G) |
| Annual Energy Consumption | Approx. 250 kWh |
| Noise Level | 39 dB (Normal) |
| Climate Class | SN-T (Subnormal to Tropical) |
| Freezing Capacity | Approx. 12 kg/24h |
| Temperature Range | -24°C to -18°C |
| Defrost Type | Manual (Ice buildup requires manual defrosting) |
| Control Type | Mechanical dial or electronic (check manual) |
| Fast Freeze Function | Yes (activates maximum freezing) |
| Interior Light | Yes |
| Door Reversible | Yes (can be swapped left/right) |
| Door Alarm | Yes (audible when door left open) |
| Drawers / Shelves | 4 drawers, 1 shelf |
| Dimensions (H x W x D) | 1850 x 595 x 650 mm (approx.) |
| Weight | Approx. 65 kg |
| Power Cable Length | 1.5 m |
| Spare Parts Availability | De Dietrich authorized service (7 years) |
| Cleaning | Wipe with mild detergent; defrost regularly |
Frequently Asked Questions - DFU1781EN DE DIETRICH
User questions about DFU1781EN DE DIETRICH
0 question about this device. Answer the ones you know or ask your own.
Ask a new question about this device
Download the instructions for your Freezer in PDF format for free! Find your manual DFU1781EN - DE DIETRICH and take your electronic device back in hand. On this page are published all the documents necessary for the use of your device. DFU1781EN by DE DIETRICH.
USER MANUAL DFU1781EN DE DIETRICH
FRGUIDE D'UTILISATION
EN GUIDE TO INSTALLATION
CS NÁVOD K POUŽITÍ
DK BRUGSANVISNING
ET KASUTUSJUHEND
ΕΛ ΟΔΗΓΙΕΣ ΧΡΗΣΗΣ
תְרָה בַרִי הַלְרָה
natural_image
Illustration of various cleaning tools including screwdriver, ruler, and tool holder (no text or symbols)
*Selon modèle

natural_image
Pure technical line drawings of mechanical components without any text, numbers, or symbols
natural_image
Diagram of two refrigerators with labeled parts and a blue arrow indicating a component (no text or symbols present)

Mode Super congélation
natural_image
Simple line drawing of a washing machine with two circular gauges (no text or symbols)CONTACT & INFORMATIONS
Interventions France
Discovering De Dietrich products is experiencing unique emotions that only valuable objects can produce.
The appeal is immediate at first glance. The quality of the design is illustrated by the timeless aesthetics and the meticulous finishes that make each object elegant and refined in perfect harmony with each other.
Then comes the urge to touch. De Dietrich design is based on robust and prestigious materials; authenticity is favored.
By combining the most advanced technology with noble materials, De Dietrich ensures the creation of high quality products at the service of the culinary art, a passion shared by all kitchen lovers.
We wish you a lot of satisfaction in using this new appliance and will be happy to receive your suggestions and answer your questions. We invite you to express them to our customer service or on our website.
We invite you to register your product on www.de-dietrich.com to enjoy the benefits of the brand.
Thank you for your confidence.

This appliance complies with the European directives.

SAFETY GUIDELINES
For your safety and in order to use your appliance correctly, carefully read these instructions (including the warnings and useful advice), before installation and first use.
To avoid damaging the appliance and unnecessary injury, it is important that the persons who use the appliance fully understand how it works and the safety instructions.
Always keep these instructions close to the appliance so that they can accompany it in the event of resale or a change of house. In this way, the appliance will continue to function optimally and any risk of injury will be avoided.
The manufacturer shall not be held liable in the event of misuse of the appliance.
GENERAL SAFETY AND WARNINGS
This appliance is exclusively intended for domestic use in private households. It may only be used in a roofed, enclosed and heated environment such as a kitchen or any other room fulfilling these conditions. Its use on shared or professional premises such as in an office or workshop break room, a camp site building, or a hotel, etc., does not comply with the use defined by the manufacturer.
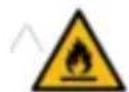
WARNING! Keep your appliance away from any source of flame during installation, servicing and use. The symbol in the margin which is found on the rear of your appliance, means that there are inflammable materials in this area.
The refrigerating and insulating agents used in this appliance contain inflammable gases.
When transporting, installing and servicing the appliance, make sure that none of the components of the cooling circuit are damaged. If the cooling circuit is damaged:
√ Avoid naked flames and all sources of inflammation.
√ Ventilate the room in which the appliance is installed.

Installation safety
- Your appliance must be installed and, if necessary, secured and used in accordance with the instructions in this manual in order to avoid any risks due to poor installation.
- Maintain clear of obstruction ventilation openings in the appliance enclosure or in the built-in structure.
- It is dangerous to change the composition of this model in any way whatsoever.
- Ensure that the power cord is not trapped or damaged when you position your appliance.
- Any damage to the power cord may result in a short circuit and/or electrocution.
- If the consensus could be decreased, it should be reduced by the consensus.
understood.
● Children must not play with the appliance.
● Children must not clean and maintain the appliance without supervision.
● Children aged 3 to 8 are allowed to load and unload refrigeration appliances.
- Keep all the packaging materials out of the reach of children, as they can cause suffocation.

Safety of use
- Do not damage the refrigerating circuit.
- Do not use any mechanical or other means, other than those recommended by the manufacturer, to speed up the defrosting process.
- Do not use any electric appliances inside the compartment for food, unless they are of a type recommended by the manufacturer.
- Do not store any explosive substances, such as aerosols containing inflammable propellant gases, inside the appliance.

Food safety
To avoid contaminating food, follow the instructions below:
- If the refrigerator remains empty for an extended period of time, switch it off, defrost it, clean it, dry it and leave the door open to prevent any mould from forming inside the appliance.
DISPOSAL

This symbol indicates that this product should not be treated as household waste.
Only dispose of the appliance in certified collection centres.
Your appliance contains a large amount of recyclable material. It is marked with this label to indicate the used appliances must be disposed of in certified collection points.
Contact your town hall or your retailer for the used appliance collection points closest to your home. This way, the appliance recycling organised by your manufacturer will be done under the best possible conditions, in compliance with European Directive on Waste Electrical and Electronic Equipment.
This appliance's packing materials are also recyclable. Help recycle it and protect the environment by dropping it off in the municipal receptacles provided for this purpose.
In accordance with the most recent legislative provisions applying to the protection and respect for the environment, your appliance does not contain any Q50s, but a refrigerator called B600s. The use type of contact
ECODESIGN
To access the data on your model, stored in the product database in line with regulation (EU) 2019/2016 and data relating to energy labelling, please connect to the dedicated website at https://eprel.ec.europa.eu/
Find the reference of your appliance on the website by entering the service reference shown on the ID plate on your appliance.
Another way to access this information is to flash the QR code found on the energy label on your product.
Layout and presentation of your appliance
- Your appliance was designed and tested to optimise its energy use.
- The proposed layout represents the ideal solution for achieving ideal energy consumption and optimum food storage.

Energy-saving measures
In order to reduce the power consumption of your appliance:
• Install it in a suitable location (see "Installing your appliance").
- Leave the doors open for the shortest time possible.
- Never put hot food in the fridge or the freezer, and in particular soups and other preparations that release a lot of steam.
- Check that your appliance is working correctly and do not allow too much ice to accumulate in the freezer (defrost when the ice is more than 5-6 mm thick). Clean the condenser on a regular basis.
- Regularly check the door seals and make sure that the doors can be closed properly. If this is not the case, contact after-sales service.
- Do not adjust the temperature too low.
Storing food
Here are some rules you should follow:
- Maintain the cold chain and select "Booster" mode at least 6 hours before coming home with groceries (if your model has it).
- Keep home-made food in the refrigerator after first taking care to leave it to cool.
- Make sure that your appliance is set to the recommended temperatures shown below. The temperatures for every compartment are recommended to optimise storing food and avoid any waste.
| Area | Type of compartment | Recommended temperature |
| Frozen food compartments | 0 star compartment (depending on model) | 0^ |
| 1 star compartment (depending on model) | -6^ |
- Place the food in the locations recommended in the tables below.
| Freezer compartments | Logos & Markings | Type of food |
| 0 star compartment | To store sorbet for a few hours and make ice cubes.This compartment is not suitable for freezing fresh food. | |
| 1 star compartment |  | To store frozen products for a few hours and make ice cubes.This compartment is not suitable for freezing fresh food. |
| 2 star compartment |  | To store frozen products for a few days, make ice cream and ice cubes.This compartment is not suitable for freezing fresh food. |
| 3 star compartment |  | To store frozen products for a few weeks/months and make ice cubes.This compartment is not suitable for freezing fresh food. |
| 4 star freezer drawers/shelves |  | To freeze food and store:Meat, fish (lower drawer/shelf).Vegetables, chips (intermediate drawer/shelf).Ice cream, fruit, ready-made dishes (upper drawer/shelf) |
INSTALLATION
Care before installation
Before installing the appliance and connecting it to the power, wash the interior and all internal accessories with lukewarm water and some neutral soap so as to remove the typical smell of a brand new product, then dry thoroughly.
① Never use detergents or abrasive cleaners, they will damage the inside coating.
When using the appliance for the first time or after a period of non-use, before putting the food in the compartment let the appliance run at least two hours on the higher settings.
Location

Warning! Never expose the appliance to a naked flame.
• Install the appliance in a dry and well ventilated place.
• The appliance should be located far from heat sources like radiators, boilers, sunlight, etc.
- Your appliance is designed to function optimally at a given ambient temperature. In this case, it is said to be designed for a particular "climate class". The climate class is clearly shown on the ID plate (see the "Contact" chapter). The freezer may not maintain satisfactory inside temperatures if it operates outside of the temperature limits set for the "climate class" it is designed for. Ensure that the chosen location is compliant with these temperature limits:
| Class | Ambient temperature |
| SN | This refrigeration appliance is designed for use at ambient temperatures between 10°C and 32°C |
| SN-ST | This refrigeration appliance is designed for use at ambient temperatures between 10°C and 38°C |
| SN-T | This refrigeration appliance is designed for use at ambient temperatures between |
How to reverse the door
- Ensure the unit is unplugged and empty.
• To take the door off, it is necessary to tilt the unit backwards. You should rest the unit on something solid so that it will not slip during the door reversing process. - All parts removed must be saved to do the reinstallation of the door.
- Do not lay the unit flat as this may damage the coolant system.
- It's better that 2 people handle the unit during assembly.
Refer to the drawing below

Installation
Kits for installation

*Depending on models
Tools needed
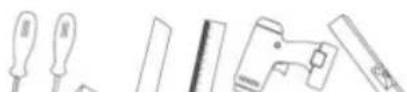

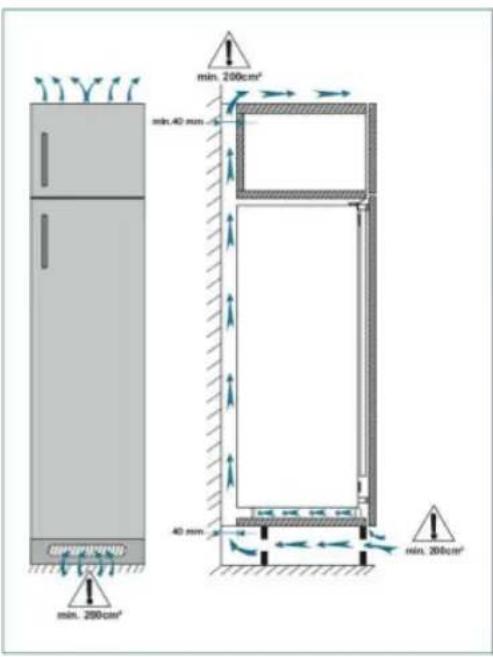
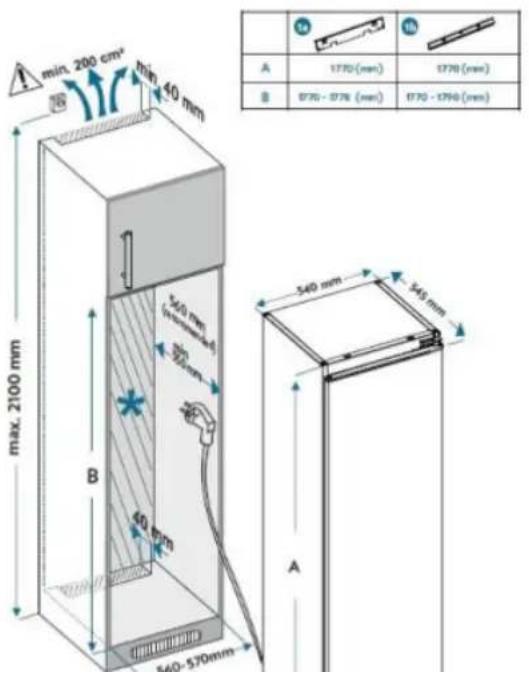
- Ensure the size of cabinet is enough for proper ventilation.

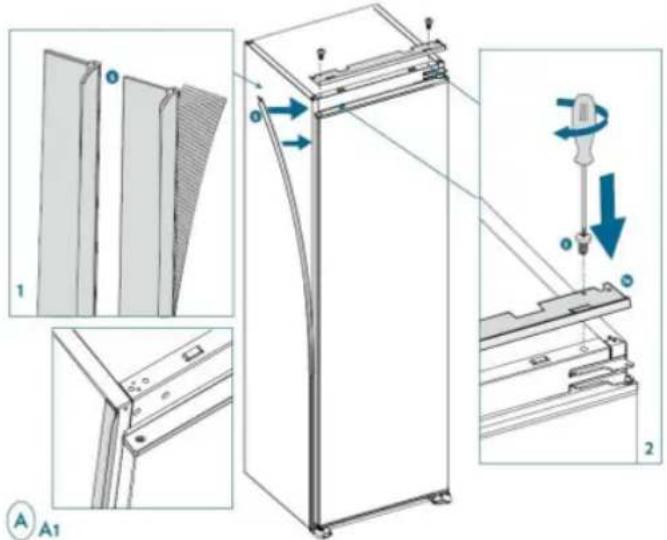
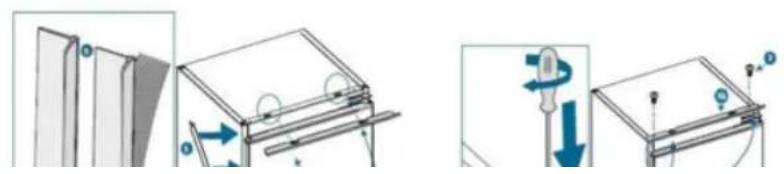
- Install the side cover gasket on the side where the door opens, to close the gap between the appliance and the wooden cabinet. Attach the top cover bracket to the appliance.
*Depending on models

natural_image
Pure technical line drawings of mechanical components without any text, numbers, or symbols- Carefully slide the appliance into the cabinet. Make sure the opening side of the door is as close as possible to the cabinet wall.
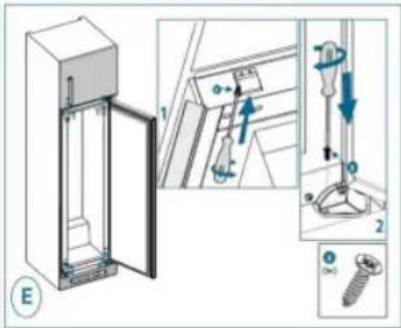
- Do not plug in the appliance. Fix the top cover bracket and feet to the cabinet.


natural_image
Illustration of two refrigerators with one showing a blue arrow indicating rotation (no text or symbols)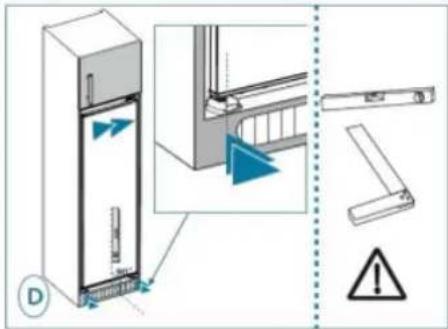

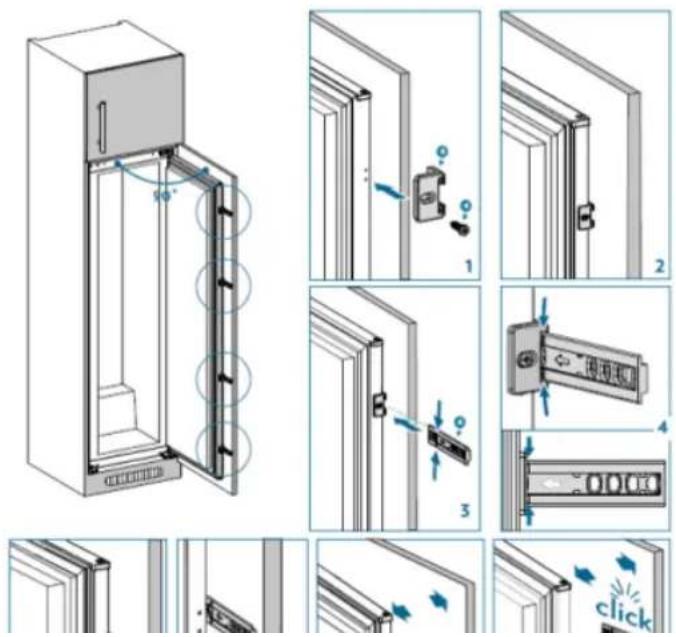
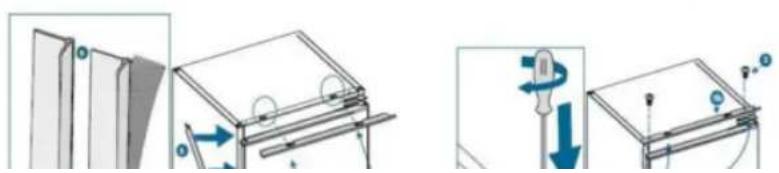
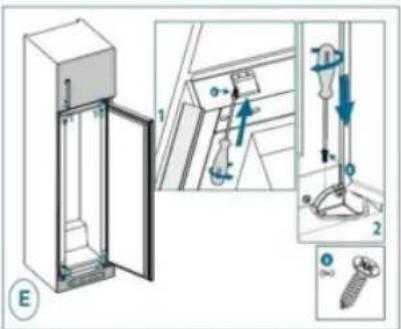
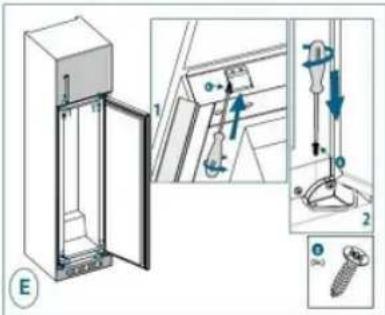
- Screw a guide into the holes on the appliance side. Insert the sliding rail into the guide and screw it to the door. Unscrew the guide to screw the last screw of the sliding rail to the door. Then attach the sliding rail cover to the sliding rail. Screw the guide back onto the unit by inserting the slide.
Levelling the appliance
Choose a place to install the appliance on a flat surface.
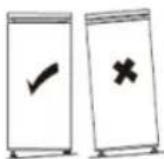
If the appliance is not level, the doors will not be correctly aligned and compartment sealing will not be ensured.
Electrical connections

Warning! It must be possible to unplug the appliance from the mains power, so the plug must remain easy to access after installation.
- The electric connections must meet the applicable standards and be capable of withstanding the maximum power shown on the ID plate.
• The power plug must be easily accessible and out of the reach of children. - For your safety this appliance must be earthed. If the power plug is not earthed, consult a qualified electrician to connect your appliance in line with applicable regulations.
- Do not use extensions, adapters or multiple plugs.
- Do not place multiple plugs or portable power supply units behind the appliance.
The manufacturer declines all liability if the above-mentioned safety precautions are not complied with. If in doubt, refer to your reseller.
USE & TIPS
"COLD AREA" indicator

The sign opposite can be found in your freezer.
It clearly shows the coldest zone of your appliance, where the temperature is lower than or equal to +4°C.
A temperature gauge in this zone allows you to check the settings of your freezer.

Adjust the thermostat

Temperature correct
Warning!
If the door of the freezer is left open for too long, the temperature inside the freezer will rise. Check the temperature gauge within 30 seconds after opening the door to make sure that the reading is correct.
Temperature setting
Control Panel

Super freeze mode
This mode allows you to freeze fresh cooked food faster, and is also useful when a large quantity of food is inserted at the same time, after fresh or frozen food purchase for example. It is necessary to activate this mode 24 hours before placing the food or, if not done, at least 4 hours before. After 54 hours, the appliance automatically returns to the previous setting.
- Scroll through the different temperatures until the wanted temperature for the Super freeze mode appears.
- Press and hold the Freezer button (#5 on the control panel drawing) while the displayed temperature is flashing, to activate the mode. A buzzer sounds the mode is set.
- Press the button until you return to the temperature at which you set the Super freeze mode. The Super freeze light (# 2 on the control panel drawing) appears next to the temperature, the mode is set.
During this mode:
• Eco mode cannot be selected.
• It can be disabled manually, but it must be kept active for at least 24 hours.
To disable Super freeze mode press and hold the Freezer button again. When disabled, the selected setting values will proceed.
Eco mode
During periods of less frequent use or absence from home, such as holidays, Eco program can provide optimum temperature while saving power.
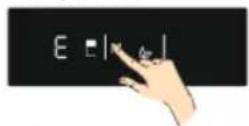
- Push Mode button (#3 on control panel drawing) until Eco symbol appears. Buzzer will sound mode will be set.
• Temperature light (#1) will show "E".
• Eco symbol and E will light until mode finishes.
Door open alarm
- The alarm will sound when door is left open for a long time. It switches off when door is closed.
Daily use
Your freezer is equipped with shelves and drawers with logos to help you store your food in the right place.
Twist Ice
This equipment makes it easier to make and remove ice cubes than a conventional ice cube tray.
• Pull the white drawer out of the Twist Ice
• Fill it with water to the level indicated
• Put back the white drawer in the Twist Ice
- When ice cubes are formed, turn the buttons to drop the ice cubes into the ice cube compartment
• Pull out the ice cube compartment to pick them up
Removing Twist Ice
- Remove the glass shelves from the freezer
- Remove the Twist Ice by moving it on the shelf to the left or right
Remarks
- Do not fill the ice cube compartment with water to make ice cubes, as this may break it
- It is possible to remove the Twist Ice to use more freezer space
- Moving the Twist Ice may be difficult when the freezer is operating. In this case, it should be cleaned by removing the glass shelves

natural_image
Diagram of a front view of a kitchen appliance with two circular gauges and a base unit, showing airflow direction (no text or symbols)Freezing tips
To help you optimise the freezing process, here are some important tips:
- The maximum amount of food that you can freeze every 24 hours can be found on the ID plate.
• The freezing process takes 24 hours. Do not add any more food to freeze during this time.
• Only freeze good quality, fresh and properly washed food. - Prepare food in small portions to enable it to be rapidly and completely frozen and to make it possible to subsequently thaw only the quantity required.
- Wrap up the food in aluminium foil or polyethylene food wraps which are airtight.
- Do not allow fresh, unfrozen food to touch the food which is already frozen to avoid raising their temperature.
- Iced products, if consumed immediately after removal from the freezer compartment, may cause frost burns to the skin.
• We recommend labelling and dating each frozen package.
• To obtain ice cubes faster, we recommend placing the ice cube trays in the top drawer.
Thawing food
Before eating, frozen or deep frozen food may be thawed in the refrigerator compartment or at ambient temperature, depending on the time available.
Some food may also be cooked directly when taken out of the freezer, while it is still frozen. In this case, cooking will take longer.
Important! In the event of accidental thawing, caused for example by a power break, quickly eat the thawed food. Never refreeze thawed food.

Warning! No thawed food may be replaced in the freezer. Place it in the refrigerator then eat it quickly.
CARE & CLEANING

Warning! Always unplug your appliance before any maintenance work. Never pull on the power cord, but only on the plug itself.
Cleaning
For hygiene reasons, regularly clean the appliance (sidewalls and interior and exterior accessories).
Important! Ethereal oils and organic solvents can damage plastic parts, e.g. lemon juice, butyric acid or acetic acid.
- Do not allow such substances to come into contact with appliance parts.
• Do not use any abrasive cleansers. - Remove food from the appliance. Store it in a cool place and keep well covered.
- Clean the appliance and the interior accessories with a cloth and lukewarm water with a diluted white vinegar or bicarbonate of soda solution. Do not wash the accessories in a dishwasher.
• After cleaning them, rinse surfaces with clear water and dry them.
• After everything is dry, plug the appliance back into the plug.
• Make sure that no water enters the lamp housing and other electrical components. - Clean the condenser with a brush at least twice a year. This will help you to save energy costs and increase productivity.
① Never clean the appliance with a steam cleaner.
Replacing the light
This product contains a light source whose the energy efficiency class is F .
The light inside the fridge uses a LED. To replace it, please contact your after sales service or an approved technician.
You will find all the information you need to contact our authorized technicians and our after-sales service in the "CONTACTS & INFORMATION" section.
Troubleshooting
Warning! If there is any anomaly, unplug your appliance. Only a qualified electrician or competent person may carry out troubleshooting.
If there is any anomaly during operation, check the following points before calling our approved after sales service or a qualified professional.
| E01 | Sensor warning | Call Service for assistance as soon as possible. | |
| E02 | Sensor warning | Call Service for assistance as soon as possible. | |
| E03 | Sensor warning | Call Service for assistance as soon as possible. | |
| E06 | Sensor warning | Call Service for assistance as soon as possible. | |
| E07 | Sensor warning | Call Service for assistance as soon as possible. | |
| E08 | Low voltage warning | Power supply to the device has dropped to below 170V. | - This is not a device failure, this error helps to prevent damages to the compressor.- The voltage needs to be increased back to required levels.If this warning continues, an authorised technician needs to be contacted. |
| E09 | Freezer compartment is not cold enough | Likely to occur after long term power failure. | 1. Set the freezer temperature to a colder value or set Super freeze mode. This should remove the error code once the required temperature has been reached. Keep doors closed to improve time taken to reach the correct temperature.2. Remove any products which have thawed/defrosted during this error. They must be eaten within a short period of time.3. Do not add any fresh food into the freezer compartment until the correct temperature has been reached and the error remains.If this warning continues an authorised technician needs to be contacted. |
Some noises may be heard during normal appliance operation (compressor operating cycle, automatic defrosting, circulation of the refrigerating gas through the appliance, etc.).
If you cannot find the cause of the anomaly, only call our approved after sales service or a qualified professional.
CONTACTS & INFORMATION
Customer Relations
For more information about our products or to contact us, please:
□ Visit our website: www.de-dietrich.com
Servicing and repairs,
Any repairs to your appliance must be made by a qualified professional accredited to work on the brand.
When making contact, mention the complete reference of your appliance (model, type, serial number). This information is provided on the ID plate located at the bottom left of the freezer (above the shelf or behind the crisper).
Reference
Serial number
Type
Model
Service Reference
You can find a list of approved service centres on our website www.de-dietrich.com
This website also allows access to information on spare parts.
Original replacement parts
During servicing, ask for only original spare parts to be used.
The minimum length of time for making available spare parts listed in European Regulation 2019-2019-EU and accessible especially to the appliance user is 10 years under the terms set out in the above regulation.
Guarantee
Please contact your reseller to benefit from the guarantee. The manufacturer does not offer any commercial guarantee for the refrigeration appliance.

VÁŽENÁ ZÁKAZNICE, VÁŽENÝ ZÁKAZNÍKU,
* Podlie modelu.
natural_image
Pure mechanical assembly diagrams showing frame structure and mounting mechanism without any text or symbols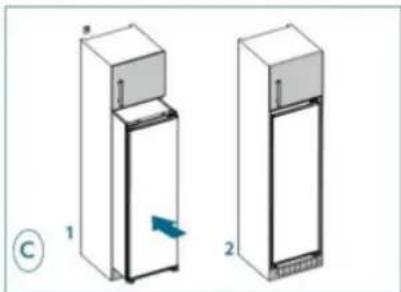
natural_image
Illustration of two refrigerators with one showing a cooling effect and the other with a cooling arrow (no text or symbols)

Tlačitka
Režim Super mrazeni
natural_image
Diagram showing airflow patterns around a ventilation unit with two circular components and directional arrows (no text or labels)Poznámky:
Sikkerhed under installation
natural_image
Line drawings of various tools including screwdriver, plunger, and tool holder (no text or symbols)*Ifølge modellen

natural_image
Pure technical diagrams showing mechanical assembly or assembly steps without any text, numbers, or symbols
natural_image
Diagram of two refrigerators with one showing a blue arrow indicating airflow or cooling (no text or symbols present)
Indikator for "KOLDT OMRÅDE"

Taster
Tilstanden Super frysning
Seadme paigaldamine
Paigalduskomplektid

*Vastavalt mudellie
*Vastavalt mudellie

natural_image
Pure mechanical assembly diagrams showing frame structure and mounting mechanism without any text or symbols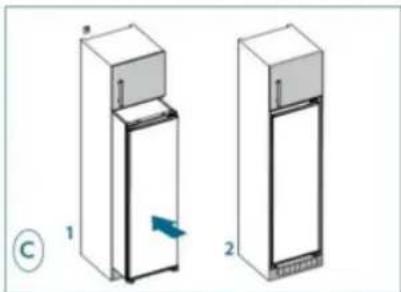
natural_image
Illustration of two refrigerators with one opening its side, showing internal structure and a blue arrow indicating rotation (no text or symbols)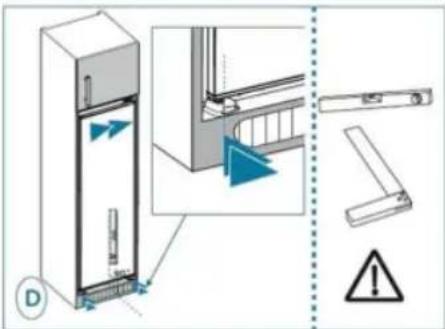

Nupud
Super-režiim
natural_image
Diagram showing airflow around a ventilation unit with two circular gauges and a base-mounted fan (no text or symbols)Märkused
natural_image
Diagram showing two mechanical assembly steps: one with a slide and arrow, the other with a rotating component and base mount (no text or symbols)
natural_image
Illustration of two refrigerators with one showing a blue arrow indicating rotation (no text or symbols)

natural_image
Diagram of a kitchen appliance with two circular gauges and a front panel, showing no text or symbols.• Household and other household households are being married.
•
./https://eprel.ec.europa.eu
• Household is usually too nice, so it's quite.
。
תְפַרָה בְּרָה
תְקַרָה בְּרָה
הכלהה
The image is too blurry to recognize any text content.
CILK KELON, 1974
הכלה
תְקַרָה

THE DOK
0979 110
הכלה
ФИТЫ ОКПИДО
בְרָה בְּרָה


1920-1930 CHINESE
cudte cium
- 1


•
natural_image
Pure mechanical assembly diagrams showing structural components without any text or symbols
natural_image
Illustration of two refrigerators with one open lid and one closed lid, showing internal components and a blue arrow indicating rotation (no text or symbols)
natural_image
Diagram of an open refrigerator with doors open and circled areas indicating ventilation or cooling zones (no text or symbols present)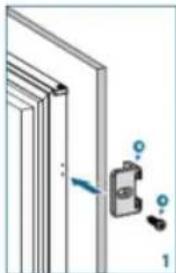
natural_image
Diagram of a door frame with a switch and two small components, no text or symbols present
natural_image
Pure architectural line drawing of a door or cabinet structure without any text, numbers, or symbols
natural_image
Diagram of a door handle assembly with labeled parts and directional arrows (no text or symbols)

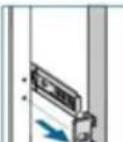
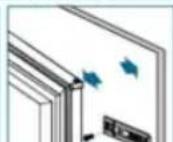
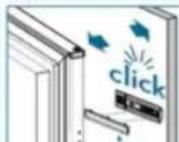

הכלה
• Se will be sure that useful is useful.
• No证据 Household is the first time you can be done to make a good job.
flowchart
graph TD
    A["1: Air intake"] --> B["2: Air intake with airflow arrow"]
    B --> C["3: Air intake with airflow arrow and click indicator"]
    C --> D["4: Air intake with airflow arrow and click indicator"]
*Consoante o modelo

natural_image
Pure mechanical assembly diagrams showing frame structure and mounting mechanism without any text or symbols
natural_image
Illustration of two refrigerators with one opening its side, showing internal structure and a blue arrow indicating rotation (no text or symbols)

Botões
natural_image
Simple line drawing of a ceiling-mounted air conditioner unit with two circular gauges (no text or symbols)Retirar o Twist Ice
• Retire as prateleiras de vidro do congelador

flowchart
graph TD
    A["Step 1: Internal air intake"] --> B["Step 2: Internal air intake with flow indicators"]
    B --> C["Step 3: Internal air intake with click button"]
    C --> D["Step 4: Internal air intake with flow indicator"]
    D --> E["Final output"]
natural_image
Diagram showing two mechanical assembly steps: one with a rotating component, the other with a rotating tool and a base mount (no text or symbols)
natural_image
Illustration of two refrigerators with one open lid and one closed, showing internal structure and airflow direction (no text or symbols)

Inštalácia
natural_image
Line drawings of various tools including screwdriver, flat tool, and pushpin (no text or symbols)Inštalačné pokyny
* Podfa modelu

natural_image
Diagram showing three steps of folding a panel or structure, with arrows indicating movement and a tool on the base (no text or symbols present)
natural_image
Illustration of two refrigerators with labeled parts and a blue arrow indicating motion (no text or symbols present)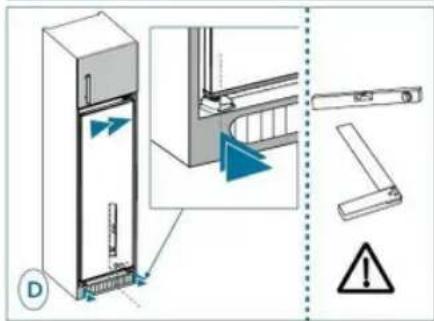
- Zaskrutkujte držiak do otvorov na strane spotrebiča. Vložte vodiacu lištu do držiaku a zaskrutkujte ju na dvierka. Odskrutkujte držiak a priskrutkujte poslednú skrutku posuvnej kofajničky k dvierkam.
Vyrovnanie spotrebiča
natural_image
Diagram of a front-mounted air conditioner unit with cooling fans and airflow indicators (no text or labels)Poznámky
natural_image
Diagram of an open refrigerator with internal compartments and doorways (no text or labels)natural_image
Pure mechanical assembly diagrams showing frame structure and mounting mechanism without any text or symbols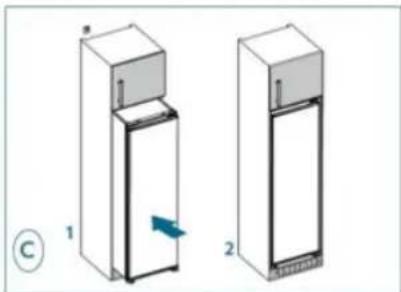
natural_image
Illustration of two refrigerators with one moving down and the other holding a lid, showing internal structure (no text or symbols)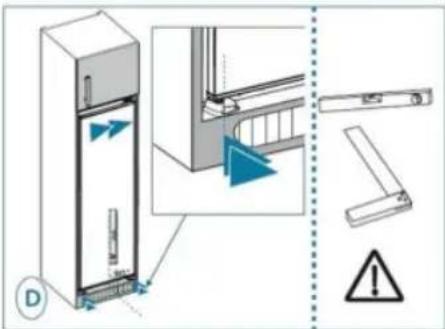

natural_image
Diagram of a washing machine with two circular gauges and red-handled buttons, shown in line drawing without any text or symbols.


- Mode Super congélation
- CONTACT & INFORMATIONS
- Interventions France
- SAFETY GUIDELINES
- GENERAL SAFETY AND WARNINGS
- Installation safety
- Safety of use
- Food safety
- DISPOSAL
- ECODESIGN
- Layout and presentation of your appliance
- Energy-saving measures
- Storing food
- INSTALLATION
- Care before installation
- Location
- Warning! Never expose the appliance to a naked flame.
- How to reverse the door
- Levelling the appliance
- Electrical connections
- USE & TIPS
- "COLD AREA" indicator
- Warning!
- Temperature setting
- Super freeze mode
- During this mode:
- Eco mode
- Door open alarm
- Daily use
- Twist Ice
- Removing Twist Ice
- Remarks
- Freezing tips
- Thawing food
- CARE & CLEANING
- Cleaning
- Replacing the light
- Troubleshooting
- CONTACTS & INFORMATION
- Customer Relations
- Servicing and repairs,
- Original replacement parts
- Guarantee
- VÁŽENÁ ZÁKAZNICE, VÁŽENÝ ZÁKAZNÍKU,
- Režim Super mrazeni
- Sikkerhed under installation
- Indikator for "KOLDT OMRÅDE"
- Tilstanden Super frysning
- Seadme paigaldamine
- Super-režiim
- Märkused
- תְפַרָה בְּרָה
- הכלה
- Inštalácia
- Inštalačné pokyny
- Vyrovnanie spotrebiča
- Poznámky
Brand : DE DIETRICH
Model : DFU1781EN
Category : Freezer