640-035 - Trailer Jula - Free user manual and instructions
Find the device manual for free 640-035 Jula in PDF.


| Product Type | Trailer |
| Brand | Jula |
| Model | 640-035 |
| Overall Length | 2.4 m (approx.) |
| Overall Width | 1.2 m (approx.) |
| Deck Height | 0.3 m (approx.) |
| Gross Vehicle Weight Rating (GVWR) | 750 kg (approx.) |
| Net Weight | 150 kg (approx.) |
| Load Capacity | 600 kg (approx.) |
| Tire Size | 13 inch (typical) |
| Coupling Type | Ball hitch 50 mm |
| Electrical System | 12V with 7-pin connector |
| Main Functions | Transporting goods, utility towing |
| Safety Features | Rear lights, reflectors, safety chains |
| Maintenance | Check tire pressure, grease bearings, inspect lights |
| Cleaning | Wash with mild soap and water, dry thoroughly |
| Storage | Store indoors or under cover when not in use |
| Spare Parts | Tires, light units, bearings |
| Reparability | User replaceable parts with basic tools |
| General Information | Designed for light to medium duty hauling |
Frequently Asked Questions - 640-035 Jula
User questions about 640-035 Jula
0 question about this device. Answer the ones you know or ask your own.
Ask a new question about this device
Download the instructions for your Trailer in PDF format for free! Find your manual 640-035 - Jula and take your electronic device back in hand. On this page are published all the documents necessary for the use of your device. 640-035 by Jula.
USER MANUAL 640-035 Jula
EN - Operating instructions in original
SVENSKA....4
Handhavande....4
Koppling till dragfordon 4
Ljuskontroll....5
Lastning 5
Begränsningar 6
Lastsäkring 6
Connecting to towing vehicle....12
Checking the lights. 13
Loading....13
Limitations 14
Securing the load. 14
Checking the tyres and tyre pressures 14
Nominal tyre pressure for best economy 14
Maintenance 15
Electric cables....15
Changing the wheels 16
Wiring diagram 17
Main plug 12 V....17
Light groups 17
Other lights 3....17
HANDHAVANDE
Värna om miljön!
Read the User Instructions carefully before use
The rear view mirrors on the towing vehicle should be positioned so that the trailer can easily be seen. If the trailer is wider than the towing vehicle, suitable extended rear view mirrors should be used on the right and left side.
CONNECTING TO TOWING VEHICLE
- The trailer is intended for connection to a ball coupling. Always connect the safety wire. The wire must be disconnected from the towbar to a separate attachment point, so that the wire cannot come loose from the towing vehicle if the trailer comes loose from the towbar when driving.
- Check that the drawbar is correctly connected to the towbar on the vehicle. The ball hitch must be horizontal. The latch must be in the locked position. Lift the drawbar to check that the trailer is correctly connected.
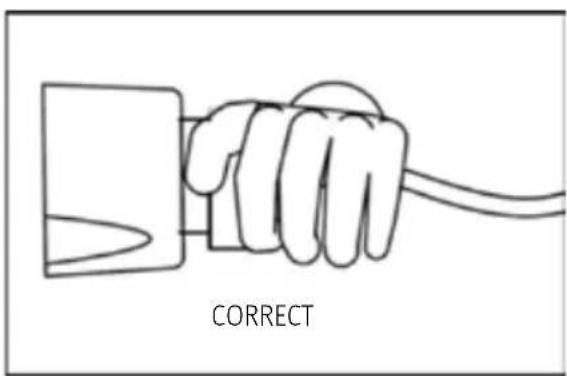
- Connect the power cable on the trailer to the plug on the towing vehicle. Do not pull the cable to unplug the plug.


- If the support wheel (accessory) is used it should be fitted on the left-hand member on the trailer (A).
- Wind up the support wheel before driving.
cHEcKING THE LlgHTs
-
Connect the power cable on the trailer to the towing vehicle and check that all the lights are working properly.
-
If the lights are not working properly you could try connecting the trailer to another vehicle to check that there is not a fault on the plug on the towing vehicle.
Possible reasons, trailer
- Plug not correctly inserted.
- Plug contaminated.
- Plug corroded or damaged.
- Bust bulbs.
• Corroded connections. Clean the connections.
Possible reasons for faults on towing vehicle
- Connection fault. Get a workshop to check out the fault.
- The electrical systems in some towing vehicles can be designed to trip fuses when the direction indicators are used. Get a workshop to check the electrical system and install a larger fuse.
See wiring diagram for a more detailed description of the electrical connections.
- Check that the wheel nuts are properly tightened before driving. Tighten the wheel nuts with a torque wrench if necessary.
- The wheel nuts can come loose after some time. Retighten the wheel nuts at intervals of 500 km.
LoADING
- Information on the loading capacity of the trailer is given in the registration certificate for the trailer.
- Never exceed the permitted load for the trailer.
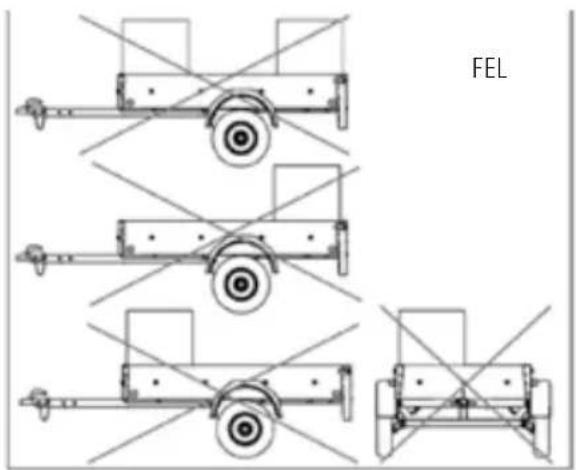
- Distribute the load uniformly on the trailer so that the ball pressure on the towing vehicle is about 25 kg. The maximum permitted ball pressure (given on the ball hitch) must never be exceeded. The diagrams show a suitable distribution of the load.

-
Overloading and/or improper distribution of the load can result in an accident and may invalidate the warranty.
-
The drawbar can be damaged if the trailer is heavy at the front.
— The trailer can vibrate and have inferior road holding if the trailer is heavy at the back. - Overloading can damage the tyres, axles and wheel bearings.
Limitations
In Sweden your registration certificate, part 1, indicates how much you can load on your trailer.
For speed limits and other regulations refer to the Swedish Transport Agency, www.transportstyrelsen.se.
In Norwegian for speed limits and other regulations refer to
http://www.vegvesen.no/Kjoretoy/Eie+og+vedlikeholde/Tilhengerkalkulator.
sEcUrlNg THE LoAD
- The load must be secured so that it cannot move. Loads such as sand, soil, leaves and stones etc. may need to be covered with a net, or put into suitable containers. Avoid sharp acceleration and braking. Check that the vehicle insurance covers the trailer and the load.
- Avoid driving without the front and side members fitted. Secure the back before driving. Check before driving that the rails and back are correctly positioned and secured with lock pins. Check that the drawbar is correctly attached to the trailer and secured with lock pins.
cHEcKINg THE TyrEs AND TyrE prEssUrEs
- The trailer has tubeless tyres. These tyres are marked TUBELESS. The tyres require no maintenance apart from filling with air to the correct pressure. Suitable tyre pressures for each type of tyre are specified below.
NomINAL TyrE prEssUrE for BEsT EcoNomy
Tyre type 145/70 R13 155/70 R13 165/70 R13
Tyre pressure for best economy 3.0 bar 2.5 bar 2.5 bar
The values apply to a trailer with maximum load. In hot weather and when driving on the motorway the tyre pressure should be reduced by 0.2 bar. Allow the tyres to cool before checking the tyre pressure.
- If the tyre does not maintain the pressure, change the wheel and take the damaged wheel to a tyre workshop.
- Sunlight ages the tyres.
NoTE: A spare wheel and jack are not included in the delivery. Check whether the spare wheel for the towing vehicle is of the same type as the one for the trailer. If not the trailer should be fitted with a suitable spare wheel and bracket for the wheel and the jack. The trailer has sharp edges. Wear safety gloves.
mAINTENANcE
Follow the maintenance instructions to ensure correct functionality. Failure to follow the maintenance instructions will invalidate the warranty.
- Clean the trailer with water after transporting corrosive substances.
- Avoid direct contact with the ball hitch, wheel hubs, wheel bearings and the lights. The drawbar and side members can be waxed to provide optimum protection.
- Never use the trailer if the ball hitch is loose. If the ball hitch does not sit properly round the towbar, check the trailer immediately and replace worn components.
- Do not push or pull the coupling to move the trailer. Lubricate the ball hitch properly.
- The towbar should comply with ISO1103 ( 50 mm) and the ball coupling with Directive 94/20.
Follow the instructions below if the trailer is not going to be used for some time.
- Wash the metal parts and apply a thin layer of protective wax, or equivalent.
- Put the trailer under a roof. Some models have special supports so that they can be stood upright on the back end and take up less space. Models without supports can be placed on pallets, or equivalent. The trailer should be placed on a dry, stable surface, protected from rain and snow. Remove any accessories. At least 2 persons are needed to prepare the trailer for storage. The trailer has sharp edges. Wear safety gloves.
- Pull out the power cable and unscrew the lenses to access the bulbs.
Follow the instructions below to replace the bulbs.
- Unscrew the lens.
- Replace the bulb.
- Check all the wire connections.
- Screw the lens back on.
The following bulbs can be used.
• Direction indicator, fog light: 12 V, 21 W
- Reversing light, brake light, number plate light: 12 V, 21 W/5 W
ELEcTrlc cABLEs
- Protect the connections from dirt and moisture to avoid corrosion.
- Check before driving that the power cable is properly connected by checking that all the lights are working. See the wiring diagram for the cable and plug in the event of any problems.
- Replace bulbs, cables and plugs etc. if necessary.
cHANgINg THE WHEELs
Follow the instructions below if a tyre is damaged when the trailer is loaded.
- Secure the trailer by putting the parking brake on in the towing vehicle and wedging the other wheel.
- Release the wheel nuts about 1 turn.
- Place the jack on a stable surface and lift from under the middle of the frame or axle.
- Unscrew the wheel nuts and take off the wheel. Make sure not to get the threads dirty.
- Put on a new wheel.
- Put the wheel nuts on and tighten them crosswise.
- Lower down the trailer and remove the jack.
- Finish off tightening the wheel nuts, crosswise.
- Check the air pressure in the new tyre.
We recommend that you have the new wheel balanced in a tyre workshop.
Wash and wax the trailer after driving on gritted roads. Damage to the galvanization should be degreased, cleaned, dried and painted with 2 or 3 coats of zinc spray, or equivalent. The zinc in the surface layer reacts with the air in time and darkens. This is quite normal. The surface layer can be corroded by acid, salt and other chemicals. Zinc corrosion, also called white rust, does not deteriorate the corrosion protection.
Carry out inspection and maintenance as shown in the table below.
| Km DrIVEN X 100 | ||||||||||
| Action | 1 | 2 | 3 | 4 | 5 | 6 | 7 | 8 | 9 | 10 |
| General technical check after 100 km.Check of ball hitch, axle brackets, drawbar, wheel bearings, lights. | x | x | x | |||||||
| Check of screw joint torque for wheels, axles and drawbar. | x | x | x | x | x | |||||
| Check of tyre pressures and condition of the tyres. | x | x | x | |||||||
| Lubrication | ||||||||||
| Lubrication of hinges, locks and ball hitch joints with oil. | x | x | ||||||||
NOTE:
- Check the condition of the trailer before driving, especially the ball hitch, wheels and latch on the drawbar.
- Clean and lubricate the ball hitch joints and load supporting surfaces regularly.
- Check at regular intervals that the tyres have the correct air pressure according to the manufacturer's documentation.
Only use original spare parts. Submit the following details when ordering spare parts.
– Type and year of manufacture for the trailer.
– Trailer serial number (see type plate).
WIRING DIAGRAM
Main plug 12 V
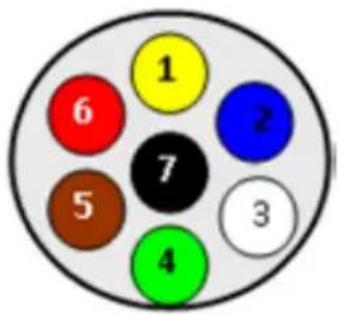
1 - yellow
2 - blue
3-white (earth)
4 - green
5-brown
6-red
7 - black
Light groups
Left light group, 6 functions
- earth 3 - white
- brake light 6 - red
- side marker left 7 – black
- direction indicator 1 – yellow
- fog light 2 - blue
- number plate light 7 - black
Right light group, 6 functions
- earth 3 - white
- brake light 6 – red
- side marker right 5-brown
- direction indicator 4 – brown (black1)
- fog light 2 – spare terminal
- number plate light 7 – brown (black1)
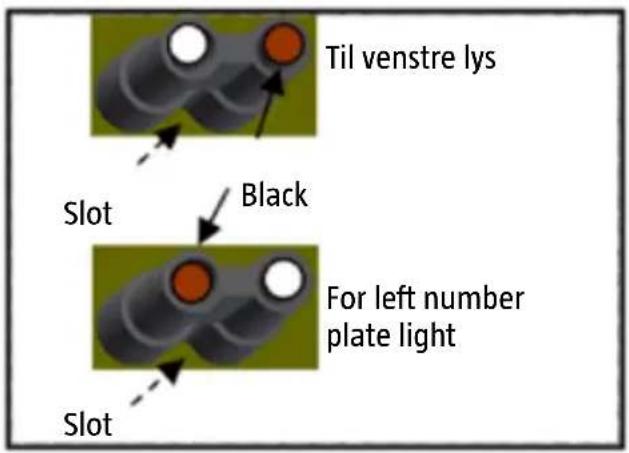
Other lights
Number plate light, left
Front side marker light, left
3 - white 7 - black
Explanation:
1 - internal light
2 - Only in light group
Number plate light, right
Front side marker light, right
3 - white 5 - brown
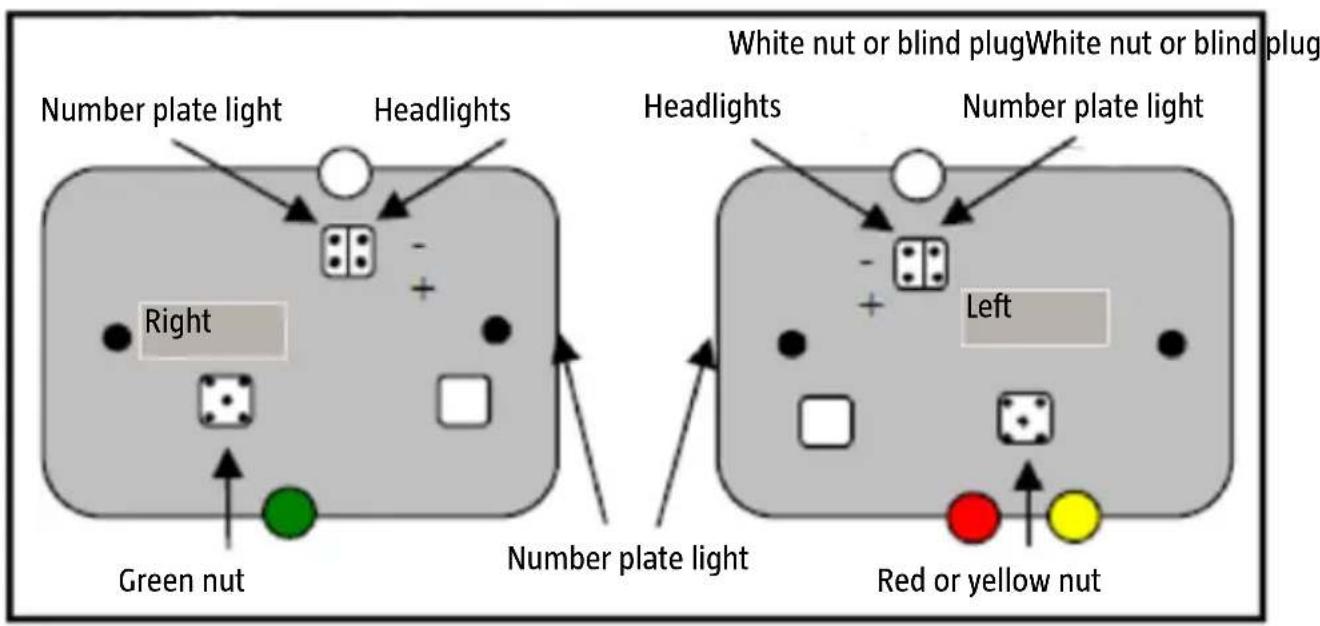
![graph TD A["Slot"] --> B["Brown"] B --> C["Slot"] style A fill:#999,stroke:#333 style C fill:#999,stroke:#333 note1["For right light"] -.-> A note2["For right number plate light"] -.-> C](/content/2026/05/1097842/images/9c4a686efe855f9bf93fba8349397eaa559fe08d14574d90c6a4680eb61e5f99.jpg)


Jula reserves the right to make changes. In the event of problems, please contact our service department.
www.jula.com

Care for the environment!
Must not be discarded with household waste!
This product contains electrical or electronic components that should be recycled.
Leave the product for recycling at the designated station e.g. the local authority's recycling station.
- SVENSKA....4
- HANDHAVANDE....4
- MAINTENANCE 15
- WIRING DIAGRAM 17
- HANDHAVANDE
- VÄRNA OM MILJÖN
- READ THE USER INSTRUCTIONS CAREFULLY BEFORE USE
- CONNECTING TO TOWING VEHICLE
- CHECKING THE LLGHTS
- LOADING
- LIMITATIONS
- SECURLNG THE LOAD
- CHECKING THE TYRES AND TYRE PRESSURES
- NOMINAL TYRE PRESSURE FOR BEST ECONOMY
- MAINTENANCE
- ELECTRLC CABLES
- CHANGING THE WHEELS
- NOTE
- WIRING DIAGRAM
- LIGHT GROUPS
- RIGHT LIGHT GROUP, 6 FUNCTIONS
- OTHER LIGHTS
- CARE FOR THE ENVIRONMENT
Brand : Jula
Model : 640-035
Category : Trailer