
RangeMax WNDA3100 - Wi-Fi USB Key NETGEAR - Free user manual and instructions
Find the device manual for free RangeMax WNDA3100 NETGEAR in PDF.


| Product Type | Dual Band Wireless-N USB Adapter |
| Model | WNDA3100 |
| Standards | IEEE 802.11a, 802.11b, 802.11g, 802.11n draft 2.0 |
| Frequency Bands | 2.4 GHz and 5 GHz |
| Maximum Data Rate | Up to 300 Mbps |
| Interface | USB 2.0 (backward compatible with USB 1.1) |
| Power | 5V DC via USB bus |
| Antenna | 2 integrated internal antennas |
| Security | WEP (64/128-bit), WPA-PSK, WPA2-PSK |
| Supported OS | Windows Vista, Windows XP (SP2 required) |
| LED Indicators | Amber (2.4 GHz), Blue (5 GHz) – solid when connected, blinking during activity |
| Dimensions (approx.) | 3.5 x 1.0 x 0.5 in (89 x 25 x 13 mm) |
| Weight (approx.) | 0.8 oz (23 g) |
| Operating Temperature | 0° to 40°C (32° to 104°F) |
| Emissions Compliance | FCC Class B, CE |
| RF Exposure (SAR) | 0.74 W/kg (body-worn) |
| Warranty | Limited 1-year warranty |
| Included Accessories | USB cable, adapter cradle, installation guide, resource CD |
Frequently Asked Questions - RangeMax WNDA3100 NETGEAR
User questions about RangeMax WNDA3100 NETGEAR
0 question about this device. Answer the ones you know or ask your own.
Ask a new question about this device
Download the instructions for your Wi-Fi USB Key in PDF format for free! Find your manual RangeMax WNDA3100 - NETGEAR and take your electronic device back in hand. On this page are published all the documents necessary for the use of your device. RangeMax WNDA3100 by NETGEAR.
USER MANUAL RangeMax WNDA3100 NETGEAR
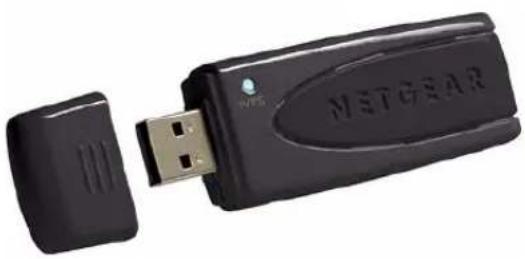
NETGEAR RangeMax Dual Band Wireless-N USB Adapter WNDA3100 User Manual
natural_image
Black MetGear USB device with a separate connector (no visible text or symbols on the device body)NETGEAR®
NETGEAR, Inc. 4500 Great America Parkway Santa Clara, CA 95054 USA
202-10329-01
December 2007
© 2007 by NETGEAR, Inc. All rights reserved..
Technical Support
Please refer to the support information card that shipped with your product. By registering your product at http://www.netgear.com/register, we can provide you with faster expert technical support and timely notices of product and software upgrades.
NETGEAR, INC. Support Information
Phone: 1-888-NETGEAR, for US & Canada only. For other countries, see your Support information card.
E-mail: support@netgear.com
North American NETGEAR website: http://www.netgear.com
Trademarks
NETGEAR, the NETGEAR logo, ProSafe, and Auto Uplink are trademarks or registered trademarks of NETGEAR, Inc. Microsoft, Windows, Windows NT and Vista are registered trademarks of Microsoft Corporation. Other brand and product names are registered trademarks or trademarks of their respective holders.
Statement of Conditions
In the interest of improving internal design, operational function, and/or reliability, NETGEAR reserves the right to make changes to the products described in this document without notice.
NETGEAR does not assume any liability that may occur due to the use or application of the product(s) or circuit layout(s) described herein.
Maximum Wireless Signal Rate Derived from IEEE Standard 802.11 Specifications
Actual data throughput will vary. Network conditions and environmental factors, including volume of network traffic, building materials and construction, and network overhead, lower actual data throughput rate.
Safety and Regulatory Notices
FCC Statement
The WNDA3100 has been tested and complies with the specifications for a Class B digital device, pursuant to Part 15 of the FCC Rules.
Operation is subject to the following two conditions:
(1) This device may not cause harmful interference, and
(2) This device must accept any interference received, including interference that may cause undesired operation.
These limits are designed to provide reasonable protection against harmful interference in a residential installation. This equipment generates, uses, and can radiate radio frequency energy and, if not installed and used according to the instructions, may cause harmful interference to radio communications. However, there is no guarantee that interference will not occur in a particular installation. If this equipment does cause harmful interference to radio or television reception, which is found by turning the equipment off and on, the user is encouraged to try to correct the interference by one or more of the following measures:
- Reorient or relocate the receiving antenna
-
Increase the separation between the equipment or devices
-
Connect the equipment to an outlet other than the receiver's
- Consult a dealer or an experienced radio/TV technician for assistance
FCC Caution: Any change or modification to the product not expressly approved by Netgear could void the user's authority to operate the device.
FCC RF Radiation Exposure and SAR Statements
SAR Statement
The NETGEAR WNDA3100 has been tested for body-worn Specific Absorption Rate (SAR) compliance. The FCC has established detailed SAR requirements and has established that these requirements have been met while installed in host notebook computer.
RF Exposure Information
The radio module has been evaluated under FCC Bulletin OET 65C (01-01) and found to be compliant to the requirements as set forth in CFR 47 Sections, 2.1093, and 15.247 (b) (4) addressing RF Exposure from radio frequency devices. This model meets the applicable government requirements for exposure to radio frequency waves. The highest SAR level measured for this device was 0.74 W/kg.
Canadian Department of Communications Industry Canada (IC) Notice
"To prevent radio interference to the licensed service, this device is intended to be operated indoors and away from windows to provide maximum shielding. Equipment (or its transmit antenna) that is installed outdoors is subject to licensing."
Europe - EU Declaration of Conformity
A printed copy of the EU Declaration of Conformity certificate for this product is provided in the WNDA3100 product package.
| Èesky [Czech] | NETGEAR, Inc. tímto prohlašuje, že tento NETGEAR RangeMax Dual Band Wireless-N USB Adapter WNDA3100 je ve shodi se základními požadavky a dalšími półslušnými ustanoveními smirnice 1999/5/ES. |
| Dansk [Danish] | Undertegnede NETGEAR, Inc. erklærer herved, at følgende udstyr NETGEAR RangeMax Dual Band Wireless-N USB Adapter WNDA3100 overholder de væsentlige krav og øvrige relevante krav i direktiv 1999/5/EF. |
| Deutsch [German] | Hiermit erklärt NETGEAR, Inc., dass sich das Gerät NETGEAR RangeMax Dual Band Wireless-N USB Adapter WNDA3100 in Übereinstimmung mit den grundlegenden Anforderungen und den übrigen einschlägigen Bestimmungen der Richtlinie 1999/5/EG befindet. |
| Eesti [Estonian] | Käesolevaga kinnitab NETGEAR, Inc. seadme NETGEAR RangeMax Dual Band Wireless-N USB Adapter WNDA3100 vastavust direktiivi 1999/5/EÜ põhinõuetele ja nimetatud direktiivist tulenevatele teistele asjakohastele sätetele. |
| English | Hereby, NETGEAR, Inc., declares that this NETGEAR RangeMax Dual Band Wireless-N USB Adapter WNDA3100 is in compliance with the essential requirements and other relevant provisions of Directive 1999/5/EC. |
| Español [Spanish] | Por medio de la presente NETGEAR, Inc. declara que el NETGEAR RangeMax Dual Band Wireless-N USB Adapter WNDA3100 cumple con los requisitos esenciales y cualesquiera otras disposiciones aplicables o exigibles de la Directiva 1999/5/CE. |
| Ελληνική [Greek] | ME THN ΠΑΡΟΥΣΑ NETGEAR, Inc. ΔΗΛΩΝΕΙ ΟΤΙ NETGEAR RangeMax Dual Band Wireless-N USB Adapter WNDA3100 ΣΥΜΜΟΡΦΩΝΕΤΑΙ ΠΡΟΣ ΤΙΣ ΟΥΣΙΩΔΕΙΣ ΑΠΑΙΤΗΣΕΙΣ ΚΑΙ ΤΙΣ ΛΟΙΠΕΣ ΣΧΕΤΙΚΕΣ ΔΙΑΤΑΞΕΙΣ ΤΗΣ ΟΔΗΓΙΑΣ 1999/5/ EK. |
| Français [French] | Par la présente NETGEAR, Inc. déclare que l'appareil NETGEAR RangeMax Dual Band Wireless-N USB Adapter WNDA3100 est conforme aux exigences essentielles et aux autres dispositions pertinentes de la directive 1999/5/CE. |
| Italiano [Italian] | Con la presente NETGEAR, Inc. dichiara che questo NETGEAR RangeMax Dual Band Wireless-N USB Adapter WNDA3100 è conforme ai requisiti essenziali ed alle altre disposizioni pertinenti stabilite dalla direttiva 1999/5/CE. |
| Latviski [Latvian] | Ar šo NETGEAR, Inc. deklarç, ka NETGEAR RangeMax Dual Band Wireless-N USB Adapter WNDA3100 atbilst Direktīvas 1999/5/EK bûtiskajâm prasībâm un citiem ar to saistítajiem noteikumiem. |
| Lietuvio [Lithuanian] | Šiuo NETGEAR, Inc. deklaruoja, kad šis NETGEAR RangeMax Dual Band Wireless-N USB Adapter WNDA3100 atitinka esminius reikalavimus ir kitas 1999/5/EB Direktyvos nuostatas. |
| Nederlands [Dutch] | Hierbij verklaart NETGEAR, Inc. dat het toestel NETGEAR RangeMax Dual Band Wireless-N USB Adapter WNDA3100 in overeenstemming is met de essentiële eisen en de andere relevante bepalingen van richtlijn 1999/5/EG. |
| Malti [Maltese] | Hawnhekk, NETGEAR, Inc., jiddikjara li dan NETGEAR RangeMax Dual Band Wireless-N USB Adapter WNDA3100 jikkonforma mal-tijiet essenzjali u ma provvedimenti orajn relevanti li hemm fid-Dirrettiva 1999/5/EC. |
| Magyar [Hungarian] | Alulírott, NETGEAR, Inc. nyilatkozom, hogy a NETGEAR RangeMax Dual Band Wireless-N USB Adapter WNDA3100 megfelel a vonatkozó alapvető követelményeknek és az 1999/5/EC irányelv egyéb előírásainak. |
| Polski [Polish] | Niniejszym NETGEAR, Inc. oœwiadcza, ¿e NETGEAR RangeMax Dual Band Wireless-N USB Adapter WNDA3100 jest zgodny z zasadniczymi wymogami oraz pozosta³ymi stosownymi postanowieniami Dyrektywy 1999/5/EC. |
| Português [Portuguese] | NETGEAR, Inc. declara que este NETGEAR RangeMax Dual Band Wireless-N USB Adapter WNDA3100 está conforme com os requisitos essenciais e outras disposições da Directiva 1999/5/CE. |
| Slovensko[Slovenian] | NETGEAR, Inc. izjavlja, da je ta NETGEAR RangeMax Dual Band Wireless-N USB Adapter WNDA3100 v skladu z bistvenimi zahtevami in ostalimi relevantnimi doloèili direktive 1999/5/ES. |
| Slovensky[Slovak] | NETGEAR, Inc. týmto vyhlasuje, že NETGEAR RangeMax Dual Band Wireless-N USB Adapter WNDA3100 spåøa základné požiadavky a všetky príslušné ustanovenia Smernice 1999/5/ES. |
| Suomi[Finnish] | NETGEAR, Inc. vakuuttaa täten että NETGEAR RangeMax Dual Band Wireless-N USB Adapter WNDA3100 tyyppinen laite on direktiivin 1999/5/EY oleellisten vaatimusten ja sitä koskevien direktiivin muiden ehtojen mukainen. |
| Svenska[Swedish] | Härmed intygar NETGEAR, Inc. att denna [utrustningstyp] står l överensstämmelse med de väsentliga egenskapskrav och övriga relevanta bestämmelser som framgår av direktiv 1999/5/EG. |
Product and Publication Details
Model Number: WNDA3100
Publication Date: December 2007
Product Family: Wireless-N USB Adapter
Product Name: NETGEAR RangeMax Dual Band Wireless-N USB Adapter WNDA3100
Home or Business Product: Home
Language: English
Publication Part Number: 202-10329-01
Publication Version Number: 1.0
Contents
About This Manual
Conventions, Formats, and Scope ix
How to Use This Manual ....x
How to Print This Manual ....x
Chapter 1
Basic Setup
What You Need Before You Begin ....1
Verify System Requirements .... 1
Observe Wireless Location and Range Guidelines 2
What Is in the Box 3
WNDA3100 Default Wireless Settings 3
Installation 4
Installing the WNDA3100 Software 4
Connecting the Wireless-N USB Adapter 5
Using the Smart Wizard to Set Up Your Wireless-N USB Adapter 6
Connecting to Wireless Networks and the Internet 8
WNDA3100 Icon Colors 9
Smart Wizard Status Bar 9
Wireless-N USB Adapter LED 11
Placing the USB Adapter Cradle 11
Removing the WNDA3100 Software 13
Upgrading the WNDA3100 Software 13
Chapter 2
Network Connections and Wireless Security
Disabling the Windows Zero Configuration Utility ....1
Understanding the Smart Wizard 2
Viewing Wireless Networks in Your Area 2
Finding a Network ....4
Profiles 5
Adding Profiles .... 5
Setting Up a Profile to Connect to an Access Point or Router 5
Setting up a Computer-to-Computer (Ad Hoc) Profile 7
Starting a Computer-to-Computer (Ad Hoc) Network Connection 9
Wireless Security 10
Using Wireless Security Features 10
Wireless Network Name (SSID) and Security Settings 11
Setting Up WPA-PSK Security 12
Setting Up WEP Encryption Security 13
Statistics Tab 15
About Tab 16
Advanced Settings 17
Chapter 3 Wireless Network Performance
Optimizing Wireless Performance ....1
Optimizing Your Network Bandwidth 2
Overview of Home and Small Office Networking Technologies .... 3
Assessing Your Speed Requirements .... 4
Chapter 4 Troubleshooting
Troubleshooting Tips .... 1
Ad Hoc Mode Is Not Working Correctly 3
Windows XP Occasional Connection Problems 3
Appendix A Technical Specifications and Factory Default Settings
Technical Specifications .... 1
Factory Default Settings 2
Appendix B Related Documents
About This Manual
The NETGEAR ® RangeMax ™ Dual Band Wireless-N USB Adapter WNDA3100 User Manual describes how to install, configure and troubleshoot the NETGEAR RangeMax Dual Band Wireless-N USB Adapter WNDA3100. The information in this manual is intended for readers with intermediate computer and Internet skills.
Conventions, Formats, and Scope
The conventions, formats, and scope of this manual are described in the following paragraphs:
- Typographical Conventions. This manual uses the following typographical conventions::
| Italic Emphasis, books, CDs | |
| Bold User input, IP addresses, GUI screen text | |
| italic URL links |
- Formats. This manual uses the following formats to highlight special messages:
| Note: This format is used to highlight information of importance or special interest. |
| Tip: This format is used to highlight a procedure that will save time or resources. |
| Warning: Ignoring this type of note may result in a malfunction or damage to the equipment. |
- Scope. This manual is written for the RangeMax Dual Band Wireless-N USB Adapter WNDA3100 according to these specifications:
| Product Version NETGEAR Range | Max Dual Band Wireless-N USB Adapter WNDA3100 |
| Manual Publication Date December | 2007 |
For more information about network, Internet, firewall, and VPN technologies, see the links to the NETGEAR website in Appendix B, “Related Documents.

Note: Product updates are available on the NETGEAR, Inc. website at http://www.netgear.com/support.
How to Use This Manual
The HTML version of this manual includes the following:
- Buttons, and , for browsing forwards or backwards through the manual one page at a time
- A button that displays the table of contents and an button. Double-click on a link in the table of contents or index to navigate directly to where the topic is described in the manual.
- A button to access the full NETGEAR, Inc. online knowledge base for the product model.
- Links to PDF versions of the full manual and individual chapters.
How to Print This Manual
To print this manual, you can choose one of the following options, according to your needs.
- Printing a page from HTML. Each page in the HTML version of the manual is dedicated to a major topic. Select File > Print from the browser menu to print the page contents.
- Printing from PDF. Your computer must have the free Adobe Acrobat reader installed in order to view and print PDF files. The Acrobat reader is available on the Adobe Web site at http://www.adobe.com.
- Printing a PDF chapter. Use the PDF of This Chapter link at the top left of any page.
- Click the PDF of This Chapter link at the top left corner of any page in the chapter you want to print. The PDF version of the chapter you were viewing opens in a browser window.
- Click the print icon in the upper left of your browser window.
- Printing a PDF version of the complete manual. Use the Complete PDF Manual link at the top left corner of any page.
- Click the Complete PDF Manual link at the top left corner of any page in the manual. The PDF version of the complete manual opens in a browser window.
- Click the print icon in the upper left of your browser window.

Tip: If your printer supports printing two pages on a single sheet of paper, you can save paper and printer ink by selecting this feature.
Chapter 1 Basic Setup
This chapter describes how to install your RangeMax Dual Band Wireless-N USB Adapter WNDA3100 and set up basic wireless connectivity on your wireless local area network (WLAN). Advanced wireless network set up is covered in “Network Connections and Wireless Security” in Chapter 2.

Note: Indoors, computers can easily connect to 802.11 wireless networks at distances of several hundred feet. Because walls do not always block wireless signals, others outside your immediate area could access your network. It is important to take steps to secure your network from unauthorized access. The wireless USB adapter provides highly effective security features, which are covered in “Using Wireless Security Features” in Chapter 2. Use the security features appropriate to your needs.
What You Need Before You Begin
You need to verify that your computer meets the minimum system requirements and identify the wireless network settings of the WLAN where you will connect before you can set up your wireless USB adapter and connect.
Verify System Requirements
Before installing the NETGEAR RangeMax Dual Band Wireless-N USB Adapter WNDA3100, please make sure that these minimum requirements have been met:
- You must have a PC with a Pentium 300 MHz or higher compatible processor with an available USB 2.0 or 1.1 port.

Note: The maximum speed of a USB v2.0 port is 480 Mbps. If your computer has a USB v1.1 port, the WNDA3100 is limited to that port's maximum speed, which is 14 Mbps.
- A C D d r i v e .
- 5 Mbytes of free hard disk space.
- Vista, Windows XP Home, or Windows XP Professional. Some versions of Windows ask for the original Windows operating system installation files to complete the installation of the WNDA3100 driver software.

Note: Windows XP users must install SP2 or install the KB822603 hot fix (update), which fixes the USB 2.0 host controller driver. Go to the following link to install the hot fix: http://www.microsoft.com/downloads/details.aspx?displaylang=en&FamilyID=733dd867-56a0-4956-b7fe-e85b688b7f86
Observe Wireless Location and Range Guidelines
For best performance, place the wireless USB adapter at least 4 feet (over 1 meter) away from the wireless router or access point.
Computers can connect over wireless networks indoors at a range that varies significantly based on the physical location of the computer with the wireless USB adapter. For best results, avoid potential sources of interference, such as the following:
• Large metal surfaces
- Microwaves
• 2.4 GHz or 5 GHz cordless phones

Note: If there is 2.4 GHz interference at your location, such as from a cordless phone, you can change the setting to 5 GHz for better wireless throughput. See “Advanced Settings” on page 2-17.
In general, wireless devices can communicate through walls. However, if the walls are constructed with concrete, or have metal, or metal mesh, the effective range decreases if such materials are between the devices.
What Is in the Box
The product package should contain the following items:
• NETGEAR RangeMax Dual Band Wireless-N USB Adapter WNDA3100
- USB cable and adapter cradle
- Installation Guide for the NETGEAR RangeMax™ Dual Band Wireless-N USB Adapter WNDA3100
• Resource CD, including:
– Driver and configuration utility software
- NETGEAR RangeMax Dual Band Wireless-N USB Adapter WNDA3100 User Manual (this document)
- Animated Network Properties Configuration Tutorial
- PC Networking Tutorial
- Warranty and Support information card
If any of the parts are incorrect, missing, or damaged, contact your NETGEAR dealer. Keep the carton, including the original packing materials, in case you need to return the product for repair.
WNDA3100 Default Wireless Settings
If this is a new wireless network installation, use the factory default settings to set up the network and verify wireless connectivity. If this is an addition to an existing wireless network, you must identify the wireless network and wireless security settings that are already defined.
Your RangeMax Dual Band Wireless-N USB Adapter WNDA3100 basic factory default settings are:
• Network Name Service Set Identification (SSID), Any (First available network)

Note: For the RangeMax Dual Band Wireless-N USB Adapter WNDA3100 to communicate with a wireless access point or wireless adapter, all devices must be set up to use the same wireless network name (SSID).
• Network mode (Infrastructure or Ad-hoc), Infrastructure
- Data security WEP, WPA2-PSK, or WPA-PSK encryption, Disabled
Installation
To complete this installation you must:
- Install the WNDA3100 software.
- When prompted, insert the wireless USB adapter and follow the Windows XP Found New Hardware wizard prompts (unless using Vista).
- Set up the wireless USB adapter to connect to your wireless network.
Installing the WNDA3100 Software

Note: Do not connect the wireless USB adapter until you are prompted to do so.
To install the software:
-
Insert the Resource CD. If the Welcome screen does not open, browse the files on the CD, and double-click Autorun.exe.
-
Click Install the Software. The Software Update Check screen displays:

Figure 1-1
-
If you are connected to the Internet, click Check for Updates. If not, you can choose to install from the CD.
-
Follow the onscreen instructions to install the NETGEAR WNDA3100 software.
• For Windows XP, if a Windows logo testing message appears, click Continue Anyway.
- If a message that Windows Vista cannot verify the publisher of this driver displays, click Install this driver software anyway.
- When the NETGEAR Smart Wizard Installation Complete screen displays, click Next.
Connecting the Wireless-N USB Adapter
After you have installed the NETGEAR Smart Wizard, the following screen displays:

Figure 1-2
To connect your wireless USB adapter:
- Locate an available USB port on your computer.
| Note: If you do not have a USB 2.0 port on your computer, the throughput of the WNDA3100 will be limited to the 14 Mbps of the USB 1.1 standard. |
-
Insert the wireless adapter in a USB port on your computer.
-
For best results, put the wireless adapter at least 4 feet (1 meter) from your router.
-
To use the USB cable, connect it to the wireless USB adapter and a USB port. See “Placing the USB Adapter Cradle” on page 1-11.
-
For Windows Vista computers, the adapter and driver are automatically added. Click Next and then go to the following section "Using the Smart Wizard to Set Up Your Wireless-N USB Adapter" on page 1-6. For Windows XP computers, the Found New Hardware Wizard displays.
- Follow the onscreen instructions for the Found New Hardware Wizard.
- When the NETGEAR Smart Wizard screen returns, click Next.
Using the Smart Wizard to Set Up Your Wireless-N USB Adapter
After you have connected the wireless USB adapter, the following screen displays:

Figure 1-3
Windows XP or Vista users can set up the wireless adapter either with the NETGEAR Smart Wizard (recommended) or the Windows configuration utilities.
- NETGEAR Smart Wizard. Reveals more information about each network and makes it easier to troubleshoot network connection problems.
- Windows configuration utilities. See the Windows documentation or the NETGEAR application note at: http://documentation.netgear.com/reference/enu/winzerocfg/index.htm.
To set up your wireless USB adapter with the NETGEAR Smart Wizard:
- Click Next to proceed.
You are prompted to let the wizard help you connect to a network (recommended).

Figure 1-4
2. Click Next to continue.
The Smart Wizard finds the wireless networks in your area, and displays the following screen:
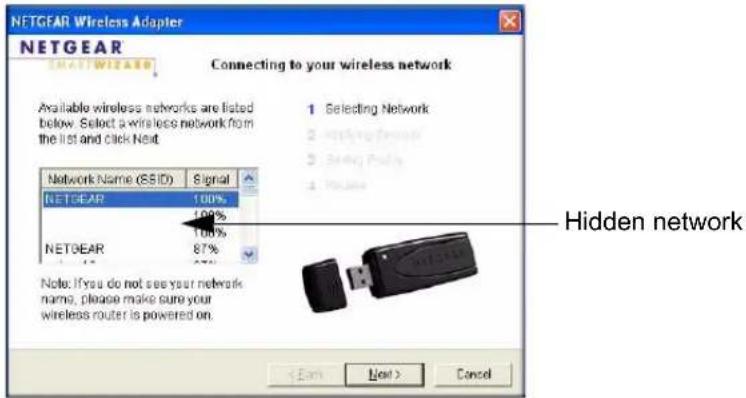
Figure 1-5
| Note: Hidden networks do not broadcast the network name (SSID). These networks are in the drop-down list, but the Network Name (SSID) field is blank. |
-
Select the wireless network from the drop-down list. The wizard records your choice.
If the network uses security, then the Smart Wizard detects it. -
Follow the wizard steps for security (if used) and for saving a profile.
-
After you have reviewed the settings, click Finish. The Settings screen displays:
![NETGEAR WNDA 3100 SMART W/ARD - Wireless Assistant Settings Networks Statistics About NETGEAR® selected Adapter: Profiles New Profile Network Name [SSID] YaBridge Advanced Settings Network Type (Start) Access Point (Infrastructure) Computer-to-computer (Ad Hoc) Enter Ad Hoc Save Profile Digital Profile Security Disable WPA PSK, (TKP) WEP Create in Web Changer Passphone 64 bits Enter Key Manual Key 1 64 bits YeEnage (20.1B-2F-5H-BF-92) Connected to Internet Ch: 40,36 162 Mbps Signal Help End a Network Apply Cancel Close](/content/2026/05/1093247/images/530d0d256dbcae0ed7ca67584d54fe49ff6708c32ecf33bff1104a2391d5ef10.jpg)
Figure 1-6
The icon appears in the system tray and on the desktop. The wizard initiates your wireless connection, which could take up to a minute.
- Use the status bar to verify your wireless connectivity. See "Smart Wizard Status Bar" on page 1-9."
Connecting to Wireless Networks and the Internet

Note: The maximum speed of a USB v2.0 port is 480 Mbps. If your computer has a USB v1.1 port, the WNDA3100 is limited to that port's maximum speed, which is 14 Mbps.
The WNDA3100 has indicators in three locations that show the status of your connection to a wireless network and to the Internet:
- WNDA3100 icon. After you install the WNDA3100 software, the icon appears on the desktop and in the right on the Windows task bar. It is color coded to show the status of the connection.
- Smart Wizard status bar. Clicking on the system tray icon opens the Smart Wizard. The status bar at the bottom of the screen shows details about your wireless and Internet connection. See “Smart Wizard Status Bar
- LED status light. The LED on the wireless USB adapter shows the network connection. Solid indicates a connection. The LED blinks when the wireless USB adapter is looking for a network association and when it is sending or receiving data. See “Wireless-N USB Adapter LED” on page 1-11.
WNDA3100 Icon Colors
The WNDA3100 icon is on the desktop and in the Windows system tray. The system tray is on one end of the taskbar in the Microsoft Windows desktop.
| Color Condition Description | ||
Red The wire | less USB adapterhas no connection to anyother wireless node. | The wireless USB adapter cannot link to any other wirelessnode, or the link is lost. Check your configuration, or trymoving to a location where the wireless signal quality is better. |
Yellow The w | wireless USB adapterhas a connection with anotherwireless node. | The wireless link is weak. Move to a better location, such as closer to the wireless access point. Also, look for possibleinterference such as a 2.4 GHz cordless phone or large metalsurface. |
Green The w | wireless USB adapterhas a connection with anotherwireless node. | The wireless USB adapter has established goodcommunication with an access point, and the signal quality isstrong. |
Smart Wizard Status Bar
Click the icon to open the Smart Wizard so that you can view the status bar. The Smart Wizard Settings tab displays. The status bar is located at the bottom of the Settings tab.
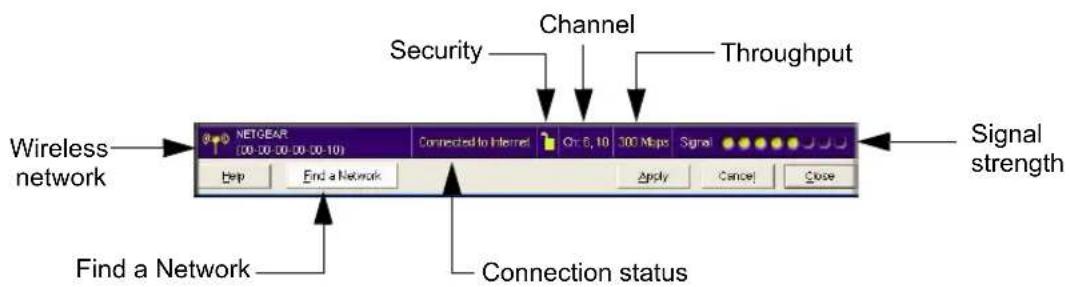
Figure 1-7
The following table describes how to interpret the Smart Wizard status bar.
| Understanding the Status Bar | |
| Wireless network Identifies which wireless network you have joined. | |
| Security • A closed | lock indicates that security is enabled.• An open lock indicates an open network without wireless security. |
| Channel The wireless channel used by the network. If many wireless networks in your area use the same channel, they can interfere with one another. | |
| Throughput | • To optimize wireless throughput, connect to a network with a high-speed router or access point and a high-speed Internet connection.See Chapter 3, “Wireless Network Performance.• If there is wireless interference in the 2.4 GHz range, such as from a cordless phone, use the Advanced Settings to select 5GHz. See “Advanced Settings” on page 2-17.• If your computer has a USB v1.1 port, the wireless USB adapter is limited to that port’s maximum speed, which is 14 Mbps. |
| Signal strength More dots indicates a stronger signal. Usually, you experience higher throughput when the signal is strongest. | |
| Find a Network | Click Find a Network to open the Connection Wizard. |
| Connection status | The status of your network connection.• Connected to Internet. The wireless Internet connection is OK.• Connected to Router. The wireless connection to the router is OK, but the router is not connected to the Internet.169.254.x.x or ____. . . . . . . . . . . . . . . . . . . . . . . . . . . . . . . . . . . . . . . . . . . . . . . . . . . . . . . . . . . . . . . . . . . . . . . . . . . . . . . . . . . . . . . . . . . . . . . . . . . . . |
The connection status is useful in isolating a problem. For example, if you are connected to a router, but not to the Internet, then check the router's Internet connection.
If you right-click the system tray icon, you can disable the Internet notification feature by clearing the check mark enabling notification, as shown in the following figure. If you do so, then only the IP address is shown.
√ Enable "Internet Connected" Notification Exit
Figure 1-8
In Vista, there is one more option: Enable NETGEAR Smart Wizard.

Figure 1-9
If you clear the check mark for Enable NETGEAR Smart Wizard, the NETGEAR Smart Wizard is disabled, and you must set up the wireless adapter with Vista auto-configuration.
Wireless-N USB Adapter LED
The LED on the wireless USB adapter indicates the condition of wireless link.
| Wireless-N USB Adapter LED | Meaning | |
 The LED color changes depending on the type of network connection. Amber indicates 2.4 GHz, and blue indicates 5 GHz. The LED color changes depending on the type of network connection. Amber indicates 2.4 GHz, and blue indicates 5 GHz. | Off | The wireless USB adapter in not plugged in to the USB port.The wireless USB adapter is in power save mode (default from power up or reset). |
| Slow blinking | Alternating amber and blue. The wireless USB adapter is scanning for a network.Amber. The wireless USB adapter is connecting to a network at 2.4 GHz.Blue. The wireless USB adapter is connecting to a network at 5 GHz. | |
| Blinking The wireless USB adapter is connected to a wireless network, and is sending or receiving data. | ||
| Solid The wireless USB adapter isconnected to a wireless network, but it is not sending or receiving data. | ||
Placing the USB Adapter Cradle
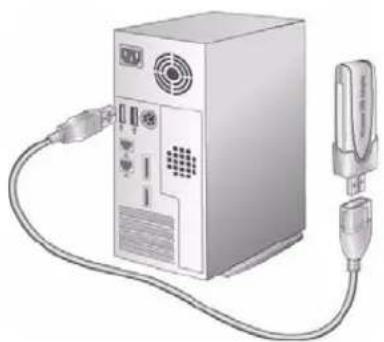
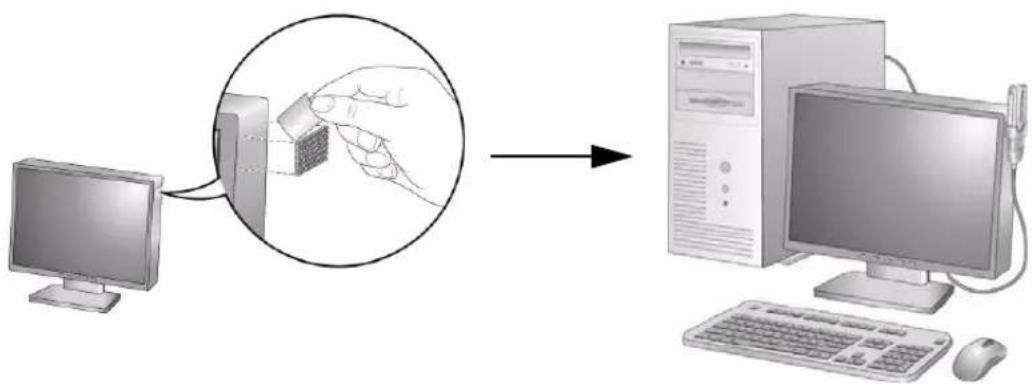
You can attach the wireless USB adapter directly to a USB port on your computer, or use the USB cable to extend the range and obtain better wireless reception.
To use the USB cable, plastic cradle, and loop-and-hook fastener for better USB adapter placement on a computer monitor:
- The wireless USB adapter comes with three black fasteners. Locate the one with a prickly side, and attach it to the plastic cradle on the middle of the outside rear.

natural_image
Hand holding a small object with a rectangular block, no text or symbols visibleFigure 1-10
- Insert the wireless USB adapter in the plastic cradle, and connect the USB cable.
natural_image
Illustration of a computer tower connected to a USB cable, showing ports and connectors (no text or symbols)Figure 1-11
- Place one of the other pieces of loop-and-hook fastener on the side or back of your monitor near the top for better reception. Then join the pieces of the fastener to attach the USB adapter in the plastic cradle to the monitor.
Removing the WNDA3100 Software
You can remove the wireless adapter software in these two ways:
- Select the Windows Start menu > RangeMax Dual Band Wireless-N USB Adapter WNDA3100 program group > uninstall option, and then follow the screen prompts.
- Select Windows Start menu >Control Panel > Add or Remove Program, and then select the RangeMax Dual Band Wireless-N USB Adapter WNDA3100 option, and follow the screen prompts.
Upgrading the WNDA3100 Software
Upgrades may be available at the NETGEAR website. To install an upgrade, follow these steps.
- Write down the settings for any profiles that you want to save. They will not be retained.
- Download the upgrade from the NETGEAR website Support page.
- Remove the WNDA3100 software from your computer.
- Remove the WNDA3100 adapter from your computer, and if prompted restart your computer.
- Run the installer that you downloaded (the file ends in .exe).
- Follow the installer instructions, and if prompted, restart your computer.
Chapter 2
Network Connections and Wireless Security
This chapter explains how to use your Wireless-N USB Adapter to connect to your wireless local area network (WLAN) and how to set up wireless security for the Wireless-N USB Adapter so that it matches the wireless security settings for your network.
If you chose the Windows XP or Windows Vista Zero Configuration utility during installation, and now you want to use the Smart Wizard, you must disable the Windows utility. If you are working with the Vista configuration utility, see the NETGEAR online application note at: http://documentation.netgear.com/reference/enu/winzerocfg/index.htm
Disabling the Windows Zero Configuration Utility
To disable the Windows Zero Configuration utility:
- Attach the wireless adapter to a USB port for your computer.
-
In Windows, select Start > Network Connections.
-
Select Wireless Network Connection, right-click, and then select Properties.

Figure 2-1
- Click the Wireless Networks tab. Then clear the Use Windows to configure my wireless settings check box.
Understanding the Smart Wizard
These instructions explain how to use the NETGEAR WNDA3100 Smart Wizard to change the wireless USB adapter wireless settings.
When you have installed the software from the Resource CD, the icon appears on your desktop and in the Windows system tray. The Windows system tray is located on the Windows taskbar. You can either double-click this icon on the desktop or click it in the system tray at any time, to use the Smart Wizard. This software automatically restarts when you reboot your computer.
The Smart Wizard provides a complete and easy-to-use set of tools to:
- View details about wireless networks in your area.
- Choose the network that you want to use.
- Configure wireless settings for your wireless USB adapter.
- Save your wireless network settings in profiles.
- Remove or reinstall the wireless adapter software.
The following sections . explain how to use the Smart Wizard.
Viewing Wireless Networks in Your Area
You can use the Networks tab to view all available wireless networks in your area. You can also scan to search for wireless networks and refresh the tab.
To view information about wireless networks:
-
Use the icon to open the Smart Wizard.
-
Click the Networks tab to display the following screen:

Figure 2-2
The following buttons are located at the bottom of the Networks tab:
• Help. Display online help.
• Find a Network. View networks and join a network. See “Finding a Network” on page 2-4.
- Connect. Connect to the network that you selected.
- Scan. Check for wireless networks. Clicking Scan refreshes the screen.
- Close. Close the window of the Wizard.
The screen shows the following information for each network scanned:
- Network Name (SSID). The name assigned to a wireless network. This is the same as the SSID or ESSID configuration parameter. Note that as a security measure, some wireless access points do not broadcast their SSID. In such cases, the SSID field is blank even though the rest of the information is still displayed.
- Channel. The channel determines which operating frequency is used. In this column (A) indicates a 5 GHz network, and (G) indicates a 2.4 GHz network.
• N. The access point supports wireless N mode.
• Security. Identifies whether the wireless network uses security settings such as WPA2-PSK, WPA-PSK, or WEP.
• Signal. Identifies the signal strength of the communications. - MAC Address. Identifies the hardware address (MAC address) of the wireless device broadcasting this information.
- Mode. Identifies the type of wireless network — Access Point (Infrastructure) or Computer-to-Computer (Ad Hoc)
Finding a Network
During the WNDA3100 software installation, the Smart Wizard lists the available networks. After installation you can use the Join a Network button on the Network tab at any time to view the available networks and select the one that you want to use.

Note: Make sure that you know the wireless security settings for the network that you want to use. For example, if a network uses WEP, you must know the WEP key in order to connect to it. If you use secure networks frequently, set up profiles for each network with the wireless network and security settings.
To join a network:
- Use the icon to open the Smart Wizard. On the status bar, click Find a Network. The following screen displays:

Figure 2-3
- Select a network from the drop-down list. If you select a hidden network, then you must enter the SSID. Click Next.
- Follow the steps of the wizard to specify the wireless security if used, and to create a profile.
4. Review you settings, and click Finish.
The Smart Wizard initiates your wireless connection. You can use the status bar to verify your network connection. For more information, see “Smart Wizard Status Bar” on page 1-9.
Profiles
The WNDA3100 Smart Wizard uses profiles to store all the settings for a particular wireless network. There are two special profile names: Default and Profile.
- Default. The profile named Default automatically scans for any available network. You cannot change this profile name.
- Profile. If you do not enter a name in the Profile Name field, the name Profile is used to save your settings. If you do this more than once, you are asked if you want to replace the previous settings stored in Profile.
Adding Profiles
You can store multiple profiles and recall the one that matches the network you want to join.
If you use your computer to connect to different wireless networks, you can create a profile for each wireless network. Then, you can easily load the profile that has all the settings that you need to join the network you are using at the time.
There are two types of wireless network profiles that you can set up:
- Access Point (Infrastructure). Connect to an access point or router with the 802.11 infrastructure mode.
- Computer-to-Computer (Ad Hoc). Connect directly to another computer with the 802.11 Ad Hoc mode.
For more information about wireless network modes, see the wireless reference document at: http://documentation.netgear.com/reference/enu/wireless/index.htm.
Setting Up a Profile to Connect to an Access Point or Router
Follow these instructions to set up the RangeMax Dual Band Wireless-N USB Adapter WNDA3100 to connect to a wireless access point or router.
- Use the icon to open the Smart Wizard. The Settings tab displays:
![NETGEAR WNDA 3100 SMART WIZARD - Wireless Assistant Settings Networks Statistics About NETGEAR® selected Adapter: Profiles New Profile Network Name [SSID] YaBridge Advanced Settings Network Type (Start) Access Point (Infrastructure) Computer-to-computer (Ad Hoc) Extend Ad Hoc Save Profits Digital Profits Security Disable WPA PSK, TKIPI WEP Create with Consistors Passphone 64 bits Enter Key Manual Key 1 64 bits YeEnsign (20.1B.2F.84 BF.92) Connected to Internet Ch: 40,36 162 Mbps Signal Help End a Network Apply Cancel Close](/content/2026/05/1093247/images/4523d1c4e4f7d6147fa9a1daf5942b64294284435c8172a94270c5ef7c451a47.jpg)
Figure 2-4
- Enter the network settings.
a. In the Network Type section, make sure that Access Point (Infrastructure) is selected.
b. In the Profile field, type the name of the profile.
c. In the Network Name (SSID) field, select a network or enter the SSID.

Note: You will not get a wireless network connection unless the network SSID matches exactly the SSID used by the access point.
- Save your settings in a Profile.
a. Click Save Profile.
All the configuration settings are saved in this profile.
b. Click Apply, then click Close to exit, or click Cancel to return to the previous settings.
- Verify wireless connectivity to your network.
Use a browser to connect to the Internet, or check for file and printer access on your network. You can check the status bar in the Smart Wizard for the current connection status.

Note: If you cannot connect, see Chapter 4, “Troubleshooting”. For problems with accessing network resources, the Windows client and file and print sharing software might not be installed and configured correctly on your computers. See the link to “Internet Networking and TCP/IP Addressing:” in Appendix B.
Setting up a Computer-to-Computer (Ad Hoc) Profile
The Computer-to-Computer setting uses Ad Hoc mode. Ad Hoc mode is an 802.11 networking framework in which devices or computers communicate directly with each other, without the use of an access point. For example, this mode is used when two Windows computers are configured with file and print sharing enabled and you want to exchange files directly between them.

Note: Ad Hoc mode does not work using DHCP settings. Ad Hoc mode requires either static IP addresses (such as 192.168.0.1) or the IPX protocol. For help setting up static IP addresses, see the PC Networking Tutorial on the Resource CD.
To create an Ad Hoc mode profile:
- Use the icon to open the Smart Wizard. The Settings tab displays:

Figure 2-5
- Enter the network settings.
a. Select Computer-to-Computer (Ad Hoc) for the network type.
b. Select or enter the network name (SSID) for the Ad Hoc network.
c. In the Profile field, type the name of the profile.
d. Click Apply.
- Save your settings in a profile.
a. Click Save Profile, and all the configuration settings are saved in this profile.
b. Click Apply, then click Close to exit the Smart Wizard, or click Cancel to return to the previous settings.
- Configure the computer network settings.
a. Configure each computer with either a static IP address or with the IPX protocol.
b. Restart the computers.
- Verify wireless connectivity between your peer devices with the ping program:
a. On the Windows taskbar, select Start > Run.

Figure 2-6
b. Assuming the target PC is configured with 192.168.0.1 as its IP address, type: ping -t 192.168.0.1 and then click OK.
c. A continuous ping will be sent to the device with the 192.168.0.1 static IP address. The ping response should change to Reply.
Request timed out.
Request timed out.
Reply from 192.168.0.1: bytes=32 time=40ms TTL=127
Reply from 192.168.0.1: bytes=32 time=41ms TTL=127
Reply from 192.168.0.1: bytes=32 time=30ms TTL=127
Figure 2-7
At this point the connection is established.

Note: If you cannot connect, see “Removing the WNDA3100 Software” in Chapter 1. For problems accessing network resources, the Windows client and rile and print sharing software might not be installed or configured correctly on your computers. See the link to “Internet Networking and TCP/IP Addressing:” in Appendix B.
Starting a Computer-to-Computer (Ad Hoc) Network Connection
-
On the Settings tab of the Smart Wizard, select or type the network name (SSID).
-
Select the Computer-to-Computer (Ad Hoc) network type.

Note: for Windows Vista computers, you must have administrator rights. Otherwise, this option is not available for selection.
- Click Initiate Ad Hoc. The Ad Hoc Setting screen displays:

Figure 2-8
-
In the Start Ad Hoc drop-down list, select the wireless standard (802.11a, 802.11b, or 802.11g) for your Ad Hoc computer-to-computer network.
-
In the Channel drop-down list, Automatic should work. If you notice interference problems with another nearby wireless device, select a channel that is not being used by any other wireless networks near your wireless adapter. Use the Networks tab to view the channels in use in your area.
-
Click OK.

Note: The channel number differs depending on the country. The connection speed automatically defaults to the highest speed.
Wireless Security
Many networks use wireless security to encrypt wireless data communications. If you try to connect to a network with wireless security, the Smart Wizard detects it. Before you can use that network, you must set up the WNDA3100 with exactly the same kind of wireless security settings. The main types of wireless security used for home networks are the following:
• Wi-Fi Protected Access 2 Pre-Shared Key (WPA2-PSK)
• Wi-Fi Protected Access Pre-Shared Key (WPA-PSK)
• Wired Equivalent Privacy (WEP)
For more information about wireless security, see the wireless reference document at http://documentation.netgear.com/reference/enu/wireless/index.htm.
In addition to the wireless security features, networks should use LAN network security features such as requiring a user name and password to access the shared resources in the network.
Using Wireless Security Features
You can strengthen the security of your wireless connection by enabling Wired Equivalent Privacy (WEP) encryption of the wireless data communications. Or, you can use WPA-PSK (Wi-Fi Protected Access Pre-Shared Key) encryption. For more information about wireless security, see the link to “Wireless Communications:” in Appendix B.
In addition to the WNDA3100 wireless security features, you should also configure appropriate LAN network security features such as requiring a user name and password to access the shared resources in your network.
Wireless Network Name (SSID) and Security Settings
Print this form, fill in the configuration parameters, and put it in a safe place for possible future reference. For an existing wireless network, the person who set up the network can provide this information.
- Network Name (SSID). The service set Identification (SSID) identifies the wireless local area network. Any (First available network) is the default WNDA3100 wireless network name (SSID). You may customize it using up to 32 alphanumeric characters. Write your customized wireless network name (SSID) on the line below.

Note: The SSID in the wireless access point is the SSID you configure in the wireless USB adapter. For the access point and wireless nodes to communicate with each other, all must be configured with the same SSID.
Wireless network name (SSID): ____
• If WPA2-PSK or WPA-PSK authentication is used:
- Passphrase: ____ These characters are case-sensitive. Enter a word or group of printable characters. When you use WPA-PSK, the other devices in the network cannot connect unless they are set to WPA-PSK as well, and are configured with the correct passphrase.
- If WEP authentication is used:
- WEP encryption key size. Identify one: 64-bit or 128-bit. The encryption key size must match the wireless network settings.
- Data encryption (WEP) keys. There are two methods for creating WEP data encryption keys. Whichever method you use, record the key values in the spaces below.
- Passphrase method: ____ These characters are case-sensitive. Enter a word or group of printable characters and click the Generate Keys button. Not all wireless devices support the passphrase method.
- Manual method. These values are not case sensitive. For 64-bit WEP, enter 10 hex digits (any combination of 0–9 or a–f). For 128-bit WEP, enter 26 hex digits.
Key 1: ____ Key 2: ____
Key 3: ____ Key 4: ____
Setting Up WPA-PSK Security
To configure WPA-PSK security:
- Run the WNDA3100 Smart Wizard.
a. Make sure that the WNDA3100 software is installed and the wireless USB adapter is fully inserted in a USB port in your computer.
b. Use the icon to open the Smart Wizard. The Settings tab displays:
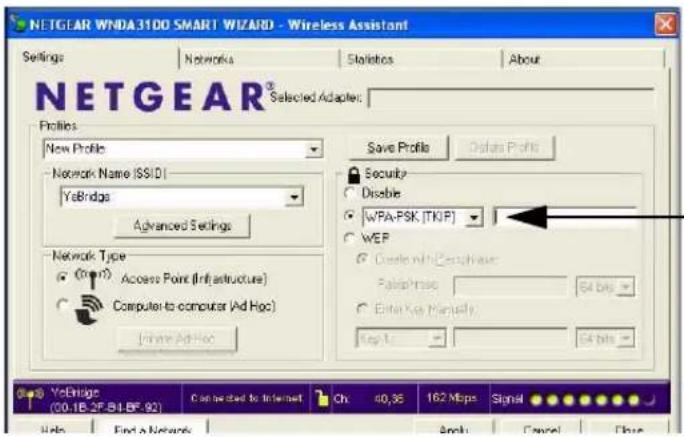
Figure 2-9
- Configure the Security settings.
a. In the Profile field, select the profile, or type in a profile name.
b. In the Network Name (SSID) field, and then select the network, or enter the SSID.

Note: You will not get a wireless network connection unless the network SSID matches exactly what is configured in the access point.
c. In the Security section, select WPA2-PSK [AES], and enter the passphrase.
For more about WPA2-PSK, see the link to "Wireless Communications:" in Appendix B.
- Save your settings in a profile.
a. Click the Save Profile button. All the configuration settings are saved in this profile.
b. Click Apply, and then click Close to exit the Smart Wizard.
Setting Up WEP Encryption Security
Follow the steps below to configure WEP encryption security:
- Run the WNDA3100 Smart Wizard.
a. Make sure that the WNDA3100 software is installed and the wireless USB adapter is connected to the USB port in your computer.
b. Use the icon to open the Smart Wizard. The Settings tab displays:

Figure 2-10
- Configure the Security settings.
a. In the Profile field, select the profile or type in a profile name.
b. In the Network Name (SSID) field, select the network, or enter the SSID.

Note: You will not get a wireless network connection unless the network SSID matches exactly what is configured in the access point.
c. In the Security section, select WEP.
-
Select the WEP encryption strength you will use.
-
64-bit WEP data encryption
• 128-bit WEP data encryption
| Note: Larger encryption keys require more processing and may slow the communications response times. |
- Select Create with Passphrase, and enter the passphrase. The configuration utility automatically generates the WEP keys.
| Note: The characters are case-sensitive. Be sure to use the same passphrase for all the wireless devices in the network. |
If the passphrase method is not available in the other devices, you must manually enter the keys to match exactly what is in the access point and other 802.11b wireless devices.
- Save your settings in a profile.
a. Click the Save Profile button. All the configuration settings are saved in this profile.
b. Click Apply.
c. Click Close to exit the configuration utility.
Statistics Tab
The Statistics tab provides real time and historical trend information about the data traffic and performance of your wireless adapter.

Figure 2-11
- Transmit/Receive Performance (%). A real-time graph identities the total, receive, and transmit utilization as a percentage the total possible.
- Transmit, Receive, and Total (TxRx). Radio buttons let you select whether to display the transmit performance, the receive performance, or both in the same graph.
- Transmit Statistics. Identifies transmit megabits per second (Mbps), transmit packets per second (Tx Packets/s), total transmitted packets, and transmit errors.
- Receive Statistics. Identifies receive megabits per second (Mbps), receive packets per second (Rx Packets/s), total received packets, and reception errors.
About Tab
The About tab displays the current version information.

Figure 2-12
The following information is displayed in the About tab:
- Regional Domain. This is the region setting for the wireless adapter. The approved channels for the region are automatically scanned. Governments regulate the channels used for wireless transmission. Operating the wireless adapter in a different region might violate local laws.
- Driver Version. The wireless adapter driver version.
• Hardware Version. The hardware version of the wireless USB adapter. - Driver Date. The wireless adapter driver release date.
- MAC Address. The MAC address of the adapter. The Media Access Control address is a unique 48-bit hardware address assigned to every network interface card. Some wireless networks restrict access based on a list of known MAC addresses. If you are communicating with such a network, you must provide the address shown here to the network administrator before you are allowed to connect. Restricting access by MAC address adds an obstacle against unwanted access to your network. However, unless you use data encryption security, the data broadcast over the wireless link is fully exposed.
- IP Address. The IP address assigned to this adapter.
• Smart Wireless Utility. The version and release date of the Smart Wizard.
Advanced Settings
You can use the Advanced Settings screen to configure the preamble (GHz) that the adapter uses. The available settings are Auto, 2.4 GHz, and 5 GHz. You can use the 5GHz range to avoid interference in the 2.4GHz range. The 2.4GHz range is commonly used by cordless telephones.

Note: The default settings for the Fragmentation Threshold field and RTS/CTS Threshold field usually work fine. Do not change them unless you have a specific reason to do so.
By changing the preamble setting, you have the option to connect to the following types of wireless networks.
- 2.4 GHz + 5GHz. Connect to both 2.4GHz and 5GHz access points, up to 300 Mbps.
- 2.4 GHz only. Connect only to 2.4GHz access points, up to 300 Mpbs.
- 5 GHz only. Connect only to 5 GHz access points, up to 300 Mpbs.
• 2.4 GHz. Connect to 802.11b/g access points, up to 54 Mbps. - 5 GHz. Connect to 802.11a access points, up to 54 Mbps.
To change the preamble (GHz) setting:
- On the Settings tab, click the Advanced Settings button to display the following screen.:

Figure 2-13

Note: for Windows Vista computers, you must have administrator rights. Otherwise, this option is not available for selection.
- In the Advanced section of the screen, select the setting that you want from the drop-down list.
Changing the setting in the Preamble field affects which options are available in the Wireless Mode section of this screen. You can change the preamble for better throughput if you experience interference, such as from a cordless telephone. Many cordless phones use 2.4 GHz, but some use 5 GHz or 6 GHz.
• Auto. Up to 300 Mbps (2.4 GHz and 5 GHz).
• 2.4 GHz. Use a 2.4 GHz preamble.
- Long. Use a long preamble for 5 GHz networks.
- Click OK.
Chapter 3 Wireless Network Performance
This chapter explains how to use your RangeMax Dual Band Wireless-N USB Adapter WNDA3100 to connect to your wireless local area network (WLAN) and how to set up wireless security for the wireless USB adapter so that it matches the wireless security settings for your network.
Optimizing Wireless Performance
The speed and operating distance or range of your wireless connection can vary significantly based on the location of the wireless router. You should choose a location for your router that will maximize the network speed.
The following list describes how to optimize wireless router performance.
- Identify critical wireless links.
If your network has several wireless devices, decide which wireless devices need the highest data rate, and locate the router near them. Many wireless products have automatic data-rate fallback, which allows increased distances without losing connectivity. This also means that devices that are farther away mighty be slower. Therefore, the most critical links in your network are those where the traffic is high and the distances are great. Optimize those first.
- Choose placement carefully. For best results, place your router:
- Near the center of the area in which your computers will operate.
- In an elevated location such as a high shelf where the wirelessly connected computers have line-of-sight access (even if through walls).
- Avoid obstacles to wireless signals.
- Keep wireless devices at least two feet from large metal fixtures such as file cabinets, refrigerators, pipes, metal ceilings, reinforced concrete, and metal partitions.
- Keep the devices away from large amounts of water such as fish tanks and water coolers.
- Reduce interference.
Avoid windows unless communicating between buildings.
Place wireless devices away from various electromagnetic noise sources, especially those in the 2400–2500 MHz frequency band. Common noise-creating sources are:
- Computers and fax machines (no closer than 1 foot)
- Copying machines, elevators, and cell phones (no closer than 6 feet)
- Microwave ovens (no closer than 10 feet)
- Choose your settings.
- Use a scanning utility to determine what other wireless networks are operating nearby, and choose an unused channel.
- Turn off SSID Broadcast, and change the default SSID. Other nearby devices might automatically try to connect to your network several times a second, which can cause significant performance reduction.
Optimizing Your Network Bandwidth
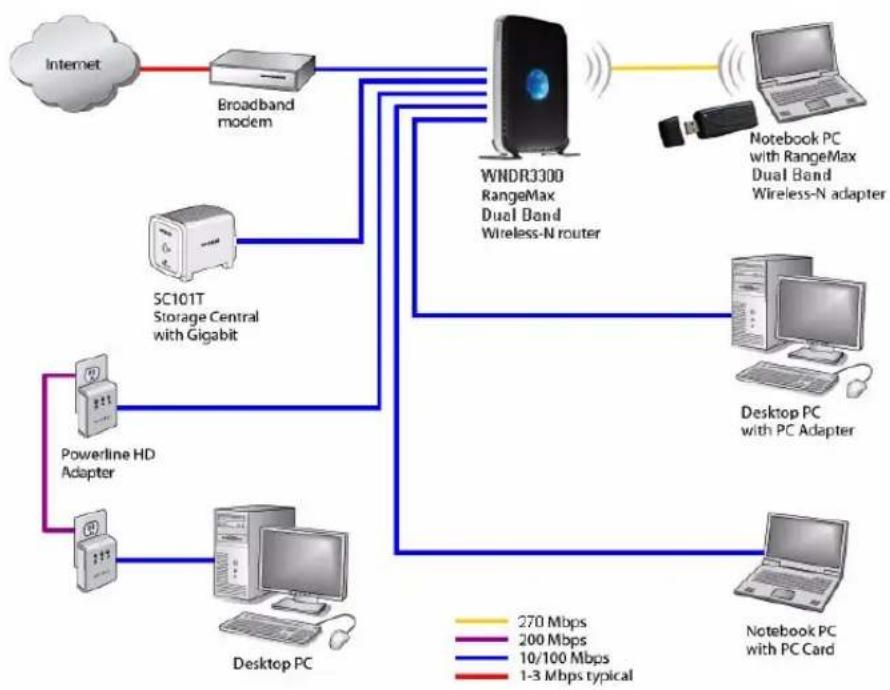
The speed of network connections depends on the type of equipment that you use. Try to use high-speed technologies for network connections with the heaviest traffic to avoid lower-speed bottlenecks in the path. The following figure shows a home network that includes many different connection speeds.
flowchart
graph TD
    A["Internet"] --> B["Broadband modem"]
    B --> C["5C101T Storage Central with Gigabit"]
    C --> D["Powerline HD Adapter"]
    D --> E["Desktop PC"]
    B --> F["WENDR3300 RangeMax Dual Band Wireless-N router"]
    F --> G["Notebook PC with RangeMax Dual Band Wireless-N adapter"]
    F --> H["Desktop PC with PC Adapter"]
    H --> I["Notebook PC with PC Card"]
    style A fill:#f9f,stroke:#333
    style B fill:#ccf,stroke:#333
    style C fill:#cfc,stroke:#333
    style D fill:#fcc,stroke:#333
    style E fill:#cff,stroke:#333
    style F fill:#ffc,stroke:#333
    style G fill:#fcc,stroke:#333
    style H fill:#cff,stroke:#333
    style I fill:#fcc,stroke:#333
Figure 3-1
In the network shown in the previous figure, the two PCs with gigabit (1000 Mbps) Ethernet adapters have a gigabit connection through the router to the storage server. With a high-speed router this connection allows for extremely fast backups or quick access to large files on the server. The PC connected through a pair of Powerline HD adapters is limited to the 200 Mbps speed of the Powerline HD connection. Although any of the links in this example would be sufficient for high-traffic applications such as streaming HD video, the use of older devices such as 10 Mbps Ethernet or 802.11b wireless would create a significant bottleneck.
In planning your network, think about which tasks will have the heaviest traffic flow between them. Examples are:
- A media center in one room streaming high-definition video from a server in another room
- A storage device that is used for backing up your computers
Overview of Home and Small Office Networking Technologies
Common connection types and their speed and security considerations are:
- Broadband Internet
Your Internet connection speed is determined by your modem type, such as ADSL or cable modem, as well as the connection speed of the sites to which you connect, and general Internet traffic. ADSL and cable modem connections are asymmetrical, meaning they have a lower data rate to the Internet (upstream) than from the Internet (downstream). Keep in mind that when you connect to someone else who also has an asymmetrical connection, the data rate between your sites is limited by each side's upstream data rate. A typical residential ADSL or cable modem connection provides a downstream throughput of about 1 to 3 megabits per second (Mbps). Newer technologies such as ADSL2+ and Fiber to the Home (FTTH) 1 increase the connection speed to tens of Mbps.
- Wireless
A high-speed wireless router can provide a wireless data throughput of up to 300 Mbps using technology called multiple-input multiple-output (MIMO), in which multiple antennas transmit multiple streams of data. The use of multiple antennas also provides excellent range and coverage. With the introduction of the newer WPA and WPA2 encryption and authentication protocols, wireless security is extremely strong.
To get the best performance, use newer adapters such as RangeMax adapters for your computers. A high-speed router might be compatible with older 802.11b and 802.11g adapters, but the use of these older wireless technologies in your network can result in lower throughput overall (typically less than 10 Mbps for 802.11b and less than 40 Mbps for 802.11g). In addition, many older wireless products do not support the latest security protocols, WPA and WPA2.
- Powerline
For connecting rooms or floors that are blocked by obstructions or are distant vertically, consider networking over your building's AC wiring. NETGEAR's Powerline HD family of products delivers up to 200 Mbps to any outlet, while the older-generation XE family of products delivers 14 Mbps or 85 Mbps. Data transmissions are encrypted for security, and you can configure an individual network password to prevent neighbors from connecting.
The Powerline HD family of products can coexist on the same network with older-generation XE family products or HomePlug 1.0 products, but they are not interoperable with these older products.
- Wired Ethernet
As Gigabit Ethernet ports become common on newer computers, wired Ethernet remains a good choice for speed, economy, and security. Gigabit Ethernet can extend up to 100 meters with twisted-pair wiring of CAT-5e or better. A wired connection is not susceptible to interference, and eavesdropping would require a physical connection to your network.

Note: Actual data throughput will vary. Network conditions and environmental factors, including volume of network traffic, building materials and construction, and network overhead, can lower actual data throughput rate.
Assessing Your Speed Requirements
Because your Internet connection is likely to operate at a much lower speed than your local network, faster local networking technologies might not improve your Internet experience. However, many emerging home applications require high data rates. For example:
- Streaming HD video requires 10 to 30 Mbps per stream. Because latency and packet loss can disrupt your video, plan to provide at least twice the capacity you need.
- Streaming MP3 audio requires less than 1 Mbps per stream and does not strain most modern networks. Like video, however, streaming audio is also sensitive to latency and packet loss, so a congested network or a noisy link can cause problems.
- Backing up computers over the network has become popular due to the availability of inexpensive mass storage. Table 3-1 shows the time to transfer 1 gigabyte (1 GB) of data using various networking technologies.
Table 3-1. Theoretical Transfer Time for 1 Gigabyte
| Network Connection Theoretical Raw Transfer Time | |
| Gigabit Wired Ethernet 8 seconds | |
| RangeMax Dual Band Wireless-N 26 seconds | |
| Powerline HD 40 seconds | |
| 100 Mbps Wired Ethernet 80 seconds | |
| 802.11g wireless 150 seconds | |
| 802.11b wireless 700 seconds | |
| 10 Mbps Wired Ethernet 800 seconds | |
| Cable Modem (3 Mbps) 2700 seconds | |
| Analog Modem (56 kbps) | 144,000 seconds (40 hours) |
Chapter 4 Troubleshooting
This chapter provides information about troubleshooting your RangeMax Dual Band Wireless-N USB Adapter WNDA3100. For information about connecting to wireless networks and the Internet, see “Basic Setup” in Chapter 1.
Troubleshooting Tips
Use the following information to solve common problems you may encounter. Also, refer to the knowledge base on the NETGEAR website at http://www.netgear.com/support/main.asp.
Table 4-1. Troubleshooting Tips
| Problem Action | |
| The LED is not lit. The WNDA3100 is not connected to the USB port correctly or the WNDA3100 software is not loaded.Remove and reinsert the WNDA3100.Check the Windows device manager to see if the WNDA3100 is recognized and enabled. Reload the WNDA3100 software, if necessary.Try to install the WNDA3100 in a different USB slot on your system if one is available. | |
| The LED blinks, but the WNDA3100 is not connected to an access point. | The WNDA3100 is trying to connect to an access point, but cannot connect.The access point might not be powered on.The access point and the WNDA3100 are not configured with the same wireless parameters. Check the SSID and wireless security settings. |
| I cannot connect to an access point.The access point is available, and there is good signal strength. | If the access point is WPA-PSK protected, you need the correct WPA-PSK passphrase. Otherwise, the WNDA3100 is still connected to the previous access point, and you cannot change to the WPA-PSK access point.If the access point is WEP protected (either 64- or 128- bit encryption), you are prompted to enter the WEP encryption security information. |
| Throughput is only 54 Mbps or only 14 Mbps. | The RangeMax Dual Band Wireless-N USB Adapter WNDA3100 can operate at faster speeds.• At 54 Mbps you are probably connecting to a standard 802.11g network. See Chapter 3, “Wireless Network Performance”.• If you do not have a USB 2.0 port on your PC, the throughput is limited to the 14 Mbps of the USB 1.1 standard. |
| The Smart Wizard keeps asking me to save settings. | If you change the settings, the Smart Wizard offers you the chance to save the changes. To avoid this prompt, simply click Apply before you close the Smart Wizard. |
| Two WNDA3100 icons are in the system tray. | You have an older software version installed on your system and it needs to be removed. See “Removing the WNDA3100 Software” in Chapter 1 or “Upgrading the WNDA3100 Software” in Chapter 1. |
| I can connect to the access point, but not to the other computers on the network or to the Internet. | This could be a physical layer problem or a network configuration problem.1. Check to make sure that the access point is physically connected to the Ethernet network.2. Make sure that the IP addresses and the Windows networking parameters are all configured correctly. See the link to “Internet Networking and TCP/IP Addressing:” in Chapter B.3. Restart the cable or DSL modem, router, access point, and computer. |
| Ho can I view the IP address for the wireless USB adapter? | To view the RangeMax Dual Band Wireless-N USB Adapter WNDA3100 IP address, click the WNDA3100 icon to open the Smart Wizard. Then check the IP address in the About page. |
| No IP address is assigned to the RangeMax Dual Band Wireless-N USB Adapter WNDA3100. | This can occur if you upgraded your RangeMax Dual Band Wireless-N USB Adapter WNDA3100 software and did not reboot your system.• Either restart your computer, or connect to a different access point.• It does not usually help to shut down the Smart Wizard or disable or enable the wireless USB adapter. |
Ad Hoc Mode Is Not Working Correctly
You must click the Initiate Ad Hoc button before you click Apply. Here is how you start an Ad Hoc network:
- Fill in the Network Name (SSID) field.
- Select the Computer-to-Computer (Ad Hoc) network type.
- Click Initiate Ad Hoc.
- Accept the default settings, or make your changes and click OK.
- Click Apply.

Note: Be sure that all computers in your Ad Hoc network are configured with static IP addresses in the same subnet.
Windows XP Occasional Connection Problems
Windows XP users who apply Windows XP Hotfix (SP2) Q815485 from the Windows XP Update Service might not be able to connect to the Internet, might have dropped wireless connections, or both when using the RangeMax Dual Band Wireless-N USB Adapter WNDA3100. You can delete this Hotfix from the Add or Remove Programs utility in the Control Panel.
To delete Windows XP Hotfix (SP2) Q815485:
- Select Start > Control Panel > Add/Remove Programs.
-
Select Windows XP Hotfix (SP2) Q815485, and then click Remove.
-
You might receive an error message that states that some program on the computer may not work correctly if the update is removed.
• You can ignore this error message, and then click Yes to remove the update. -
Restart your computer, and rerun the Smart Display Setup Wizard.
This should solve your connection issue. You can restore this hotfix by following this link: http://microsoft.com/downloads/details.aspx?FamilyId=009D8425-CE2B-47A4-ABEC-274845DC9E91&displaylang=en
Appendix A Technical Specifications and Factory Default Settings
Technical Specifications
The following table provides technical specifications for the wireless USB adapter.
| Antenna 2 integrated internal wireless antennas | ||
| Standards | 802.11a, 802.11n draft 2.0, 802.11g, or 802.11b | |
| Radio Data Rate 1, 2, 5.5, 6, 9, (Auto Rate Sensing) | 11, 12, 18, 24, 36, 48, 54, 08, 140, 246, and 300 Mbps | |
| Frequency 2.4 GHz to 2.5 GHz | CCK and OFDM Modulation); 5 GHz | |
| Power | 5V Bus powered | |
| Emissions FCC, CE | ||
| Bus interface USB 2.0 | ||
| Provided drivers Microsoft Vista, Windows XP | ||
| Operating Environment Operating temperature: 0 to 40°C | ||
| Encryption 40-bit (also called 64-bit) and 128-bit WEP data encryption, and WPA-PSK | ||
| Warranty Limited 1-year warranty | ||
Factory Default Settings
The following table lists the default settings of your wireless USB adapter.
| Feature Description | ||
| Smart Wizard Enabled | ||
| Wireless | ||
| Wireless Communication Enabled | ||
| Wireless Network Name (SSID) Any (will connect to first wireless network that responds) | ||
| Security Disabled | ||
| Network Type Infrastructure | ||
| Transmission Speed Auto | a | |
| Country/Region United States (varies by region) | ||
| Operating Mode 802.11a, 802.11n, 802.11g, 802.11b | ||
| Data Rate | Up to 300 Mbps | |
a. Maximum wireless signal rate (IEEE Standard 802.11). Actual throughput will vary. Network conditions and environmental factors, including volume of network traffic, building materials and construction, and network overhead, lower actual data throughput rate.
Appendix B Related Documents
This appendix provides links to reference documents you can use to gain a more complete understanding of the technologies used in your NETGEAR product.
| Document | Link |
| Windows XP and Vista Wireless Configuration Utilities Application Note | http://documentation.netgear.com/reference/enu/winzerocfg/index.htm |
| Internet Networking and TCP/IP Addressing: | http://documentation.netgear.com/reference/enu/tcpip/index.htm |
| Wireless Communications: | http://documentation.netgear.com/reference/enu/wireless/index.htm |
| Preparing a Computer for Network Access: | http://documentation.netgear.com/reference/enu/wsdhcp/index.htm |
| Virtual Private Networking (VPN): | http://documentation.netgear.com/reference/enu/vpn/index.htm |
| Glossary: | http://documentation.netgear.com/reference/enu/glossary/index.htm |
- NETGEAR RangeMax Dual Band Wireless-N USB Adapter WNDA3100 User Manual
- NETGEAR®
- Technical Support
- Trademarks
- Statement of Conditions
- Maximum Wireless Signal Rate Derived from IEEE Standard 802.11 Specifications
- Safety and Regulatory Notices
- FCC Statement
- FCC RF Radiation Exposure and SAR Statements
- SAR Statement
- RF Exposure Information
- Canadian Department of Communications Industry Canada (IC) Notice
- Europe - EU Declaration of Conformity
- Product and Publication Details
- Contents
- About This Manual
- Chapter 1
- Basic Setup
- Chapter 2
- Network Connections and Wireless Security
- Chapter 3 Wireless Network Performance
- Chapter 4 Troubleshooting
- Appendix A Technical Specifications and Factory Default Settings
- Appendix B Related Documents
- Conventions, Formats, and Scope
- How to Use This Manual
- How to Print This Manual
- Chapter 1 Basic Setup
- What You Need Before You Begin
- Verify System Requirements
- Observe Wireless Location and Range Guidelines
- What Is in the Box
- WNDA3100 Default Wireless Settings
- Installation
- Installing the WNDA3100 Software
- Connecting the Wireless-N USB Adapter
- Using the Smart Wizard to Set Up Your Wireless-N USB Adapter
- Click Next to continue.
- Connecting to Wireless Networks and the Internet
- WNDA3100 Icon Colors
- Smart Wizard Status Bar
- Wireless-N USB Adapter LED
- Placing the USB Adapter Cradle
- Removing the WNDA3100 Software
- Upgrading the WNDA3100 Software
- Disabling the Windows Zero Configuration Utility
- Understanding the Smart Wizard
- Viewing Wireless Networks in Your Area
- Finding a Network
- To join a network:
- Review you settings, and click Finish.
- Profiles
- Adding Profiles
- Setting Up a Profile to Connect to an Access Point or Router
- Setting up a Computer-to-Computer (Ad Hoc) Profile
- Starting a Computer-to-Computer (Ad Hoc) Network Connection
- Wireless Security
- Using Wireless Security Features
- Wireless Network Name (SSID) and Security Settings
- Setting Up WPA-PSK Security
- Setting Up WEP Encryption Security
- Statistics Tab
- About Tab
- Advanced Settings
- Optimizing Wireless Performance
- Optimizing Your Network Bandwidth
- Overview of Home and Small Office Networking Technologies
- - Broadband Internet
- - Wireless
- - Powerline
- - Wired Ethernet
- Assessing Your Speed Requirements
- Troubleshooting Tips
- Ad Hoc Mode Is Not Working Correctly
- Windows XP Occasional Connection Problems
- Technical Specifications
- Factory Default Settings
Brand : NETGEAR
Model : RangeMax WNDA3100
Category : Wi-Fi USB Key