TFTV1920D - Television Palsonic - Free user manual and instructions
Find the device manual for free TFTV1920D Palsonic in PDF.


| Product Type | LCD TV |
| Brand | Palsonic |
| Model | TFTV1920D |
| Screen Size | 19 inches (48 cm) |
| Display Resolution | 1366 x 768 pixels |
| Aspect Ratio | 16:9 |
| Brightness | 250 cd/m² |
| Contrast Ratio | 1000:1 |
| Viewing Angle | 170° (H) / 170° (V) |
| Audio Output | 2 x 3W speakers |
| Video Inputs | HDMI, VGA, Composite, USB |
| Power Consumption | ≤35W (typical) |
| Standby Power | <1W |
| Dimensions (with stand) | 450 x 340 x 170 mm |
| Weight | 3.5 kg |
| Remote Control | Included |
| Wall Mount Pattern | VESA 100x100 mm |
| Power Supply | AC 100-240V, 50/60Hz |
Frequently Asked Questions - TFTV1920D Palsonic
User questions about TFTV1920D Palsonic
0 question about this device. Answer the ones you know or ask your own.
Ask a new question about this device
Download the instructions for your Television in PDF format for free! Find your manual TFTV1920D - Palsonic and take your electronic device back in hand. On this page are published all the documents necessary for the use of your device. TFTV1920D by Palsonic.
USER MANUAL TFTV1920D Palsonic
natural_image
Front view of a black CRT television monitor with 'Palsonic' branding on the screen (no additional text or symbols visible)

Table Of Contents
Important Safety Instructions 1
Characteristic Features 3
Disc Information 4
Front and Right Side Panel 5
Left Side Panel 7
Remote Control 8
System Connections 11
Connecting to Power Supply 11
Connecting to External AV Signal Source 11
Connecting to External AV Signal Source (YPbPr) 12
Connecting to External AV Input Device (AV Output) 12
Connecting to PC 13
Connecting to Earphone 13
Connecting to TV Antenna 14
TV Function 15
Preparations 15
Image Setting 15
Audio Setting 18
Setup Setting 19
NICAM Function 23
DVD Playback Operation 24
DVD System Setup 29
USB and SD/MS/MMC Card Function 30
Troubleshooting 36
Specifications 37


The lightning flash with arrowhead symbol, within an equilateral triangle, is intended to alert the user to the presence of uninsulated “Dangerous Voltage” within the product’s enclosure that may be of sufficient magnitude to constitute a risk of electric shock to persons.

The exclamation point within an equilateral triangle is intended to alert the user to the presence of important operating and maintenance (servicing) instructions in the literature accompanying the appliance.

CAUTION: Laser radiation when open. Do note stare into beam.
CAUTION: USE OF ANY CONTROLS, ADJUSTMENTS, OR PROCEDURES OTHER THAN THOSE SPECIFIED HEREIN MAY RESULT IN HAZARDOUS RADIATION EXPOSURE.
CAUTION
- The product contains a low-power laser device. In order to ensure the safety of the laser device, do not remove any cover and attempt to repair the unit. If any service is needed, please contact the distributor or its authorised service centre.
- To reduce the risk of electric shock, do not remove the cover (or back). No user-serviceable parts inside. Refer servicing to qualified service personnel. Unplug the product from the wall outlet before servicing or when it is unused for a long period of time.
- The manufacturer should not hold responsibility for the damage caused by any substitutions and modifications of the product without authorisation from the manufacturer or authorised unit.
WARNING
The apparatus shall not be exposed to dripping or splashing and that no objects filled with liquids, such as vases, shall be placed on the apparatus.
Copyright Protection
The product incorporates copyright protection technology that is protected by U.S. patents and other intellectual property rights. Use of this copyright protection technology must be authorised by Macrovision, and is intended for home and other limited viewing uses only unless otherwise authorised by Macrovision, Reverse engineering or disassembly is prohibited.
Note:
- Read these instructions.
- Keep these instructions.
- Heed all warnings.
- Follow all instructions.
-
Do not use this apparatus near water.
-
Clean only with a dry cloth.
-
Do not block any ventilation openings. Maintain well ventilated conditions around the product. Do not put product on bed, sofa or anything that blocks ventilation. Install in according to the manufacturer's instructions.
-
Do not install near any heat sources such as radiators, heat registers, stoves, or other apparatus (including amplifiers) that produce heat.
-
Read, heed and follow all instructions to ensure correct and safe installation and inter-connection of the apparatus.
-
The apparatus shall not be exposed to dripping or splashing and no objects filled with liquids, such as vases, shall be placed on the apparatus.
-
The mains socket outlet shall be installed near the apparatus and the mains plug shall remain readily operable.
-
Protect the power cord from being walked on or pinched particularly at plugs, convenience receptacles, and the point where they exit from the apparatus.
-
Only use attachments/accessories specified by the manufacturer.
-
Use only with the cart, stand, tripod, bracket, or table specified by the manufacturer, or sold with the apparatus. When a cart is used, use caution when moving the cart/apparatus combination to avoid injury from tip-over.
-
Unplug this apparatus during lightning storms or when unused for long periods of time.
-
Refer all servicing to qualified service personnel. Servicing is required when the apparatus has been damaged in any way, such as power-supply cord or plug is damaged, liquid has been spilled or objects have fallen into the apparatus, the apparatus has been exposed to rain or moisture, does not operate normally, or has been dropped.
-
The apparatus shall be connected to a mains socket outlet with a protective earthing connection.
IMPORTANT FOR LASER PRODUCTS
1. CLASS 1 LASER PRODUCT
- DANGER: Visible laser radiation when open and interlock failed or defeated. Avoid direct exposure to beam.
- CAUTION: Do not open the top cover. There are no user serviceable parts inside the unit. Leave all servicing to qualified service personnel.
Note: Do not touch the colour TFT LCD screen by hand directly.
This product incorporates DVD player, LCD display and TV receiver in one system.
Multiple Mode
TV mode
CVBS mode
S-VIDEO mode
COMPOSITE mode
VGA mode
DVD mode
High Quality Property
High Resolution
Adopt an MPEG2 decoding format to achieve horizontal resolution more than 500 lines.
LCD (Liquid Crystal Display)
Designed with 19" colour TFT liquid crystal display clearly shows the data.
Stereo Amplifier
Built-in two speakers provide high quality sound.
AV and VGA Input
Can be connected to external audio and video signal source and PC.
Special Function
Support sleep time setting function and favourite channel setting function, etc.
Multi Audio and Multi-video modes
Support multi-audio and multi-video modes, provides more selecting.
USB and CARD PORTS
Designed with USB an SD/MS/MMC card pot, can be connected to USB device or SD/MS/MMC.
Auto TV Searching Function
Can be connected to the TV antenna, supports Auto and manual TV programs searching function.
NICAM Function
Supports the NICAM function. According to the broadcasting programs, you can choose the corresponding soundtrack
Advanced Playing Features
Compatibility
DVD, CD, and JPEG discs compatible.
All Playback Functions
Fast forward and reverse, slow playback and repeat playback
Special Playback
Support multi-angle, multi-language and multi-subtitle playback.
NOTE: It is normal for a TFT screen to experience some light or dark spots appearing on the LCD screen.
Discs Formats Supported By This Player
| DISC LOGO CONTENTS SIZE MAXIMUM TIME | ||||
| DVD |  | Audio+Video(active picture) | 12cm | 133min(SS-SL) |
| 242min(SS-DL) | ||||
| 266min(DS-SL) | ||||
| 484min(DS-DL) | ||||
| CD |  | Audio 12cm 74min | ||
| JPEG Still | high resolution 12cm | |||
◆ The operating method of some DVD discs is specified by the software maker. Please refer to the instruction manual of the disc.
About Disc Terms
Title
Generally, pictures or music compressed on a DVD are divided into several sections, "title".
Chapter
The smaller section unit of picture or music in a DVD under the title, usually one title is comprised of one or more chapters and each of them is numbered for easy searching. But some discs may not have a recording chapter.
Track
A segment of picture or music on a CD. Each track is numbered for searching.

- 19" colour TFT screen
19" colour TFT screen clearly show the data.
- SOURCE button
Press to select mode among TV, CVBS, S-VIDEO, COMPONENT, VGA and DVD.
In setup menu, the same function as ENTER button.
- MENU button
Press to enter or return to the previous setup menu.
- CH ▲/▼ button
In the TV mode, press to select channels.
In setup menu, the same function as ▲/▼ direction buttons.
- VOL ▲ /▼ button
In the TV mode, press to decrease or increase the volume.
In setup menu, the same function as ◀ / ▶ direction buttons.
- ▶ PLAY button
Press to play the disc in DVD mode.
- ■ STOP button
Press to stop disc playback in DVD mode.

- Eject button
Press to eject the disc out in DVD mode.
- Power button
Press to enter or exit the standby mode.
- SD/MS/MMC Card Port
Insert the SD, MS or MMC card into the port.
- Disc Tray Slot
Used to load disc.
- Earphone Jack
When connected to earphone, the internal speakers will automatically turn off.
- USB Connecting Port
Connecting to the USB device.
- Remote Sensor
Remote sensor window for the remote control.
- Power Indicator
In normal playback status, it is blue; in standby mode, it turns red.
- Speakers
Two speakers output high quality stereo sound.

- Y/Pb/Pr Input Jack
Connected to the Y/Pb/Pr input in COMPONENT mode.
- Y/Pb/Pr L/R Audio Input Jack
Connected to the L/R audio input in COMPONENT mode.
- Composite Audio/Video Output Jack
In the CVBS mode, connected to output the Audio/Video signals.
- S-VIDEO and CVBS Audio/Video Input Jack
Connected to the S-VIDEO input in S-VIDEO mode or CVBS input in the CVBS mode. The L/R audio input jacks can be used in the both S-VIDEO and CVBS modes.
- TV Signal Input Jack
Connected for the external TV signal input.
- DC 12V Input Jack
Connect the power adaptor or the car adaptor.
- VGA Input Jack
Connected to the VGA output jack on a personal computer.
- PC AUDIO Input Jack
Connected to the PC audio output jack.
Preparation of Remote Control
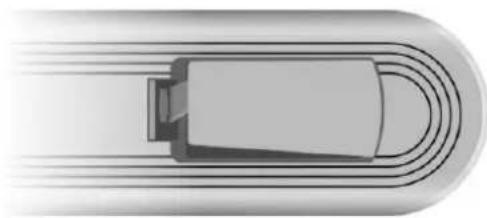
Softly push the back cover to open the battery compartment.
natural_image
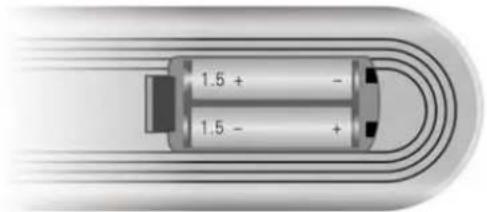
Diagram of a U-shaped object with motion lines indicating flow or motion (no text or symbols)Insert two batteries 1.5V, size AAA), please make sure the polarity matches the marks inside the compartment.
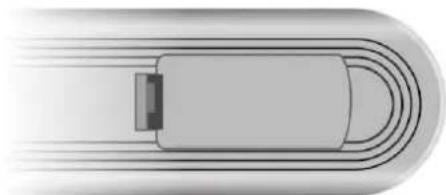
Softly press the back cover to close it.
natural_image
Diagram of a U-shaped object with curved lines indicating motion or flow, no text or symbols present● Under normal use the battery will last for six months.
● Take out battery when the remote is not in use for a long time.
Using of Remote control
Point the remote control unit from no more than about 7m from the remote control sensor and within about 60 degrees of the front of the unit.

- The operating distance may vary depending to the brightness around.
Notes:
- Do not point bright lights directly at the remote control sensor.
- Do not place objects between the remote control unit and the remote control sensor.
- Do not use this remote control unit while simultaneously operating the remote control unit of any other equipment.
Remote Control Drawing

1. POWER button
Press to turn on or off this unit.
2. TV button
Press to shift to TV mode.
3. DVD button
Press to shift to DVD mode.
4. P.M. button
Press to shift the screen picture modes among User, Standard, Soft, Bright and Shine.
5. S.M. button
Press to shift the sound modes among User, Standard, Music, Movie and Speech.
6. 0-9 Number buttons
Press to select numbers such as TV channel.
7. FAV button
Press to access to the favourite channel
8. STEREO/AUDIO button
Press to shift sound track when in TV mode.
Press to select audio language or audio track when in DVD mode.
9. VOL+/- button
Press to increase or decrease the volume.
10. MUTE button
Press to turn on or off speaker output
11. EXIT button
Press to exit from the setup menu.
12. Direction buttons (▲▼ ◀▶)
In the setup menu, press the ▲▼ button to select the desired items, press the ◀▶ button to adjust or set.
13. ENTER button
Press to confirm selection.
14. SOURCE button
Press to select modes among TV, CVBS, S-VIDEO, COMPONENT VGA and DVD.
15. ▶ PLAY button
Press to play a disc when in the DVD mode.
16. II PAUSE button
When in the DVD mode, press to pause playback. Press the ▶ PLAY button to resume normal playback.
17. ◀ / ➤ button
Press to search backward or forward when in DVD mode.
Under teletext mode, it's the teletext colour button.
18. TITLE button
When a DVD disc is playing, press the TITLE button to go to the title menu and display disc contains.
Under TV, CVBS or S-VIDEO mode, press to display/close the teletext.
19. MENU button (under DVD mode)
Press to enter disc menu when in DVD mode. Under teletext mode, press to disable teletext display and press again to resume.
20. SETUP button
Press to open DVD setup menu when in DVD mode. Under teletext mode, press to display the index page.
21. SLOW button
Press to activate slow playback under when in DVD mode. Under Teletext mode, press once to display the concealed information, such as solution of riddles or puzzles; press again to resume the riddles information from the display.
22. VGA button
Press to shift to VGA mode.
23. COMPONENT button
Press to enter COMPONENT mode.
24. DISPLAY button
Press to display the reference information about the current program.
25. SET FAV button
Press to set current channel as the favourite channel.
26. ⊖/+10 button
In the TV mode, press to return to the channel last viewed. When in DVD mode, press to select numbers greater than 10.
27. SCAN/SUBTITLE button
When in TV mode., press to scan the programs and press again to stop scanning. When in DVD mode, press to select alternate subtitle languages during playback of a multiple language DVD disc.
28. CH+/- button
When in TV mode, press to select channel.
29. ASPECT button
Press to shift the aspect ratio of the
30. screen between Fill Screen and Aspect Normal.
MENU button
Press to enter or exit the setup menu.
31. SLEEP button
This feature allows you to set up sleep time when in TV mode. Press the button repeatedly to select the desired sleep time or "Off" to close this function
32. Eject button
Press to eject the disc from the unit.
33. ■ STOP button
Press to stop disc playback, when in DVD mode.
34. / button
Press to skip to the previous or next chapter/track when in DVD mode.
Under teletext mode, it's the teletext colour button.
35. REPEAT button
Press to repeat a chapter, track, title, or all content when in DVD mode.
Under teletext mode, press to freeze the current page and press again to resume.
36. ANGLE button
Press to access various camera angles (if the DVD disc contains multiple camera angles) when in DVD mode.
Under Teletext mode, Press the button first time to double the size of teletext letters in the upper half of the screen, second to double the size of teletext letters in the lower half of the screen and third to resume normal status.
37. CARD button
Press to shift among disc playback, USB playback and SD/MS/MMC playback.
Under teletext mode, press to select four groups 3-digit numbers that displayed in different colours at the bottom of the screen.
Press the colour buttons on the remote control to select, then use the number buttons to input the corresponding number to display the page.
Repeat the above procedures for each page to be stored, using a different colour button accordingly each time.
38. GOTO button
Press to select the desired disc starting time, title or chapter when in DVD mode.
Under TV mode, press to display the real clock and press the EXIT button to exit.
• Before connections, disassemble the jack cover first.
- Do not connect the power cord until all other connections have been made.
- Ensure that you observe the colour cord when connecting audio and video cables.
Connecting to Power Supply
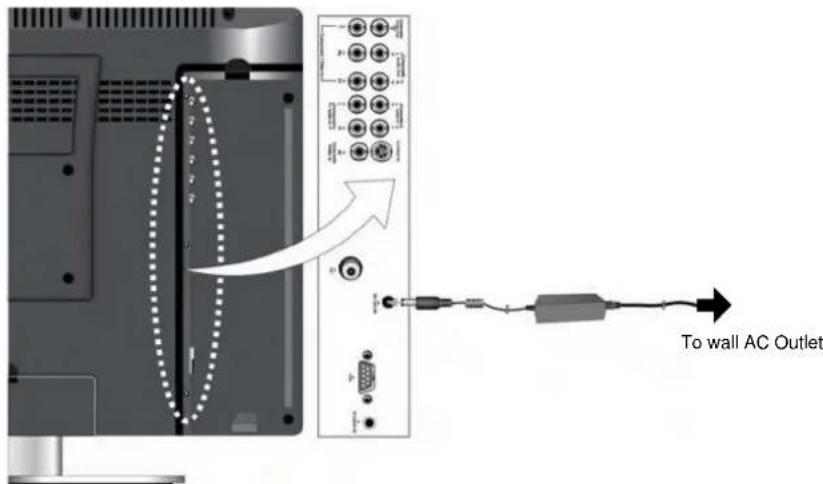
Power is supplied through the provided appropriate power adapter, one end is connected to the DC 12V IN jack on the side panel of the unit, the other end to the wall AC outlet.
Connecting to External AV Signal Source
Use the audio and video cable to connect the AV input jacks on the side panel of the unit to the external AV signal source. Use the S-VIDEO cable to connect the S-VIDEO input jack on the side panel of the unit to the external AV signal source.
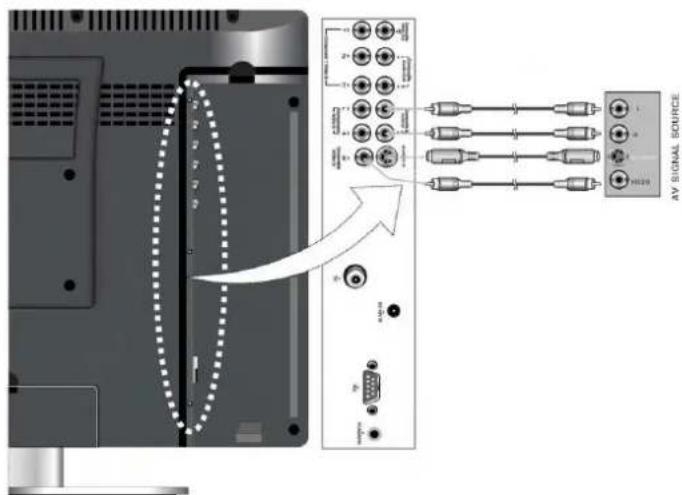
After connection, turn on the power of the unit and the external AV signal source and then press the SOURCE button to shift to CVBS or S-VIDEO mode.
Note: the L/R audio input jacks can be used in the both CBVS and S-VIDEO modes.
Connecting External AV Signal Source (YPbPr)
Use the audio and video cables to connect the Y/Pb/Pr input Jacks on the side panel of the unit to the external AV signal source.

After connection, turn on the power of the unit and external AV signal source and then press the SOURCE button to shift to COMPONENT mode.
Connecting to External AV Input Device (AV Output)
Use the audio and video cable to connect the AV output jacks on the side panel of the unit to the external AV input device.

After connection, turn on the power of the unit and external AV input device and then press the SOURCE button to shift to the corresponding mode.
Note: The unit can only output TV, CVBS and S-VIDEO signals.
Connecting to PC
The unit can be connected to PC (person computer) via the VGA cable. Follow the steps and the figure below to connect.
- Connect one end of the VGA cable to the VGA input jack on the side panel and the other end to the PC.
- Connect one end of the audio cables to the PC audio input jack on the side panel and the other end to the PC audio output jack.
- Set the PC's resolution at 1024x768@60Hz.
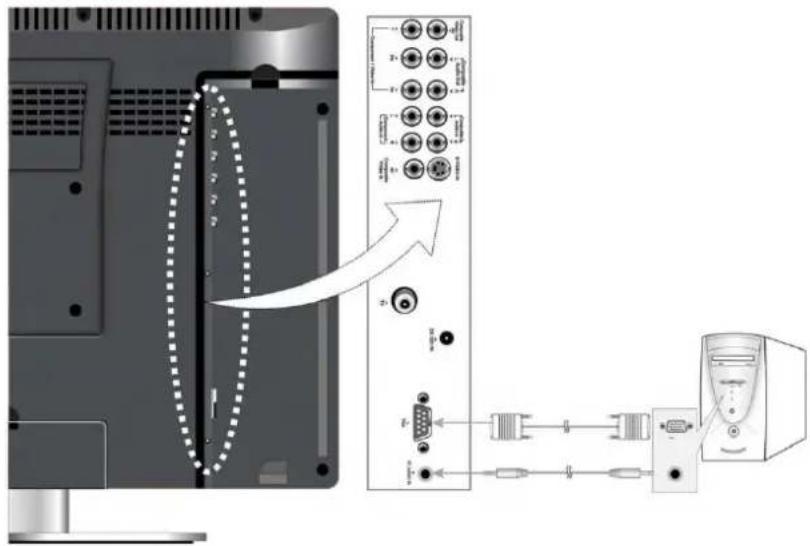
After connection, turn on the unit and the PC and then press the SOURCE button to shift to VGA mode.
Connecting to Earphones
This unit can be connected to an earphone for listening music privately. See the below figure for details:

natural_image
Illustration of a computer monitor connected to a CD-ROM with an attached cable (no text or symbols visible)After connecting to the earphone, the internal speakers output will turn off automatically.
Note: Excessively loud volume could damage your hearing. So turn down the volume before you connect the headphones, and then raise the volume to comfortable level.
Connecting to TV Antenna
This unit can be connected to the TV signal input source via the TV jack on the side panel. After connection, turn on the power of the unit. Then press the SOURCE button to shift to TV mode.

After connecting to the antenna, turn on the unit, and go on with program searching, you can follow the below steps to select channels:
- For 0\~9 channel:
Press the number buttons to select the channel X, wait several seconds and it will go to the selected channel.
Or press the number buttons to select channel X, and press the ENTER button to go to the selected channel immediately.
Or press the number buttons to select channel 0X, and it will go to the selected channel immediately.
- For 10\~99 channel:
Press the number buttons to select channel XX, and it will go to the selected channel immediately.
* X is the channel number.
NOTE: In other mode, you can refer to the following instructions in TV mode to go on with some settings. Only when there are signals, the menus can appear and be set.
Preparation
- After connection, press the POWER button to turn on the power. (If it is turned on, the power indicator is blue.)
- Press the SOURCE button to shift to TV mode. You can go on with the following operations.
Image Setting
Note: This item is only available when there is signal input.
Press the MENU button once to enter the setup menu. Press the ▲▼ button to select Image and press the ENTER button to enter the menu shown on the right.
In the Image setup menu, press the ▲▼ button to select the desired item. Press the MENU button to return to the previous menu.

flowchart
graph LR
    A["Image"] --> B["Scheme"]
    C["Audio"] --> D["Picture"]
    E["Setup"] --> F["Brightness"]
    G["..."] --> H["Contrast"]
    I["..."] --> J["Hue"]
    K["..."] --> L["Color"]
    M["..."] --> N["Sharpness"]
    O["..."] --> P["Advanced"]
Scheme Setup
Press the ▲▼ button to select Scheme and press the ENTER button to enter. Press the
▲▼ button to select the desired item and press the ENTER button to confirm your selection.
Press the MENU button to return to the previous menu.

flowchart
graph LR
    A["Image"] --> B{Scheme}
    C["Audio"] --> B
    D["Setup"] --> B
    B --> E["Normal"]
    B --> F["Vivid"]
    B --> G["Sports"]
    B --> H["Nature"]
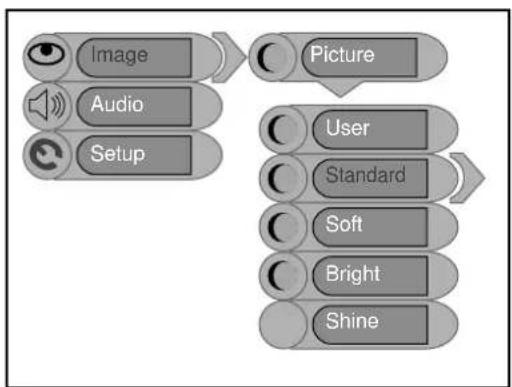
Picture Setup
Press the ▲▼ button to select Picture and press the ENTER button to enter. Press the
▲▼ button to select the desired item and press the ENTER button to confirm your selection.
Press the MENU button to return to the previous menu.
flowchart
graph LR
    A["Image"] --> B["Picture"]
    C["Audio"] --> B
    D["Setup"] --> B
    B --> E["User"]
    E --> F["Standard"]
    F --> G["Soft"]
    G --> H["Bright"]
    H --> I["Shine"]
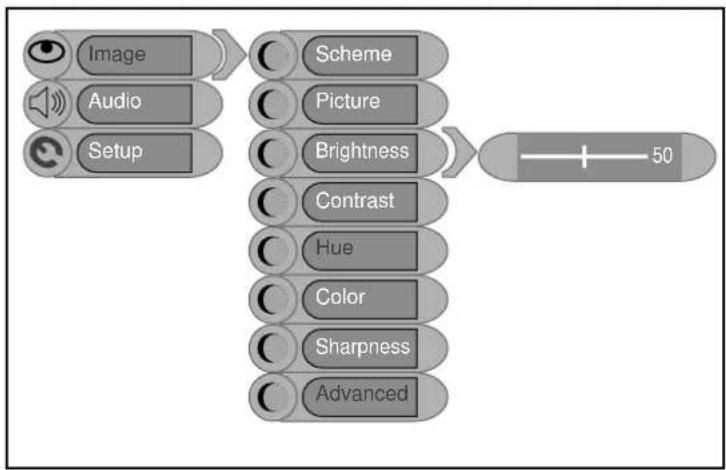
Brightness Setup
Press the ▲▼ button to select Brightness and press the ◀▶ button to adjust the value. Press the MENU button to return to the previous menu.
flowchart
graph LR
    A["Image"] --> B["Scheme"]
    C["Audio"] --> D["Picture"]
    E["Setup"] --> F["Brightness"]
    G["Contrast"] --> H["Hue"]
    I["Color"] --> J["Sharpness"]
    K["Advanced"] --> L["50"]
Contrast Setup
Press the ▲▼ button to select Contrast and press the ◀▶ button to adjust the value. Press the MENU button to return to the previous menu.
Hue Setup
Press the ▲▼ button to select Hue and press the ◀▶ button to adjust the value. Press the MENU button to return to the previous menu.
Note: This item is only available under NTSC TV signal mode.
Colour Setup
Press the ▲▼ button to select Colour and press the ◀▶ button to adjust the value. Press the MENU button to return to the previous menu.
Sharpness Setup
Press the ▲▼ button to select Sharpness and press the ◀▶ button to adjust the value. Press the MENU button to return to the previous menu.
Advanced Setup
Press the ▲▼ button to select Advanced and press he ENTER button to enter.
In the menu, press the ▲▼▶◀ direction button to move the image. Press the MENU button to return to the previous menu.

flowchart
graph TD
    A["Image"] --> B["Advanced"]
    C["Audio"] --> B
    D["Setup"] --> E["Image Pos"]
    B --> F["0"]
    E --> G["0"]
Note: This item is only available in DVD, VGA COMPONENT modes.
When the VGA signal is connected to the unit, the Advanced setup menu is shown below:
Press the "▲▼" button to select the desired item and press the "ENTER" button to enter it's setup menu. Press the "MENU" button to return to the previous menu.

flowchart
graph TD
    A["Image"] --> B["Advanced"]
    C["Audio"] --> B
    D["Setup"] --> B
    B --> E["Auto Adjust"]
    E --> F["Image Pos"]
    F --> G["Phase"]
    G --> H["Clock"]
    H --> I["Auto Color"]
    I --> J["SRGB"]
Auto Adjust:
If the monitor is not clear, you should carry out "Auto Adjust".
Press the "▲▼" button to select "Auto Adjust" and press the "ENTER" button to enter it's menu.
Press the "▲▼" button to select "Yes" to activate this function or "No" to cancel. Press the "MENU" button to return to the previous menu.
Image Pos:
Press the "▲▼" button to select "Image Pos" and press the "ENTER" button to enter it's menu. Within the menu, press the "▲▼◀▶" button to move the image. Press the "MENU" button to return to the previous menu.
Phase:
Press the "▲▼" button to select "Phase". Press the "◀▶" button to adjust the value. Press the "MENU" button to return to the previous menu.
Clock:
Press the "▲▼" button to select "Clock" and press the "ENTER" button to enter it's menu. Press the "►◀" button to adjust the value . Press the "MENU" button to return to the previous menu.
Auto Color:
Press the "▲▼" button to select "Auto Color" and press the "ENTER" button to activate this function. Press the "MENU" button to return to the previous menu.
sRGB :
Press the "▲▼" button to select "sRGB" and press the "ENTER" button to enter it's menu. Press the "▲▼" button to select "On" to activate this function or "Off" to cancel. Press the "MENU" button to return to the previous menu.
Audio Setting
Press the MENU button once to enter the setup menu. Press the ▲▼ button to select Audio and press the ENTER button to enter the menu shown on the right.
In the Audio setup menu, press the ▲▼ button to select the desired item. Press the MENU button to return to the previous menu.

flowchart
graph LR
    A["Image"] --> C["Volume"]
    B["Audio"] --> C["Volume"]
    D["Setup"] --> E["Bass"]
    D --> F["Treble"]
    D --> G["Balance"]
    D --> H["Auto Volume"]
    D --> I["Sound Mode"]
Volume Setup
Press the ▲▼ button to select Volume and press the ◀▶ button to adjust the level. Press the MENU button to return to the previous menu.
Bass Setup
Press the ▲▼ button to select Bass and press the ◀▶ button to adjust the level. Press the MENU button to return to the previous menu.
Treble Setup
Press the ▲▼ button to select Treble and press the ◀▶ button to adjust the level. Press the MENU button to return to the previous menu.
Balance Setup
Press the ▲▼ button to select Balance and press the ◀▶ button to adjust the level. Press the MENU button to return to the previous menu.
Auto Volume Setup
Press the ▲▼ button to select Auto Volume and press the ENTER button to access the menu. Press the ▲▼ button to select "On" or "Off" and press the ENTER button to confirm. Press the MENU button to return to the previous menu.
Sound Mode Setup
Press the ▲▼ button to select Sound Mode and press the ENTER button to enter. Press the ▲▼ button to select the desired item and then press the ENTER button to confirm your selection. Press the MENU button to return to the previous menu.

flowchart
graph LR
    A["Image"] --> B["Audio"]
    B --> C["Setup"]
    D["Sound Mode"] --> E["User"]
    E --> F["Standard"]
    F --> G["Music"]
    G --> H["Movie"]
    H --> I["Speech"]
Setup Setting
Press the MENU button once to enter the setup menu. Press the ▲▼ button to select Setup and press the ENTER button to enter the menu shown on the right.
In the Setup menu, press the ▲▼ button to select the desired item. Press the MENU button to return to the previous menu.

flowchart
graph LR
    A["Image"] --> B["Audio"]
    B --> C["Setup"]
    D["Tuner/Channel"] --> E["Language"]
    E --> F["Factory Reset"]
Tuner/Channel
Press the ▲▼ button to select the
Tuner/Channel and press the ENTER button to enter the menu shown on the right. Press the
▲▼ button to select the desired item. Press the MENU button to return to the previous menu.

flowchart
graph LR
    A["Image"] --> B["Setup"]
    C["Audio"] --> B
    D["Setup"] --> E["PAL Tuner/Channel"]
    F["Country"] --> G["Auto Scan"]
    H["Prog Organizer"] --> I["Manual Install"]
Country
Press the ▲▼ button to select the Country and press the ENTER button to enter the menu shown on the right. Press the ▲▼ button to select the desired item. Press the MENU button to return to the previous menu.

flowchart
graph TD
    A["Image"] --> B["PAL Tuner/Channel"]
    C["Audio"] --> B
    D["Setup"] --> B
    B --> E["Country Select"]
    E --> F["Australia"]
    F --> G["Belgium"]
    G --> H["UK"]
    H --> I["France"]
    I --> J["Czech"]
    J --> K["Denmark"]
Auto Scan
Press the ▲▼ button to select the Auto Scan and press the ENTER button to start auto scan. The screen will display shown below:

Auto scan will take a few minutes, when the tuning operation completes the unit will exit and memorise the programs by sequence automatically.
During tuning, press the MENU button to exit the auto scan mode
Prog Organizer
Press the ▲▼ button to select the
Prog Organizer and press the ENTER button to enter the menu shown on the right.
In the Prog Organizer setup menu, press the ▲▼ button to select the desired item. Press the MENU button to return to the previous menu.

flowchart
graph TD
    A["Image"] --> B["PAL Tuner/Channel"]
    C["Audio"] --> D["Prog Organizer"]
    E["Setup"] --> D
    D --> F["Channel Name"]
    F --> G["XXXXXXX"]
    F --> H["Skip"]
    H --> I["Swap From Ch"]
    I --> J["Swap To Ch"]
    J --> K["Perform Swap"]
Channel Name
Press the ▲▼ button to select the Channel Name and press the ENTER button to enter. Then press the ▲▼ button to select letters or press the number button to input numbers. Press the MENU button to return to the previous menu.
Skip
Press the ▲▼ button to select Skip and press the ENTER button to activate or cancel this function. Press the MENU button to return to the previous menu.
Swap
Press the ▲▼ button to select Swap from Ch and press the ENTER button to enter. Press the number buttons to select program number. Repeat the above operations to Swap To Ch. Then Press the ▲▼ button to select Perform Swap and press the ENTER button to confirm.
Manual Install
Press the ▲▼ button to select the
Manual Install and press the ENTER button to enter the menu shown on the right.
In the Manual Install setup menu, press the ▲▼ button to select the desired item. Press the MENU button to return to the previous menu.

flowchart
graph TD
    A["Image"] --> B["PAL Tuner/Channel"]
    C["Audio"] --> B
    D["Setup"] --> B
    B --> E["Manual Install"]
    E --> F["Search"]
    F --> G["47.00 MHz"]
    F --> H["Color System"]
    F --> I["Fine Tune"]
    F --> J["CH NO"]
    F --> K["Store"]
Search
Press the ▲▼ button to select Search and press the ▶ or ◀ to start searching forward or backward. Press the MENU button to return to the previous menu.
Colour System
Press the ▲▼ button to select Colour System and press the ENTER button to enter. Press the MENU button to return to the previous menu.
Fine Tune
Press the ▲▼ button to select Fine Tune and press the ENTER button to enter. Press the ▶or ◀ controls to start fine tuning forward or backward. Press the MENU button to return to the previous menu.
This feature allows for minor adjustments to the integrated electronic tuner's ability to tune in weak broadcast signals or where applicable solve minor irregularities in cable channel tuning parameters.
CH NO
Press the ▲▼ button to select CH NO and press the ENTER button to enter. Press the number buttons to enter the channel number. Press the button to return to the previous menu.
Store
Press the ▲▼ button to select Store and press the ENTER button to store the above operations.
Note: The "CH NO" and "Store" items only function when the program is searched out.
Language
Press the ▲▼ button to select the Language, press the ENTER button to enter the setup, press the ▲▼ button to select item. Press the MENU button to return to the previous menu.

flowchart
graph LR
    A["Image"] --> B["Setup"]
    C["Audio"] --> B
    D["Setup"] --> E["Language"]
    F["English"] --> G["French"]
    H["Spanish"] --> I["German"]
    J["Italian"] --> K["Italian"]
Factory Reset
Press the ▲▼ button to select the Factory Reset and press the ENTER button to enter. Press the ▲▼ button to select "Yes" or "No", and press the ENTER button to reset to the default status or to cancel. Press the MENU button to return to the previous menu.

flowchart
graph LR
    A["Image"] --> B["Audio"]
    C["Setup"] --> D["Factory Reset"]
    E["Yes"] --> F["No"]
The unit support NICAM function under TV mode.
Under NICAM TV broadcast:
- When receiving stereo audio signals, press the STEREO/AUDIO button on the remote control repeatedly to shift the sound tracks between Nicam Stereo and Mono and the screen will appear corresponding display as shown below:

flowchart
graph LR
    A["Nicam Stereo"] --> B["Mono"]
- When receiving bilingual audio signals, press the STEREO/AUDIO button on the remote control repeatedly to shift the sound tracks among Nicam I, Nicam II, Nicam I+II and Mono and the screen will appear corresponding display as shown below:

flowchart
graph LR
    A["Nicam I"] --> B["Nicam II"]
    B --> C["Nicam I+II"]
    C --> D["Mono"]
- When receiving mono audio signals, press the STEREO/AUDIO button on the remote control repeatedly to shift the sound tracks between Nicam Mono and Mono and the screen will appear corresponding display as shown below:

flowchart
graph LR
    A["Nicam Mono"] --> B["Mono"]
Under A2 TV broadcast:
- When receiving stereo audio signals, press the STEREO/AUDIO button on the remote control repeatedly to shift the sound tracks between Stereo and Mono and the screen will appear corresponding display as shown below:

flowchart
graph LR
    A["Stereo"] --> B["Mono"]
- When receiving bilingual audio signals, press the STEREO/AUDIO button on the remote control repeatedly to shift the sound tracks among I, II and I+II and the screen will appear corresponding display as shown below:

flowchart
graph LR
    A["I"] --> B["II"]
    B --> C["I + II"]
- When receiving mono audio signals, press the STEREO/AUDIO button on the remote control to display sound track Mono on the screen.

Preparation:
After connections, turn on the unit and select the relevant video input before playback.
Disc Loading Steps:
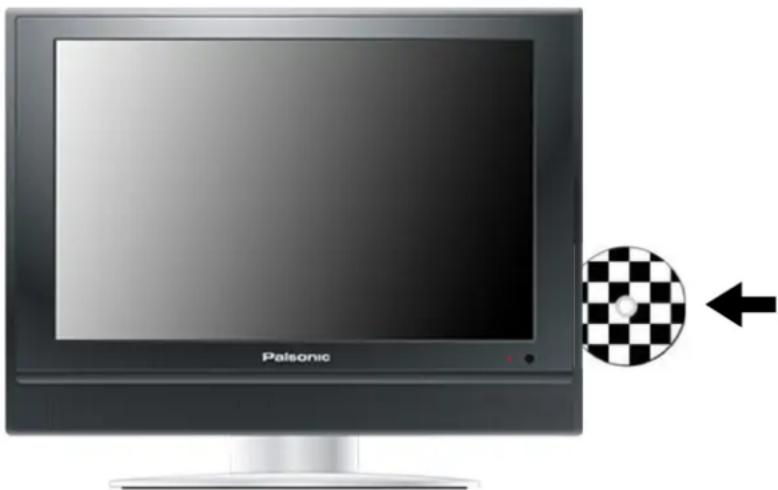
- Press the POWER button to turn on the power. Press the SOURCE button and select DVD, press the ENTER button to confirm and shift to DVD mode.
- Handing the disc with its printed side outward vertically to the disc tray. (Referring to the below picture.)
- Slightly put the disc into the disc tray.
- As disc is automatically taken in the disc tray fully, the player will search a disc and play it automatically in DVD mode.
natural_image
Computer monitor with 'Palsonic' label and a checkerboard icon pointing to it (no text or symbols on the monitor itself)Warning: Do not play poor quality discs that may damage the player's lens.
DVD Playback
Region Code
DVD players and discs are coded by region. These regional codes must match the played discs. If the codes don't match, the disc cannot be played. This player's default code is region 4.
Play
Press the PLAY button to start playback. Press the STOP button once on the remote control to stop playback, and press the PLAY button again to resume playback.
Stop
Press the ■ STOP button once to stop playback and press the ▶ PLAY button to resume normal playback. Press this button twice repeatedly to stop playback completely.
Pause
Press the ▶ PAUSE button once to pause the playback; press it repeatedly to start step-by-step playback. Press the ▶ PLAY button to resume normal playback.
Previous ◀◀ and ▶▶ Next
Press the ▶ button to go to the next chapter. Press the ◀ button once to return to the beginning of the current chapter or track; press it twice to go to the previous chapter.
Fast Playback
Press the ◀ or ▶ FWD/REV SCAN button on the remote control to activate fast backward or forward playback.
SLOW
During DVD disc playback, press the SLOW button on the remote control to start slow playback. During slow playback, press the PLAY button to resume normal playback.
Repeat
Use the REPEAT button repeatedly to repeat a chapter, title or all.
◆ Some discs do not support the repeat function.
Menu
Normally there is a selecting menu for DVD discs. You can press the MENU button (under DVD mode) to enter the menu, and use the direction buttons to highlight an item. Then press the ENTER button to confirm.
Title & Chapter
Normally there are several titles in a DVD disc, and several chapters (sections) in a title. You can select any title or chapter quickly by entering the relevant number.
Language (Audio)
There can be up to 8 audio languages on a DVD disc. When you play a multi-language DVD disc you can use press the AUDIO button on the remote control to select a language.
Subtitle
The DVD player can support multiple kinds of subtitles. When you play a multi-subtitle disc you can press the SUBTITLE button on the remote control to select different subtitles.
GOTO
During DVD disc playback, press the GOTO button on the remote control once, there will be a menu displayed on the screen. You can set or select items for your preference. Use the ▲▼ direction buttons to select items and press the ENTER button to enter and use the ▲▼ direction buttons to select the desired item. Press the ◀ direction button to return. When select the Title/Chapter, TT Time/CH Time, use number buttons to input desired title/chapter number time.
◆ Some DVD discs do not support the search function.
Various Camera Angles
The movies on some DVDs have been recorded from various camera positions. This lets you enjoy the same scene from different perspectives. In this case you'll usually find a marking on the DVD sleeve.
When playing a DVD containing various camera angles the camera symbol appears on the screen. Press the ANGLE button repeatedly until the desired perspective is shown. The picture will be adjusted in 1\~2 seconds.
CD Playback
The player will play all tracks on a CD disc by default. You can use the ◀◀ and ▶▶ (PREV/NEXT skip) buttons, or number buttons to select a track.
Stop
Press the ■ STOP button once to stop playback and press the ▶ PLAY button to resume normal playback. Press this button twice repeatedly to stop playback completely.
Pause
Press the ▶▶ PAUSE button to pause the playback and then press the ▶ PLAY button to resume normal playback.
Previous and Next
Press the ◀ button once to go the beginning of this track. Press twice repeatedly to go the previous track.
Press the ▶ button to play from the beginning of the next track.
Fast Playback
Press the ◀ or ▶ FWD/REV SCAN button on the remote control to activate fast backward or forward playback.
Repeat
Use the REPEAT button repeatedly to repeat Track, All or to cancel repeat.
◆ Some discs do not support the repeat function.
Audio
During CD playback, press the AUDIO button on the remote control to select the audio output mode: Mono Left, Mono Right, Mix-Mono and Stereo.
GOTO
Press the GOTO button to access the time-selected state. You can select Disc Go To, Track Go To or Select Track respectively by pressing this button repeatedly. Use the 0-9 buttons to enter the desired time, and then the player will play according to the selected time.
JPEG Playback
JPEG is a common picture format that requires small amounts of storage per image and has low loss in resolution. Hundreds of pictures can be stored on a disc in this format. In order to view JPEG photo albums, you can ask your film development company to make a "PICTURE CD" when they develop your film.
Normal Playback
Load a JPEG disc in. For JPEG disc, there will be a root menu displayed on the screen. Use the OK button and the direction button to select a submenu, and then use the ▲▼ direction button to select the contents. Many discs have other contents besides pictures.
For Picture CD disc, it will display the pictures automatically.
During playback, press the ◀◀ or ▶▶ button to select picture.
◆ Many discs have other contents besides pictures.
Stop
Press the ■ STOP button once to stop playback and return to the preview menu. Press the ▶ PLAY button to resume normal playback. Press this button twice repeatedly to stop playback completely.
Pause
Press the ▶← PAUSE button to pause playback, press the ▶ PLAY button to resume playback.
Repeat
During playback, press the REPEAT button repeatedly, and the repeat modes are Shuffle, Random, Single, Repeat One, Repeat All and Repeat Off.
Previous and Next
During playback, press the ◀◀ or ▶▶ button to select picture.
Menu
Press the MENU button once to stop playback and return to the root menu.
GOTO
During playback, press the GOTO button on the remote control once, use the number buttons to input the file number.
Picture Rotation
This can be used only when the picture is normally displayed. Once another picture is selected, rotation will be cancelled automatically. Use the ◀▶ buttons to rotate the picture.
◆ Some JPEG disc may not support rotating
USB and SD/MS/MMC Card Function
Preparation:
- Connect the unit to the power supply.
- Press the POWER to turn on the unit.
- Press the SOURCE button to shift to DVD mode.
- Insert the USB into the unit's USB slot, or insert the SD/MS/MMC card into the SD/MS/MMC card slot on the right side of the unit. Please see the below figure:

natural_image
Illustration of a Panasonic TV monitor with an external cable showing a switch (no text or symbols on the screen)Make sure that files are stored in the USB and the SD/MS/MMC card before the connection.
- Press the CARD button to shift among disc playback, USB playback and the SD/MS/MMC playback. The default state is disk playback. Please see the below figure:
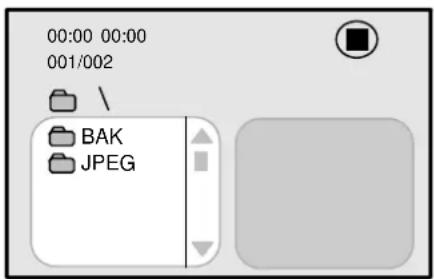
- Press the ▲▼ button to select the folder, and press ENTER button to enter.
- Press the ▲▼ buttons to select the desired track. Then press PLAY ▶ button to start playback.
- Press STOP ■ button to stop playback. Press the ◀ button to return to the folder menu.
Note:
- The screen display will vary from disc to disc.
- Pull out the USB or SD/MS/MMC card directly after the files are played. Then the unit will be in disc playback again.
Preparations
- Connect to the power supply and turn on the unit.
- Press the SOURCE button to shift to DVD mode.
- Press the SETUP button on the remote control to display the settings menu.
- Press the ◀▶ direction buttons on the remote control to select a category. All the items in the category will appear on the screen.
- Press the SETUP button again to exit the setup.
General Setup Page
Press the DVD SETUP button to enter the General setup menu. The screen will display as the below:
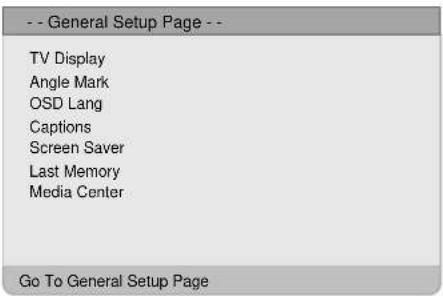
In the menu, Use the ▲▼ direction buttons to select the desired Item. Press the ENTER button to enter the item. Press the ◀ button to return.
TV Display

- Press the ▲▼ direction buttons to select TV Display.
- Press the ENTER button to enter the setup.
- Use the ▲▼ direction buttons to select items.
- Press the ENTER button again to confirm selection and return.
Angle Mark
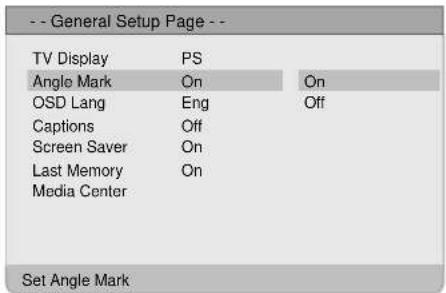
- Press the ▲▼ direction buttons to select Angle Mark.
- Press the ENTER button to enter the setup.
- Use the ▲▼ direction buttons to select On or Off.
- Press the ENTER button again to confirm selection and return.
OSD Lang
| -- General Setup Page -- | ||
| TV Display | PS | |
| Angle Mark | On | |
| OSD Lang | Eng | English |
| Captions | Off | French |
| Screen Saver | On | Spanish |
| Last Memory | On | German |
| Media Center | Italian | |
| Portuguese | ||
| Dutch | ||
| Set OSD Language | ||
Captions
| -- General Setup Page -- | ||
| TV Display | PS | |
| Angle Mark | On | |
| OSD Lang | Eng | |
| Captions | Off | On |
| Screen Saver | On | Off |
| Last Memory | On | |
| Media Center | ||
| Closed Captions | ||
Screen Saver
| -- General Setup Page -- | ||
| TV Display | PS | |
| Angle Mark | On | |
| OSD Lang | Eng | |
| Captions | Off | |
| Screen Saver | On | On |
| Last Memory | On | Off |
| Media Center | ||
| Screen Saver | ||
Last Memory
| -- General Setup Page -- | ||
| TV Display | PS | |
| Angle Mark | On | |
| OSD Lang | Eng | |
| Captions | Off | |
| Screen Saver | On | |
| Last Memory | On | On |
| Media Center | Off | |
| Set Last Memory State | ||
The item is used to select the OSD language.
- Press the ▲▼ direction buttons to select OSD Lang.
- Press the ENTER button to enter the setup.
- Use the ▲▼ direction buttons to select items.
-
Press the ENTER button again to confirm selection and return.
-
Press the ▲▼ direction buttons to select Captions.
- Press the ENTER button to enter the setup.
- Use the ▲▼ direction buttons to select items.
-
Press the ENTER button again to confirm selection and return.
-
Press the ▲▼ direction buttons to select Screen Saver.
- Press the ENTER button to enter the setup.
- Use the ▲▼ direction buttons to select On or Off.
-
Press the ENTER button again to confirm selection and to return.
-
Press the ▲▼ direction buttons to select Last Memory.
- Press the ENTER button to enter the setup.
- Use the ▲▼ direction buttons to select On or Off.
- Press the ENTER button again to confirm selection and return.
Media Center

- Press the ▲▼ direction buttons to select Media Center.
- Press the ENTER button to enter the setup.
- Use the ▲▼direction buttons to select DVD, USB, SD/MMC or MS.
- Press the ENTER button again to confirm selection and return.
Audio Setup Page
Press the SETUP button to enter the General setup menu, then use the ◀▶direction buttons to select Audio Setup Page, the screen will display as the below:

In the menu, Use the ▲▼ direction buttons to select the desired item. Press the ENTER button to enter the item. Press the ◀ button to return.
Dolby Digital Setup
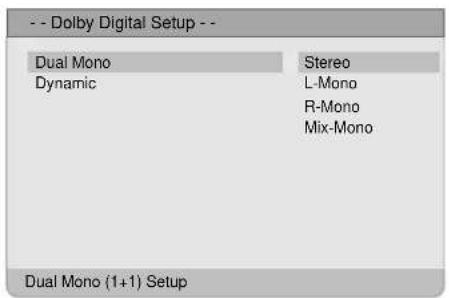
- Press the ▲▼ direction buttons to select Dolby Digital.
- Press the ENTER button to enter the setup, the screen will display as left:
- In the menu, use the ▲▼ direction buttons to select items.
- Press the ENTER button to enter the setup. Press the ◀ button to return.
Dual Mono
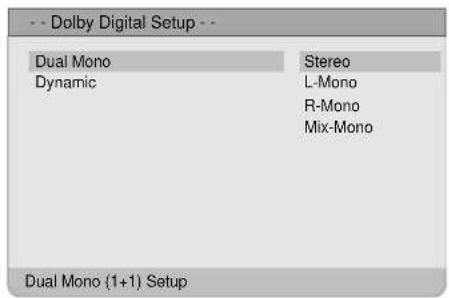
- Press the ▲▼ direction buttons to select Dual Mono.
- Press the ENTER button to enter the setup.
- Use the ▲▼ direction buttons to select items.
- Press the ENTER button again to confirm selection and return.
Dynamic

- Press the ▲▼ direction buttons to select Dynamic.
- Press the ENTER button to enter the setup, the screen will display as left:
- Press the OK button to enter.
- Use the ▲▼ direction buttons to adjust.
- Press the ENTER button again to confirm setting and return.
- Press the ◀ button to return.
HDCD Setup
In the Audio Setup Page, use the ▲▼ direction buttons to select HDCD Setup. Press the ENTER button to enter the setup and the screen will display as below:
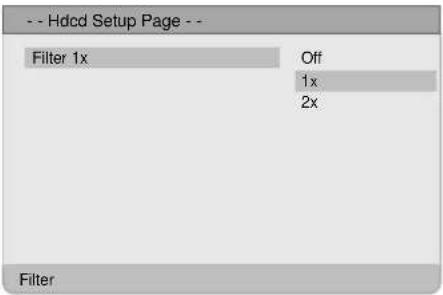
- In the menu, press the ENTER button to enter the setup.
- Use the ▲▼ direction buttons to select items.
- Press the ENTER button again to confirm selection and return.
- Press the ◀ button to return.
Video Setup
Press the SETUP button to enter the General setup menu, then use the ◀▶ direction buttons to select Video Setup Page, the screen will display as the below:
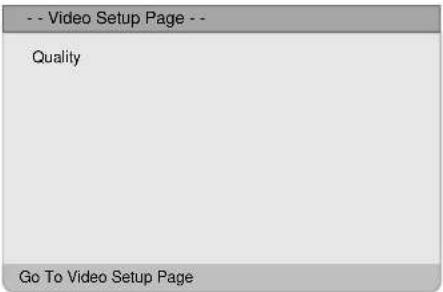
In the menu, Use the ▲▼ direction buttons to select the desired item. Press the ENTER button to enter the item. Press the ◀ button to return.
Video Quality Setup
Select Quality, press the ENTER button to enter the menu as below:

- In the menu, Use the ▲▼ direction buttons to select the desired item.
- Press the ENTER button to enter the item.
- Press the ◀ button to return.
Sharpness

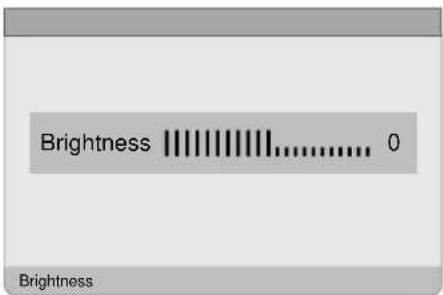
Brightness
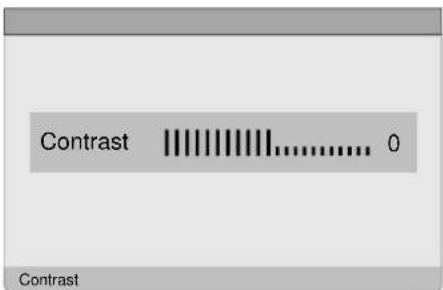
Contrast
- Press the ▲▼ direction buttons to select Sharpness.
- Press the ENTER button to enter the setup.
- Use the ▲▼ direction buttons to select High, Medium or Low.
-
Press the ENTER button again to confirm selection and return.
-
Press the ▲▼ direction buttons to select Brightness.
- Press the ENTER button to enter the setup, the screen will display as left:
- Use the ◀▶ direction buttons to adjust the level.
-
Press the ENTER button again to confirm setting and return.
-
Press the ▲▼ direction buttons to select Contrast.
- Press the ENTER button to enter the setup, the screen will display as left:
- Use the ◀▶ direction buttons to adjust the level.
- Press the ENTER button again to confirm setting and return.
Preference Setup
Press the SETUP button to enter the General setup menu, then use the ◀▶direction buttons to select Preference Page, the screen will display as the below:
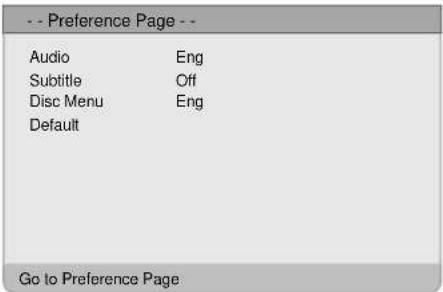
In the menu, press the ▲▼ direction button to enter the desired item. Press the ENTER button to enter the item. Press the ◀ button to return.
Audio
| Audio | Eng | English |
| Subtitle | Off | French |
| Disc Menu | Eng | Spanish |
| Default | Chinese | |
| Japanese | ||
| Italian | ||
| Russian | ||
| German |
Subtitle
| Audio | Eng | French |
| Subtitle | Off | Spanish |
| Disc Menu | Eng | Chinese |
| Default | Japanese | |
| Italian | ||
| Russian | ||
| German | ||
| Off |
Disc Menu
| -- Preference Page -- | ||
| Audio | Eng | English |
| Subtitle | Off | French |
| Disc Menu | Eng | Spanish |
| Default | Chinese | |
| Japanese | ||
| Italian | ||
| Russian | ||
| German | ||
| Preference Menu Language | ||
Default
| -- Preference Page -- | |
| Audio | Eng |
| Subtitle | Off |
| Disc Menu | Eng |
| Default | Reset |
| Load Factory Setting | |
- Press the ▲▼ direction buttons to select Audio.
- Press the ENTER button to enter the setup, see the left figure:
- Press the ▲▼ direction buttons to select audio language.
-
Press the ENTER button again to confirm setting and return.
-
Press the ▲▼ direction buttons to select Subtitle.
- Press the ENTER button to enter the setup, see the left figure:
- Press the ▲▼ direction buttons to select Subtitle language.
-
Press the ENTER button again to confirm setting and return.
-
Press the ▲▼direction buttons to select Disc Menu.
- Press the ENTER button to enter the setup, see the left figure:
- Press the ▲▼direction buttons to select Menu language.
-
Press the ENTER button again to confirm setting and return.
-
Press the ▲▼ direction buttons to select Default.
- Press the ENTER button to select Reset.
- Press the ENTER button, all the settings will return to the default status.
| SYMPTOM CHECK | ITEM |
| The player cannot play. | Make sure disc tray is closedMake sure disc is loaded in.Make sure disc is loaded correctly.Make sure disc is not dirty or warped.Make sure the player's region code is the same as region code of DVD disc.Make sure water condensation has not occurred.Take out disc and leave the player on for at least one hour when water condensation occurs. |
| There is no sound. | Make sure system connection is correct.Make sure the power of speakers is turned on.Make sure the sound setup of DVD disc is correct.Make sure disc is not dirty or warped.Clean or replace the disc. |
| There is no picture or the picture moves up and down Unsteady. | Make sure the unit is turned on and is in correct video mode.Make sure system connections are correct. If it is not, access the setup menu and select the correct system. |
| Cannot continue to play and play a section repeatedly. | Make sure it is not in A-B repeat status.Press A-B button to cancel it.Make sure disc is not dirty or damaged.Clean the disc or skip selection. |
| The remote control does not work. | Make sure there are no obstructions between the remote control and the player.Make sure the remote control is pointing at the player.Make sure batteries are inserted and the polarity is correct.Make sure battery is not weak.Replace the weak battery. |
Other Notes:
Static or other external interference may cause the player to behave abnormally. In this occurrence, unplug the power-supply cord from the outlet and plug it in again to reset the player. If the problems persist, then please disconnect the power and consult a qualified technician.
| TFT-LCD Resolution 1440 x 900 | |
| TFT-LCD Screen Size 19 inches | |
| Power | AC100~240V, 50/60HzDC 12V 5A |
| Power Consumption < 60W | |
| Dimension | 494mm x 184mm x 412mm (LxWxD) |
| Weight About 9.2 Kg | |
| Ambient Temperature 10~45 | °C |
DESIGN AND SPECIFICATIONS ARE SUBJECT TO CHANGE WITHOUT NOTICE
Manufactured under license from Dolby Laboratories.
"Dolby" and the double-D symbol are trademarks of Dolby Laboratories.
Confidential unpublished works. © 1992 -1997 Dolby Laboratories, Inc.
All rights reserved.
All Images in this manual are only for your information.
PALSONIC CORPORATION PTY LTD
1 JOYNTON AVENUE
WATERLOO NSW 2017 AUSTRALIA
TEL: (02) 9313 7111
FAX: (02) 9313 7555
www.palsonic.com.au
PALSONIC CUSTOMER SERVICE
TELEPHONE
AUSTRALIA: 1300 657 888
- Table Of Contents
- CAUTION
- WARNING
- Copyright Protection
- Note:
- IMPORTANT FOR LASER PRODUCTS
- CLASS 1 LASER PRODUCT
- Multiple Mode
- High Quality Property
- High Resolution
- LCD (Liquid Crystal Display)
- Stereo Amplifier
- AV and VGA Input
- Special Function
- Multi Audio and Multi-video modes
- USB and CARD PORTS
- Auto TV Searching Function
- NICAM Function
- Advanced Playing Features
- Compatibility
- All Playback Functions
- Special Playback
- About Disc Terms
- Title
- Chapter
- Track
- Preparation of Remote Control
- Using of Remote control
- Notes:
- Remote Control Drawing
- POWER button
- TV button
- DVD button
- P.M. button
- S.M. button
- 0-9 Number buttons
- FAV button
- STEREO/AUDIO button
- VOL+/- button
- MUTE button
- EXIT button
- Direction buttons (▲▼ ◀▶)
- ENTER button
- SOURCE button
- ▶ PLAY button
- II PAUSE button
- ◀ / ➤ button
- TITLE button
- MENU button (under DVD mode)
- SETUP button
- SLOW button
- VGA button
- COMPONENT button
- DISPLAY button
- SET FAV button
- ⊖/+10 button
- SCAN/SUBTITLE button
- CH+/- button
- ASPECT button
- screen between Fill Screen and Aspect Normal.
- MENU button
- SLEEP button
- Eject button
- ■ STOP button
- / button
- REPEAT button
- ANGLE button
- CARD button
- GOTO button
- Connecting to Power Supply
- Connecting to External AV Signal Source
- Connecting External AV Signal Source (YPbPr)
- Connecting to External AV Input Device (AV Output)
- Connecting to PC
- Connecting to Earphones
- Connecting to TV Antenna
- Preparation
- Image Setting
- Scheme Setup
- Picture Setup
- Brightness Setup
- Contrast Setup
- Hue Setup
- Colour Setup
- Sharpness Setup
- Advanced Setup
- Auto Adjust:
- Image Pos:
- Phase:
- Clock:
- Auto Color:
- sRGB :
- Audio Setting
- Volume Setup
- Bass Setup
- Treble Setup
- Balance Setup
- Auto Volume Setup
- Sound Mode Setup
- Setup Setting
- Tuner/Channel
- Country
- Auto Scan
- Prog Organizer
- Channel Name
- Skip
- Swap
- Manual Install
- Search
- Colour System
- Fine Tune
- CH NO
- Store
- Language
- Factory Reset
- Under NICAM TV broadcast:
- Under A2 TV broadcast:
- Preparation:
- Disc Loading Steps:
- DVD Playback
- Region Code
- Play
- Stop
- Pause
- Previous ◀◀ and ▶▶ Next
- Fast Playback
- SLOW
- Repeat
- Menu
- Title & Chapter
- Language (Audio)
- Subtitle
- GOTO
- Various Camera Angles
- CD Playback
- Previous and Next
- Audio
- JPEG Playback
- Normal Playback
- Picture Rotation
- USB and SD/MS/MMC Card Function
- Preparations
- General Setup Page
- TV Display
- Angle Mark
- OSD Lang
- Captions
- Screen Saver
- Last Memory
- Media Center
- Audio Setup Page
- Dolby Digital Setup
- Dual Mono
- Dynamic
- HDCD Setup
- Video Setup
- Video Quality Setup
- Sharpness
- Brightness
- Contrast
- Preference Setup
- Disc Menu
- Default
- Other Notes:
- DESIGN AND SPECIFICATIONS ARE SUBJECT TO CHANGE WITHOUT NOTICE
Brand : Palsonic
Model : TFTV1920D
Category : Television