Bumper - Guitar effects pedal Radial Engineering - Free user manual and instructions
Find the device manual for free Bumper Radial Engineering in PDF.


| Product Type | Stereo Passive Direct Box (DI) |
| Dimensions | 3.75" x 1.75" x 1.25" (95 x 44 x 32 mm) |
| Weight | 0.5 lbs (227 g) |
| Power Supply | Passive (no external power required) |
| Input Connections | 1/4" TRS stereo input jack |
| Output Connections | Two balanced XLR outputs (Left/Mono & Right) |
| Pad Switch | -15 dB pad to handle hot signals |
| Ground Lift | Ground lift switch to eliminate hum and buzz |
| Transformer Isolation | Premium isolation transformers for clean signal |
| Main Functions | Converts unbalanced stereo signal to balanced mono or stereo; eliminates noise |
| Care & Cleaning | Wipe with dry cloth; avoid liquids and solvents |
| Safety | No user-serviceable parts; refer to qualified service |
| Spare Parts & Repairability | Contact Radial Engineering for servicing; no user replaceable parts |
| General Information | Compact, rugged steel chassis; ideal for stage and studio |
Frequently Asked Questions - Bumper Radial Engineering
User questions about Bumper Radial Engineering
0 question about this device. Answer the ones you know or ask your own.
Ask a new question about this device
Download the instructions for your Guitar effects pedal in PDF format for free! Find your manual Bumper - Radial Engineering and take your electronic device back in hand. On this page are published all the documents necessary for the use of your device. Bumper by Radial Engineering.
USER MANUAL Bumper Radial Engineering
Radial Engineering Ltd.
1588 Kebet Way, Port Coquitlam BC V3C 5M5
Tel: 604-942-1001 • Fax: 604-942-1010 • Email: info@radialeng.com
Bumper™ Instrument Selector
Overview....1
Features 2
Making Connections....3
Setting the Drag Control....4
Using the Trim Setting 5
Using the Tuner Out 6
Block Diagram 7
Specifications 8
Warranty .... Back Cover

Thank you for purchasing the Radial Tonebone Bumper™; a useful device that will enable you to effortlessly switch between instruments while maximizing the space on your pedalboard.
As with all products, in order to get the most out of your experience, please take a few minutes to read through this short manual. This will not only give you insight on how to use the Bumper, but also help you address concerns should they come up. If, after reading, you find yourself asking a question that is not covered, please visit the Bumper FAQ page on the Radial web site. This is where we post questions and answers from users like you along with updates. If afterwards, you still find yourself in need, feel free to send us an email at info@radialeng.com and we will do our best to reply in short order.
Now get ready for instrument switching made easy!
OVERVIEW
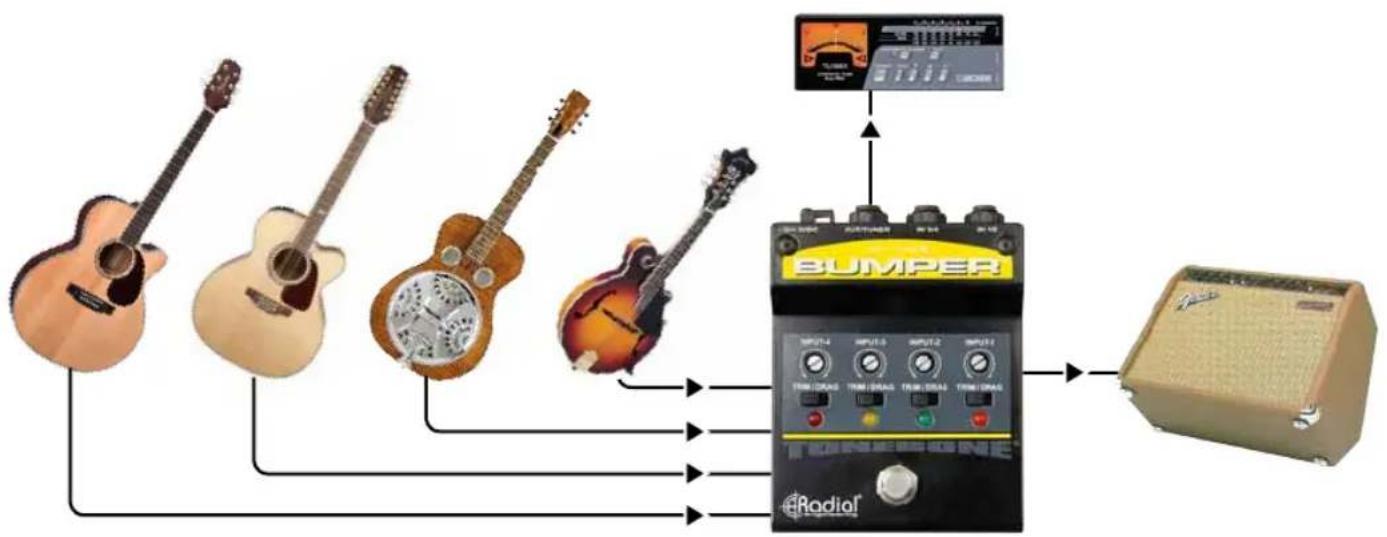
The Bumper is a unity gain device that lets you switch between as many as four instruments using a single sequential footswitch. Because the 14 " input jacks are actually switching jacks, it will only advance through the inputs that are connected. This way, you can use the Bumper on gigs where only two guitars are required or max it out to four inputs when on a concert stage.
Each input is equipped with a slider switch that lets you engage a variable Drag™ control or an input Trim. This enables you to optimize the Bumper for use with vintage guitars, active basses, wireless systems or just about any instrument you can think of. With Radial's award winning Class-A buffer circuit, you can rest assured your tone will be delivered without distortion or artifact.
flowchart
graph TD
    A["Acoustic Guitar"] --> D["Bumper"]
    B["Acoustic Guitar"] --> D
    C["Acoustic Guitar"] --> D
    E["Acoustic Guitar"] --> D
    F["Acoustic Guitar"] --> D
    G["ACoustic Guitar"] --> D
    H["ACoustic Guitar"] --> D
    I["ACoustic Guitar"] --> D
    D --> J["Output"]
    style A fill:#f9f,stroke:#333
    style B fill:#f9f,stroke:#333
    style C fill:#f9f,stroke:#333
    style E fill:#f9f,stroke:#333
    style F fill:#f9f,stroke:#333
    style G fill:#f9f,stroke:#333
    style H fill:#f9f,stroke:#333
    style I fill:#f9f,stroke:#333
    style J fill:#ccf,stroke:#333
FEATURES
-
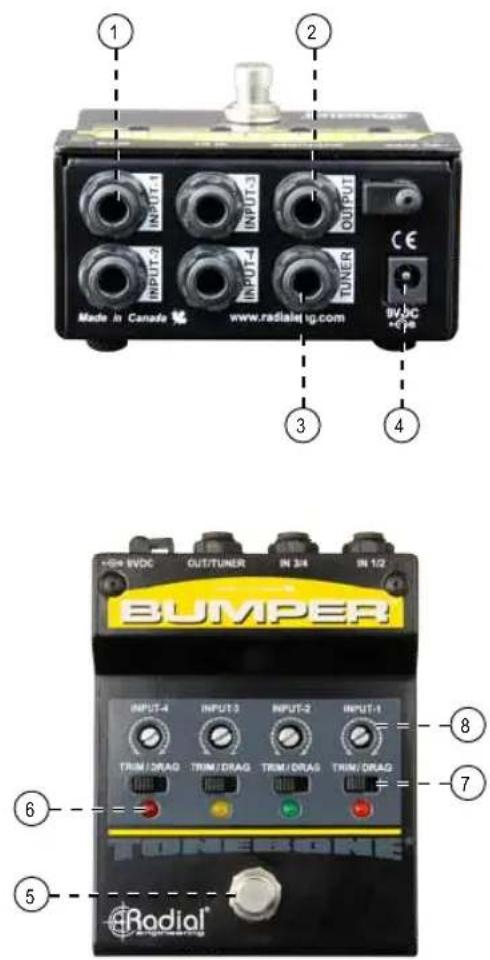
INPUT 1-4: Standard 14 " instrument inputs are ideally suited for bass and guitar.
-
AMP OUT: Used to connect the output from the Bumper to your stage amp.
-
TUNER: Separately buffered output is always on - used to connect your tuner.
-
9VDC: Standard Boss® style power supply connection.
-
INPUT SELECT: Footswitch sequentially advances the input to activate the desired instrument.
-
LED: Four ultra-bright LED's let you know which instrument input is active.
-
TRIM / DRAG SELECT: Toggles between the input function for Drag or Trim adjustments.
-
'SET AND FORGET' POTENTIOMETER:
DRAG: Load correction offsets the overly clean effect of the buffer for a more natural tone.
TRIM: Reduces the input sensitivity of high output instruments to match the level going to the stage amp.
MAKING CONNECTIONS
As with all audio gear, always turn the volume down on your stage amp before making connections as this will avoid connection transients from damaging more sensitive components. The Bumper requires a 9V power adaptor or connection from a 9V pedalboard power brick using a standard Boss® style supply. The power supply is not included. Make sure you check the polarity of the supply to ensure it is center negative. There is no power switch. As soon as you connect the power, the Bumper will spring to life.
A handy cable lock can be used to secure the power from accidental disconnection. To use, simply unscrew using a hex key and then pass the power cable through the access hole and re-tighten.
Upon power-up, the Bumper will automatically be set to input-1 and the input-1 LED will illuminate. Connect your first instrument to input-1 Then connect the Bumper's output jack to your amp. Slowly increase the level on your amp while playing to make sure the connections are working. It is good practice to always test at a low volume. This way, should a connection not be right, plug-in transients will not harm your speaker or shorten their life.
If all is well, connect your second instrument to the Bumper. Using the selector footswitch, you can now 'bump' between inputs 1 and 2. The LED indicators will follow the active instrument input. Adding a 3rd or 4th instrument can now be done. The switching jacks automatically set the selector switch to advance incrementally and then rotate back to input-1.

SETTING THE DRAG™ CONTROL
Each input on the Bumper is equipped with a slider switch and a 'set & forget' potentiometer. The slider can be set to Drag or to Trim. Drag control is used to adjust the load on a passive pickup to counteract the effect of the buffer, while the trim setting is used to reduce the input sensitivity or loudness of the instrument.
The buffer inside the Bumper is basically a unity gain amplifier that lets us manipulate the audio signal inside the circuit. Once the signal is buffered, the impedance is lowered which allows cable lengths of up to 15 meters (50') without appreciable noise. Although Radial employs an exceptionally natural sounding Class-A buffer, it can in fact sound too clean. Drag control is used to replicate the tone and feel as if connected directly to your amp. This essentially lets you tame the top end by loading down the pickup to create a warmer more natural tone. Drag has little or no effect on buffered or active circuits. Set the slider switch to Drag and then set the Drag control to 12 o'clock and listen. Rotate the Drag control using a guitar pick as a screwdriver - clockwise to brighten the tone or counter-clockwise to darken.

flowchart
graph LR
    A["Electric Guitar"] --> B["Amplifier"]
    C["Refrasist"] --> B
    B --> D["Radiofrequency Display"]


When set to Drag control, start at the 12 o'clock position. Rotate clockwise to brighten the tone or counter-clockwise to darken.
USING THE TRIM SETTING
Output levels can vary significantly between active and passive instruments. So when switching between them, you are usually forced to readjust the level on your amp to compensate. If the amp is being mic'd in the PA, the front of house and monitor engineers must also compensate. The Bumper solves the problem by allowing you to Trim or lower the volume on the louder instruments to match the output of the softer ones.
To audition the output levels of various instruments, set all of the Trim/Drag switches to the Drag position. Start by connecting all of your instruments and then rotate through each one using the selector footswitch to identify which instrument has the lowest output. Keep in mind the Bumper does not produce any gain – in other words it will not boost the signal. You can only reduce the signal level of the louder instruments.
For those that are louder, set the Drag-Trim to the Trim position. Turn the set & forget knob fully clockwise and then slowly turn it counter-clockwise until the output levels are matched. You will of course have to switch back and forth using the selector switch.

flowchart
graph LR
    A["Electric Guitar"] --> C["Audio/EDR"]
    B["Busiket"] --> C["Audio/EDR"]
    C --> D["Hertke"]


TRIM / DRAG

When set to Trim, start with the pot turned fully clockwise, then turn down slowly as needed to match instrument levels.
USING THE TUNER OUT
A separately buffered tuner output is available for your tuner. This is always on for quick, on-the-fly adjustments. Because this output is buffered, it does not allow clocking noise from the tuner to bleed back into the signal chain.

flowchart
graph TD
    A["Electric Guitar"] --> B["Amplifier"]
    B --> C["Stage 1"]
    B --> D["Stage 2"]
    C --> E["Output Stage"]
    D --> E
USE WITH AN AMP SELECTOR
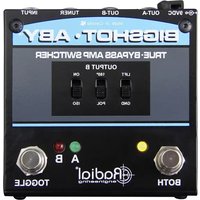
Expand your rig even further with the BigShot ABY™ amp selector. This compact switcher allows you to either switch between two amplifiers or combine the signal when you want both amps to play at the same time.

flowchart
graph LR
    A["Electric Guitar"] --> B["BuVIPS"]
    C["Electric Guitar"] --> B
    B --> D["BuBHOT/ABY"]
    D --> E["VEX"]
    D --> F["BuVIPS"]
    D --> G["BuBHOT/ABY"]
    D --> H["BuVIPS"]
    D --> I["BuBHOT/ABY"]
    D --> J["BuVIPS"]
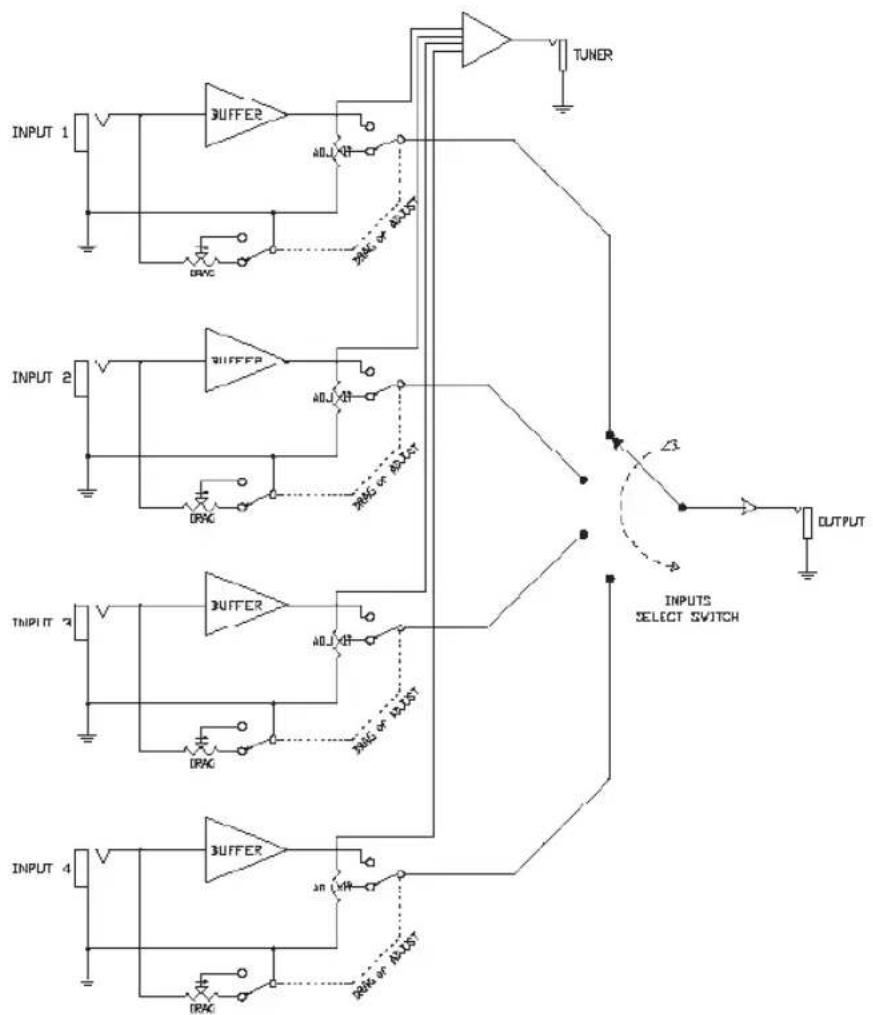
BLOCK DIAGRAM\*
flowchart
graph TD
    INPUT1["INPUT 1"] --> BUFFER1["BUFFER"]
    INPUT2["INPUT 2"] --> BUFFER2["BUFFER"]
    INPUT3["INPUT 3"] --> BUFFER3["BUFFER"]
    INPUT4["INPUT 4"] --> BUFFER4["BUFFER"]
    BUFFER1 --> DAC1["AND"]
    BUFFER2 --> DAC2["AND"]
    BUFFER3 --> DAC3["AND"]
    BUFFER4 --> DAC4["AND"]
    DAC1 --> TUNER["TUNER"]
    DAC2 --> TUNER
    DAC3 --> TUNER
    DAC4 --> TUNER
    TUNER --> OUTPUT["OUTPUT"]
    DAC1 -.-> DAC2
    DAC2 -.-> DAC3
    DAC3 -.-> DAC4
    DAC4 -.-> INPUTS_SELECT_SWITCH["INPUTS SELECT SWITCH"]
    style INPUT1 fill:#f9f,stroke:#333
    style INPUT2 fill:#f9f,stroke:#333
    style INPUT3 fill:#f9f,stroke:#333
    style INPUT4 fill:#f9f,stroke:#333
    style TUNER fill:#ccf,stroke:#333
    style OUTPUT fill:#ccf,stroke:#333
* Subject to change without notice.
SPECIFICATIONS\*
Audio circuit type: Discrete class-A, except tuner output
Frequency response: ....±<1dB 20Hz-20kHz
Gain: -0.22dB
Dynamic range: 109dB
Maximum input: ....+7dBu with trim fully clockwise (no level reduction)
Input impedance – trim mode: 220kΩ
Input impedance – drag mode: 20kΩ to 1MΩ
Output impedance: 120Ω
Equivalent input noise: -109dBu, A-weighted
Noise floor: -109dBu, A-weighted
Intermodulation distortion: 0.015% @ -20dBu
Total harmonic distortion (THD): 0.007% @ -20dBu
Phase deviation: -15° @ 20Hz, +5° @ 20kHz
Crosstalk: -94dB
Tuner output: ....Always-on buffered output
LED indicators: ....Large 3mm OD ultra-bright LED's
Construction: 14 gauge steel
Power: 9V / 40mA (center pin negative)
Construction: Steel enclosure
Size (LxWxD): 4.75" x 3.625" x 1.75" (120 x 92 x 44mm)
Weight: 1.4lb (0.63kg)
Warranty: Radial 3-year, transferable
* Subject to change without notice.
RADIAL ENGINEERING 3 YEAR TRANSFERABLE WARRANTY
RADIAL ENGINEERING LTD. ("Radial") warrants this product to be free from defects in material and workmanship and will remedy any such defects free of charge according to the terms of this warranty. Radial will repair or replace (at its option) any defective component(s) of this product (excluding finish and wear and tear on components under normal use) for a period of three (3) years from the original date of purchase. In the event that a particular product is no longer available, Radial reserves the right to replace the product with a similar product of equal or greater value. In the unlikely event that a defect is uncovered, please call 604-942-1001 or email service@radialeng.com to obtain a RA number (Return Authorization number) before the 3 year warranty period expires. The product must be returned prepaid in the original shipping container (or equivalent) to Radial or to an authorized Radial repair center and you must assume the risk of loss or damage. A copy of the original invoice showing date of purchase and the dealer name must accompany any request for work to be performed under this limited and transferable warranty. This warranty shall not apply if the product has been damaged due to abuse, misuse, misapplication, accident or as a result of service or modification by any other than an authorized Radial repair center.
THERE ARE NO EXPRESSED WARRANTIES OTHER THAN THOSE ON THE FACE HEREOF AND DESCRIBED ABOVE. NO WARRANTIES WHETHER EXPRESSED OR IMPLIED, INCLUDING BUT NOT LIMITED TO, ANY IMPLIED WARRANTIES OF MERCHANTABILITY OR FITNESS FOR A PARTICULAR PURPOSE SHALL EXTEND BEYOND THE RESPECTIVE WARRANTY PERIOD DESCRIBED ABOVE OF THREE YEARS. RADIAL SHALL NOT BE RESPONSIBLE OR LIABLE FOR ANY SPECIAL, INCIDENTAL OR CONSEQUENTIAL DAMAGES OR LOSS ARISING FROM THE USE OF THIS PRODUCT. THIS WARRANTY GIVES YOU SPECIFIC LEGAL RIGHTS, AND YOU MAY ALSO HAVE OTHER RIGHTS, WHICH MAY VARY DEPENDING ON WHERE YOU LIVE AND WHERE THE PRODUCT WAS PURCHASED.
To meet the requirements of California Proposition 65, it is our responsibility to inform you of the following: WARNING: This product contains chemicals known to the State of California to cause cancer, birth defects or other reproductive harm. Please take proper care when handling and consult local government regulations before discarding.
All trademarks belong to their respective owners. All references to these are for example only and are not associated with Radial.

www.radialeng.com
Radial Engineering Ltd.
1588 Kebet Way, Port Coquitlam BC V3C 5M5
Tel: 604-942-1001 • Fax: 604-942-1010 • Email: info@radialeng.com


Radial Bumper™ User Guide - Part #: R870 1016 00 / 06-2016 Copyright © 2016, all rights reserved.
Appearance and specifications subject to change without notice.
Made in Canada


Brand : Radial Engineering
Model : Bumper
Category : Guitar effects pedal