
Olipad 100 - Tablet OLIVETTI - Free user manual and instructions
Find the device manual for free Olipad 100 OLIVETTI in PDF.


| Product Type | Tablet |
| Brand | Olivetti |
| Model | Olipad 100 |
| Display Size | 7 inches |
| Display Resolution | 1024 x 600 pixels |
| Processor | 1.2 GHz ARM Cortex |
| RAM | 1 GB |
| Internal Storage | 8 GB |
| Expandable Storage | microSD up to 32 GB |
| Operating System | Android 4.0 Ice Cream Sandwich |
| Battery Capacity | 4000 mAh Lithium-ion |
| Charging | DC 5V, 2A via micro USB |
| Dimensions (W x H x D) | 198 x 122 x 11 mm |
| Weight | 350 g |
| Connectivity | Wi-Fi 802.11 b/g/n, Bluetooth 2.1 |
| Rear Camera | 2 MP |
| Front Camera | 0.3 MP |
| Sensors | Accelerometer, proximity |
| Audio | Built-in speaker, 3.5 mm headphone jack |
| Main Functions | Web browsing, email, social media, video playback, e-book reader, GPS |
| Cleaning | Clean with a soft, dry cloth. Avoid liquids. |
| Safety | Keep away from moisture and extreme temperatures. Do not disassemble. |
| Spare Parts & Repairability | Available through authorized Olivetti service centers. |
| General Information | Tablet for personal and professional use. |
Frequently Asked Questions - Olipad 100 OLIVETTI
User questions about Olipad 100 OLIVETTI
0 question about this device. Answer the ones you know or ask your own.
Ask a new question about this device
Download the instructions for your Tablet in PDF format for free! Find your manual Olipad 100 - OLIVETTI and take your electronic device back in hand. On this page are published all the documents necessary for the use of your device. Olipad 100 by OLIVETTI.
USER MANUAL Olipad 100 OLIVETTI
Edited/Published/Produced by:
Olivetti S.p.A.
Copyright © Olivetti, 2011
All rights reserved
The mark affixed to the product certifies that the product satisfies the basic quality Requirements.

Date of publication: March 2011
Trademarks and trade names may be used in this document to refer to either the entities claiming the marks and names or their products.
Olivetti disclaims any proprietary interest in trademarks and trade names other than its own.
CE0168①
Here by, Olivetti S.p.A. declares that this product is in compliance with the essential requirements and other relevant provisions of Directive 1999/5/EC.
This product is in compliance with requirements of European Directives 2004/108/EC e 2006/95/EC relating to electromagnetic compatibility and safety of electrical equipment designed for use within certain voltage limits.
The Declaration of Conformity can be found at: www.olivetti.com/site/public/support.asp
TABLE OF CONTENTS
TABLE OF CONTENTS......1
INSTRUCTIONS ....5
SAFETY PRECAUTIONS......6
SAR (SPECIFIC ABSORPTION RATE) CERTIFICATION DATA....7
YOUR TABLET PC PROFILE 8
FRONT VIEW 8
BOTTOM VIEW 9
TOP VIEW....9
LEFT/RIGHT VIEWS....10
CARING FOR YOUR TABLET PC....11
LCD SCREEN 11
OTHER ACCESSORIES....12
IF WATER ENTERS INSIDE YOUR TABLET PC 12
OTHER WARNINGS 12
TRAVELLING WITH YOUR TABLET PC 13
GETTING STARTED 14
CONNECTING THE POWER ADAPTER 14
TURNING ON YOUR TABLET PC 15
FIRST STEPS 16
THE TABLET HOME SCREEN .... 18
GET TO KNOW YOUR SYSTEM....19
THE STATUS ICONS 19
HOW TO USE THE TOUCH SCREEN TO ACCESS THE SETTINGS FUNCTION....20
SYSTEM SETTINGS 21
NETWORK CONFIGURATION....22
WIRELESS CONNECTIONS 23
BLUETOOTH CONNECTIONS 23
BLUETOOTH SETTINGS 24
MOBILE NETWORKS (ONLY FOR MODEL WITH 3G FUNCTION) 25
SOUND 26
DISPLAY....27
FAMILY ACCOUNTS 28
LOCATION, DATE AND TIME 29
STORAGE 30
SECURITY....31
APPLICATIONS 32
LANGUAGE & KEYBOARD 33
BATTERY USE 34
ABOUT TABLET 35
COMMUNICATIONS 36
BROWSER....36
CONTACTS 37
Insert New Contact 37
Import contacts....37
EMAIL - SETUP AN ACCOUNT 38
Configuring an Exchange account....39
FUN 40
PHOTOS 40
MUSIC 42
VIDEOS 43
CAMERA 44
UPDATING THE TABLET 45
UPDATING AUTOMATICALLY 45
UPDATING MANUALLY 46
SYSTEM CONNECTIONS......47
INSERTING THE SD CARD 47
CONNECTING TO A PC 47
CONNECTING HEADPHONES 48
INSERTING THE SIM CARD 49
APPENDIX 50
TROUBLESHOOTING 50
TECHNICAL SPECIFICATIONS ....52
DOCKING STATION (OPTIONAL) 54
CONNECTIONS 55
Setting up the Tablet....55
Connecting an HDMI Device 55
Connecting the Power Supply 56
INSTRUCTIONS
Meanings of icons:

Indicates operations that are forbidden in order to prevent damage to the Tablet PC.

Caution: warnings for operators to avoid potential injury. Please take note and remember.

Important: important information, notes, definitions, general knowledge and references, etc.
Other trademarks and trade names may be used in this manual to refer to entities claiming the marks and names or their products.
The manufacture disclaims any proprietary interest in trademarks and trade names other than its own.
Information in this manual is subject to change without notice.
Reproduction in any manner without the written permission of the manufacturer is strictly forbidden.
Product images in this manual are for reference purposes only.
SAFETY PRECAUTIONS
- DO NOT stow the Tablet in its case together with small objects that may scratch the LCD Screen or penetrate inside the Tablet.
- DO NOT use the Tablet PC in a dirty or dusty environment. Keep the environment clean and dry.
- DO NOT place the Tablet PC on an uneven or unstable work surface.
- DO NOT place or drop objects on top of the Tablet PC. DO NOT push any foreign objects into the Tablet PC. DO NOT cover the LCD Screen with heavy objects.
- DO NOT expose the Tablet PC to strong magnetic or electrical fields; DO NOT place the floppy disk near or on the Tablet PC as this may cause loss of floppy disk data.
- DO NOT leave the Tablet PC in bright sunlight, especially in the car, as this may damage the LCD Screen.
- SAFE TEMP: This Tablet PC should be used only in environments with an ambient temperature of between 5°C (41°K) and 35°C (95°K).
- DO NOT expose the Tablet PC to or use it close to liquids, moisture or in rain.
- DO NOT dispose of the Tablet PC in municipal waste. Check local regulations for disposal of electronic products. Recycle the Battery Pack and check with your Local Authority or retailer for recycling advice.
- VOLTAGE: Refer to the rating label on the Tablet PC and make sure that the Power Adapter complies with the specifications indicated. Use only attachments or accessories approved by the manufacturer.
- Before turning on the Tablet PC, check connections between the main unit and attachments.
- DO NOT use the Tablet PC when eating to avoid soiling the Tablet PC
- DO NOT insert anything in the Tablet PC that may cause a short-circuit or damage electric circuits.
- Switch off the Tablet PC before installing or removing external devices that do not support hot plug-in.
- Disconnect the Tablet PC from the electrical outlet and keep it out of the reach of children.
- DO NOT disassemble the Tablet PC. Only a certified service technician should repair your computer. Otherwise, problems may be caused and the manufacturer shall not be held responsible for any damage.
- Excessive sound pressure from earphones and headphones can cause hearing loss.
SAR (SPECIFIC ABSORPTION RATE) CERTIFICATION DATA
This product complies with EU requirements regarding restriction of exposure of persons to radio-frequency energy (RF) emitted by telecommunication and radio devices as it is designed and manufactured in such a way as not to exceed the exposure limits indicated by the Council of the European Union. The permitted SAR limit for the general population is 2.0 W/Kg. This limit guarantees an ample safety margin such as to protect all persons regardless of age and conditions of health.
SAR tests are carried out using normal operator stations with the device transmitting at its highest certified power limit in all the frequency bands tested.
During the test, the highest SAR level recorded for this model was equal to 1.96 W/kg.
During normal use, the effective SAR limit of the device may be well below the maximum value as it has been designed to emit only the radio-frequency energy necessary to transmit the signal to the nearest base station of the network.
The Declaration of Conformity available at the address indicated at the start of this guide demonstrates conformity of this device with the R&TTE (European Radio & Terminal Telecommunications Equipment) Directive.
YOUR TABLET PC PROFILE
FRONT VIEW
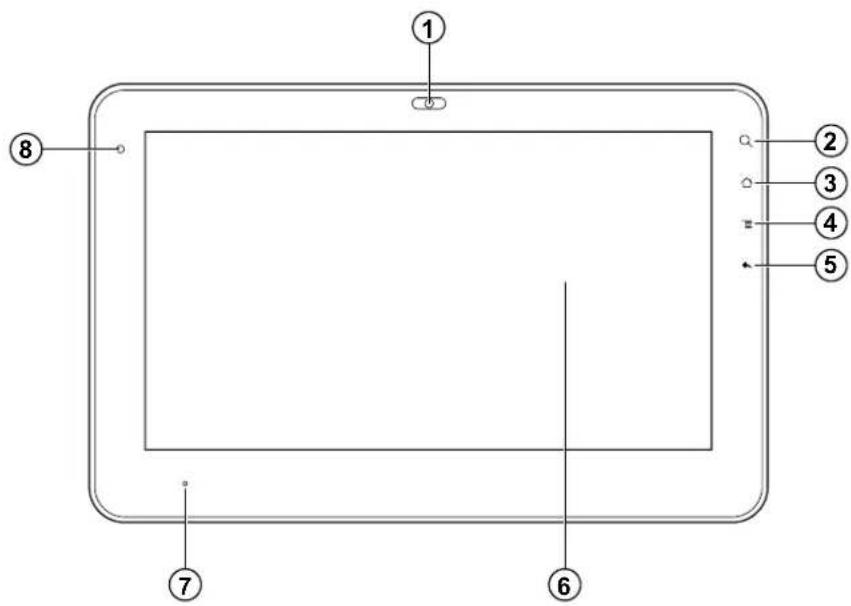
| 1 | Built-in Camera |
| 2 | Search |
| 3 | HOME:Press once to display the Home Screen |
| 4 | MENU:Displays the menu |
| 5 | BACK:Return to previous screen. |
| 6 | LCD Touch-sensitive Screen:Touching the screen lightly you can interact with the system (for example, to make selections, enable/disable settings etc.). |
| 7 | Charge Indicator:Light is red while battery is charging, green when the battery is fully charged. |
| 8 | Light sensor Window:Automatically adjusts the screen brightness on the basis of environment lighting levels. |
BOTTOM VIEW

| 1 | Microphone Port |
| 2 | SIM card slot (only for models with 3G capabilities) |
| 3 | Docking port |
TOP VIEW

| 1 | VOL +/- button |
LEFT/RIGHT VIEWS
| 1 | Power button |
| 2 | Micro SD Port |
| 3 | USB (USB2.0) Port |
| 4 | Mini-USB Port |
| 5 | Speakers |
| 6 | Headphone Jack |
| 7 | Power Jack |
| 8 | Speakers |


The USB device must be inserted oriented correctly. Forced insertion may cause damage.
CARING FOR YOUR TABLET PC
The Tablet PC is precision-engineered; incorrect operation may damage the device.
LCD SCREEN
The LCD Screen, made of thin glass, is the most delicate component of the Tablet PC and may be damaged by any sudden external impact. DO NOT scratch the cover of the Tablet PC as scoring of the cover cannot be removed.
• DO NOT place heavy objects on the LCD Screen as this may damage it.
- DO NOT drop or place heavy objects on the LCD Screen.
• DO NOT scratch the LCD Screen with your fingernails or hard objects.
- Use a soft, lint-free cloth to clean your Tablet PC, wiping the LCD Screen gently so as not to damage it.
• DO NOT use chemical cleaning fluids to clean the LCD Screen.
- The LCD Screen MUST NOT come into contact with hard objects (e.g.: buttons, watch-straps).
- Use a soft, dry, lint-free cloth to wipe the LCD Screen gently. DO NOT try to wipe the LCD Screen directly with your hand.
- DO NOT spill liquids inside the Tablet PC as the components may be damaged.

DO NOT clean the Touch Pad applying or spraying acidic cleaning fluids directly onto the Tablet PC.
OTHER ACCESSORIES
Follow the steps below before cleaning your Tablet PC and accessories.
- Turn off the Tablet PC. Disconnect your Tablet PC and all external devices from their electrical outlets.
- Moisten a soft, lint-free cloth with water and wipe the surface of the Tablet PC gently. DO NOT allow liquids to penetrate inside the Tablet PC otherwise a short-circuit could occur with resulting damage.
IF WATER ENTERS INSIDE YOUR TABLET PC
- DO NOT turn on the Tablet PC immediately.
- Disconnect the power cord, if connected, and turn off the Tablet PC.
- Drain the water from the Tablet PC. Use soft damp cloth to wipe carefully the surface of the Tablet PC.
• Use a fan to dry the Tablet PC and accessories, then send it to the service centre for advice.
• DO NOT use a hair dryer to dry the Tablet PC as it may be distorted by high temperatures.
• DO NOT place the Tablet PC back into the wet carrying case. - Switch the Tablet PC on again when it is completely dry.
OTHER WARNINGS
- DO NOT expose the Tablet PC to high temperatures for long periods, especially in the car, as the various components could become distorted.
• Periodically make back-ups of its data. - Periodically upgrade/update the hardware and software so as to ensure that the Tablet PC maintains compatibility and reliability.
TRAVELLING WITH YOUR TABLET PC
Turn off the Tablet PC and disconnect all cables before moving it. Carry out the following steps if you intend to travel with your Tablet PC.
- Turn off the Tablet PC and disconnect it from electrical outlets.
- Before travelling, place the Tablet PC in its carrying case to protect it from dust, water, shock and scratches.
- Check that you have packed the AC Adapter, power cords, manual and Warranty card with you. DO NOT forget the passwords of your Tablet PC.
- Check the voltages used in the countries you plan to visit. Your Tablet PC comes with a universal AC-DC adapter so you only need to buy the different power cords for connection to the different types of outlet. Sometimes hotels provide universal outlets that are suitable for the power cord provided with your Tablet PC.

When driving in your car, DO NOT leave the Tablet PC exposed to the sun. Place it in a cool, shady area.

The connection between the Internet and your Tablet PC is interrupted when the system switches to stand-by mode.
GETTING STARTED
CONNECTING THE POWER ADAPTER
The Tablet PC comes with a universal AC-DC adapter that supports an input voltage between 100V and 240V. The procedure for connecting the adapter is indicated below:
- Take the adapter and the plug, then push the plug into the socket until it clicks into place.
- Plug the DC end of the adapter into the power jack of the Tablet PC.
- Insert the AC end into the wall electrical outlet
- Check that the connections above are correct before turning on the Tablet PC.
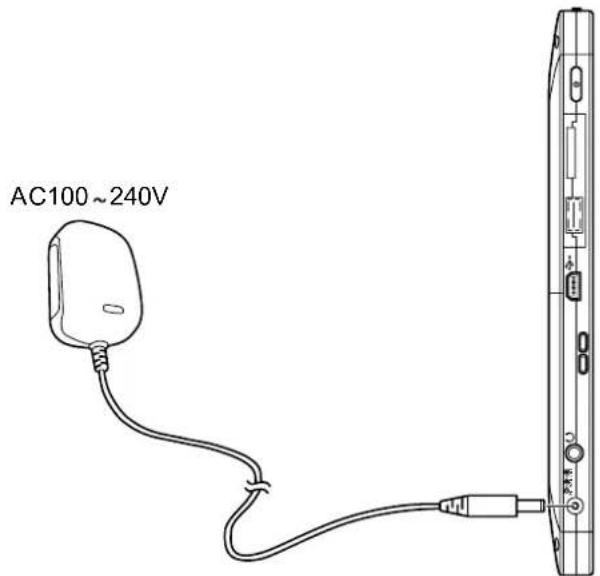
Your Tablet PC and accessories may differ from those shown.
TURNING ON YOUR TABLET PC
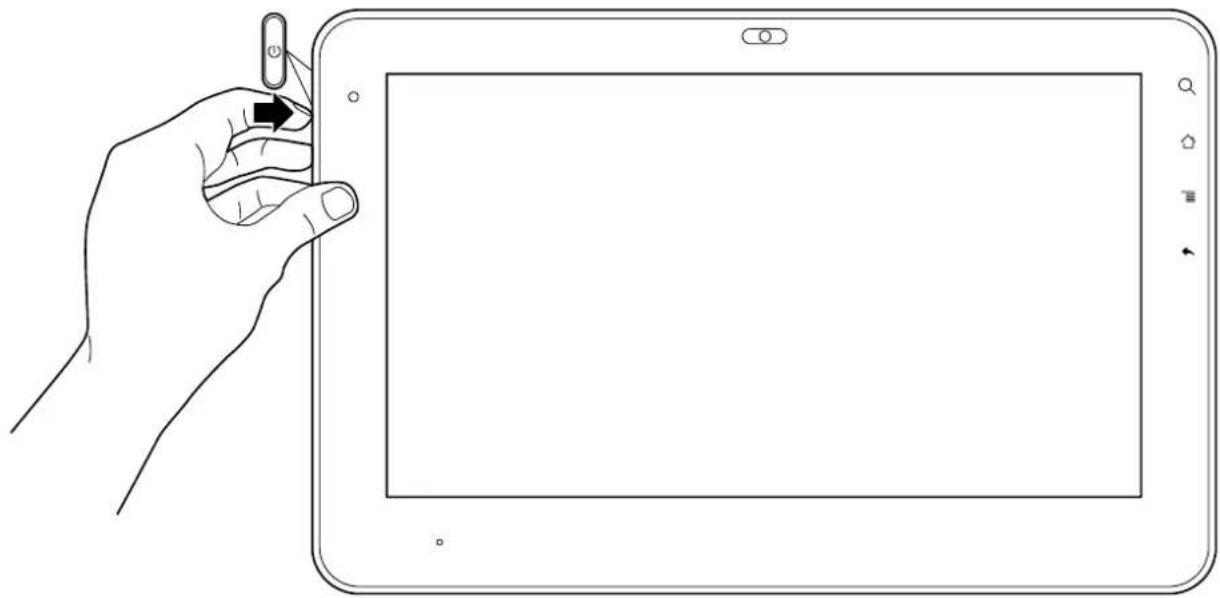
Press the POWER button to turn on the Tablet PC. To turn off the Tablet PC, press the POWER button once and select "Power Off" from the pop-up menu.
natural_image
Line drawing of a hand holding a tablet device with a stylus, no text or symbols present
Press the Power button for 4 seconds to turn the device off forcibly if the system remains blocked.
FIRST STEPS
The first time you turn on the tablet, the initial screen below appears.
- Read the License Agreement and confirm by selecting Accept to continue.
![Benvenuto! Accordo di licenza utonke finale READ CATERELELY THE TERMS AND CONDITIONS OF THIS END USER LICENSE AGREEMENT. THIS AGREEMENT BETWEEN TAIP MAY, INC., A DELAWARE CORPORATION WITH AN ADDRESS AT THE CABBEGHEN DRINK, CHABBEGNE, MATZALI, VALE GEBENDEP, AND YOU THE PERSON THAT ACCEPTS THIS AGREEMENT. IFG ORDER CONTAINED THE EXCLUSIVE TEXT AND COORDINuous TEXT WILL AUTHORIZE OR ANY ACCESSORIES THIS SOFTWARE SPACING ON THE "ACCEPT" BUTTON BELOW OR ANY OTHER ANY INSTALLING. OFFICING ACCESSIBLE LOCATIONS OVERWINS THIS SOFTWARE WILL CONSTITUTE ACCEPTANCE AND CREDIT A LA ELLAFY ENFORCITABLE CONTACT IN WHICH YOU ARE TO BE SOLD IN ANY ITEMS AND CONDITIONS OF THIS AGREEMENT, WITHOUT ACCEPTATION. IF YOU ARE NOT AUTHORIZED TO ENTER INTO THIS AGREEMENT, OR IF YOU DO NOT QUATE TO ALL OF THE TERMS OF THIS AGREEMENT, YOU MUST TAG ON THAT "YOU NOT ACCEPT BUTTON BELOW AND YOU MUST NOT INSTALL COPY, ACCESS, LIME OR LIKE THIS SOFTWARE." 5. DEFINITIONS: "Authenticed Software" means the responsive, distributor, IBM, or other third party than provides the Software and Documentation to Grid User in accordance with JavaScript from License. "Authentication" means the your rights, help information and other hardware registration for the Software that is referred to Grid User. "Cool User Customer Contract" means a separate contract between Web User and Advanced Distributor perspectives which Web User acquires the web user device or other product (without) on which the Software is intended to be used. "Top all software" means Customers' proprietary computer programs that are delivered to Web User for use under this agreement. "Software" means the exclusive versions of the Taip US Software and if any other Materials, indicating any updates. [Do not Accept] Accept](/content/2026/05/1090477/images/b58327877ab26cb3f2cf84d2e398a1d03a45aa4608d29a1c70a9ebdf9a9f16e6.jpg)
- Select the language desired from the list of languages available and select Next to confirm.

- Select the Position, Date and Time. Select Next to confirm.
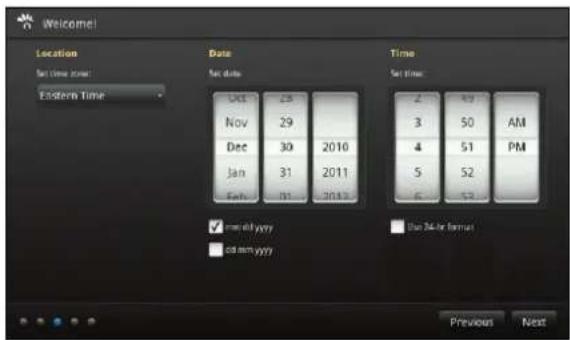
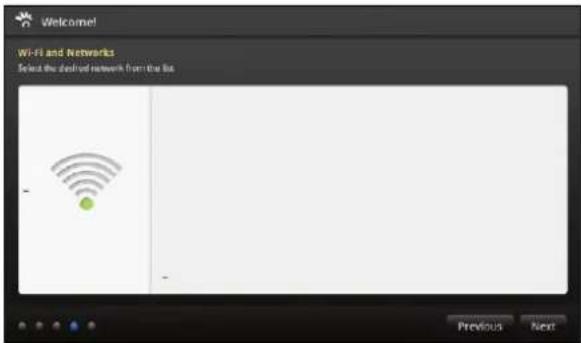
- The device searches for wireless networks, displaying the list of those available. To access the Wi-Fi network, enter the connection parameters and confirm with Next.
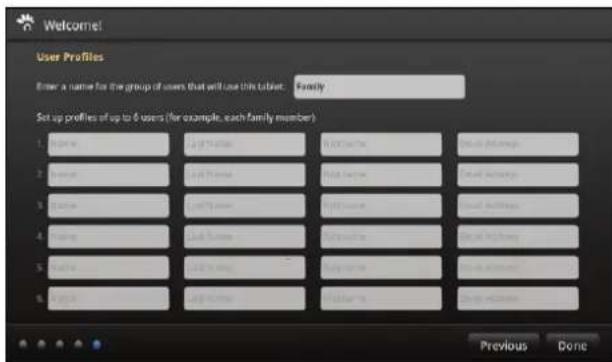
- Set the User Profiles and then confirm with Done.
- Initial configuration of the device is complete and you can now use all its functionalities..
Note: During the initial configuration phase, selecting Previous you can return to the previous screen page to modify settings entered previously.
All settings configured during the first configuration phase can be subsequently modified from Settings by selecting the

icon.
The first time you turn on the tablet, you must unlock it by dragging the lock icon towards the top-corner of screen to access the Home screen. The Home screen offers three portlets containing dynamic contents. Applications can be launched simply by touching them.
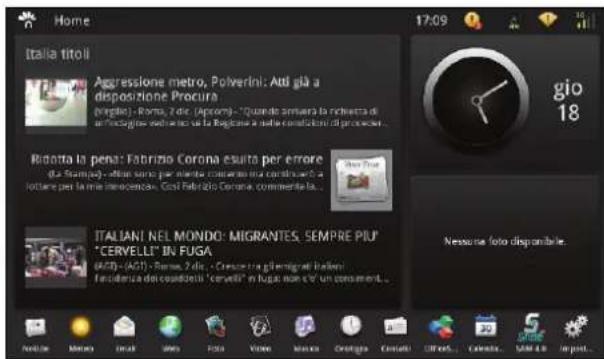
- The Home screen displayed at the end of initial configuration is shown below.
From this screen you can access all the main applications available on the Tablet by simply selecting the related icon at the bottom.
- Tapping the display, using the right or left scrolling function, you can access the screen page with the other applications provided by the Tablet.
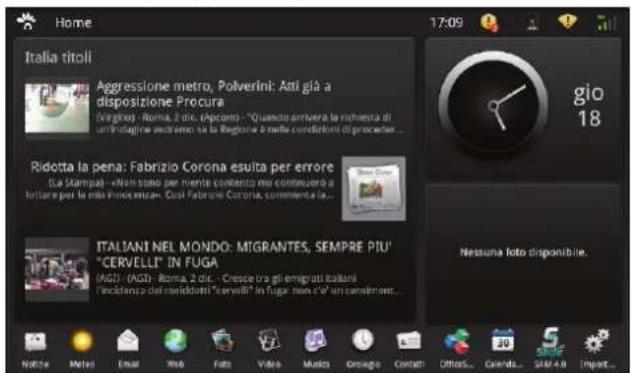
Easy-to-read initial screen with three windows (portlets) and a bar for favourite applications:
- scrolling from left to right you can view other screens;
- pressing "Other", you can display other applications with "garage door" type animations;
- dragging and inserting new application icons into the portlets.
Note: Not all applications can display dynamic information when dragged into the portlets.
Add applications
Applications can be added by purchasing them directly from the online shop (market store), accessed by selecting

the Slide icon. The market store provides also free applications.
GET TO KNOW YOUR SYSTEM
THE STATUS ICONS
The status icons at the top right of the screen are always active, and indicate:
- the current time
– the presence of messages to be read - battery charge status if you are using the internal battery, or are connected to the mains supply
– availability of Wi-Fi network, and current connections to it
– availability of mobile network (e.g. 3G systems) and current connections to it.
Note: This tablet comes with an automatic software update service. Please check for the
existence of updates by pressing the icon 📄 and following the instructions on the screen. This will allow you to have the latest software updates.
17:09


HOW TO USE THE TOUCH SCREEN TO ACCESS THE SETTINGS FUNCTION
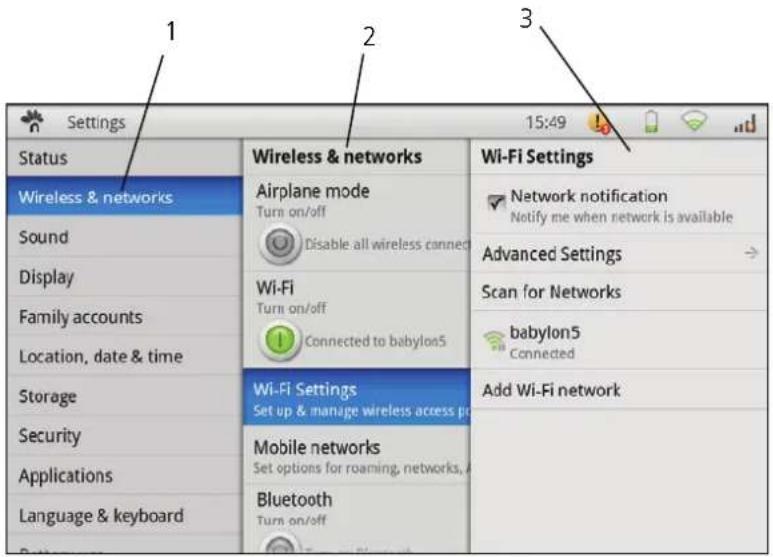
You can use the Setup function to change the configurations of your Tablet PC. You can access the various functions through touchscreen interactions with a system of submenus.
Example:
1 Select the item you require. The related submenu opens to the right of the selected item.
2 To return to the previous menu, or to one of the menus open, select its title at the top of the menu you want to access.
3 If a number of menus are present, you can press the BACK key to return to the previous menu.
SYSTEM SETTINGS
To access the configuration menu, select the

icon.
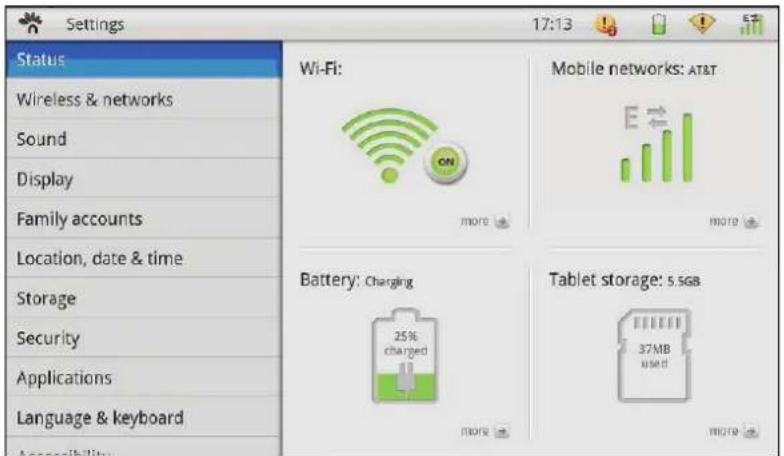
All the settings available are listed on the left (touching the display, using the up or down scroll function, you can display the items in the Settings menu).
General information about the device is displayed at the centre of the screen: Wi-Fi status, 3G status, battery charge and memory used.
This guide helps you configure your wireless, Bluetooth and mobile network settings for connection to the Internet.
To access the network configuration menu,

select the impost... icon.
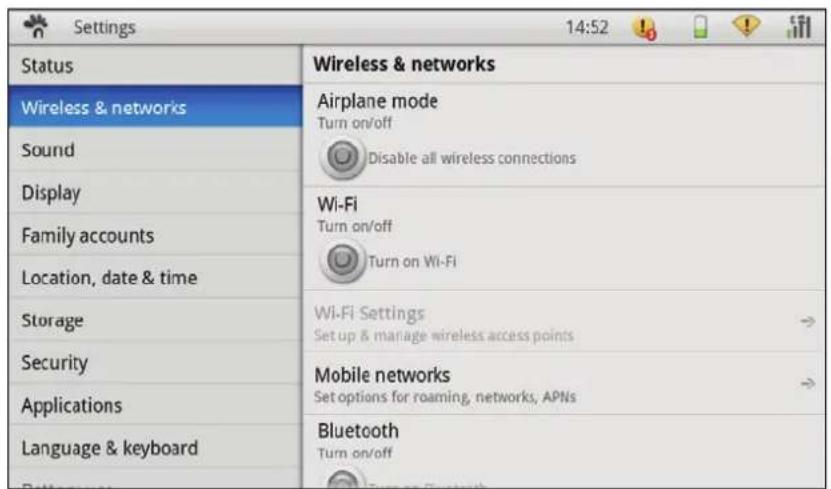
Then select Wireless & networks to enable/disable the Wi-Fi network, set up the Wi-Fi connection or enable/disable Bluetooth.
Airplane Mode
If this mode is enabled, the wireless connection e.g. Wi-Fi, Bluetooth and so on, is disabled.
WIRELESS CONNECTIONS
- Click "Wi-Fi" to turn on the Wi-Fi device, then click "Wi-Fi Settings" to perform the configuration.
- Execute the automatic search and, from the list of networks available, choose the one you want. Click "Connect" to connect automatically to the network set up in the "Wi-Fi Settings" menu. Enter the password for the network.
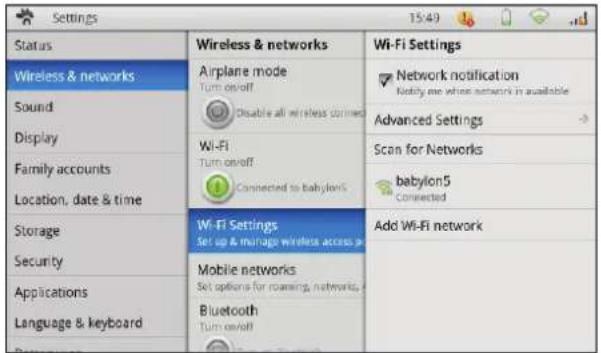
A Wi-Fi network can also be added manually using the option "Add Wi-Fi network", entering the SSID for the network and the related security settings.
Note: If you want to be notified when an open network is available, make sure that the "Network notification" checkbox is ticked.
BLUETOOTH CONNECTIONS
- Click "Bluetooth" to activate the Bluetooth device, and click "Bluetooth Settings" to configure it.
- Click "Scan for devices", connect the device and carry out other functions after pairing the two devices.

Before this step, turn on your Bluetooth device (mobile phone, Bluetooth earphone etc.,) and make sure the device is within field of reception (approx. 10 metres).
Bluetooth: to turn on or off the Bluetooth switch.
Device name: to define a name for the Bluetooth device.
Available: to allow the Bluetooth device to be detected by other devices.
Scan for devices: to start searching for remote Bluetooth devices.
BLUETOOTH SETTINGS
Bluetooth allows you to exchange files between the local and remote devices.
Pairing Devices
- Press the button to turn on/off Bluetooth.
- Select the Bluetooth settings and tick "Discoverable".
- Scan the network to find other accessible devices and select the one you require.
- Wait for recognition and, if requested, enter the password (the default password is usually "0000"). Confirm by selecting OK.
- The connection with the device is now established.
To send a file to a remote device
- Carry out pairing, select a file on the local device using the File Explorer application and select the "Send" option using Bluetooth.
- The Tablet displays a setup screen containing a list of the remote devices.
- Select the device you want and the corresponding item.
To receive a file from a remote device
- Carry out pairing between the Bluetooth devices.
- Make sure that "Discoverable" is still active (it disactivates automatically after 2 minutes).
- Select a file on the remote device and send it to the local device via Bluetooth. A message appears (see message icon at top right) indicating an incoming file.
- Confirm reception of the file and transfer starts.
MOBILE NETWORKS (ONLY FOR MODEL WITH 3G FUNCTION)
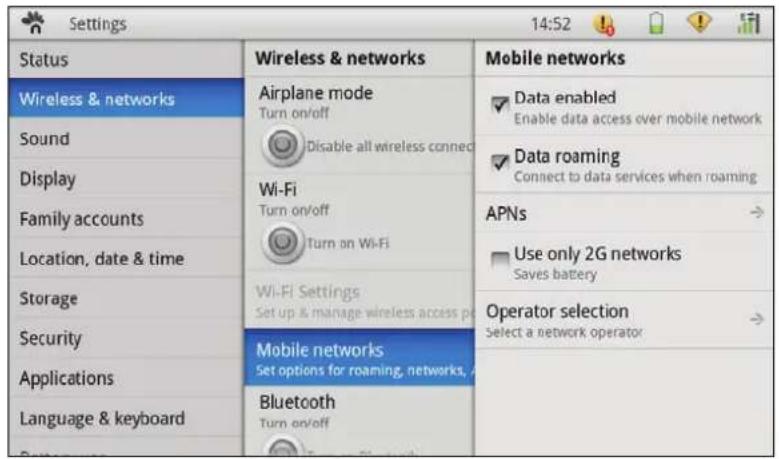
To access the network configuration menu, select the Impost. icon, followed by selecting Mobile networks.
In the menu for the 3G connection the following can be enabled:
– data access via a mobile network
– data access in roaming mode.
It is also possible to select the operator and define the APN (Access Point Name) required for data exchange.

WARNING :
To obtain the best performance of the device, a data connection must always be active. If the Internet connection is established via a radio-mobile network (3G), the service cost may be high. All operators offer special rates that permit low-cost data connections. Make sure your subscription is suitable before using the device for long periods.
SOUND
Silent mode: to mute all sounds except media & alarms.
Audible selection: to hear the screen selection tone.
Volume: to set the volume for warning notification tones or multimedia applications.
Select notification tone: to associate a notification tone to a specific event.

DISPLAY
Auto-rotate screen: tick the option to activate the automatic orientation function when rotating the Tablet PC.
Auto-brightness: automatically adjusts screen brightness.
Brightness: allows screen brightness to be adjusted manually using the cursor.
Screen timeout: to select the time lapse after which the screen is switched off automatically.


The screen switches automatically to standby mode after the number of seconds set without the need for any command.
FAMILY ACCOUNTS
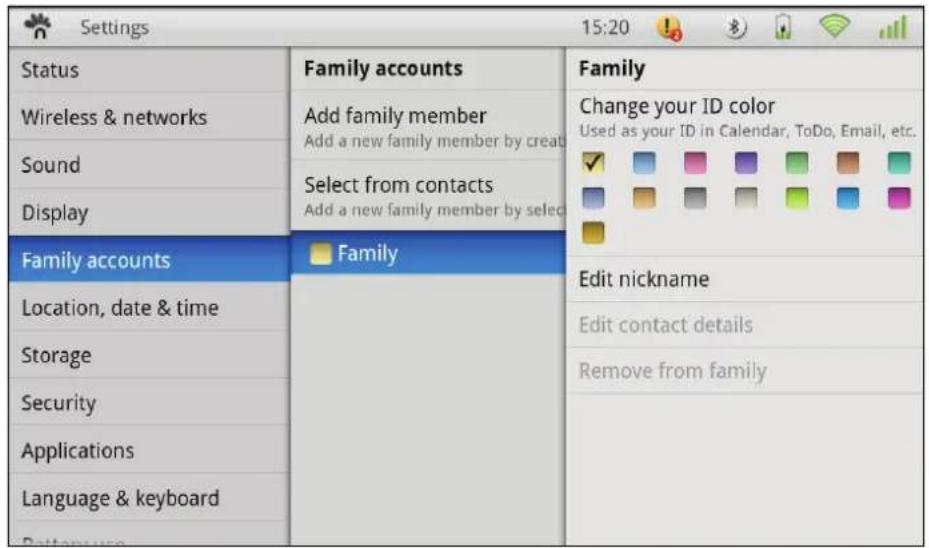
To manage user accounts.
Add family member: to insert new contacts, for example family members, selecting them from those available.
Following insertion, they can be modified and colours associated with each name.
Select from contacts: to add a new member from the list of contacts already present.
LOCATION, DATE AND TIME
To set the time zone, current date, date display format, time and time display format.
| Settings | 15:21 | ||
| Status | Location, date & time | Amsterdam, Berlin | GMT+1:00 |
| Wireless & networks | AutomaticUse network-provided values | Belgrade | GMT+1:00 |
| Sound | Select time zoneGMT+01:00, Amsterdam, Berlin | Brussels | GMT+1:00 |
| Display | Sarajevo | GMT+1:00 | |
| Family accounts | Set date21/01/2011 | Windhoek | GMT+2:00 |
| Location, date & time | Select date format√ dd mm yyyy□ mm dd yyyy | Cairo | GMT+2:00 |
| Storage | Harare | GMT+2:00 | |
| Security | Amman, Jordan | GMT+2:00 | |
| Applications | Set time15:21 | Jerusalem | GMT+2:00 |
| Language & keyboard | Use 24-hour format13:00 | Athens, Istanbul | GMT+2:00 |
STORAGE
Allows you to check the free space available on the Tablet or on the Micro-SD card, and remove safely and format the SD card.
Shows the amount of total/occupied memory for every partition of the internal memory (system archive, data archive).
If an external memory card is present, it can be formatted or enabled for use by the Tablet.
| Status | Storage | Tablet storage |
| Wireless & networks | Tablet storageInternal data storage capacity | Total tablet storageTotal space: 14.94GBAvailable space: 14.21GB |
| Sound | SD cardExternal memory card storage capa | Application storageTotal space: 1.84GBAvailable space: 1.68GB |
| Display | User content storageTotal space: 13.09GBAvailable space: 12.52GB | |
| Family accounts | ||
| Location, date & time | ||
| Storage | Format user content storageFormat (erase) the user content storage | |
| Security | ||
| Applications | ||
| Language & keyboard |
SECURITY
Using this function, the access modes can be managed for using the SIM card (change the PIN of the SIM card, lock/unlock the device by PIN request).
The Tablet can also be restored to the factory default conditions, erasing all the internal data of the Tablet.
Note: During this operation, follow attentively the instructions and warnings in the dialogue boxes.
| Settings | |
| Status | Security |
| Wireless & networks | Visible passwordsShow password as you type |
| Sound | Lock SIM cardRequire PIN to use device. |
| Display | |
| Family accounts | Change SIM PIN |
| Location, date & time | Factory data resetErases data on device |
| Storage | |
| Security | |
| Applications | |
| Language & keyboard | |
APPLICATIONS
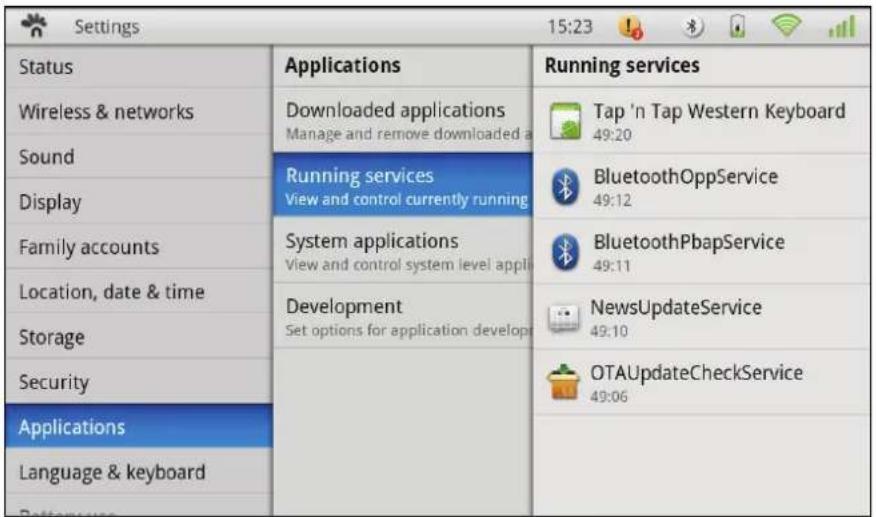
This menu allows you to:
- view new applications downloaded and remove them if required
- check which services are active on the Tablet
- display and check the status of the applications preloaded onto the Tablet
- set options needed by anyone developing specific applications for the Tablet.
LANGUAGE & KEYBOARD
Allows you to set the language and other settings related to the virtual keyboard.
- Ticking the options on the right you can:
- associate sounds with keys
- use capital letters at the beginning of a sentence
- correct typing errors
- display hints
- activate functions for automatic completion
| Settings | 15:23 | |
| Status | Language & keyboard | Tap 'n Tap Western Keyboard |
| Wireless & networks | Select languageEnglish (United States) | SoundPlay sound on keypress |
| Sound | Tap 'n Tap Western KeyboardOnscreen keyboard settings | Auto-capitalizationCapitalize the start of a sentence |
| Display | ||
| Family accounts | Quick fixesCorrects commonly typed mistakes | |
| Location, date & time | Show suggestionsDisplay suggested words while typing | |
| Storage | Auto-completeSpacebar and punctuationautomatically insert highlighted word | |
| Security | ||
| Applications | ||
| Language & keyboard | ||
BATTERY USE
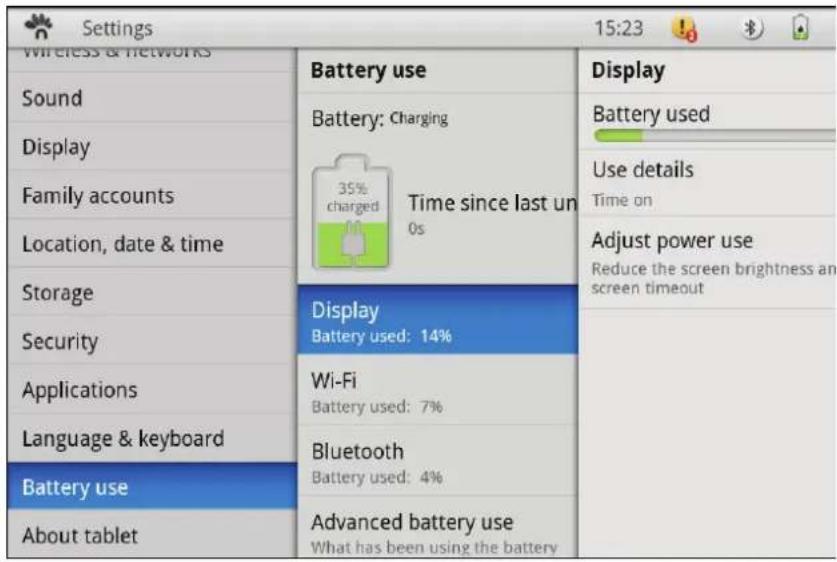
Indicates the percentage of battery being used by the activities active on the Tablet such as the display, Wi-Fi and Bluetooth.
Via a submenu, you can regulate the consumption by modifying the screen brightness and disabling the integrated peripherals for Wi-Fi and Bluetooth.
ABOUT TABLET
Provides detailed information about the Tablet, comprising mainly of legal information, mobile network information, model serial number and the versions installed of: Android OS operating system, TAP UI, Baseband and the Kernel.
| Settings | 15:24 | |
| Wireless & networks | ||
| Sound | About tablet | Mobile network info |
| Legal information | NetworkTIM | |
| Display | Mobile network info | Signal strength-83 dBm 15 asu |
| Family accounts | Model numberOliPad 100 | Mobile network typeUMTS |
| Location, date & time | Android OS version2.2 | Service stateIn service |
| Storage | ||
| Security | Tap UITM version1.1-3542 | RoamingNot roaming |
| Applications | Baseband versionR2A11 | Mobile network stateDisconnected |
| Language & keyboard | ||
| Battery use | Kernel version2.6.32.9-00000-10.8.2-dirtyhudson@tapntapsvn #19 | IMEI |
| About tablet | ||
COMMUNICATIONS
BROWSER
After the network connection is established, click the Browser icon
to surf the network, or click the Bookmarks icon to view straightaway the web site desired.

Click the icon at top right 📄 to enter the configuration menu.

Note: The functionalities available are those used by the main browsers available on the market, the only difference being the use in "touch" mode (via the touch screen).
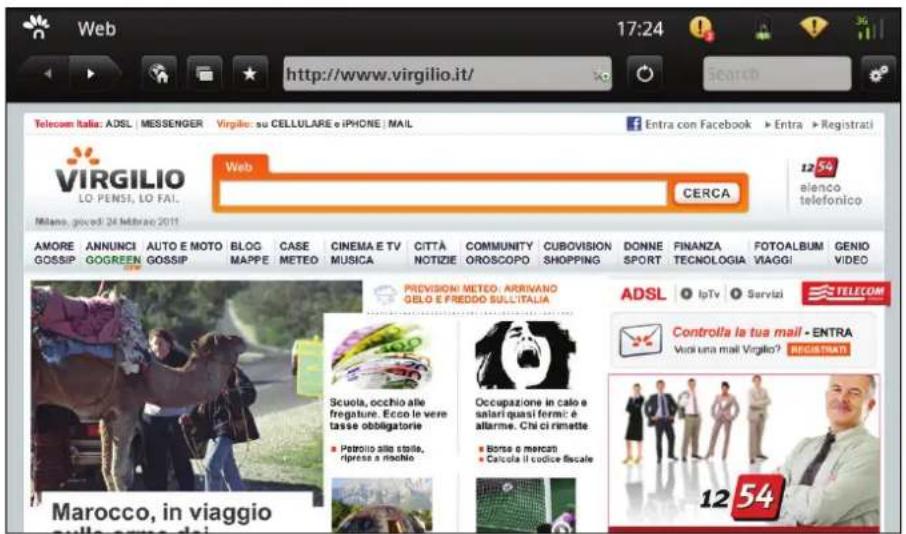
Sites containing a lot of graphics require more time for loading and may slow down internet surfing.
CONTACTS
Insert New Contact
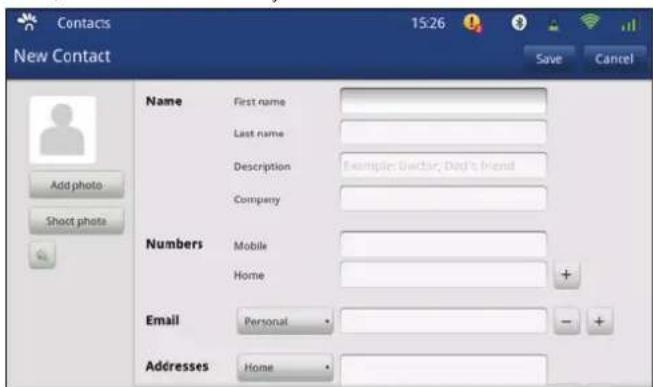
- From the Contacts environment, select "New contact". A screen page is displayed asking you to enter the data for the new contact.
- Touch the area related to the item you want to modify. At the bottom of the screen a keyboard is displayed to allow you to enter the letters and numbers desired.
- Fill in all the parts required for the contact (by scrolling downwards other fields may be visible at the bottom). At the end, touch the "Save" key.
Import contacts
- From the Contacts environment, select "Import contact". A screen page is displayed in which you can enter the address of the account from which you want to retrieve the contacts.
Note: Contacts can be imported only if an Internet connection is active and the contacts are imported only from the addressbook associated with a Gmail account present on the Internet.
EMAIL - SETUP AN ACCOUNT
1. Select Add Account.
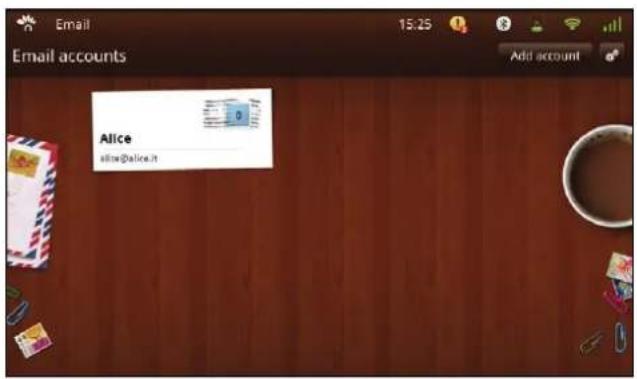
3. Select the type of server for the incoming post e.g. POP3, and at the end select the "Save" button.
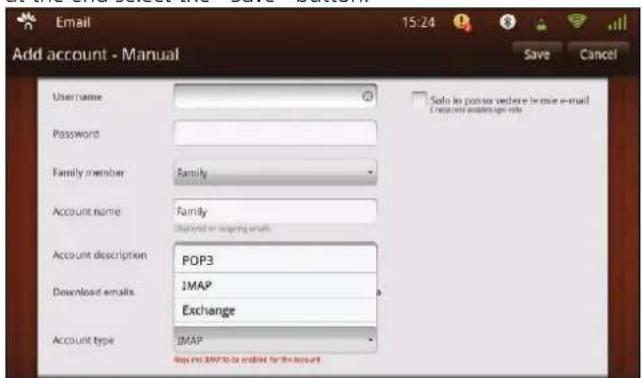
2. Enter the user data and password and press the "Next" button.


Make sure to enter correctly the names of the servers for the incoming and outgoing post.
Configuring an Exchange account
Set up an account to access services using the Exchange protocol (refer to previous screens):
- Using the virtual, on-screen, keyboard, enter the email address and email password then click "Next";
- Select the type of incoming server such as Exchange (Microsoft Exchange);
- Select "Synchronise" at the bottom, and tick the "Contacts" and "Calendars" options;
- Save the settings and wait until the Tablet performs the checks and saves the configuration data.
This configuration creates an Exchange account and imports the contacts and appointments associated with the Exchange account indicated.
FUN
PHOTOS
This application allows easy access to all the images stored on the Tablet (internal memory) and on the SD memory card (external memory), and allows images to be imported from your Picasa account.
Note: the user must already be the owner of a Picasa account or create one using the Picasa web site.
The application allows you to display the pictures on the Tablet PC.
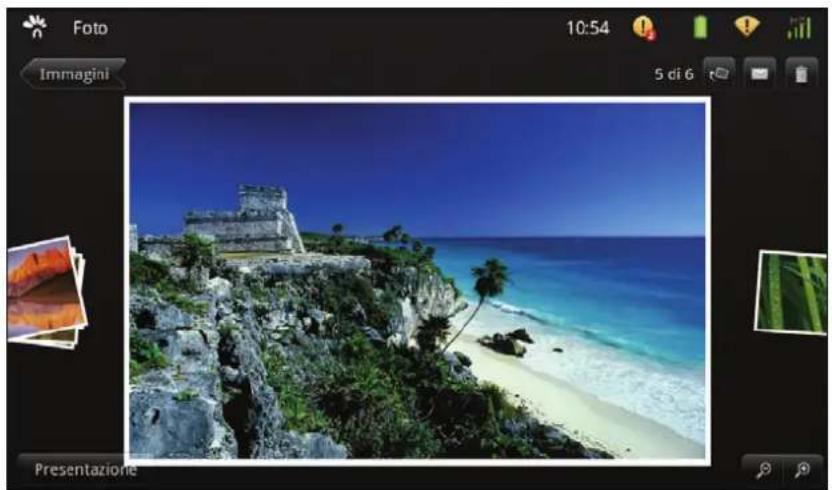
To view a given picture, select it from the screen, or start a slideshow presentation by clicking Slideshow at the screen bottom left.
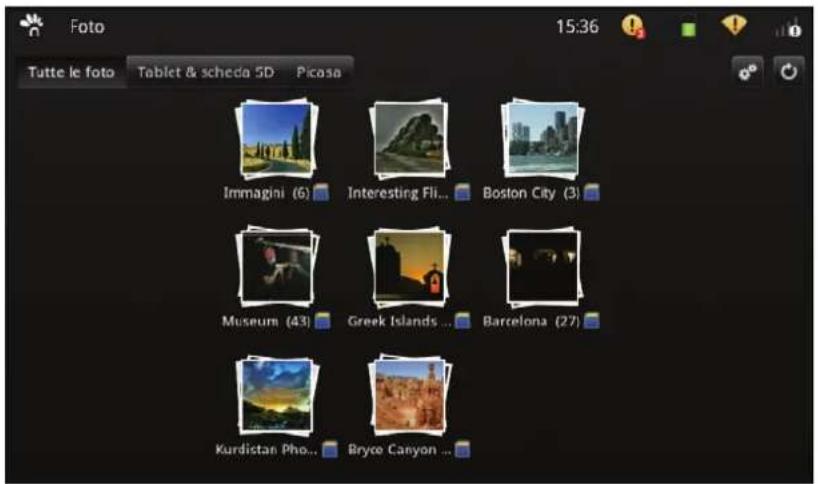
Viewing a photo album
Selecting an album, the contents are displayed and you can perform certain operations on the images.
Slideshow: to view the pictures in the album as a slideshow;
Rotate: rotate the picture to the left or to the right;
Delete: delete the current picture;
Send to mail: to send the picture to an e-mail address.
natural_image
Scenic coastal view of a colorful tower with turquoise waves and rocky cliffs, no visible text or symbols.MUSIC
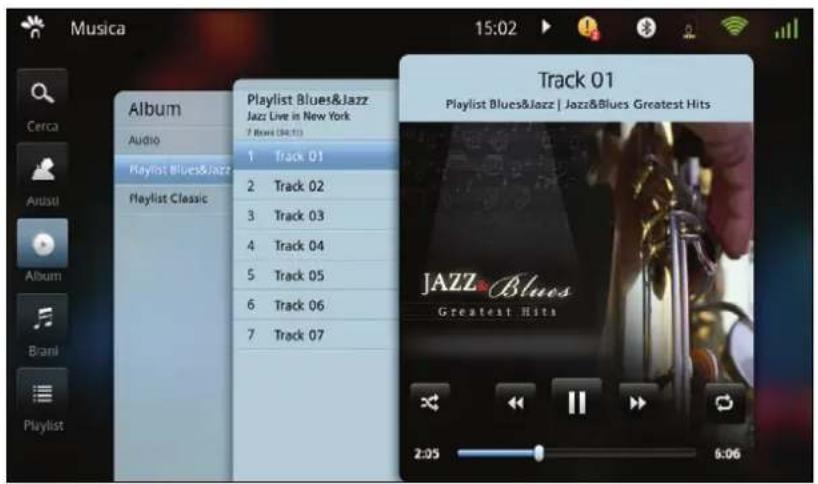
With this application, you can display and play a musical album.
The multimedia contents can be viewed according to Artists, Albums, Songs and Playlists.
The players provide the standard functions: play, stop, pause, forwards, backwards.
plays the selected songs in random
repeats a song.
VIDEOS
In this environment you can view the videos stored on the internal memory or on the external memory card.
Select the film/video you want to view.
The players provide the standard functions: play, stop and pause. Using a cursor you can scroll quickly through the film.

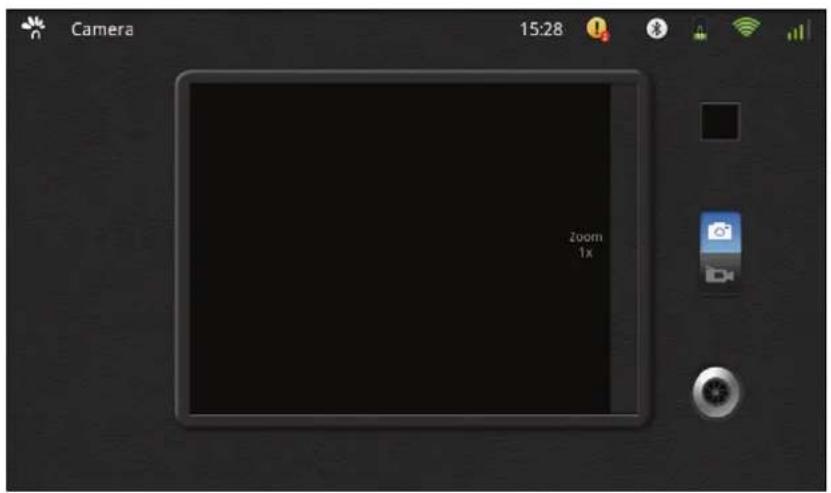
CAMERA
This environment allows you to use the built-in camera to take photos and/or record a film.

selects photo mode.

selects recording mode (film).

displays a miniature of the photo taken deo recorded. Simply clicking the ature you can play the video or view the o.

press this key to take the photo or to recording a film.
Note: a zoom function is available by touching the right side of the screen dedicated to registering photos/videos.
UPDATING THE TABLET
Periodically software updates are available for the Tablet to guarantee optimised operation. Updating can be performed as described below.
UPDATING AUTOMATICALLY
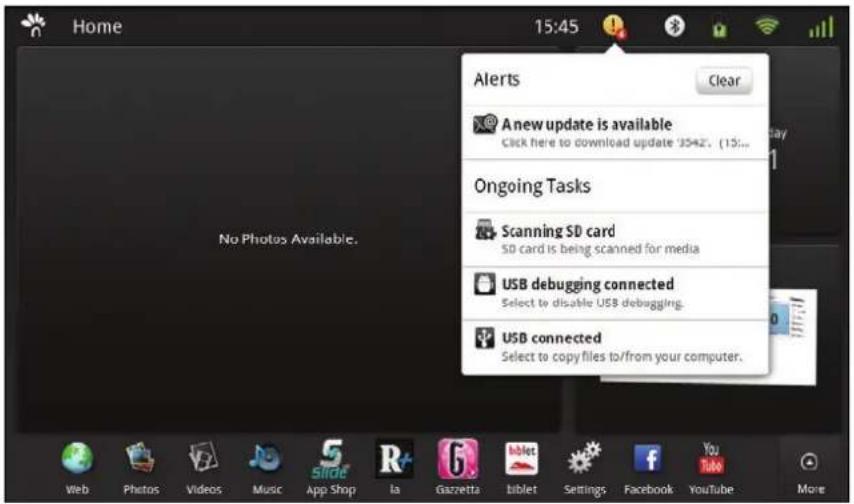
- Periodically, the system checks if any updates are available on the server. If the result is positive, a message appears in the notifications icon (see top right).
- Select "a new update is available".
- Follow the instructions shown on the screen and proceed with the updating.
- When requested, press the "Update" button.
- Execute the updating by pressing the "Apply update" button
- Wait until updating is completed, then restart the machine.
UPDATING MANUALLY
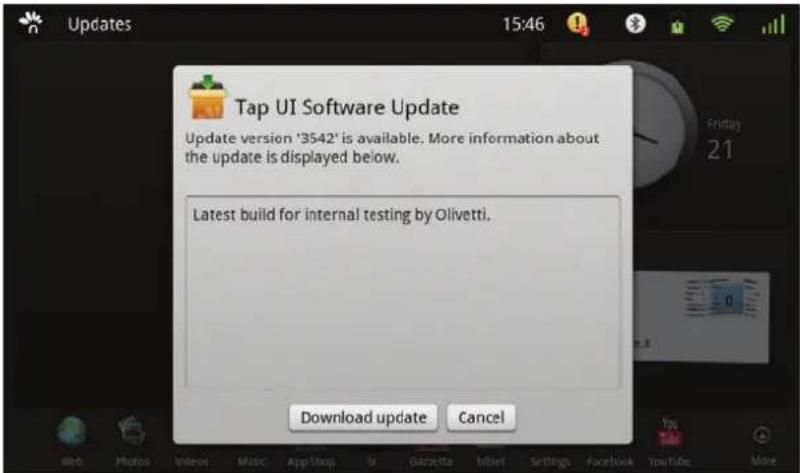
- You can check if software updates are present manually by selecting the Update
application icon

- If updates are available, a screen is displayed showing the number of the update version available. You can proceed with updating by pressing the "Download update" button or otherwise cancel the operation pressing the "Cancel" key.
- Press "Download update" to proceed with the update.
- Follow the instructions on the screen and continue with the update.
- When requested, press the "Update" button.
- Execute the updating by pressing the "Apply update" button.
- Wait until updating is complete then restart the machine.
SYSTEM CONNECTIONS
INSERTING THE SD CARD
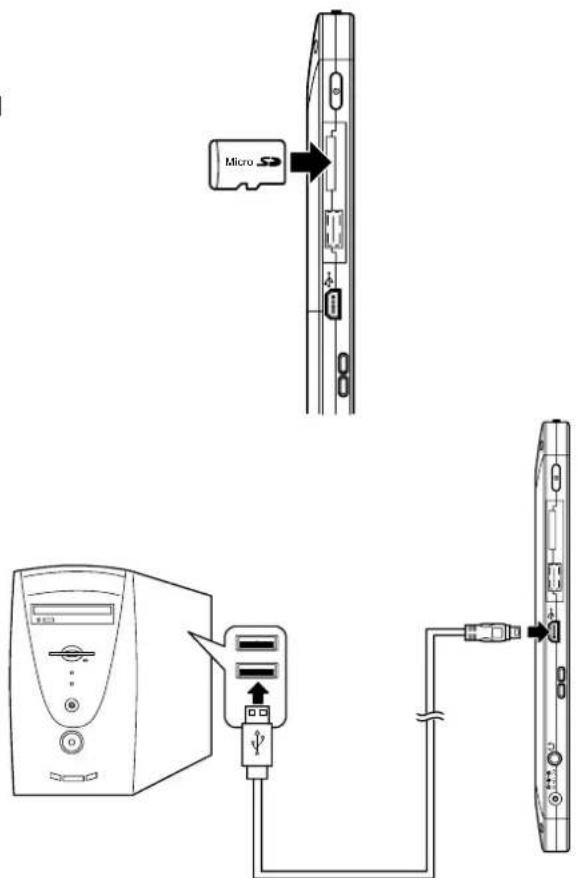
The unit is furnished with a Micro SD Card slot. To insert the card orient it as shown here on the right:
CONNECTING TO A PC
The unit is equipped with a mini-USB port which allows you to connect the unit to a PC. See the figure here for details:
Connect the USB cable to the computer and to the Tablet as shown in the figure. When a prompt appears on the Tablet display, select "Activate USB Transfer" and confirm activation. The computer recognises the Tablet and its memory can now be accessed from the computer resources.
CONNECTING HEADPHONES
Headphones can be connected to the Tablet PC.

The speakers are automatically disactivated when external headphones are connected to the Tablet PC. As an excessively high volume can damage hearing, turn down the volume before connecting headphones. You can raise the volume afterwards to a comfortable level.

natural_image
Line drawing of a CD-ROM cable with earplugs attached to a vertical panel (no text or symbols)INSERTING THE SIM CARD
The unit is furnished with a SIM Card slot. To insert the card, orient it as shown in the following figure.

APPENDIX
TROUBLESHOOTING
Q1 : How do I turn off the Tablet PC if the system blocks?
A : Press the POWER button and hold 4 or 6 seconds to turn off the Tablet PC.
Q2 : How do I check the Tablet PC if it cannot be switched on?
A :
- The battery could be uncharged, connect the Tablet to an electrical outlet.
- Make sure that the charge indicator turns on and that the adapter is working correctly.
- Remove the micro-SD card and any other external device that could be blocking it from working.
Q3 : What do I do if water penetrates inside the Tablet PC ?
A :
- DO NOT turn on the Tablet PC.
- Disconnect the cable from the electrical outlet so as to turn off the Tablet PC, instead of turning it off using the POWER button. Disconnect all external devices, then send the Tablet PC to the service centre for advice.
- DO NOT put the Tablet PC back into the wet carrying case.
Q4 : How do I restore factory settings?
A : Click "Setting"---"Security"---"Factory data reset" in the Home menu to restore the system to the factory default settings.
Q5 : How can I extend the duration of the Battery?
A :
- Adjust the brightness of the LCD Screen to the correct level using "Brightness".
- Turn down the volume.
- Reduce the timeout value for "Screen timeout".
Q6: What do I do if the image isn't clear
A: Check that the lens is clean, if not, clean it with a soft cloth.
Q7: What do I do if the micro-SD card / USB Pen drive cannot be read?
A: Re-insert the device and restart the unit.
Q8: How do I deal with problems related to Bluetooth "pairing"?
A: Make sure that the timeout has not elapsed and that the Tablet (and remote device) are still detectable.
Q9: What do I do in the case of light-sensor malfunction?
A: Turn on the "Automatic brightness" function by selecting "Setting" "Display" "Brightness" and ticking the checkbox "Automatic brightness".
Q10: What do I do if Bluetooth and 3G are disabled? (only for model with 3G)
A: Check whether "Airplane mode" is enabled, if so, Bluetooth and 3G functions cannot be activated.
TECHNICAL SPECIFICATIONS
| Base Specifications | |
| Processor NVIDIA Tegra2 | |
| Memory (#) 1 GB DDR | |
| Operating System Android 2.2 | |
| Data Storage | |
| Mass memory (#) 16GB (max. | 32GB) |
| Nand Flash 512MB | |
| Display | |
| Size | 10.1" |
| Display Technology TFT-LCD | |
| Resolution | 1024X600(WSVGA) |
| Touch Panel | |
| Type | Multiple-point Capacitive Touch Panel |
| Camera | |
| Resolution | 1.3M Pixels |
| Bluetooth | |
| Bluetooth Specification V2.1+ EDR | |
| Video/Audio Features | |
| Audio | Stereo |
| Video | HD Output (supports max. 1080P) |
| Condition | |
| Operating Temperature 5-35 °C | |
| Operating Humidity 35%-85% | |
| Storage Temperature -20-55 °C | |
| Storage Humidity 20%-93% | |
| Power | |
| Adapter | Input: 100-240V AC or 200-240V AC 50/60Hz, 1A; Output: 12V DC 2A |
| Output Power (maximum) | ≤ 24W |
| Battery (type) Built-in Lithium Polymer Battery | |
| Ports | |
| WLAN Wireless Card: 802.11 b/g/n | |
| Audio Port Headphone, Speaker and Built-in Microphone port | |
| USB Port USB (X1), USB 2.0; Mini-USB (X1) | |
| Micro SD Card Port Supports Micro-SD Card | |
| Physical Features | |
| Dimension 267mm x 173mm x | 13.9mm |

Features and specifications are subject to change without notice. The # symbol means that the item is optional.
DOCKING STATION (OPTIONAL)
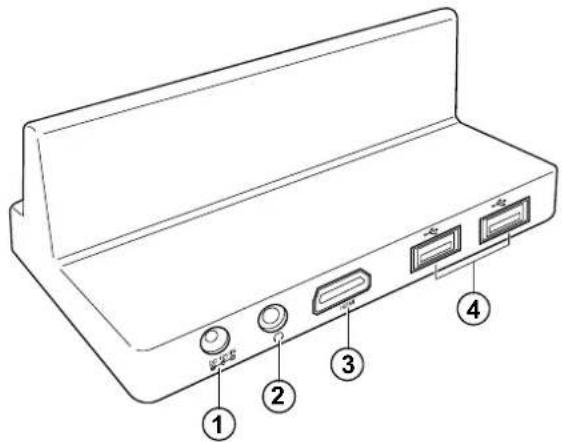
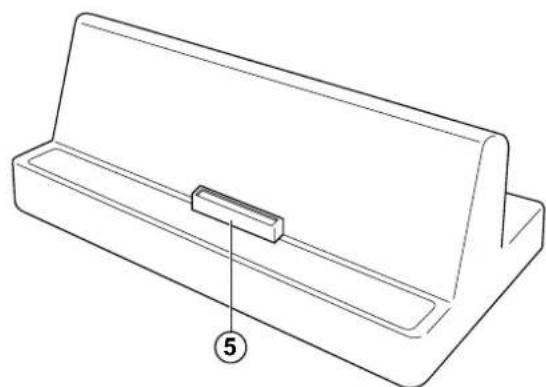
The optional docking station is used to recharge the Olipad and to provide connectivity.
natural_image
Technical line drawing of a mechanical component with a labeled part (5), no text or symbols present.| 1 | Power Jack |
| 2 | Headphone Jack |
| 3 | HDMI Output Port |
| 4 | USB Port (USB 2.0) |
| 5 | Dock Connector |
WARNING:
1) Make sure that the Power Adapter complies with the ratings indicated. Only use manufacturer-approved attachments and accessories.
2) The USB device can only be inserted in one direction. To avoid damaging it do not attempt to force insertion.
3) Excessively high sound volumes from the earphones and headphones can cause damage to hearing.
CONNECTIONS
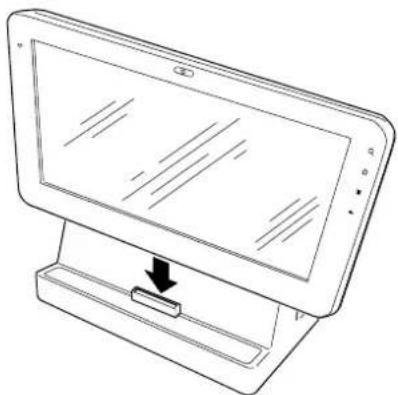
Setting up the Tablet
Insert the docking port on the Tablet into the docking connector as shown here:
natural_image
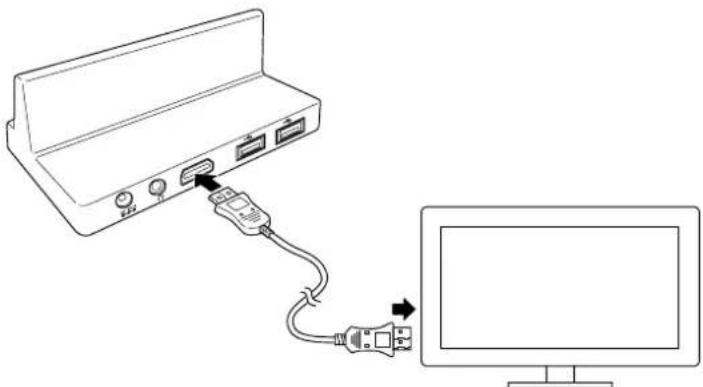
Line drawing of a computer monitor with an arrow pointing to its base (no text or symbols)Connecting an HDMI Device
Connect one end of the HDMI cable to the HDMI port on the Docking station, and the other end to the HDMI port on the external device, as shown here.
natural_image
Line drawing of a device with ports and cables connected to a monitor (no text or symbols)Connecting the Power Supply
Connect the power supply before operation.
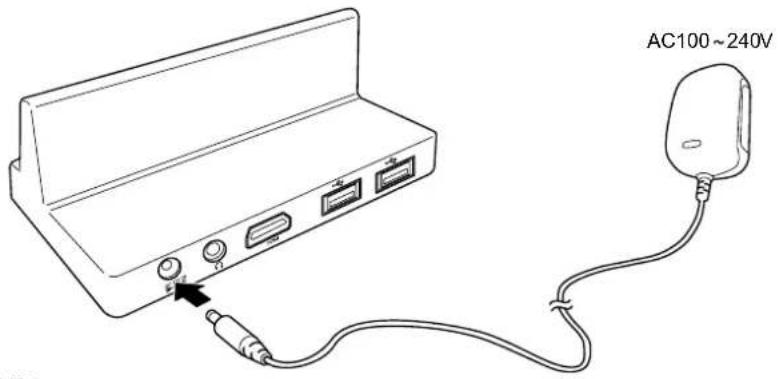
Docking Station Technical Specifications
Power Supply
Input: 100-240V AC or 200-240V AC 50/60Hz, 1A;
Output: 12V DC 2A
Ports
USB Port USB-A(X2), USB 2.0
Audio Port Headphone Port
HDMI Port HDMI1.2 Output (Audio)
Physical Specifications
Weight Approximately 256g
Dimension 120mm x 70mm x 43.2mm (L x W x H)
DIRECTIVE 2002/96/CE ON THE TREATMENT, COLLECTION, RECYCLING AND DISPOSAL OF ELECTRIC AND ELECTRONIC DEVICES AND THEIR COMPONENTS
1. FOR COUNTRIES IN THE EUROPEAN UNION (EU)
The disposal of electric and electronic devices as solid urban waste is strictly prohibited: it must be collected separately. The dumping of these devices at unequipped and unauthorized places may have hazardous effects on health and the environment.
Offenders will be subjected to the penalties and measures laid down by the law.
TO DISPOSE OF OUR DEVICES CORRECTLY:
a Contact the Local Authorities, who will give you the practical information you need and the instructions for handling the waste correctly, for example: location and times of the waste collection centres, etc.
b When you purchase a new device of ours, give a used device similar to the one purchased to our dealer for disposal.
The crossed dustbin symbol on the device means that:
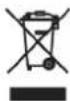
- When it to be disposed of, the device is to be taken to the equipped waste collection centres and is to be handled separately from urban waste; - Olivetti guarantees the activation of the treatment, collection, recycling and disposal procedures in accordance with Directive 2002/96/CE (and subsequent amendments).
2. FOR OTHER COUNTRIES (NOT IN THE EU)
The treatment, collection, recycling and disposal of electric and electronic devices will be carried out in accordance with the laws in force in the country in question.
Code: 536720Y-02
OLIVETTI S.P.A. VIA JERVIS, 77 10015 IVREA (TO) ITALY www.olivetti.com
- Date of publication: March 2011
- TABLE OF CONTENTS
- FIRST STEPS 16
- THE TABLET HOME SCREEN .... 18
- GET TO KNOW YOUR SYSTEM....19
- SYSTEM SETTINGS 21
- COMMUNICATIONS 36
- FUN 40
- UPDATING THE TABLET 45
- SYSTEM CONNECTIONS......47
- APPENDIX 50
- TECHNICAL SPECIFICATIONS ....52
- DOCKING STATION (OPTIONAL) 54
- INSTRUCTIONS
- Meanings of icons:
- SAFETY PRECAUTIONS
- SAR (SPECIFIC ABSORPTION RATE) CERTIFICATION DATA
- YOUR TABLET PC PROFILE
- FRONT VIEW
- LEFT/RIGHT VIEWS
- CARING FOR YOUR TABLET PC
- LCD SCREEN
- OTHER ACCESSORIES
- IF WATER ENTERS INSIDE YOUR TABLET PC
- OTHER WARNINGS
- TRAVELLING WITH YOUR TABLET PC
- GETTING STARTED
- CONNECTING THE POWER ADAPTER
- TURNING ON YOUR TABLET PC
- FIRST STEPS
- Add applications
- GET TO KNOW YOUR SYSTEM
- THE STATUS ICONS
- HOW TO USE THE TOUCH SCREEN TO ACCESS THE SETTINGS FUNCTION
- Example:
- SYSTEM SETTINGS
- Airplane Mode
- WIRELESS CONNECTIONS
- BLUETOOTH CONNECTIONS
- BLUETOOTH SETTINGS
- Pairing Devices
- To send a file to a remote device
- To receive a file from a remote device
- MOBILE NETWORKS (ONLY FOR MODEL WITH 3G FUNCTION)
- WARNING :
- SOUND
- DISPLAY
- FAMILY ACCOUNTS
- LOCATION, DATE AND TIME
- STORAGE
- SECURITY
- APPLICATIONS
- LANGUAGE & KEYBOARD
- BATTERY USE
- ABOUT TABLET
- COMMUNICATIONS
- BROWSER
- CONTACTS
- Insert New Contact
- Import contacts
- EMAIL - SETUP AN ACCOUNT
- Select Add Account.
- Select the type of server for the incoming post e.g. POP3, and at the end select the "Save" button.
- Enter the user data and password and press the "Next" button.
- Configuring an Exchange account
- FUN
- PHOTOS
- Viewing a photo album
- MUSIC
- VIDEOS
- CAMERA
- UPDATING THE TABLET
- UPDATING AUTOMATICALLY
- UPDATING MANUALLY
- SYSTEM CONNECTIONS
- INSERTING THE SD CARD
- CONNECTING TO A PC
- CONNECTING HEADPHONES
- INSERTING THE SIM CARD
- APPENDIX
- TROUBLESHOOTING
- Q1 : How do I turn off the Tablet PC if the system blocks?
- Q2 : How do I check the Tablet PC if it cannot be switched on?
- Q3 : What do I do if water penetrates inside the Tablet PC ?
- Q4 : How do I restore factory settings?
- Q5 : How can I extend the duration of the Battery?
- Q6: What do I do if the image isn't clear
- Q7: What do I do if the micro-SD card / USB Pen drive cannot be read?
- Q8: How do I deal with problems related to Bluetooth "pairing"?
- Q9: What do I do in the case of light-sensor malfunction?
- Q10: What do I do if Bluetooth and 3G are disabled? (only for model with 3G)
- DOCKING STATION (OPTIONAL)
- WARNING:
- CONNECTIONS
- Setting up the Tablet
- Connecting an HDMI Device
- Connecting the Power Supply
- Docking Station Technical Specifications
- Power Supply
- Ports
- Physical Specifications
- DIRECTIVE 2002/96/CE ON THE TREATMENT, COLLECTION, RECYCLING AND DISPOSAL OF ELECTRIC AND ELECTRONIC DEVICES AND THEIR COMPONENTS
- FOR COUNTRIES IN THE EUROPEAN UNION (EU)
- TO DISPOSE OF OUR DEVICES CORRECTLY:
- FOR OTHER COUNTRIES (NOT IN THE EU)
Brand : OLIVETTI
Model : Olipad 100
Category : Tablet