
AVD 120 - Cooker WHIRLPOOL - Free user manual and instructions
Find the device manual for free AVD 120 WHIRLPOOL in PDF.


| Product Type | Freestanding Cooker |
| Brand | Whirlpool |
| Model | AVD 120 |
| Dimensions (H x W x D) | 85 cm x 90 cm x 60 cm |
| Weight | 50 kg |
| Power Supply | 220-240 V ~ 50/60 Hz |
| Energy Source | Electric |
| Oven Type | Conventional with Grill |
| Oven Capacity | 70 L |
| Number of Hob Burners | 4 |
| Hob Type | Radiant or Ceramic (assumed) |
| Control Type | Knobs with Timer |
| Cleaning | Enamel Interior, Removable Shelves |
| Safety Features | Cool Touch Door, Child Lock |
| Energy Efficiency Class | A |
| Spare Parts Availability | Through Whirlpool Service Centers |
| Repairability Index | 8.0 / 10 (estimated) |
Frequently Asked Questions - AVD 120 WHIRLPOOL
User questions about AVD 120 WHIRLPOOL
0 question about this device. Answer the ones you know or ask your own.
Ask a new question about this device
Download the instructions for your Cooker in PDF format for free! Find your manual AVD 120 - WHIRLPOOL and take your electronic device back in hand. On this page are published all the documents necessary for the use of your device. AVD 120 by WHIRLPOOL.
USER MANUAL AVD 120 WHIRLPOOL
Instructions for installation and use
嵌入式爐具使用說明書
AVD110 單頭氣體煮食爐
AVD120 雙頭氣體煮食爐
目錄
外形結構圖----1
主要技術性能參數----1
嵌入式的安装方法----2
爐具安裝的環境----2
爐具的安裝----3
連接氣體----3
連接不固定的管接頭 4
連接固定的管接頭----4
檢查密封性----4
爐頭的放置----4
爐架的放置----4
操作簡介----5
使用注意事項----6
維護與保養----6
一般故障處理--------7
售後服務----7
natural_image
Line drawing of a cabinet or shelf with two horizontal plates and a side panel (no text or symbols)
圖E
連接氣體
注意:
natural_image
Exploded view of a mechanical assembly showing internal components and a cross symbol (no text or labels)爐架的放置
natural_image
Two identical diagrams showing circular components with cross-sectional arrows, no text or symbols present.4. 操作簡介
natural_image
Crossed black-and-white diagram showing three cylindrical objects with no visible text or symbols圖F
7. 一般故障處理
natural_image
3D CAD model of a mechanical assembly with mounting holes and a small component (no text or symbols visible)電源盒 機身標貼
Tableofcontents
Close-upview----10
Productspecifications----11
Installationinstructionsforbuilt-in----11
Positioningforgashob----11
Installationofbuilt-incooktops----12
Gasconnectionforcooktop----13
Connectiontonon-flexibletube----13
Connectiontoflexiblesteeltube----13
Checktheseal----14
Theplacementoftheburner----14
Theplacementofthepansupport----14
Howtouse----14
Practicaladvice----15
Howtokeepyourcookinghobinshape----16
Isthereaproblem?----17
Customerservice----17
😊 Pleasereadthismanualcarefullybeforeoperatingtheappliance.
😊 Pleasekeepthismanualforfuturereference.
😊 Kindlykeeptheoriginalinvoiceandwarrantycardforfuture referenceforservice.
This appliance has been designed for home use only.
😊 Nogovernorrequiredforthisappliance.
The information contained in these instructions is essential for the correct operation of the appliance and, more importantly, for your safety. Them manufacturer is exempt from all responsibility if this the requirement so this manual are not complied with.
Attention! Under the gassafety (Registration of Gas installers and Gas Contractors) Regulations Chapter 51 D, only registered gas installers (registered to the appropriate class) employed by registered gas contractors can personally carry out gas installation work.
ThankyouforchoosingWhirlpoolappliance,whichyouwillfind dependableandeasytouse.Werecommendthatyoureadthis manualforbestperformanceandtoextendthelifeofyourappliance.
1.CLOSE-UPVIEW
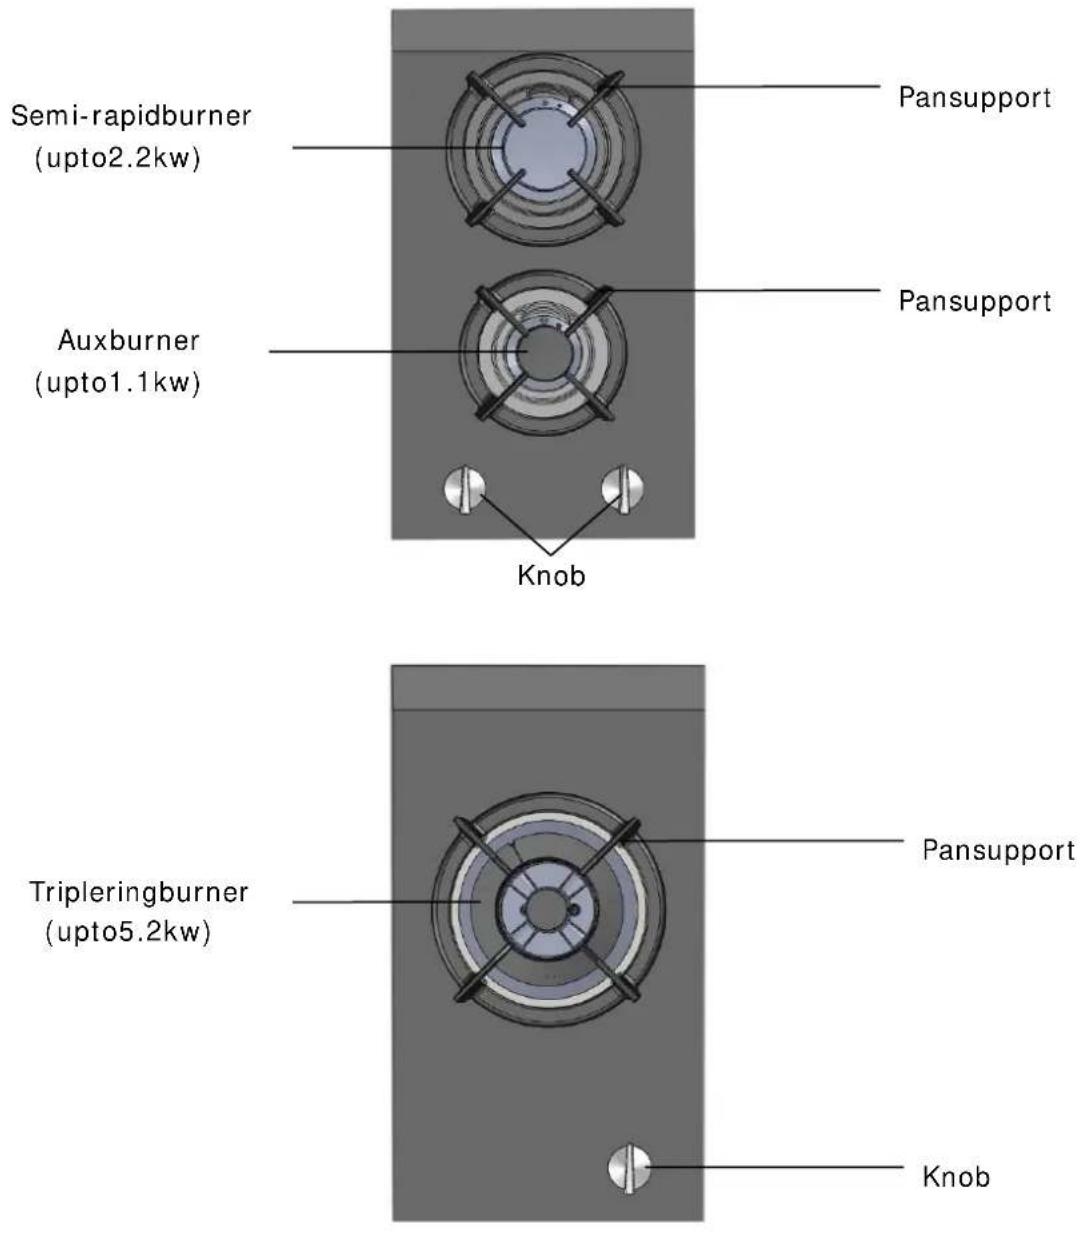
* These individual appliances can be combined and/or with conventional hobsof similar design, using the joint accessory. Seetheserver manualfordetails.
2.PRODUCTSPECIFICATIONS
| Modelno.AVD11 | 0AVD120 | |||
| ProductdescriptionS | singleburnergashobTwob | urnersgashob | ||
| Productsize510m | mx288mmx121mm | 510mmx288mmx102mm | ||
| Netweight6.0kg | 5.7kg | |||
| GastypeLPGTowngasLPGTowngas | ||||
| Heatinput4.8kw | 5.2kw | F: 1.0kwR: 2.0kw | F: 1.1kwR: 2.2kw | |
| Operatinggas pressure | 2900pa | 1500pa | 2900pa | 1500pa |
| Ratedvoltage | DC1.5V | DC1.5V | ||
3. INSTALLATION INSTRUCTION FORBUILT-IN
The following instructions are guidelines for the qualified installer so that the installation and maintenance procedures should be followed inthemostprofessional andexpertmanner.
Positioningforgashob
Important: this unit may be installed and used only impermanently ventilated rooms. The following requirements must be observed:
a) The room must be fitted with a ventilation system which ventssmoke and gases from combustion to the outside. we suggesttousewhirlpool cooker hoods.
b) The room must also allow for the influx of the air needed for proper combustion.
The flow of air for combustion purpose must not be less than 2m3/h per kwof installed capacity. The supply of said air can be effected by means of direct influx from the outside through a duct with a inner cross section of least 100cm2 which must not be able to accidentally blocked. Or, thereom can be vented indirectly through adjacent rooms fitted with ventilation duct to the outside as described above, as long as the adjacent rooms are not shared areas, bed room or present theriskoffire (Fig.B).

c) Intensive and prolonged use of the appliance may need supplemental ventilation, e.g. opening a window or increasing the power of the air intake.
d) Liquidified petroleum gases are heavier than air and as a result, settled downwards. LPG tanks, whether empty or partially full, must not be installed or stored in rooms or spaces below ground level (cellars, etc.). It is also good to date to keep only the tank currently being used in the room, making sure that it is not near sources of heat (ovens, fireplace, stove, etc.) that could raise the internal temperature of the tank above 50°C.
Installation of built-in cook tops
The appliance can be installed next to furniture units which are no taller than the top of the cooker hob. Thewall indirect contact with the back panel of the cookermust be made of non-flammable material. During operation the back panel of the cooker could reach at temperature of 50irc C above room temperature. For proper installation of the cooker, the following precautions must be taken:
a) The hob may be located in a kitchen, akitchen/dinner or living room, but not in a bathroom or showerroom.
b) The furniturestanding next to the unit, that is higher than the workingboards, must be placed at least 600 mm from the edge of the board.
c) Thecabinetsshouldbeposition-ednextto thecooktop ata height ofatleast540mm (Fig.C).
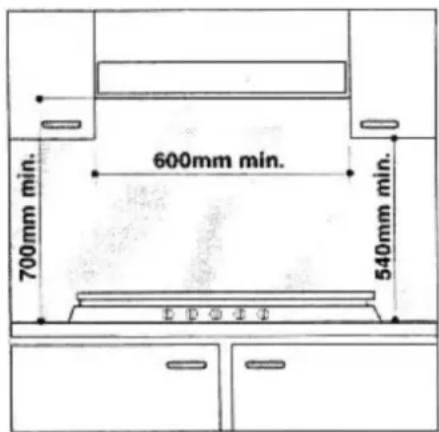
d) Should the hobbe installed directly under a cupboard the latter should beat least 700 mm from the worktop, as shown in Fig. C.
e) Cutoutdimensionsasshowin Fig. D

Fig.D
f) The hob can only be installed above a built-in oven provided with coolingventilation. Incasethe cooktopisn't installedabovebuilt -in oven, a wood panel must be inserted as insulation. This panel mustbeplacedatleast20mm from thebottomofcooktop.
Important: Wheninstallingthehob aboveabuilt-inoven,theoven shouldbeplacedontwowooded strips;inthecaseofajoining cabinetsurface,remembertoleave aspaceofatleast45×560mm at theback.(Fig.E)

natural_image
Line drawing of a cabinet or shelf structure with two horizontal bars and a dashed oval base (no text or symbols)
Fig.E
Gasconnectionforcooktop
Important: for safety, for the correct use of gas appliance and extending the life of the appliance, ensure that the gas pressure conform to the indications given in "product specifications" table. Caution: Gas appliances used in Hong Kong SAR: alloperations relating to installation, regulation and conversion to other type of gas must be carried out by a registered gas installer who hired by registered gas contractor, and use the GTXXX approved flexible gas tubing for installation. During installation of this product it is essential to an approved gas tap to isolate the supply from the appliance for the convenience of any subsequent removal or servicing. Connection of the applianceto the gas mains or liquid gas must be carried out according to the prescribed regulation in force, and only after it is ascertained that it is adaptable to the type of gas to be used.
Ifconnecttoliquidgas,use pressureregulatorsthatconform totheregulationinforce. Adaptingthecooktopfordifferent typesofgas.Toadaptthe cooktoptoadifferenttypeofgas thanthatforwhichitwas designed,seetheproduct specificationstable,Theburner nozzlesmustbechanged.Howto replacing the nozzles please checkthe"Replacingthenozzles" tableoftheservicemanual.
Connection to non-flexible tube
Connection to the gas source must be done in such a way as not to create anystress points at part of the appliance.
The appliance is fitted with an adjustable, “L” shaped connector andagasketfortheattachment to thegassupply. Should this connectorhavetobe turned,the gasketmustbereplaced(supplied withtheappliance).
Thefeeding connector of the gas to the appliance is threaded G1/2 gasmalecylinder
Connection to flexible steel tube
The gas feed connector to the applianceisathreaded, maleG 1/2 connectorforroundgaspipe and sealinggasketsthatconform to thestandardscurrently inforce. The maximum length of the flexiblepipes mustnotexceed 2000mm. Once the connection hasbeenmade,ensurethatthe flexiblemetaltubedoesnottouch any moving parts and is not crushed.
Checktheseal
Oncetheappliancehasbeen installedmakesureallthe connectionsareproperlysealed, usingasoapywatertest.Never useaflamefortesting.
Theplacementofthebu
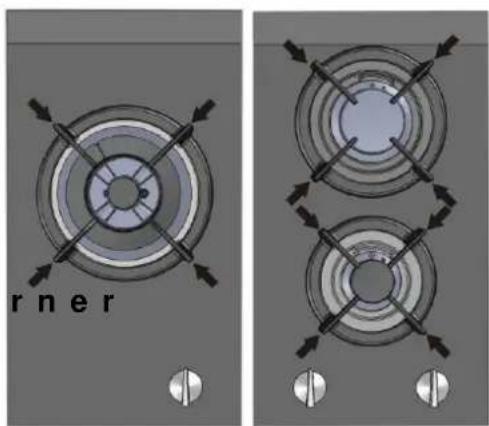
Important: Please confirm that the burner components are correctly positioned before using the appliances. Otherwise may affect the flame equality.
A. Theplacementofburner
1. Placetheburnerproperly, and thesparkplugmustbeimedat theholeoftheburnerwhen install.
2. Putburnercapontheburner properly.
B. The Placement method of burnercapissameasabove

natural_image
Exploded view of a mechanical assembly showing internal components and a cross symbol (no text or labels)Theplacementofthepan support
Makesurethat the pan support arealwayscorrectlypositionedto avoid accidental contact when cooking. After the placement of burner, put the pan support on thewater drip (concave).Same asabove.
4.Howtouse
Thepositionofthecorresponding gas burner is indicated near to each control knob. The burner differinsizeandpower.Choose themostappropriateoneforthe diameter of thecookwarebeing used.
Theburnercanberegulatedwith the corresponding control knob by using one of the following settings:
OFF
High
Low
● To light the selected burner, firstly, press the corresponding knob down fully, turn it anticlockwise to the high flame symbol and keep the knob pressed for approximately 2-3 secondstoallowthesafely device "F" to heat up. The gas can be delivered when the valve is open.
- I after 15 secondsthe flame doesn't light, switch off the burner and open near by window or door. Wait at least one minute before trying to switch the burner on again.
● Totheminimum flame, turn the corresponding knobanticlockwise tothelowflamesymbol. - Toturnoffaburner,turnthe knobclockwiseuntilitstops(it shouldbeonthe"OFF"setting).
Caution: if the flame eaccidentally goes out, turn off the gas with the control knob and wait at least one minute before you try to light it again.
Forbestperformance, follow thesegeneralguidelines:
Caution: If cookware does not correctly positioned or set the unstable cookware, it may be cause accident.
● All types of cookwares with a flat bottom can be used with this appliances.
- Use pans which are the right size for each burner. To prevent the flame from touching the sides of the potorpan.
●Alwaysusecookwarewithaflat bottom and keep the lid on; When the water or contents become boiling, turn the knob to "Low".
● Usethe appropriatecookware foreachburner(seetable)
- To identify the type of burner, refertothedesignsin" product Specifications".
| burner | Minimum diameter | Maximum diameter |
| Triplering | 22cm | 30cm |
| Semi-rapid | 16cm | 22cm |
| Auxburner | 14cm | 20cm |
5. Practical advice
TomaintaintheEFFICIENCYand SAFETY of this appliance, we recommend:
- Call the Whirlpool Service Center.
●Always useoriginalSpareParts.
● This appliance is designed for non-commercial use in the home and its features and technical specifications must not be modified.
● These instructions are only validforthecountriesthesymbols for which appear on the manualandtheserialplate.
Preventchildrenandthedisabled from coming into contact or having access to the following, as they are possible sources of danger:
- The controls and the appliance in general;
-The packaging (plastic bags, polystyrenenail, etc); - Thehob, during and immediately after use given the heat generated by operation; Surface will remain hot for at least half an hour after being turned off;
Thefollowingshouldbeavoided:
-non-accordancewiththemanufacture'sinstruction;
- Obstructingtheventilationor heatdissipationslots.
- Allowing the powers supply cord of other appliance to come into contact with the hot part of the cooktop;
- Exposure to atmospheric agents (rain, sun);
-Dostoreflammablematerialson ornearthecooktop. Thefumes could create an explosion and/or firehazard - Using unstable or deformed cookware;
-Tryingtoinstallorrepairthe appliancebyunqualified personnel.
ContactWhirlpoolServiceCentre inthebelowcases:
- Installation(inaccordancewith themanufacture'sinstruction);
- Converttoanother type of gas with suitable nozzle. If you are not sure the gastype, please inquire your supply supplier.
-When in doubt about the operation of the appliance;
It's recommended that you follow the guidelines below:
- Do not strike the hob and do not placeover15kgweightonit.
- Only us the appliance to cook food, avoiding all other use;
-Check the condition of the appliances afterithasbeenunpacked;
-When not in use, disconnect the appliance from the powers supply and turn off the gas valve (if present);
-Alwayschecktomakesurethat the control knobs are on the “OFF” setting when the applianceisnotinuse;
6.Howtokeepyour
cooktopingoodshape
Toextendthelifeofthecooktop, it is absolutely indispensable for it tobecleanedcarefully and thoroughlyonafrequentbasis, keepinginmindthefollowing: Donotusesteamcleanerswhich coulddamagethehob.
● The enamelled partsmust be washed with warm water without using abrasive powders or corrosivesubstances which could dodamagetothe appliance;
● Theremovable part sof the burners should bewashed frequently with water and soap, makingsuretoremovecaked-on substances.
● Onapplianceswithautomatic ignition, theendoftheignition device must be cleaned carefully and frequently, gasholes are not clogged; Donot use gasoline or other flammable materials clean the appliances otherwise create an explosion and/or fire hazard.
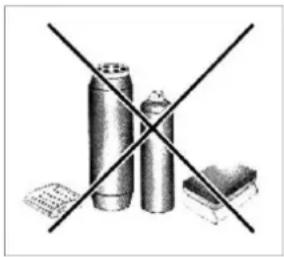
● Cleanthe cookingsurfacewhen itisstillwarmwithasuitable cleaningproduct. Thenrubwitha dampclothanddry. Aluminum foilplasticitems,objectsmadeof synthetic material,sugarorfoods withahighsugarcontentthat havemeltedontothesurface mustberemovedimmediately withascraperwhilethecooking
surfaceisstillhot.Donotuse abrasivespongesorcleaning appliancesunderany circumstances.Similarlythis holdstrueforchemically aggressivecleanerslikeoven spraysandstainremovers(Fig.F)
natural_image
Illustration of three cylindrical objects crossed by a black X (no text or symbols)Fig.F
7. I sthereaproblem?
It may occur that the cooktop does not function order does not function properly. Let's see what can be done.
Firstofall, checktomakesure that there are no interruptions in thegasandbattery, and in particular that thegasvalves for them ainsareopen.
Theburnerdoesnotlightorthe flameisnotuniform.
Checktomakesurethat:
● Thegasholesontheburnerare notclogged;
●Allofthemovablepartsthat makeuptheburneraremounted correctly;
● Therearenodraughtaround thecookingsurface.
Theflamedoesnotstaylighted (onthemodelwiththesafety device).
Checktomakesurethat:
● Youpresstheknoballtheway in;
● Presstheknobsenoughtimeto lightthesafetydevice;
● Thegasholesarenotcloggedin theareacorrespondingtothe safetydevice.
Theburnerdoesnotremainon whensetto"low".
Checktomakesurethat:
●Thegasholesarenotclogged.
● Therearenodraughtnearthe cookingsurface.
●Howtoregulatetheminimum flamepleaserefertothe
"Minimum Regulation" of the servicemanual.
Thecookwareisnotstable.
Checktomakesurethat:
● Placethepansupportproperly;
●Thebottomofthecookwareis perfectlyflat;
●Thecookwareiscentered
correctly on the pansupport, no
tooneside;
● The weight of the cook waresis not over 15 kg;
8. Customerservice
Incaseofmalfunctionofyour appliance,youmayeliminate the problembyfollowing "Istherea problem".Ifitpersists,please contactWhirlpoolServiceCentre bytelephoneormailindicating the followinginformation:
● Descriptionofthefault;
● Themodelnumberandserial numberofyourappliance;
- Yourname,telephonenumber andcommunicationaddress.
USERMANUAL
▲ Donotresorttothemechanicwhoisnotauthorizedbythe manufacturer.AndalwaysuseoriginalSpareParts.
▲Afterchangingthegastypeandnozzle,thestickerindicatingthe newtypeofgasmustbeplacedneartothespecificationsplate.

natural_image
3D CAD model of a mechanical assembly with mounting holes and a small component (no text or symbols visible)BATTERYCOMPARTMENTRATINGLABEL
Whirlpool Service Centre
14/F, Wilson Logistics Centre
24-28 Kung Yip Street,
Kwai Chung, NT Hong Kong
Tel:2406 9138

惠而浦客戶服務中心
- 目錄
- 連接氣體
- 爐架的放置
- 操作簡介
- 一般故障處理
- Tableofcontents
- 1.CLOSE-UPVIEW
- INSTALLATION INSTRUCTION FORBUILT-IN
- Positioningforgashob
- Installation of built-in cook tops
- Gasconnectionforcooktop
- Connection to non-flexible tube
- Connection to flexible steel tube
- Checktheseal
- Theplacementofthebu
- Theplacementofthepan support
- 4.Howtouse
- OFF
- High
- Low
- Forbestperformance, follow thesegeneralguidelines:
- Practical advice
- 6.Howtokeepyour
- cooktopingoodshape
- I sthereaproblem?
- Customerservice
- USERMANUAL
Brand : WHIRLPOOL
Model : AVD 120
Category : Cooker