DVD-025 Prince 3 - DVD player Manta - Free user manual and instructions
Find the device manual for free DVD-025 Prince 3 Manta in PDF.


| Product Type | Portable DVD/MP3 Player |
| Brand | Manta |
| Model | DVD-025 Prince 3 |
| Disc Formats Supported | DVD, DVD±R/RW, CD, CD-R/RW, MP3, JPEG |
| Playback Features | Repeat, A-B Repeat, Slow, Zoom, Search |
| Display | 7-inch TFT LCD screen (16:9) |
| Resolution | 480 x 234 pixels |
| Audio Output | Stereo speakers, headphone jack |
| Video Output | Composite AV out, HDMI (if applicable) |
| USB Port | USB 2.0 for media playback |
| Card Slot | SD/MMC card slot |
| Power Supply | AC 100-240V, 50/60Hz (via adapter) or built-in rechargeable battery |
| Battery | Rechargeable lithium-ion, approx. 3 hours playback |
| Dimensions (W x D x H) | 260 x 190 x 35 mm (approx.) |
| Weight | 0.8 kg (approx.) |
| Remote Control | Included |
| Accessories Included | AC adapter, car adapter, AV cable, user manual |
| Cleaning | Wipe with a soft, dry cloth. Do not use solvents. |
| Safety Warnings | Do not expose to moisture; avoid direct sunlight; use only specified power adapter. |
| Repairability | Contact authorized service center; do not disassemble. |
Frequently Asked Questions - DVD-025 Prince 3 Manta
User questions about DVD-025 Prince 3 Manta
0 question about this device. Answer the ones you know or ask your own.
Ask a new question about this device
Download the instructions for your DVD player in PDF format for free! Find your manual DVD-025 Prince 3 - Manta and take your electronic device back in hand. On this page are published all the documents necessary for the use of your device. DVD-025 Prince 3 by Manta.
USER MANUAL DVD-025 Prince 3 Manta
natural_image
Exterior view of a silver DVD 024 Prince 3 audio workstation with a remote control (no visible text or symbols on the device body)
To ensure proper use of this product please read this User Manual carefully and keep for future reference.
MM5000 Dune
natural_image
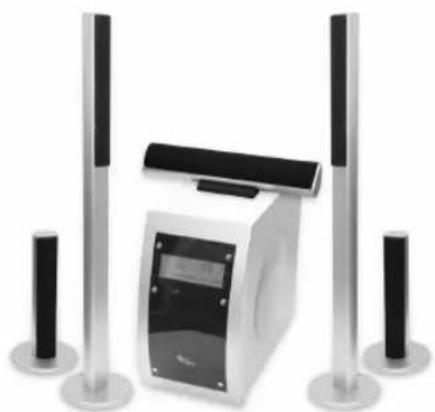
Modern audio amplifier with three vertical speakers and a central display unit (no visible text or symbols)Supercharger Supreme

natural_image
Product photo of a car steering wheel, driver shift jack, and Subercharger box (no visible text or symbols)DVD-012 Emperor Recorder
natural_image
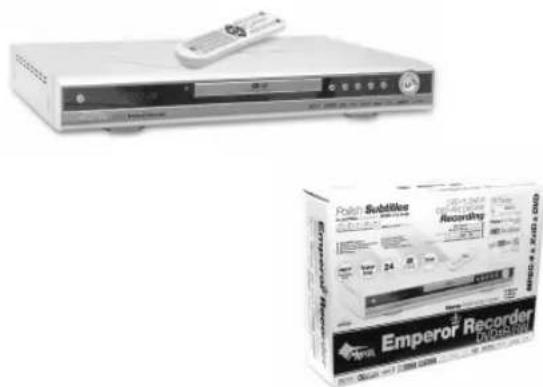
Exterior view of a modern audio amplifier with three speakers (no visible text or symbols)2/5.1 Channel Analog Audio Output 28
Dolby® Digital & DTS® Digital Audio Output Support 28
High Quality 96kHz/24bit Audio D/A Converter 28
10-Bit 27Mhz D/A Video Converter 28
Auto NTSC and PAL Video Disc Conversion 28
X1.5/X2X3 Video Zoom Support 28
Multi-Speed Fast Forward/Reverse Scan 28
Multi-Speed Slow Motion Forward/Reverse Scan 28
Volume Control of Analog Audio Output 28
Package contents 28
Precautions 28
Power Supply 28
Power Cord 29
Usage and Storage 29
Unit Placement 29
Condensation 29
Unit Cleaning 29
Disc care 29
Disc Usage 29
Disc Cleaning 29
Disc Storage 29
Front panel 30
Back panel 30
Remote control unit 31
Disc compatibility chart 32
Back panel connections 32
Optical Audio Output 32
Analog 5.1 Audio output 32
Composite Video Output Terminal 32
Component Video 32
SCART Terminal 33
Coaxial Digital Audio Output Terminals 33
S-Video Output Termina 33
DVD-024 & DVD-025♦ PRINCE 3
VGA 33
Initial setting 33
General setup DVD only 33
TV DISPLAY 33
ANGLE MARK 34
OSD LANGUAGE 34
CAPTIONS 34
SCREEN SAVER 34
Speaker setup 34
DOWN MIX 34
CENTER 34
REAR 34
SUBWOOFER 34
CNTR DELAY 34
REAR DELAY 34
TEST TONE 34
Audio setup 34
AUDIO OUT 34
PROLOGIC 35
DUAL MONO 35
COMPRESSION 35
Linear PCM setup 35
Linear PCM OUT 35
Preferences 35
TV TYPE 35
VIDEO OUTPUT 35
AUDIO 35
SUBTITLE 35
DISC MENU 35
PARENTAL 36
PASSWORD 36
DEFAULTS 36
SMARTNAVI 36
On screen display (OSD) 36
DVD OSD Modes 36
CD/VCD OSD Modes 36
PBC ON (VCD 2.0 above only) 36
Basic operation of playback 36
Preparation 36
START Playback 36
SKIP Playback 36
VCD/Audio CD Playback 37
FAST FORWARD/REVERSE SCAN 37
DVD Playback 37
VCD/Audio CD Playback 37
SLOW-MOTION Playback 37
VCD/Audio CD Playback 37
STOP Playback 37
VCD/Audio CD Playback 37
DVD-024 & DVD-025♦ PRINCE 3
Advanced operation of playback 37
REPEATED Playback 37
A-B 38
PROGRAM Playback 38
Track Program 38
Start/Cancel the Program Playback 38
TITLE MENU (DVD Only) 38
DVD MENU (DVD Only) 38
MULTI-ANGLE Playback 38
Changing SUBTITLE During Playback 38
Changing AUDIO LANGUAGE During Playback 39
DIRECT Function 39
DVD Search Functions 39
VCD/Audio CD DIRECT Functions 39
VCD PLAYBACK CONTROL (PBC) 39
USB Port 39
Troubleshooting 39
PICTURE 39
SOUND 40
THE REMOTE CONTROL DOES NOT WORK PROPERLY 40
THE DVD PLAYER DOES NOT START PLAYBACK 40
Specifications 40
DVD-024 & DVD-025♦ PRINCE 3
Instrukcja obsługi
W zestawie
Odtwarzacz DVD

Pilot
Uwaga!
flowchart
graph TD
    A["ALAB OUT"] --> B["5.1 Amp"]
    B --> C["5.1 Speakers"]
    C --> D["Ampfitter with 5.1 Decoder"]
natural_image
Black-and-white landscape photo of a mountain range with a river and snow-capped peaks in the background (no text or symbols visible)4:3 Letter Box
natural_image
Black-and-white landscape photo of a mountainous lake with snow-capped peaks in the background (no text or symbols visible)16:9 Wide Screen
This DVD player can play a variety of disc media including DVD Video, Video CD, CDDA, WMA, Super VCD, MPEG-4, XviD, CD-DVD, Mini-DVD and MP3 media format.
2/5.1 Channel Analog Audio Output
This DVD player can output down mixed audio with LT/RT, Stereo, and 5.1 Dolby Surround modes.
Dolby® Digital & DTS® Digital Audio Output Support
This DVD player can send Dolby® Digital or DTS® Digital audio data via its built-in digital audio output to an external Dolby® Digital or DTS® Digital decoder.
High Quality 96kHz/24bit Audio D/A Converter
This DVD player features a 96KHz/24Bit D/A converter for superior audio reproduction of encoded discs.
10-Bit 27Mhz D/A Video Converter
This DVD player's 10-bit D/A converter is four times more accurate than conventional 8-bit converters. The result is artifact-free and crystal clear video image.
Auto NTSC and PAL Video Disc Conversion
This unit can play NTSC and PAL formats discs. This DVD player can automatically convert either format to match your TV set. For example, if your TV set is a NTSC system TV and you're playing a PAL format disc, this DVD player will automatically convert the PAL format signal to NTSC format signal to play on your TV.
X1.5/X2X3 Video Zoom Support
The user selectable digital video zooms out zoom-in on a specific portion of a video image.
Multi-Speed Fast Forward/Reverse Scan
The digital fast forward/reverse scan is capable of scanning speeds of X2, X4, X6, and X8.
Multi-Speed Slow Motion Forward/Reverse Scan
This DVD player offers perfect slow motion scans in the following speeds: X1/2, X1/4, and X1/8.
Volume Control of Analog Audio Output
This DVD player can control the volume of analog audio output from remote control.
Package contents
Please verify that the following items are included within the DVD carton. If items are missing, please promptly return this unit to the retailer for an exchange.

DVD Player

Remote Control
User Manual
Precautions
Please read the following carefully to get the best and safest performance from this DVD player
Power Supply
Make sure to use the correct power outlet as rated on the back of the DVD unit. (AC 100 - 120V AC 220-240V).
DVD-024 & DVD-025♦ PRINCE 3
Power Cord
- Do not put any heavy objects on top of the power cord to avoid fires or electrical shocks caused by cord damage.
● Unplug the power cord if the unit will not be used for a long time.
Usage and Storage
- Do not remove the top cover to avoid possible electric shock from touching the inside of this unit.
- Do not place any heavy objects on top of this unit.
Unit Placement
- Do not place this unit in locations with:
- Vibrations
– High humidity - Poor ventilation
- Direct sunlight
– Extremely high or low temperatures
● This unit should be placed on a horizontal surface only.
- Keep this unit away from television sets, radios, computers and loudspeakers to avoid magnetic field interference.
Condensation
Condensation may result from moving the unit from a cold place to a hot place. Please turn the power on for 1 to 2 hours before using this unit if condensation occurs.
Unit Cleaning
Clean the front panel and the body of the unit with a dry soft cloth. Other areas can be cleaned using a soft cloth moistened with a mild detergent. Do not clean with evaporative solutions to avoid possible damage to the unit.
Disc care
Disc Usage
- Please hold all discs by their edges or the center opening as shown below. Do not touch the shiny surface of the discs.

- Do not stick labels or tape on the discs, and do not scratch or damage the discs.
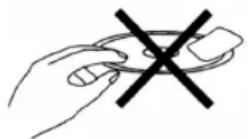
● The disc spins at a high speed during playback. Do not use damaged, cracked, or warped discs because they could damage the unit.

natural_image
Two abstract geometric symbols: a circle with cross and concentric rings, and an eye with cross and concentric rings (no text or labels)Disc Cleaning
● Fingerprints or dirt on disc surfaces can weaken the light reflected from the disc and directly influence the signal quality. The poorer the signal quality, the poorer the playback performance. Keep the disc clean by wiping it straight out from the center with a dry soft cloth.

natural_image
Hand holding a padlock with directional arrows indicating rotation or movement (no text or symbols)- If the disc is very dirty, wipe with a moist soft cloth, then follow with a dry soft cloth.
- Do not use record cleaning sprays, benzene, thinner, anti-static electricity liquids, or any other solvent. These may damage the disc surface.
Disc Storage
- Please keep the discs in their original cases to avoid bending the discs. Do not keep discs in locations with high temperature, high humidity, or direct sunshine. These conditions may also cause damage to the discs.
● Carefully read all instructions on the disc label.
DVD-024 & DVD-025♦ PRINCE 3
Front panel

- Disc Tray
- Place Compact discs on.
- POWER Button
- Press this button to turn on/off the player
- REMOTE CONTROL
- Receiving window
- Display Window
-
USB port
-
OPEN/CLOSE Button
-
Open or closes the disc tray
- Accept the operating instruction from the RC
-
Display operation information.
-
PLAY/PAUSE Button
- Begin disc play/ Pause the playback, press again to resume playback
- Stop
Back panel

- Optical Digital Audio Output
- Analog Audio Output 5.1
- Component Video
- Video Output
-
SCART Output
-
VGA port
- S-Video Output
- Coaxial Digital Audio Output
DVD-024 & DVD-025♦ PRINCE 3
Remote control unit
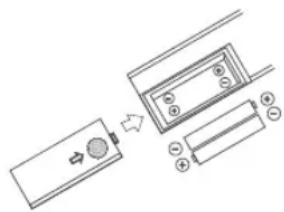
To use the remote control, please point the remote control unit at the remote sensor on the DVD player.
Notes!
- Do not use different types of batteries.
- When the remote control unit does not function correctly or its operation range reduces, please replace both batteries at the same time.
- Keep the remote control away from extremely hot or humid locations.
- If the remote control unit will be not used for a long time, please remove the batteries to avoid possible damage from battery leakage or corrosion.
- Do not open the remote controller unit.
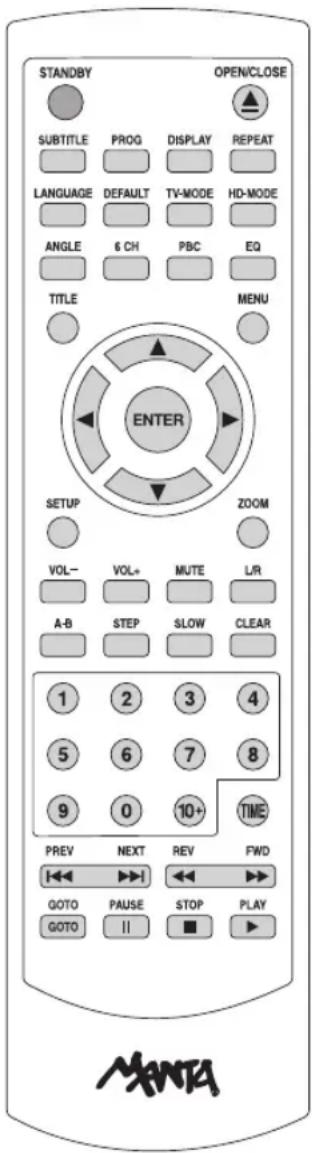
STANDBY – Press this button to turn on/off the player
OPEN/CLOSE – Opens or closes disc tray.
SETUP – Bring up DVD player's Setup Menu
DISPLAY – Display Console Menu
PROG – Bring up Program Menu
TIME – Time Search
REV – Fast Reverse
FWD – Fast Forward
PREV – Go back to the previous chapter during playback
NEXT – Skip to the next chapter during playback
SLOW – Slow motion
PLAY – Begin disc play
PAUSE – Pause the playback, press again to resume playback.
STEP - Enter step mode where video can be advanced frame by frame.
N/P – Select NTSC, PAL60, PAL, AUTO
PBC – Select S-VIDEO, Interlace-YUV, TV-RGB, P-SCAN YPBPR, PC-VGA video output format
STOP – Stop playback
L/R – Change language
VOL+/- - Adjust volume
A-B - Use to mark a segment to repeat between A and B.
ZOOM – Magnify areas within a picture
MUTE – To mute the sound of playback
ENTER – Press this button to turn on or off the player.
TITLE – Enter the title menu for DVD disc
MENU – Bring up DVD's Menu
ANGLE – Use to access various camera angels on a DVD
LANGUAGE – Select language
SUBTITLE – Select subtitle
REPEAT – Repeat a chapter or title
DVD-024 & DVD-025♦ PRINCE 3
Disc compatibility chart
This DVD player can play the following types of discs:
| Type of Discs | Discs Mark | Contents | Disc Size | Maximum Playback Time |
| DVD video discs | [IMAGE] | Audio+Video (moving pictures) | 12cm | Approx. 4 hours (single sided disc) |
| Approx. 8 hours (double sided disc) | ||||
| 6 cm | Approx. 95 minutes (single sided disc) | |||
| Approx. 100 minutes (double sided disc) | ||||
| VIDEO CD | [IMAGE] | Audio+Video (moving pictures) | 12cm | Approx. 74 minutes |
| 6cm | Approx. 20 minutes | |||
| Audio CD | [IMAGE] | Audio | 12cm | Approx. 74 minutes |
| 8 cm | Approx. 20 minutes | |||
| CD-ROM (ISO) | [IMAGE] | Audio | 12cm | Dependant from file compression |
| 6 cm | ||||
| CD-ROM (ISO) | [IMAGE] | Audio+Video (moving pictures) | 12cm | Dependant from file compression |
| 8 cm | ||||
| CD-ROM (ISO) | [IMAGE] | Audio+Video (moving pictures) | 12cm | Dependant from file compression |
| 6 cm |
DVD and VCD. Dists contain both views and audio and can support multiple audio tracks,
CD: Devices have audio only.
This unit complies with VCD ver. 1.0, ver. 2.0. This unit complies with MPEG-4/DivXTM Video. XWD.
This unit is compatible with CDLR & CDWR.
Picture CD (PFEQ).
DVD and VCD Discs contain both video and audio and can support multiple audio tracks.
- CD: Discs have audio only.
- This unit complies with VCD ver. 1.0, ver. 2.0.
- This unit is compatible with CD-R & CD-RW.
- Picture CD (JPEG).
Back panel connections
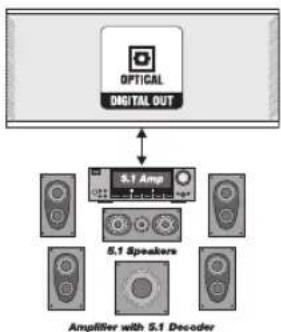
Optical Audio Output
flowchart
graph TD
    A["OPTICAL DIGITAL OUT"] --> B["5.1 Amp"]
    B --> C["5.1 Speakers"]
    C --> D["Amplifier with 5.1 Decoder"]
Output where signal is distributed by 'light' thru optical fiber wire. No magnetic field distortion.
Analog 5.1 Audio output

Here plug-in 5.1 Home Theater System Speaker with Amp.
Composite Video Output Terminal
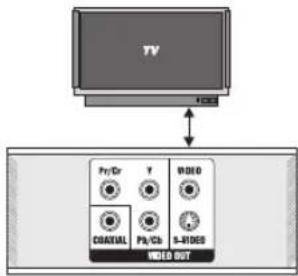
Composite video output is the most commonly used video connection in use today and is supported by most televisions and A/V receivers. Composite video is set to display without user setup.
Component Video

(Y, Cb i Cr) – Component video - A video signal in which the brightness (luminance) and color (chrominance) portions of the signal are processed separately. Component video signals provide greater color accuracy than S-video or composite signals.
DVD-024 & DVD-025♦ PRINCE 3
SCART Terminal

The SCART terminal can be connected to the TV set equipped with SCART connectors. Whenever the SCART terminal is used, you must set the DVD player's "PREFERENCES PAGE"/ "VIDEO OUTPUT" setting to "SCART".
NOTE: S-Video and SCART jacks cannot output signals simultaneously.
Coaxial Digital Audio Output Terminals

Use digital audio outputs for connection with an external Dolby® Digital or DTS® decoder. To use the Coaxial output, you will need to purchase an Coaxial cable for connection with the Coaxial Input Terminal of an AV amplifier. (Digital cable is not included with this player.)
S-Video Output Termina

You will want to use S-video output with televisions or monitors equipped with an S-video input whenever component video inputs are not available. To activate the S-video output, you must set the DVD player's "PREFERENCES PAGE"/ "VIDEO OUTPUT" setting to S-VIDEO.
VGA

Initial setting
Press the [SETUP] button on the remote controll to set up the initial setting. The On-Screen Display (OSD) will display below:
General setup DVD only
TV DISPLAY

natural_image
Black-and-white landscape photo of a mountainous lake with snow-capped peaks in the background (no text or symbols visible)16:9
Wide Screen
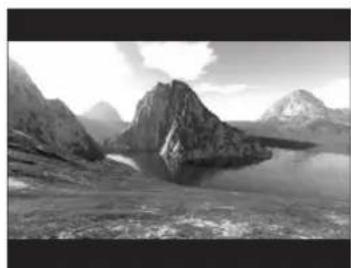
- 16: 9 (wide screen): Select this item when this unit connects a wide screen television unit.
natural_image
Black-and-white landscape photo of a mountainous river valley with rocky peaks and a winding river (no text or symbols visible)4:3
Letter Box
- 4:3LB (Letter Box): As for televisions of general sizes, please select this item. The top and bottom of the television screen will appear black rims in the time of playing wide screen pictures.
DVD-024 & DVD-025♦ PRINCE 3

natural_image
Black-and-white landscape photo of a mountainous river valley with snow-capped peaks and rocky peaks (no text or symbols visible)4:3 Pan and Scan
- 4:3PS (Pan and Scan): Adaptable to televisions of general sizes. In the time of playing wide screen pictures, the left and right rims of pictures will be cut and the pictures will be shown on the full screen.
NOTES: Aspect ratios available for playback will be printed on the DVD disc rear packaging. Some DVDs are recorded in the Cinema wide format (16:9 aspect ratio). And some are recorded in the standard format (4:3 aspect ratio). Some DVD discs are recorded in both formats and may have the Pan Scan feature available. The Pan Scan feature if available will fill the entire screen in 4:3 TV screen. However it will cut some of the picture off at the two sides.
ANGLE MARK
During playback of a title with multiple angle sections, the message [CAMERA SIGN] will appear on the upper corner of the screen.
- When ANGLE MARK is set to "ON", the angle mark OSD will stay on the screen until the end of the playback title or chapter.
- When ANGLE MARK is set to "OFF", the angle mark OSD will stay on the screen for 3 sec and then disappear.
OSD LANGUAGE
You can select the language for the setup menu or the operation message display. There are three available OSD languages: ENGLISH, and RUSSIAN for display. Default setting is "ENGLISH".
CAPTIONS
Closed Captions (CC) are a standardized method of encoding text into an NTSC television signal. A TV can display the text with a built-in decoder. Closed Captions can be carried on DVD. If a DVD title contains a [CC] mark on the rear of the box, then you can set Captions to "ON" and read written captions on the TV screen. Default is set to "OFF".
SCREEN SAVER
When this DVD player is idle (after about 1 minutes of inactivity), the screen saver can be activated to prolong the TV monitor's life.
NOTES: Caution: The DVD player can hold a still video image or OSD image on your television screen indefinitely. If you leave the still video image or OSD image displayed on your TV for a very long time. It may cause the permanent damage to your TV screen.
Speaker setup
DOWN MIX
- LT/RT - Please connect to a built-in Dolby Pro Logic receiver or amplifier to enjoy the Dolby Pro-Logic surround sound.
- STEREO - Down mixed Stereo L/R audio output.
- 5.1 CHANNEL - Turn off the DOWN MIX function to enable the 5.1ch setting items.
CENTER
Set the CENTER output ON/OFF. (Setting to "ON" for CNTR DELAY)
REAR
Set the REAR output ON/OFF. (Setting to "ON" for REAR DELAY)
SUBWOOFER
Set the SUBWOOFER output ON/OFF.
CNTR DELAY
Adjust the delay time of CENTER output.
Note: Please set the "CENTER" item to ON first.
REAR DELAY
Adjust the delay time of REAR output.
Note: Please set the "REAR" item to ON first.
TEST TONE
Test the output ability of left, center, right, right surround, and left surround speakers in sequence.
Note: Please set the "DOWN MIX" item to OFF first.
Audio setup
There are five available settings:
AUDIO OUT
You can choose to send the player's audio signals to an external receiver using the following outputs:
- SPDIF/RAW: Set to this selection will output the raw bit stream signal of Dolby® Digital or DTS from the coaxial jack. In order to enjoy Dolby® Digital DTS
DVD-024 & DVD-025♦ PRINCE 3
discs, this unit's digital output jack must be connected to the digital-input jack of a Dolby®Digital or DTS compatible receiver or processor.
- SPDIF/PCM: PCM stands for Pulse Code Modulation and is digital audio. Connecting this unit to an amplifier with a built-in D/A converter can play the same digital audio format as on CDs. Additionally, 2-channel analogue audio will output from the audio output jacks of amplifier.
NOTES: Analogue and digital audio signals cannot output simultaneously. This player has a conversion function for converting Dolby® Digital and MPEG audio into the LPCM format. This allows playback of CDs with the regular playback system without the need for a special converter.
PROLOGIC
ProLogic Mode will create pseudo 5.1 Sound from normal stereo.
DUAL MONO
There are four available modes: STEREO, L-MONO, R-MONO, and MIX-MONO.
COMPRESSION
„Compression Range“ is the difference between the maximum level and the minimum level of sounds. Sounds on a movie originally designed for movie theaters feature a very wide compression range, so sometimes it is not suitable for home use. Depending on the condition of your listening environment, Compression function can reduce the instant sound effect alteration of the movie while playing back. When seeing movies in the night, turn this function on to avoid the suddenly loud sound to influence your neighbors. (Default value is FULL, no compression to be done.)
NOTES: This function works only during playback of Dolby Digital recorded discs. The level of Dynamic Range Reduction may differ depending on the DVD discs.
Linear PCM setup
This option sets the audio output format sent using the unit's coaxial digital audio output.
Linear PCM OUT
- LPCM 48K - In the Linear PCM setting, "48K" means "the digital audio output maximum sampling rate is 48KHz"; therefore, when the title's encoding sampling rate* is 96KHz, the output will be forced converted to 48KHz.
- LPCM 96K - If "96K" is selected, then the maximum output sampling rate is 96KHz and no conversion will take place.
Preferences
Preferences allow you to set the default TV TYPE, VIDEO OUTPUT, AUDIO, SUBTITLE, DISC MENU, PARENTAL, PASSWORD, factory DEFAULTS and SMART-NAVI of this player. This setting is only available when the DVD player is in the STOP mode by pressing the [STOP] button twice and then press the [SETUP] button to call on the "GENERAL PAGE" fore selection settings. NOTES: Pressing the [STOP] button once only pause the playback, to stop the playback completely by pressing [STOP] twice.
TV TYPE
- MULTI - The DVD player will choose the correct system to display the playback of inserted disc.
- NTSC - The DVD player will output in NTSC format regardless of what format the disc was designed for.
- PAL - The DVD player will output in PAL format regardless of what format the disc was designed for.
Note: Press [N/P] directly on the Remote Control to alter NTSC, PAL or MULTI of TV System being played.
VIDEO OUTPUT
The TV OUTPUT has three kinds of output ways; they are VIDEO, S-VIDEO and SCART. If you are using S-video output, please set this setting to "S-VIDEO". If you are using SCART output set to "SCART", which matches with your TV's SCART input.
NOTES:
SCART output and S-Video output cannot be used simultaneously.
AUDIO
This unit supports three audio selections, as shown below, for your preferred audio setting.
SUBTITLE
This unit supports three subtitle selections, as shown below, for your preferred default subtitle setting. When "OFF" is selected, there will be no subtitle is displayed during playback.
DISC MENU
This unit supports three DISC MENU languages.
DVD-024 & DVD-025♦ PRINCE 3
PARENTAL
Functions to limit the playback of some discs that contain mature scenes. The limitation varies from disc to disc; when it is activated, playback is completely prohibited. There are eight levels of parental setting of this unit.
When you want to change the parental rating level, you will be asked to enter a password.
NOTES: Use "3308" to override the forgotten password.
PASSWORD
The password is a 4-digit number. When you want to change the password, select "CHANGE" as shown below.
You will be asked to enter the old password, then enter the new password, and confirm it.
NOTES: The default password number is "3308".
DEFAULTS
When you select "RESET", all the initial settings will be restored to the default setting.
SMARTNAVI
With the WITH MENU of the SMART NAVI highlighted, there will be the Menu of JPG or MP3 displayed on the screen (WITH MENU is the default setting).
On screen display (OSD)
DVD OSD Modes
There are two OSD display modes available when playing a DVD disc.
Mode 1
When the [OPEN/CLOSE] button is pressed, the OSD shows: the status of the pressed button and some special Logoes are displayed on the screen.
Mode 2
Shows the playback information of a movie or title.
- When pressing the [OSD] button on R/C, the information OSD will display on the screen in the sequence as shown below:
- When pressing the [DISPLAY] button on the remote control again, it will turn off the OSD.
CD/VCD OSD Modes
There are two OSD display modes available when playing a VCD, and Audio CD disc.
Mode 1
Shows the status of the pressed button and some special messages are displayed on the screen as previous description.
Mode 2
Shows the playback time information of a disc.
PBC ON (VCD 2.0 above only)
- When pressing the [OSD] button on R/C, the information OSD will display on the screen in the sequence as shown below:
- When pressing the [DISPLAY] button on the remote control again, it will turn off the OSD.
Basic operation of playback
Preparation
- If a television set is used, turn on its power and select the appropriate input AV, S-Video VGA. If the VGA connection is used then the TV will switch to the correct input when the DVD player is turned on.
- If a sound system is used, turn on the amplifier first and make sure its outputs are set properly.
START Playback
- Turn on the DVD player.
- Press the [OPEN/CLOSE] button to open the disc tray.
- Place a disc onto the tray and make sure that it is placed squarely on the tray.
- Press the [OPEN/CLOSE] or [PLAY/PAUSE] button to play the disc.
NOTES:
When using a DVD disc, some menu selections and some DVD playback functions are available during play-back. When using a VCD disc with PBC, the PBC menu will be displayed on the screen. You can use the PBC menu, or press the PBC button to set PBC off and the disc will play immediately. For a VCD disc without PBC or an Audio CD, the disc will be played immediately.
SKIP Playback
DVD Playback
- Press the [NEXT] button to skip to the next chapter.
- Press the [PREV] button to skip to the beginning of the current chapter or previous chapter.
DVD-024 & DVD-025♦ PRINCE 3
VCD/Audio CD Playback
- PBC ON (VCD 2.0 above only): Press the [NEXT] or [PREV] button will go back to the PBC menu.
Note: There will be a case that playback stops when
[NEXT] or [PREV] is pressed.
- PBC OFF or Audio CD Press the [NEXT] or [PREV] button will skip to the next or previous track of VCD or Audio CD.
Note: PBC: Play Back Control. See page 26. This function is only available for Video-CD version 2.0 or higher. The PBC operation may differ by disc, therefore, refer to the instructions for each disc.
FAST FORWARD/REVERSE SCAN
Using the [FWD] and [REV] buttons to fast forward and reverse scan.
DVD Playback
- When the [FWD] or [REV] button is pressed, the speed of playback changes in cycles of 2 → 4 → 6 → 8 → Play → 2
- When the [PLAY/PAUSE] button is pressed during fast forward/reverse scan, normal playback will be resumed.
VCD/Audio CD Playback
- When the [FWD] or [REV] button is pressed, the speed of playback changes in cycles of 1 → 2 → 3 → 4 → Play → 1
- When the [PLAY/PAUSE] button is pressed during fast forward/reverse scan, normal playback will be resumed.
NOTES:
It is normal that video image may seem discontinuous during fast forward/reverse scan. When the fast forward scan reaches the end of a track (Audio CD/VCD) or a title (DVD), normal playback of the next track/title will be resumed. When the fast reverse scan reaches the beginning of a track (Audio CD/VCD) or a title (DVD), the normal playback of the track/title will be resumed.
- When the [SLOW] button is pressed, the speed of playback changes in cycles of slow forward ▶2 → ▶4 → ▶8 and then slow reverse ◀2 → ◀4 → ◀8.
- When the [PLAY/PAUSE] button is pressed during slow forward/reverse scan, normal playback will be resumed.
VCD/Audio CD Playback
- When the [SLOW] button is pressed, the speed of playback changes in cycles of slow forward 1 2 3 PLAY 1
- When the [PLAY/PAUSE] button is pressed during slow forward/reverse scan, normal playback will be resumed.
NOTES: During slow-motion play, you will not be able to hear the audio portion of the track.
STOP Playback
DVD Playback
Pressing the [STOP] button once only pre-stop the playback. You must press the [STOP] button twice to totally stop the playback.
NOTES:
When the unit is not in use, please remove the disc and press the [POWER] button to turn off DVD player.
VCD/Audio CD Playback
- PBC ON (VCD 2.0 above only): When the disc playing is over, system will go back to PBC (main page) Menu.
Note:
Some function keys will be differed from its original definition even cease to function in some discs. [HAND] The main cause is those specific discs were already contained its operation function in process of manufacturing. In this case, to operate the function key, please follow on-screen indication for operation. The particular feature only exists in those specific discs; it will not further affect DVD player's normal operation. When PBC mode is ON, even when STOP button is pressed some discs will not go back to PBC Menu and “____” is shown on the screen.
- PBC OFF or Audio CD Press [STOP] button will stop playback during PBC off or Audio CD playback.
Advanced operation of playback
REPEATED Playback
TITLE/CHAPTER Repeat
When the [REPEAT] button is pressed, the repeated playback is triggered and the OSD message is changed in cycles of "CHAPTER REPEAT ON", "TITLE REPEAT ON", and "REPEAT OFF."
DVD-024 & DVD-025♦ PRINCE 3
- CHAPTER REPEAT - Enables the repeated play-back of a chapter for a DVD disc or track for a Audio CD disc or a VCD disc.
- TITLE REPEAT - Enables the repeated playback of a title for a DVD disc or a disc for a Audio CD disc or a VCD disc.
- REPEAT OFF - Resumes normal play.
A-B
You are able to perform a repeated playback between any two points of a track or a chapter.
- Press the [A-B] button during playback to set the beginning point (A). The OSD message "A TO B SET A" will be shown on the right lower screen corner.
- Press the [A-B] button again to set the end point (B). The OSD message "A TO B SET B" will be shown. In the meantime, the repeated playback begins between the two points, A and B.
- Pressing the [A-B] button again resumes normal play. The OSD message "A TO B CANCELLED" will be shown.
PROGRAM Playback
Here the program playback function is only available for Audio CD, or a VCD with PBC off.
Track Program
- Press the [PROG] button to program the tracks for program playback during STOP status.
- Use the numbers on the remote control to begin programming. Press the corresponding track number in the same sequence as your desired playback order. For example: To program tracks 2, 4, 6 (in the same order), simply press key digits [2], digit [4], digit [6] sequentially.
- A number larger than 10 must be keyed by using [+10] additionally. For example, "22" is keyed in by pressing [+10] twice and then [2] once.
NOTES: The maximum program capability is 99 tracks.
Start/Cancel the Program Playback
- Press the [PLAY/PAUSE] to start the program playback in the order that you programmed it.
- Press the [STOP] button to stop playback, press [PROG] to reset program order, press [PROG] again to cancel the program function.
- During the program playback, the [NEXT] button and the [PREV] button can be used to advance to the next programmed track or go back to the previous programmed track.
TITLE MENU (DVD Only)
Some DVD discs have a title menu recorded within them to use for selecting titles for play. This feature will only work with these discs.
- Press the [TITLE] button during playback to reach the title menu. Pressing the [TITLE] button again resumes the playback of the scene when the [TITLE] button was first pressed.
- Use the [◀] [▶] [▲] [▼] buttons to control the direction and press the [PLAY/PAUSE] button to select the preferred title or you can directly press the numeric buttons to select the title.
NOTE: DVD discs are divided into units referred to as titles, and titles are divided into chapters. Menu screens do not belong to any title. A disc that contains a movie may have only one title with many chapter divisions.
DVD MENU (DVD Only)
Some DVDs have complex contents such as multi-subtitle, multi-audio, or multi-angle. In these cases, you may use the DVD menu to select audio language, subtitle language, and angle.
- Press the [MENU] button during playback to display the DVD menu, if it is available on the disc.
- Use the [◀] [▶] [▲] [▼] buttons to control the direction and press the [PLAY/PAUSE] button to select the preferred item. Or you can directly press the numeric buttons to select the item.
- Pressing the [MENU] button again resumes the playback of the scene when the [MENU] button was first pressed.
MULTI-ANGLE Playback
Some DVD discs may contain scenes with a number of different angle views. Whenever a scene with multiple angle views is played, you can use the [ANGLE] button to view this scene from different angles.
- The OSD icon [CAMERA MARK] will appear on the screen during the playback of a scene with multi-angle views.
- When the [ANGLE] button is pressed, the angle for playback will change in cycles among the available angle numbers.
NOTES: The "ANGLE MARK" in the initial setting must be set to "ON."
Changing SUBTITLE During Playback
During playback of a DVD disc with more than two subtitle languages, you can change the subtitle or disable the subtitle by pressing the [SUBTITLE] button.
DVD-024 & DVD-025♦ PRINCE 3
- When the [SUBTITLE] button is pressed, the subtitle for playback will change in cycles among the available subtitle numbers and "OFF" status. "OFF" will disable the subtitle display.
- The OSD message will show the current subtitle number. If no selection is made, this OSD message will disappear after 3 seconds.
NOTES: 'UNKNOWN" will be displayed for languages that are not supported by the subtitle function in this player.
NOTES: Sometimes the subtitle language can only be changed in DVD menu instead of during playback. The number of available subtitle language is depending on the disc.
Changing AUDIO LANGUAGE During Playback
During playback of a DVD disc with more than two audio languages, you can change the audio/language by pressing the [LANGUAGE] button.
- When the [LANGUAGE] button is pressed, the audio/language for playback will change in cycles among the available audio/language numbers.
- The OSD message will show the current subtitle number. If no selection is made, this OSD message will disappear after 3 seconds.
NOTES: Sometimes the audio language can only be changed in DVD menu instead of during playback. The number of available audio language is depending on the disc
DIRECT Function
Under the search mode, specific title, chapter, or time can be located for immediate playback.
DVD Search Functions
During a DVD playback, pressing the [TIME] button can enable the search function. The OSD will show three search methods after pressing [TIME] button one time and two times.
The “TITLE 01/35” indicates that the player is currently playing title no. 1 of 35 titles. The “CHAPTER 06/38” indicates that the player is currently playing chapter 6 of 38 chapters. The “TIME 00:20:12” indicates that the current playback time is 20 minutes and 12 seconds into the playback.
- To search by title, use the [◀] [▶] [▲] [▼] buttons to highlight the first two digits of the "TITLE nn/nn" section. Once highlighted, use the number keys on the remote to enter the title you want to play. Presses [ENTER] to complete your search selection.
- To search by chapter, use the [◀] [▶] [▲] [▼] buttons to highlight the first two digits of the "CHAPTER
nn/nn" section. Once highlighted, use the number keys on the remote to enter the chapter you want to play. Presses [ENTER] to complete your search selection.
- To search by time, use the [◀][▶][▲][▼] buttons to highlight the "TIME nn:nn:nn" section. Once highlighted, use the number keys on the remote to enter the time frame from which you want to play. Presses [ENTER] to complete your search selection.
VCD/Audio CD DIRECT Functions
During a VCD or Audio CD playback, this unit only supports the time search function.
- Pressing the [TIME] button during play will display the OSD for VCD/Audio CD search.
- When the time is set, play from this position will start immediately.
NOTES: Audio CD playback's background is start up logo.
VCD PLAYBACK CONTROL (PBC)
This function is only available for Video-CD version 2.0 or higher. The PBC operation may differ by disc, therefore, refer to the instructions for each disc.
- Press the [MENU/PBC] button to switch on/off the PBC function. The OSD message "PBC ON" or "PBC OFF" will be displayed.
- On the PBC menu, the [PREV] and [NEXT] buttons are dedicated for "GO BACK TO PREVIOUS PAGE" and "GO TO NEXT PAGE" of the PBC menu, if available.
USB Port
The USB port could read any USB 1.1 device, to take the MP3 player as an example, we just plug it into the DVD player, then the player could play the music which is stored in the MP3 player.
Troubleshooting
Before requesting service for this player, check the items below for a possible cause of the problem you are experiencing. Some simple checks or a minor adjustment on your part may eliminate the problem and restore proper operation.
PICTURE
No Picture
- Ensure that the equipment is connected properly.
DVD-024 & DVD-025♦ PRINCE 3
- Connect the video cable securely into the appropriate jacks.
- Select the appropriate video input mode on the TV so the picture from the DVD video player appears on the TV screen.
Picture Distorted
- The disc is dirty and needs to be cleaned.
- It is normal for some distortion to appear while Fast Motion Playback.
Picture not Suit TV Screen
- Change "TV SCREEN" setting in DVD Setup Menu to suit your television.
SOUND
No Sound
- Check the connections.
- Check the volume on the equipment you have connected.
- Connect the audio cable securely into the appropriate jacks.
- Ensure that the input settings for the television and stereo system are correct.
- IF the player is in mute mode, please press "Mute" button again to turn on sound.
No Stereo Sound Effect when
Playing Video CD or CD
- Check the connections.
- Press "Stereo" button to select stereo sound.
THE REMOTE CONTROL DOES NOT WORK PROPERLY
- Remove the obstacle existing between the DVD player and the remote control.
- The remote control is too far from the DVD video player. Operate the remote control within operating distance.
- Point the remote control at the remote sensor of the DVD video player.
- If the batteries in the remote control are exhausted, please replace batteries with new ones.
THE DVD PLAYER DOES NOT START PLAYBACK
- No disc is inserted. ("No disc" symbol appears on the screen). Please insert disc.
- The disc is placed upside down. Place the disc with the playback side down.
– The disc is dirty. Please clean the disc.
Specifications
Wavelength: 650nm Signal System: PAL/ AUTO/ NTSC Frequency Response: 4 Hz\~20,000 Hz
Signal to Noisy Ratio: ≥100dB Audio Distortion+Noise: ≤80dB(1KHz)
Audio Dynamic Range: ≥100dB(1KHz) Output
Audio output (Analog audio) average output: 2V±10%, Load: 10KΩ
Audio output (Digital audio) average output: 0.5Vp-p±20%, Load: 75Ω
Video output average output: 1Vp-p±20%, negative sync, Load: 75Ω
Color difference output: Luminance (Y) 700mv±20%; Color (Cb) 535.5mv±20%, Color (Cr) 535.5mv±20%
S video output average output: Luminance signal (Y) 1Vp-p±20% (75Ω load) Color signal (C) 0.286Vp-p±20%, (75Ω load)
Power Supply: AC100V\~240V; 50/60Hz
DVD-024 & DVD-025♦ PRINCE 3
Note:
TV LCD 701

natural_image
Black-and-white photo of a vintage television displaying a woman with hands on her ear, next to a remote control (no visible text or symbols)natural_image
Modern black keyboard with silver frame and scroll wheel (no visible text or symbols)natural_image
Close-up of a pair of black and silver headsets with earphones (no visible text or symbols)
LCD Monitor 1703 with TV

natural_image
Black-and-white photo of a woman's portrait displayed on a computer monitor (no visible text or symbols)
- MM5000 Dune
- Supercharger Supreme
- DVD-012 Emperor Recorder
- Package contents 28
- Precautions 28
- Disc care 29
- Front panel 30
- Back panel 30
- Remote control unit 31
- Disc compatibility chart 32
- Back panel connections 32
- DVD-024 & DVD-025♦ PRINCE 3
- Initial setting 33
- General setup DVD only 33
- Speaker setup 34
- Audio setup 34
- Linear PCM setup 35
- Preferences 35
- On screen display (OSD) 36
- Basic operation of playback 36
- Advanced operation of playback 37
- USB Port 39
- Troubleshooting 39
- Specifications 40
- Instrukcja obsługi
- W zestawie
- Uwaga!
- 2/5.1 Channel Analog Audio Output
- Dolby® Digital & DTS® Digital Audio Output Support
- High Quality 96kHz/24bit Audio D/A Converter
- 10-Bit 27Mhz D/A Video Converter
- Auto NTSC and PAL Video Disc Conversion
- X1.5/X2X3 Video Zoom Support
- Multi-Speed Fast Forward/Reverse Scan
- Multi-Speed Slow Motion Forward/Reverse Scan
- Volume Control of Analog Audio Output
- Package contents
- Precautions
- Power Supply
- Power Cord
- Usage and Storage
- Unit Placement
- Condensation
- Unit Cleaning
- Disc care
- Disc Usage
- Disc Cleaning
- Disc Storage
- Front panel
- Back panel
- Remote control unit
- Notes!
- Disc compatibility chart
- Back panel connections
- SCART Terminal
- Coaxial Digital Audio Output Terminals
- S-Video Output Termina
- VGA
- Initial setting
- General setup DVD only
- TV DISPLAY
- ANGLE MARK
- OSD LANGUAGE
- CAPTIONS
- SCREEN SAVER
- Speaker setup
- DOWN MIX
- CENTER
- REAR
- SUBWOOFER
- CNTR DELAY
- REAR DELAY
- TEST TONE
- Audio setup
- AUDIO OUT
- PROLOGIC
- DUAL MONO
- COMPRESSION
- Linear PCM setup
- Linear PCM OUT
- Preferences
- TV TYPE
- VIDEO OUTPUT
- NOTES:
- AUDIO
- SUBTITLE
- DISC MENU
- PARENTAL
- PASSWORD
- DEFAULTS
- SMARTNAVI
- On screen display (OSD)
- DVD OSD Modes
- Mode 1
- Mode 2
- CD/VCD OSD Modes
- PBC ON (VCD 2.0 above only)
- Basic operation of playback
- Preparation
- START Playback
- SKIP Playback
- DVD Playback
- VCD/Audio CD Playback
- FAST FORWARD/REVERSE SCAN
- STOP Playback
- Note:
- Advanced operation of playback
- REPEATED Playback
- TITLE/CHAPTER Repeat
- A-B
- PROGRAM Playback
- Track Program
- Start/Cancel the Program Playback
- TITLE MENU (DVD Only)
- DVD MENU (DVD Only)
- MULTI-ANGLE Playback
- Changing SUBTITLE During Playback
- Changing AUDIO LANGUAGE During Playback
- DIRECT Function
- DVD Search Functions
- VCD/Audio CD DIRECT Functions
- VCD PLAYBACK CONTROL (PBC)
- USB Port
- Troubleshooting
- PICTURE
- No Picture
- Picture Distorted
- Picture not Suit TV Screen
- SOUND
- No Sound
- No Stereo Sound Effect when
- Playing Video CD or CD
- THE REMOTE CONTROL DOES NOT WORK PROPERLY
- THE DVD PLAYER DOES NOT START PLAYBACK
- Specifications
- TV LCD 701
- LCD Monitor 1703 with TV
Brand : Manta
Model : DVD-025 Prince 3
Category : DVD player