
ZEW1603 - Network card Zonet - Free user manual and instructions
Find the device manual for free ZEW1603 Zonet in PDF.


| Product Type | Wireless PCI network card |
| Standards | IEEE 802.11g, IEEE 802.11b |
| Interface | 32-bit PCI |
| Chipset | Ralink Ra2561 + Ra2528 |
| Operating Systems | Windows 2000/XP/Vista, Linux, Mac OS X |
| Frequency Range | 2.4 – 2.4835 GHz |
| Radio Data Rate | 11g: 54/48/36/24/18/12/9/6 Mbps; 11b: 11/5.5/2/1 Mbps |
| Modulation | BPSK, QPSK, CCK, OFDM (BPSK/QPSK/16-QAM/64-QAM) |
| Transmit Output Power | 54 Mbps: 16-17 dBm; 11 Mbps: 18-20 dBm |
| Antenna | External dipole (detachable), 2 dBi gain |
| Number of Selectable Channels | USA/Canada: 11; Europe: 13; Japan: 14 |
| Data Security | WPA/WPA2, 64/128/256-bit WEP, TKIP/AES |
| LED Indicators | Link/Active status |
| Transmission Distance | Indoor up to 100 m, outdoor up to 300 m (environment dependent) |
| Roaming | Supports multipoint auto roaming and configuration |
| Operating Temperature | 0°C – 45°C |
| Storage Temperature | -20°C – 70°C |
| Operating Humidity | 10% – 95% RH, non-condensing |
| Main Functions | Wireless client, Soft AP, zero configuration, profile management |
| Package Contents | Card, antenna, installation CD, quick installation guide |
| Warranty | Standard manufacturer warranty (check with reseller) |
Frequently Asked Questions - ZEW1603 Zonet
User questions about ZEW1603 Zonet
0 question about this device. Answer the ones you know or ask your own.
Ask a new question about this device
Download the instructions for your Network card in PDF format for free! Find your manual ZEW1603 - Zonet and take your electronic device back in hand. On this page are published all the documents necessary for the use of your device. ZEW1603 by Zonet.
USER MANUAL ZEW1603 Zonet
USER MANUAL
Table of Contents
Chapter 1. Introduction......2
1.1 System requirement....2
1.2 Package Contents....2
Chapter 2. Install Your ZEW1603....3
2.1 Software Installation....3
2.2 Hardware Installation....5
Chapter 3. Configuration ......7
3.1 Profile 7
3.2 Link Status....8
3.3 Site Survey....9
3.3.1 ADD/EDIT Profile.....10
3.4 Statistics....13
3.5 Advanced....14
Chapter 4. Zero configuration....15
Chapter 5. SOFT AP....19
5.1 Start Soft AP....19
5.2 Configuration 20
5.3 Access Control....20
5.4 MAC Table....21
5.5 Switch to Working Station mode....21
Chapter 6. Specifications....22
Chapter 7. Troubleshooting....23
Chapter 1. Introduction
1.1 System requirement
● A desktop PC with an available 32-bit PCI slot
- At least a 300MHz processor and 32MB of memory
● Windows 2000, XP, Vista 32-bit, Linux, MAC OSX
● A CD-ROM Drive
1.2 Package Contents
- One ZEW1603
- One Wireless Antenna
● One Installation CD w/ User Manual
● One Quick Installation Guide
Contact your local authorized reseller or the store purchased from for any items damaged and/or missing.
Chapter 2. Install Your ZEW1603
2.1 Software Installation
NOTE: Snap-shot screens of the following installation procedure are based on Windows XP. For other windows operating systems, same procedure but different screen.
-
Power-ON computer, Insert Installation CD to your CD-ROM drive. Browse CD and double-click setup.exe in ZEW1603 folder to execute it. The wizard will run and install all necessary files to your computer automatically.
-
Click Yes to accept the Agreement. Or click No to cancel the installation.

Figure 2-1
- (Only for Win XP) SelectRalink Configuration Tool or Microsoft Zero Configuration Tool then click Next.
a. If you select Ralink Configuration Tool, please go to Chapter 3 – Configuration for details.
b. If you select Microsoft Zero Configuration Tool, please go to Chapter 4 – Zero Configuration for details.
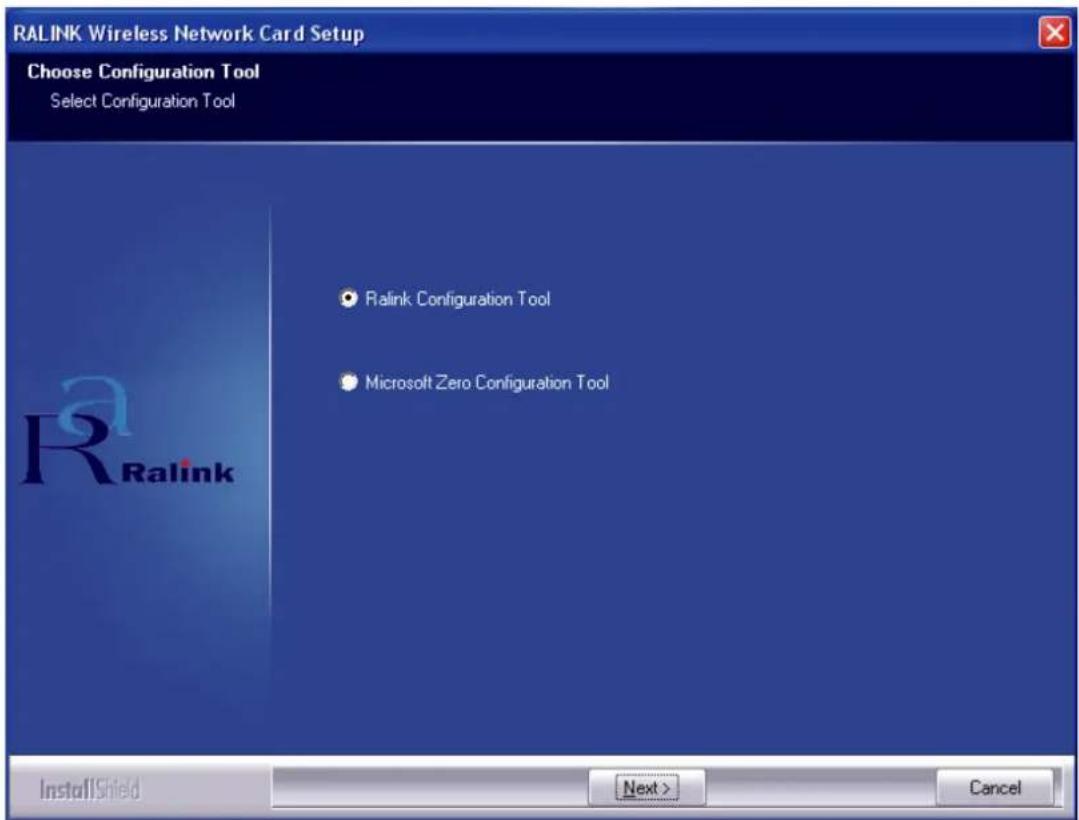
Figure 2-2
- Select Optimize for WiFi mode or Optimize for performance mode then click Next.

Figure 2-3
- Click Finish to complete the software installation.

Figure 2-4
2.2 Hardware Installation
- Power-OFF your desktop PC. Open your PC case and locate an available PCI Slot.
- Insert your ZEW1603 into the PCI slot.
- Attach the external antenna to the ZEW1603's SMA plug.
- Power-ON your desktop PC.

natural_image
3D diagram showing a computer motherboard with a downward arrow pointing to it, enclosed in an enclosure (no text or symbols)Figure 2-5
After Installing ZEW1603, the tray icon will appear in your system tray at the bottom of the screen.
You have now completed the software and hardware installation for ZEW1603. Your ZEW1603 is now ready to use.
Chapter 3. Configuration
3.1 Profile
Profile can keep your favorite wireless setting among your home, office, and other public hotspot. You may save multiple profiles and activate the one at your preference.

Figure 3-1
1. Definitions:
a. Profile Name: Name of the profile, preset to PROF* (* indicate 1, 2, 3,)
b. SSID: The public name of a wireless network, Service Set Identifier
c. Channel: Channel of the connected wireless network
d. Authentication: Open, Shared, (Leap), WPA-PSK, WPA2-PSK, WPA and WPA2
e. Encryption: WEP, TKIP, AES, and None
f. Network Type: Infrastructure and/or Ad-Hoc
- Add: to create a new profile
- Delete: to delete an existing profile
- Edit: to edit/modify/change parameter of an existing profile
- Activate: to make an existing profile become active and to connect
3.2 Link Status
Link status page shows detail information about the current connection.
![Ralink Wireless Utility Profile Link Status Site Survey Statistics Advanced QoS About Status: Supper G Wireless Network <-> 00-03-7F-BE-F0-E4 Extra Info: Link is Up [TxPower:100%] Channel: 11 <-> 2462000 KHz Link Speed: Tx (Mbps) 54.0 Rx (Mbps) 54.0 Throughput: Tx (Kbps) 0.0 Rx (Kbps) 7.8 Link Quality: Good 98% Good 71% dBm Signal Strength: Good 100% Signal Strength2: Low 16% Noise Level: OK Help](/content/2026/05/1089251/images/adae00e9039d8e1bb65291de59c6ac59f7f322f53d5e44652094215747f38183.jpg)
Figure 3-2
- Status: Shows the current connected SSID / BSSID. You will see "Disconnected" if it has no connection.
- Extra Info: Shows link status and its transmit power
- Channel: Shows the current connected channel
- Link Quality: Based on signal strength and TX/RX packet error rate (%)
- Signal Strength: Shows in percentage (%) or dBm
- Noise Level: Shows noise and signal strength ratio (%)
- Transmit:
a. Link Speed: Shows current transmitting rate (Mbps)
b. Throughput: Shows current transmitting throughput (Kbps)
- Receive:
a. Link Speed: Shows current receiving rate (Mbps)
b. Throughput: Shows current receiving throughput (Kbps)
3.3 Site Survey
Under Site Survey tab, you will know information of all surrounding wireless networks from the last scan. Click Rescan to update and refresh. Or Select a SSID to add to your profile.

Figure 3-3

Indicates your current connected network.
3.3.1 ADD/EDIT Profile
a. Configuration

Figure 3-4
Create a Profile Name and choose SSID from the drop-down menu for all available wireless networks.
1. Power Save Mode:
CAM (Constantly Awake Mode): ZEW1603 will stay power-ON as long as the computer is connected to a power outlet.
PSM (Power Saving Mode): ZEW1603 will hibernate when the computer is hibernate.
2. Network Type:
Infrastructure: A wireless Router and/or Access Point is required.
Ad-hoc: Peer-to-Peer network, no base station required.
3. TX Power:
Amount of transmit power used by the radio transceiver to send out signal. User can choose different value in the drop down menu
4. Preamble:
Only available under Ad-hoc mode. Value can be chose from Auto, Long, or Short
5. Threshold:
Frame size when RTS/CTS handshake performs before attempt to transmit.
RTS Threshold: Default value = 2347
Fragment Threshold: Default value = 2346
b. Authentication and Security:
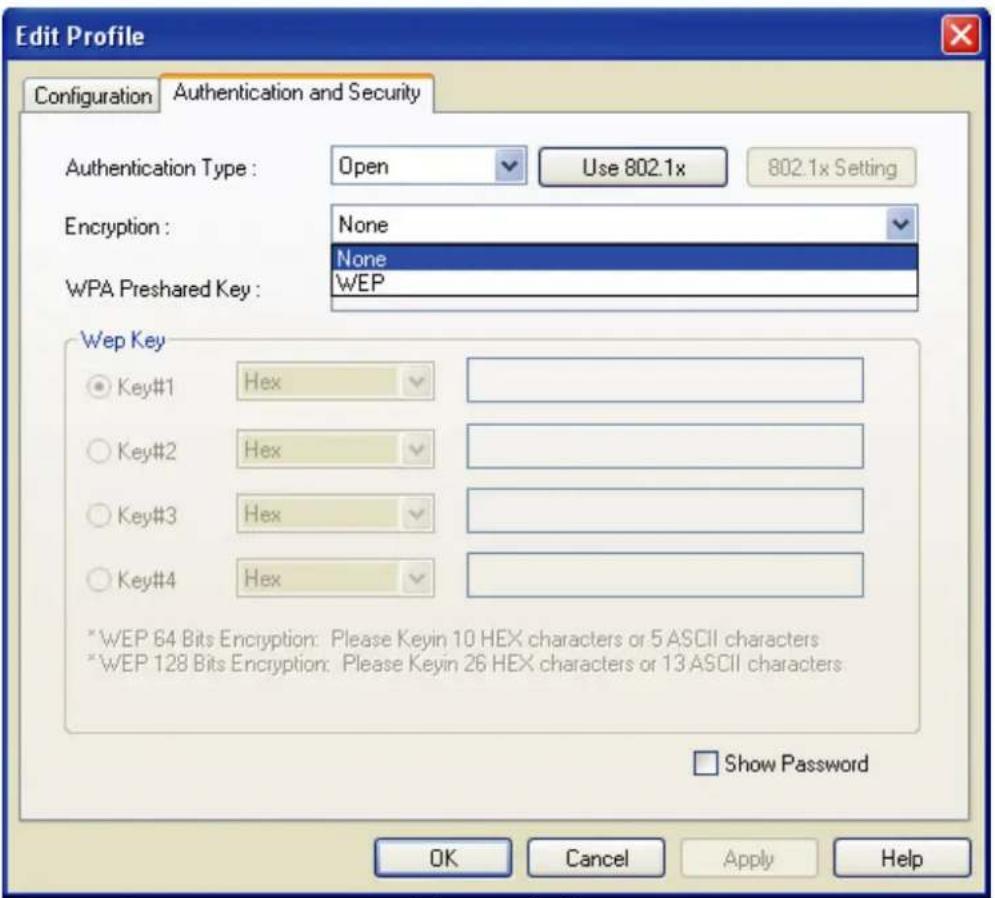
Figure 3-5
- Authentication: Open, Shared, Leap, WPA-PSK, WPA2-PSK, WPA and WPA2
- Encryption: Algorithm used in BSS or IBSS, WEP, TKIP, AES, and None
- 802.1x configuration:
When choosing Authentication - WPA or WPA2, you could configure 802.1x by clicking 802.1x Setting
When choosing Authentication - Open or Shared-key, you could also click 802.1x Setting to configure 802.1x.

Figure 3-6
PEAP(Protected Extensible Authentication Protocol): an edition of EAP(Extensible Authentication Protocol). EAP assures the mutual authentication of wireless users and server in the networking operation center.
TLS/Smart Card: TLS(Transport Layer Security), use to configure an encryption channel and obtain the authentication of server, similar to the webpage server authentication by SSL(Secure Sockets Layer).
This type uses data certificate to check the identity of users and server.
TTLS: uses certificate to validate the server identity and keep the similar security properties of TLS at same time. Such as, to mutually authenticate and dialog the shared secret of WEP key.
Md5 challenge: a single arithmetic using user name and password, it doesn't support key management, but need a pre-configure key.
3.4 Statistics
Statistics page shows the detail counter information based on 802.11 MIB counters. This page translates MIB counters into an easier format for user to read.
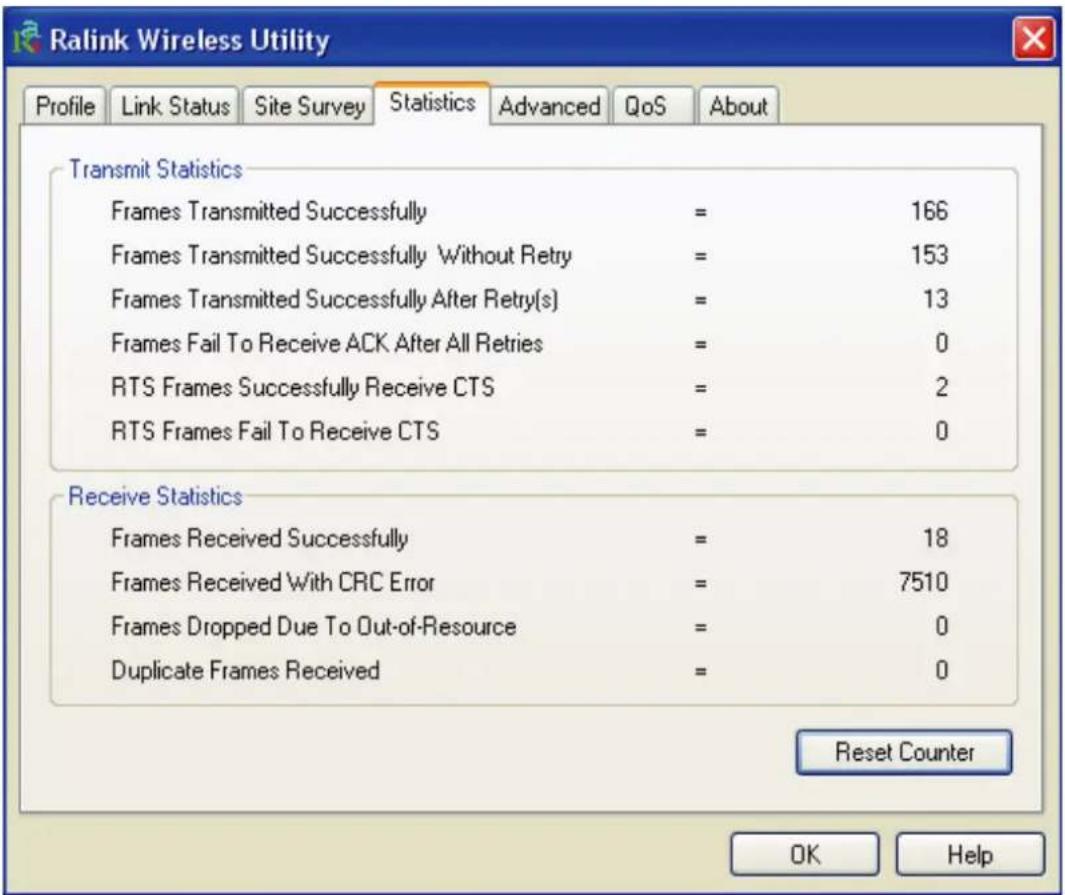
Figure 3-7
3.5 Advanced

Figure 3-8
1. Wireless mode:
Select from 802.11B only, 802.11 and B/G mixed
2. B/G Protection:
ERP protection mode of 802.11B/G definitions, select from Auto, On, and Off
a. Auto: STA will dynamically change as AP announcement
b. On: Always send frame with protection
c. Off: Always send frame without protection.
-
TX Rate: Manually force the Transmit using selected rate. Default = Auto
-
TX Burst: Ralink's proprietary frame burst mode. Suggest using with an AP that has the same technology.
5. Enable TCP Window Size
- Fast Roaming at: Fast to roaming, setup by transmitting power
- Select Your Country Region Code: Eight countries to choose from
- Enable CCX(Cisco Compatible eXtensions):
a. LEAP: Turn on CCKM
b. Enable Radio Measurement: channel measures every 0\~2000 milliseconds
After finish configuring your ZEW1603, you must clickApply to confirm the changes. Otherwise, no change will be made to ZEW1603.
Chapter 4. Zero Configuration
Windows XP has a built-in wireless utility "Wireless Zero Configuration" (WZC). It is a built in service to configure your wireless clients from Windows.
- Start using WZC, right click the tray utility and choose Use Zero Configuration as configuration Utility, and then Windows wireless network configuration could be used.
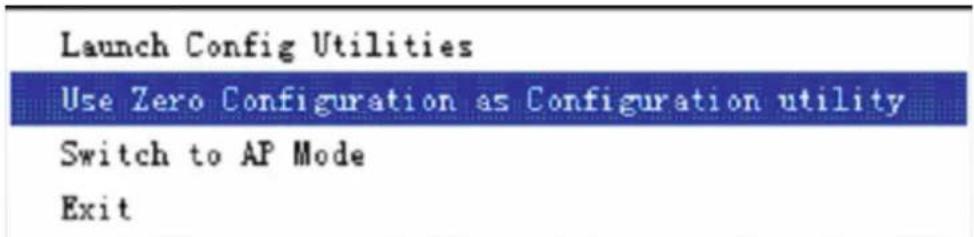
Figure 4-1
- The windows wireless network connection will appear, double click the wireless network icon ☐ on the system tray to check the wireless network, choose the network and click Connect to setup the association.
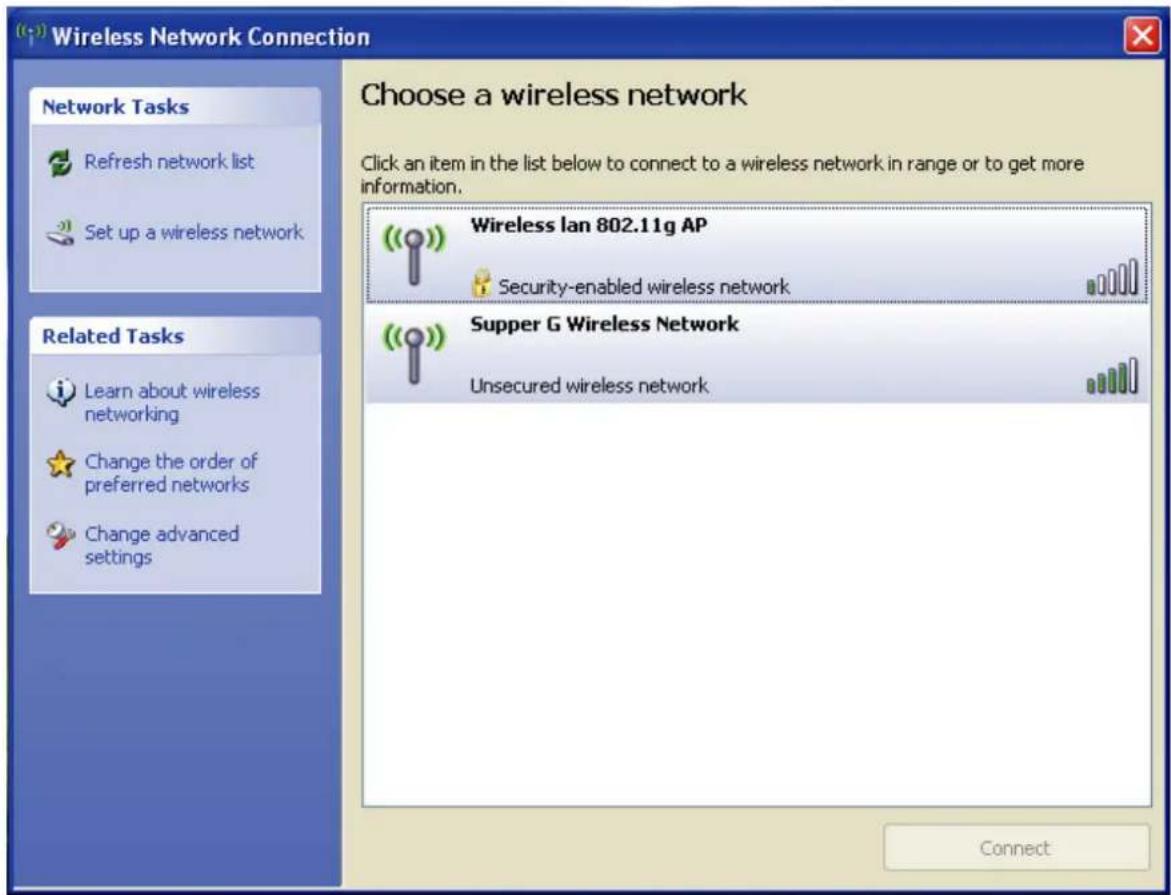
Figure 4-2
- If your wireless router has been encrypted, there will be a window appeared for input the key. Please input the key and click Connect, then the connection connect.
- To configure the wireless connect properties, please right click the wireless icon in the system tray and choose Status to open the page Wireless Network Connection Status.
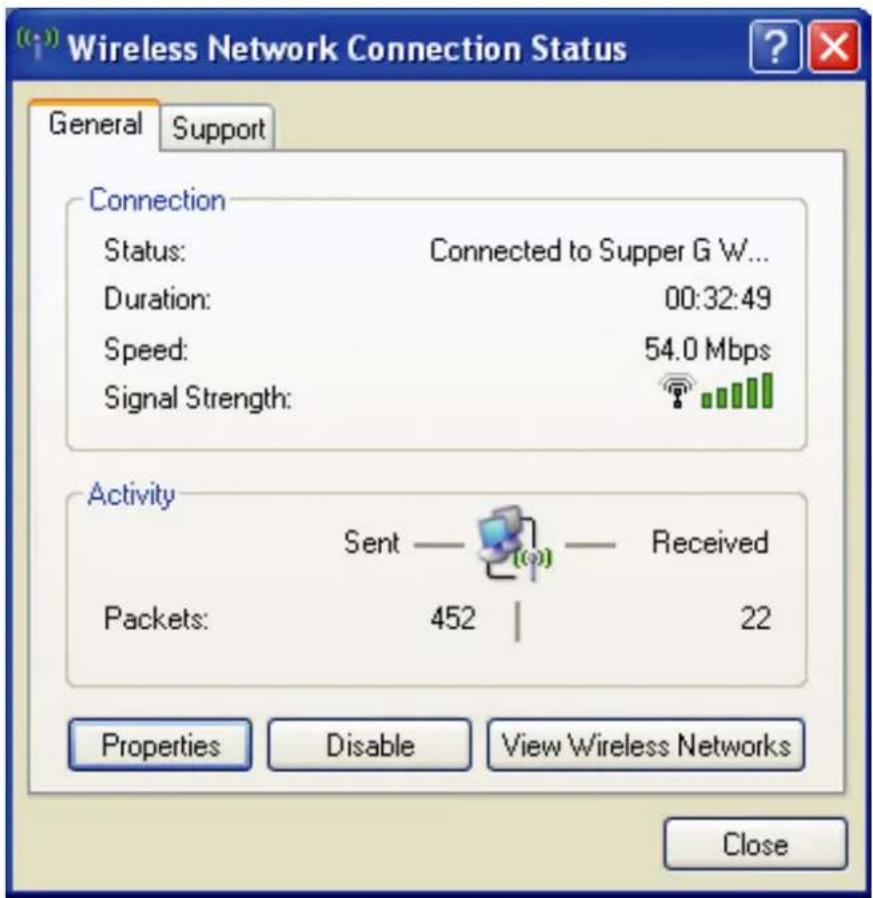
Figure 4-3
- Click Properties button in General page and choose the tab Wireless Networks to add the SSID of available network by clicking Add, if there are several available networks, linking priority could be configured by the button Move up and Move down. The icon shows the current linked AP. Click Properties to configure authentication of wireless connection.

Figure 4-4
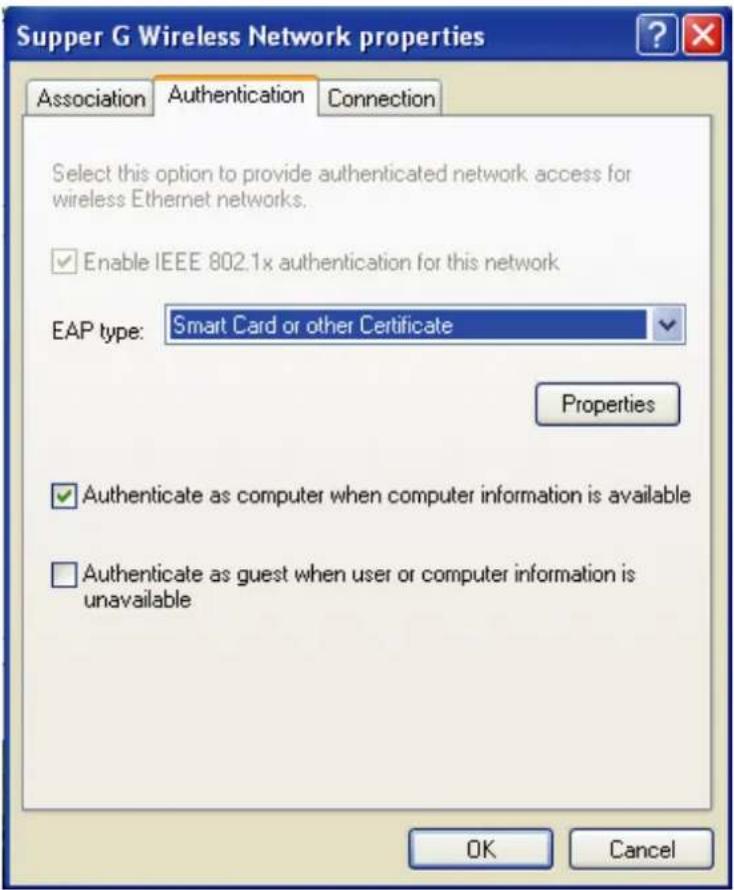
Figure 4-5
- Advanced page configures firewall and connection sharing.

Figure 4-6
Chapter 5. Soft AP
ZEW1603 has two modes: working station and Soft AP. After start Soft AP, ZEW1603 will be an AP to accept any wireless device access.
Note: the soft AP mode is available only in Windows XP.
5.1 Start Soft AP
After starting ZEW1603 driver, you will see icon in the system tray. Right click the icon and choose Switch to AP Mode, the soft AP configuration Utility window will appear as Figure 5-2.

Figure 5-1
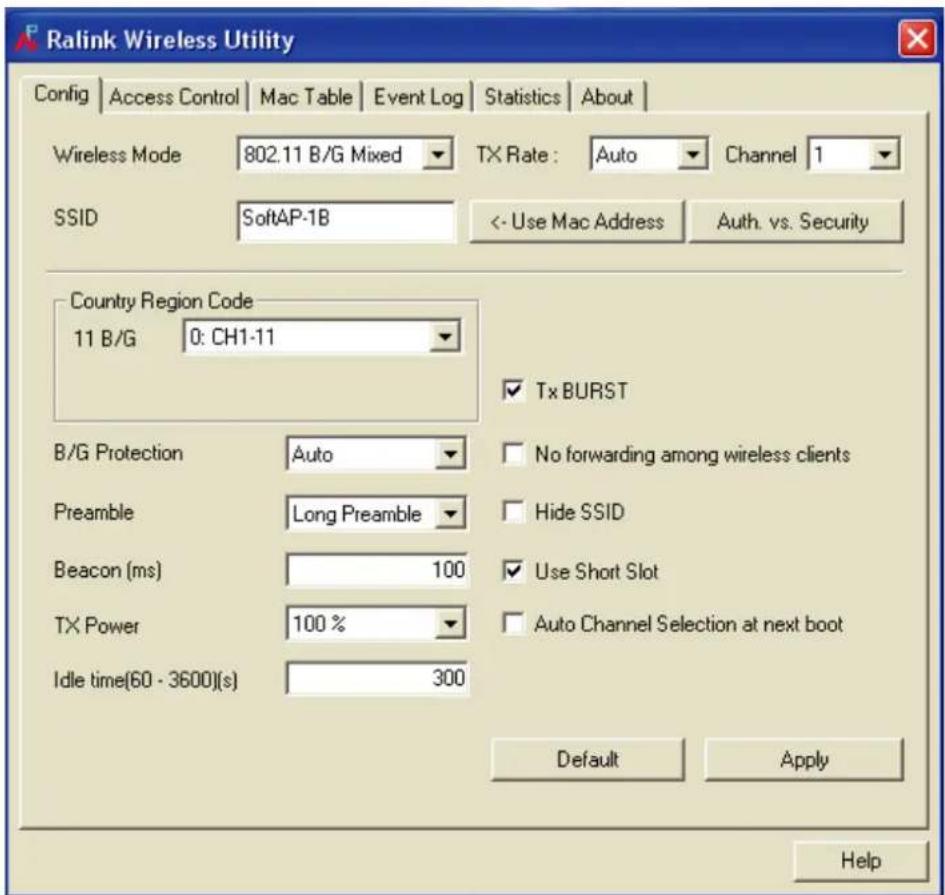
Figure 5-2
5.2 Configuration
In soft AP configuration Utility page, you can make some basic configurations, such as wireless network name, mode, channel and authentication.
Click Auth. vs. Security button to make different security configurations of wireless communication, and you can choose the authentication type or encryption type.
5.3 Access Control
Choose Access Control tab to start MAC control. Access control includes Allow All and Refuse All. After editing the MAC address access list, only the MAC in the Allow All list could access the Soft AP.
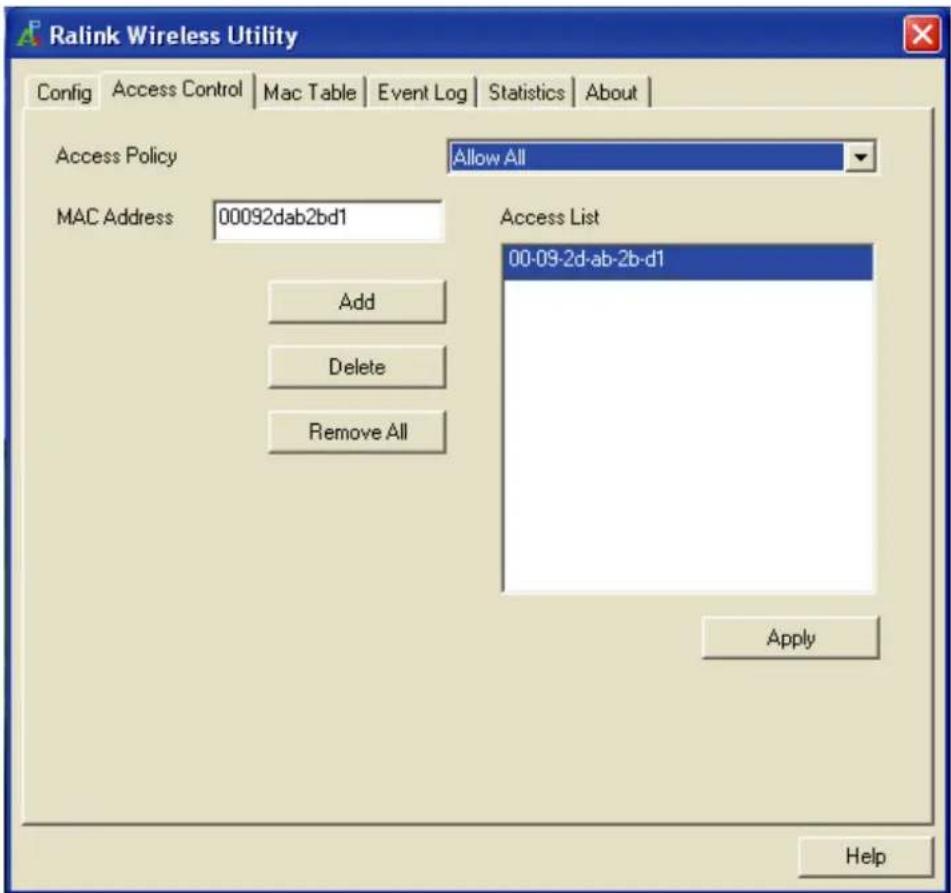
Figure 5-3
5.4 MAC Table
MAC Table page shows the information of the wireless devices accessed to this soft AP.

Figure 5-4
5.5 Switch to Working Station mode
In the Soft AP mode, right-click the icon 📁 in the system tray and choose Switch to Station Mode, then ZEW1603 is switching to working station mode with an interface of working station.

Figure 5-5
Chapter 6. Specifications
| General Features | |
| Standards | IEEE 802.11g; IEEE 802.11b |
| Interface | 32-bit PCI |
| Chipset Ralink | Ra2561+Ra2528 |
| OS | Windows 2000/XP/Vista, Linux, MAC OSX |
| User interface | Easy to use user configuration software |
| Transmit distance | indoor up to 100 meters and outdoor up to 300 meters (standard transmit distance is limited to the environments) |
| roaming | Support multipoint auto roaming and configuration; Support wireless network environments auto detect. |
| LED | Link/Active status indicator |
| Antenna type External Dipole | Antenna (Detachable) |
| RF and baseband Technical Features | |
| Frequency range | 2.4~2.4835GHz |
| Radio data rate | 11g: 54/48/36/24/18/12/9/6Mbps11b: 11/5.5/2/1Mbps |
| Modulation | BPSK, QPSK, CCK and OFDM(BPSK/QPSK/16-QAM/64-QAM) |
| Spectrum Spread Technology | DSSS |
| Transmit output power | 54Mbps: 16-17dBm11Mbps: 18-20dBm |
| Antenna Gain 2 dBi | |
| Number of Selectable Channels | USA,Canada: 11 channelsEurope: 13 channelsJapan: 14 channels |
| Media Access Protocol | CSMA/CA with ACK |
| Data security | WPA/WPA2; 64/128/256-bit WEP; TKIP/AES |
| Environmental and Physical | |
| Operation Temp. | 0°C - 45°C |
| Storage Temp. | -20°C - 70°C |
| Operation Humidity | 10% - 95% RH, Non-condensing |
Chapter 7. TroubleShooting
This chapter provides solutions to problems that may occur during the installation and operation of ZEW1603. Read the descriptions below to solve your problems.
1. The ZEW1603 does not work properly.
Reinsert ZEW1603 into your PC's PCI slot.
Right click on My Computer and select Properties. Select the device manager and click on the Network Adapter. You will find ZEW1603 if it is installed successfully. If you see the yellow exclamation mark, the resources are conflicting. You will see the status of ZEW1603. If there is a yellow question mark, please check the following:
Make sure that your PC has a free IRQ (Interrupt ReQuest, a hardware interrupt on a PC.)
Make sure that you have inserted the right adapter and installed the proper driver. If ZEW1603 does not function after attempting the above steps, remove it and do the following:
Uninstall the driver software from your PC.
Restart your PC and repeat the hardware and software installation as specified in this User Guide.
2. I cannot communicate with the other computers linked via Ethernet in the Infrastructure configuration.
Make sure that the PC to which ZEW1603 is associated is powered on.
Make sure that ZEW1603 is configured on the same channel and with the same security options as with the other computers in the Infrastructure configuration.
3. What should I do when the computer with ZEW1603 installed is unable to connect to the wireless network and/or the Internet?
Check that the LED indicators for the broadband modem are indicating normal activity. If not, there may be a problem with the broadband connection.
Check that the LED indicators on the wireless router are functioning properly. If not, check that the AC power and Ethernet cables are firmly connected.
Check that the IP address, subnet mask, gateway, and DNS settings are correctly entered for the network.
In Infrastructure mode, make sure the same Service Set Identifier (SSID) is specified on the settings for the wireless clients and access points.
In Ad-Hoc mode, both wireless clients will need to have the same SSID. Please note that it might be necessary to set up one client to establish a BSS (Basic Service Set) and wait briefly before setting up other clients. This prevents several clients from trying to establish a BSS at the same time, which can result in multiple singular BSSs being established, rather than a single BSS with multiple clients associated to it.
Check that the Network Connection for the wireless client is configured properly.
If Security is enabled, make sure that the correct encryption keys are entered on both ZEW1603 and the access point.


- Table of Contents
- Chapter 1. Introduction......2
- Chapter 2. Install Your ZEW1603....3
- Chapter 3. Configuration ......7
- Chapter 4. Zero configuration....15
- Chapter 5. SOFT AP....19
- Chapter 6. Specifications....22
- Chapter 7. Troubleshooting....23
- Chapter 1. Introduction
- System requirement
- Package Contents
- Chapter 2. Install Your ZEW1603
- Software Installation
- Hardware Installation
- Chapter 3. Configuration
- Profile
- Definitions:
- Link Status
- Site Survey
- ADD/EDIT Profile
- a. Configuration
- Power Save Mode:
- Network Type:
- TX Power:
- Preamble:
- Threshold:
- b. Authentication and Security:
- Statistics
- Advanced
- Wireless mode:
- B/G Protection:
- Enable TCP Window Size
- Chapter 4. Zero Configuration
- Chapter 5. Soft AP
- Start Soft AP
- Configuration
- Access Control
- MAC Table
- Switch to Working Station mode
- Chapter 7. TroubleShooting
- The ZEW1603 does not work properly.
- I cannot communicate with the other computers linked via Ethernet in the Infrastructure configuration.
- What should I do when the computer with ZEW1603 installed is unable to connect to the wireless network and/or the Internet?
Brand : Zonet
Model : ZEW1603
Category : Network card