
ZEW1642S - Network card Zonet - Free user manual and instructions
Find the device manual for free ZEW1642S Zonet in PDF.


| Product Type | 16-Port Fast Ethernet Switch |
| Model | ZEW1642S |
| Brand | Zonet |
| Number of Ports | 16 |
| Port Speed | 10/100 Mbps |
| Network Standards | IEEE 802.3, IEEE 802.3u |
| Switching Capacity | 3.2 Gbps |
| MAC Address Table Size | 8K entries |
| Dimensions (W x D x H) | 440 x 150 x 44 mm |
| Weight | 1.5 kg |
| Power Supply | External AC adapter, 5V DC |
| Power Consumption | 12W maximum |
| Operating Temperature | 0°C to 40°C |
| Storage Temperature | -40°C to 70°C |
| Humidity | 10% to 90% non-condensing |
| LED Indicators | Power, Link/Act per port |
| Switching Method | Store-and-forward |
| Auto MDI/MDIX | Supported on all ports |
| Housing Material | Metal |
| Mounting | Desktop or rack-mountable (brackets included) |
| Maintenance | Clean with a soft, dry cloth; do not use liquids |
| Safety | Keep away from water and heat sources; use only supplied adapter |
| Spare Parts / Repairability | No user-serviceable parts; contact support for issues |
Frequently Asked Questions - ZEW1642S Zonet
User questions about ZEW1642S Zonet
0 question about this device. Answer the ones you know or ask your own.
Ask a new question about this device
Download the instructions for your Network card in PDF format for free! Find your manual ZEW1642S - Zonet and take your electronic device back in hand. On this page are published all the documents necessary for the use of your device. ZEW1642S by Zonet.
USER MANUAL ZEW1642S Zonet
USER MANUAL
Copyright Statement
Zonet is the registered trademark of Zonet Technology Inc. All the products and product names mentioned herein are the trademarks or registered trademarks of their respective holders. Copyright of the whole product as integration, including its accessories and software, belongs to Zonet Technology Inc. Without the permission of Zonet Technology Inc., any individual or party is not allowed to copy, plagiarize, imitate or translate it into other languages.
Table of Content
Chapter 1. Introduction......2
1.1 Welcome....2
1.2 Product Feature....2
1.3 Content of Package....2
1.4 Before you begin....3
1.5 Designing your ZEW1642S....3
Chapter 2. Installation......4
Chapter 3. Configuration....7
3.1 Station Mode....7
3.1.1 Profile....8
3.1.1.1 Add/Edit Profile....8
3.1.2 Network....10
3.1.3 Link Status ....10
3.1.4 Advanced....11
3.1.5 Statistics....11
3.1.6 WMM....12
3.1.7 WPS....13
3.1.8 SSO....14
3.1.9 CCX....14
3.2 AP Mode....15
3.2.1 Configuration....16
3.2.2 Access Control....17
3.2.3 MAC Table....18
3.2.4 Switch to Working Station Mode....18
3.3 Use Zero Configuration....19
Chapter 4. How to connect with PSP......22
4.1 Configure PSP with Ad-Hoc mode....22
4.2 Configure XLink Kai....24
Chapter 5. Product Specifications....25
Chapter 6. TroubleShooting....26
Chapter 1 Introduction
1.1 Welcome
ZEW1642S-Wireless 802.11n PCI Adapter delivers an incredible speed to your desktop PC without running wires. It complies with the IEEE 802.11n standard, making it backward compatible with 802.11b/g networks for assured compatibility. Advanced 64/128-bit WEP, WPA/WPA2 encryption is supported to provide secure access for your data. Once you're connected, you can stay in touch with your email, access to the internet and send large files across the network at greater distances than ever before.
1.2 Product Feature
● Complies with IEEE 802.11n, IEEE 802.11g and IEEE 802.11b standards
- Provides 32-bit PCI interface
- Provides 300Mbps receiving rate and 300Mbps sending rate
● Supports 20MHz/40MHz frequency width
● Auto- detects and changes the network transmission rate
- Provides two work modes: Infrastructure and Ad-Hoc
● Supports Soft AP to establish your wireless LAN networking
● supports PS3, PSP, Wii and Nintendo DS connecting with Internet and Xlink Kai to enjoy on-line gaming
● Supports 64/128-bit WEP, WPA, WPA2 encryption methods and 802.1x security authentication standard
- WPS (Wi-Fi Protected Setup) simplify the security setup and management of Wi-Fi networks.
● Supports WMM for Multimedia Applications with Quality of Service in Wi-Fi® Networks
● Supports Windows 2000 / XP / Vista / 7
1.3 Contents of Package
- One ZEW1642S
● One Installation CD
● One Quick Installation Guide
Contact your local authorized reseller or the store purchased from for any items damaged and/or missing.
1.4 Before you begin
You must have the following:
● A desktop PC with an available 32-bit PCI slot
● Minimum 300MHz processor and 32MB memory
● Windows 2000, XP, 2003, Vista, 7
● A CD-ROM Drive
- PCI controller properly installed and working in the desktop PC
- 802.11n or 802.11b/g Access Point (for infrastructure Mode) or another 802.11n or 802.11b/g wireless adapter (for Ad-Hoc; Peer-to-Peer networking mode.)
1.5 Designing your ZEW1642S
ZEW1642S supports up to 300Mbps connections. It is fully compliant with the specifications defined in 802.11n standard.

natural_image
Technical line drawing of a mechanical assembly with articulated arms and a separate panel (no text or symbols)The status LED indicators of ZEW1642S are described in the following.
- Lnk/Act ON (Green): Indicates a valid connection
- Lnk/Act Flashing: Indicates the Adapter is transmitting or receiving data.
Chapter 2 Installation
NOTE:
- For future driver upgrading, please visit our website at www.zonetusa.com
-
Snap-shot screens of the following installation procedure are based on Windows XP. Installation procedures will be similar for other windows operating systems.
-
Install ZEW1642S into your computer as following steps:
-
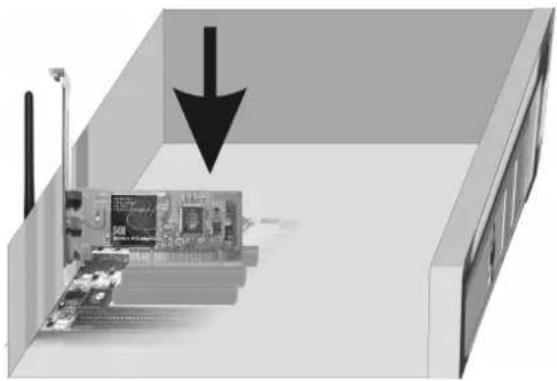
Open your PC case and locate an available PCI on the motherboard.
- Slide ZEW1642S into the PCI slot. Make sure that all of its pins are touching the slot's contacts. You may have to apply a bit of pressure to slide ZEW1642S all the way in. after it is firmly in place, secure its fastening tab to your PC's chassis with a mounting screw. Then close your PC.
● Power on the PC.
natural_image
Interior view of a room with a computer monitor and a downward arrow pointing to it (no text or symbols visible)- Select Cancel when "Found New Hardware" window appears.

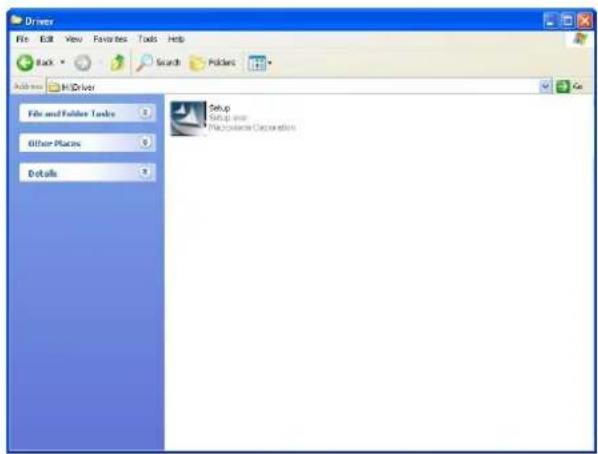
- Insert Installation CD to your CD-ROM drive. Browse CD and double-click setup.exe in Driver folder to execute it. The wizard will run and install all necessary files to your computer automatically.
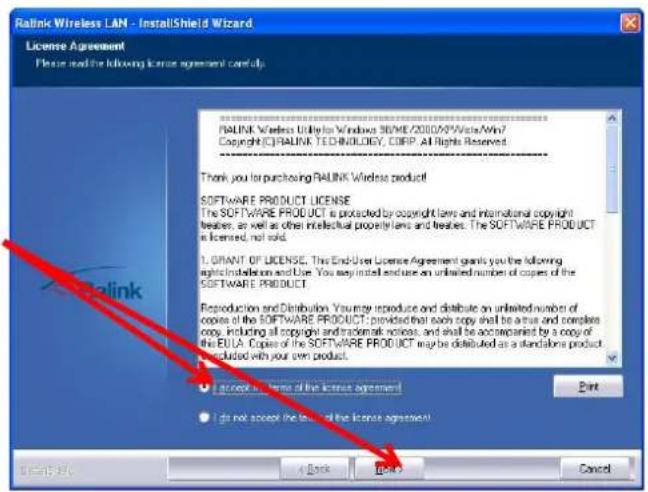
- Click Next to accept the Agreement. Or click Cancel to exit.
- Select Install driver and Ralink WLAN Utility or Install driver only then click Next.

- Select Ralink Configuration Tool or Microsoft Zero Configuration Tool then click Next.
a. It's recommended to select Ralink Configuration Tool, which provides fully access to all function of ZEW1642S.
b. If you prefer to use the wireless configuration tool provided by Windows XP or Vista, please select Microsoft Zero Configuration Tool.

- Click Install to start the installation.

- Click Finish to complete the software installation.
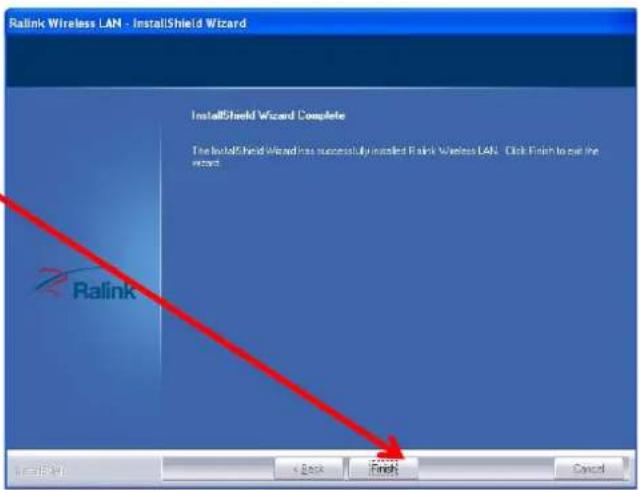
You will see a tray iconR appear in your system tray at the bottom of the screen after the software and hardware installation completed successfully.
Chapter 3 Configuration
3.1 Station Mode
Station Mode is the default access mode for ZEW1642S.
In this mode, ZEW1642S serves as a client to receive the wireless signals to access the Internet.

Double-click the tray icon 📁 to launch the configuration utility.
Or right click the tray icon and select Launch Config Utility.

3.1.1 Profile
Profile can keep your favorite wireless setting among your home, office, and other public hotspot. You may save multiple profiles and activate the one at your preference.
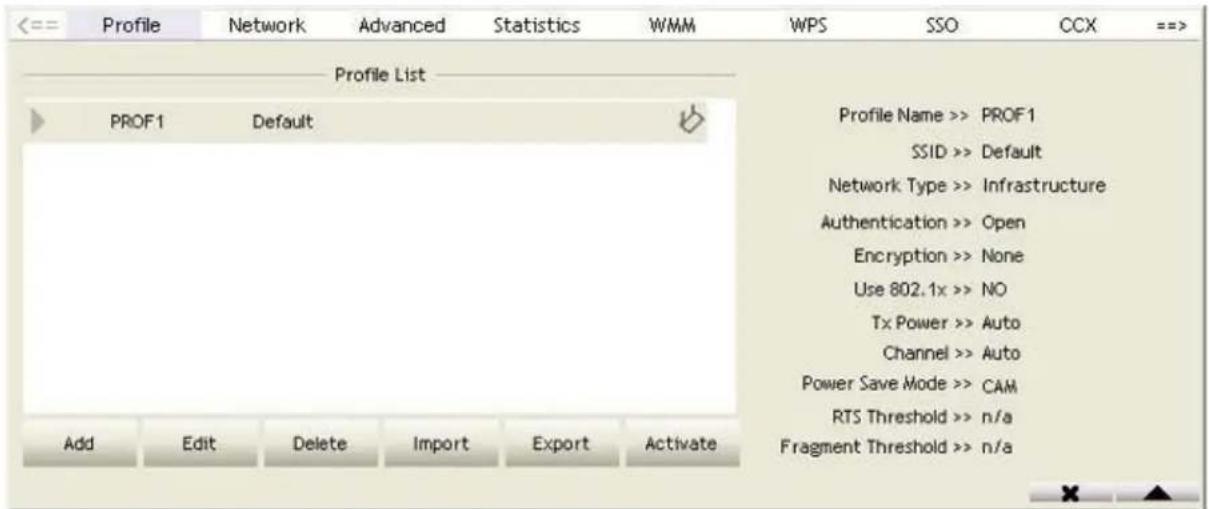
- Add: to create a new profile
- Edit: to edit/modify/change parameter of an existing profile
- Delete: to delete an existing profile
● Activate: to make an existing profile become active and to connect
3.1.1.1 Add/Edit Profile
a. System Configuration

• Power Save Mode:
a.CAM (Constantly Awake Mode) – ZEW1642S will stay power-ON as long as the computer is connected to a power outlet.
b.PSM (Power Saving Mode) - ZEW1642S will hibernate when the computer is hibernating.
• Network Type:
a. Infrastructure – A wireless Router and/or Access Point is required. b. Ad-hoc – Peer-to-Peer network, no base station required.
• TX Power:
Amount of transmit power used by the radio transceiver to send out signal. User can choose different value in the drop down menu
- Preamble:
Only available under Ad-hoc mode. Value can be chose from Auto, Long, or Short
- Threshold:
Frame size when RTS/CTS handshake performs before attempt to transmit.
a. RTS Threshold: Default value = 2347
b. Fragment Threshold: Default value = 2346
b. Authentication and Encryption

- Authentication: Open, Shared, WPA(CCKM capable), WPA-PSK, WPA2(CCKM capable), WPA2-PSK, WPA-NONE, WAPI-PSK, WAPI-CERT
- Encryption: None, WEP, TKIP, AES, TKIP(MFP), AES(MFP), SMS4
c. 802.1X

3.1.2 Network
Under Network tab, you will know information of all surrounding wireless networks from the last scan.
Click Rescan to update and refresh.

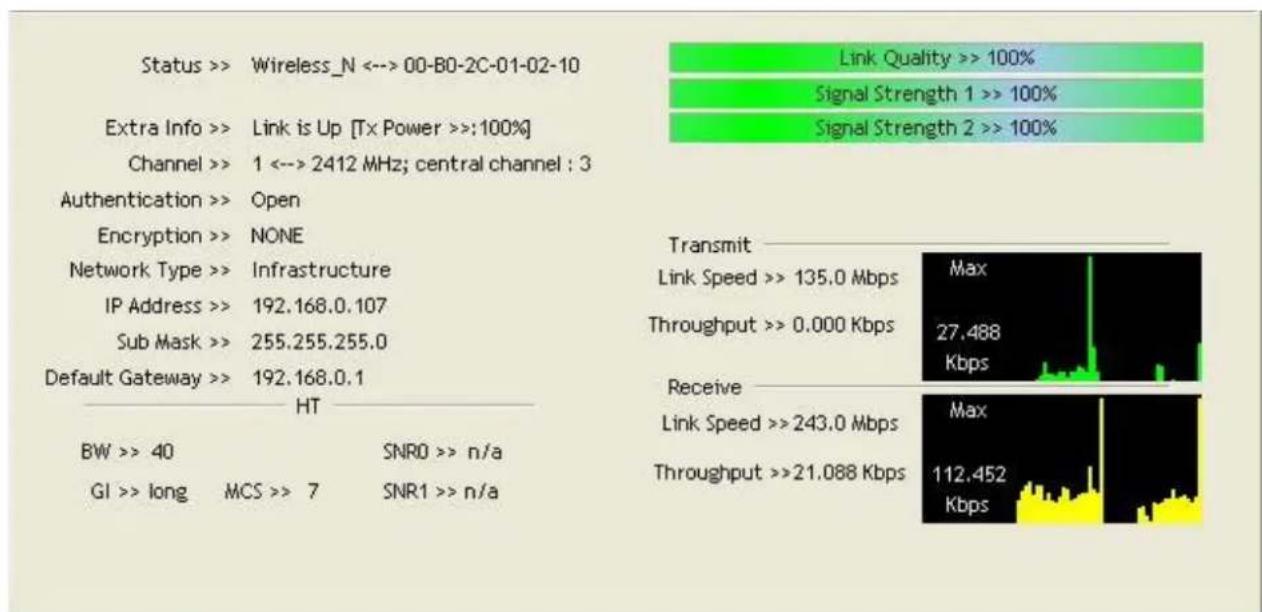
3.1.3 Link Status
Link status page shows detail information about the current connection.
other
| Metric | Value | | :--- | :--- | | Link Quality >> 100% | | | Signal Strength 1 >> 100% | | | Signal Strength 2 >> 100% | |3.1.4 Advanced
The Advanced tab shows Advance function of UI
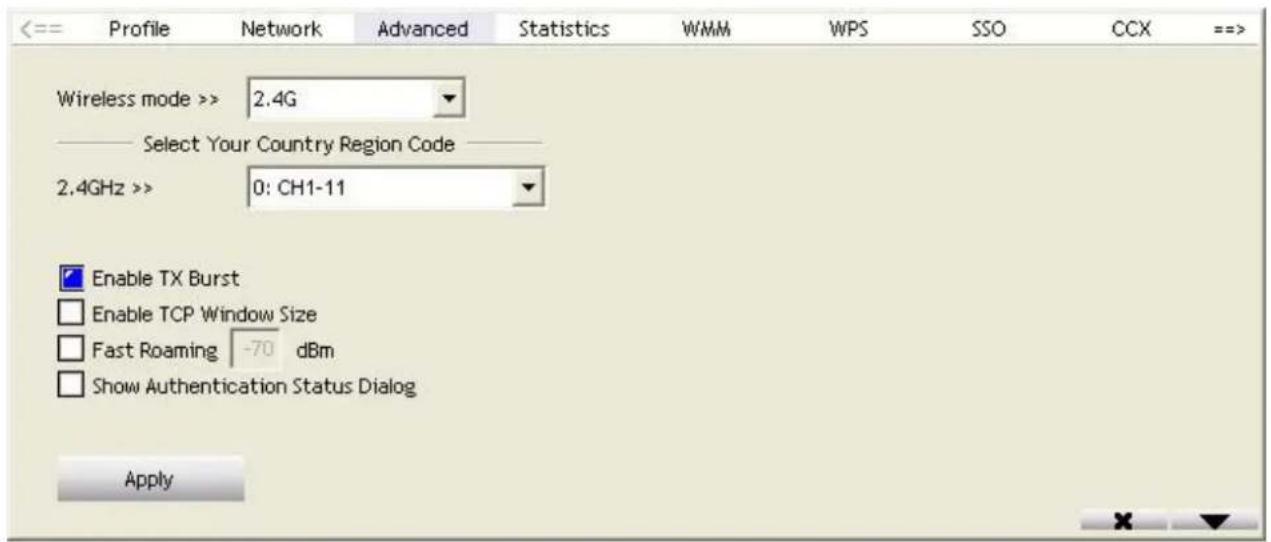
- Enable Tx Burst:Ralink's proprietary frame burst mode. Suggest using with an Access Point that has the same technology.
- Enable TCP Window Size: Check this box and the configuration utility will adjust TCP window size automatically to get better performance.
- Fast Roaming at: Fast to roaming, setup by transmitting power
3.1.5 Statistics
Statistics tab displays the detail counter information based on 802.11 MIB counters. This page translates that MIB counters into a format easier for user to understand.

3.1.6 WMM

• WMM Enable: Enable Wi-Fi Multi-Media
- WMM - Power Save Enable: Enable WMM Power Save
- Direct Link Setup Enable: Enable DLS (Direct Link Setup). This function will greatly improve the data transfer rate between WMM-enabled wireless devices.
a. MAC Address: Input the MAC address of another WMM-enabled wireless device you wish to establish a direct link.
b. Timeout Value: must be between 0\~65535 in integer. If the value is zero represents it always connects. Default value of Timeout Value is 60 seconds.
c. Tear Down: If you want to remove a specific wireless device from DLS table, select the device and click this button to remove it.
3.1.7 WPS
WPS tab supports the configuration setup using PIN configuration method or PBC configuration method.
WPS(Wi-Fi Protected Setup) simplify the security setup and management of Wi-Fi networks.
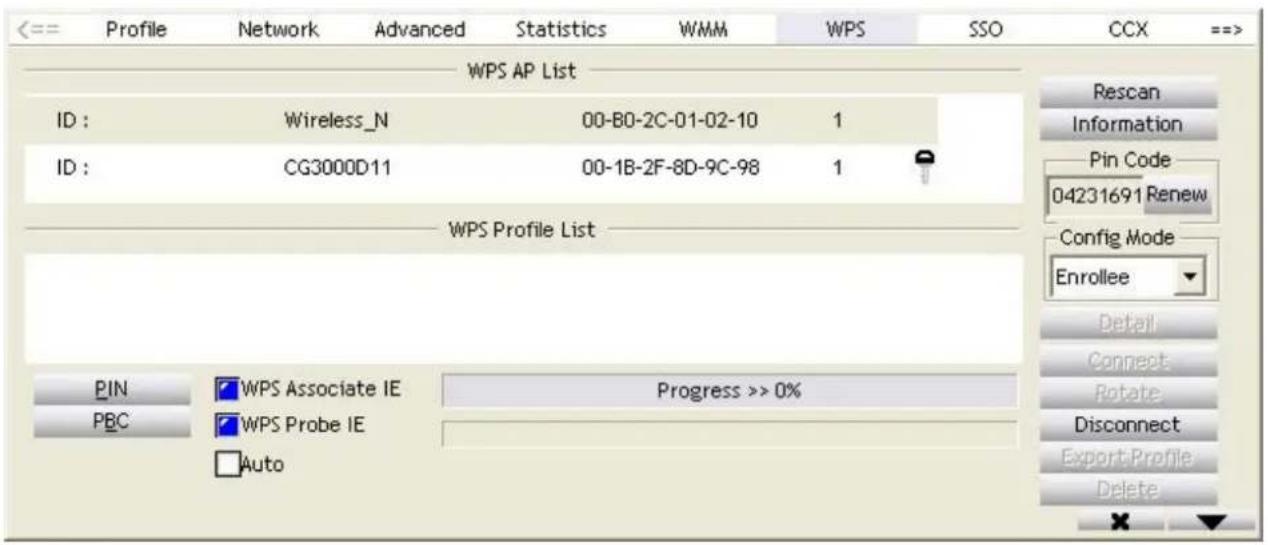
- PIN: Enter the Pin code and click PIN to automatically connect ZEW1642S with wireless devices around.
- PBC: Click PBC to complete auto-check and connections between ZEW1642S and other wireless device.
- Rescan: Update information on surrounding wireless network.
- Information: Display the information about WPS IE on the selected network.
• Pin Code: 8 digit numbers. - Renew: Click to update the Pin code.
- Config Mode: Enrollee or external Registrar.
● Detail: Information about Security and Key in the credential. - Connect: click to connect the WPS wireless network.
- Rotate: Connect to the next network inside credentials.
- Disconnect: to disconnect the connected wireless network.
● Export Profile: Export all credentials to Profile. - Delete: Delete an existing credential.
- WPS associate IE: Send the association request with WPS IE during WPS setup.
- WPS probe IE: Send the probe request with WPS IE during WPS setup.
Note: When clicking PIN or PBC button, please don't click Rescan within two-minute. If you want to abort this setup within the interval, restart PIN/PBC or press Disconnect to stop WPS.
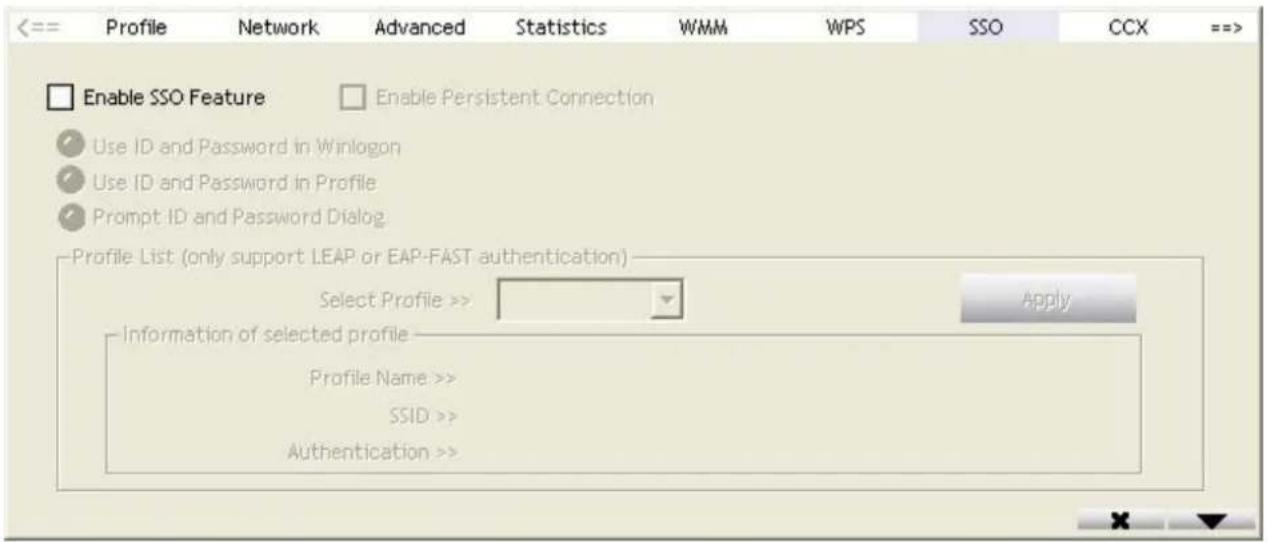
3.1.8 SSO
SSO (Backup Exec for Windows servers SAN Shared Storage Option) is a strong LAN-free backup solution.
3.1.9 CCX

- Enable CCX(Cisco Compatible eXtensions):
- Enable Radio Measurement: channel measures every 0\~1023 milliseconds
3.2 AP Mode
ZEW1642S also can serve as an access point to transmit wireless signals and create wireless network, allowing other wireless clients to access the network.
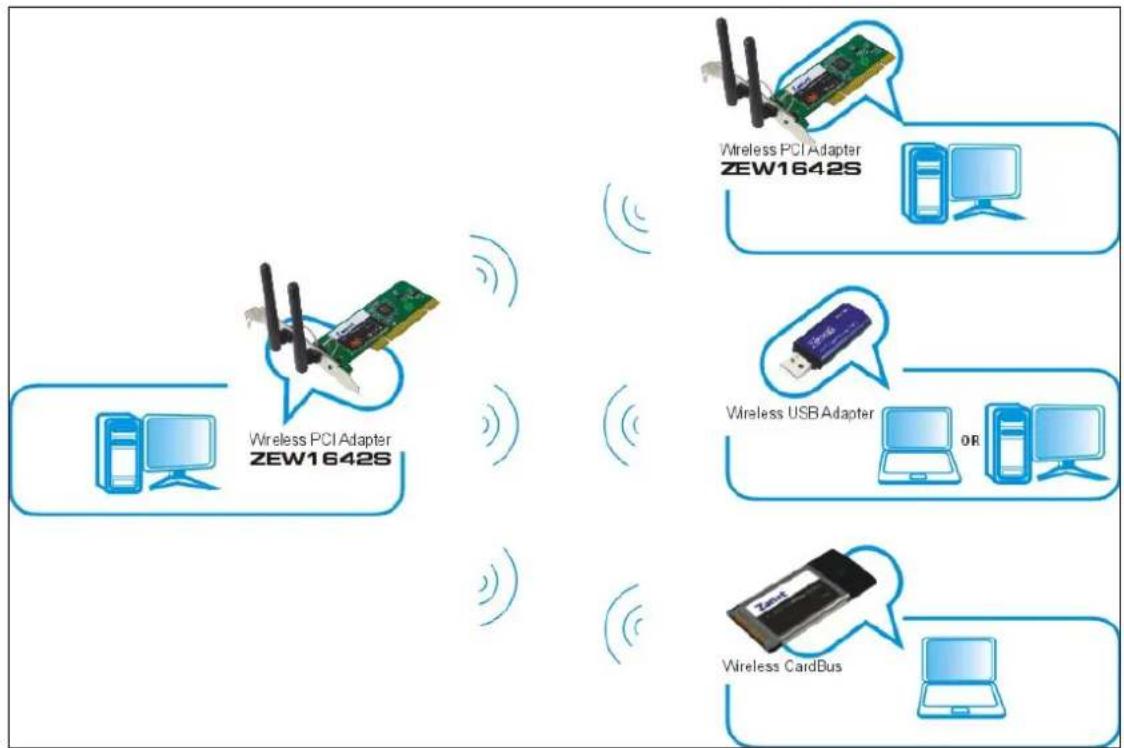
flowchart
graph TD
    A["Wireless PCI Adapter ZEW1642S"] --> B["Wireless PCI Adapter ZEW1642S"]
    A --> C["Wireless USB Adapter"]
    A --> D["Wireless CardBus"]
    B --> E["Computer"]
    C --> F["OR"]
    D --> G["Computer"]
Right-click the tray icon 📁 and select Switch to AP Mode.
Launch Config Utility
Use Zero Configuration as Configuration Utility
Switch to AP Mode
Open Diagnostic Testing Mode
Exit
3.2.1 Configuration
In soft AP configuration Utility page, you can make some basic configurations, such as wireless network name, mode, channel and authentication.

Click Security Setting button to make different security configurations of wireless communication, and you can choose the authentication type or encryption type.
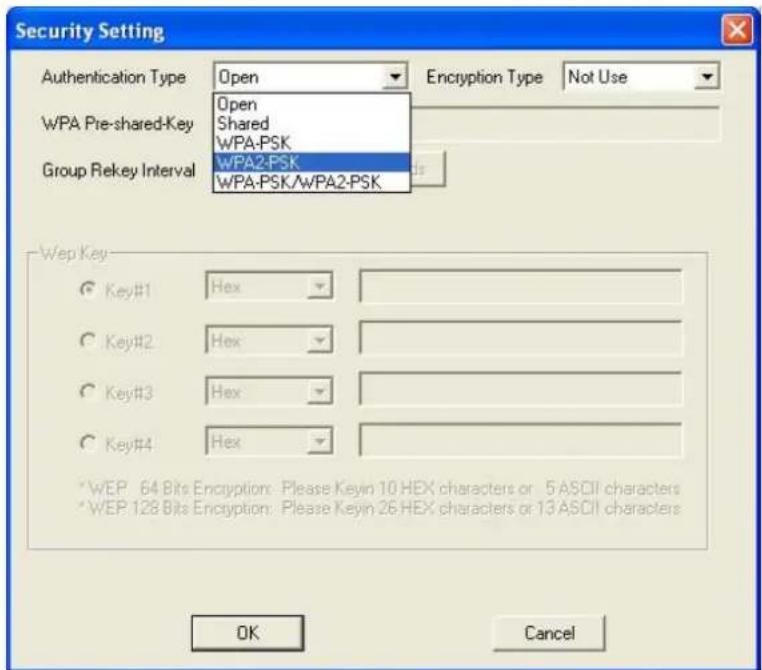
Note:
- The Hex characters include 0\~9 numbers and a\~f letters.
- ASCII characters include any numbers/letters and characters.
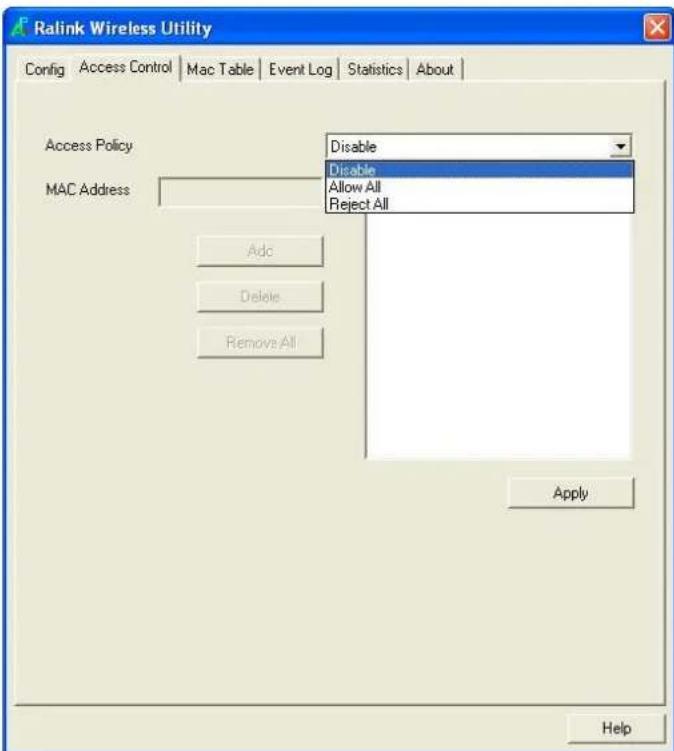
3.2.2 Access Control
Choose Access Control tab to start MAC control. Access control includes Allow All and Reject All. After editing the MAC address access list, only the MAC in the Allow All list could access the Soft AP.
3.2.3 MAC Table
MAC Table page shows the information of the wireless devices accessed to this soft AP.

3.2.4 Switch to Working Station mode
In the Soft AP mode, right-click the icon in the system tray and choose Switch to Station Mode, then ZEW1642S is switching to working station mode with an interface of working station.

3.3 Use Zero Configuration
Windows XP and Vista has a built-in wireless network configuration utility "Windows Zero Configuration" (WZC). It is a built-in service to configure your wireless clients from Windows
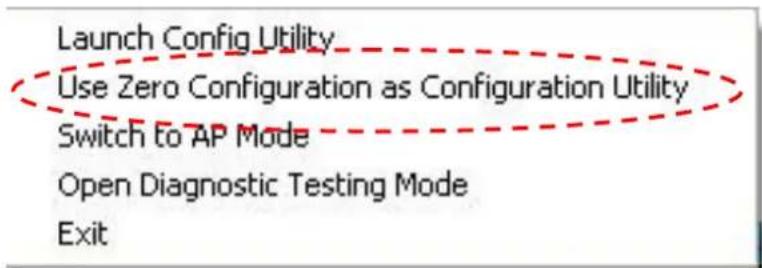
- Start using WZC, right click the tray icon and select Use Zero Configuration as Configuration utility.
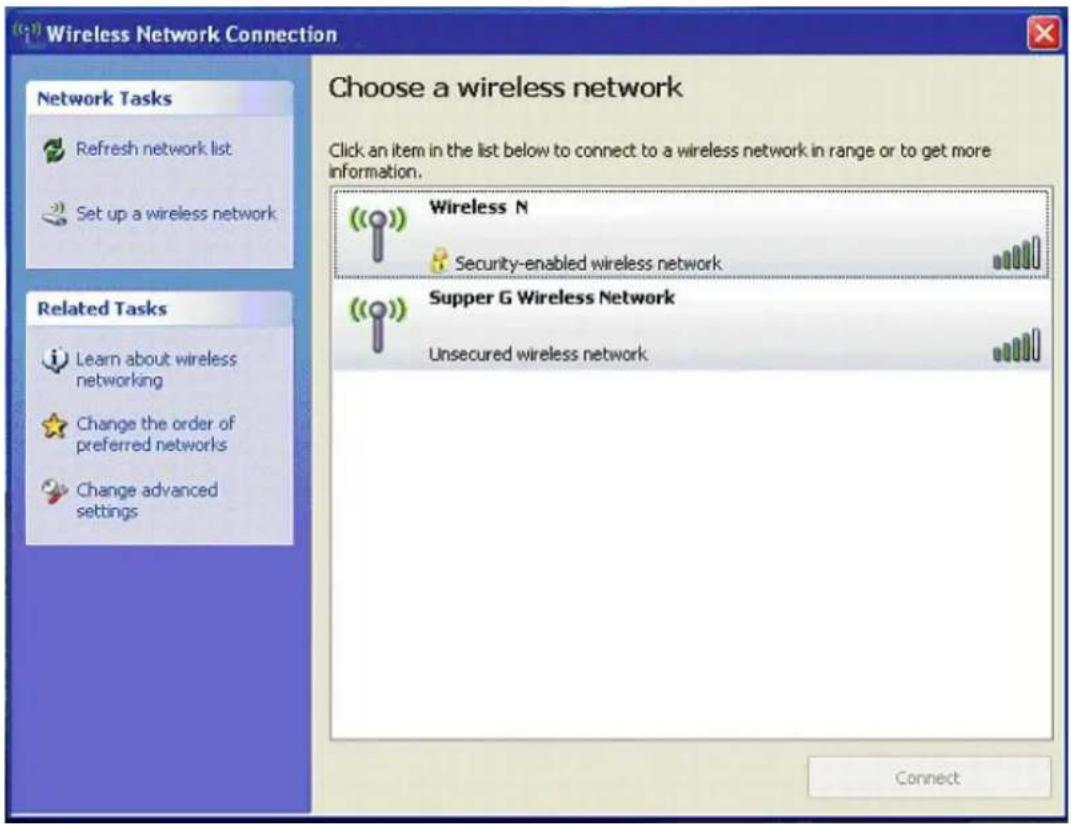
- The windows wireless network connection will appear. Double click the wireless network icon 📋 on the system tray to check the wireless network, choose the network and click Connect to setup the association.
-
If your wireless router has been encrypted, there will be a window appeared for input the key. Please input the key and click Connect, then the connection connect.
-
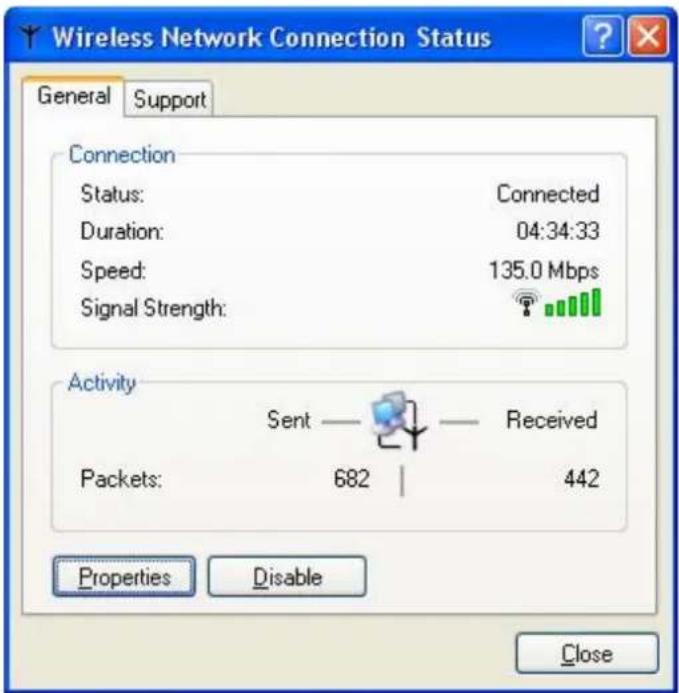
To configure the wireless connect properties, please right click the wireless icon in the system tray and choose Status to open the page Wireless Network Connection Status.
- Click Properties button in General page and choose the tab Wireless Networks to add the SSID of available network by clicking Add, if there are several available networks, linking priority could be configured by the button Move up and Move down. The icon 🔒 shows the current linked AP. Click Properties to configure authentication of wireless connection.


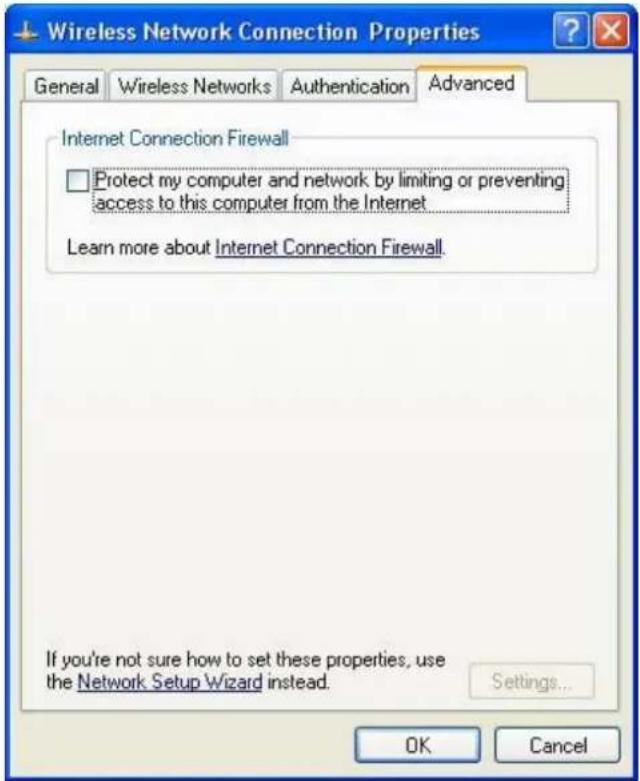
- Advanced page configures firewall and connection sharing.
Chapter 4 How to connect with PSP
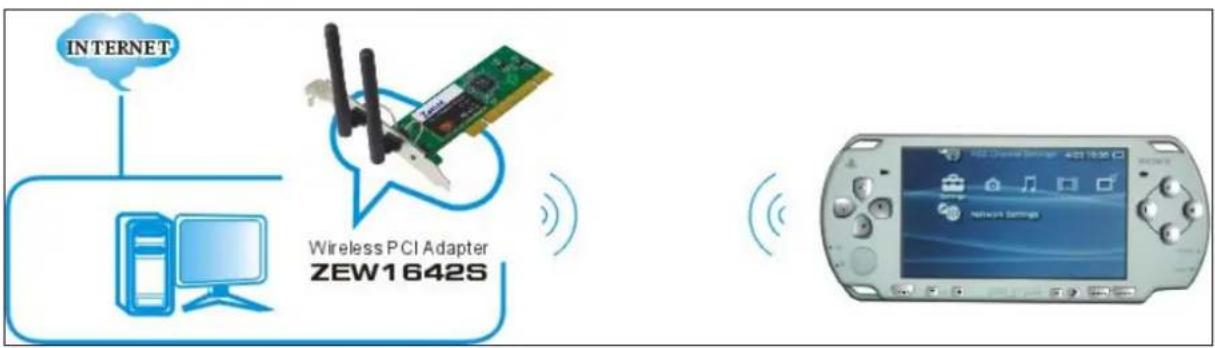
4.1 Configure PSP with Ad-Hoc mode
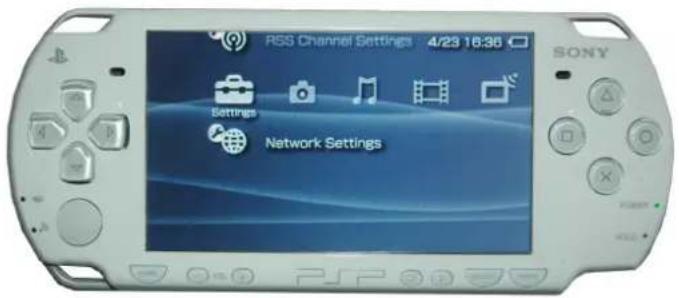
- Select Network Settings on PSP
- Select Ad-Hoc mode on PSP
![Network Settings [Ad Hoo Mode] Infrastructure Mode Settings for direct communication between PSP® systems without using an access point: X Back O Enter](/content/2026/05/1067964/images/e6385eb8bcb78ea423d3b3957f234435892adec9ba451ce41dee53f4e28ca339.jpg)
- Select Channel on PSP

- Select Start → Control Panel → double-click System icon → select Hardware tab → click Device Manager button → select ZEW1642S (802.11n Wireless LAN Card) list in Network adapters.

- Double-click 802.11n Wireless LAN Card to configure properties → select Advanced tab → select PSP XLink Mode list in Property and choose Enable from Value drop-down menu.

4.2 Configure XLink Kai
XLink Kai is a global gaming network - bringing together XBox, Playstation, Gamecube and PSP users, in one integrated community. It is software running on your PC or Macintosh that allows you to play system-link enabled games online for free.
Select Start All programs XLink Kai Evolution VII Start Kai Config to configure the user name, password and other parameters.

Login XLink Kai: Select Start → All programs → XLink Kai Evolution VII → Start Kai. PSP will connect with XLink Kai automatically. The following window will indicate the connection is established well now.

Chapter 5 Product Specifications
| General Features | |
| Standards | IEEE 802.11nIEEE 802.11gIEEE 802.11b |
| Interface | 32-bit PCI |
| OS | Windows 2000/XP/Vista/7 |
| User interface | Easy to use user configuration software |
| roaming | Support multipoint auto roaming and configuration; Support wireless network environments auto detect. |
| LED Status / activity | |
| Antenna type External Dipole | Antenna (Fixed) |
| RF and baseband Technical Features | |
| Frequency range | 2.4~2.4835GHz |
| Radio data rate | 11n: 270/243/216/162/108/81/54/27Mbps135/121.5/108/81/54/40.5/27/13.5Mbps150/130/117/104/78/52/39/26/13Mbps65/58.5/52/39/26/19.5/13/6.5Mbps11g: 54/48/36/24/18/12/9/6Mbps11b: 11/5.5/2/1Mbps |
| Modulation | BPSK, QPSK, CCK and OFDM(BPSK/QPSK/16-QAM/64-QAM) |
| Spectrum Spread Technology | DSSS |
| Sensitivity | 11n 20MHz/40MHz: -65dBm54Mbps: -72dBm11Mbps: -88dBm |
| Antenna Gain 2 x 2.2 dBi | |
| Number of Selectable Channels | USA,Canada: 11 channelsEurope: 13 channels |
| Media Access Protocol | WMM |
| Data security | WPA/WPA2; 64/128-bit WEP; TKIP/AES |
| Environmental and Physical | |
| Operation Temp. | 0°C ~ 40°C |
| Storage Temp. | -20°C ~ 70°C |
| Operation Humidity | 10% - 90% RH, Non-condensing |
Chapter 6. TroubleShooting
This chapter provides solutions to problems that may occur during the installation and operation of ZEW1642S. Read the descriptions below to solve your problems.
Q1. The ZEW1642S does not work properly.
A: Reinsert ZEW1642S into your PC's PCI slot.
Right click on My Computer and select Properties. Select the device manager and click on the Network Adapter. You will find ZEW1642S if it is installed successfully. If you see the yellow exclamation mark, the resources are conflicting. You will see the status of ZEW1642S. If there is a yellow question mark, please check the following:
Make sure that your PC has a free IRQ (Interrupt ReQuest, a hardware interrupt on a PC.)
Make sure that you have inserted the right adapter and installed the proper driver. If ZEW1642S does not function after attempting the above steps, remove it and do the following:
Uninstall the driver software from your PC.
Restart your PC and repeat the hardware and software installation as specified in this User Guide.
Q2. I cannot communicate with the other computers linked via Ethernet in the Infrastructure configuration.
A: Make sure that the PC to which ZEW1642S is associated is powered on. Make sure that ZEW1642S is configured on the same channel and with the same security options as with the other computers in the Infrastructure configuration.
Q3. What should I do when the computer with ZEW1642S installed is unable to connect to the wireless network and/or the Internet?
A: Check that the LED indicators for the broadband modem are indicating normal activity. If not, there may be a problem with the broadband connection.
Check that the LED indicators on the wireless router are functioning properly. If not, check that the AC power and Ethernet cables are firmly connected.
Check that the IP address, subnet mask, gateway, and DNS settings are correctly entered for the network.
In Infrastructure mode, make sure the same Service Set Identifier (SSID) is specified on the settings for the wireless clients and access points.
In Ad-Hoc mode, both wireless clients will need to have the same SSID. Please note that it might be necessary to set up one client to establish a BSS (Basic
Service Set) and wait briefly before setting up other clients. This prevents several clients from trying to establish a BSS at the same time, which can result in multiple singular BSSs being established, rather than a single BSS with multiple clients associated to it.
Check that the Network Connection for the wireless client is configured properly.
If Security is enabled, make sure that the correct encryption keys are entered on both ZEW1642S and the access point.


- Copyright Statement
- Table of Content
- Chapter 1. Introduction......2
- Chapter 2. Installation......4
- Chapter 3. Configuration....7
- Station Mode....7
- AP Mode....15
- Use Zero Configuration....19
- Chapter 4. How to connect with PSP......22
- Chapter 5. Product Specifications....25
- Chapter 6. TroubleShooting....26
- Chapter 1 Introduction
- Welcome
- Product Feature
- Contents of Package
- Before you begin
- Designing your ZEW1642S
- Chapter 2 Installation
- NOTE:
- Chapter 3 Configuration
- Station Mode
- Profile
- Add/Edit Profile
- a. System Configuration
- • Network Type:
- • TX Power:
- - Preamble:
- - Threshold:
- b. Authentication and Encryption
- c. 802.1X
- Network
- Link Status
- Advanced
- Statistics
- WMM
- WPS
- SSO
- CCX
- AP Mode
- Configuration
- Access Control
- MAC Table
- Switch to Working Station mode
- Use Zero Configuration
- Chapter 4 How to connect with PSP
- Configure PSP with Ad-Hoc mode
- Configure XLink Kai
- Chapter 6. TroubleShooting
- Q1. The ZEW1642S does not work properly.
- Q2. I cannot communicate with the other computers linked via Ethernet in the Infrastructure configuration.
- Q3. What should I do when the computer with ZEW1642S installed is unable to connect to the wireless network and/or the Internet?
Brand : Zonet
Model : ZEW1642S
Category : Network card