
MBQX-RAD-1 - Car radio MB QUART - Free user manual and instructions
Find the device manual for free MBQX-RAD-1 MB QUART in PDF.


| Product Type | Marine Digital Media Receiver |
| Brand | MB Quart |
| Model | MBQX-RAD-1 |
| Dimensions (W x H x D) | 7.0 x 2.0 x 6.0 inches (standard DIN) |
| Weight | 1.5 lbs |
| Power Supply | 12V DC (negative ground) |
| Maximum Power Output | 50 watts x 4 channels |
| RMS Power Output | 22 watts x 4 channels (at 4 ohms, 1% THD) |
| Radio Bands | AM/FM with RDS |
| Bluetooth | Built-in, with hands-free calling and audio streaming |
| USB Input | Front USB port for MP3/WMA/FLAC playback and device charging |
| AUX Input | 3.5mm front auxiliary input |
| Remote Control | Included wired remote (optional wireless remote compatible) |
| Marine Rating | SAE J1455 certified, UV resistant |
| Display | LCD with adjustable color and brightness |
| Preamp Outputs | 2 pairs (front/rear), 2V RMS |
| Subwoofer Output | 1 mono subwoofer preout |
| Maintenance | Clean with soft dry cloth; avoid alcohol and ammonia |
| Safety | Disconnect battery before installation; use proper fuse (10A) |
| Spare Parts | Contact MB Quart customer service or authorized dealers |
| General Information | Designed for marine and powersports applications; weather-resistant |
Frequently Asked Questions - MBQX-RAD-1 MB QUART
User questions about MBQX-RAD-1 MB QUART
0 question about this device. Answer the ones you know or ask your own.
Ask a new question about this device
Download the instructions for your Car radio in PDF format for free! Find your manual MBQX-RAD-1 - MB QUART and take your electronic device back in hand. On this page are published all the documents necessary for the use of your device. MBQX-RAD-1 by MB QUART.
USER MANUAL MBQX-RAD-1 MB QUART
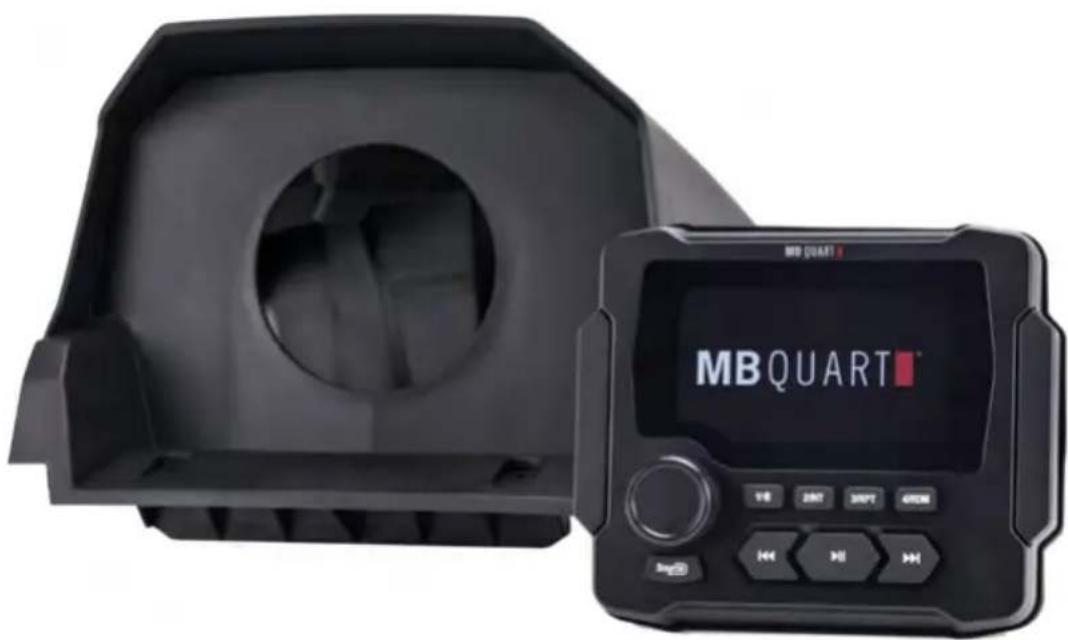
MBQ X-R AD-1 AM/FM/USB/Bluetooth® Multimedia Controller and Vehicle-Specific Housing for Can-Am X3 Vehicles
natural_image
Exterior view of a black MBQUART device with a circular vent and control panel (no readable text or symbols beyond branding)Operator's Guide and Installation Instructions
Congratulations for choosing the MBQX-RAD-1, an AM/FM/WB, USB and Bluetooth Multimedia Controller by MB Quart. The unit and housing are engineered to fit 2017 and newer Can-Am Maverick X3 vehicles. For more detailed information about the product and a video tutorial, please visit MBQuart.com

CAUTION

Always consider consulting a professional audio installation technician before installing any mobile audio components. Be careful and take your time. Do not let wires make contact with metal edges, sources of moisture or hot engine components.
General Information
Powersports and Marine Multimedia Source Unit
AM/FM, Weather Band Radio, USB, Bluetooth® and AUX sources 160 Watts Peak Power with Pre Amplifier Line Outputs Marine Certified to IPX67 for Water and Dust Intrusion
Auxiliary A/V Sources
Quick Connect Bluetooth Audio USB Audio Input w/Charging Auxiliary RCA Stereo Preamp Input Weather Band Radio Composite Video Camera Input Composite Video Output
AM / FM / Weather Band Section
USA Frequency: FM87.9 – 107.9MHz / AM530-1710kHz Europe Frequency: FM87.5 – 108MHz / AM522 – 1620kHz NOAA NWR Weather Band Frequency: 162.400-162.550MHz Intermediate AM/FM Frequency: 10.7MHz Intermediate Frequency Rejection: 50dB Noise Limit Sensitivity: >5uV
USB / AUX / Bluetooth Audio Section
RCA S/N: >81dB Powered Outputs S/N: >74dB USB A/D Conversion: 16bit Frequency Response: 20Hz – 20KHz
Audio Section & Other Features
Power Output: 4 x 40 Watts Max (160 Watts Peak Power) Load Impedance: 4 - 8 Ohms / Channel Preamp Output Voltage: 4 volts Dual Zone Capability between Preamp Outputs and Built-in Power Independent Subwoofer Level Control with Selectable Low Pass Filter 8-Band Graphic EQ (62, 125, 250, 500, 1K, 4K, 10K and 16K)
Installation Specifications (Source Unit Only)
4" / 100mm - Total Mounting Depth Required Inside Housing 3" / 76.2mm - Housing Cut Out Diameter
Water Tight Plug Face Shown (Wires to Connect Exit Rear)


flowchart
graph TD
    A["Yellow (+12v Constant)"] --> B["Red (+12v Accessory)"]
    C["Blue(Amp Turn-On)"] --> D["Black (Chassis Ground)"]
    E["Water Tight Plug"] --> F["USB Connector"]
    G["Orange (Illumination)"] --> H["Purple/White (Reverse)"]
    I["AM/FM Antenna"] --> J["AUX Input"]
    K["AUX Input"] --> L["SUB Outputs"]
    M["SUB Outputs"] --> N["FRONT Preamp Outputs*"]
    O["FRONT Preamp Outputs*"] --> P["REAR Preamp Outputs*"]
    Q["REAR Preamp Outputs*"] --> R["Camera Input"]
    S["CVBS Video Output (Mirrors Unit's Screen)"] --> T["See page 19 for Video Output details"]
    style A fill:#f9f,stroke:#333
    style C fill:#f9f,stroke:#333
    style E fill:#f9f,stroke:#333
    style F fill:#ccf,stroke:#333
    style G fill:#ccf,stroke:#333
    style H fill:#ccf,stroke:#333
    style I fill:#ccf,stroke:#333
    style J fill:#ccf,stroke:#333
    style K fill:#ccf,stroke:#333
    style L fill:#ccf,stroke:#333
    style N fill:#ccf,stroke:#333
    style O fill:#ccf,stroke:#333
    style P fill:#ccf,stroke:#333
    style Q fill:#ccf,stroke:#333
    style R fill:#ccf,stroke:#333
    style S fill:#ccf,stroke:#333
    style T fill:#ccf,stroke:#333
Note: See wiring chart on next page for connection tips, wire colors and functions. Also note preamp level output connections if using external amplifiers and ZONE control capability.
Wiring and Connections
- MB Quart recommends wire-to-wire connections such as power, ground and speaker wiring are soldered and protected with either heat shrink tubing or high quality electrical tape.
- The main (yellow) power wire should be connected to a source with at least 10 amps of additional current capability to support the unit.
| Wire Color Location Function | ||
| Black Plug Pin A | Negative Chassis Ground (-) | |
| Blue Plug Pin B | Amp Turn-On (+12v Output) | |
| Green Plug Pin C | Left Rear Speaker (+) | |
| Green/Black Plug Pin D | Left Rear Speaker (-) | |
| Gray/Black Plug Pin E | Right Front Speaker (+) | |
| Gray Plug Pin F | Right Front Speaker (-) | |
| Purple Plug Pin G | Right Rear Speaker (+) | |
| Purple/Black Plug Pin H | Right Rear Speaker (-) | |
| Red Plug Pin J | +12 volt Accessory | |
| White Plug Pin K | Left Front Speaker (+) | |
| White/Black Plug Pin L | Left Front Speaker (-) | |
| Yellow | Plug Pin M | +12 volt Constant (>10a) |
| Purple/White | Harness | Reverse Camera +12v Input |
| Orange | Harness | +12 volt Illumination |
Preamp Level Audio Connections
- Front and rear RCA preamp outputs are labeled as such. These are intended to be connected to external amplifiers, not included.
- Subwoofer RCA outputs (green RCAs) are mono and paralleled. They are identical subwoofer audio signals. Their frequency range is controlled by the low pass crossover and the subwoofer level control. Both are found in SETTINGS. See Page 18. We recommend starting with 100Hz for the low pass crossover point.
- The unit offers a zone control feature to balance sound levels between different zones. The front and/or rear RCA outputs (using external amplifiers) are one zone. The source unit's built-in power is the other zone. An example is a boat having separate volume control of amplified wakeboard tower speakers versus cabin speakers positioned closer to listeners using the unit's built-in power. Zone level control is found in SETTINGS. See page 18. Subwoofer RCA outputs or speaker-level outputs are unaffected by the zone level control. All work with the main volume.
Can-Am X3 Source Unit Mounting Instructions
natural_image
Close-up of a hand pressing down on a black plastic component with a blue-green interior (no text or symbols visible)
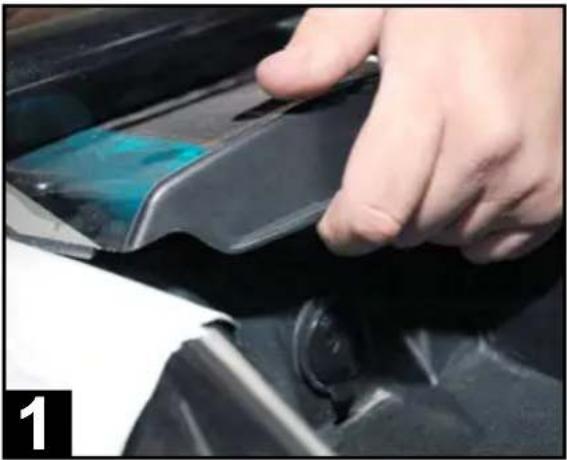
1) Remove top center plastic cover above dash pocket. Push up on the front pocket edge above lighter socket, then pull toward you. Remove lighter socket to facilitate wiring path or drill a 1" hole on the side of the pocket near the lighter socket for wire access.
2) Connect and route all wiring (as described on page 3 and 4) to source unit area as shown. Connect source unit wiring pigtail using the wiring diagram. Remember to include any RCA audio or USB cables if the apply in your system. Do not yet connect to source unit.


3) Take note of the four (4) holes for mounting of the source unit's housing as shown. These must be carefully drilled. Two (2) in front and two (2) at the back.
4) Set source unit housing in place in center dash area to locate four (4) mounting holes required for final mounting. Using a permanent marker or awl, locate and mark dimples for verification of where you'll drill. Remove housing and set aside when completed.
Can-Am X3 Source Unit Mounting Instructions

natural_image
Close-up of a car's engine component with a drill bit and red wiring, no visible text or symbols5) Using battery-powered cordless drill with a 9/64" drill bit, drill two (2) mounting holes in the dimpled areas as indicated. As the material is plastic, there is very little pressure needed..

natural_image
Close-up of a precision drilling setup with a drill bit and mechanical components, no visible text or symbols6) Drill the remaining two (2) mounting holes at the back of the housing as indicated. Again, as the material is plastic very little pressure is needed.
natural_image
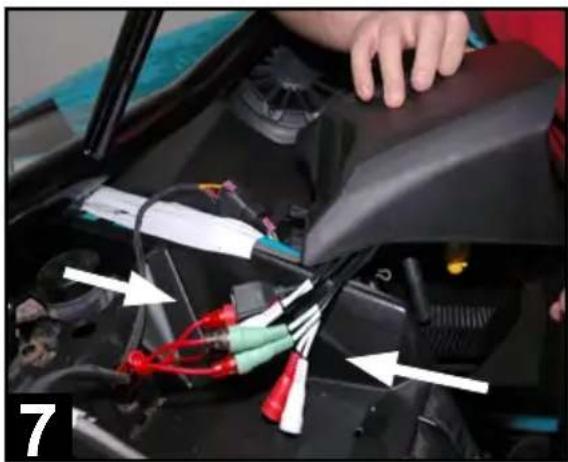
Close-up of a car engine bay with visible wiring and components, no text or symbols present7) Connect the electrical plug and, if used, RCA audio and USB cables. Test source unit functionality and sound before final mounting and installation. See Troubleshooting section on page 22 if needed.

natural_image
Close-up of a mechanical device with a digital display and tool, no visible text or symbols8) Place the source unit in the fina installation location with wiring neatly secured and zip tied in place. Attach the four included screws through the housing's mounting holes drilled out earlier. Two T-25 32mm screws (front) and two T-25 24mm screws (back).
Front Panel Controls
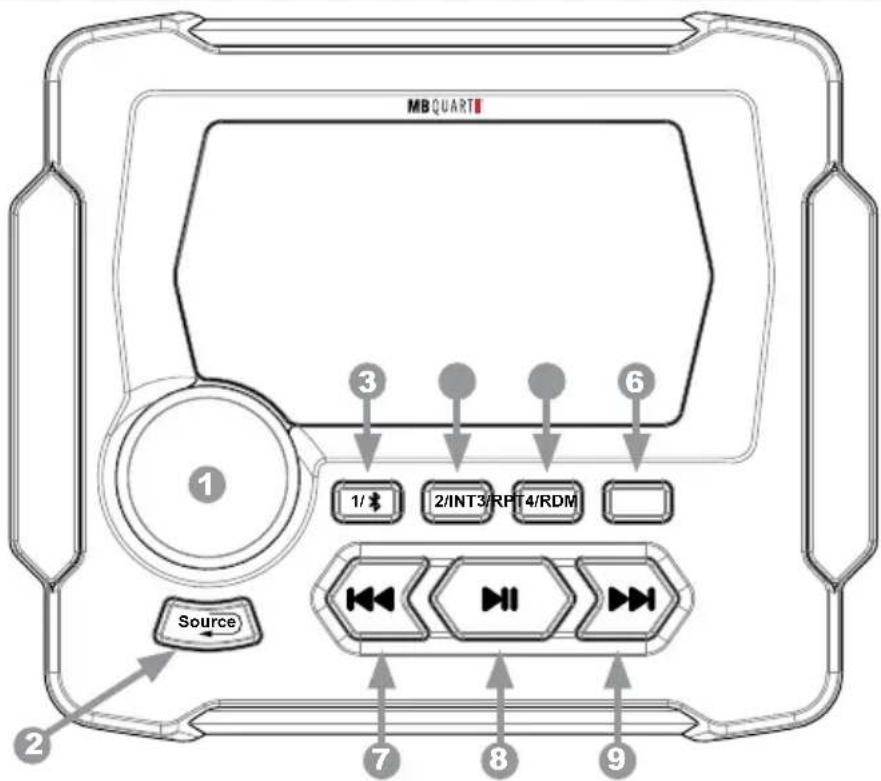
1 POWER/Selector and Volume Knob
- Press the POWER/Selector Knob to power on the unit.
- Rotate the POWER/Selector Knob to view sources when source selection menu wheel is displayed. To select a source, press and release the POWER/Selector Knob.
- Rotate the POWER/Selector and Volume Knob to increase or decrease sound levels once a source is selected.
- Press and hold the POWER/Selector Knob for 5 seconds to power the unit off.
2 SOURCE Button
- Press the SOURCE button to display the source selection menu wheel. See next page for details. Also functions as the "back" button in a SETTINGS menu (such as EQ, Audio, Zone Volume, Clock Adjust, Backlight, etc.)
3 1/ \* Button
- Preset 1 for AM/FM, pairing on Bluetooth source.
4 2/INT Button
- Preset 2 for AM/FM. No other function.
5 3/RPT Button
- Preset 3 for AM/FM. Repeat play (1 or all) on USB source.
6 4/RDM Button
- Preset 4 for AM/FM. Random play (Shuffle) on USB source
7 Scan Down for AM/FM or Track Back for USB/Bluetooth source.
8 Mute for AM/FM and AUX or Play/Pause for USB/Bluetooth source.
9 Scan Up for AM/FM or Track Up for USB/Bluetooth source.


Press Selector Knob (once) to complete source selection menu.
Note: On USB source, the unit "auto selects" USB input whenever a device is plugged in. All other sources must be selected by the user. When selecting Bluetooth, a device must be first paired to playback audio.
AM/FM Configuration
Several configurable AM/FM radio parameters are available.
- Select between AM or FM on the Source Menu wheel. Each has its own menu.
- Once the chosen source is selected, press and hold the SOURCE button for 2 seconds. The AM or FM menu will appear (whichever source is selected).

- Use the source menu selector knob to scroll to the chosen parameter. Press the center of the knob to either adjust the parameter directly, or enter the sub-menu and adjust by scrolling and pressing the center of the knob again.
- A complete list of each parameter and its variables is listed on the following page.
After selecting AM or FM source, press and hold SOURCE button for 2 seconds to enter the AM or FM Settings menu. Use the Menu Selector Knob to navigate the menu items.

- Use the SOURCE button to go back to the previous screen.
- Continue using the SOURCE button to exit AM or FM setup.
Settings Choices for AM
- PRESETS - This function shows stored AM presets 1-6 on AM1 or AM2. Only presets 1-4 have front panel quick access buttons without using this menu.
- SAVE PRESETS - This function stores AM presets in spaces 1-6. Only presets 1-4 have front panel quick access buttons.
- RADIO REGION - This function specifies the region: EUROPE, USA1, USA 2, JAPAN or RUSSIA. This function also controls FM RADIO REGION setting simultaneously and will reset the clock. USA1 is recommended for USA.
- LOCAL - This function filters out weaker signals when ON to limit only strong stations in seek feature. Choose OFF when signals have with adequate reception. Also controls FM LOCAL setting.
- AM BAND - This function selects AM1 or AM2 bands. Choose and store and recall AM presets. 6 on AM1, 6 on AM2.
- AUTO STORE - Automatically searches and stores presets in memory.
- STEREO - Choose STEREO or MONO. Recommended to set to MONO for AM as AM radio signal is broadcast in mono.
Settings Choices for FM
- PRESETS - This function shows stored FM presets 1-6 on FM1, FM2 or FM3. Only presets 1-4 have front panel quick access buttons without using this menu.
- SAVE PRESETS - This function stores FM presets in spaces 1-6. Only presets 1-4 have front panel quick access buttons.
- RADIO REGION - This function specifies the region: EUROPE, USA1, USA 2, JAPAN or RUSSIA. This function also controls AM RADIO REGION setting simultaneously and will reset the clock. USA1 is recommended for USA.
- LOCAL - This function filters out weaker signals when ON to limit only strong stations in seek feature. Also controls AM LOCAL setting.
- FM BAND - This function selects between FM1, FM2 or FM3 bands. Choose and store and recall FM presets. 6 each on FM1, FM2 & FM3.
- AUTO STORE - Automatically searches and stores presets in memory.
- STEREO - Choose STEREO or MONO. Recommended to set to STEREO for FM as FM radio signal is broadcast in stereo.
Once setup is complete, select between AM or FM icons on the Source Menu wheel or simply press the SOURCE button to back up to the source screen showing the current AM or FM frequency.
- Press the ◀◀◀ or ▶▶buttons less than 1 second to manually seek radio stations one frequency at a time.
- Press the ◀◀◀ or ▶▶buttons more than 1 second to automatically seek the next / previous radio stations with strong reception.
- Press and hold buttons 1-4 below the screen to store a preset. Four AM and four FM preset locations are available on the front panel.
Note: Two more AM and FM presets (5 and 6) are located in the AM and FM setup menus, but note that 5 and 6 are only accessible through the menu, not the front panel buttons.
- Press the center ▶|| button to mute the AM or FM source. Press
▶II again to unmute or simply rotate the volume control knob.

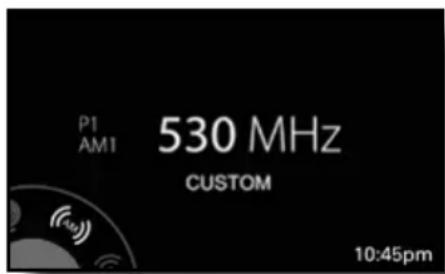
FM Screen Example AM Screen Example
Weather Band Operation
Select the Weather icon on the Source Menu wheel.
- Press the ◀◀◀ or ▶▶buttons less than 1 second to manually seek weather band stations one frequency step at a time.
- Press the ◀◀◀ or ▶▶buttons more than 1 second to automatically seek the next / previous weather band stations with strong reception.
- Press the center ▶|| button to mute the weather band source. Press ▶|| again to unmute or simply rotate the volume control knob.
- Press and hold buttons 1-4 below the screen to store a preset. Four weather band preset locations are available.

Weather Band Screen Example
Bluetooth Pairing
The multimedia controller supports Bluetooth A2DP for wireless music streaming from a mobile device, such as a smartphone or streaming music source component. The unit does not support the HF (Hands-Free) or PBAP (Phone Book Access for Contacts) profiles. No calling features are available, only Bluetooth music streaming.
Pairing a Bluetooth device:
- Ensure the multimedia controller is on and Bluetooth is the selected source. The screen will show "BT Disconnected!"

BT Disconnected Screen
- Ensure the Bluetooth functionality on the mobile device is enabled and supports A2DP audio streaming.
- Scan for "MB QUART" in the Bluetooth list on the mobile device.
- Select "MB QUART" and the connection will then be made automatically.
- A "BLUETOOTH Loading" screen will appear briefly as the mobile device's song info and album art are transferred to the multimedia source unit.
Included in Bluetooth Play Screen:
Album Art (or Music Note Icon)
Song Title and Artist Info
Time Elapsed in Song Play
Play or Pause Status

BT Connected Screen
See next page if a pin code is required to pair.
If a PIN Code is Required:
- Some Bluetooth devices require inputting a pass code for connection. Please input code "0000" and the connection will be made automatically.
Automatically Connecting:
- Once the multimedia controller has made a connection with the Bluetooth mobile device for the first time, the unit can then connect to the Bluetooth mobile device automatically within a valid range.
Manually Disconnecting:
- To disconnect temporarily, for example to take a phone call, press and hold the 1/8 button for 3 seconds and the mobile device will disconnect. If no phone call is in progress, it will automatically reconnect to the unit in about 15 seconds.
- To disconnect and allow another user to connect, use the mobile device to forget the "MB QUART" connection entirely.
Once a Bluetooth device is paired and recognized:
- Be sure the multimedia controller has the Bluetooth source selected. The multimedia controller should automatically begin playing where the mobile device last left off of the music player's song or playlist.
- If the unit does not automatically begin playing, press the center ▶■ button to play the Bluetooth source. The play (▶) symbol will display when music is playing. The time elapsed in the song play is also displayed on the screen.
- Press ▶■ again to mute and pause the song. The pause(■) symbol will display when music is paused.
- Press ▶II again to resume playback or simply rotate the volume control knob.
- Press the ◀◀◀ or ▶▶buttons more than 1 second to manually fast forward or rewind within a song. Press the same button again to stop the fast forward or rewind function.
- Press the ◀◀◀ or ▶buttons less than 1 second to automatically fast forward or rewind the next / previous song.
Note: Functions such as "Repeat" and "Random Play" (a.k.a "Shuffle") must be controlled at the mobile device directly.
See the USB Input section for smartphones connected via USB and the capability for Repeat and Random (Shuffle) functionality.
The multimedia controller supports MP3, WMA, and WAV audio files with a USB thumb drive connected. Additionally, M4A or Apple Lossless file types are supported if the user connects an iPhone® using iTunes as the music player.
Most smartphones with a USB-based charging connector and USB thumb drives easily connect to the multimedia controller. Many smartphones include album art through the phone's music player. Some USB thumb drive files may not include album art, only song information.

To begin, connect a USB device and the unit reads the music files automatically.
- A "USB Loading" screen appears as the device's song info and album art (if present) transfer to the unit. Smartphones take a few seconds longer than a USB thumb drive.
- If the unit does not automatically begin playing, press the center ▶|| button to play the USB source. Press ▶|| again to mute and pause the song. Press ▶|| again to resume playback or simply rotate the volume control knob.
- Press the ◀◀◀ or ▶▶buttons more than 1 second to manually fast forward or rewind within a song. Press the same button again to stop the fast forward or rewind function.
- Press the ◄◀◀ or ▶▶buttons less than 1 second to automatically fast forward or rewind the next / previous song.
Read about Repeat (RPT) and Random (RDM) modes and controls on the following page. Smartphones behave differently than USB drives.
USB Thumb Drive Screen:
Album Art (or Music Note Icon) Song Title and Artist Info Time Elapsed in Song Play Play or Pause Status Status of RPT (even when OFF) Status of RDM (only when ON)

USB Thumb Drive Screen
USB Smartphone Screen:
Album Art (or Music Note Icon)
Song Title and Artist Info
Time Elapsed in Song Play
Play or Pause Status
Status of RPT & RDM (only when ON)
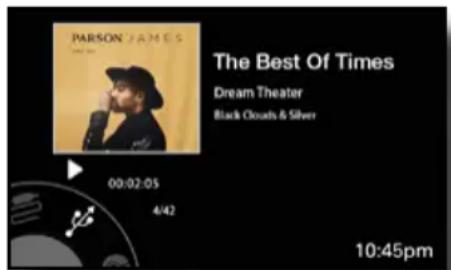
USB Smartphone Screen
USB RPT and RDM Functionality
The multimedia controller has two modes of making a USB-connected music library more interesting with Repeat (RPT) and Random (RDM) functions. Random play is also called "Shuffle" on some mobile devices.
USB Thumb Drive RPT and RDM
With a thumb drive connected to the USB input, users see an icon on the right side of the screen (centered) that indicates the status of the RPT mode. The default status is off. RDM (Shuffle) default status is off and no icon shows until it is engaged.

natural_image
Abstract black-and-white graphic of a looped arrow shape (no text or symbols)Repeat OFF
- The RPT sequence of button presses is as follows:

- The RDM (Shuffle) sequence of button presses is as follows:
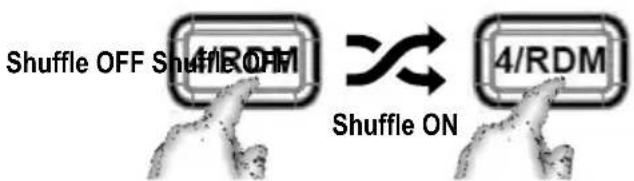
USB Smartphone RPT and RDM
With a smartphone connected to the USB input, users see no icons. When a function is active, the screen displays a text message of the mode above 3/RPT button. The default status of RPT and RDM (Shuffle) are both off.
- The RPT sequence of button presses is as follows:

- The RDM (Shuffle) sequence of button presses is as follows:
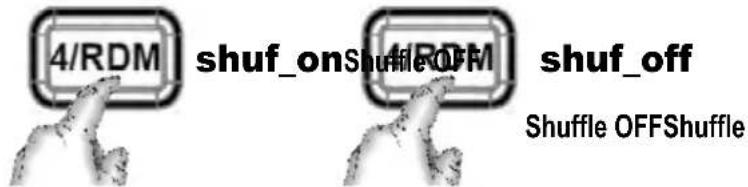
Auxiliary (AUX) Input and Camera
The multimedia controller has right and left preamp level RCA connections for the Auxiliary Input. If a portable device with a headphone jack is used, a 3.5mm (male) to RCA (male) adapter cable is required and not included.
Select the AUX icon on the Source Menu wheel.
- Press play on the auxiliary device and turn up its volume. Volume is controlled from the Selector/Volume Knob on the unit.
- Press the center ▶|| to mute. This only mutes the input. It does not pause the song. Press ▶|| again to unmute or simply rotate the volume control knob.

Select the AUX icon in the menu.

After selecting AUX in the source menu, begin paying the music on the auxiliary device. Turn its volume up. Main volume can then be controlled via the unit along with muting audio.
Camera Operation
- Connect the yellow RCA "Camera Input" to the installed camera's composite video output.
- Connect the camera's ground wire to a known good source of chassis ground. If in doubt, connect to the same ground point where the unit's black wire is grounded.
- Connect a +12 volt trigger, typically a reverse gear signal, to the unit's purple/white wire. This automatically triggers the camera screen when active. It should supply +12 volts to trigger.
- User can also manually select the "Camera" source from the menu.
Manually select the Camera icon or trigger automatically w/reverse input.

natural_image
Interior view of a parking garage with visible tire lanes and camera unit (no text or symbols)The unit displays a clear picture of whatever view the camera views. This could be used for a front thermal imaging UTV camera or boat docking camera depending on the application.
SETTINGS Menu
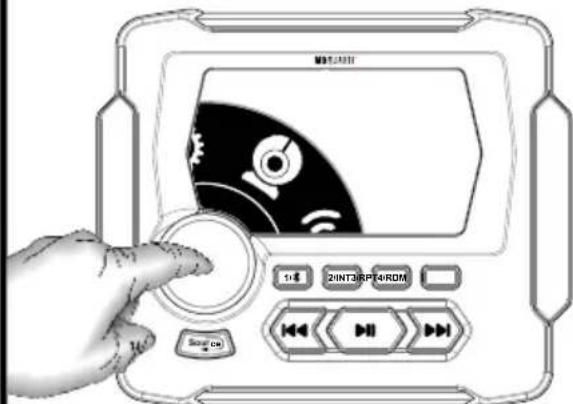
To access SETTINGS, press Selector/Volume knob in any source. The "SETTINGS" menu appears immediately. Alternatively, select "SOURCE" and navigate to the SETTINGS icon ("Gear" icon), then press the Selector/Volume knob to access the menu.

Press the Selector/Volume knob in any source, or select the "Gear" icon.
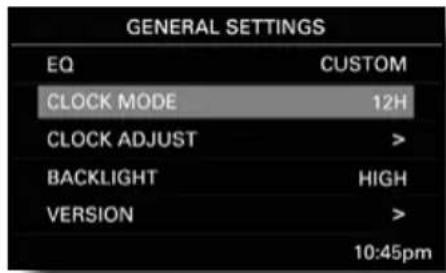
Use the Selector/Volume knob to navigate the main menu by turning to scroll and pressing to enter a specific feature or sub-menu.
- Use the Selector/Volume knob to navigate the menu items. When the gray highlighted bar is on the chosen parameter, press the Selector/Volume knob to go into that menu (or sub-menu). This is similar to an "Enter" command. Use the Selector/Volume knob to navigate parameters within the menu. Once the parameter is set, use the SOURCE button to go back to the previous screen.
Equalization (EQ)
- Use the Selector/Volume knob to select the 8-band graphic EQ.
- Navigate each EQ band by turning the knob and select the band by pushing the knob.
- Adjust each band as desired, then push the knob again to move to another band.
- Use the SOURCE button to close the EQ screen when complete and return to the main menu.
Clock Mode
- Access the clock mode menu to adjust 12 hour (USA) and 24 hour (Europe/World) clock.
- Verify preferred setting with the check marked choice.
- Use the SOURCE button to close the clock mode screen when complete and return to the main menu.
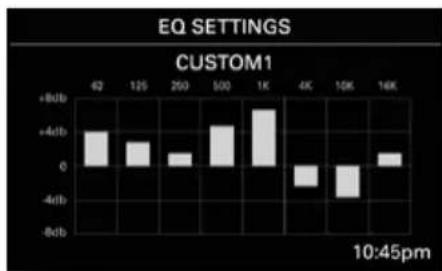
bar
EQ SETTINGS CUSTOM1 | Clock | Value | |---|---| | 4Q | +4dB | | 12S | +3dB | | 250 | +1dB | | 500 | +4dB | | 1K | +7dB | | 4K | -1dB | | 10K | -3dB | | 16K | +1dB | 10:45pm8 EQ Bands: 62Hz, 125Hz, 250Hz, 500Hz, 1KHz, 4KHz, 10KHz and 16KHz
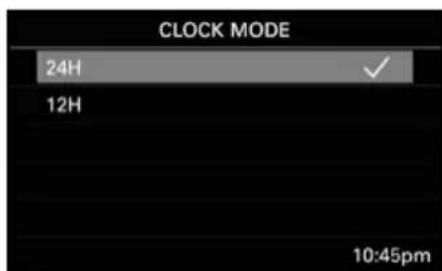
SETTINGS Menu (Continued)
Clock Adjust
- Access the clock adjust mode menu to change the time displayed on the unit's main screen.
- Navigate each time parameter (hour, then minute) by turning the knob and select by pushing the knob.
- Adjust the hour parameter as desired, then push the knob again to move to minutes.
- AM or PM settings are automatically determined by the clock mode settings (12 or 24 hour format).
- Use the SOURCE button to close the clock adjust screen when complete and return to the main menu.

Clock Adjust Screen
Backlight
- Access the backlight menu to adjust the brightness of the screen lighting.
- Verify preferred setting with the check marked choice.
- Use the SOURCE button to close the backlight screen when complete and return to the main menu.
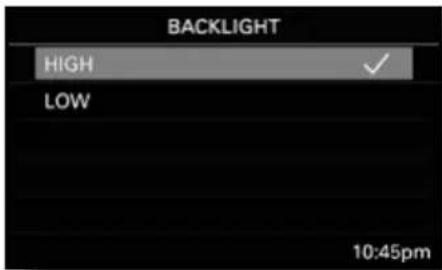
Backlight Adjust Screen
Version
- This menu reports the software version in the unit. No settings or changes are available to the user.
AUDIO Settings Sub-Menu
Access the "Audio" menu and the following adjustments are available:
SUB Frequency
- Adjust the low pass crossover for the SUB preamp (green) RCA outputs. The choices are 80Hz, 100Hz and 120Hz.
SUB Level
- Adjust the relative volume level for the SUB preamp (green) RCA outputs in a range of 0 (fully attenuated) to 40 (fully open).
ZONE Level
- Adjust the relative volume level for the front/rear preamp RCA outputs in a range of 0 (fully attenuated) to 40 (fully open). The unit's built-in power and SUB levels are unaffected by this adjustment. Only the front/rear preamp outputs are controlled by the zone volume. See page 20-21 for example system diagrams utilizing zone control.
BASS Level
- Adjust the bass from -7 to +7. Default setting is "0." Center frequency is 100Hz.
TREBLE Level
- Adjust the treble range from -7 to +7. Default setting is "0." Center frequency is 10KHz.
BALANCE Control
- Adjust the balance between the left and right speakers using the grid on the screen and the Selector/Volume knob to move the dot. Equal balance (center dot) is the default setting.
- Use the SOURCE button to close the balance screen when complete and return to the main menu.
FADER Control
- Adjust the fader between the front and rear speakers using the grid on the screen and the Selector/Volume knob to move the dot. Equal fader position between front/rear (center dot) is the default setting.
- Use the SOURCE button to close the fader screen when complete and return to the main menu.
Although the balance and fader adjustments are two separate screens, for purposes of easy understanding they are shown here in the same screen. Left and right of the grid represent the balance. Top (front) and bottom (rear) of the grid represent the fader.

Factory Reset
- This setting resets the unit to its factory defaults. Be cautious when entering this menu if you don't want to manually reset all your preferences such as radio presets, EQ, sub level/crossover, backlighting, etc.
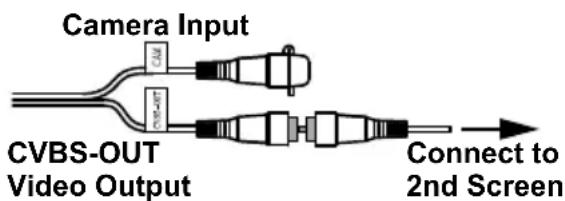
Video Output Feature
- The multimedia controller features a composite video output that mirrors the same information on the unit's screen. This is a useful feature to provide a secondary screen for passengers or in other zones within a larger space, such as a boat or RV.
- Simply connect the unit's "CVBS-OUT" to the composite video input of a secondary screen.
Audio System Design Ideas
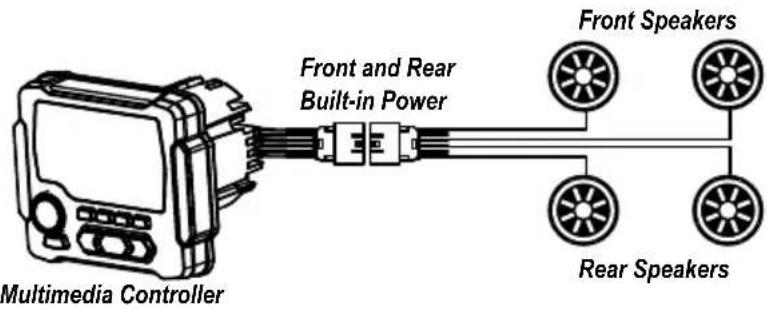
4-Speaker System using Built-in Power

flowchart
graph TD
    A["Multimedia Controller"] --> B["4 Channel Amp"]
    A --> C["Subwoofer Amp"]
    B --> D["Front and Rear RCAs"]
    C --> E["Sub (Green) RCAs"]
    D --> F["Rear Speakers"]
    E --> G["Subwoofers"]
    style A fill:#f9f,stroke:#333
    style B fill:#ccf,stroke:#333
    style C fill:#cfc,stroke:#333
    style D fill:#fcc,stroke:#333
    style E fill:#cff,stroke:#333
    style F fill:#ffc,stroke:#333
    style G fill:#fcc,stroke:#333
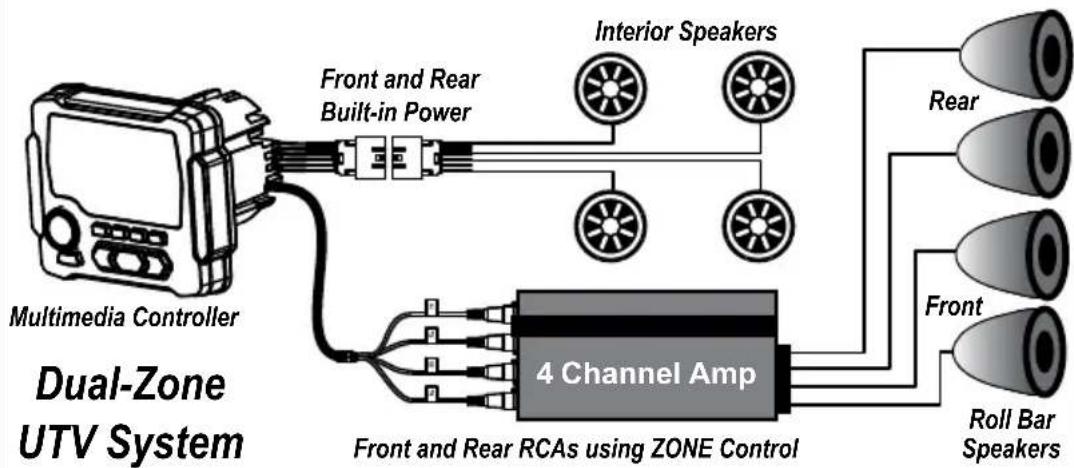
flowchart
graph TD
    A["Multimedia Controller"] --> B["Front and Rear Built-in Power"]
    B --> C["Interior Speakers"]
    C --> D["4 Channel Amp"]
    D --> E["Rear"]
    D --> F["Front"]
    D --> G["Roll Bar Speakers"]
    style A fill:#f9f,stroke:#333
    style B fill:#ccf,stroke:#333
    style C fill:#cfc,stroke:#333
    style D fill:#fcc,stroke:#333
    style E fill:#ffc,stroke:#333
    style F fill:#cfc,stroke:#333
    style G fill:#fcc,stroke:#333

flowchart
graph TD
    A["Multimedia Controller"] -->|Front and Rear Built-in Power| B["4 Channel Amp"]
    B --> C["Subwoofer Amp"]
    C --> D["Sub (Green) RCAs"]
    E["Interior Speakers"] --> B
    F["Rear"] --> B
    G["Front"] --> B
    H["Roll Bar Speakers"] --> B
    I["Optional MBQX-SUB-2 Add-On Kit"] --> C
Problem Cause Solution
| No power(Unit does not turn on) | 1. Incorrect wiring2. Fuse is blown3. Wiring harness is not connected | 1. Re-check wiring2. Replace fuse3. Re-check wiring harness connection |
| No sound(Only with built-in power used) | 1. Volume is too low2. Speaker wire connection loose or wired incorrectly | 1. Increase volume2. Double check connection and re-attach |
| No sound(Only on external amplifiers) | 1. Amplifiers not connected to power2. Amplifiers not turning on | 1. Check amplifier power/ground connections2. Connect blue remote turn on wire |
| No AM/FM reception | 1. Antenna cable is not connected2. The signals are too weak | 1. Insert the antenna cable securely2. Select a station manually |
| AUX Input or RCA output distortion | 1. Volume may be up too much on external device | 1. Lower volume on external device until distortion goes away |
| External amplifiers have low signal input. Gain too high (hiss) | 1. Zone control is turned down too far | 1. Increase zone control level to provide more signal level to amplifiers |
| Bluetooth can't/won't connect | 1. Mobile device has BT switched off2. Mobile device is not discoverable | 1. Enable the Bluetooth function2. Make the device discoverable |
| USB thumb drive not reading | 1. Music file is not MP3, WAV or WMA format | 1. Convert music file format into MP3, WAV or WMA format |
| Camera does not display in reverse, only in camera source menu | 1. Purple/white reverse trigger wire not powered | 1. Power the purple/ white wire on the back of the unit with +12v trigger |
If you have problem or question that was not mentioned here, please visit MBQuart.com and go to the TEQ Support section or the Frequently Asked Questions.
Notes
FCC Notice
This equipment has been tested and found to comply with the limits for a Class B digital device, pursuant to part 15 of the FCC Rules. These limits are designed to provide reasonable protection against harmful interference in a mobile installation. This equipment generates, uses and can radiate radio frequency energy and, if not installed and used in accordance with the instructions, may cause harmful interference to radio communications. However, there is no guarantee that interference will not occur in a particular installation.
WARNING: Changes or modifications not expressly approved by the party responsible for compliance could void the user's authority to operate the equipment.
This equipment complied with FCC radiation exposure limits set forth for an uncontrolled environment. This equipment should be installed and operated with minimum distance 20cm between the radiator & your body.


MBQuart.com
#MUSIC DEFINED
WARRANTY
Maxxsonics USA Inc. warrants this product, to the original consumer purchaser, to be free from defects in material and workmanship for a period of one (1) year from the date of purchase. Maxxsonics USA Inc. will, at its discretion, repair or replace defective products during the warranty period. Components that prove to be defective in materials and workmanship under proper installation and use must be returned to the original authorized Maxxsonics USA Inc. retailer from where it was purchased. A photocopy of the original receipt must accompany the product being returned. The costs associated with removal, re-installation and freight are not the responsibility of Maxxsonics USA Inc. This warranty is limited to defective parts and specifically excludes any incidental or consequential damages connected therewith. To view the full warranty, please visit the website.
The Bluetooth ^® word mark and logos are registered trademarks owned by the Bluetooth SIG, Inc. and any use such marks by MB Quart is under license.
All product names, logos, and brands are property of their respective owners. All company, product and service names used in this literature are for identification purposes only. Use of these names, logos, and brands does not imply endorsement.
MBQuart products are designed and engineered in the USA by
MAXXSONICS®


- MBQ X-R AD-1 AM/FM/USB/Bluetooth® Multimedia Controller and Vehicle-Specific Housing for Can-Am X3 Vehicles
- CAUTION
- General Information
- Powersports and Marine Multimedia Source Unit
- Auxiliary A/V Sources
- AM / FM / Weather Band Section
- USB / AUX / Bluetooth Audio Section
- Audio Section & Other Features
- Installation Specifications (Source Unit Only)
- Wiring and Connections
- Preamp Level Audio Connections
- Can-Am X3 Source Unit Mounting Instructions
- Front Panel Controls
- POWER/Selector and Volume Knob
- SOURCE Button
- 1/ \* Button
- 2/INT Button
- 3/RPT Button
- 4/RDM Button
- Scan Down for AM/FM or Track Back for USB/Bluetooth source.
- Mute for AM/FM and AUX or Play/Pause for USB/Bluetooth source.
- Scan Up for AM/FM or Track Up for USB/Bluetooth source.
- AM/FM Configuration
- Settings Choices for AM
- Settings Choices for FM
- Weather Band Operation
- Bluetooth Pairing
- Pairing a Bluetooth device:
- Included in Bluetooth Play Screen:
- If a PIN Code is Required:
- Automatically Connecting:
- Manually Disconnecting:
- USB Thumb Drive Screen:
- USB Smartphone Screen:
- USB RPT and RDM Functionality
- USB Thumb Drive RPT and RDM
- USB Smartphone RPT and RDM
- Auxiliary (AUX) Input and Camera
- Camera Operation
- SETTINGS Menu
- Equalization (EQ)
- Clock Mode
- SETTINGS Menu (Continued)
- Clock Adjust
- Backlight
- Version
- AUDIO Settings Sub-Menu
- SUB Frequency
- SUB Level
- ZONE Level
- BASS Level
- TREBLE Level
- BALANCE Control
- FADER Control
- Factory Reset
- Video Output Feature
- Audio System Design Ideas
- Notes
- FCC Notice
- MBQuart.com
- #MUSIC DEFINED
- WARRANTY
Brand : MB QUART
Model : MBQX-RAD-1
Category : Car radio