
T-1 - Microphone BEHRINGER - Free user manual and instructions
Find the device manual for free T-1 BEHRINGER in PDF.


| Type | Vacuum Tube Condenser Microphone |
| Brand | Behringer |
| Model | T-1 |
| Transducer Type | Condenser, 16 mm (0.63") |
| Polar Pattern | Cardioid |
| Preamplifier | Vacuum tube (12AX7) |
| Frequency Response | 20 Hz to 20 kHz |
| Open Circuit Sensitivity | -40 dBV (0 dBV = 1 V/Pa) |
| Max SPL | 130 dB (3% THD @ 1 kHz) |
| Dynamic Range | 110 dB |
| Nominal Impedance | Approx. 200 Ω |
| Load Impedance | >1 kΩ |
| Level Attenuation | -20 dB, switchable |
| Low-Cut Filter | 12 dB/oct. @ 100 Hz, switchable |
| Output Connector | Gold-plated balanced XLR (on PSU-T) |
| Power Supply | Behringer PSU-T (included) |
| Mains Voltage | 100-120 V~ or 220-230 V~, 50/60 Hz |
| Dimensions | ∅ 68 mm x 211 mm (∅ 2.7" x 8.3") |
| Weight | Approx. 1.1 kg (2.4 lbs) |
| Included Accessories | Elastic shockmount, windscreen, power supply PSU-T, 7-pin XLR cable |
| Recommended Warm-Up Time | 30 minutes before use |
| Warranty | Limited warranty, register at behringer.com |
| Maintenance | Wipe with soft cloth after use, store in protective case |
| Safety | Keep away from moisture; do not open; use only provided power supply |
Frequently Asked Questions - T-1 BEHRINGER
User questions about T-1 BEHRINGER
0 question about this device. Answer the ones you know or ask your own.
Ask a new question about this device
Download the instructions for your Microphone in PDF format for free! Find your manual T-1 - BEHRINGER and take your electronic device back in hand. On this page are published all the documents necessary for the use of your device. T-1 by BEHRINGER.
USER MANUAL T-1 BEHRINGER
User Manual
EN

natural_image
Black-and-white collage of music events including a singer performing, NFL player on stage, and silhouetted performers celebrating (no visible text or symbols)TUBE CONDENSER MICROPHONE T-1
Vacuum Tube Condenser Microphone
EN
EN
Important Safety Instructions


Terminals marked with this symbol carry electrical current of sufficient magnitude to constitute risk of electric shock. Use only high-quality commercially-available speaker cables with 14 " TS plugs pre-installed. All other installation or modification should be performed only by qualified personnel.

This symbol, wherever it appears, alerts you to the presence of uninsulated dangerous voltage inside the enclosure - voltage that may be sufficient to constitute a risk of shock.

This symbol, wherever it appears, alerts you to important operating and maintenance instructions in the accompanying literature. Please read the manual.

Always keep in mind that the contained tube is a highly sensitive component. Avoid impact and other mechanical interferences. BEHRINGER assumes no liability for any damage caused by the user. If possible, keep a spare tube of the same type (12AX7) at hand.

The T-1 is extremely sensitive to moisture. Both the microphone and the PSU-T power supply should not be used near water (for example, near a bathtub, washing machine, swimming pool, etc.). When doing voice recordings, always use the enclosed windscreen to protect the capsule from moisture.

To reduce the risk of electric shock, do not remove the top cover (or the rear section).
No user serviceable parts inside.
Do not defeat the safety purpose of the polarized or grounding-type plug. You should only connect the T-1 to the provided power supply.

After each use, wipe the microphone down with a soft cloth and place it back into its protective casing (included with the microphone).
Limited Warranty
Please register your new BEHRINGER equipment right after your purchase by visiting behringer.com and read the terms and conditions of our warranty carefully.
1. At a Glance


① Mount the microphone
2 Connect the microphoneto the PSU-T
3 Connect the PSU-T to the mixer
4 Connect the mains cable
5 Switch on the PSU-T
6 Allow the tube to warm up
And you're good to go!
EN
2. Control Elements and Connections
2.1 Microphone
You can tell that the T-1 is switched on when the small window glows red. It is also possible to activate an attenuation of -20 dB on the side of the T-1, for example, when signal sources are very loud. There is an XLR connector on the bottom end of the microphone. Connect it to the power supply (PSU-T).
2.2 Power supply
The included BEHRINGER PSU-T not only provides the supply voltage for the tube preamplifier but also employs a circuit that reduces the low frequency response. This is activated on the front panel with the LOW CUT switch.
The POWER switch on the unit's rear panel turns on the power supply.
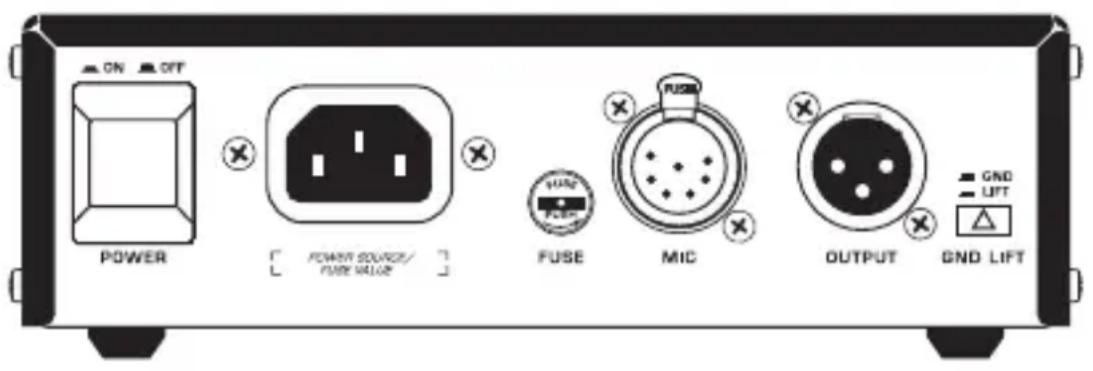
Here you also find the following:
• a seven-pin XLR connector to connect to the T-1 (MIC),
• a three-pin XLR connector to transmit the signal (OUTPUT),
• a switch to suppress signal humming noise (GND LIFT),
• an IEC power receptacle
• and a fuse holder.
Use the provided cable to connect the T-1 to the power supply unit!
3. Set-up
Mounting the microphone
The microphone comes with an elastic shockmount. The advantage to a conventional microphone stand mount is that mechanically induced noise is virtually absorbed.
To mount the microphone, attach the shockmount to the microphone stand and, from above, slide the T-1 into the shockmount.

Caution
◇ The provided shockmount is not intended to be used for suspending the T-1!
Alternatively, you can also mount the T-1 on a microphone stand mount. There is a screw adapter on the bottom side of the microphone.
Warming up
The T-1 can basically be used a couple of seconds after the PSU-T has been switched on. However, the typical sound of the the T-1 only unfolds a while after activating the power supply. We recommend allowing the microphone to “warm up” 30 minutes before use.

Level setting/adjusting the basic sound
Adjust the gain control in the microphone channel of your mixing console so that the peak LED lights up only occasionally or never at all. The EQ controls in the microphone channel should be set to mid-travel position to start with; low-cut filter and signal level attenuation should be switched off. To get the sound you want, try changing the mic position relative to the sound source or even move the microphone around in the recording room of your studio. Adjusting the angle at which walls face the sound source can also be helpful. Only when the desired basic sound has been achieved, you should start to use equalizers and signal processors, if any at all. Remember: less is often more!
4. Directivity
Your T-1 features a capsule with a cardioid pickup pattern and is ideal for recording individual instruments, vocals and speech. Cardioid pickup pattern means that the sound produced by sources located in front of the mic is strongly picked up. It is often used in recording situations, since this directivity pattern tones down the pickup of sounds located to the back of the microphone.
To place the microphone correctly, the BEHRINGER logo needs to face the sound source being recorded.
5. Audio Connection

To transmit a preamplified signal (OUTPUT connector on the PSU-T), use a balanced microphone cable with the following pin assignment: pin 1 = shielding; pin 2 = +; pin 3 = -. Since your PSU-T features gold-plated contact points, we recommend that you use only microphone cables with gold-plated connectors.
Balanced use with XLR connectors

input
1 = ground/shield
2 = hot (+ve)
3 = cold (-ve)
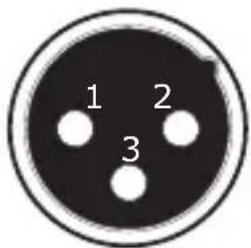
output
For unbalanced use, pin 1 and pin 3 have to be bridged
Fig. 5.1: XLR connectors

6. Specifications
| Transducer type condenser, 16 mm (0.63") |
| Polar pattern cardioid |
| Preamplifier vacuum tube (12AX7) |
| Output (PSU-T) gold-plated balanced XLR connector |
| Open circuit sensitivity -40 dBV (0 dBV = 1 V/Pa) |
| Frequency response 20 Hz to 20 kHz |
| Level attenuation -20 dB, switchable |
| Low-cut filter 12 dB/oct. @ 100 Hz (switchable) |
| Max. SPL (3% THD @ 1 kHz) 130 dB |
| Dynamic range 110 dB |
| Nominal impedance approx. 200 Ω |
| Load impedance >1 kΩ |
| Supply voltage adapter BEHRINGER PSU-T |
Mains Voltage/Fuse
| 100-120 V~, 50/60 Hz T 160 mA L 250 V | |
| 220-230 V~, 50/60 Hz T 80 mA L 250 V | |
| Mains connector | standard IEC receptacle |
Physical/Weight
| Dimensions | ∅ shaft: 2.7", length: 8.3"∅ shaft: 68 mm, length: 211 mm |
| Weight (net) | approx. 1.1 kg (2.4 lbs) |


natural_image
Black-and-white photo of a smiling woman making a heart gesture with her hands (no text or symbols visible)We Hear You


- TUBE CONDENSER MICROPHONE T-1
- EN
- Important Safety Instructions
- Limited Warranty
- At a Glance
- Control Elements and Connections
- Microphone
- Power supply
- Set-up
- Mounting the microphone
- Caution
- Warming up
- Level setting/adjusting the basic sound
- Directivity
- Audio Connection
- Balanced use with XLR connectors
- Specifications
Brand : BEHRINGER
Model : T-1
Category : Microphone