
LVS-400 - Printer ROLAND - Free user manual and instructions
Find the device manual for free LVS-400 ROLAND in PDF.


| Product Type | Large-Format Printer |
| Model | LVS-400 |
| Brand | Roland |
| Print Technology | Inkjet |
| Maximum Print Width | Approximately 1.6 m (63 in) |
| Dimensions (W x D x H) | 2,500 mm x 800 mm x 1,200 mm |
| Weight | Approximately 150 kg |
| Power Supply | AC 100-240 V, 50/60 Hz |
| Power Consumption | Max 500 W (printing), <10 W (standby) |
| Print Resolution | Up to 1440 x 1440 dpi |
| Ink Type | Eco-Solvent or UV (depending on configuration) |
| Media Handling | Roll-to-roll with automatic take-up system |
| Interface | USB 2.0, Ethernet |
| Main Functions | Printing, cutting (with optional cutter), RIP software support |
| Maintenance | Regular print head cleaning, ink system maintenance, media path cleaning |
| Safety Features | Emergency stop, cover interlock, overheat protection |
| Spare Parts & Repairability | Replaceable print heads, maintenance kit, power supply unit |
| General Information | For indoor and outdoor signage, graphics, and textiles |
Frequently Asked Questions - LVS-400 ROLAND
User questions about LVS-400 ROLAND
0 question about this device. Answer the ones you know or ask your own.
Ask a new question about this device
Download the instructions for your Printer in PDF format for free! Find your manual LVS-400 - ROLAND and take your electronic device back in hand. On this page are published all the documents necessary for the use of your device. LVS-400 by ROLAND.
USER MANUAL LVS-400 ROLAND
Thank you, and congratulations on your choice of the EDIROL VIDEO MIX/LIVE SWITCHER LVS-400.
Before using this unit, carefully read the sections entitled: "USING THE UNIT SAFELY" and "IMPORTANT NOTES" (p. 2–3; p. 4). These sections provide important information concerning the proper operation of the unit. Additionally, in order to feel assured that you have gained a good grasp of every feature provided by your new unit, Owner's Manual should be read in its entirety. The manual should be saved and kept on hand as a convenient reference.

USING THE UNIT SAFELY
INSTRUCTIONS FOR THE PREVENTION OF FIRE, ELECTRIC SHOCK, OR INJURY TO PERSONS
About ⚠️ WARNING and ⚠️ CAUTION Notices
 | Used for instructions intended to alert the user to the risk of death or severe injury should the unit be used improperly. |
 | Used for instructions intended to alert the user to the risk of injury or material damage should the unit be used improperly.* Material damage refers to damage or other adverse effects caused with respect to the home and all its furnishings, as well to domestic animals or pets. |
About the Symbols
| [0152] | The △ symbol alerts the user to important instructions or warnings. The specific meaning of the symbol is determined by the design contained within the triangle. In the case of the symbol at left, it is used for general cautions, warnings, or alerts to danger. |
| [0467] | The ⊙ symbol alerts the user to items that must never be carried out (are forbidden). The specific thing that must not be done is indicated by the design contained within the circle. In the case of the symbol at left, it means that the unit must never be disassembled. |
| [0002] | The ● symbol alerts the user to things that must be carried out. The specific thing that must be done is indicated by the design contained within the circle. In the case of the symbol at left, it means that the power-cord plug must be unplugged from the outlet. |
ALWAYS OBSERVE THE FOLLOWING
WARNING
- Before using this unit, make sure to read the instructions below, and the Owner's Manual.

- Do not open (or modify in any way) the unit or its AC adaptor.

- Do not attempt to repair the unit, or replace parts within it (except when this manual provides specific instructions directing you to do so). Refer all servicing to your retailer, the nearest Roland Service Center, or an authorized Roland distributor, as listed on the "Information" page.

- Never use or store the unit in places that are:
- Subject to temperature extremes (e.g., direct sunlight in an enclosed vehicle, near a heating duct, on top of heat-generating equipment); or are
- Damp (e.g., baths, washrooms, on wet floors); or are
- Humid; or are
- Exposed to rain; or are
- Dusty; or are
- Subject to high levels of vibration.
• Make sure you always have the unit placed so it is level and sure to remain stable. Never place it on stands that could wobble, or on inclined surfaces.

- Be sure to use only the AC adaptor supplied with the unit. Also, make sure the line voltage at the installation matches the input voltage specified on the AC adaptor's body. Other AC adaptors may use a different polarity, or be designed for a different voltage, so their use could result in damage, malfunction, or electric shock.


WARNING
- Use only the attached power-supply cord. Also, the supplied power cord must not be used with any other device.

- Do not excessively twist or bend the power cord, nor place heavy objects on it. Doing so can damage the cord, producing severed elements and short circuits. Damaged cords are fire and shock hazards!

- Do not allow any objects (e.g., flammable material, coins, pins); or liquids of any kind (water, soft drinks, etc.) to penetrate the unit.

- In households with small children, an adult should provide supervision until the child is capable of following all the rules essential for the safe operation of the unit.

- Protect the unit from strong impact. (Do not drop it!)

- Do not force the unit's power-supply cord to share an outlet with an unreasonable number of other devices. Be especially careful when using extension cords—the total power used by all devices you have connected to the extension cord's outlet must never exceed the power rating (watts/amperes) for the extension cord. Excessive loads can cause the insulation on the cord to heat up and eventually melt through.

- Before using the unit in a foreign country, consult with your retailer, the nearest Roland Service Center, or an authorized Roland distributor, as listed on the "Information" page.


CAUTION
- The unit and the AC adaptor should be located so their location or position does not interfere with their proper ventilation.

• Always grasp only the plug on the AC adaptor cord when plugging into, or unplugging from, an outlet or this unit.

- At regular intervals, you should unplug the AC adaptor and clean it by using a dry cloth to wipe all dust and other accumulations away from its prongs. Also, disconnect the power plug from the power outlet whenever the unit is to remain unused for an extended period of time. Any accumulation of dust between the power plug and the power outlet can result in poor insulation and lead to fire.

- Try to prevent cords and cables from becoming entangled. Also, all cords and cables should be placed so they are out of the reach of children.

- Never climb on top of, nor place heavy objects on the unit.

- Never handle the AC adaptor or its plugs with wet hands when plugging into, or unplugging from, an outlet or this unit.

- Before moving the unit, disconnect the AC adaptor and all cords coming from external devices.

- Before cleaning the unit, turn off the power and unplug the AC adaptor from the outlet (p. 8).

- Whenever you suspect the possibility of lightning in your area, disconnect the AC adaptor from the outlet.

- Should you remove the BNC-RCA adaptors, make sure to put them in a safe place out of children's reach, so there is no chance of them being swallowed accidentally.

In addition to the items listed under "USING THE UNIT SAFELY" on page 2–3, please read and observe the following:
Power Supply
- Do not connect this unit to same electrical outlet that is being used by an electrical appliance that is controlled by an inverter (such as a refrigerator, washing machine, microwave oven, or air conditioner), or that contains a motor. Depending on the way in which the electrical appliance is used, power supply noise may cause this unit to malfunction or may produce audible noise. If it is not practical to use a separate electrical outlet, connect a power supply noise filter between this unit and the electrical outlet.
- The AC adaptor will begin to generate heat after long hours of consecutive use. This is normal, and is not a cause for concern.
- Before connecting this unit to other devices, turn off the power to all units. This will help prevent malfunctions and/or damage to speakers or other devices.
Placement
- This device may interfere with radio and television reception. Do not use this device in the vicinity of such receivers.
- Noise may be produced if wireless communications devices, such as cell phones, are operated in the vicinity of this unit. Such noise could occur when receiving or initiating a call, or while conversing. Should you experience such problems, you should relocate such wireless devices so they are at a greater distance from this unit, or switch them off.
- When moved from one location to another where the temperature and/or humidity is very different, water droplets (condensation) may form inside the unit. Damage or malfunction may result if you attempt to use the unit in this condition. Therefore, before using the unit, you must allow it to stand for several hours, until the condensation has completely evaporated.
Maintenance
- For everyday cleaning wipe the unit with a soft, dry cloth or one that has been slightly dampened with water. To remove stubborn dirt, use a cloth impregnated with a mild, non-abrasive detergent. Afterwards, be sure to wipe the unit thoroughly with a soft, dry cloth.
- Never use benzine, thinners, alcohol or solvents of any kind, to avoid the possibility of discoloration and/or deformation.
Additional Precautions
- This product is compatible with regular NTSC or PAL video signal. In case irregular signal is input, it may obstruct stable operation of this product.
- Use a reasonable amount of care when using the unit's buttons, sliders, or other controls; and when using its jacks and connectors. Rough handling can lead to malfunctions.
- When connecting / disconnecting all cables, grasp the connector itself—never pull on the cable. This way you will avoid causing shorts, or damage to the cable's internal elements.
- When you need to transport the unit, package it in the box (including padding) that it came in, if possible. Otherwise, you will need to use equivalent packaging materials.
Copyright
- Unauthorized recording, distribution, sale, lending, public performance, broadcasting, or the like, in whole or in part, of a work (musical composition, video, broadcast, public performance, or the like) whose copyright is held by a third party is prohibited by law.
- Do not use this unit for purposes that could infringe on a copyright held by a third party. We assume no responsibility whatsoever with regard to any infringements of third-party copyrights arising through your use of this unit.
- Even when intended for the user's private enjoyment (use), any duplication of third-party copyrighted works that circumvents technology to protect such works without the permission of the copyright holder is an infringement of copyright, and is prohibited by law.
- Duplication of works not protected by such technology are allowed for private individual use.
USING THE UNIT SAFELY....2
IMPORTANT NOTES ....4
Before You Begin....6
Check the Included Items....6
Connecting Peripheral Devices 7
Turning the Power On 8
Turning the Power Off 8
Switching Between NTSC and PAL....8
Names of Things and What They Do....9
Front Panel....9
Rear Panel....9
Basic Operation ....10
Switching Images with the Switcher 10
Controlling the Output....11
Using the Monitor Output to Check the Images....11
Advanced Operation....12
Inserting Images with the Video Fader 12
About Insert Effects 12
Key Composite Effects....13
Control the LVS-400 from an External Device....14
Correspondence Between Commands and MIDI Messages.... 14
Using V-LINK to Control the LVS-400....15
Using V-LINK....15
MIDI Implementation Chart ....16
Troubleshooting....17
Specifications....18
Check the Included Items
1

natural_image
Pure electrical circuit lines without any symbols2

3
4
1 LVS-400
2 AC adaptor and power cable
3 Owner's manual
4 BNC-RCA adaptors
About Ground Terminal
In some cases, depending on the environment in which the unit is installed, the surface of the panel may sometimes feel rough and grainy. This is due to an infinitesimal electrical charge, which is absolutely harmless. However, if you are concerned about this, connect ground terminal (see figure) with an external ground. When the unit is grounded, a slight noise may result, depending on the particulars of your installation. If you are unsure of the connection method, contact nearest Edirol Service Center, or authorized Edirol/Roland distributor, as listed on the "Information" page.

Unsuitable places for connection
• Water pipes (may result in shock or electrocution)
• Gas pipes (may result in fire or explosion)
- Telephone-line ground or lightning rod (may be dangerous in the event of lightning)
Connecting Peripheral Devices
1
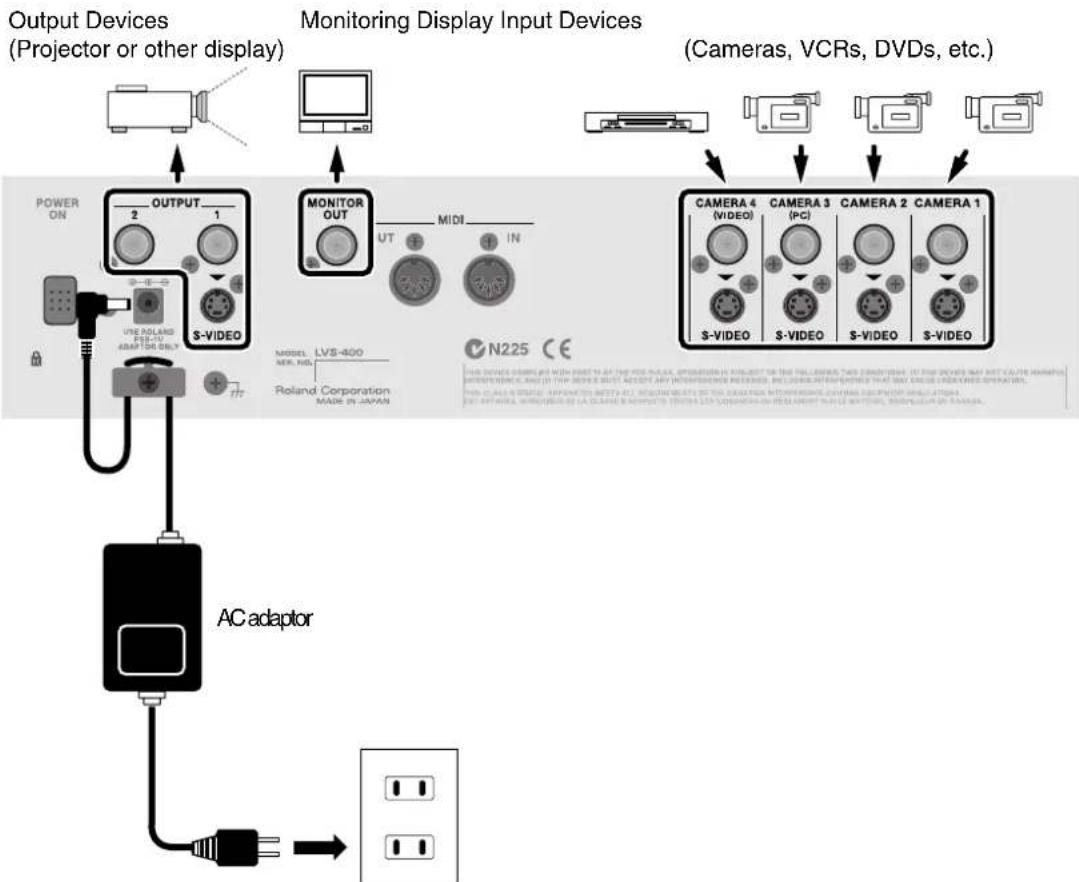
You can connect up to four video playback devices (sources). Here's how to connect sources such as a video camcorder, VCR, DVD player, and play them back to create an impressive video performance. To prevent malfunction and/or damage to other devices, always turn down the volume, and turn off the power on all devices before making any connections.
2
Connect the AC adaptor included with the LVS-400 to the DC IN jack, then plug the adaptor into a power outlet.
3
Connect the LVS-400 to peripheral equipment as shown in the figure.
flowchart
graph TD
    A["Power On"] --> B["AC adaptor"]
    B --> C["Output Devices (Projector or other display)"]
    C --> D["Monitoring Display Input Devices (Cameras, VCRs, DVDs, etc.)"]
    D --> E["CAMERA 4 (VIDEO)"]
    D --> F["CAMERA 3 (PC)"]
    D --> G["CAMERA 2 (CAMERA 1)"]
    E --> H["S-VIDEO"]
    F --> I["S-VIDEO"]
    G --> J["S-VIDEO"]
    H --> K["POWER OUT"]
    I --> L["MIDI IN"]
    K --> M["OUTPUT 2"]
    L --> N["MONITOR OUT UT"]
    M --> O["MODEL: LVS-400"]
    N --> P["MODEL: POLAND FOR U ADAPTOR ONLY"]
    P --> Q["AC adaptor"]
    Q --> R["AC adaptor"]
    R --> S["Power Out"]
    style A fill:#f9f,stroke:#333
    style D fill:#ccf,stroke:#333
    style E fill:#cfc,stroke:#333
    style F fill:#cfc,stroke:#333
    style G fill:#cfc,stroke:#333
    style H fill:#fcc,stroke:#333
    style I fill:#fcc,stroke:#333
    style J fill:#fcc,stroke:#333
    style K fill:#ffc,stroke:#333
    style L fill:#ffc,stroke:#333
    style M fill:#ffc,stroke:#333
    style N fill:#ffc,stroke:#333
    style O fill:#ffc,stroke:#333
    style P fill:#ffc,stroke:#333
    style Q fill:#fff,stroke:#333
    style R fill:#fff,stroke:#333
    style S fill:#fff,stroke:#333
* To prevent the inadvertent disruption of power to your unit (should the plug be pulled out accidentally), and to avoid applying undue stress to the AC adaptor jack, anchor the power cord using the cord hook, as shown in the illustration.
- The LVS-400 does not have audio inputs so will not mix audio. Audio outputs can be connected directly to speakers or via an audio mixer if mixing of audio from multiple devices is necessary.
- No video cables come with this product. Please use appropriate video cables for connection with source devices or TV monitor/Projector.
- It is recommended to use composite cable rather than S-video cable where you need to connect devices long distances (unless using S-video amplifiers). If devices are installed closer to the LVS-400, it is recommended to use S-video cables so that you can obtain better image quality.
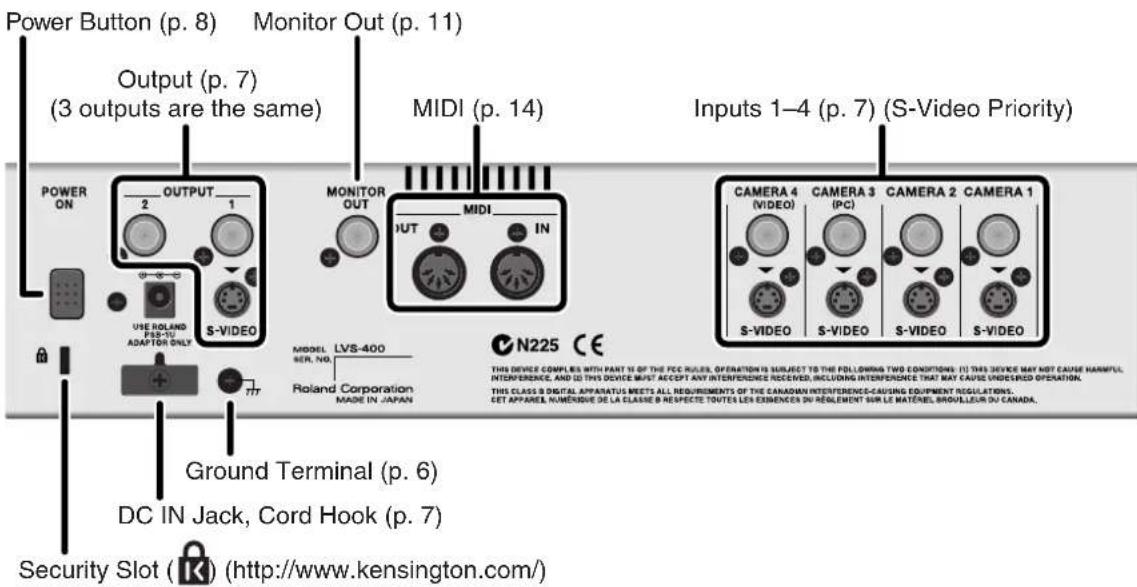
- If both video (composite) and S-video signals are input simultaneously to the same channel, the S-video signal will take priority.
- The same image is output simultaneously from the OUTPUT 1, OUTPUT 2, and S-VIDEO outputs.
- The LVS-400 inputs and outputs composite video via BNC connectors. Using the BNC connectors securely locks the connection. If connecting with RCA phono connectors, use the BNC-RCA phono adaptor included with the LVS-400 or another commercially available BNC-RCA adaptor to connect to the LVS-400's BNC connector.
Turning the Power On
1
Check the power cable.
Make sure that the cable from the AC adaptor is firmly plugged into the LVS-400.
2
Press the POWER button.
Press the POWER button located on the rear panel of the LVS-400. It will take approximately five seconds for the LVS-400 to initialize itself and begin operating.
POWER ON


* This unit is equipped with a protection circuit. A brief interval (a few seconds) after power up is required before the unit will operate normally.
Turning the Power Off
1
Press the POWER button.
Press the POWER button located on the rear panel of the LVS-400. All of the front panel LEDs will go dark.
Switching Between NTSC and PAL
The LVS-400 can be switched to support either NTSC or PAL format signals.
To start up in PAL mode, hold down monitor select "OUTPUT" button and "OUTPUT ON/OFF" button, and press the power button.
The next time you start up, you can simply press the power button to start up in PAL mode.
If you want to return to NTSC mode, once again hold down monitor select "OUTPUT" button and "OUTPUT ON/OFF" button, and press the power button.
When the LVS-400 starts up, an indication of whether it is starting up in NTSC mode or PAL mode will appear for several seconds in the monitor out screen.
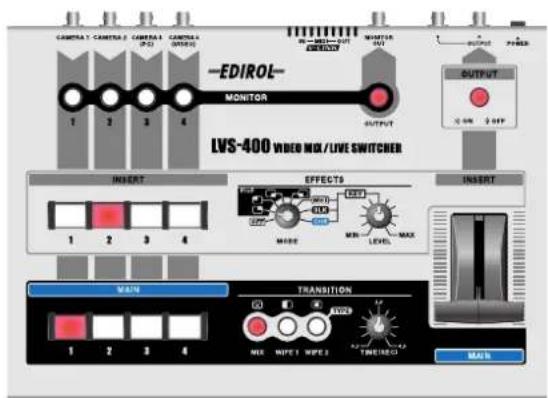
Front Panel
Switcher (p. 10)
![① Main Input Select Buttons (1–4) ② Transition Type Select Buttons (MIX, WIPE 1, WIPE 2) ③ Transition Time Control Knob (0–4 sec.) Monitor (p. 11) ④ Monitor Select Buttons (Input 1–4, Output) Output Control (p. 11) ⑤ Output Control Buttons (ON: Normal, OFF: Black Out) LVS-400 VIDEO MIX/LIVE SWITCHER INSERT EFFECTS INSERT ⑥ ⑦ ⑧ ⑨ Insert (p. 12) ⑥ Insert Input Select Buttons (1–4) ⑦ Effects Mode Select Knob (OFF, PinP [RightUp, LeftUp, RightDown, LeftDown], Key [White, Black, Chroma]) ⑧ Key Level Control Knob ⑨ Video Fader for Insert (Start from MAIN position)](/content/2026/05/1087078/images/0196d574901950c525025fa6539907a4261004b168c9dcee081273252c55c200.jpg)
Rear Panel
Switching Images with the Switcher
You can easily get a transition effect when switching images, just by using the MAIN [1]–[4] buttons.
1. Play back the images with the video equipment.
Input the images from the video device connected to the LVS-400 (such as a video camera or DVD player).
2. Check the output.
Turn on the video monitor or projector connected to the LVS-400's output jacks/connector and check to see whether or not the images are being output correctly.
3. Switch the input channel.
Switch the LVS-400's input channel. Turn the TRANSITION TIME control knob so that it points straight up (2 seconds), then press one of the buttons from [1] through [4] to switch the input.
Check the image on the video monitor or from the projector to confirm that the images are switched correctly.
Changing the TRANSITION TIME control knob setting allows you to adjust the amount of time required to completely switch from one image to another.

4. Switch the transition effect.
Press the TRANSITION TYPE select buttons and switch the input.
The following effects are available when switching images.

MIX: The two images are mixed (overlapped) as they are switched.

Start Finish

WIPE 1: The images are switched by wiping left to right.

Start Finish

WIPE 2: The images are switched with a rectangular wipe starting from the center of the image.

Start
Finish
Controlling the Output
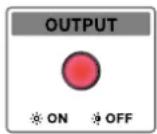
You can use the OUTPUT (Output Control) button to pause output of the image.
1. Press the Output Control button.
When you press the Output Control button, output of the images is paused.
A black (blank) screen is output, and the button indicator flashes.
2. Press the Output Control button once more.
When you press the button again, the images are output as before.
The button's indicator goes out.
MEMO
A synchronization signal is output continuously, so the images remain stable.

Take care not to mistake the "OUTPUT" in the MONITOR selection section for this button.
Using the Monitor Output to Check the Images
You can check both the input and output without affecting the output images.
1. Play back the images with the video equipment.
Input the images from the video device connected to the LVS-400 (such as a video camera or DVD player).
2. Check the output.
Turn on the video monitor connected to the LVS-400's MONITOR OUT connector and check to see whether or not the images are being output correctly.
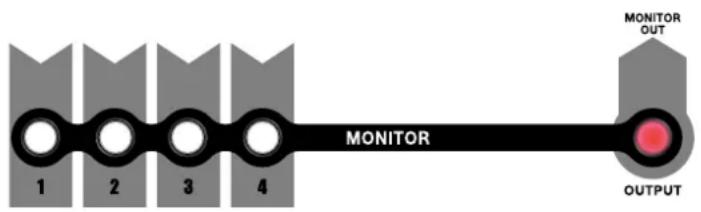
3. Switch the view using the Monitor Select buttons.
Switch using the Monitor Select buttons. You can select from Inputs 1 through 4 or the OUTPUT. The selected image is displayed on the video monitor.
flowchart
graph LR
    A["1"] --> B["2"]
    B --> C["3"]
    C --> D["4"]
    D --> E["MONITOR"]
    E --> F["OUTPUT"]
    G["MONITOR OUT"] --> H["Red Light Source"]

When selecting the MONITOR OUTPUT, the video OUTPUT in the monitor is disrupted for a moment, but this has no effect on the actual video being OUTPUT.
Check the following if there is no video output.
- Is the output of the video device properly connected to the LVS-400's input?
- Is video being output from the video device connected to the LVS-400's input?
- Is the input for the output projector or video monitor properly selected?
- Is the Output Control button indicator unlit? Press the button if the indicator is flashing.
A blue screen is displayed when you select a channel that has no input connected to it.
The video fader is used for inserts. For more on inserting, refer to p. 12.
Inserting Images with the Video Fader
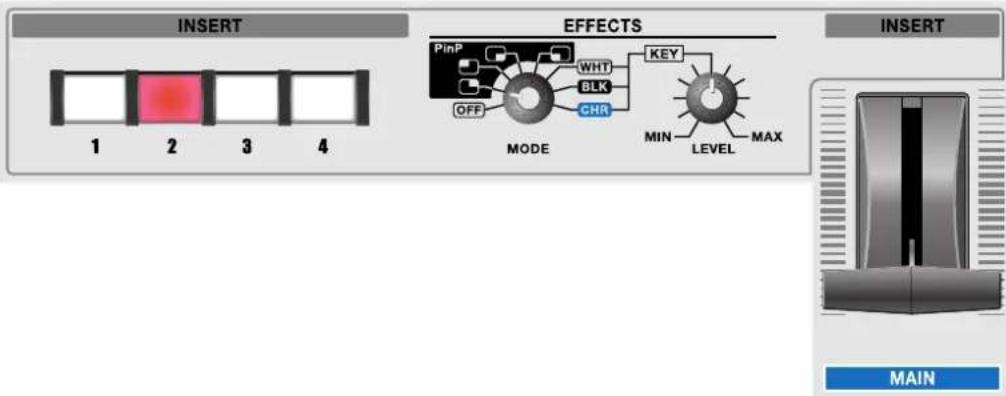
You can use the video fader to insert video images manually.
When using this feature, you can use the "PinP" (Picture in Picture) or key composite effects.
1
Pull the video fader all the way toward MAIN.
2
Select the input to insert (1-4).
3
Move the video fader to the INSERT side.
The video images are inserted as you move the fader.
4
Return the fader to the MAIN side to return to the original image.
About Insert Effects
MODE: OFF

MODE
When this is set to "OFF," composite effects are not applied. The video is inserted in the entire screen according to the transition selected with the TRANSITION TYPE selection buttons (p. 10).
MODE: PinP

MODE
When PinP is selected, the Picture in Picture function goes into effect. A small picture is mixed (faded in), regardless of the TRANSITION TYPE button setting.
The position of the smaller picture changes according to the MODE setting (upper right, upper left, lower right, or lower left).
MAIN Image INSERT Image OUTPUT Image


If you do not start out with the video fader completely tilted to the MAIN side, then the Insert function will not work, even when you then move the video fader. First bring the fader all the way to MAIN to start the function.

The insert method varies with the insert effect.

Switch the insert input before inserting. Although it is possible to switch the insert input while the insert is in progress, note that this disrupts synchronization.
Key Composite Effects
MODE: WHT/BLK/CHR

flowchart
graph TD
    A["MODE"] --> B["WHT"]
    A --> C["BLK"]
    A --> D["CHR"]
    B --> E["KEY"]
    C --> E
    D --> E
    E --> F["MIN"]
    E --> G["LEVEL"]
    E --> H["MAX"]
The key composite functions are enabled when WHT/BLK/CHR is selected.
The video is inserted according to the transition selected with the TRANSITION TYPE selection buttons.
Adjust the composite effects with the KEY LEVEL adjustment knob.
WHT: Light portions of the inserted image are replaced with the main image. (White Luminance Key)
BLK: Dark portions of the inserted image are replaced with the main image. (Black Luminance Key)
CHR: Blue portions of the inserted image are replaced with the main image. (Blue Chroma Key)
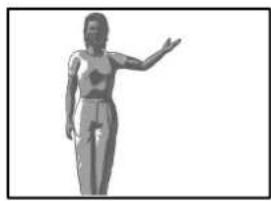
Key Composite Example: MODE: CHR
MAIN Image INSERT Image OUTPUT Image

natural_image
Monochrome illustration of a human figure in motion, possibly standing or gesturing, with no visible text or symbols.
1
Tilt the video fader to the MAIN side.
2
Input the video to be used as the background in the final composite output to MAIN.
3
Record the video you want to insert against a blue background, then input to INSERT.
4
Return the fader to the INSERT side.
The composite output video appears as shown in the figure above. You can adjust with the KEY LEVEL knob.
5
Return the fader to the MAIN side to return to the original image.
HINT
If you reselect the MAIN input while the Insert function is still in use, the insert is automatically cleared, and the video image switches via the transition effect from the current MAIN image to the newly selected image. If you want to use the Insert function again, first bring the fader all the way to the MAIN side, then move it to INSERT again.
Control the LVS-400 from an External Device
You can connect the LVS-400 with a MIDI device, and control the LVS-400 remotely.
What is MIDI?
MIDI stands for "Musical Instrument Digital Interface" a worldwide standard that allows performance data and other information to be exchanged among musical instruments. MIDI compatible devices can be connected together easily using MIDI cables. Once connected, performance data can readily be communicated between the two devices; or one can make settings for, as well as control the operation of the other device.
Correspondence Between Commands and MIDI Messages
Normally, after power up (with V-LINK off), the LVS-400 outputs the corresponding MIDI messages from its MIDI OUT when its buttons and knobs are operated.
Conversely, when any of the supported MIDI messages arrive at its MIDI IN, the LVS-400 performs the same functions that it would if its buttons or knobs were operated.
* MIDI message values are in hexadecimal notation.
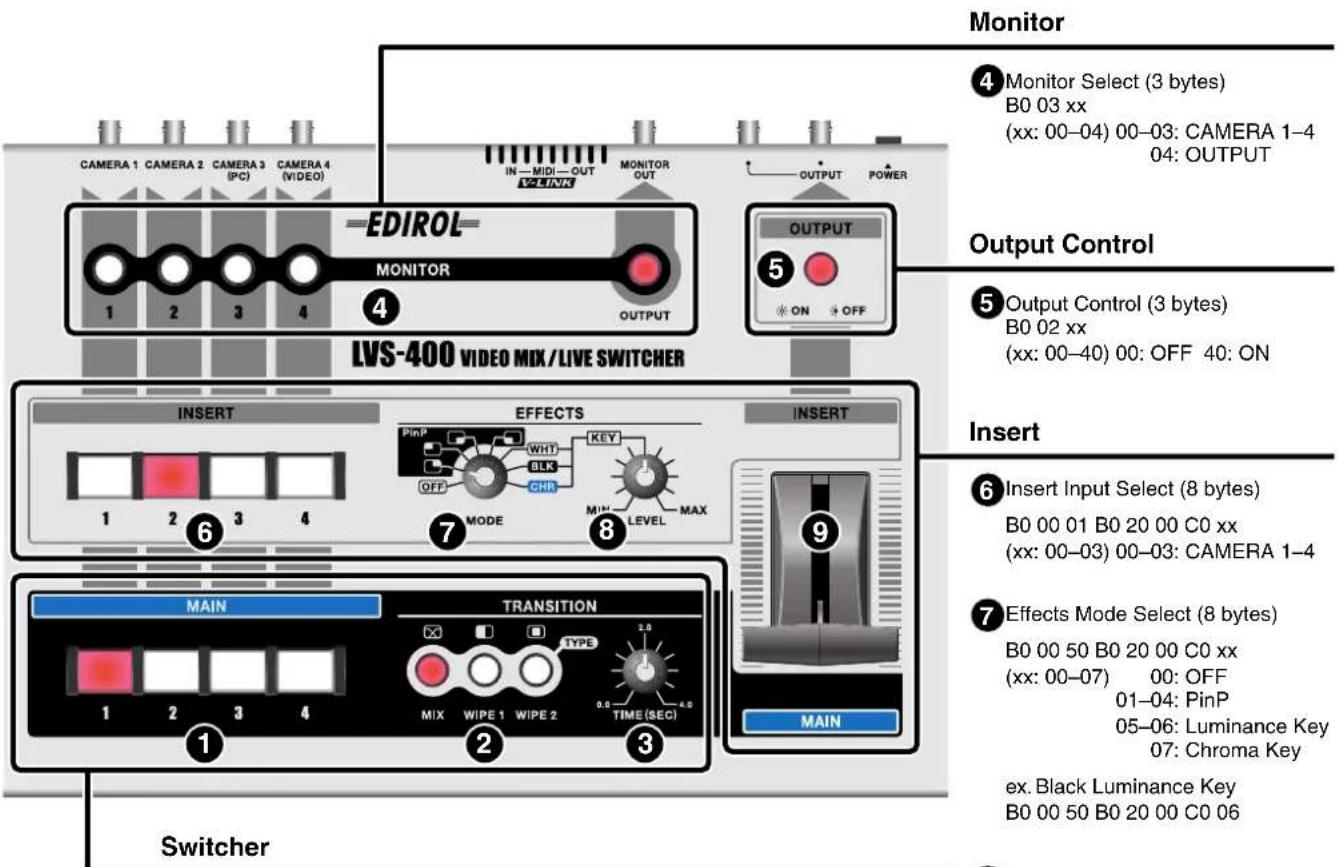
1 Main Input Select (8 bytes) B0 00 00 B0 20 00 C0 xx (xx: 00–03) ex. Select CAMERA 1 B0 00 00 B0 20 00 C0 00 ex. Select CAMERA 3 B0 00 00 B0 20 00 C0 02
2 Transition Type Select (3 bytes) B0 01 00 (MIX) B0 01 01 (WIPE1) B0 01 02 (WIPE2)
3 Transition Time Control (3 bytes) B0 07 xx (xx: 00–7F) 00: 0 sec. 7F: 4 sec. ex. Set to 2 sec. B0 07 40
Monitor
4 Monitor Select (3 bytes) B0 03 xx (xx: 00–04) 00–03: CAMERA 1–4 04: OUTPUT
Output Control
⑤ Output Control (3 bytes) B0 02 xx (xx: 00–40) 00: OFF 40: ON
Insert
6 Insert Input Select (8 bytes) B0 00 01 B0 20 00 C0 xx (xx: 00–03) 00–03: CAMERA 1–4
7 Effects Mode Select (8 bytes) B0 00 50 B0 20 00 C0 xx (xx: 00-07) 00: OFF 01-04: PinP 05-06: Luminance Key 07: Chroma Key ex. Black Luminance Key B0 00 50 B0 20 00 C0 06
8 Key Level Control (3 bytes) B0 04 xx (xx: 01–7F) 01: MIN 7F: MAX
9 Video Fader for Insert (3 bytes) B0 0B xx (xx: 00–7F) 00: MAIN 7F: INSERT ex. Set to the center position B0 0B 40
Using V-LINK to Control the LVS-400
The LVS-400 can be placed under the control of V-LINK capable instruments and operated in sync with musical performances (when V-LINK is on).
What is V-LINK?
V-LINK is a function that allows images to be synchronized to music. V-LINK makes it easy to manipulate images in a variety of ways, while linking them to the expressive elements of a performance.
Using V-LINK
For details on how to turn V-LINK on/off, refer to the owner's manual of the V-LINK compatible device that you intend to connect to the LVS-400.
Use 10H as the LVS-400's Device ID in V-LINK messages.
The factory setting of V-LINK (receipt of V-LINK ON message only) is as follows.
| Rx Channel | 1 |
| Tx Channel 1 | |
| Input Select A ch: 1 | |
| B ch: 2 | |
| Transition Time (CC#5) 0.0 sec | |
| Transition Select 1 | |
| Output Fade Off | |
| Video Fader (CC#11) Main | |
MIDI Implementation Chart
| Function... | Transmitted Recognized | Remarks | ||
| Basic Channel | Default Changed | 1-16 1-16 | 1-16 1-16 | |
| Mode | Default Messages Altered | Mode 3 X********** | Mode 3 X | |
| Note Number : True Voice | X X | O 36, 38, 40, 41, 43, 45, 47, 48 | Operational only when Note Mode in ON | |
| Velocity | Note On Note Off | X X | O X | |
| After Touch | Key's Channel's | X O | X O | Control Various Values |
| Pitch Bend | O | O | Control Various Values | |
| Control Change | 0, 32 1-5 7-31 64-95 | O O O O | O O O O | Bank Select Control Various Values Control Various Values Control Various Values |
| Program Change : True Number | O 0-3, 0-7 | O 0-3, 0-7 | Input Select : 1-4 Effects Mode : 1-8 | |
| System Exclusive | X | O | Control Various Values, V-LINK | |
| System Common : Song Position : Song Select : Tune Request | X X X | X X X | ||
| System Real Time : Commands | X X | O O | Start, Continue | |
| Aux Messages : All Sound Off : Reset All Controllers : Local On/Off : All Notes Off : Active Sensing : System Reset | X X X X X O X | X X X X X O X | ||
| Notes | ||||
Mode 1: OMNI ON, POLY
Mode 2 : OMNI ON, MONO
Mode 3 : OMNI OFF, POLY
Mode 4 : OMNI OFF, MONO
O: Yes
X: No
If you think there may be a problem with the device, first check the following points. If after checking these points the problem persists, consult your dealer or local Roland Service.
Image not switching when fader is moved
If the same input is selected for both MAIN and INSERT while the EFFECTS MODE is set to OFF, moving the video fader to switch the images will not change the image that is output.
In addition, switching the main input while the insert effects are in use automatically cancels the insert effects, so to start using the insert effects again, first tilt the video fader completely to the MAIN side. Begin the insertion with the fader tilted all the way to MAIN.
Image not switching when main input is switched
Are you looking at a display connected to MONITOR OUT? Select OUTPUT in the Monitor Select buttons. Alternatively, you can connect the display to OUTPUT (the video output connector).
Images not switching as intended when the input is switched
You cannot use the same input simultaneously with both the composite and S-VIDEO connectors. The S-VIDEO takes priority in this case.
No picture, even though source device is producing a signal
Is the Output Control button switched off (flashing)? If it is switched off, the screen will be black. Press the flashing Output Control button to switch it to ON (lit), and the images are then output.
Transition effects not working
When the TIME setting knob is set near "0," no transition effect is attained when the main image is switched. You can obtain the effect by using a longer time setting.
In addition, if the unit is not operating as you expect, first connect a display to the output of the device connected to the LVS-400's input connector and confirm that the images are being output correctly.
13.5 MHz, 4:2:2 (Y: B-Y: R-Y), 8 bits
Frame Synchronizer
2
Video Input
Video (Composite): BNC type x 4
* If S-Video is simultaneously, S-Video takes priority
Video Output
Video (Composite): BNC type x 2
Monitor Output
Video (Composite): BNC type x 1
Input/Output Level and Impedance
S-Video Luminance signal: 1 Vp-p, 75 ohms
Chrominance signal: 0.286 mVp-p, 75 ohms (NTSC), 0.3 mVp-p, 75 ohms (PAL)
Video (Composite): 1 Vp-p, 75 ohms
Control Connectors
MIDI IN: 5-pin DIN type
MIDI OUT: 5-pin DIN type
Transition Effects
Mix (Dissolve)
Wipe 1
Wipe 2
Composite Effects
Picture-in-Picture (4 types)
Luminance Key (2 types)
Chroma Key
Power Supply
DC 9 V (AC Adaptor)
Current Draw
1500 mA
Dimensions
* Maximum height (top of T-bar): 118 mm / 4-11/16 inches
Weight (excluding the AC adaptor)
2.95 kg
6 lbs 9 oz
Accessories
Owner's Manual
AC Adaptor (PSB-1U)
BNC-RCA Adapter x 4
* In the interest of product improvement, the specifications and/or appearance of this unit are subject to change without prior notice.
For the U.K.
IMPORTANT: THE WIRES IN THIS MAINS LEAD ARE COLOURED IN ACCORDANCE WITH THE FOLLOWING CODE.
BLUE: NEUTRAL
BROWN: LIVE
As the colours of the wires in the mains lead of this apparatus may not correspond with the coloured markings identifying the terminals in your plug, proceed as follows:
The wire which is coloured BLUE must be connected to the terminal which is marked with the letter N or coloured BLACK. The wire which is coloured BROWN must be connected to the terminal which is marked with the letter L or coloured RED.
Under no circumstances must either of the above wires be connected to the earth terminal of a three pin plug.
For EU Countries

This product complies with the requirements of European Directive 89/336/EEC.
-For the USA
FEDERAL COMMUNICATIONS COMMISSION RADIO FREQUENCY INTERFERENCE STATEMENT
This equipment has been tested and found to comply with the limits for a Class B digital device, pursuant to Part 15 of the FCC Rules. These limits are designed to provide reasonable protection against harmful interference in a residential installation. This equipment generates, uses, and can radiate radio frequency energy and, if not installed and used in accordance with the instructions, may cause harmful interference to radio communications. However, there is no guarantee that interference will not occur in a particular installation. If this equipment does cause harmful interference to radio or television reception, which can be determined by turning the equipment off and on, the user is encouraged to try to correct the interference by one or more of the following measures:
– Reorient or relocate the receiving antenna.
— Increase the separation between the equipment and receiver.
- Connect the equipment into an outlet on a circuit different from that to which the receiver is connected.
- Consult the dealer or an experienced radio/TV technician for help.
This device complies with Part 15 of the FCC Rules. Operation is subject to the following two conditions:
(1) This device may not cause harmful interference, and
(2) This device must accept any interference received, including interference that may cause undesired operation.
Unauthorized changes or modification to this system can void the users authority to operate this equipment.
This equipment requires shielded interface cables in order to meet FCC class B Limit.
For Canada
NOTICE
This Class B digital apparatus meets all requirements of the Canadian Interference-Causing Equipment Regulations.
AVIS
When you need repair service, call your nearest EDIROL/Roland Service Center or authorized EDIROL/Roland distributor in your country as shown below.
EDIROL
EUROPE
EDIROL (Europe) Ltd.
Studio 3.4 114 Power Road
London W4 5PY
U. K.
TEL: +44 (0)20 8747 5949
FAX:+44 (0)20 8747 5948
http://www.edirol.com/europe
Deutschland
TEL: 0700 33 47 65 20
France
TEL: 0810 000 371
Italia
TEL: 02 93778329
U. S. A. / CANADA
EDIROL Corporation North
America
425 Sequoja Drive, Suite 114
Bellingham, WA 98226
U.S.A.
TEL: (360) 594-4276
FAX: (360) 594-4271
http://www.cdirol.com/
Roland
ASIA
TAIWAN
ROLAND TAIWAN
ENTERPRISE CO., LTD.
Room 5, 9fl. No. 112 Chung Shan N.Road Sec.2, Taipei, TAIWAN, R.O.C.
TEL: (02) 2561 3339
AUSTRALIA
AUSTRALIA
Roland Corporation
Australia Pty., Ltd.
38 Campbell Avenue
Dee Why West. NSW 2099
AUSTRALIA
TEL: (02) 9982 8266
CENTRAL/LATIN AMERICA
BRAZIL
Roland Brasil Ltda
Rua San Jose, 780 Sala B
Parque Industrial San Jose
Cotia - Sao Paulo - SP, BRAZIL
TEL:(011)4615 5666
EUROPE
AUSTRIA
Roland Austria GES.M.B.H.
Siemensstrasse 4, P.O. Box 74,
A-6063 RUM, AUSTRIA
TEL: (0512) 26 44 260
BELGIUM/HOLLAND/ LUXEMBOURG
Roland Benelux N. V.
Houtstraat 3, B-2260. Oeyel
(Westerlo) BELGIUM
TEL: (014) 575811
CZECH REP.
K-AUDIO
Kardasovska 626.
CZ-198 00 Praha 9.
CZECH REP
TEL: (2) 666 10529
DENMARK
Roland Scandinavia A/S
Nordhavnsvej 7, Postbox 880,
DK-2100 Copenhagen
DENMARK
TEL: 3916 6200
FRANCE
Roland France SA
4, Rue Paul Henri SPAAK,
Parc de l'Esplanade, F 77 462 St.
Thibault, Lagny Cedex FRANCE
TEL: 01 600 73 500
FINLAND
Roland Scandinavia As,
Filial Finland
Elannontie 5
FIN-01510 Vantaa, FINLAND
TEL: (0)9 68 24 020
GERMANY
155, New National Road
Patras 26442, GREECE
TEL: 2610 435400
HUNGARY
Roland East Europe Ltd.
Warehouse Area 'DEPO' Pf.83
H-2046 Torokbalint, HUNGARY
TEL: (23) 511011
IRELAND
Roland Ireland
G2 Calmount Park, Calmount
Avenue, Dublin 12
Republic of IRELAND
TEL: (01) 4294444
ITALY
Roland Italy S. p. A.
Danvik Center 28, 2 tr.
S-131 30 Nacka SWEDEN
TEL: (0)8 702 00 20
SWITZERLAND
Roland (Switzerland) AG
Atlantic Close, Swansea
Enterprise Park, SWANSEA
SA7 9FJ
UNITED KINGDOM
TEL: (01792) 702701

- USING THE UNIT SAFELY
- INSTRUCTIONS FOR THE PREVENTION OF FIRE, ELECTRIC SHOCK, OR INJURY TO PERSONS
- ALWAYS OBSERVE THE FOLLOWING
- WARNING
- CAUTION
- Power Supply
- Placement
- Maintenance
- Additional Precautions
- Copyright
- USING THE UNIT SAFELY....2
- IMPORTANT NOTES ....4
- Before You Begin....6
- Names of Things and What They Do....9
- Basic Operation ....10
- Advanced Operation....12
- Control the LVS-400 from an External Device....14
- MIDI Implementation Chart ....16
- Troubleshooting....17
- Specifications....18
- Check the Included Items
- About Ground Terminal
- Connecting Peripheral Devices
- 1
- 2
- 3
- Turning the Power On
- Turning the Power Off
- Switching Between NTSC and PAL
- Front Panel
- Rear Panel
- Switching Images with the Switcher
- Play back the images with the video equipment.
- Check the output.
- Switch the input channel.
- Switch the transition effect.
- Controlling the Output
- Press the Output Control button.
- Press the Output Control button once more.
- MEMO
- Using the Monitor Output to Check the Images
- Switch the view using the Monitor Select buttons.
- Inserting Images with the Video Fader
- About Insert Effects
- Key Composite Effects
- Key Composite Example: MODE: CHR
- HINT
- Control the LVS-400 from an External Device
- What is MIDI?
- Correspondence Between Commands and MIDI Messages
- Monitor
- Output Control
- Insert
- Using V-LINK to Control the LVS-400
- What is V-LINK?
- Using V-LINK
- Image not switching when fader is moved
- Image not switching when main input is switched
- Images not switching as intended when the input is switched
- No picture, even though source device is producing a signal
- Transition effects not working
- Frame Synchronizer
- Video Input
- Video Output
- Monitor Output
- Input/Output Level and Impedance
- Control Connectors
- Transition Effects
- Composite Effects
- Current Draw
- Dimensions
- Weight (excluding the AC adaptor)
- Accessories
- FEDERAL COMMUNICATIONS COMMISSION RADIO FREQUENCY INTERFERENCE STATEMENT
- NOTICE
- AVIS
- EDIROL
- EUROPE
- S. A. / CANADA
- Roland
- ASIA
- TAIWAN
- AUSTRALIA
- CENTRAL/LATIN AMERICA
- BRAZIL
- AUSTRIA
- BELGIUM/HOLLAND/ LUXEMBOURG
- CZECH REP.
- DENMARK
- FRANCE
- FINLAND
- GERMANY
- HUNGARY
- IRELAND
- ITALY
- SWITZERLAND
Brand : ROLAND
Model : LVS-400
Category : Printer