NCB-5 - In-wall speaker JobSite - Free user manual and instructions
Find the device manual for free NCB-5 JobSite in PDF.


| Product Type | Battery Charger |
| Model | NCB-5 |
| Brand | JobSite |
| Input Voltage | 120V AC, 60Hz |
| Output Voltage | 18V DC |
| Output Current | 2.0A |
| Compatible Battery Types | JobSite 18V Li-Ion |
| Charge Time | Approximately 60 minutes for 2.0Ah battery |
| LED Indicators | Power, Charging, Full Charge, Error |
| Overcharge Protection | Yes |
| Short Circuit Protection | Yes |
| Dimensions (L x W x H) | 6.5 x 4.0 x 3.5 inches |
| Weight | 1.2 lbs |
| Operating Temperature | 32°F - 104°F (0°C - 40°C) |
| Charger Type | Automatic, Smart Charger |
| Housing Material | High-impact plastic |
| Cooling Method | Passive (no fan) |
| Certification | UL Listed, CE |
| Included Accessories | User manual, wall mount bracket (optional) |
| Maintenance | Wipe with dry cloth; keep vents clean |
| Safety Features | Reverse polarity protection, temperature monitoring |
Frequently Asked Questions - NCB-5 JobSite
User questions about NCB-5 JobSite
0 question about this device. Answer the ones you know or ask your own.
Ask a new question about this device
Download the instructions for your In-wall speaker in PDF format for free! Find your manual NCB-5 - JobSite and take your electronic device back in hand. On this page are published all the documents necessary for the use of your device. NCB-5 by JobSite.
USER MANUAL NCB-5 JobSite
INSTALLATION & USER GUIDE

For Installing
In-Ceiling Speakers
in New Construction

natural_image
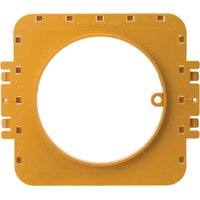
3D rendered mechanical component with circular center and mounting holes, no visible text or symbols5-1/4", 6-1/2" AND 8" CEILING BRACKETS
NCB-5 /6/8
NCB-5/NCB-6/NCB-8
5-1/4", 6-1/2" AND 8" CEILING BRACKETS
PRODUCT OVERVIEW
Figure 1
The illustration shows how a typical In-Ceiling loudspeaker mounts into a ceiling.
Ceiling Bracket serves as a "hole saver" when drywall has not been applied.

Figure 2
Break away two of the outer mounting tabs on the side you wish to affix.

Emergency
screw hole
for butting
bracket
against
joist.
NOTE: Ceiling Bracket is designed to be used in New Construction ONLY. Cannot be used in retrofit applications.
DESCRIPTION
NCB-5 ceiling bracket is for JobSite LSC-5 series speakers installation in New Construction
NCB-6 ceiling bracket is for JobSite LSC-6 series speakers installation in New Construction
NCB-8 ceiling bracket is for JobSite LSC-8 series speakers installation in New Construction
PACKAGE CONTENTS
Ceiling Brackets x 2
4" x 10" Wings x 2
4" x 14-1/2" Wings x 2
6 x 1-5/8" Phillips Head Drywall Screws x 9
PREPARING FOR INSTALLATION
Determine the best mounting locations based on the room layout. Make sure the area behind both speakers is clear for installation. Speakers provide the best coverage, when centered in the room. Line up the ceiling brackets with permanently mounted ceiling fixtures such as can lights or a light fixture. Snap a chalk line to help center the brackets.
TOOLS REQUIRED
Tape Measure
- Cordless screwdriver with No2 Phillips bit
Pencil
Chalk line
INSTALLATION
-
Attach the wings to the bracket by snapping them into the sides of the bracket (See Figure 1). To shorten the wings, break them along the scored lines.
-
The wings and brackets have centering lines to simplify placement of the speaker.
-
Use a tape measure to locate and center the brackets in the ceiling.
-
Mark each speaker location with a pencil.
-
Screw one side of the assembled bracket with wings to the joist using one of the supplied screws.
-
Screw the other side of the bracket/wing assembly to the joist. Two screws on each side make for a very secure installation.
-
Secure the wire to the bracket using the bracket's wire tie.
-
In unique situations where the bracket must be located precisely next to a joist, the bracket has "emergency" screw holes located on its snap-on tabs. Break away two of the outer mounting tabs on the side you wish to affix, see Figure 2. Notching the joist so the bracket lies flush may be required. Next, screw the bracket tab to the joist using one of the supplied screws. Important: Do not over-tighten the screw, doing so could crack the bracket tab. Level the bracket, then affix the other side of the bracket assembly using the supplied screws.
-
After the drywall is installed, cut a hole in the drywall using the outside of the circular bracket flange as a template.

JOBSITE SYSTEMS
12331 S.W. 130 STREET, MIAMI, FLORIDA 33186
P (866) 4JB-SITE (866-452-7483) - F (305) 238-0185
WWW.JOBSITESYSTEMS.COM
© 2005 JobSite Systems. All rights reserved. JobSite, Pure Custom and Niles are registered trademarks of Niles Audio Corporation and the JobSite Logo is a trademark of Niles Audio Corporation. All other trademarks are the property of their respective owners. Some JobSite products (or components thereof) are manufactured under one or more U.S. Patents, foreign equivalents and/or pending patents (see product for details). Because we constantly strive to improve our products, JobSite reserves the right to change product specifications, descriptions, and prices without notice. The technical and other specifications of information contained herein are not intended to set forth all technical and other specifications of JobSite products. Additional information can be obtained at WWW.JOBSITESYSTEMS.COM or by calling JobSite at 866-452-7483. Printed in China. 07/05 DS00379BCN


Brand : JobSite
Model : NCB-5
Category : In-wall speaker