
DVI2PCIe Duo - Video Capture Card Epiphan - Free user manual and instructions
Find the device manual for free DVI2PCIe Duo Epiphan in PDF.


| Product Type | Video Capture Card |
| Brand | Epiphan |
| Model | DVI2PCIe Duo |
| Interface | PCI Express x1 |
| Video Inputs | 2 x DVI-I (supports DVI, HDMI, VGA via adapters) |
| Maximum Resolution | 1920 x 1200 per channel |
| Frame Rate | Up to 60 fps |
| Video Format | RGB 24-bit, YUV 4:2:2 |
| Dimensions (PCB) | 105 mm x 68 mm (half-height bracket included) |
| Weight | Approx. 100 g |
| Power Consumption | <5 W (from PCIe slot) |
| Operating Temperature | 0°C to 50°C |
| Storage Temperature | -20°C to 70°C |
| Supported Software | Windows, Linux, macOS (drivers provided) |
| Main Functions | Dual-channel video capture for live streaming, recording, and medical imaging |
| Maintenance & Cleaning | Use dry compressed air to remove dust from PCB; avoid liquid cleaners |
| Safety | Electrostatic discharge precautions required during handling |
| Spare Parts & Repairability | Not user-serviceable; contact Epiphan for repairs |
| Warranty | 2-year limited warranty |
| General Information | Designed for professional video acquisition and medical imaging applications |
Frequently Asked Questions - DVI2PCIe Duo Epiphan
User questions about DVI2PCIe Duo Epiphan
0 question about this device. Answer the ones you know or ask your own.
Ask a new question about this device
Download the instructions for your Video Capture Card in PDF format for free! Find your manual DVI2PCIe Duo - Epiphan and take your electronic device back in hand. On this page are published all the documents necessary for the use of your device. DVI2PCIe Duo by Epiphan.
USER MANUAL DVI2PCIe Duo Epiphan
DVI2PCIe Duo™ User Guide

natural_image
Close-up of a blue computer RAM card with visible internal components and ports (no text or symbols)
natural_image
Abstract green logo design with a stylized 'p' shape (no text or symbols)epiphan
Epiphan Technical
Documentaon
©2015
Epiphan Systems Inc.
All Rights Reserved
April 2015
Thank you for choosing Epiphan!
At Epiphan Systems Inc. ("Epiphan"), product function and quality are our top priority. We make every effort to make sure that our products exceed our customers' expectations.
Product Feedback
We regularly contact our customers to ensure product performance and reliability. We strive to continually enhance our products to accommodate your needs. We welcome your feedback and suggestions for product improvements. You can email your comments to info@epiphan.com.
Specifications
Go to the Products page of the Epiphan website for more information about DV12PCIe Duo.
Warranty
All Epiphan Systems products are provided with a 100% return to depot warranty for one year from the date of purchase.
Technical Support
Table of Contents
Terms and Conditions
This document, the Epiphan web site, and the information contained therein, including but not limited to the text and images as well as Epiphan Systems Inc's trademarks, trade names and logos are the property of Epiphan and its affiliates and licensors, and are protected from unauthorized copying and dissemination by Canadian copyright law, United States copyright law, trademark law, international conventions and other intellectual property laws.
Epiphan, Epiphan Systems, Epiphan Systems Inc., and Epiphan logos are trademarks or registered trademarks of Epiphan Systems Inc., in certain countries. All Epiphan product names and logos are trademarks or registered trademarks of Epiphan. All other company and product names and logos may be trademarks or registered trademarks of their respective owners in certain countries.
Copyright © 2014 Epiphan Systems Inc. All Rights Reserved.
THE SOFTWARE LICENSE AND LIMITED WARRANTY FOR THE ACCOMPANYING PRODUCT ARE SET FORTH IN THE INFORMATION PACKET OR PRODUCT INSTALLATION SOFTWARE PACKAGE THAT SHIPPED WITH THE PRODUCT AND ARE INCORPORATED HEREIN BY REFERENCE. IF YOU ARE UNABLE TO LOCATE THE SOFTWARE LICENSE OR LIMITED WARRANTY. CONTACT YOUR EPIPHAN REPRESENTATIVE
LIMITED TO, NEGLIGENCE) OR OTHERWISE, EXCEED THE AMOUNTS YOU PAID TO EPIPHAN DURING THE MOST RECENT THREE-MONTH PERIOD IN CONNECTION WITH AMOUNTS WHICH YOU PAID FOR USING THIS PRODUCT.
INFORMATION AND DOCUMENTS, INCLUDING PRODUCT SPECIFICATIONS, PROVIDED IN THIS DOCUMENT OR THE EPIPHAN WEB SITE ARE PROVIDED "AS IS." SPECIFICALLY, BUT WITHOUT LIMITATION, EPIPHAN DOES NOT WARRANT THAT: (i) THE INFORMATION IS CORRECT, ACCURATE, RELIABLE OR COMPLETE; (ii) THE FUNCTIONS CONTAINED ON THE EPIPHAN WEB SITE WILL BE UNINTERRUPTED OR ERROR-FREE; (iii) DEFECTS WILL BE CORRECTED, OR (iv) THIS WEB SITE OR THE SERVER(S) THAT MAKES IT AVAILABLE ARE FREE OF VIRUSES OR OTHER HARMFUL COMPONENTS. EPIPHAN SPECIFICALLY DISCLAIMS ALL REPRESENTATIONS, WARRANTIES AND CONDITIONS, EITHER EXPRESS, IMPLIED, STATUTORY, BY USAGE OF TRADE OR OTHERWISE INCLUDING BUT NOT LIMITED TO ANY IMPLIED WARRANTIES OF MERCHANTABILITY, NON-INFRINGEMENT, TITLE, SATISFACTORY QUALITY OR FITNESS FOR A PARTICULAR PURPOSE.
For additional terms and conditions, please refer to additional seconds in this document.
1 Table of Contents
1 Table of Contents ....1
1. DVI2PCIe Duo Introducon....4
1.1 What's in the box 4
2 Physical Aributes 6
2.1 System Hardware Features 6
2.2 Cables, Connectors and Adapters 8
2.2.1 VGA to DVI Cable 8
2.2.2 DVI to DVI Cable 9
2.2.3 SDI to SDI Cable 9
2.2.4 HDMI to DVI Adapter 9
2.2.5 DisplayPort Cable 10
2.2.6 Mini DisplayPort Cable.... 10
2.2.7 Thunderbolt Port Cable.... 11
3 System Requirements....11
4 Installing DVI2PCIe Duo 12
4.1.1 To install a DVI2PCIe Duo Frame Grabber: 12
5 Installaon Steps for the Windows Video Capture Workstaon......13
5.1 Install the Windows Drivers and Epiphan Capture Tool.... 14
5.2 Upgrading to the Latest Windows Software Version .... 18 Finding Soware Updates .... 1
5.2.1 18
5.2.2 Firmware Upgrade 18
5.3 Troubleshoong a Windows Installaon 21
6 Mac OS X Video Capture Workstaon Installaon....22
6.1 To Install the Mac Drivers and Epiphan Capture Tool....22
6.2 To Start the Mac OS Capture Applicaon.... 23
6.3 Upgrading to the Latest Mac OS X Software Version....23
6.4 Finding Soware Updates 23
7 Linux Video Capture Workstaon Soware....24
7.1 The Epiphan USB Device Driver 24
7.2 Video4Linux 25
7.3 The Epiphan Capture API....25
7.4 V4L Custom Video Capture Applicaons....25
8 Connecng DVI2PCIe Duo to a Video Source 26
9 Windows Video Capture Applicaon 26
9.1 Start the Windows Video Capture Applicaon 27
9.2 Pausing, Copying, Saving, and Prinng Images 28
9.2.1 To pause and resume image capture: 28
9.2.2 To copy a snapshot of the current image: 29
9.2.3 To save a snapshot of the current image as an image le:.... 29
9.2.4 To print a snapshot of the current image: 29
9.2.5 To invert or reverse the colors of the image: 30
9.3 Recording Captured Images 30
9.3.1 To record captured images as a series of image les 30
9.3.2 To record captured images as a video le: 31
9.4 Menus....32
9.4.1 File Menu 32
9.4.2 Edit Menu.... 33
9.4.3 View Menu 34
9.4.4 Capture Menu 34
9.4.5 Congure Device 36
9.4.6 Tools Menu 45
9.4.7 Help Menu 46
9.5 Toolbar 47
9.6 Status Bar 48
9.7 Capture, Recording, and Display Opons....48
9.7.1 Conguring Recording Opons 49
9.7.2 Conguring Display Opons....53
9.7.3 Conguring Capture Opons 56
9.7.4 Seng On-Screen Text Parameters 58
9.7.5 Congure Startup.... 59
9.7.6 Sharing 60
10 Conguring DVI2PCIe Duo from the Windows Control Panel....61
11 Mac OS X Video Capture Applicaon 62
11.1 Starng the Mac OS X Video Capture Applicaon 62
11.2 Menus....64
11.2.1 File Menu....64
11.2.2 Edit Menu 65
11.2.3 View Menu....65
11.2.4 Tools Menu 65
11.2.5 Window Menu 66
11.2.6 Help Menu 66
11.3 Toolbar 66
11.3.1 Save 67
11.3.2 Copy 67
11.3.3 Print 67
11.3.4 Record....67
11.3.5 Adjust....67
11.3.6 Info....67
11.3.7 Devices....68
12 Seng Apple QuickTime Opons for Recording Videos 68
12.1 To add or remove a network device 68
13 Web Broadcastng 71
13.1 To set the display format for web streaming 72
13.2 To start a web streaming session 72
13.3 Viewing a web broadcasting session....73
13.4 Changing web streaming compression and performance....74
13.5 Troubleshoong web streaming performance 74
14 Advanced Topics....75
14.1 EDID....75
14.1.1 About EDID 75
14.1.2 Changing the EDID on your Frame Grabber 76
14.1.3 An EDID example 77
14.2 Windows command line opons....77
14.2.1 Creang a Windows Shortcut that Uses Command Line Opons ... 78
15 Table of Figures 79
16 Soware and Documentaon License 81
1. DVI2PCIe Duo Introduction
DVI2PCIe Duo™ is Epiphan's newest internal frame grabber with a DVI-I dual link and an SDI input. It is installed in a video capture workstation's PCI Express (PCIe) slot and transmits captured data to the video capture workstation over the PCIe bus.
DVI2PCIe Duo captures video from any dual or single link DVI, unencrypted HDMI, VGA, or 3G-SDI, HD-SDI and SD-SDI source. An optional A/V kit can be installed to capture S-Video/composite, analog audio and balanced or unbalanced TRS audio. DVI2PCIe Duo captures full HD at 60 frames per second and captures and streams audio and HD video sources with resolutions up to 2048×2048 when connected to a DVI-dual link connector. The DVI2PCIe Duo capture card driver is fully compatible with DirectShow in Windows, Video4Linux in Linux, and QuickTime in Mac OS X, and can be used with third party software.
In addition to capturing video from SDI, DVI/HDMI/VGA and S-Video/composite video sources, DVI2PCIe Duo supports DisplayPort, Mini DisplayPort, and Thunderbolt sources using a converter cable, sold separately.
DVI2PCIe Duo Introduction
- One DVI-VGA cable
- One HDMI to DVI adapter
- One Low-profile bracket
Figure 1: What's in the box?

natural_image
Diagram showing hardware components including I/O connectors, I/O ports, and a blue PCI card (no text or labels)2 Physical Attributes
2.1 System Hardware Features
The Epiphan DVI2PCIe Duo frame grabber is a PCIe x4 card that includes a DVI-I type connector, SDI connector and three activity LEDs. The DVI2PCIe card can be installed in a 4x, 8x or 16x PCIe slot on the motherboard of the video capture workstation.
Note: To maintain high performance levels, the DVI2PCIe Duo card requires a minimum of PCIe x4. Consult your motherboard manufacturer's support to ensure your motherboard supports PCIe x4.
Note: PCIe card performance is determined by the length of the card and slot, (x1, x4, x8 or x16) and the generation of the PCIe card and the motherboard slot. The DVI2PCIe Duo card is a generation 2 card and is fully backward compatible with first generation slots; the card will perform at first generation speed. DVI2PCIe Duo card is compatible with generation 3 slots; the card will perform at generation 2 speed.
Physical Attributes
Figure 4 shows an example of different PCIe slots on a single PC motherboard. DVI2PCIe can be installed on any of the following PCIe slots.
Figure 3: PCIe slots (from top to bottom: 4x, 16x, 1x and 16x), compared to a traditional 32-bit PCI slot (bottom)

natural_image
Close-up of a computer motherboard with yellow CPU slots and visible circuitry (no text or symbols)Physical Attributes
| lights up. After about another 20 seconds the blue LED turns off, leaving the green LED on indicating that the device has started up and can start capturing images. During operation the blue LED blinks during the signal test operation and when the system tunes the parameters. | |
| DVI In | Connect a DVI, VGA, or HDMI source to the DVI2PCIe Duo card. See the DVI2PCIe Duo Specifications on the Epiphan web site for information about the video inputs supported by the DVI2PCIe Duo card. |
2.2 Cables, Connectors and Adapters
The DVI2PCIe Duo can be connected to a number of different types of equipment using a variety of cables, and adapters. This section describes a subset of connectors, cables and adapters that are known to be compatible with the DVI2PCIe Duo.
2.2.2 DVI to DVI Cable
Connects a DVI source to the DVI2PCIe Duo DVI port. This cable is included with the DVI2PCIe Duo.
Figure 5: DVI to DVI Cable

natural_image
Coiled black and gold DVI cable with gold connectors (no text or symbols visible)2.2.3 SDI to SDI Cable
Connects an SDI (3G, HD or SD) source to the DVI2PCIe Duo SDI port. This cable is included for DVI2PCIe Duo
Connects an HDMI source to the DVI2PCIe Duo DVI port. This adapter is included with the DVI2PCIe Duo.
Figure 7: HDMI to DVI Adapter

natural_image
Close-up of a black DVI D-sub connector with gold connectors (no text or symbols visible)2.2.5 DisplayPort Cable
Connects a source's DisplayPort to the DVI2PCIe Duo DVI port (cable sold separately).
Figure 8: Display Port Cable
System Requirements

natural_image
Close-up of a white USB cable with 16-pin connector (no text or symbols visible)2.2.7 Thunderbolt Port Cable
Connects a source's Thunderbolt port to the DVI2PCIe Duo DVI port (cable sold separately).
Figure 10: Thunderbolt Port Cable

Installing DVI2 PCIe Duo
| RAM memory | 2 GB RAM (32-bit and 64-bit) |
| Available hard disk space | 16 GB available hard disk space (32-bit) or 20 GB (64-bit) |
| Video capture workstation OS | Windows XP SP2 or newer;Mac OS X 10.8 (Mountain Lion) or newer;A list of precompiled drivers is available on the Software Download page. |
To download the latest versions of the DVI2PCIe Duo drivers and Epiphan Capture Tool, browse to http://www.epiphan.com/products/dvi2pcie-duo/downloads/.
4 Installing DVI2PCIe Duo
This section describes how to install the DVI2PCIe Duo and to connect a
DVI/VGA/HDMI or 3G-SDI/HD-SDI/SD-SDI source to it.
Note: It is recommended that you download and install the latest drivers for the video
- Shut down and power off the video capture workstation.
- Disconnect all cables from the video capture workstation.
- Open the system unit to expose the PCIe slots (usually located at the back of the PC).
- Attach the antistatic wrist strap to the metal casing of the PC power supply and to your wrist according to the instructions supplied with the wrist strap.
- Select a PCIe slot and remove the corresponding filler panel from the PC slot opening.
- Holding the DVI2PCIe Duo card by the edges, align the card edge connector with the PCIe slot.
- Slide the card mounting bracket into the small slot at the end of the PCIe opening.
- Applying even pressure at both corners of the card, push the card down until it is firmly seated in the slot.
Caution: Do not use excessive force when installing the card into the PCIe slot. You may damage the card's PCIe connector. If the card does not seat properly when you apply even pressure, remove the card and carefully reinstall it.
Note: Install the drivers and Epiphan Capture Tool after installing the DVI2PCIe duo in a PCIe slot on the Windows video capture workstation.
5.1 Install the Windows Drivers and Epiphan Capture Tool
The drivers and application software includes the Epiphan device drivers and the Epiphan Capture Tool.
- Find the latest Windows drivers and Epiphan Capture software. Browse to http://www.epiphan.com/products/dvi2pcie-duo/downloads/.
- Scroll to the Windows section of the download page.
- Download the latest version of the drivers and capture tool that will run on the video capture workstation.
Make sure you note the download destination folder. - Unzip the downloaded file.
- Right-click on the .zip file and choose Extract All.
7. Click Next. The License Agreement window opens.
Figure 12: License Agreement window

- Select I Agree.
- Click Next; the Select Installation Folder window opens.
Figure 13: Select Installation Folder
Installaon Steps for the Windows Video Capture Workstaon
- Click Next; a Confirm Installation window opens.
- Click Next; a progress bar appears. When the installation is complete, the progress bar closes and a Windows Security window opens.
Figure 14: Windows Security window
- Click Install. A Grabbers setup window opens. Indicating board detection is in progress.
Figure 15: Grabbers setup window
- Perform one of the following:
a. If the setup operation detects a mismatch between the driver software and the FPGA image; go to Firmware Upgrade.
Figure 16: Grabbers upgrade request window

b. If the installation is successful and no mismatches are detected, the Installation Complete window opens.
Figure 17: Installation Complete window

5.2 Upgrading to the Latest Windows Software Version
From time to time Epiphan makes new versions of all Epiphan Frame Grabber software available from the Epiphan web site. To confirm that you have the latest Epiphan Capture Tool software, select the Check for Updates command from the Help menu.
Note: Check for Updates will only recommend an update if Epiphan recommends that you install a new version. This will happen if the latest version contains significant bug fixes or enhancements. If a new Epiphan Capture Tool software version only contains minor changes, Check for Updates may not recommend that you install a new version.
In most cases you can upgrade the Epiphan software on your Windows video capture workstation by following normal procedures for your operating system to download the latest version and install it without uninstalling the previous version. If you have problems upgrading Windows software, see the detailed driver update instructions and install/uninstall instructions available from the Windows section of the Download page.
When you upgrade your driver, you may be prompted to upgrade your FPGA image. Follow the steps below when DVI2PCIe Duo detects a mismatch between the driver software and the FPGA image.
To update firmware:
- Open the Epiphan Capture Tool from the video capture workstation; the following window opens indicating a mismatch was detected.
Figure 18: Firmware version mismatch detected

Figure 19: Grabbers upgrade request
- Perform one of the following:
a. Click None when you do not want to upgrade the firmware for any of the frame grabbers detected on the network. The window closes; minimal firmware saved from on-board storage is applied.
b. Click All to upgrade the firmware for all frame grabbers detected on the network; go to the next step.
- A Grabbers upgrade status window opens and provides a progress of the upgrade.
Figure 21: Grabbers upgrade status
- When the upgrade is complete, a dialog box appears requesting a soft reboot.
Figure 22: Important action required

- Perform one of the following:
a. Click Reboot; the reboot cycle begins. The Frame Grabber software is updated.
b. Click Cancel; the video capture workstation loads minimal firmware saved from on-board storage.
6 Mac OS X Video Capture Workstation Installation
Follow the step-by-step procedures in this section if you are going to use a Mac as a video capture workstation to view and record images captured by the frame grabber.
6.1 To Install the Mac Drivers and Epiphan Capture Tool
A single download from the Epiphan web site includes the capture application command line capture application (v2u), the DVI2PCIe Duo system preferences and the QuickTime digitizer (vdig).
- Find the latest Mac drivers and capture tool software. Browse to http://www.epiphan.com/products/dvi2pcie-duo/downloads/ and scroll down to the Mac section of the download page
6.2 To Start the Mac OS Capture Application
On the video capture workstation, run the capture tool, from the Applications folder, select DVI2USB.app. The capture application starts up. If the DVI2PCIe Duo frame grabber is connected and powered on, the capture application should automatically find the frame grabber and begin displaying captured images. If the frame grabber is operating but not capturing images the device name and serial number should appear in the title bar and the capture application displays No signal detected.
6.3 Upgrading to the Latest Mac OS X Software Version
From time to time Epiphan releases new versions of all Epiphan frame grabber software available from the Epiphan web site. In most cases you can upgrade the Epiphan software on your Mac OS X video capture workstation by using normal procedures to download the latest version and install it without uninstalling the previous version.
Note: Some versions of the DVI2PCIe Duo user interface do not install a shortcut on the Mac OS X desktop. You can drag the Epiphan icon from the Applications folder to your desktop or add it to the Dock after installing a new version of the DVI2PCIe Duo user interface. You may also need to delete older versions of the Epiphan icon.
6.4 Finding Software Updates
To find the latest versions of all Epiphan software and drivers for Mac OS X, go to http://www.epiphan.com/products/frame-grabbers/dvi2pcie-duo/downloads/.
On this download page you will find the most recent release of the Epiphan device driver, QuickTime component and DVI2PCIeDuo application compatible with Mac OS X.
7 Linux Video Capture Workstation Software
Epiphan provides the Epiphan USB device driver and the Epiphan capture API for Linux. Epiphan does not provide a video capture tool for Linux. However, the USB device driver is compatible with Video4Linux so you can use Video4Linux compatible applications to receive and process captured images. You can also use the Epiphan Linux SDK to write your own custom video capture application that receives captured images from the Epiphan capture API. The following software components operate on a video capture workstation running Linux:
The Epiphan USB device driver
Video4Linux
The Epiphan capture API
V4L custom video capture applications
7.1 The Epiphan USB Device Driver
The Linux Epiphan USB device driver receives images from an Epiphan DVI2PCIe Duo and delivers the images to the Epiphan capture API and to Video4Linux. Before delivering the images the Epiphan USB device driver also performs image adjustment to improve the quality of the image. Image adjustments include setting the sampling phase, PLL adjustments, and horizontal shift. The USB device driver can also change the color depth of the captured image before sending the image to the video API. For example, if the DVI2PCIe Duo is capturing the frames at a color depth that is different than that required by the video capture application, the USB device driver converts the images to the required color depth.
The Epiphan USB device driver may not be available for your version of Linux. Epiphan does not provide source code for the Epiphan USB device driver. But you can contact Epiphan if you need an Epiphan USB device driver compiled for a specific Linux kernel version or kernel setting. Using the Epiphan software development kit (SDK) you can also create custom USB device drivers that incorporate the functions you need.
7.2 Video4Linux
Video4Linux (V4L) is a Linux video capture API. The Epiphan USB device driver can send captured images directly to Video4Linux. This means that any Video4Linux-compatible application can receive captured images. You can use a Video4Linux-compatible application to record a series of captured images as a video in the video format supported by the Video4Linux application. You can also create your own custom Video4Linux-compatible video capture application to record captured images from Video4Linux.
7.3 The Epiphan Capture API
The Epiphan Capture API receives captured images from the Epiphan USB device driver. It is optimized for processing Epiphan DVI2PCIe Duo captured images. The Epiphan Capture API analyzes individual images, performs on-device cropping, and handles video mode changes. It is an alternative to using Video4Linux to capture images on Linux video capture workstations. You can use the Epiphan software development kit (SDK) to create your own custom video capture application to record captured images from the Epiphan Capture API.
7.4 V4L Custom Video Capture Applications
Epiphan does not provide a video capture application for Linux. However, you can use Video4Linux-compatible applications to perform many video capture operations such as recording images or video, copying, printing and saving images, or broadcasting images across the Internet. You can also use the Epiphan Linux SDK to create your own custom video capture application. The SDK along with some example applications is available from the downloads page of the Epiphan Web Site. To download the latest version, browse to http://www.epiphan.com/products and locate the downloads page for your product.
8 Connecting DVI2PCIe Duo to a Video Source
This section describes how to connect a DVI/VGA/HDMI or SDI (3G, HD or SD) source to the DVI2PCIe Duo. Complete the following before making the connections:
• Install the frame grabber and Epiphan Capture Tool on the video capture workstation; and
• Power up the video capture workstation.
- Connect the DVI2PCIe Duo to the video source using the provided cables. If necessary, you can use a high-quality VGA, DVI or SDI splitter to split the VGA, DVI and SDI signal between an external monitor and the frame grabber in order to monitor the output signal quality.
- Connect one of the following to the frame grabber's DVI In port:
a. connect a DVI source using a standard DVI cable.
b. connect a VGA source using a VGA to DVI cable.
c. connect an HDMI source using an HDMI to DVI adapter.
- Connect an SDI source directly to the SDI In port.
9.1 Start the Windows Video Capture Application
- From the video capture workstation, click Start > Epiphan Capture Tool; a User Account Control dialog box opens.
- Click Yes. The application starts up and searches for the DVI2PCIe Duo frame grabber connected to your PC. If the application successfully connects to and synchronizes with the DVI2PCIe Duo device, it begins displaying captured images
Note: When 2 sources are connected to the DVI2PCIe Duo, images from the first signal detected are displayed.
- When two input sources are connected to the DVI In and SDI In ports, perform one of the following the view the images:
a. To simultaneously view both sources, start up another capture tool, Start > Epiphan Capture Tool.
b. To view the second source from the same capture tool window, select, Capture > Select Device; click the frame grabber to display The following figure displays the available options when an optional A/V kit is installed.
Figure 23: Select Device window with an optional A/V kit is installed
Windows Video Capture Applicaon
- When a video signal source is not connected, or the DVI2PCIe Duo device is not capturing images, the application displays No signal detected.
As the Epiphan Capture Tool starts, the following messages may appear:
☐ Capture device not found - as the application attempts to connect with DVI2PCIe Duo device.
☐ Detecting video mode - as the application connects to a device and then determines the video mode of the device.
Tuning capture parameters - as the application synchronizes and tunes capture settings and image adjustments.
☐ No signal detected - if the application connects to the DVI2PCIe Duo that is not connected to an active video source.
9.2 Pausing, Copying, Saving, and Printing Images
Once the application displays images captured by the frame grabber, you can pause, copy, save, and print the current image.
9.2.1 To pause and resume image capture:
- Select Pause Capture from the Capture menu or from the toolbar click
- While image capture is paused, the application stops receiving new images from the device. Pause also pauses video recording and image recording. While paused, you can save, print, and copy the captured image.
- To resume image capture select Resume Capture from the Capture menu or from the toolbar click again. You can use the following procedure to copy the image currently displayed to the video capture workstation clipboard.
9.2.2 To copy a snapshot of the current image:
- Select Copy from the Edit menu or select from the toolbar. You can also use the key combination CTRL+C. The current image is copied to the clipboard.
- Paste the image into a document or other application as a bitmap image. The image is pasted as an independent bitmap image.
9.2.3 To save a snapshot of the current image as an image ile:
Use the following procedure to save the current image as a .bmp, .png, or .jpg file on the video capture workstation. You can optionally pause the image capture before saving an image.
- Select Save from the File menu or from the toolbar select or use the key combination CTRL+S.
The status bar displays the location and name of the saved file.
The first time you save an image, the Save As dialog appears and you can specify the file name, file type, and location of the saved image file. - When you select Save again, the application saves the new image with the same file name and location, overwriting the previously saved file. Select Save As to save the image with a different file name, file type, or location or use the key combination CTRL+Shift+S.
- You can open the saved image file with most bitmap image editing applications.
9.2.4 To print a snapshot of the current image:
Use the following procedure to print the current image on any printer connected to the video capture workstation. You can optionally pause the image capture before printing an image.
- Select Print from the File menu, or select → from the toolbar or use the key combination CTRL+P. The current image is sent to the default printer set in your computer.
- Select Print Setup from the file menu or use the key combination CTRL+Shift+P to select a different printer and set printer options.
9.2.5 To invert or reverse the colors of the image:
Use the following procedure to invert colors for printing. By reversing or inverting the colors of an image, the colors are complementary of the original value. After performing color inversion, black becomes white, yellow becomes blue, and red becomes aqua.
- Select Options from the Tools menu.
- Select the Display tab.
- Enable the invert colors for printing checkbox.
- Click OK.
Windows Video Capture Application
the Recording tab (Tools – Options). The Status bar displays the name and location of the last saved file. Pause recording by using the key combination
CTRL+U, by selecting Pause from the Capture menu or 11 from the toolbar.
- Stop recording by selecting Stop Recording from the Capture menu or from the toolbar. When you stop recording images, the status bar displays the number of image files saved.
9.3.2 To record captured images as a video file:
Before recording captured images as a video file, you must configure the recording options by selecting Options from the Tools menu, then selecting the Recording tab, and select Record as Video. Refer to Configuring Recording Options.
- Select Start Recording from the Capture menu or from the toolbar select

- overwrites the original video file and continues recording.
Pause a recording by selecting Pause Capture from the Capture menu or from the toolbar.
Stop recording by selecting Stop Recording from the Capture menu or from the toolbar.
When you stop recording, the Status bar displays the name and location of the saved video file, the elapsed time the video file was recording, and the number of frames or images that were recorded. For example: Wrote c:\temp\example.avi (85 sec, 464 frames).
9.4 Menus
This section describes the commands available from the Windows-based DVI2PCIe Duo user interface menus.
Note: The frame grabber and input source type determine the settings that are
Windows Video Capture Application
| location and format. After saving the first file, every time you selectSave, the video capture software saves a snapshot using the same file name in the same location replacing the previously saved file. When you select Save, the status bar shows the location and name of the saved file. | |
| Save As | Save a snapshot of the current image to a file on the video capture workstation. Using Save As you can enter a file name and select a file location and format.Save As resets the file name, location, and file format used by the Save command and the Save snapshot toolbar button. When you select Save As the status bar displays the location and name of the saved file. |
| Print Setup | Configure printer settings used when you select the Print command or the Print snapshot toolbar button. You can also configure the DVI2PCIe Duo user interface to invert colors for printing. By reversing or inverting the colors of an image, the colors are made complementary of the original value. After performing picture color inversion, black becomes white, yellow becomes blue, red becomes aqua. From the Tools menu select Options, then select the Display tab and select Invert colors for printing. |
| Print a snapshot of the current image using the configured printer. | |
| Exit | Close the DVI2PCIe Duo user interface. |
9.4.2 Edit Menu
From the Edit menu, copy a snapshot of the current image, or use the key combination CTRL+C.
| Copy | Copy a snapshot of the current image to the video capture workstation clipboard and paste the image into a document or other application as a bitmap image. |
9.4.3 View Menu
Use the options on the View menu to control the layout of the DVI2PCIe Duo user interface window.
| Toolbar | Change the size of the toolbar icons or hide the toolbar. You can select small, large, or huge icons and hide the toolbar. When the toolbar is hidden, select an icon size to display the toolbar. |
| Status Bar | Hide or unhide the status bar. |
| Full Screen | Enable full screen mode, Ctrl+F. Click the Esc button to go back to normal screen mode. |
| Image Only | Change the DVI2PCIe Duo user interface to operate in the Image Only mode. In Image Only mode the DVI2PCIe Duo user interface displays the captured image only. The window borders, toolbar, status bar and menu bar are not displayed. Scroll bars are displayed if required.The Image only mode can be useful for applications such as integrating the DVI2PCIe Duo user interface into a custom system. You can still use all of the shortcut keys to save and print images, start and stop recordings, and to exit from the Image only mode. Click the Esc button to go back to normal screen mode.Press Alt+F4 to exit from the DVI2PCIe Duo user interface.You can also use the --borderless command line option to start the DVI2PCIe Duo user interface in image only mode. Refer to Windows command line options. |
9.4.4 Capture Menu
Use the commands on the Capture menu to start, stop or pause capturing and recording images. From the Capture menu you can select from which device the DVI2PCIe Duo user interface receives captured images when you have more than one source connected to your DVI2PCIe Duo or other Epiphan frame grabbers
Windows Video Capture Applicaon
connected to the network. You can also view image adjustment settings and VGA mode settings for the selected device.
The record option on the Capture menu allows you to record the current image as a video or as a series of consecutive image files. Select Options from the Tools menu and use the settings on the Recording tab to configure what the DVI2PCIe Duo user interface records.
| Start recording | Start recording the current image to a video file or a series of image files. |
| Pause capture | Pause or resume image capturing. If you select pause, the DVI2PCIe Duo user interface stops displaying newly captured images and the image captured when you selected Pause is displayed. Pause also pauses the recording of video and the saving of image files. Select pause again to resume displaying captured images and to resume recording. |
| Select device | Choose Select Device or use the key combination Ctrl+D to choose from which device or input the DVI2PCIe Duo user interface receives captured images. The command searches and lists available frame grabber devices and inputs. The list displays the serial number, device type, or input type, captured image resolution and frequency or status and location of each device. You can also use this command to select which device to configure with the Configure Device command. |
| Connect network device | Connect a device recognized on the network. |
| Disconnect network device | Disconnect current device. |
| Recent network devices | Displays a list of recently viewed devices. |
| Enable/Disable | When enabled, captured audio is played on the video capture |
Windows Video Capture Application
| audio capture | workstation and can be recorded. The toolbar icon indicates enabled. When disabled, captured audio is not played on the video capture workstation and is not recorded. The toolbar icon indicates disabled. |
| Audio input device | From the dropdown menu select the audio source device. For example when you capture audio from a built-in microphone, choose microphone. When you capture video and embedded audio from an SDI source, select SDI In or Default Windows device, if you set SDI In as the Windows default.When you capture video and embedded audio from an HDMI source, select HDMI In or Default Windows device, if you set HDMI In as the Windows default. |
| Play captured audio | When enabled, captured audio is played on the video capture workstation and is recorded. When disabled, audio is not played on the video capture workstation, however it is recorded. Use this setting to choose whether or not to play the audio while capturing.Enable audio capture must be enabled for the Play captured audio settings to take effect. |
| Configure device | You can view image adjustments for the selected device. You can configure image adjustments from the Web Admin Interface or from the Network Discovery Utility.You can also select and configure VGA modes for the selected device.See the Configure Device section for more information regarding this function. |
9.4.5 Configure Device
This window allows you to perform various image adjustments and select a required VGA mode. The following section illustrates and describes what can be configured using each tab.
Adjustments tab:
Figure 24: Adjustments tab


Windows Video Capture Applicaon
| VGA modes to be displayed by the capture tool window.The Epiphan USB device driver may not be able todetermine whether the video source is sending a widevideo mode signal. Select this option when your videosource uses a wide video mode to ensure the EpiphanUSB device driver selects a wide video mode.This option is available when a VGA source isconnected to the input port. | |
| YCrCb capture | Select this checkbox when you need to capture analogcomponent video with YCrCb encoding. |
| Swap interlaced fields | Select this checkbox to swap odd and even fields of thevideo frame. Use this feature when fields are reversedfrom the state in which they were originally captured. |
DirectShow tab:
Figure 25: DirectShow tab
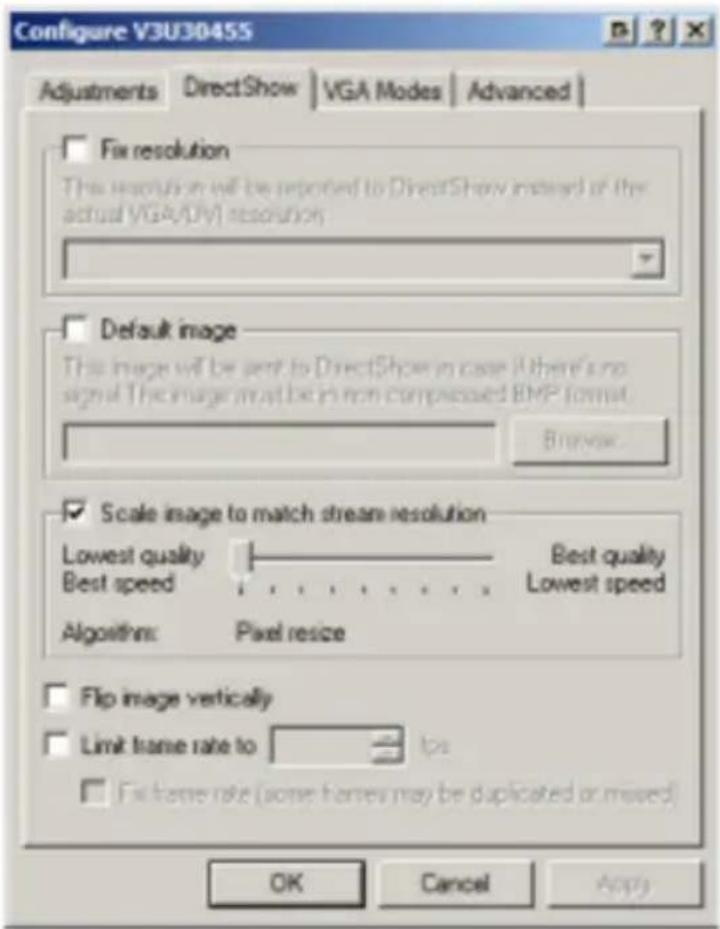
| Fix resolution | Resolution that is sent to DirectShow |
| Default image | Image sent to DirectShow if there is no signal. Click the checkbox to browse to a .bmp image saved on the video capture workstation. |
| Scale image to match stream resolution | Use the slider to scale the image |
| Flip image vertically | Select the checkbox to flip the image |
| Limit frame rate to | Specify the frame rate limit |
| Fix frame rate | Select the checkbox to fix frame rate |
VGA Modes tab
VGA Modes tab is applicable when a source is connected to the DVI input port.
Figure 26: VGA Modes tab

To add a standard VGA mode
- Click on the Capture menu option from the toolbar; a dropdown menu opens.
- Select Configure Device from the dropdown menu.
- Click on the VGA Modes tab.
- Select the standard VGA modes that are used during image capture. The Standard VGA modes checkbox allows you to select all standard modes. To apply several modes select the checkboxes near the mode resolution value.
The following parameters are displayed for each mode:
- Refresh Rate
- Interlaced
• Horizontal active area
• Horizontal front porch - Horizontal sync time (the time the beams needs to get from the far right edge back to the far left)
• Horizontal back porch (left border) -
Hsync polarity
• Vertical active area -
Enter number of horizontal pixels
- Enter number of vertical lines.
- Enter refresh rate.
- Select the Standard VESA timings checkbox to use these timings.
- Select the Interlace checkbox to apply the interlacing technique.
- Select the Reduced blanking checkbox if necessary. Reducing the DVI pixel clock makes it much easier to transmit the digital image through the cable.
- Select the Show horrible technical details checkbox to see more details about the custom mode.
To edit a custom VGA mode
- Select a mode from the Custom VGA modes list.
- Click on the blue pencil icon in the upper right corner of the tab. The Custom VGA Mode window opens.
- Edit the mode.
- Click OK; the Custom VGA Mode window closes.
To delete a custom VGA mode
- Select a mode from the Custom VGA modes list.
- Click on the red minus sign in the upper right corner of the tab. The selected mode is removed from the list.
Click OK; the Configure VGA Mode window closes.
Advanced tab:
Figure 28: Advanced tab

Windows Video Capture Application
| adjustment | Note: This menu option is not displayed when an SDI input is chosen from the Select Device menu. |
9.4.6 Tools Menu
Use the Tools menu to customize basic DVI2PCIe Duo user interface operating settings.
| Web Broadcasting | Use this command to broadcast the captured signal, refer to Chapter 5, Web Broadcasting, for more details. |
| Upload EDID to device | Use this command to upload an extended display identification data (EDID) file to your device. Refer to the section EDID.Extended display identification data (EDID) is a data structure provided by a digital display to describe its capabilities to a video source. It is what enables a modern personal computer to know what type of monitors are |
Windows Video Capture Application
| support. | |
| Upgrade EDIDs for all Devices | Select the option to upgrade the EDID for all frame grabber devicesNote: This menu option is not available when an SDI input is chosen from the Select Device menu. |
| Upgrade Grabber Firmware | Select this option to download the latest firmware version.When DVI2PCIe Duo detects that a firmware upgrade is required, a message appears on the capture screen notifying the user to upgrade their firmware.Select Upgrade Grabber Firmware; the firmware upgrade request window opens indicating the number of grabbers that require an upgrade. If there is no available upgrade, the menu option is greyed out. |
| Options | Configure video recording and display settings. See the section Capture, Recording, and Display Options for more information. |
9.5 Toolbar
The toolbar can be used to save, print, or copy the current captured image; to start, pause, and stop the recording of the currently captured image. Use the Toolbar command on the View menu to change the size of the toolbar icons or to hide the toolbar. You can select small, large, or huge icons. If the toolbar is hidden, you can select an icon size to unhide the toolbar.
| [XWOK] | Save a snapshot of the current image captured by the DVI2PCIe Duo user interface to a file on the video capture workstation. Select a location for the file and select a file format. Save the snapshot as a Windows bitmap (*.bmp), portable network graphics (*.png), or JPEG (*.jpg) file. |
 | Print a snapshot of the current image to the configured printer. |
| [TTWS] | Copy a snapshot of the current image to the video capture workstation's clipboard. Paste this image into a document or another application as a bitmap image. |
| [20TS] | Start or stop recording the images that are captured by the DVI2PCIe Duo |
9.6 Status Bar
The status bar displays information about the DVI2PCIe Duo user interface. You can choose which information is displayed on the status bar.
To choose which information is displayed on the status bar:
- From the Capture tool menu, choose Tools; a drop down menu opens.
- Select Options from the dropdown menu.
- Click the Display tab.
-
From the Optional status bar indicators panel, check which options to display in the status bar. Refer to the options listed below:
-
The location and file name for the image or video files saved during recording.
- Recording status. "RECORDING" indicates the DVI2PCIe Duo is recording captured images.
• The data rate is the rate (in MB/s, KB/s, Mbps, and Kbps) of data transfer to
Note: The functionalities located on the KVM tab do not apply to DVI2PCIe Duo.
9.7.1 Configuring Recording Options
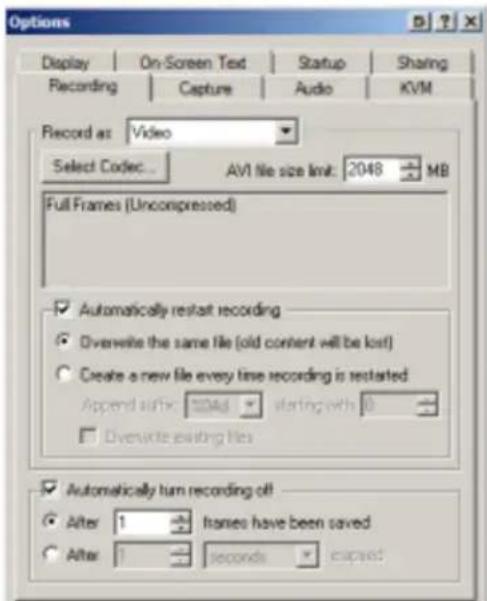
To control how the DVI2PCIe Duo user interface records captured images, select Options from the Tools menu and then select the Recording tab. You can record captured images as a series of consecutively saved graphic files or as a video file. How the DVI2PCIe Duo user interface records images when you start recording from the Toolbar or the capture menu depends on how you set the recording options.
From this tab select the codec used to encode the captured video stream. Codecs are not included in the software package provided by Epiphan. You must download them before using the frame grabber. For example, you can download an x264 codec pack - a free library for encoding H.264/MPEG-4 AVC video streams.
If your computer is running under the 32-bit OS, download 32-bit codecs. For the 64-bit OS, download 64-bit codecs.
Figure 29: Recording tab with Video selected
Windows Video Capture Application
| for the Record as value. | |
| AVI file size limit | Specify the size limit of the .AVI file to where data is recorded.This option is available when Video is selected for the Record as value. |
| Automatically restart recording | Select the checkbox to restart recording automatically. This checkbox enables the five fields below.This option is available when Video is selected for the Record as value |
| Overwrite the same file (old content will be lost) | After the video file size limit is reached, delete the original file and start recording a new video file with the same name. If you select this option the original saved video data is lost.This option is available when Video is selected for the Record as value. |
| Create a new file every time recording is restarted | After the video file size limit is reached, start a new video file. Use the append suffix setting to |
Windows Video Capture Application
file name appended with a sequential numeric suffix. Use the append suffix options to specify the format of this suffix.
Each suffix starts with a % sign and can include the following characters:
02, 04, 06, or 08 indicates the number of digits to use in numbering the suffix. You can specify 2, 4, 6, or 8 digits.
"d" means decimal numbers are used in the suffix.
“X” means hexadecimal numbers are used in the suffix.
The suffix %02d means the saved file names end with two-digit decimal numbers, for example: 01, 02, 03, ..., 10, 11 and so on. The suffix %04X means the saved file names end with 4-digit hexadecimal numbers, for example: 0001, 0002,
Windows Video Capture Application
| If you do not select overwrite existing files, the file number in the suffix of the file name is incremented until a file can be saved without overwriting an already saved file. | |
| Ignore write failures | This option is available when you select Image for the Record as value. Select this feature to ignore failures.This option is available when Image is selected for the Record as value. |
| Save all frames | Click on the radio button to save each frame as an image.This option is available when Image is selected for the Record as value. |
| Skip | Specify a number of frames to skip between saves. |
| Wait | Specify a length of time to skip between saved |
| Automatically turn recording off | Specify under which conditions recording turns |
The following display options are available:
| Display format | Specify in which format video or image are displayed |
| Image scaling | Specify whether the image should be scaled and how |
| Image rotation | Specify whether the image should be rotated and how |
| Resize window on resolution change | Select the checkbox to resize window when the image resolution is changed |
| Invert colors for printing | Select the checkbox to change dark colors to light colors and light colors to dark colors |
Windows Video Capture Application
| Flip image vertically | Flip the image at its vertical axis |
| Select the check boxes below to add optional indicators to the status bar... | |
| Frame rate | Displays frame rate |
| Crop rectangle | Displays crop status |
| Audio format | Displays audio format.. |
| Number of captured frames | Displays number of captured frames |
| Data rate (network grabbers only) | The data rate is the rate (in MB/s, KB/s, Mbps, and Kbps) that the DVI2PCIe Duo user interface receives data from the device capturing images. |
9.7.3 Configuring Capture Options
Use this tab to encode the stream.
Figure 31: Capture tab

Windows Video Capture Application
| the frame rate. | |
| Automatically reconnect network grabbers | Select this checkbox to restore connection with the remote frame grabbers in case the connection has been lost. Otherwise the system connects to the local frame grabber, if one exists or displays a warning “No frame grabbers found”. In this case you need to restore connection manually. |
| Limit frame rate to ... fps | Set the maximum frame rate for the video signal |
9.7.4 Setting On-Screen Text Parameters
Use this tab to timestamp the captured video and add static text.
Figure 32: On-Screen Text tab

Windows Video Capture Application
| Position | Set the location on the screen where the timestamp is displayed |
| Static text | Select this checkbox to set static text parameters |
| Format | Specify the static text format |
| Color | Set the color for the static text |
| Outline | Add an outline to the static text. Use an outline to highlight the text when the text color is similar to the display background color |
| Font | Click the ...button to set the font and the font size |
| Position | Set the location on the screen where the static text is displayed |
9.7.5 Configure Startup
Use this tab to specify actions the application should perform during startup.
Figure 3.3: Startup tab

Windows Video Capture Application
| the current resolution of the screen | |
| Search for network grabber at startup | When enabled the application will search for a network frame grabber on your subnet if it doesn't find local frame gabbers. |
9.7.6 Sharing
Use this tab to change web broadcasting compression. Select Override default compression settings and adjust the Lossless and Lossy settings.
Figure 34: Sharing tab

Configuring DVI2PCIe Duo from the Windows Control Panel
| compression takes some processing power, so it's always best to keep this value low. | |
| Lossy compression | Lossy compression compresses the streamed video or images by reducing image quality. Lossy compression is not as CPU intensive as lossless compression. |
10 Configuring DVI2PCIe Duo from the Windows Control Panel
Your DVI2PCIe Duo can be configured from the Windows Control Panel using the
Eplphan Frame Grabbers icon -
Epighen Frame Grabbers
. Here you can verify the
device's serial number, type and status as well as setup configuration parameters.
Figure 35: Frame Grabber Configuration Window

It is similar to the Tools > Options > Configure command in the Epiphan Capture Tool.
- Edit parameters.
- After editing click OK and select the Use default configuration parameter radio button to activate settings. Then click Close.
To maintain device-specific configuration:
- Select the Maintain device-specific configuration radio button.
- Click the Configure Device... button. It is similar to the Tools > Options > Configure command in the Epiphan Capture Tool.
- Edit parameters.
- After editing click OK and select the Maintain device-specific configuration radio button to activate settings. Then click Close.
11 Mac OS X Video Capture Application
This chapter describes the functions and features of the Epiphan Capture Tool for Mac OS X. You can use the Mac OS X version of the video capture tool to configure your DVI2PCIe Duo and to record video captured by the DVI2PCIe Duo.
Mac OS X Video Capture Application
- Select Open Network Grabber from the File menu.
- Select the arrow next to the Network Address box to open a list of networked devices.
- Select a frame grabber and select connect.
The following messages may appear in the capture tool window.
- Detecting Video Mode as the video capture tool starts up and attempts to connect with the frame grabber.
- Tuning Capture Parameters when the video capture tool locates the frame grabber and begins synchronizing and tuning capture settings and image adjustments
- No Signal Detected when the video capture tool cannot connect to the frame grabber or if the frame grabber is not connected to an active video source.
Figure 36: Capture application window (Mac OS X)

11.2 Menus
This section describes the commands available from the capture tool menus for Mac OS X.
11.2.1 File Menu
Use the File menu commands to save the current image, print the current image, open new capture windows and start a recording. Also included are the commands to connect to other frame grabbers on the network and disconnect any available frame grabber.
| New Capture Window | Opens another capture window. The window opens displaying the same image as the original window. You can open a different device in each capture window.Having a large number of capture windows open simultaneously can eventually slow performance on the video capture workstation. |
| Open Network Grabber | Connect to a DVI2PCIe Duo device on the network. |
| Recent Network Grabbers | Select from the list of recently opened frame grabber devices. |
| Disconnect Network | Disconnect the DVI2PCIe Duo device on the network. |
| Grabber | The device serial number will be shown next to the Disconnect menu item. If you have multiple capture windows open, make sure you select the capture window containing the device you want to disconnect. |
| Record Movie | Record captured video in a file |
| Save Image | Save a snapshot of the current image to a file on the video capture workstation. Select a name and a location for the file and select a file format. You can save the snapshot as a bitmap (*.bmp), portable network graphics (*.png), JPEG (*.jpg) file, or tiff (*.tiff) file. |
| Page Setup | Configure the printer settings used when you select the Print command or the Print toolbar button. |
Mac OS X Video Capture Application
| Print a snapshot of the current image to the configured printer. |
11.2.2 Edit Menu
From the Edit menu you can copy a snapshot of the current image.
| Copy | Copy a snapshot of the current image to the video capture workstation clipboard. |
11.2.3 View Menu
Use the commands on the View menu to control what information is displayed in the DVI2PCIe Duo user interface window.
| Show Device Information | View the information about hardware type, location, serial number, video mode, and frame rate |
| Hide Device Information | Hide information about hardware type, |
Mac OS X Video Capture Application
| your device. Extended display identification data (EDID) is a data structure provided by a digital display to describe its capabilities to a video source. It is what enables a modern personal computer to know what type of monitors are connected to it. EDID is defined by a standard published by the Video Electronics Standards Association (VESA). | |
| Read EDID from Device | Use this command to read an extended display identification data (EDID) file from the device. |
11.2.5 Window Menu
Minimize
Minimize the window
11.3.1 Save
Use this button ( ) to save a copy of the current image. You will be prompted to provide the following information.
| Save As | Enter the file name for saving data |
| Where | Enter the path where the file is saved |
| Format | Select the format for the recorded file |
11.3.2 Copy
Use this button ( ) to copy the snapshot of the image to the video capture workstation's clipboard.
11.3.3 Print

Setting Apple QuickTime Options for Recording Videos
Click this button (

) to display information about the frame grabber, its location,
serial number and image characteristics.
11.3.7 Devices
Click this button ( ) to display all frame grabber devices that are currently available on the network.
12 Setting Apple QuickTime Options for Recording Videos
Before starting to record videos, saving images or printing images, you should configure the Epiphan QuickTime integration options by opening System Preferences, selecting Epiphan under Other, and configuring the QuickTime settings.
Seng Apple QuickTime Opons for Recording Videos
Figure 37: QuickTime Opons for Recording Videos
Configure the following QuickTime recording options:
Video resolution
Select a video resolution option:
Actual: The actual resolution of the video source as reported to QuickTime. No scaling is performed. If, at any point during a recording session, no signal is detected an error will occur that could interrupt the recording session.
Default: If a video signal is not detected, the default resolution is reported and the video remains blank until a signal is detected. If the default resolution does not match the actual resolution, images are resized to the default resolution.
Fixed: The same resolution is reported to QuickTime, regardless of the actual resolution of
Setting Apple QuickTime Options for Recording Videos
| the image and whether or not a video signal is present. All images are scaled to the fixed resolution.For Default or Fixed resolution, you can select the resolution to use. | |
| Scaling | Select a Scaling Algorithm. When Video Resolution is set to Default or Fixed, you can move the slider to select a scaling algorithm from a set of algorithms that range from Lowest quality and Best speed to Best quality and Lowest speed. Choose from:Nearest pixelFast bilinearWeighted averageBilinearLuma bilubin chromabilinear |
Web Broadcasting
| set the default frame rate that the Epiphan device driver sends to QuickTime. This default frame rate is only used if the application does not explicitly set the frame rate. | |
| Network Devices | Add or remove Epiphan devices connected to the network. The Display shows the serial number, IP address and status (screen resolution and refresh rate of the video source) of each device. To add devices select the plus sign. To delete devices, select the minus sign. |
13 Web Broadcasting
Use the information in this chapter to share or stream the images captured by your DVI2PCIe Duo over the Internet. Note that web streaming is available on video capture workstations running Windows.
supported by the Epiphan Capture Tool is a relatively limited feature. Epiphan's streaming products provide a richer web streaming feature set.
13.1 To set the display format for web streaming
- Open the capture tool on a video capture workstation running Windows.
- From the Tools menu select Options.
- Select the Display tab.
- Set Display Format to RGB 24 bits per pixel.
- Optionally limit the frame rate to reduce the number of images sent over the Internet reducing bandwidth. Depending on your requirements you may not have to change any other display settings. Refer to section, Configuring Display Options for all available display settings.
- Select OK to save your changes.
13.2 To start a web streaming session
No special setup is required for web streaming except the video capture workstation
The Start web broadcasting dialog box appears.
Figure 38: Start Web Broadcasting Dialog

13.3 Viewing a web broadcasting session
View a web broadcasting session from a web browser running Windows 2000, XP, Vista and 7 versions. The following browsers are supported:
- Internet Explorer
A second web browser window appears displaying the message Applet is loading. Please wait... The streamed image should appear within 10 to 20 seconds.
The first web browser window in which the web stream URL address was entered, displays a message indicating that the web presentation has been opened in a new window. Use the first window to refresh the stream or re-open the stream window if it is accidentally closed.
13.4 Changing web streaming compression and performance
Normally you should not need to change the default web streaming compression settings. The default settings reduce the amount of Internet bandwidth used for web streaming by applying a combination of lossless and lossy compression to the images being broadcasted.
To change the web streaming compression, from the Tools menu of the DVI2PCIe
- If the video capture workstation CPU usage is too high during web streaming or if viewers of the web stream notice delays and you have determined that the delays are not caused by low Internet bandwidth. The delays could be caused by high CPU usage on the video capture workstation resulting in the video capture workstation not being able to process all image data. Lossless compression increases CPU usage, so you can reduce CPU usage during web streaming by reducing lossless compression.
Note: You cannot change web streaming compression during a web broadcast. You must stop the stream, adjust the settings and then start the stream again.
Changes made to default web stream compression settings are only visible to viewers of the web stream. Changing these settings does not change how the video capture application displays, records, or prints captured images.
14 Advanced Topics
Advanced Topics
When you connect a DVI2PCIe Duo to a video source, the video source sees the DVI2PCIe Duo as a monitor. Just like a monitor, the DVI2PCIe Duo contains EDID that is used by the video source to determine the video signal to send to the DVI2PCIe Duo.
Usually you would operate a DVI2PCIe Duo using the factory installed default EDID. However, in some cases when you connect a DVI2PCIe Duo to a video source, the video source may operate using video settings at which you do not want to operate. For instance, you can control the video source output settings by uploading a custom EDID file to the DVI2PCIe Duo. The EDID information in the file restricts the video signal that can be accepted by the DVI2PCIe Duo. For example, you can upload a custom EDID file to your DVI2PCIe Duo that limits the DVI2PCIe Duo to operate at 1040x768. When the video source reads the EDID from the DVI2PCIe Duo, the video source will reset to operate at 1024x768 as set in the EDID.
You can obtain custom EDID files from Epiphan Support. You can also download custom EDID files for DVI2PCIe Duo frame grabber from the frame grabber product page of the Epiphan web site. This page contains custom EDIDs for single video
- Disconnect any input cables from the DVI2PCIe Duo. Keep the DVI2PCIe Duo connected to the video capture workstation USB port.
- From the video capture application Tools menu, select Upload EDID and select the EDID file.
- Wait for the EDID update to complete. This can take several minutes.
- Reconnect input cables to the DVI2PCIe Duo.
- Set the required resolution on the video source. You may need to disable/re-enable or reset the DVI or SDI input port.
14.1.3 An EDID example
In this example, a user was viewing the video output from a system using a flat panel monitor. The monitor displayed video images at a screen resolution of 640x480. When the user replaced the flat panel monitor with a DVI2PCIe Duo, the system changed to produce video images at a screen resolution of 720x400.
It turned out that the video source preferred to output 720x400, but because the original monitor did not support 720x400, the video source was forced to operate at 640x480. The DVI2PCIe Duo supported 720x400 so the system changed to this resolution when the DVI2PCIe Duo was connected to it.
The user wanted to return the video source to operating at 640x480 but could not manually adjust the screen resolution. To solve the problem, Epiphan created a custom EDID for the DVI2PCIe Duo that excluded support for 720x400. When the user uploaded the custom EDID to the DVI2PCIe Duo, the video source returned to operating at 640x480.
14.2 Windows command line options
Use the following command line options to control how the Windows video capture application starts up. You can add as many command line options as you want in any order. All command line options must start with two dashes. Separate command line options with spaces.
Advanced Topics
| -borderless | Start the video capture application in image only mode. Press Esc to exit from image only mode. |
| -en | To specify which Frame Grabber to use if more than one Frame Grabber is connected to the PC. Similar to the Capture menu Select Device command.is the serial number of the Frame Grabber. |
| -ha | Set the horizontal shift*. The range is -100 to 100. |
| -ve | Set the vertical shift*. The range is -80 to 80. |
| -phase | Set the sampling Phase*. The range is 0 to 31. |
| -pil | Set the PLL adjustment*. The range is -50 to 50. |
| -offset | Set the offset (brightness)*. The range is 0 to 63. |
| -gain | Set the gain (contrast)*. The range is 0 to 255. |
| -noesc | Enter this parameter so that you can disable exiting image only mode by Pressing the Esc key. Press Alt+F4 to exit from the video capture application. |
| -topmost | To keep the video capture application window on top. |
| “*” – Refer to the Configure device section for more details. | |
Table of Figures
to v2ugui2.exe.Ink". The ".Ink" may not appear if Windows does not display file extensions. Change the name of this file and copy it to another location if required. Don't change the file extension.
-
Right click on the shortcut file and select Properties.
-
Edit the Target field and add command line options after the closing quote. For example, to add the --topmost command line option:
"C:\Program Files\Epiphan\v2ugui2.exe" –topmost
For example, to add --topmost and --borderless, set the horizontal shift to -67, and the vertical shift to 10:
"C:\Program Files\Epiphan\v2ugui2.exe" -topmost --borderless --hs -67 --vs 10
-
Select OK to save your changes to the shortcut.
-
Double-click on the shortcut to start the video capture application with the command line options.
15 Table of Figures
Figure 1 DVI2PCIe Duo Capture card 6
Figure 2 DVI2PCIe Duo connectors and LEDs 6
Figure 3 PCIe slots (from top to bottom: 4x, 16x, 1x and 16x), compared to a traditional 32-bit PCI slot (bottom) 7
Figure 4 VGA to DVI Cable 8
Figure 5 DVI to DVI Cable 9
Figure 6 HDMI to DVI Adapter 10
Figure 7 DisplayPort Cable 10
Figure 8 Mini DisplayPort Cable 10
Figure 9 Thunderbolt Port Cable 11
Figure 10 Adjustments tab 37
Figure 11 DirectShow tab 40
Figure 12 Advanced tab 44
Figure 13 The Recording tab of the Options window 50
Figure 14 The Display tab of the Options window 54
Figure 15 The Capture tab of the Options window 56
Figure 16 The On-Screen Text tab of the Options window 58
Figure 17 The Startup tab of the Options window 59
Figure 18 Web Broadcasting Compression Options 60
Figure 19 Frame Grabber Configuration Window 61
Figure 20 Capture application window (Mac OS X) 63
Figure 21 QuickTime Opons for Recording Videos 69
Figure 22 Start Web Broadcastng Dialog 73
16 Software and Documentation License
ATTENTION: THE SOFTWARE AND DOCUMENTATION PROVIDED UNDER THIS AGREEMENT ARE BEING LICENSED TO YOU BY EPIPHAN SYSTEMS INC. ("LICENSOR") AND ARE NOT BEING SOLD. THIS AGREEMENT CONTAINS LIMITATIONS ON REPRESENTATIONS, WARRANTIES, CONDITIONS, REMEDIES, AND LIABILITIES THAT ARE APPLICABLE TO THE SOFTWARE AND DOCUMENTATION.
Epiphan Soware License
IMPORTANT: BEFORE DOWNLOADING, INSTALLING, OR USING THE SOFTWARE AND DOCUMENTATION, PLEASE CAREFULLY READ THIS AGREEMENT WHICH CONTAINS THE TERMS AND CONDITIONS UNDER WHICH YOU ARE ACQUIRING A LICENSE TO USE THE SOFTWARE AND DOCUMENTATION. IF YOU DO NOT ACCEPT THE TERMS AND CONDITIONS OF THIS AGREEMENT PLEASE DO NOT DOWNLOAD, INSTALL, OR USE THE SOFTWARE AND DOCUMENTATION AND PROMPTLY RETURN OR DESTROY THE SOFTWARE AND DOCUMENTATION. IF YOU DOWNLOAD, INSTALL, OR USE THE SOFTWARE AND/OR DOCUMENTATION, YOU WILL HAVE ACCEPTED AND AGREED TO THESE TERMS AND CONDITIONS. THE SOFTWARE AND DOCUMENTATION ARE ALSO PROTECTED BY COPYRIGHT LAWS AND INTERNATIONAL COPYRIGHT TREATIES, AS WELL AS OTHER INTELLECTUAL PROPERTY LAWS. IF YOU ARE AN AGENT OR EMPLOYEE OF AN ENTITY, YOU REPRESENT AND WARRANT THAT (I) THE INDIVIDUAL ACCEPTING THIS AGREEMENT IS DULY AUTHORIZED TO ACCEPT THIS AGREEMENT ON SUCH ENTITY'S BEHALF AND TO BIND SUCH ENTITY, AND (II) SUCH ENTITY HAS FULL POWER, CORPORATE OR OTHERWISE, TO ENTER INTO THIS AGREEMENT AND PERFORM ITS OBLIGATIONS UNDER THIS AGREEMENT.
1. Denions: In this Agreement:
"Agreement" means this Epiphan Soware License;
"Documentaon" means the technical publicaons delivered to You with the Soware relang to the installaon and operaon of the Soware, such as reference, user, installaon and technical guides and release notes;
"Soware" means the Licensor binary and/or bytecode soware programs that (i) are made available to You for download aer acceptance of this Agreement, (ii) are packaged with this Agreement, or (iii) embed this Agreement in their installer(s) and which are installed aer acceptance of this Agreement, and which binary and/or bytecode soware programs include any Documentaon; and
"You" or "Your" means the individual acquiring the Soware license or any entity on whose behalf such individual is acng. In the case of an entity, "You" includes any entity that by majority vong interest controls, is controlled by, or is under common control with You.
-
Grant of Soware License: Subject to the terms and conditions of this Agreement, Licensor grants You a non-exclusive, non-transferable, non-sublicensable, internal license to use a reasonable number of copies of the Soware. All copies of the Soware made by You shall include all trademarks, copyright noces, restricted rights legends, proprietary markings and the like exactly as they appear on the copy of the Soware originally provided to You. No other rights in the Soware or Documentaon are granted to You.
-
Open Source Soware: Binary, bytecode and source code versions of certain open source soware packages may be embedded in or distributed with the Soware ("Open Source Soware"). If a separate license agreement for an item of open source soware is: delivered to You with the Soware; included in the download package for the Soware; referenced in any material (including the Documentaon) that is included in the download or distribuon package for the Soware; or listed at www.epiphan.com/opensource, then such open source soware shall be Open Source Soware and such separate license agreement shall govern Your use of that item or version of such open source soware. The Open Source Soware may include free soware (i.e. soware licensed under the GNU Lesser General Public License or other free soware licenses) for which the applicable free soware license may also require that the source code for such free soware be made available to those receiving only executable versions of such free soware. If the source code for any free soware distributed with the Soware is not provided with the Soware, then upon request, within a three (3) year period from the original receipt of such Open Source Soware from Licensor, for a fee that shall not exceed Licensor's costs associated with the shipping of the source code for such free soware, Licensor will provide a copy of the source code for such free soware to You.
-
Restricons: The terms set forth in this Secon 4 shall constute condions to the licenses granted in Secon 2. You shall not reverse engineer, disassemble, reverse translate, decompile or in any other manner decode the Soware except to the extent the Soware is distributed with any Open Source Soware that prohibits the imposition of such a restricon or to the extent the foregoing restricon is expressly prohibited by applicable law notwithstanding a contractual obligaon to the contrary. You acknowledge and agree that no rights in respect to the source code of the Soware are granted to You. You shall not distribute, lease, rent, grant a security interest in, assign, or otherwise transfer the Soware except as expressly provided in this Agreement. You shall not modify or create any derivatives works of the Soware or merge all or any part of the Soware with another program. You shall not use the Soware or make the Soware available to any third pares as part of any service bureau, me sharing service, applicaon service provider oering, soware-as-a-service oering or any other managed service oering. You shall not disclose any performance, benchmarking, or feature-related informaon about the Soware. You further agree not to disclose, transfer or otherwise provide to any third party any poron of the Soware, except as expressly permied herein.
-
Disclaimer of Warranes: Licensor does not make any representations or provide any warranties or conditions in respect to the Soware. EXCEPT FOR ANY WARRANTIES THAT MAY BE PROVIDED IN ANY COMMERCIAL AGREEMENT BETWEEN YOU AND LICENSOR, THE SOFTWARE AND DOCUMENTATION ARE PROVIDED "AS IS", WITHOUT ANY REPRESENTATIONS, CONDITIONS, OR WARRANTIES OF ANY KIND. WITHOUT LIMITATION, LICENSOR AND ITS LICENSORS, SUPPLIERS, SUBCONTRACTORS AND DISTRIBUTORS DISCLAIM ANY EXPRESS OR IMPLIED REPRESENTATIONS, CONDITIONS, AND/OR WARRANTIES OF MERCHANTABILITY, MERCHANTABILITY QUALITY, NON-INFRINGEMENT, DURABILITY, TITLE, SATISFACTORY QUALITY, OR FITNESS FOR A PARTICULAR PURPOSE WHETHER ARISING BY STATUTE, COURSE OF DEALING, USAGE OF TRADE, OR OTHERWISE. EXCEPT AS OTHERWISE EXPRESSLY PROVIDED IN ANY COMMERCIAL AGREEMENT, THE ENTIRE RISK OF THE USE OF THE SOFTWARE AND DOCUMENTATION SHALL BE BORNE BY YOU. EXCEPT AS OTHERWISE EXPRESSLY PROVIDED IN ANY COMMERCIAL AGREEMENT, NEITHER LICENSOR NOR ANY OF ITS LICENSORS, SUPPLIERS, SUBCONTRACTORS AND/OR DISTRIBUTORS MAKE ANY REPRESENTATIONS OR PROVIDE ANY CONDITIONS AND/OR WARRANTIES ABOUT THE SUITABILITY OF THE SOFTWARE AND/OR DOCUMENTATION OR ABOUT ANY INFORMATION AND/OR DATA THAT MAY BE PROCESSED BY OR MADE AVAILABLE USING THE SOFTWARE.
-
LIMITATION OF LIABILITY: NEITHER LICENSOR NOR ANY OF ITS LICENSORS, SUPPLIERS, SUBCONTRACTORS AND/OR DISTRIBUTORS SHALL HAVE ANY LIABILITY TO YOU OR ANY OTHER PERSON OR ENTITY FOR ANY DAMAGES ARISING FROM THIS AGREEMENT, RELATING TO THE SOFTWARE OR DOCUMENTATION, OR RELATING TO ANY SERVICES PROVIDED TO YOU BY LICENSOR
(INCLUDING ITS LICENSORS, SUPPLIERS, SUBCONTRACTORS AND/OR DISTRIBUTORS) IN RELATION TO THE SOFTWARE AND/OR DOCUMENTATION FOR ANY INDIRECT, RELIANCE, INCIDENTAL, SPECIAL, PUNITIVE, EXEMPLARY OR CONSEQUENTIAL DAMAGES, INCLUDING, BUT NOT LIMITED TO, LOSS OF REVENUE OR PROFIT, LOSS OF OR DAMAGE TO DATA, BUSINESS INTERUPTION, LOSS OF DATA, REPLACEMENT OR RECOVERY COSTS, OR OTHER COMMERCIAL OR ECONOMIC LOSS, WHETHER ARISING FROM CONTRACT, EQUITY, TORT (INCLUDING NEGLIGENCE OR STRICT LIABILITY) OR ANY OTHER THEORY OF LIABILITY, EVEN IF LICENSOR (INCLUDING ITS LICENSORS, SUPPLIERS, SUBCONTRACTORS AND DISTRIBUTORS) HAS BEEN ADVISED OF THE POSSIBILITY OF SUCH DAMAGES, OR THEY ARE FORESEEABLE. THE LIMITATIONS IN THIS SECTION SHALL APPLY WHETHER OR NOT THE ALLEGED BREACH OR DEFAULT IS A BREACH OF A FUNDAMENTAL CONDITION OR TERM OR FUNDAMENTAL BREACH. SOME JURISDICTIONS DO NOT ALLOW THE EXCLUSION OR LIMITATION OF LIABILITY FOR CONSEQUENTIAL OR INCIDENTAL DAMAGES, SO THESE LIMITATIONS MAY NOT APPLY TO YOU. IN NO EVENT SHALL THE TOTAL CUMULATIVE LIABILITY OF LICENSOR (INCLUDING ITS LICENSORS, SUPPLIERS, SUBCONTRACTORS AND DISTRIBUTORS) TO YOU OR ANY OTHER PERSON OR ENTITY FOR ANY DAMAGES ARISING FROM THIS AGREEMENT, RELATING TO THE SOFTWARE, DOCUMENTATION AND/OR RELATING TO ANY SERVICES PROVIDED TO YOU BY LICENSOR (INCLUDING ITS LICENSORS, SUPPLIERS, SUBCONTRACTORS AND DISTRIBUTORS) IN RELATION TO THE SOFTWARE AND/OR DOCUMENTATION, EXCEED THE LICENSE FEES PAID BY YOU FOR THE SOFTWARE.
THE DISCLAIMER OF REPRESENTATIONS, WARRANTIES AND CONDITIONS AND LIMITATION OF LIABILITY CONSTITUTE AN ESSENTIAL PART OF THIS AGREEMENT. YOU ACKNOWLEDGE THAT BUT FOR THE DISCLAIMER OF REPRESENTATIONS, WARRANTIES AND CONDITIONS AND LIMITATION OF LIABILITY, NEITHER LICENSOR NOR ANY OF ITS LICENSORS OR SUPPLIERS WOULD GRANT THE RIGHTS GRANTED IN THIS AGREEMENT.
-
Term and Terminaon: This Agreement shall continue for as long as You use the Soware, however, it may be terminated sooner as provided in this Secon 7. You may terminate this Agreement by destroying all copies of the Soware and Documentaon under Your control and providing cercaon of such destrucon to Licensor or by returning the Soware to Licensor. Licensor may terminate this Agreement immediately by providing You with wrien noce if: (a) You are in material breach of any provision of this Agreement, which breach, if capable of being cured, is not cured within thirty (30) days aer Licensor gives You wrien noce thereof; or (b) You have commied a non-curable material breach of this Agreement. Upon terminaon You shall destroy all copies of the Soware. In addition to this Secon, the Secons entled Denions, Disclaimer of Warranes, Limitaon of Liability, Title, High-Risk Acvies, Intellectual Property, and General shall connue in force even aer any terminaon of this Agreement. No terminaon of this Agreement will entle You to a refund of any amounts paid by You to Licensor or aect any obligaons You may have to pay any outstanding amounts owing to Licensor. Upon any terminaon by Licensor, You shall destroy all copies of the Soware and Documentaon under Your control and cerfy such destrucon to Licensor.
-
Support and Updates: This Agreement does not grant You the right to any updates or enhancements of the Soware or the right to receive any technical support for the Soware. Such updates and other technical support services, if available, may be purchased separately from Licensor. Use of any updates or enhancements to the Soware provided pursuant to any technical support You may procure from Licensor shall be governed by the terms and conditions of this Agreement. Licensor reserves the right at any me not to release or to disconnue the release of any Soware and to alter prices, features, specicaons, capabilities, funcons, licensing terms, release dates, general availability or other characteristics of the Soware.
-
Title: All right, tle, and interest (including all intellectual property rights) in, to, and under the Soware (including all copies thereof) shall remain with Licensor and its licensors.
-
High-Risk Acvies: The Soware is not fault-tolerant and is not designed, manufactured or intended for use in or in conjuncon with on-line control equipment in hazardous environments requiring fail-safe performance, such as in the operaon of nuclear facilities, aircra navigaon systems, air trac control, or direct life support machines. Licensor, its licensors, suppliers, subcontractors and distributors specially disclaim any express or implied representaons, warranes and/or condions for such uses.
-
U.S. Government End-Users: The Soware and Documentaon are each a "commercial item" as that term is dened at FAR 2.101, consisting of "commercial computer soware" and "commercial computer soware documentation" as such terms are dened in FAR 12.212, and are provided to the U.S. Government only as commercial end items. Government end users acquire the rights set out in this Agreement for the Soware and Documentaon consistent with: (i) for acquisition by or on behalf of civilian agencies, the terms set forth in FAR12.212; or (ii) for acquisition by or on behalf of units of the Department of Defense, the terms set forth in DFARS 227.7202. Use of the Soware and Documentaon is further restricted by the terms and conditions of this Agreement. For the purposes of any applicable government use, the Soware and Documentaon were developed exclusively at private expense, and are trade secrets of Epiphan Systems Inc. for the purpose of any Freedom of Informaon legislaon or any other disclosure statute, regulaon or provision.
-
Export Restricons: The Soware, Documentaon and related informaon are subject to export and import restricons. By downloading, installing, or using the Soware, Documentaon and/or related informaon, You are representing and warranting that You are not located in, are not under the control of, and are not a naonal or resident of any country to which the export of the Soware, Documentaon and/or related informaon would be prohibited by the laws and/or regulaons of Canada or the United States. You are also representing and warranting that You are not an individual to whom the export of the Soware, Documentaon or related informaon would be prohibited by the laws and/or regulaons of Canada or the United States. You shall comply with the export laws and regulaons of Canada and the United States that are applicable to the Soware, Documentaon and related informaon and You shall also comply with any local laws and/or regulaons in Your jurisdicon that may impact Your right to export, import, or use the Soware, Documentaon or related informaon, and You represent and warrant that You have complied with any such applicable laws and/or regulaons. The Soware, Documentaon and related informaon shall not be used for any purposes prohibited by export laws and/or regulaons, including, without limitaon, nuclear, chemical, or biological weapons proliferaon. You shall be responsible for procuring all required permissions for any subsequent export, import, or use of the Soware, Documentaon or related informaon.
-
Intellectual Property: Epiphan is a trademark or a registered trademark of Epiphan Systems Inc. in certain countries. All Licensor product names and logos are trademarks or registered trademarks of Epiphan Systems Inc. in certain countries. All other company and product names and logos are trademarks or registered trademarks of their respective owners in certain countries. You shall not disclose, transfer or otherwise provide to any third party any poron of the Soware, except as expressly permied in this Agreement.
-
General: This Agreement is the enre agreement between You and Licensor in respect to the Soware, superseding any other agreements or discussions, oral or wrien. The terms and conditions of this Agreement shall prevail over any pre-printed terms on any quotes, orders, purchase orders, or purchase order acknowledgements, and shall prevail over any other communicaons between the pares in relaon to the Soware. You may not assign this Agreement whether voluntarily, by operaon of law, or otherwise without Licensor's prior wrien consent. Licensor may assign this Agreement at any me without noce. The failure of a party to claim a breach of any term of this Agreement shall not constute a waiver of such breach or the right of such party to enforce any subsequent breach of such term. If any provision of this Agreement is held to be unenforceable or illegal, such decision shall not act the validity or enforceability of such provisions under other circumstances or the remaining provisions of this
Agreement and such remaining provisions shall be reformed only to the extent necessary to make them enforceable under such circumstances. This Agreement shall be governed by the laws of the Province of Ontario and the laws of Canada applicable therein. No choice or conict of laws rules of any jurisdicon shall apply to this Agreement. You shall only be entled to bring any acon or proceeding arising out of or relang to this Agreement, the Soware, Documentaon or any services provided in respect to the Soware and/or Documentaon in a court in Oawa, Ontario, Canada, and You consent to the jurisdicon of such courts for any such acon or proceeding. You waive all rights that You may have or that may hereaer arise to contest the jurisdicon of such courts for any acon or proceeding brought by You. You hereby waive any right You may have to request a jury trial with respect to any acon brought by You in conneccon with this Agreement, the Soware or any services provided in respect to the Soware. The applicaon of the United Naons Convenon on Contracts for the Internaonal Sale of Goods to this Agreement is expressly excluded.
August 26, 2014
Environmental Information
The equipment that you bought has required the extraction and use of natural resources for its production. It may contain hazardous substances that could impact health and the environment.
In order to avoid the dissemination of those substances in our environment and to diminish the pressure on the natural resources, we encourage you to use the appropriate take-back systems. Those systems will reuse or recycle most of the materials of your end life equipment in a sound way.
The crossed-out wheeled bin symbol invites you to use those systems. If you need more information about collection, reuse and recycling systems, please contact your local or regional waste administration. You can contact us for more information on the environmental performance of our products.
FCC & CE Compliance Statement
This device complies with Part 15 of the FCC Rules. Operation is subject to the following two conditions:
(1) This device may not cause harmful interference
(2) This device must accept any interference received, including interference that may cause undesired operation.
Marking by the symbol indicates compliance of this device with EMC directive of the European Community and meets or exceeds the following technical standard.
EN 55022 - Limits and Methods of Measurement of Radio Interference Characteristics of Information Technology Equipment.
Other Jurisdictional Issues
Epiphan makes no representation that its products or information in this document or its web site is appropriate or available for use in your jurisdiction. Those who choose to access the Epiphan web site or use Epiphan products do so on their own initiative and are responsible for compliance with local laws, if and to the extent local laws are applicable.
Submissions to Epiphan and Affiliated Servers
Any information, including but not limited to remarks, suggestions, ideas, graphics, or other submissions, communicated to Epiphan through their Epiphan web site is the exclusive property of Epiphan. Epiphan is entitled to use any information submitted for any purpose, without restriction (except as stated in Epiphan's Privacy Statement) or compensation to the person sending the submission. The user acknowledges the originality of any submission communicated to Epiphan and accepts responsibility for its accuracy, appropriateness, and legality.
Third Parties and Links to Third-Party Web Sites
Mention of non-Epiphan Systems Inc. products or services on their website, or this document site is for informational purposes and does not constitute an endorsement or recommendation.
This document may contain links to non-Epiphan web sites. These links are provided to you as a convenience, and Epiphan is not responsible for the content of any linked web site. Any outside web site accessed from the Epiphan web site is independent from Epiphan, and Epiphan has no control over the content of that web site. In addition, a link to any non-Epiphan web site does not imply that Epiphan endorses or accepts any responsibility for the content or use of such a web site.
In no event shall any reference to any third party or third party product or service be construed as an approval or endorsement by Epiphan of that third party or of any
product or service provided by a third party.
Miscellaneous
It is the user's responsibility to ascertain whether any information downloaded from the Epiphan web site or other websites is free of viruses, worms, trojan horses, or other items of a potentially destructive nature.
Enforcement of Terms and Conditions
These Terms and Conditions for use of this document and the associated Epiphan Product are governed and interpreted pursuant to the laws of the province of Ontario, Canada, notwithstanding any principles of conflicts of law.
All disputes arising out of or relating to these Terms and Conditions shall be finally resolved by arbitration conducted in the English language in Ottawa, Ontario, Canada under the commercial arbitration rules of the Canada. The parties shall appoint as sole arbitrator a retired judge who presided in the province of Ontario. The parties shall bear equally the cost of the arbitration (except that the prevailing party shall be entitled
Soware and Documentaon License


- DVI2PCIe Duo™ User Guide
- Thank you for choosing Epiphan!
- Product Feedback
- Specifications
- Warranty
- Table of Contents
- Terms and Conditions
- Table of Contents
- Table of Contents ....1
- DVI2PCIe Duo Introducon....4
- Physical Aributes 6
- System Requirements....11
- Installing DVI2PCIe Duo 12
- Installaon Steps for the Windows Video Capture Workstaon......13
- Mac OS X Video Capture Workstaon Installaon....22
- Linux Video Capture Workstaon Soware....24
- Connecng DVI2PCIe Duo to a Video Source 26
- Windows Video Capture Applicaon 26
- Advanced Topics....75
- Table of Figures 79
- Soware and Documentaon License 81
- DVI2PCIe Duo Introduction
- DVI2PCIe Duo Introduction
- Physical Attributes
- System Hardware Features
- Cables, Connectors and Adapters
- DVI to DVI Cable
- SDI to SDI Cable
- DisplayPort Cable
- Thunderbolt Port Cable
- Installing DVI2PCIe Duo
- Install the Windows Drivers and Epiphan Capture Tool
- Click Next. The License Agreement window opens.
- Upgrading to the Latest Windows Software Version
- To update firmware:
- Figure 19: Grabbers upgrade request
- Figure 21: Grabbers upgrade status
- Mac OS X Video Capture Workstation Installation
- To Install the Mac Drivers and Epiphan Capture Tool
- To Start the Mac OS Capture Application
- Upgrading to the Latest Mac OS X Software Version
- Finding Software Updates
- Linux Video Capture Workstation Software
- The Epiphan USB Device Driver
- Video4Linux
- The Epiphan Capture API
- V4L Custom Video Capture Applications
- Connecting DVI2PCIe Duo to a Video Source
- Start the Windows Video Capture Application
- Windows Video Capture Applicaon
- Pausing, Copying, Saving, and Printing Images
- To pause and resume image capture:
- To copy a snapshot of the current image:
- To save a snapshot of the current image as an image ile:
- To print a snapshot of the current image:
- To invert or reverse the colors of the image:
- Windows Video Capture Application
- To record captured images as a video file:
- Menus
- Edit Menu
- View Menu
- Capture Menu
- Configure Device
- Adjustments tab:
- DirectShow tab:
- VGA Modes tab
- To add a standard VGA mode
- The following parameters are displayed for each mode:
- Advanced tab:
- Tools Menu
- Toolbar
- Status Bar
- Configuring Recording Options
- Configuring Capture Options
- Setting On-Screen Text Parameters
- Configure Startup
- Sharing
- Configuring DVI2PCIe Duo from the Windows Control Panel
- Mac OS X Video Capture Application
- Mac OS X Video Capture Application
- Menus
- File Menu
- Edit Menu
- View Menu
- Window Menu
- Save
- Copy
- Devices
- Setting Apple QuickTime Options for Recording Videos
- Seng Apple QuickTime Opons for Recording Videos
- Figure 37: QuickTime Opons for Recording Videos
- Web Broadcasting
- To set the display format for web streaming
- To start a web streaming session
- Viewing a web broadcasting session
- Changing web streaming compression and performance
- Advanced Topics
- Advanced Topics
- An EDID example
- Windows command line options
- Table of Figures
- Table of Figures
- Software and Documentation License
- Epiphan Soware License
- Denions: In this Agreement:
- Environmental Information
- FCC & CE Compliance Statement
- Other Jurisdictional Issues
- Submissions to Epiphan and Affiliated Servers
- Third Parties and Links to Third-Party Web Sites
- Miscellaneous
- Enforcement of Terms and Conditions
Brand : Epiphan
Model : DVI2PCIe Duo
Category : Video Capture Card