
E755 - Smartphone TOSHIBA - Free user manual and instructions
Find the device manual for free E755 TOSHIBA in PDF.


| Product Type | Smartphone |
| Brand | Toshiba |
| Model | E755 |
| Dimensions (HxWxD) | 120 x 65 x 15 mm (4.72 x 2.56 x 0.59 in) |
| Weight | 150 g (5.29 oz) |
| Display | 2.8-inch TFT resistive touchscreen, 240x320 pixels |
| Operating System | Windows Mobile 5.0 Pocket PC |
| Processor | Intel XScale PXA272 400 MHz |
| RAM | 64 MB SDRAM |
| Storage | 128 MB ROM, expandable via miniSD card |
| Battery | Removable Li-Ion 1200 mAh, 3.7V |
| Talk Time | Up to 4 hours |
| Standby Time | Up to 200 hours |
| Camera | 2.0 MP rear camera with LED flash |
| Connectivity | Wi-Fi 802.11b/g, Bluetooth 2.0, miniUSB 1.1 |
| GPS | Yes, with external antenna support |
| Wireless Networks | GSM 850/900/1800/1900, GPRS, EDGE |
| Sensors | Accelerometer, light sensor |
| Input Methods | Resistive touchscreen, stylus, hardware buttons |
| Audio | Speakerphone, 3.5 mm headphone jack |
| Maintenance & Cleaning | Clean with a soft, dry cloth. Do not use liquid cleaners. |
| Safety | Do not expose to moisture or extreme temperatures. Use only approved accessories. |
| Spare Parts & Repairability | Battery, stylus, and AC adapter are replaceable. Contact Toshiba support for other parts. |
Frequently Asked Questions - E755 TOSHIBA
User questions about E755 TOSHIBA
0 question about this device. Answer the ones you know or ask your own.
Ask a new question about this device
Download the instructions for your Smartphone in PDF format for free! Find your manual E755 - TOSHIBA and take your electronic device back in hand. On this page are published all the documents necessary for the use of your device. E755 by TOSHIBA.
USER MANUAL E755 TOSHIBA
Thank you very much for your purchase of this Toshiba Pocket PC e750.
Please be sure to read this user's manual before using the Toshiba Pocket PC, and ensure that you are aware of the correct handling procedures.
Please be sure to read the “Safety precautions” section in this document to learn about important safety issues.
■ After reading this document, keep it in a convenient place for future reference.
Copyright Information
© 2003 by Toshiba Corporation. All rights reserved. Under the copyright laws, this manual cannot be reproduced in any form without the prior written permission of Toshiba. No patent liability is assumed, with respect to the use of the information contained herein.
TOSHIBA Pocket PC e750 User's Manual
First edition March 2003
Trademarks
Microsoft, ActiveSync, Outlook, Pocket Outlook, Windows, Windows CE, and the Windows logo are either registered trademarks or trademarks of Microsoft Corporation in the United States and/or other countries. Microsoft products are licensed to OEMs by Microsoft Licensing, Inc., a wholly owned subsidiary of Microsoft Corporation.
ATI ^® and IMAGEON ^® are registered trademarks of ATI Technologies, Inc.
IA Album ^® , IA Presenter ^® , and IA Screen Mirror ^® are registered trademarks of IA Style, Inc., and Information In Action(tm) is a trademark of IA Style, Inc.
CompactFlash is a registered trademark of Scandisk Corporation.
Toshiba uses the trademark of Bluetooth based upon a license agreement.
The names of all other products contained herein are trademarks or registered trademarks of their respective companies.
Limitation of liability
Toshiba Corporation is in no way liable for any damage resulting from earthquakes, lightning, wind, flood; or fire, actions on the part of a third party, or other accidents beyond the control of Toshiba Corporation; intentional acts, negligence or misuse on the part of the user, or any usage under abnormal conditions.
Toshiba Corporation is in no way liable for any damage, including but not limited to change or loss of stored data, loss of business profit, loss of earnings, interruption of business, or lost communication opportunities that are caused by usage or unusability of this product.
■ Toshiba Corporation is in no way liable for any damage resulting from failure to comply with the contents of this user's guide.
■ Toshiba Corporation is in no way liable for any damage resulting from malfunction due to use with connection devices or software other than those provided by Toshiba Corporation.
■ Toshiba Corporation cannot guarantee any data recorded in memory devices, such as internal memory and memory cards, regardless of the cause of damage or malfunction.
Usage conditions
The Bluetooth was not developed or produced for use with equipment in systems that directly support the medical welfare of individuals1 or systems that are critical for the maintenance of public welfare and safety2. Do not use the Bluetooth for these purposes.
- These include life-support systems, surgery room equipment, and other medical devices.
- These include the main equipment control systems and safety protection systems at nuclear power facilities, other critical safety systems, fleet transportation operating control systems, and air traffic control systems.
Do not disassemble, modify or try to service this product yourself.
This may cause injury. Unapproved changes or modifications to this product could void your authority to operate this product. Please contact the dealer from whom you purchased this product and request repair service.
Do not use this product in areas where the use of electrical devices is prohibited, such as on board an aircraft and in a hospital.
If you are uncertain whether electrical devices are prohibited, please consult the proper authorities and follow all instructions. Usage in prohibited areas can cause an accident due to radio interference with equipment such as aviation and medical equipment.
Do not use the Bluetooth within 9 inches (22 cm) of persons with a heart pacemaker implant or defibrillator implant.
Failure to maintain this distance can cause a malfunction of the pacemaker due to radio interference.
Do not use the Bluetooth near an automated controlling device, such as an automatic door or fire alarm.
Failure to do so can cause an accident due to radio interference with the automated controlling device.
Immediately discontinue use of the Bluetooth if it causes radio interference with other devices.
Continued use of the Bluetooth can cause other devices to malfunction and thereby create an accident.
Keep the product out of the reach of children, as it may be accidentally swallowed or cause injury.
Safety precautions
Please carefully read “Safety precautions” before using the Toshiba Pocket PC and ensure that you are aware of correct handling procedures.
The precautions provide essential information for the protection of the user and others from possible injury and property damage. They also provide information on the safe handling of this product.
Please check that you fully understand the definition of the following messages (signs and graphical symbols) before reading the text, and always follow the instructions provided.
Safety instructions
All safety instructions must be read carefully and must be fully understood, before attempting to use your Toshiba Pocket PC. This manual contains the safety instructions that must be observed in order to avoid potential hazards that could result in personal injuries or could damage your computer. The safety instructions have been classified according to the seriousness of the Risk, as follows:
Signal icons for WARNING, CAUTION, and NOTE, will be followed by important safety information that must be carefully reviewed.
| Icon Meaning | |
 | WARNINGIndicates a potentially hazardous situation, which could result in death or serious injury (*1) if you do not follow instructions. |
 | CAUTIONIndicates a potentially hazardous situation, which if not avoided, can result in minor injury (*2) or property damage (*3). |
 | NOTE Gives you helpful information. |
*1: Serious injury corresponds to an injury that leaves some aftereffect, and requires hospital treatment or long term treatment as an outpatient such as blindness, injuries, burns (high temperature, low temperature), electric shock, fractures, poisoning, etc.
*2: Minor injury corresponds to an injury that does not require hospital treatment or long term treatment as an outpatient, that is to say, injuries, burns, electric shock, etc.
*3: Property damage corresponds to the extensive damage with regard to the house structure, household goods, livestock, pets, etc.
DANGER
- Never attempt to disassemble or repair an AC Adaptor, and never alter their Power Supply Cables or plugs as exposure to electric shock hazards could result.
Always contact an authorized service provider, if repair or replacement is required.
WARNINGS
Always request and obtain prior consent and approval of an authorized airline representative before using your Pocket PC aboard an aircraft. Always follow the instructions of the airline representative whenever using your Pocket PC aboard an aircraft, to prevent any possible interference with airborne electronic equipment. Your Pocket PC produces low levels of RF energy due to the generation of digital timing pulses by its clock oscillator circuits. Your Pocket PC has been equipped with internal shielding to minimize any stray emissions of RF energy. Airlines may nevertheless prohibit the on-board use of all portable PCs(and all other portable electronic devices that could potentially emit stray RF energy), particularly during take-offs and landings, to prevent any possible interference with the reception of signals by airborne electronic navigational devices.
■ Certain locations, such as hospitals, may restrict the use of Pocket PCs and other devices that emit low-level RF energy.
Always comply was posted prohibitions of the use of RF-emitting devices, such as in hospitals. Failure to follow such directives could result in the interference with medical equipment and/or devices.
Never come closer than 16cm (6inches) to a person with a heart pacemaker implant when using this Pocket PC in combination with a mobile cellular telephone. Failure to do so could result in interference with the function of the pacemaker.
- Never use a Pocket PC while driving an automobile or any other moving vehicle. Always pull out of traffic and come to a stop in a legally permissible and safe location before using your Pocket PC. Failure to do so could result in serious bodily injury in a traffic accident.
Never use your Pocket PC while walking. Usage while walking could result in bodily injury caused by inattention to automobile traffic or other pedestrian hazards.
Never allow metallic objects, such as staples and paper clips, to enter inside your Pocket PC. Metallic objects, such as staples and paper clips, if allowed to enter your Pocket PC, could cause the generation of excess heat or fire.
Never connect terminals (metal parts) to metallic objects (such as wires). Connecting terminals to metal objects could cause excessive heat or fire.
Always immediately turn the battery switch to the “off” position and disconnect the AC Adaptor from the power outlet in the event the Pocket PC emits an unusual odor or sound or generates smoke.
■ Never use or store your Pocket PC in the following locations:
■ Anywhere it may be exposed to water, such as a bathroom or sauna;
In conditions of high humidity, such as in the rain or fog; Where your Pocket PC will be exposed to high temperatures, such as near a fire or equipment that emits high temperatures; In direct sunlight; or In a sealed automobile left in the sun and subject to high temperature.
- Never drop your Pocket PC or subject it to severe shock. Dropping your Pocket PC or subjecting it to severe shock could cause the removable battery to leak, ignite and/or rupture.
Always immediately remove your Pocket PC and its battery from the vicinity of any open flame in the event the removable battery leaks liquid or emits an unusual odor. Continued use of your Pocket PC under either of these conditions could cause ignition (i.e., fire) of the leaked battery liquid, or rupture.
Never touch any fluid that might leak from the removable battery. Such liquid when in contact with the eyes or skin, could cause injury to the skin or eyes. Should the liquid come into contact with the eyes, irrigate the eyes thoroughly with clean water and immediately seek medical attention. In the event the liquid comes into contact with the skin or clothing, wash it away immediately with clean water.
Never attempt to disassemble, repair or make any modification to your Pocket PC. Disassembly, modification or any attempt at repair could cause bodily injury or property damage, as well as damage to the Pocket PC itself.
Failure to follow the above directions concerning use and storage could result in damage to your Pocket PC or bodily injury and property damage due to battery liquid leakage, fire or rupture.
■ Always use the AC Adaptor that has been provided with your Pocket PC.
Bodily injury or property damage could occur as a result of the use of an unauthorized and incompatible AC Adaptor in violation of this Warning.
- Never connect or disconnect the AC Adaptor with wet hands. Connecting or disconnecting the AC Adaptor to a power source with wet hands could cause electric shock.
CAUTIONS
- Never raise the sound volume level to high when using your Pocket PC with earphones. An excessive sound volume level could cause damage to your hearing.
Never touch the liquid that might leak from a broken liquid crystal display. Contact with this liquid could cause a skin rash. If the crystal display liquid should come into contact with the skin or clothing, wash it immediately with clean water. - Never allow infants or small children within reach of your Pocket PC. Infants or small children could injure themselves if allowed access to your Pocket PC.
- Never place an AC Adaptor on a wooden surface (or any other surface that could be marred by exposure to heat) while it is in use, since its surface temperature increases during normal use. Always rest it on a suitable heat-insulating material.
- Never cover the AC Adaptor with any object while it is in use, and never place it adjacent to a heat source. An excessive temperature increase could detrimentally affect its performance.
- Never place a Power Supply Cable near a heat source, as damage to the cord or to its insulation could result.
■ Always use a surge protector when utilizing the AC Adaptor during an electrical storm. Otherwise, a power surge could result in the loss of stored data. - Insert the power plug to a household electric outlet.
When travelling abroad, never plug the AC Adaptor into a power source that does not correspond to both the voltage and the frequency specified on the rating plate of the unit, as equipment damage will result. - Never attempt to connect or disconnect the power plug with damp or wet hands. Connecting or disconnecting the power plug with damp or wet hands could result in an electric shock.
-
Never leave an open container, such as a cup or glass, containing a liquid near the AC Adaptor. Spilled liquid coming in contact with the AC Adaptor could cause a fire or electric shock.
Always ensure the power plug pins are clean and free of dust or other foreign material by wiping the pins with a clean dry cloth. Dust or other foreign material accumulation on the power plug pins could cause fire.
Always unplug the power plug from an outlet by grasping the power plug itself. Never pull on the Power Supply Cable to disconnect the Power Supply Cable from an outlet. Pulling on the Power Supply Cable could cause a fire or electric shock as a result of damage to the Power Supply Cable. -
Never use a worn or damaged AC Adaptor Power Supply Cable or plug, or a worn or damaged extension cord or plug. The use of a worn or damaged Power Supply Cable or plug could result in electric shock or fire. Always contact an authorized service provider immediately to obtain a suitable Power Supply Cable replacement.
- Never bend or twist a Power Supply Cable, and never pull on a Power Supply Cable in an attempt to remove a plug from an outlet. Always grasp the plug directly when unplugging a Power Supply Cable to avoid causing any damage to the cord.
- Never plug the AC Adaptor into an overloaded multiple outlet, power strip or surge protector to prevent blowing a fuse or tripping a circuit breaker.
- Never place heavy objects on a Power Supply Cable, as that could result in damage to the cord.
Always confirm that the AC Adaptor plug (and the extension cord and plug, if any) have been fully inserted into the receptacle, to assure a secure electrical connection.
Dispose of used batteries

Do not dispose of used batteries with your ordinary waste. Dispose of the batteries as required by local ordinances or regulations. Use only batteries recommended by Toshiba as replacements.
NOTES
■ Under certain conditions, data may be lost, including:
- Misuse of your Pocket PC; Subjecting the main unit of your Pocket PC to static electricity and/or noise; Total loss of electric charge in the removable battery; and Servicing of your Pocket PC.
Avoid connecting your Pocket PC to an external device such as a computer in an environment likely to be affected by static electricity. For example during low-humidity weather, shuffling your shoes upon a rag can produce static electricity. Before you handle your computer, you should touch a grounded object to discharge any static electricity from your body.
Avoid using your Pocket PC in environments that are likely to be affected by static electricity or are prone to high electrical noise. If you connect your Pocket PC to a computer via the docking cradle for data transfer or data restoration purposes, Toshiba will not be responsible for any Pocket PC or computer malfunction, problems with data transfer or data modifications/loss that may occur in these environments.
- Use your Pocket PC only in locations with the following ambient environmental conditions:
Under normal operational use with temperatures between 0 C and 40 C (32 F and 104 F); With humidity of 30% to 80%; and When charging the battery with temperatures between 5 C and 40 C (41 F and 104 F).
- Do not store or use your Pocket PC in the following locations:
Those subject to extremely high or low temperatures; Dusty locations; and Locations or sites subject to strong vibration.
Use or storage in these location, sites or areas can result in product failure, malfunction or loss of data.
Do not subject your Pocket PC to sudden and severe temperature changes. This could result in moisture condensation in the Pocket PC that could cause damage to your Pocket PC, computer function loss, and/or the loss of data. In the event of moisture condensation, allow your Pocket PC to dry out completely.
It is normal for the AC Adaptor to become warm when charging.
- Disconnect the power plug from the outlet when not in use.
Take care not to sit on your Pocket PC when it is located in the back pocket of trousers, etc. This could cause damage to your Pocket PC or malfunction of the Pocket PC functions.
Do not place objects on top of your Pocket PC or drop them on top of your Pocket PC. This could cause damage to your Pocket PC and/or malfunction.
- Clean terminals (metallic parts) on a regular basis with a cotton swab. Dirty terminals could affect battery charging.
- Never use organic solvents such as benzene or paint thinner to clean your Pocket PC. Use of these solvents can cause deformation or discoloration.
Do not wipe the display with a damp or wet cloth or touch the display with damp or wet hands. Wiping or touching the display under this condition can cause product failure or malfunction. Always use a soft dry cloth to wipe the display.
When using the “SD memory card” and/or “(CF) compact flash card,” be sure to read the relevant instruction manual and ensure that you know the proper procedures for their use.
- Never subject the card to any severe shock while connected to your Pocket PC. Such a shock can cause damage to the card and a malfunction.
Do not carry your Pocket PC with the card connected to it. This can result in the damage or loss of the card.
- Never connect cradle terminals with metallic objects, such as wires. Connecting these terminals with metallic objects may cause the production of excess heat, burns and damage to the charger and/or your Pocket PC.
Lithium ion batteries are recyclable. Never dispose of the battery with ordinary waste.
■ Never bend or twist your Pocket PC. This could cause damage to your Pocket PC or malfunction of the Pocket PC functions.
(For Bluetooth model Only)
| Supplementary Information: | “The product complies with the requirements of the Low Voltage Directive 73/23/EEC and the EMC Directive 89/336/EEC.” |
| Weitere Informationen: | “Das Produkt entspricht den Anforderungen der Niederspannungs Richtlinie 73 23/EG und der EMC-Richtlinie 89/336/EG.” |
| Informations complérinentaires: | “Ce produit est conforme aux exigences de la directive sur les basses tensions 73/23/CEE et de la directive EMC 89/336/CEE.” |
| Información complementaria: | “El Producto cumple los requistos de baja tensión de la Directiva 73/ 23/CEE y la Directiva EMC 89/336/CEE.” |
| Ulteriori informazioni: | “Il prodotto é conforme ai requisiti della direttiva sulla bassa tensione 73/23/EG e la direttiva EMC 89/336/EG.” |
| Ytterligare information: | “Produkten uppfyller kraven enligt lågspänningsdirektiver 73/23/EEC och EMC-direktiv 89/336/EEC.” |
Working environment
This product was designed to fulfill the EMC (electromagnetic compatibility) requirements for “residential, commercial and light industry environments”.
Toshiba does not approve the use of this product in working environments other than “residential, commercial and light industry environments”.
For example, the following environments are not approved:
Industrial Environments (environments with a main voltage >230V\~)
■ Medical Environments
■ Automotive Environments
Aircraft Environments
Any consequences resulting from the use of this product in working environments that are not approved are not the responsibility of Toshiba Corporation.
The consequences of the use of this product in non-approved working environments may be:
- Interference with other devices or machines in the nearby surrounding area
Malfunction of, or data loss from, this product caused by disturbances generated by other devices or machines in the nearby surrounding area
Therefore Toshiba strongly recommends that the electromagnetic compatibility of this product be suitably tested in all non-approved working environments before use. In the case of automobiles or aircraft, the manufacturer or airline respectively should be asked for permission before use of this product.
Furthermore, for general safety reasons, the use of this product in environments with explosive atmospheres is not permitted.
CE compliance
This product and the original options are designed to observe the related EMC (Electromagnetic compatibility) and safety standards. However, Toshiba cannot guarantee that this product still observes these EMC standards if options or cables not produced by Toshiba are connected or implemented. In this case, the persons who have connected / implemented those options / cables have to make sure that the system (PC plus options / cables) still fulfils the required standards. To avoid general EMC problems, the following advice should be observed:
■ Only CE marked options should be connected / implemented
■ Only best shielded cables should be connected
FCC Notice "Declaration of Conformity"
This equipment has been tested and found to comply with the limits for a Class B digital device, pursuant to part 15 of the FCC Rules. These limits are designed to provide reasonable protection against harmful interference in a residential installation. This equipment generates, uses and can radiate radio frequency energy and, if not installed and used in accordance with the instructions, may cause harmful interference to radio communications. However, there is no guarantee that interference will not occur in a particular installation. If this equipment does cause harmful interference to radio or television reception, which can be determined by turning the equipment off and on, the user is encouraged to try to correct the interference by one or more of the following measures:
■ Reorient or relocate the receiving antenna
■ Increase the separation between the equipment and receiver
■ Connect the equipment into an outlet on a circuit different from that to which the receiver is connected
Consult the dealer or an experienced radio/TV technician for help.

Only peripherals complying with the FCC class B limits may be attached to this equipment. Operation with non-compliant peripherals or peripherals not recommended by Toshiba is likely to result in interference to radio and TV reception. Shielded cables must be used between the external devices and the computer's USB ports, external monitor port, PS/2 keyboard port and PS/2 mouse port. Changes or modifications made to this equipment, not expressly approved by Toshiba or parties authorized by Toshiba could void the user's authority to operate the equipment.
This device complies with part 15 of the FCC Rules. Operation is subject to the following two conditions:
- This device may not cause harmful interference
- This device must accept any interference received, including interference that may cause undesired operation.
Canadian Regulatory Information (Canada Only)
This digital apparatus does not exceed the Class B limits for radio noise emissions from digital apparatus as set out in the Radio Interference Regulation of the Canadian Department of Communications.
Note that Canadian Department of Communications (DOC) regulations provide, that changes or modifications not expressly approved by TOSHIBA Corporation could void your authority to operate this equipment.
This Class B digital apparatus meets all requirements of the Canadian Interference-Causing Equipment Regulations.
FCC Class B Digital Devices & Peripheral Devices (Declaration of Conformity or Certification Authorization)
Declaration of Conformity Label & Marking Requirements
User Manual must provide user information in accordance with ±15.19(a)(3) , 15.21, 15.27 and 15.105(b):
Instruction Manual Federal Communication Commission Interference Statement
This equipment has been tested and found to comply with the limits for a Class B digital device, pursuant to Part 15 of the FCC Rules. These limits are designed to provide reasonable protection against harmful interference in a residential installation. This equipment generates, uses and can radiate radio frequency energy and, if not installed and used in accordance with the instructions, may cause harmful interference to radio communications. However, there is no guarantee that interference will not occur in a particular installation. If this equipment does cause harmful interference to radio or television reception, which can be determined by turning the equipment off and on, the user is encouraged to try to correct the interference by one of the following measures:
■ Reorient or relocate the receiving antenna
■ Increase the separation between the equipment and receiver
■ Connect the equipment into an outlet on a circuit different from that to which the receiver is connected
- Consult the dealer or an experienced radio/TV technician for help.
FCC Caution: Assure continued compliance (for example, use only shielded interface cables when connecting to computer or peripheral devices). Any changes or modifications not expressly approved by the manufacturer of this device could void the user's authority to operate this equipment.
This device complies with Part 15 of the FCC Rules. Operation is subject to the following two conditions: (1) This device may not cause harmful interference, and (2) this device must accept any interference received, including interference that may cause undesired operation.
Table of Contents
Chapter 1 Getting Started
Welcome 1-1
Where to Find Information....1-2
Chapter 2 Basic Skills
Parts Names and Function....2-1
Power Button....2-3
Battery Switch 2-4
Battery/Alarm LED 2-4
Wireless Communication Switch (Wireless LAN/Bluetooth model only) 2-5
Wireless LED Descriptions 2-5
How to Use the Stylus....2-6
About the Cursor Button 2-6
About the Scroller....2-6
Battery Charging 2-7
How to Charge the Battery....2-7
How to Attach/Detach the Main Battery Pack....2-8
How to Use the optional High Capacity Battery Pack....2-9
How to Prolong Battery Life 2-10
Battery Life 2-10
Battery Charge Level and Stored Data Protection 2-11
How to Use the optional Expansion Pack....2-11
Parts and Functions of the Expansion Pack....2-12
How to use the optional USB Host Cable ....2-13
Initial Setup....2-14
Inserting a CF II Card....2-15
Inserting an SD Card 2-17
Connecting to a Computer 2-18
To Connect Using the Supplied Cradle: 2-18
To connect directly using a connection cable:....2-19
Today Screen....2-20
Programs 2-22
Navigation Bar and Command Bar 2-23
Pop-up Menus 2-24
Notifications....2-24
Enter Information on Your Toshiba Pocket PC....2-25
Entering Text Using the Input Panel 2-25
Writing on the Screen....2-28
Drawing on the Screen....2-31
Recording a Message....2-32
Using My Text....2-33
Find and Organise Information 2-34
Customize Your Toshiba Pocket PC 2-35
Adjusting Settings....2-35
Adding or Removing Programs 2-35
Setting a Password ......2-37
To Set Screen Light 2-37
Setting Power 2-39
Setting Memory 2-41
Flash ROM Disk (NAND Flash Memory) 2-42
Setting Advanced Sounds....2-43
Setting Microphone 2-44
Chapter 3 Microsoft ActiveSync
Change the synchronization schedule....3-2
Chapter 4 Microsoft Pocket Outlook
Calendar: Scheduling Appointments and Meetings......4-2
To create an appointment ....4-3
Using the Summary Screen....4-4
Creating Meeting Requests....4-4
Contacts: Tracking Friends and Colleagues....4-5
To create a contact: 4-6
Finding a contact....4-7
Using the Summary Screen....4-7
Tasks: Keeping a To Do List....4-8
To create a task: 4-8
Using the Summary Screen....4-9
Notes: Capturing Thoughts and Ideas....4-10
To create a note:....4-11
Inbox: Sending and Receiving E-mail Messages....4-12
Synchronizing E-mail Messages....4-12
Using the Message List 4-13
Composing Messages....4-14
Managing E-mail Messages and Folders 4-15
Chapter 5 Companion Programs
Pocket Word....5-1
Typing Mode....5-3
Writing Mode....5-4
Drawing Mode 5-5
Recording Mode....5-5
Pocket Excel....5-6
Tips for Working in Pocket Excel....5-7
MSN Messenger 5-7
Setting Up....5-8
Working with Contacts 5-8
Chatting with Contacts....5-9
Windows Media Player....5-11
Microsoft Reader....5-12
Getting Books on Your Device 5-12
Using the Library 5-13
Reading a Book....5-14
Using Reader Features....5-15
Removing a Book 5-15
Pictures....5-16
Edit Pictures ....5-16
Send Pictures ....5-16
Set Picture as Background....5-17
View Slideshow of Pictures 5-17
Chapter 6 Pocket Internet Explorer
The Mobile Favorites Folder....6-1
Favorite Links 6-1
Mobile Favorites....6-2
To save device memory....6-3
Using AvantGo Channels....6-3
Using Pocket Internet Explorer....6-4
To view mobile favorites and channels:....6-4
To browse the Internet: 6-5
Chapter 7 Getting Connected
Transfer Items Using Infrared 7-2
Connect to the Internet....7-2
Connect to Work 7-4
End a Connection....7-7
Connect Directly to an E-mail Server 7-8
Get Help on Connecting 7-8
Chapter 8 Wi-Fi (IEEE 802.11b) Wireless LAN
Overview 8-1
Configure Wireless LAN Network 8-1
Join to Existing Network....8-2
Launch Wireless LAN Configuration....8-2
Turn Off/On Wireless LAN connection....8-3
Power Off/On Wireless LAN modules....8-3
Select Preferred Network 8-3
IP Address....8-4
IP Address Page....8-4
IP Address 8-4
Subnet mask....8-4
Default gateway....8-4
Name Servers Page....8-5
DNS 8-5
WINS 8-5
Alt DNS....8-6
Alt WINS 8-6
Wireless LAN Configuration 8-6
Set up a wireless network....8-6
Configure Wireless Network 8-7
Configure Network Authentication Screen 8-8
TMU-Traffic Monitoring Utility 8-9
Icon Specification....8-9
Wireless LAN Manager 8-9
Manager Screen 8-10
Link Screen....8-11
Info Screen 8-12
Toshiba Enroller 8-13
Certificate for TLS....8-13
Certificate Import Wizard....8-13
RootCert Page....8-14
Manage Page 8-15
Advanced Page 8-16
Toshiba Certificate Import Wizard....8-17
Start Screen....8-17
Example: Obtain TLS Certificate from server (1)....8-18
Example: Obtain TLS Certificate from server (2)....8-19
Example: Obtain TLS Certificate from server (3)....8-19
Example: Obtain PEAP Certificate from a file (1)....8-20
Example: Obtain PEAP Certificate from a file (2)....8-21
Example: Obtain PEAP Certificate from a file (3)....8-22
Chapter 9 Bluetooth
Specifications 9-1
Major specifications....9-2
Bluetooth Settings....9-3
Enabling Bluetooth on Your Toshiba Pocket PC....9-3
Bluetooth Environmental Settings....9-3
Advanced Settings 9-4
Preparing to Connect with Bluetooth....9-5
Using COM Service....9-8
Establishing an ActiveSync connection with a computer....9-8
Using DUN/LAP Service....9-9
Connecting to the Internet....9-9
Using OPP Service 9-9
Sending a contact 9-10
Sending a schedule....9-11
Sending a task....9-11
Exchanging business cards....9-12
Receiving a business card....9-12
Using FTP Service....9-13
Starting Bluetooth FTP 9-13
Sending a file....9-14
Receiving a file....9-14
FTP Authentication setting on Bluetooth FTP server....9-15
The Bluetooth Settings Screen 9-16
Tools menu....9-16
View menu....9-17
Options menu....9-17
Chapter 10 Optional Functions
Home 10-1
Launching an Application From the Home 10-1
About Running....10-2
Display Icon List 10-3
Moving an Application Icon into Another Tab....10-3
Deleting an Icon....10-4
Adding an Icon ....10-4
Tab Setting 10-5
To change a background:....10-5
Text Colour Setting:....10-6
Home Help ....10-6
"Running" tab 10-6
Launching applications....10-6
Switching the icon display....10-6
Icon settings....10-7
Tab settings....10-8
How to Make a Backup....10-10
Making a Backup....10-11
Carrying Out the Restore Operation....10-12
System Information....10-14
Identity Tab....10-14
Memory tab 10-15
Driver tab....10-15
System tab 10-16
Wireless tab....10-16
Tools Menu....10-17
Chapter 11 ATI Presentation Pack
IA Presenter....11-1
IA Screen Mirror....11-1
IA Presenter....11-1
Getting Started....11-1
Installing the ATI Presentation Pack....11-2
Using IA Presenter's Desktop Converter....11-2
Choosing Dimensions for the Converted .IAP File....11-3
Opening a Presentation and Using View Modes ......11-3
Normal View 11-3
Slide Sorter....11-4
Notes Page....11-5
Quick Notes....11-5
Slide Show....11-5
VGA Slide Show 11-9
Controlling Transition Effects 11-10
Merging Presentations....11-10
IA Screen Mirror 11-11
Getting Started....11-11
On-line Help....11-11
Copyright and Contact Information....11-12
Chapter 12 Additional Information
Troubleshooting ....12-1
Resetting....12-4
Clear Memory 12-4
Troubleshooting for Wi-Fi....12-5
Appendix A Specifications
Appendix B FAQ for Wi-Fi
Appendix C Error Messages for Bluetooth
Appendix D Glossary for Bluetooth
Appendix E TOSHIBA's Worldwide Computer Representatives
Chapter 1
Getting Started
Welcome
Congratulations on purchasing your Toshiba Pocket PC. Due to the size and capabilities of this device, you can keep your most important business and personal information up-to-date and close at hand. Microsoft® ActiveSync® increases the power of your device by allowing you to synchronize the information on your desktop or laptop computer with your device. Picture yourself in the following situations:
While walking with a colleague, your cell phone rings and your manager asks if you two are free this afternoon for an emergency meeting. While your colleague fumbles through his paper organizer, you press a button on your device and instantly see a list of today's appointments and meetings. You are quickly able to tell your manager your available times. For more information on scheduling appointments and meetings, see Chapter 4.
You're meeting your friends tonight for dinner and a movie. You download the latest movie information from the Internet to your computer and then synchronize it with your device. At dinner, you pull out your Toshiba Pocket PC device and review your movie options with your friends. For more information on downloading Web pages to your device, see Chapter 6.
A Calendar reminder alerts you that it is time to catch the bus. You grab your Toshiba Pocket PC device and catch the bus just in time. Because ActiveSync keeps the information on your device up-to-date, you leisurely review your task list, make notes about the new books and CDs you want to buy, and read and respond to e-mail messages. When you get back to the office, ActiveSync transfers any task changes you made, your notes, and your e-mail message responses to your computer. For more information on ActiveSync, see Chapter 3.
Where to Find Information
This book describes your Pocket PC hardware, provides an overview of the programs on your Pocket PC, and explains how to connect your Pocket PC to a computer, a network, or the Internet. For instructions on setting up your Pocket PC and installing ActiveSync, see the Quick Start Card. The following table is a guide to additional information to help you use your Pocket PC.
For information on: See this source:
| Programs on your Pocket PC | This User's Manual and device Help. To view Help, tap 📋 and then Help. |
| Additional programs that can be installed on the Pocket PC | The Toshiba Pocket PC Companion CD. |
| Connecting to and synchronizing with a computer | The Quick Start Card or ActiveSync Help on your computer. To view Help, click Help and then Microsoft ActiveSync Help. |
| Last-minute updates and detailed technical information | The Read Me files, located in the Microsoft ActiveSync folder on the computer and on the Toshiba Pocket PC Companion CD. |
| Up-to-date information on your Toshiba Pocket PC | http://www.toshiba.co.jp/worldwide |
Chapter 2
Basic Skills
Your Toshiba Pocket PC e750 is easy to learn how to use. This chapter describes the use and customization of your Toshiba Pocket PC e750.
Parts Names and Function
Main unit and optional Expansion Pack (front view)
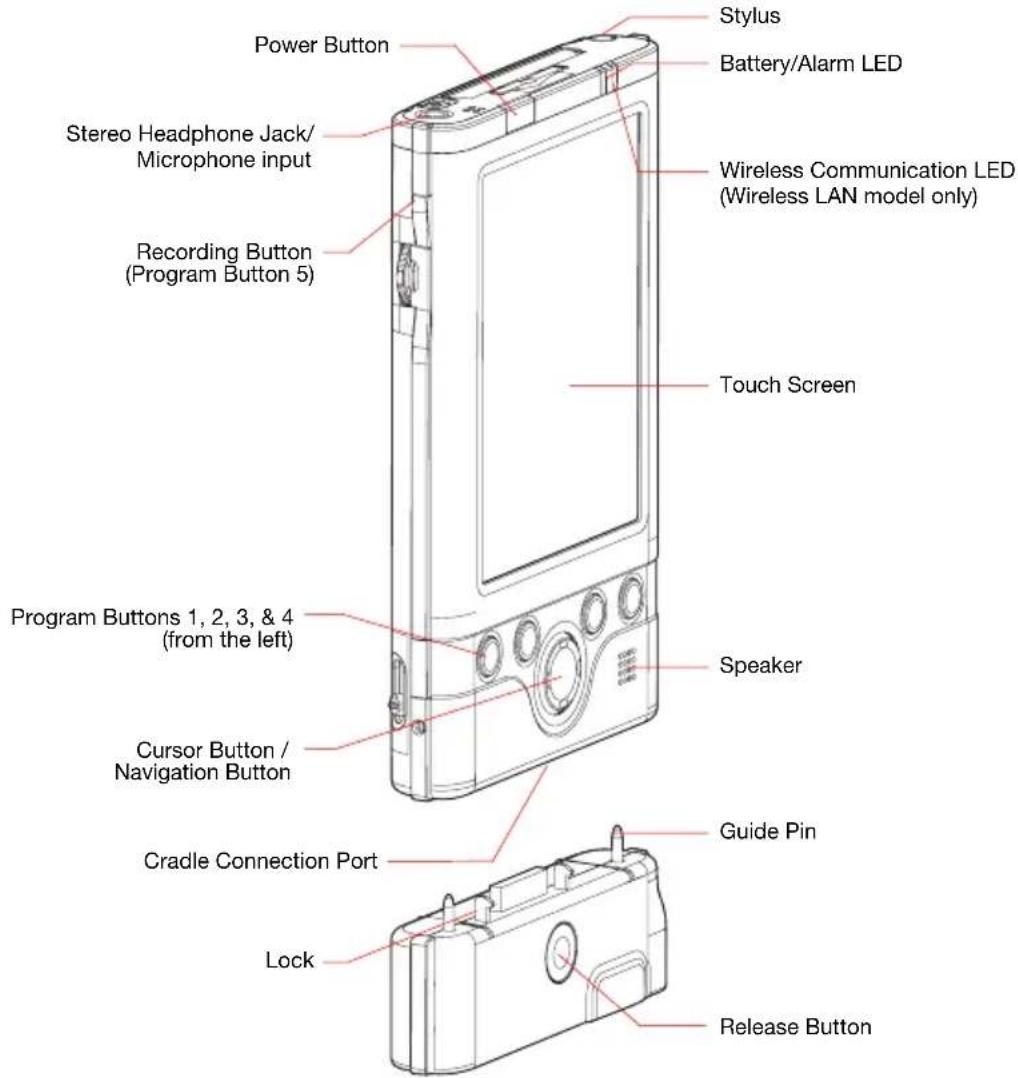
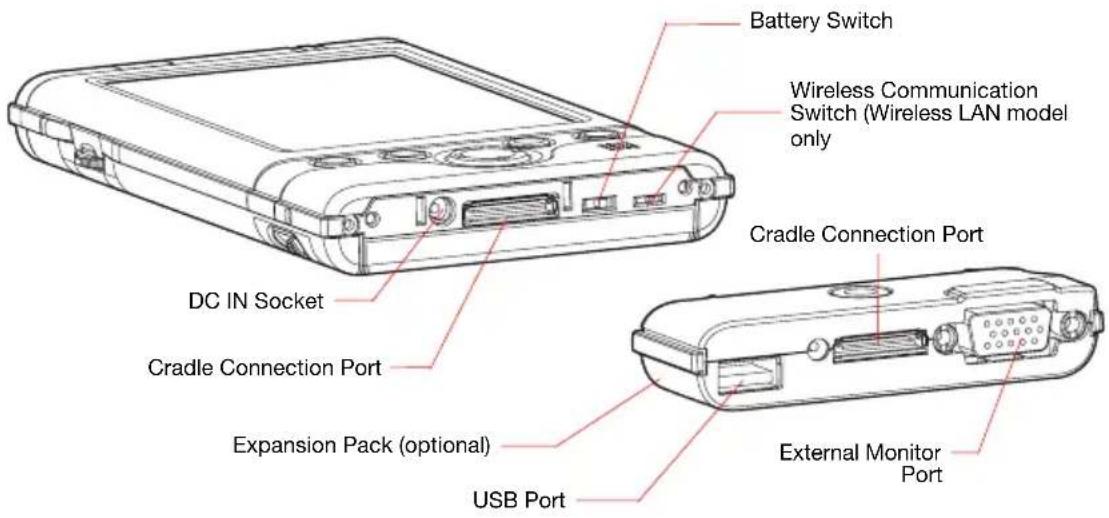
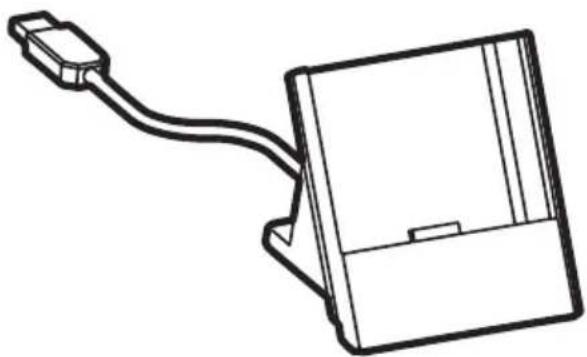
The Cradle
natural_image
Line drawing of a USB cable connector with a rectangular housing (no text or symbols)Initial Setting of Program Buttons
Program button 1 = Calendar
Program button 2 = Tasks
Program button 3 = Home
Program button 4 = Contacts
Program button 5 = Voice recorder
Main unit (back view)

Power Button
The power button performs the functions described in the table below.
| Power button | When the power is off | When the power is on |
| Press and hold. | The power turns on. | The screen light alternately turns on/off. |
| Press it quickly. | The power turns on. | The power turns off. |
Battery Switch
The battery switch supplies/cuts off the battery power to the Toshiba Pocket PC e750.
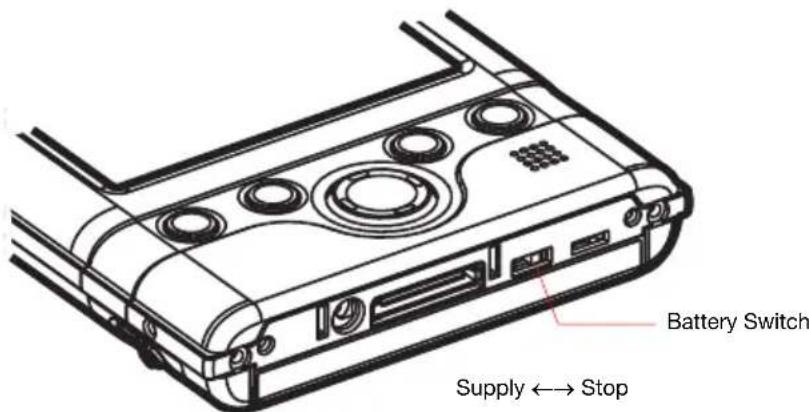
The setting of this switch at shipment is “stop”. When using the Toshiba Pocket PC for the first time, slide this switch to the left (the “supply” side) with the stylus.

Switching the battery switch to the "stop" position at any time will lead to loss of data.
Battery/Alarm LED
The Battery/Alarm LED indicates the machine condition.
Flashing orange When the preset alarm time, which was set through Calendar or Tasks, goes off, the lamp flashes.
Orange Indicates charging of the battery.
Yellow The battery charging process is stopped due to the ambient temperature being too high or low. Charge the battery in an ambient temperature of approx. 5°C to 40°C.
Green Indicates full charge of the battery.
Wireless Communication Switch (Wireless LAN/Bluetooth model only)
- To enable Wireless module, make sure the Wireless Communication Switch is turned on. (The default setting is Power Off. Slide the switch to the left to turn the power on.)
- If this is your first time turning on the switch, the IP Address Page will pop up for you to set the IP address, Subnet mask and Default gateway.

natural_image
Line drawing of a rectangular electronic device with ports and connectors (no text or symbols)Wireless Communication Switch (On Off)
Wireless LED Descriptions
LED indicates the different status:
Off Wireless Communication Switch is turned OFF
Orange Wireless Communication Switch is turned ON
How to Use the Stylus
The stylus is used for menu selection or data input on the touch-screen of the Toshiba Pocket PC e750.
Tap: Touch the screen once with the stylus to open items and select options.
Drag: Hold the stylus on the screen and drag it across to select text and images. Drag in a list to select multiple items.
Tap and hold: Tap and hold the stylus on an item to see a list of actions available for that item. On the pop-up menu that appears, tap the action you want to perform.

When you operate the touch screen of the Toshiba Pocket PC e750, use the supplied stylus.
If the tip of the stylus is damaged, do not use it. If you operate the touch screen with a damaged stylus or a ballpoint pen, the touch screen may be damaged.
When the stylus is damaged, please purchase a new one.
About the Cursor Button
You can move a cursor (selection display) on the screen by pressing the upper, lower, right or left part of the cursor button.
You can select a program to launch by pressing the center part of the cursor button.

The cursor movement is different depending on the screen. When the cursor is at the right or the left side of the screen, it may not move.
About the Scroller
You can also move the cursor on the screen by moving the scroller up and down.
You can select a program to launch by pressing the scroller.
Battery Charging
When using the Toshiba Pocket PC e750 for the first time, set the battery switch to the supply side, and then charge the battery with the supplied AC adapter.
How to Charge the Battery
You can use two charging methods.

Turn the unit off before connecting the AC Adapter and Pocket PC.
Method 1. Connect the supplied AC adapter and the cradle as shown in the figure below, and then insert the Toshiba Pocket PC e750 into the cradle.

natural_image
Diagram showing connections between a power outlet, plug-in socket, and electronic device (no text or symbols)Method 2. Connect the supplied AC adapter and the Toshiba Pocket PC e750 as shown in the figure below.

natural_image
Diagram showing connections between a power plug, a switch, and an electronic device (no text or symbols present)
For charging the battery, maintain an ambient temperature from approx. 5°C to 40°C.
When the lamp glows orange or green during the battery charging, you can use the Toshiba Pocket PC e750.
When the battery is completely charged, the Battery/Alarm LED colour will change to green.
How to Attach/Detach the Main Battery Pack
- Turn off the power.
- Switch the Battery Pack Lock to release the battery pack.
- Attach/Detach battery from the Pocket PC.


You cannot turn on the power if the Battery Pack Lock is at the Release position.

You can change the main battery without data loss because the Toshiba Pocket PC e750 has a rechargeable backup battery. However, the capacity of the backup battery is limited, therefore when you change the main battery, attach the new main battery and switch the Battery Pack Lock to the lock side as soon as possible.
How to Use the optional High Capacity Battery Pack
- Turn off the power.
- Switch the Battery Pack Lock to release the battery pack.
- Remove battery from the Pocket PC.

natural_image
Diagram showing two views of a smartphone with an open lid, illustrating the folding and disassembly process (no text or symbols present)- Connect the High Capacity Battery pack to the Pocket PC.
- Switch the Battery Pack Lock to lock the High Capacity Battery pack.

You cannot turn on the power if the Battery Pack Lock is at the Release position.

You can replace the main battery with the High Capacity Battery without data loss because the Pocket PC e750 has a rechargeable backup battery. However, the capacity of the backup battery is limited, therefore when you change the main battery, attach the new main battery and switch the Battery Pack Lock to the lock side as soon as possible.
How to Prolong Battery Life
■ Use the Toshiba Pocket PC e750 with the AC adapter.
When you use the Toshiba Pocket PC under the following conditions, the power consumption will be higher than normal. Please use the AC adapter when:
The Toshiba Pocket PC e750 is operated while connected to your computer.
The Toshiba Pocket PC e750 is operated with a storage card or with any other optional equipment.
- Select the short power-off time in the setting menu. This will shorten the time the unit will remain on if not used. For more information, see “Customize Your Toshiba Pocket PC” in this chapter.
■ Turn off the Screen Light. - Set the screen brightness to power save mode (Med Bright or low Bright). Also shorten the light turn-off time. For more information, see “Customize Your Toshiba Pocket PC” in this chapter.
Use the Toshiba Pocket PC with an ambient temperature between 15^ C ( 59^ F) and 25^ C ( 77^ F). This temperature range is the most effective for the battery.
When you use the Toshiba Pocket PC e750 in high or low temperature environments, the operable time is shortened due to the decrease of the battery capacity.
Turn off the Wireless Communication Switch when you don't use Wireless LAN (Wireless LAN models only).
Battery Life
The removable battery has a limited life. Repeated charging/discharging of the battery gradually decreases operable time. When the operable time has been diminished, it is time to replace the removable battery with a new one.
Do not leave the Toshiba Pocket PC in a place of high or low temperature. It may shorten battery life.

If you have not used the Toshiba Pocket PC for several days, its battery charge level reading may be inaccurate. Fully recharge the battery before using.
Battery Charge Level and Stored Data Protection
If the battery charge level becomes extremely low, or the battery becomes completely discharged, the memory data stored in the Toshiba Pocket PC will be lost.
When the low battery status icon or the alarm message appears, immediately connect the AC adapter to your Toshiba Pocket PC and charge the battery.

The battery gradually discharges even if the device is not being used. When the Toshiba Pocket PC is left for a long time, the battery of the Toshiba Pocket PC may completely discharge.
As a precaution, it is recommended that you save the Toshiba Pocket PC's memory data to your computer or to a storage card.
The manufacturer is not responsible for data change or data loss due to battery discharge.
How to Use the optional Expansion Pack
You can use the optional Toshiba Expansion Pack to connect the Pocket PC e750 to additional peripherals.

Parts and Functions of the Expansion Pack
The Cradle Connection Port allows you to connect the Expansion Pack to the Cradle.
The External Monitor Port is a standard 15-pin RGB port for connecting an external display device such as a monitor or projector. Supported resolutions are:
640 x 480 64K colours @60Hz
800 x 600 64K colours @60Hz

Only IA-Presenter and IA Screen Mirror (see chapter 10) can output the image to the external monitor. Other applications cannot output the image to the external monitor.
The USB Port allows you to connect a USB keyboard to the Pocket PC.

Only use a Microsoft Pocket PC compatible keyboard.
When pressed, the Release Button releases the Expansion Pack from the Pocket PC e750.
Connecting the Expansion Pack to the Pocket PC
-
Plug the Guide Pins into the corresponding jacks on the Pocket PC.
-
A light click is heard when the Expansion Pack is locked in place.

The locks are based on foolproof design to help you connect the Expansion Pack to the Pocket PC with the right face-up, i.e. the face with the Release Button.
Releasing the Expansion Pack from the Pocket PC
Press the Release Button on the Expansion Pack and gently remove the Pack from the Pocket PC.
How to use the optional USB Host Cable
The optional USB Host Cable allows you to connect a USB keyboard to the Pocket PC.
To connect a USB keyboard to the Pocket PC:
- Turn off the power.
- Plug the optional USB Host Cable to the Pocket PC.
- Connect a USB keyboard to the USB Port of the optional USB Host Cable.

Charging the battery or connect AC adapter if the battery power is low. You cannot use a USB keyboard if the battery power is less than 15%.


Use only a Microsoft Pocket PC compatible keyboard.
Initial Setup
When using the Toshiba Pocket PC e750 for the first time, follow the initial setup procedures below after the battery has been charged.
-
Move the battery switch to the "supply" position. The Toshiba Pocket PC e750 powers on automatically and the Welcome screen appears. Tap the screen to start the following setup.
-
Execute touch screen alignment.
When the alignment screen appears, tap the center of the cross target with the stylus. The next target position changes upon tapping the target. Five taps completes the positioning alignment. The screen then changes to the Stylus screen.
If a finger or any other object besides the stylus touches the screen during alignment, the alignment will be cancelled and you must repeat the procedure.
- Read how to use the stylus.
Read and understand the stylus operation, and then tap NEXT.

For more information on stylus operation, see “How to Use the Stylus” in this chapter.
- Learn the pop-up menu operation.
Read the on-screen explanation and then follow the instructions. Display the pop-up menu, and cut and paste the data according to the screen instructions.
After you finish the paste operation, this stage is completed. Tap NEXT.
- Set the TIME ZONE.
When tapping the right ▼ mark, the city and the time zone list appears. Tap the desired city and time zone.
- When the setup is completed, tap NEXT.
- Complete the initial setup.
When the Complete screen appears, the initial setup is completed.
■ After tapping the screen, you can use the Toshiba Pocket PC.

When you tap the Complete screen, the Today screen appears. For more information, see “Today screen” in this chapter.
Inserting a CF II Card
- Turn off the power.
- Remove the dummy card.
- Insert the CF II card confirming the direction of the card. Line up the side grooves of the card and the groove edge of the card slot. Insert the card smoothly and completely.

natural_image
Technical line drawing of a device's internal structure showing a rectangular housing and a separate open panel with internal components (no text or symbols)- Press down on the card until it clicks into place.
To remove a card:
- Turn off the power.
- Lightly press down the release button with the stylus. The button will pop out. Press down on the release button again. The card will withdraw slightly from the slot.
- Pull the card straight up to remove.


Use the stylus to release the CF II card.
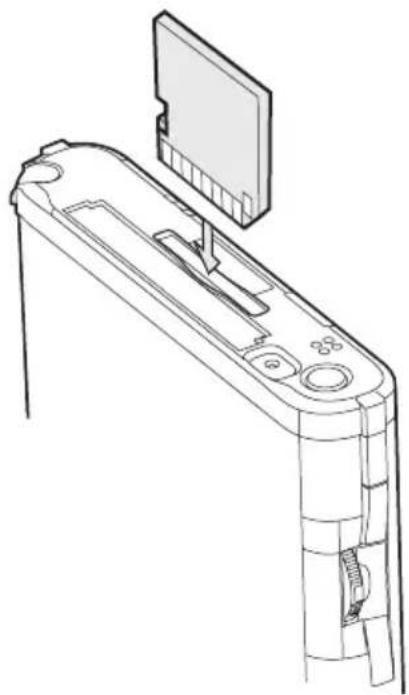
Inserting an SD Card
-
Turn off the power.
-
Remove the dummy card.
-
Insert the card with its contact surface (metal contact surface) facing the back of the Toshiba Pocket PC e750.
-
Press down on the card until it clicks.
natural_image
Technical line drawing of a device handle assembly with a flat panel and internal components (no text or symbols)To remove a card:
-
Turn off the power.
-
Lightly press the card down until a clicking sound is heard. The card will pop out slightly from the slot.
-
Pull the card straight up to remove it.

natural_image
Technical line drawing of a handheld device with internal components and directional arrows indicating movement (no text or symbols)Connecting to a Computer
Before connecting your Toshiba Pocket PC to a computer, check the following:
■ ActiveSync has been installed on your computer. (See Chapter 3.)
The position of connecting port on the computer may differ according to the computer type.
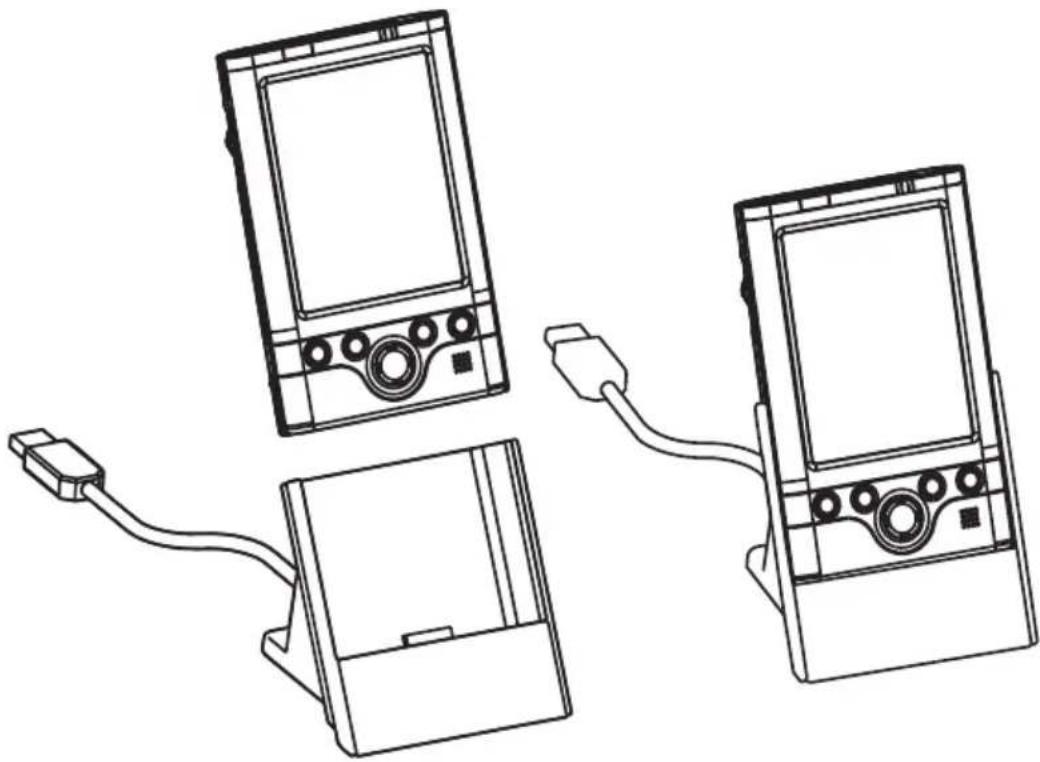
To Connect Using the Supplied Cradle:
- Connect the USB cradle to your computer as shown in the illustration below.

natural_image
Line drawing of a device rear panel connected to a cable via a plug, showing ports and connectors (no text or symbols)- Insert the Pocket PC into the cradle.
natural_image
Line drawing of three electronic devices connected by cable, showing front, side, and top views (no text or symbols)To connect directly using a connection cable:
Connect the Pocket PC directly to your computer using an optional USB Client cable.


When the Pocket PC is connected to another device via a USB Client cable do not plug the AC adapter directly into the Pocket PC as this may lead to interference. Instead, plug the AC adapter into the port on the USB Client cable connector.
Today Screen
When you turn on your device for the first time each day (or after 4 hours of inactivity), you'll see the Today screen. You can also display it by tapping 📁 and then Today. On the Today screen, you can see at a glance important information for the day.

Following are some of the status icons you may see.
| Status Icon Meaning | |
| Turns all sounds on and off | |
| Main battery is charging | |
| Main battery is low | |
| Main battery is very low | |
| Main battery is full | |
| Connection is active | |
| Connection is inactive | |
| Synchronization is occurring | |
| Notification that one or more instant messages were received | |
| Notification that one or more e-mail messages were received | |
| Traffic Monitoring Utility (Wireless LAN model only) |

If more notification icons need to be displayed than there is room to display them, the Notification icon, 📋 will display. Tap the icon to view all notification icons.
Programs
You can switch from one program to another by selecting it from the menu. (You can customize which programs you see on this menu. For information, see “Adjusting Settings,” later in this chapter.) To access some programs, you’ll need to tap Programs, and then the program name.
You can also switch to some programs by pressing a program button. Your device has one or more program buttons located on the front or side of the device. The icons on the buttons identify the programs they switch to.

Some programs have abbreviated labels for check boxes and drop-down menus. To see the full spelling of an abbreviated label, tap and hold the stylus on the label. Drag the stylus off the label so that the command is not carried out.
The following table contains a partial list of programs that are on your device. Look on the Toshiba Pocket PC Companion CD for additional programs that you can install onto your device.
Icon Program Description
 | ActiveSync Synchronize information between your Pocket PC and computer. | |
 | Calendar Keep track of your appointments and create meeting requests. | |
 | Contacts Keep track of your friends and colleagues. | |
 | Inbox Send and receive e-mail messages. | |
 | Pocket Internet Explorer | Browse Web and WAP sites, and download new programs and files from the Internet. |
 | Notes Create handwritten or typed notes, drawings, and recordings. | |
 | Tasks Keep track of your tasks. | |
 | Pocket Excel Create Excel spreadsheet or view and edit Excel spreadsheet created on your computer. | |
 | MSN Messenger Send and receive instant messages with your MSN Messenger contacts. | |
 | Pocket Word Create new documents or view and edit Word documents created on your computer. | |
Navigation Bar and Command Bar
The navigation bar is located at the top of the screen. It displays the active program and current time, and allows you to switch to programs and close screens.
Use the command bar at the bottom of the screen to perform tasks in programs. The command bar includes menu names, buttons, and the Input Panel button. To create a new item in the current program, tap New. To see the name of a button, tap and hold the stylus on the button. Drag the stylus off the button so that the command is not carried out.

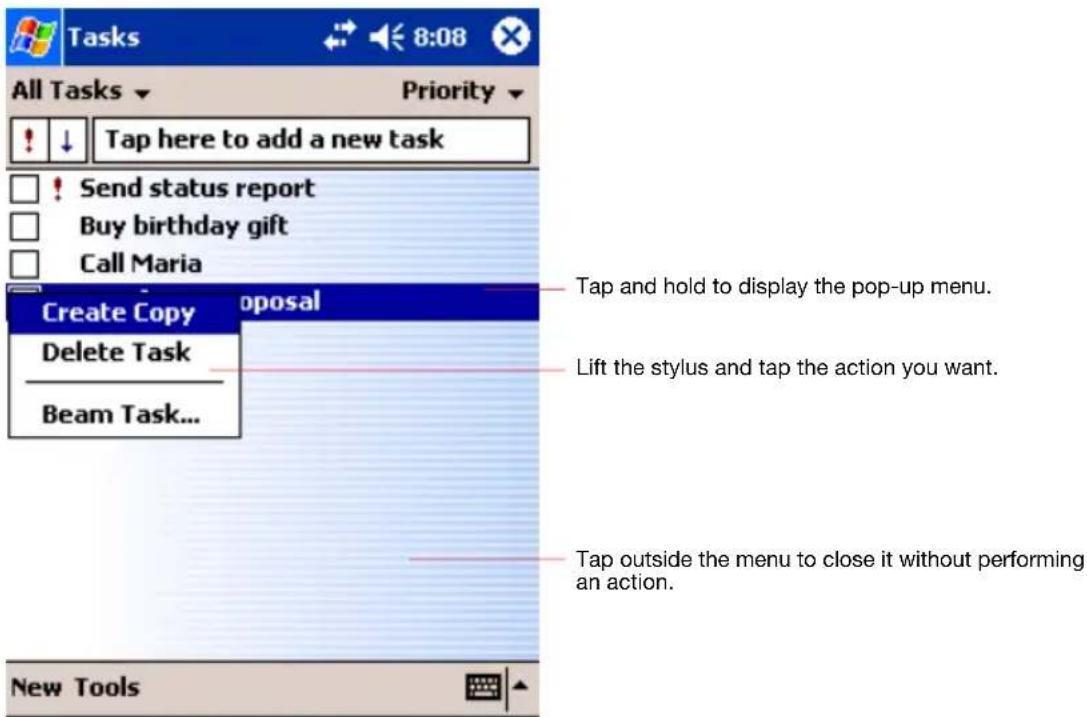
Pop-up Menus
With pop-up menus, you can quickly choose an action for an item. For example, you can use the pop-up menu in the contact list to quickly delete a contact, make a copy of a contact, or send an e-mail message to a contact. The actions in the pop-up menus vary from program to program. To access a pop-up menu, tap and hold the stylus on the item name that you want to perform the action on. When the menu appears, lift the stylus, and tap the action you want to perform. To close the menu without performing an action, tap anywhere outside the menu.
Notifications
Your device reminds you in a variety of ways when you have something to do. For example, if you've set up an appointment in Calendar, an e-mail message arrives, or a friend sends you an instant message, you'll be notified in any of the following ways:
A message box appears on the screen
A sound, which you can specify, is played
A light flashes on your device
To choose reminder types and sounds for your device, tap and then Settings. In the Personal tab, tap Sounds & Notifications. The options you choose here apply throughout the device.
Enter Information on Your Toshiba Pocket PC
You have several options for entering new information:
Use the input panel to enter typed text, either by using the soft keyboard or other input method
Write directly on the screen
Draw pictures on the screen
Speak into your device microphone to record a message
Use Microsoft® ActiveSync® to synchronize or copy information from your computer to your device. For more information on ActiveSync, see ActiveSync Help on your computer.
Entering Text Using the Input Panel
Use the input panel to enter information in any program on your device.
You can either type using the soft keyboard or write using Letter Recognizer, Block Recognizer, or Transcriber. In either case, the characters appear as typed text on the screen.
To show or hide the input panel, tap the Input Panel button (☐). Tap the arrow next to the Input Panel button to see your choices.

When you use the input panel, your device anticipates the word you are typing or writing and displays it above the input panel. When you tap the displayed word, it is inserted into your text at the insertion point. The more you use your device, the more words it learns to anticipate.
![monthly mee meeting Tap here if this is the right word. 123 1 2 3 4 5 6 7 8 9 0 - = Tab q w e r t y u i o p [ ] CAP a s d f g h j k l ; ' Shift z x c v b n m , . / Ctl áü ` \ ↓ ↑ ← → New Edit Tools](/content/2026/05/1085736/images/8902f861e185937019db94e64388efc56061ca63507c69502959776431fb83f2.jpg)

To change word suggestion options, such as the number of words suggested at one time, tap 📄, Settings, Personal tab, Input, and then the Word Completion tab.
To type with the soft keyboard:
- Tap the arrow and then Keyboard.
- On the soft keyboard that is displayed, tap the keys with your stylus.

To use larger keys, tap the arrow, Options, select Keyboard in Input method, and then select Large Keys.
To use Letter Recognizer:
With Letter Recognizer you can write letters using the stylus just as you would on paper.
- Tap the arrow and then Letter Recognizer.
- Write a letter in the box.
When you write a letter, it is converted to typed text that appears on the screen. For specific instructions on using Letter Recognizer, with Letter Recognizer open, tap the question mark next to the writing area.
To use Block Recognizer:
With Block Recognizer you can input character strokes using the stylus that are similar to those used on other devices.
- Tap the arrow and then Block Recognizer.
- Write a letter in the box.
When you write a letter, it is converted to typed text that appears on the screen. For specific instructions on using Block Recognizer, with Block Recognizer open, tap the question mark next to the writing area.
To use Transcriber:
With Transcriber you can write anywhere on the screen using the stylus just as you would on paper. Unlike Letter Recognizer and Block Recognizer, you can write a sentence or more of information. Then, pause and let Transcriber change the written characters to typed characters.
- Tap the arrow and then Transcriber.
- Write anywhere on the screen.
For specific instructions on using Transcriber, with Transcriber open, tap the question mark in the lower right hand corner of the screen.
To select typed text:
If you want to edit or format typed text, you must select it first.
- Drag the stylus across the text you want to select.
You can cut, copy, and paste text by tapping and holding the selected words and then tapping an editing command on the pop-up menu, or by tapping the command on the Edit menu.
Writing on the Screen
In any program that accepts writing, such as the Notes program, and in the Notes tab in Calendar, Contacts, and Tasks, you can use your stylus to write directly on the screen. Write the way you do on paper. You can edit and format what you've written and convert the information to text at a later time.
To write on the screen:
Tap the Pen button to switch to writing mode. This action displays lines on the screen to help you write.

Tap the Pen button and use your stylus like a pen.

Some programs that accept writing may not have the Pen button. See the documentation for that program to find out how to switch to writing mode.
To select writing:
If you want to edit or format writing, you must select it first.
- Tap and hold the stylus next to the text you want to select until the insertion point appears.
- Without lifting, drag the stylus across the text you want to select.
If you accidentally write on the screen, tap Tools, then Undo and try again. You can also select text by tapping the Pen button to deselect it and then dragging the stylus across the screen.
You can cut, copy, and paste written text in the same way you work with typed text: tap and hold the selected words and then tap an editing command on the pop-up menu, or tap the command on the Edit menu.
To convert writing to text:
Tap Tools and then Recognize.
If you want to convert only certain words, select them before tapping Recognize on the Tools menu (or tap and hold the selected words and then tap Recognize on the pop-up menu). If a word is not recognized, it is left as writing.


Select the text you want to convert and Tap Recognize on the pop-up menu.
The writing is turned into text.
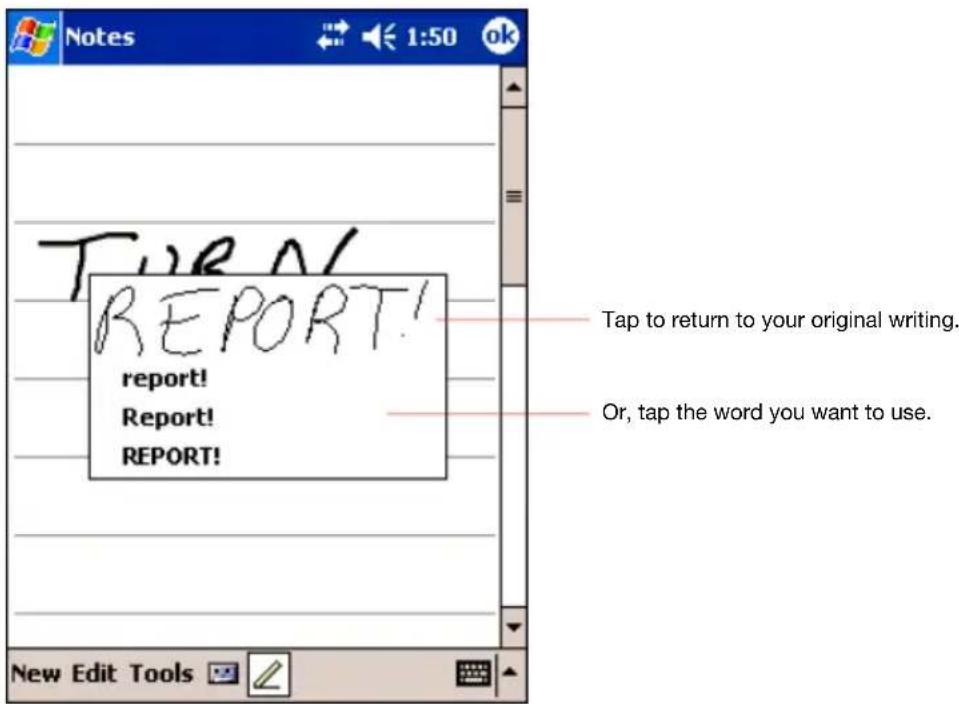
If the conversion is incorrect, you can select different words from a list of alternates or return to the original writing. To do so, tap and hold the incorrect word (tap one word at a time). On the pop-up menu, tap
Alternates. A menu with a list of alternate words appears. Tap the word you want to use, or tap the writing at the top of the menu to return to the original writing.
Tips for getting good recognition:
Write neatly.
Write on the lines and draw descendants below the line. Write the cross of the "t" and apostrophes below the top line so that they are not confused with the word above. Write periods and commas above the line.
For better recognition, try increasing the zoom level to 300% using the Tools menu.
Write the letters of a word closely and leave big gaps between words so that the device can easily tell where words begin and end.
Hyphenated words, foreign words that use special characters such as accents, and some punctuation cannot be converted.
If you add writing to a word to change it (such as changing a "3" to an "8") after you attempt to recognize the word, the writing you add will not be included if you attempt to recognize the writing again.
Drawing on the Screen
You can draw on the screen in the same way that you write on the screen. The difference between writing and drawing on the screen is how you select items and how they can be edited. For example, selected drawings can be resized, while writing cannot.
To create a drawing
Cross three ruled lines on your first stroke. A drawing box appears. Subsequent strokes in or touching the drawing box become part of the drawing. Drawings that do not cross three ruled lines will be treated as writing.
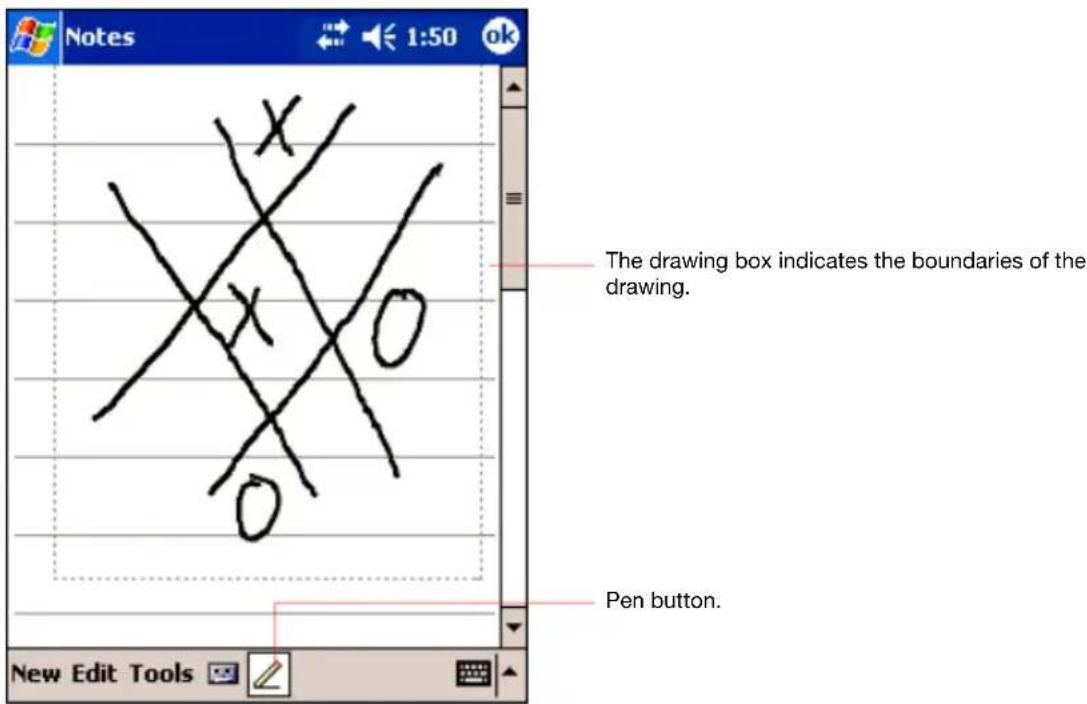

You may want to change the zoom level so that you can more easily work on or view your drawing. Tap Tools and then a zoom level.
To select a drawing
If you want to edit or format a drawing, you must select it first.
Tap and hold the stylus on the drawing until the selection handle appears. To select multiple drawings, deselect the Pen button and then drag to select the drawings you want.
You can cut, copy, and paste selected drawings by tapping and holding the selected drawing and then tapping an editing command on the popup menu, or by tapping the command on the Edit menu. To resize a drawing, make sure the Pen button is not selected, and drag a selection handle.
Recording a Message
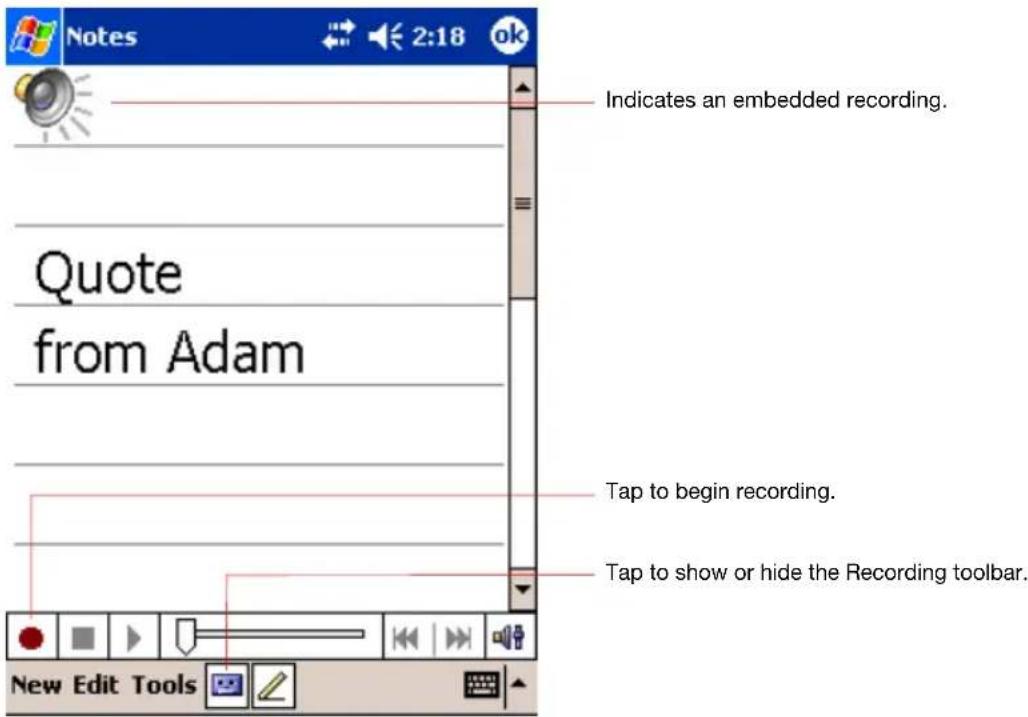
In any program where you can write or draw on the screen, you can also quickly capture thoughts, reminders, and phone numbers by recording a message. In Calendar, Tasks, and Contacts, you can include a recording in the Notes tab. In the Notes program, you can either create a standalone recording or include a recording in a written note. If you want to include the recording in a note, open the note first. In the Inbox program, you can add a recording to an e-mail message.
To create a recording:
- If you do not see the Record/Playback toolbar, tap 📄.
- Hold your device's microphone near your mouth or other source of sound.
- Tap and make your recording.
- Tap ■ when finished. If you are recording in an open note, an icon will appear in the note. If you are creating a stand-alone recording, it will appear in the note list.

You can quickly create a recording by holding down the Record hardware button. When you hear the beep, begin your recording. Release the button when you are finished. The new recording is stored in the open note or as a stand-alone recording if no note is open.
To play a recording, tap the recording icon in the open note or tap the recording in the note list.
Using My Text
When using Inbox or MSN Messenger, use My Text to quickly insert preset or frequently used messages into the text entry area. To insert a message, tap My Text and tap a message. Select the message you wish to edit and make desired change.

You can add text after inserting a My Text message before sending it.
To edit a My Text message, tap Tools and then tap Edit My Text Messages.


Find and Organise Information
The Find feature on your device helps you quickly locate information.
On the menu, tap Find. Enter the text you want to find, select a data type, and then tap Go to start the search.

To quickly find information that is taking up storage space on your Pocket PC, select Larger than 64 KB in Type.
You can also use the File Explorer to find files on your device and to organize these files into folders. On the menu, tap Programs, and then File Explorer.
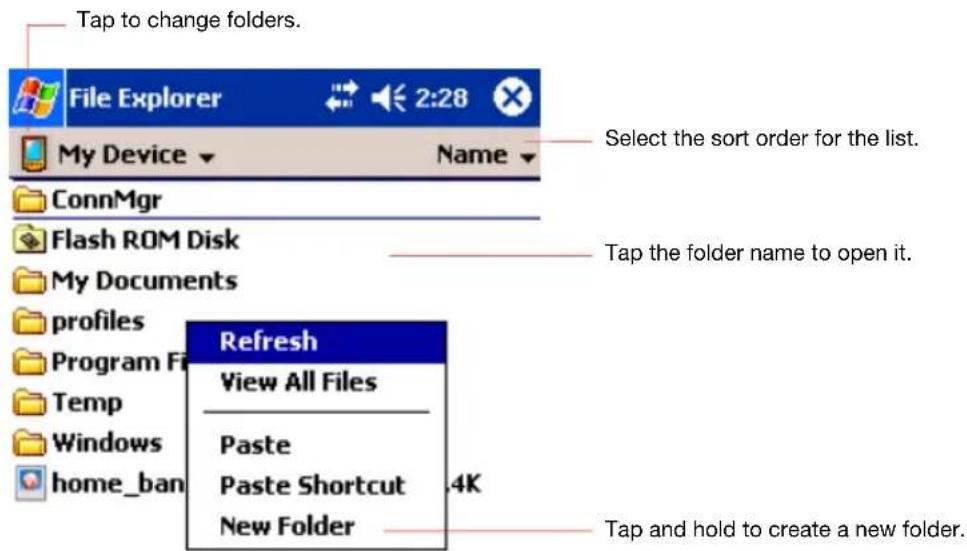


A next to a file name indicates the file is saved on a storage card. You can move files in File Explorer by tapping and holding the item you want to move, and then tapping Cut or Copy and Paste on the pop-up menu.
Customize Your Toshiba Pocket PC
You can customize your device by adjusting device settings and installing additional software.
Adjusting Settings
You can adjust device settings to suit the way you work. To see available options, tap 📋, Settings, then the Personal or System tab located at the bottom of the screen.
You might want to adjust the following:
■ Clock, to change the time or to set alarms
■ Menus, to customize what appears on the menu, and to enable a pop-up menu from the New button
- Owner Information, to enter your contact information
■ Password, to limit access to your device
■ Power, to maximize battery life
Today, to customize the look and the information that is displayed on the Today screen
Adding or Removing Programs
Programs added to your device at the factory are stored in ROM (read-only memory). You cannot remove this software, and you'll never accidentally lose ROM contents. ROM programs can be updated using special installation programs with a *.zip extension. All other programs and data files added to your device after factory installation are stored in RAM (random access memory).
You can install any program created for your device, as long as your device has enough memory. The most popular place to find software for your device is on the Pocket PC Web site
(http://www.microsoft.com/mobile/pocketpc).
To add programs using ActiveSync
You'll need to install the appropriate software for your device on your desktop computer before installing it on your device.
- Determine your device and processor type so that you know which version of the software to install.
Tap 📋 and then Settings. On the System tab, tap About. In the Version tab, make a note of the information in Processor.
-
Download the program to your computer (or insert the CD or disk that contains the program into your computer). You may see a single *.zip, *.exe, or *.zip file, a Setup.exe file, or several versions of files for different device types and processors. Be sure to select the program designed for the Toshiba Pocket PC and your device processor type.
-
Read any installation instructions, Read Me files, or documentation that comes with the program.
Many programs provide special installation instructions.
- Connect your Pocket PC and computer.
- Double-click the *.exe file.
If the file is an installer, the installation wizard will begin. Follow the directions on the screen. Once the software has been installed on your computer, the installer will automatically transfer the software to your device.
If the file is not an installer, you will see an error message stating that the program is valid but it is designed for a different type of computer. You will need to move this file to your device. If you cannot find any installation instructions for the program in the Read Me file or documentation, use ActiveSync Explore to copy the program file to the Program Files folder on your Pocket PC. For more information on copying files using ActiveSync, see ActiveSync Help.
Once installation is complete, tap 📄, Programs, and then the program icon to switch to it.
To add a program to the Start menu
Tap 📄, Settings, Menus, the Start Menu tab, and then mark the check box for the program. If you do not see the program listed, you can either use File Explorer on the device to move the program to the Start Menu folder, or use ActiveSync on the computer to create a shortcut to the program and place the shortcut in the Start Menu folder.
Using File Explorer on the device: Tap 📂, Programs, File Explorer, and locate the program (tap the folder list, labeled My Documents by default, and then My Device to see a list of all folders on the device). Tap and hold the program and tap Cut on the pop-up menu. Open the Start Menu folder located in the Windows folder, tap and hold a blank area of the window, and tap Paste on the pop-up menu. The program will now appear on the menu. For more information on using File Explorer, see “Find and Organize Information”, earlier in this chapter.
Using ActiveSync on the computer: Use the Explorer in ActiveSync to explore your device files and locate the program. Rightclick the program, and then click Create Shortcut. Move the shortcut to the Start Menu folder in the Windows folder. The shortcut now appears on the menu. For more information, see ActiveSync Help.
To remove programs
Tap 📋 and then Settings. On the System tab, tap Remove Programs
If the program does not appear in the list of installed programs, use File Explorer on your device to locate the program, tap and hold the program, and then tap Delete on the pop-up menu.
Setting a Password
You can protect data or settings from a third person by setting a password which is requested when turning power on.
- Tap and then Settings. On the Personal tab, tap Password.
- Select the type of password you would like to use.
- Enter a password and tap OK.
- Tap YES on the confirmation screen. The password is saved and the screen returns to the Personal tab screen
If you tap YES on the confirmation screen to return to the Personal tab screen, it becomes necessary to enter the password even for displaying the Password setting screen.
In case you forget the password, it is necessary to initialize the Pocket PC. Please note that when initialization is executed, data or settings stored in the Pocket PC are all deleted.
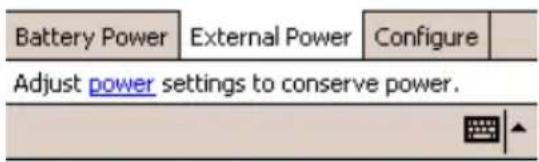
To Set Screen Light
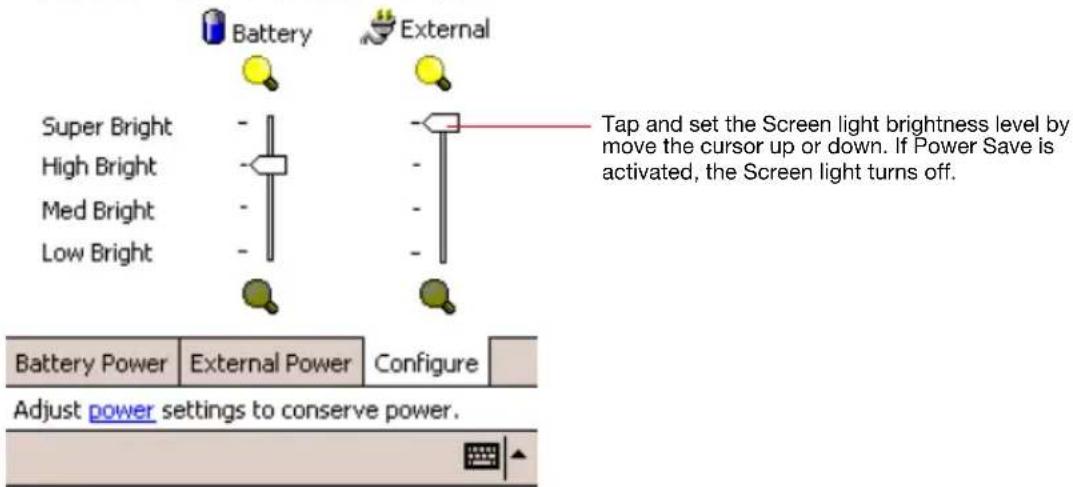
You can set the screen brightness for better sight according to a place of use. You can also set the time that elapses until the screen light turns off automatically after the last operation.
- Tap 📋 and then Settings. On the System tab, tap Screen light.
- Set the Screen light on battery power...


...or set the Screen light on External power

Screen light
On external power:

Turn off screen light if device is not used for


Turn on screen light when a button is pressed or the screen is tapped
3. Set the Brightness level.

Screen light
Screen light control
Using Bright Level high while on battery power will substantially reduce battery life.
- When finished, tap OK to return to the System tab screen.
Setting Power
You can set to confirm the battery remaining power and the time that elapses until the power turns off after the last operation.
- Tap and then Settings. On the System tab, tap Power.
- Set the Power.

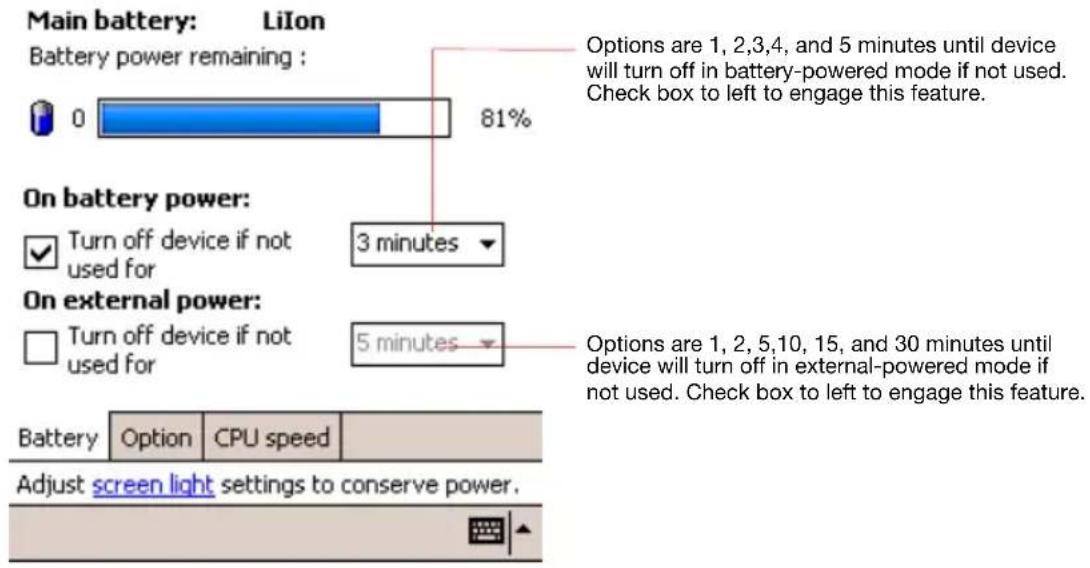
- Select the Option tab to adjust when battery alarm will come on, and to enable/disable Record and Program button wake up.

- Select CPU speed tab to set the CPU performance. To conserve battery power, select 200 MHz. Note: this will decrease performance.

Tap Apply to change the setting, then the confirmation screen is displayed.

If you tap YES, your LCD screen will become black and come back in a few seconds, and then the setting has changed.
If you tap No, the setteing has not changed.
- When finished, tap OK to return to the System tab screen.
Setting Memory
You can adjust the data storing memory and the program running memory. You can also confirm the free space of a storage card and so on. Memory for the Pocket PC is managed automatically.
To change Memory allocation:
- Tap 📁 and then Settings. On the System tab, tap Memory to display the Memory setting screen.
- Drag the knob left to right to adjust the memory allocation between Storage and Program.
- When finished, tap OK to return to the System tab screen.
To confirm usage status of a storage card:
- Tap Storage Card tab on the Memory setting screen.


- When finished, tap OK to return to the System tab screen.
To release memory:
If memory is running short of its capacity, i.e., error message display, the following methods are available to release the memory: Transfer data to a storage card and the like and delete them from the Pocket PC, delete unnecessary files, quit a program in execution, and/or delete a program not in use.
For more information on detailed operation method or the memory release method other than the above, see online help.
Flash ROM Disk (NAND Flash Memory)
The Flash ROM Disk (NAND Flash Memory) contains the built-in storage for the Pocket PC.
Data, files or programs can be stored on the Flash ROM Disk from the following sources: File Explorer, Pocket Word, Pocket Excel, Notes of Pocket Outlook, and DataBackup.
Data can be accessed on the Flash ROM Disk by using File Explorer.
- On the Start menu, tap Programs, and then File Explorer.
- Open My Device folder, and then tap Flash ROM Disk.
To confirm the memory available on the Flash ROM Disk, do the following:
- On the Start menu, tap Settings, System tab, and then Memory.
- Tap the Storage Card tab, and then select Flash ROM Disk.
To store data from Pocket Word / Notes of Pocket Outlook, open the application and do the following:
- Select a location for storage by tapping Tools, Options, and then selecting either CF card, SD Card, or Flash ROM Disk.
- Tap OK.

When accessing the data on the Flash ROM Disk, DO NOT turn off the power or reset the Pocket PC.

To store attachments in Notes of Pocket Outlook, open the application and then Tools, Options, Storage Tab. Select Store attachments. This will store the attachments on the Flash ROM Disk.
Data stored on the Flash ROM Disk are not backed up. See Making a Backup, p. 49, to make a backup of data on the Flash ROM Disk. Periodic backups of data stored on the Flash ROM Disk is recommended.
Setting Advanced Sounds
This program allows you to adjust the volume of the built-in speaker and headphone speaker on your Pocket PC.
- To adjust the system volume, tap Start, Settings, Personal tab, Sounds & Notifications.
- Tap Start and then Settings. On the System tab, tap Advanced Sounds.
- Select the Built-in tab and adjust the Volume of the built-in speaker as shown below.

- If using headphones, select the Headphone tab and make adjustments as shown in the next figure.

Setting Microphone
This program sets the Automatic Gain Control (AGC).
- Tap 📋 and then Settings. On the System tab, tap Microphone.
- Check the box below for auto or leave unchecked for manual control.

Microsoft ActiveSync
Using Microsoft® ActiveSync®, you can synchronize the information on your computer with the information on your device. Synchronization compares the data on your device with your PC and updates both computers with the most recent information. For example:
- Keep Pocket Outlook data up-to-date by synchronizing your device with Microsoft Outlook data on your PC.
■ Synchronize Microsoft Word and Microsoft Excel files between your device and desktop computer.
Your files are automatically converted to the correct format.

By default, ActiveSync does not automatically synchronize all types of information. Use ActiveSync options to turn synchronization on and off for specific information types.
With ActiveSync, you can also:
- Change synchronization settings and synchronization schedule.
■ Copy files between your device and PC.
■ Back up and restore device information. - Add and remove programs on your device.
Before you begin synchronization, install ActiveSync on your PC from the Toshiba Pocket PC Companion CD. For more information on installing ActiveSync, see your Quick Start card. ActiveSync is already installed on your device.
After installation is complete, the ActiveSync Setup Wizard helps you connect your Pocket PC to your PC, set up a partnership so you can synchronize information between your Pocket PC and your PC, and customize your synchronization settings. Your first synchronization process will automatically begin when you finish using the wizard.
After your first synchronization, take a look at Calendar, Contacts, and Tasks on your device. You'll notice that information you've stored in Microsoft Outlook on your PC has been copied to your device, and you didn't have to type a word. Disconnect your device from your PC and you're ready to go!
Once you have set up ActiveSync and completed the first synchronization process, you can initiate synchronization from your device. To switch to ActiveSync on your device, tap 📄, and then tap ActiveSync.
For information about using ActiveSync on your PC, start ActiveSync on your PC and then see ActiveSync Help.
For more information about ActiveSync on your device, switch to ActiveSync, tap 📋, and then tap Help.
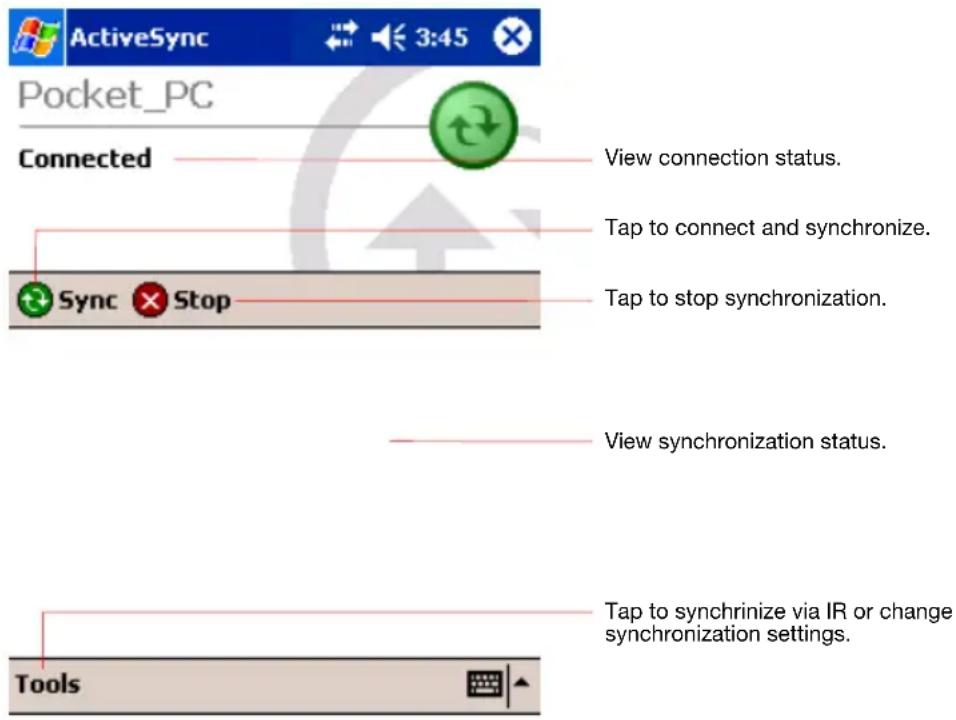
Change the synchronization schedule
Using ActiveSync, you can schedule synchronization of your device on two separate schedules. Use the peak times schedule to synchronize during working hours or other times you experience higher mail volumes. Use the off-peak schedule to synchronize during times when you experience lower mail volumes.
In ActiveSync on the device, tap Tools > Options > Mobile Schedule tab.
- To synchronize periodically during peak times, select the frequency of synchronization in the During peak times, sync list.
- To synchronize periodically during off-peak times, select the frequency of synchronization in the During off-peak times, sync list.
- To set the days and hours for peak times, tap Peak Times.
Microsoft Pocket Outlook
Microsoft® Pocket Outlook includes Calendar, Contacts, Tasks, Inbox, and Notes. You can use these programs individually or together. For example, e-mail addresses stored in Contacts can be used to address e-mail messages in Inbox.
Using ActiveSync ^® you can synchronize information in Microsoft Outlook or Microsoft Exchange on your computer with your device. You can also synchronize this information directly with a Microsoft Exchange server. Each time you synchronize, ActiveSync compares the changes you made on your device and computer or server and updates both computers with the latest information. For information on using ActiveSync, see ActiveSync Help on the computer.
You can switch to any of these programs by tapping them on the menu.
Calendar: Scheduling Appointments and Meetings
Use Calendar to schedule appointments, including meetings and other events. You can check your appointments in one of several views (Agenda, Day, Week, Month, and Year) and set Calendar to remind you of appointments with a sound or other method.


You can customize the Calendar display, such as changing the first day of the week, by tapping Options on the Tools menu.
To create an appointment
- If you are in Day or Week view, tap the desired date and time for the appointment.
- Tap New.
![Tap to return to the calendar (the appointment is saved automatically). Tap to choose from predefined text. Tap to choose from previously entered locations. Starts: 06/01/2003 12:00 PM Ends: 06/01/2003 1:00 PM All Day: No Occurs: Once Reminder: Remind me 15 minute(s) Categories: No categories... Appointment Notes 123 1 2 3 4 5 6 7 8 9 0 - = Tab q w e r t y u i o p [ ] CAP a s d f g h j k l ; ' Shift z x c v b n m , . / Ctl áü ` \ Edit](/content/2026/05/1085736/images/9ecc42cf566877a103a4479438e33e3c00bef5fa52c15bd5e750a024c7580986.jpg)
- Using the input panel, enter a description and a location. Tap first to select the field.
- If needed, tap the date and time to change them.
- Enter other desired information. You will need to hide the input panel to see all available fields.
- To add notes, tap the Notes tab. You can enter text, draw, or create a recording. For more information on creating notes, see "Notes: Capturing Thoughts and Ideas," later in this chapter.
- When finished, tap OK to return to the calendar.

If you select Remind me in an appointment, your device will remind you according to the options set in 📋. Settings, Personal tab, Sounds & Notifications.
Using the Summary Screen
When you tap an appointment in Calendar, a summary screen is displayed. To change the appointment, tap Edit.
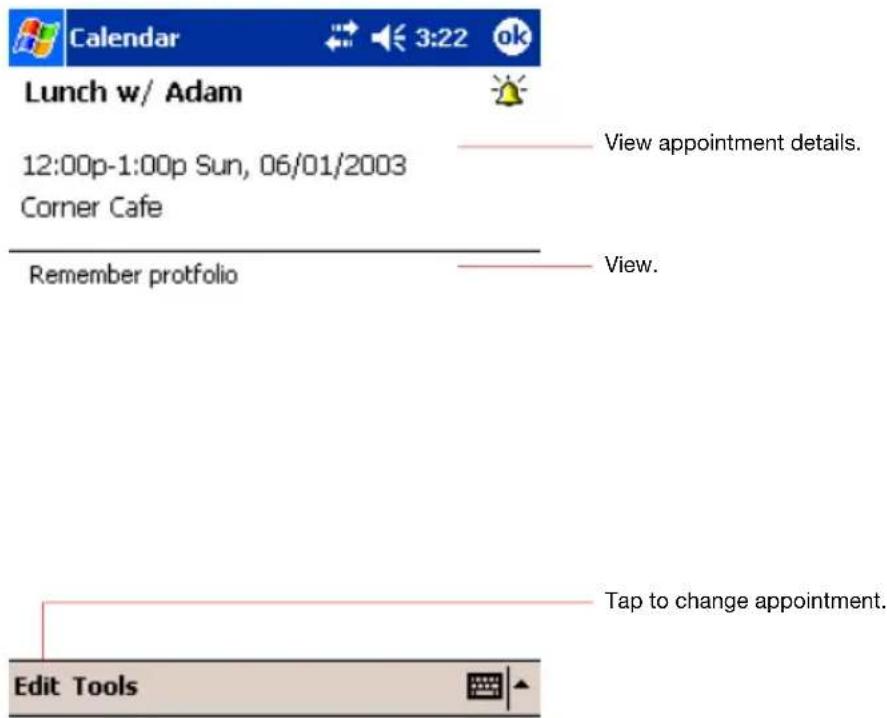
Creating Meeting Requests
You can use Calendar to set up meetings with users of Outlook or Pocket Outlook. The meeting request will be created automatically and sent either when you synchronize Inbox or when you connect to your e-mail server. Indicate how you want meeting requests sent by tapping Tools and then Options. If you send and receive e-mail messages through ActiveSync, select ActiveSync.
To schedule a meeting:
- Create an appointment by tapping New.
- In the appointment details, hide the input panel, and then tap Attendees.
- From the list of e-mail addresses you've entered in Contacts, select the meeting attendees.
The meeting notice is created automatically and placed in the Outbox folder. For more information on sending and receiving meeting requests, see Calendar Help and Inbox Help on the device.
Contacts: Tracking Friends and Colleagues
Contacts maintains a list of your friends and colleagues so that you can easily find the information you're looking for, whether you're at home or on the road. Using the device infrared (IR) port, you can quickly share Contacts information with other device users.


To change the way information is displayed in the list, tap Tools and then Options.
To create a contact:
1. Tap New.
![Contacts Name: Job title: Department: Company: Work tel: Work fax: Work addr: E-mail: Mobile tel: Details Notes 123 1 2 3 4 5 6 7 8 9 0 - = Tab g w e r tyt y u>i pivot[ ] CAP a s d f g h j k,l ; Shift z x c v b n m_/_/← Ctl äü \_ Edit Tap to return to the contact list (the contact is saved automatically). Scroll to see more fields. Notes is a good place for maps and directions.](/content/2026/05/1085736/images/ebe57d99af7170250b4d5e53ff3010dff49db667954021b722e889ac9410364b.jpg)
- Using the input panel, enter a name and other contact information. You will need to scroll down to see all available fields.
- To assign the contact to a category, scroll to and tap Categories and select a category from the list. In the contact list, you can display contacts by category.
- To add notes, tap the Notes tab. You can enter text, draw, or create a recording. For more information on creating notes, see "Notes: Capturing Thoughts and Ideas," later in this chapter.
- When finished, tap OK to return to the contact list.
Finding a contact
There are four ways to find a contact:
Tap 📄, then Find, enter the contact name (first, last, or middle), phone number, or address, select Contacts for the type, and then tap Go.
From Contacts, start typing a contact name until you see it displayed on the screen. To show all contacts again, tap the text box at the top of the screen and clear the text, or tap the arrow icon to the right of the text box.
In the contact list, tap the category list (labeled All Contacts by default) and tap the category to which you've assigned a contact. To show all contacts again, select All Contacts.
To view the names of companies your contacts work for, in the contact list, tap View > By Company. The number of contacts that work for that company will be displayed to the right of the company name.
Using the Summary Screen
When you tap a contact in the contact list, a summary screen is displayed. To change the contact information, tap Edit.

Tasks: Keeping a To Do List
Use Tasks to keep track of what you have to do.


To change the way information is displayed in the list, tap Tools and then Options.
To create a task:
- Tap New.
![Tap to return to the task list (the task is saved automatically). Tap to choose from predefined subjects. Categories: No categories... Notes is a good place for maps and drawings. Task Notes 123 1 2 3 4 5 6 7 8 9 0 - = Tab h w e r tyt u>i pivot[ ] CAP a s d f g h j k,l;i Shift z x c v b n m , . / ← Ctl áü ` \ ↓ ↑ ← → Edit](/content/2026/05/1085736/images/79bbc2889ef1d76c0fad5f47ea5ad9c271b3a55ade8c402afb677007f346467a.jpg)
- Using the input panel, enter a description.
- You can enter a start date and due date or enter other information by first tapping the field. If the input panel is open, you will need to hide it to see all available fields.
- To assign the task to a category, tap Categories and select a category from the list. In the task list, you can display tasks by category.
- To add notes, tap the Notes tab. You can enter text, draw, or create a recording. For more information on creating notes, see "Notes: Capturing Thoughts and Ideas," later in this chapter.
- When finished, tap OK to return to the task list.

To quickly create a task with only a subject, tap Entry Bar on the Tools menu. Then, tap Tap here to add a new task and enter your task information.
Using the Summary Screen
When you tap a task in the task list, a summary screen is displayed. To change the task, tap Edit.
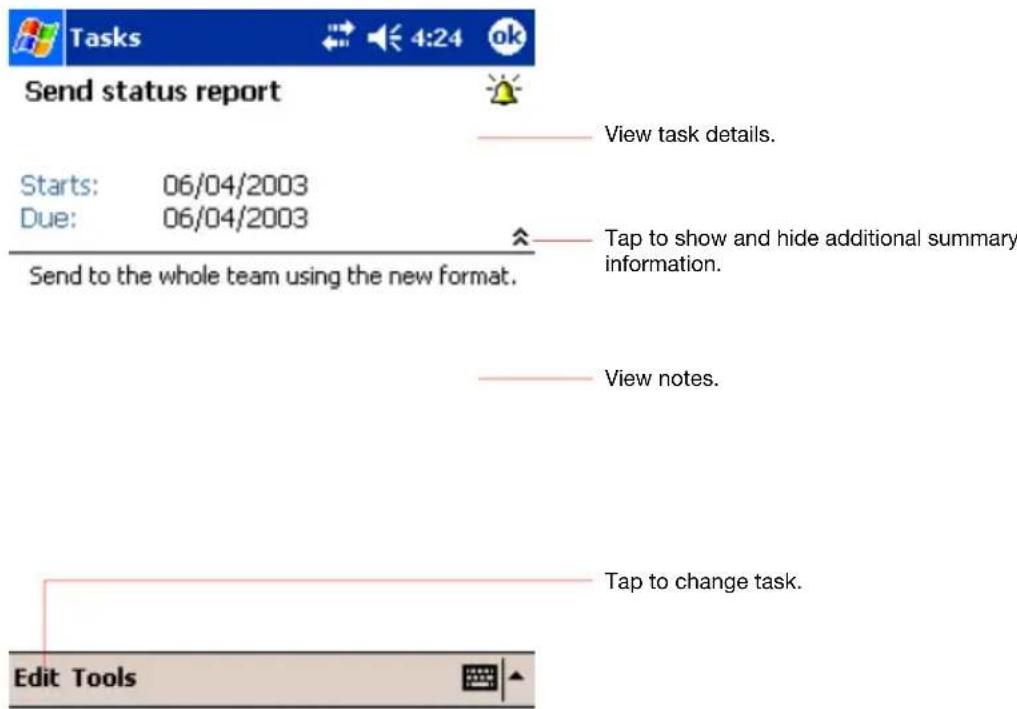
Notes: Capturing Thoughts and Ideas
Quickly capture thoughts, reminders, ideas, drawings, and phone numbers with Notes. You can create a written note or a recording. You can also include a recording in a note. If a note is open when you create the recording, it will be included in the note as an icon. If the note list is displayed, it will be created as a stand-alone recording.

To create a note:
- Tap New.
- Create your note by writing, drawing, typing, and recording. For more information about using the input panel, writing and drawing on the screen, and creating recordings, see Chapter 2.
![Tap to return to the note list (the note is saved automatically). Team meeting note: Adam will send current status to core team. Julie will get the renevue numbers. Tanner is back from the conference and reports that the product was a big hit. 123 1 2 3 4 5 6 7 8 9 0 - = Tab q w e r t y u i o p [ ] CAP a s d f g h j k l ; ' Shift z x c v b n m , . / Ctl äü ` \ New Edit Tools Tap to write on the screen. Tap to show or hide the input panel. Tap to add a recording to the note.](/content/2026/05/1085736/images/df6afaed87a6fbabcbb457480febde2682a7e77e57131e17014ddbea975af771.jpg)
Inbox: Sending and Receiving E-mail Messages
Use Inbox to send and receive e-mail messages in either of these ways:
■ Synchronize e-mail messages with Microsoft Exchange or Microsoft Outlook on your PC.
- Send and receive e-mail messages by connecting directly to an e-mail server through an Internet Service Provider (ISP) or a network.
Synchronizing E-mail Messages
E-mail messages can be synchronized as part of the general synchronization process. You will need to enable Inbox synchronization in ActiveSync. For information on enabling Inbox synchronization, see ActiveSync Help on the PC.
During synchronization:
Messages are copied from the mail folders of Exchange or Outlook on your computer to the ActiveSync folder in Inbox on your device. By default, you will receive messages from the past three days only, the first 100 lines of each message, and file attachments of less than 100 KB in size.
- Messages in the Outbox folder on your device are transferred to Exchange or Outlook, and then sent from those programs.
The messages on the two computers are linked. When you delete a message on your device, it's deleted from your PC the next time you synchronize.
■ Messages in subfolders or other e-mail folders in Outlook are synchronized only if they have been selected for synchronization in ActiveSync.
Using the Message List
Messages you receive are displayed in the message list. By default, the most recently received messages are displayed first in the list.

When you receive a message, tap it to open it. Unread messages are displayed in bold.

When you connect to your e-mail server or synchronize with your computer, by default, you'll receive messages from the last five days only, the first 100 lines of each new message, and file attachments of less than 100 KB in size. The original messages remain on the e-mail server or your computer.
You can mark the messages that you want to retrieve in full during your next synchronization or e-mail server connection. In the message list, tap and hold the message you want to retrieve. On the pop-up menu, tap
Mark for Download. The icons in the Inbox message list give you visual indications of message status.
You specify your downloading preferences when you set up the service or select your synchronization options. You can change them at any time:
- Change options for Inbox synchronization using ActiveSync options. For more information, see ActiveSync Help.
Change options for direct e-mail server connections in Inbox on your device. Tap Tools and then tap Options. On the Account tab, tap the service you want to change. Tap and hold the account and select Delete to remove an account.
Composing Messages
To compose a message:
- In the message list, tap New.
- In the To field, enter the e-mail address of one or more recipients, separating them with a semicolon, or select a name from the contact list by tapping the Address Book button. All e-mail addresses entered in the e-mail fields in Contacts appear in the Address Book.


- Compose your message. To enter preset or frequently used messages, tap My Text and select a message.
- Tap Send when you've finished the message. If you are working offline, the message is moved to the Outbox folder and will be sent the next time you connect. If you are working online, it is sent immediately.
Managing E-mail Messages and Folders
Each e-mail account has its own folder hierarchy with five default folders: Inbox, Outbox, Deleted Items, Drafts, and Sent Items. The messages you receive and send through the mail account are stored in these folders. You can also create additional folders within each hierarchy. The Deleted Items folder contains messages that have been deleted on the device. The behavior of the Deleted Items and Sent Items folders depends on the Inbox options you have chosen. In the message list, tap Tools and then Options. On the Message tab, select your options.
If you want to organize messages into additional folders, tap Tools, and then Manage Folders to create new folders. To move a message to another folder, in the message list, tap and hold the message and then tap Move to on the pop-up menu.
Folder behavior with a direct connection to an e-mail server
The behavior of the folders you create depends on whether you are using ActiveSync, SMS, POP3, or IMAP4.
If you use ActiveSync, e-mail messages in the Inbox folder in Outlook will automatically be synchronized with your device. You can select to synchronize additional folders by designating them for ActiveSync. The folders you create and the messages you move will then be mirrored on the server. For example, if you move two messages from the Inbox folder to a folder named Family, and you have designated Family for synchronization, the server creates a copy of the Family folder and copies the messages into that folder. You can then read the messages while away from your computer.
If you use POP3 and you move e-mail messages to a folder you created, the link is broken between the messages on the device and their copies on the mail server. The next time you connect, the mail server will see that the messages are missing from the device Inbox and delete them from the server. This prevents you from having duplicate copies of a message, but it also means that you will no longer have access to messages that you move to folders created from anywhere except the device.
If you use IMAP4, the folders you create and the e-mail messages you move are mirrored on the server. Therefore, messages are available to you anytime you connect to your mail server, whether it is from your device or computer. This synchronization of folders occurs whenever you connect to your mail server, create new folders, or rename/ delete folders when connected.
Companion Programs
The companion programs consist of Microsoft ^® Pocket Word, Microsoft ^® Pocket Excel, MSN Messenger, Windows Media ^™ Player for Toshiba Pocket PC, Microsoft ^® Reader and Pictures.
To switch to a companion program on your device, tap Programs on the menu, and then tap the program name.
Pocket Word
Pocket Word works with Microsoft Word on your computer to give you easy access to copies of your documents. You can create new documents on your device, or you can copy documents from your computer to your device. Synchronize documents between your computer and your device so that you have the most up-to-date content in both locations.
Use Pocket Word to create documents, such as letters, meeting minutes, and trip reports. To create a new file, tap 📄, Programs, Pocket Word, and then New. A blank document appears. Or, if you’ve selected a template for new documents in the Options dialog box, that template appears with appropriate text and formatting already provided. You can open only one document at a time; when you open a second document, you’ll be asked to save the first. You can save a document you create or edit in a variety of formats, including Word (.doc), Pocket Word (.psw), Rich Text Format (.rtf), and Plain Text (.txt).
Pocket Word contains a list of the files stored on your device. Tap a file in the list to open it. To delete, make copies of, and send files, tap and hold a file in the list. Then, select the appropriate action on the popup menu.

You can enter information by working in different modes, which you select from the View menu. For each mode, display the toolbar for that mode by tapping Show/Hide Toolbar button on the command bar.

You can change the zoom magnification by tapping View and then Zoom. Then select the percentage you want. Select a higher percentage to enter text and a lower one to see more of your document. If you're opening a Word document created on a computer, select Wrap to Window on the View menu so that you can see the entire document.
Typing Mode
Using the input panel, enter typed text into the document. For more information on entering typed text, see Chapter 2.
To format existing text and to edit text, first select the text. You can select text as you do in a Word document, using your stylus instead of the mouse to drag through the text you want to select. You can search a document to find text by tapping Edit and then Find/Replace.
![Pocket Annual Plan Cut Copy Paste Clear Format... Paragraph... Recognize Alternates... Spell Check Tap to return to the document (changes are saved automatically). Tap and hold to see a pop-up menu of actions. Tap to change formatting options. Tap to format text. 123 1 2 3 4 5 6 7 8 9 0 - = Tab q w e r t y u i o p [ ] CAP a s d f g h j k l ; ' Shift z x c v b n m , . / Ctl äü \ New Edit View Tools ↑↓ ↑ ← → Tap to show or hide the toolbar.](/content/2026/05/1085736/images/753af0d5ab019f552194c531fe1e598592233545a8c5598c4486232b4e29e1a1.jpg)
Writing Mode
In writing mode, use your stylus to write directly on the screen. Ruled lines are displayed as a guide, and the zoom magnification is greater than in typing mode to allow you to write more easily. For more information on writing and selecting writing, see Chapter 2.


If you cross three ruled lines in a single stylus stroke, the writing becomes a drawing, and can be edited and manipulated as described in the following section. Written words are converted to graphics (metafiles) when a Pocket Word document is converted to a Word document on your computer.
Drawing Mode
In drawing mode, use your stylus to draw on the screen. Gridlines appear as a guide. When you lift your stylus off the screen after the first stroke, you'll see a drawing box indicating the boundaries of the drawing. Every subsequent stroke within or touching the drawing box becomes part of the drawing. For more information on drawing and selecting drawings, see Chapter 2.
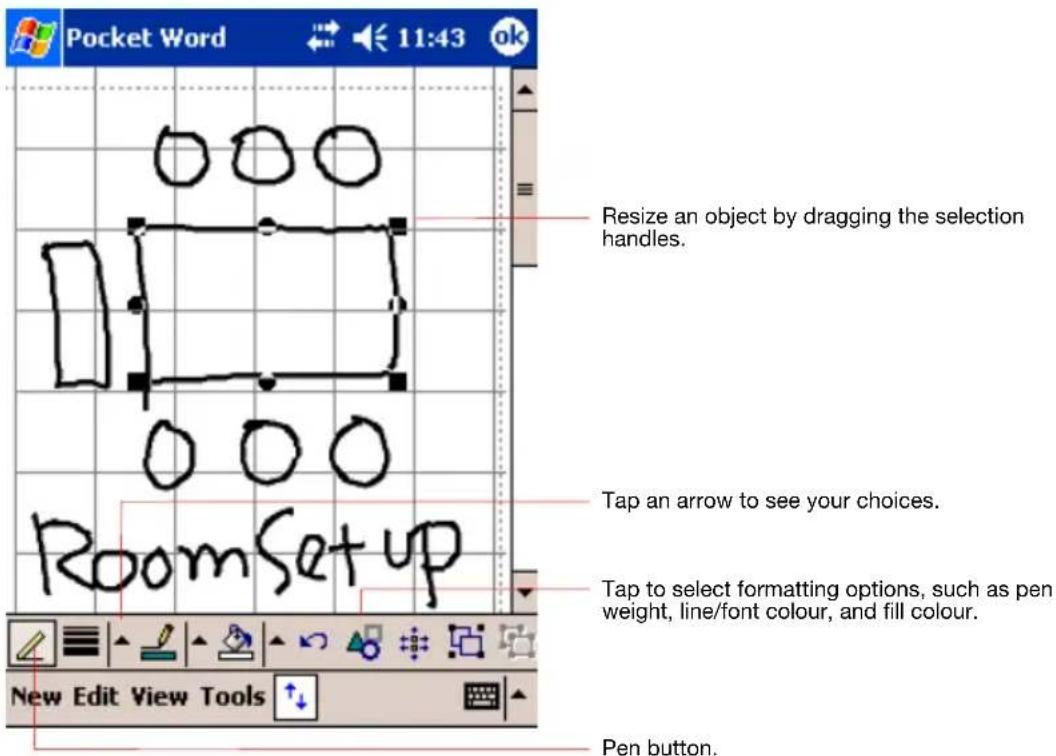
Recording Mode
In recording mode, embed a recording into your document. Recordings are saved as .wav files. For more information on recording, see Chapter 2. For more information on using Pocket Word, tap 📋 and then Help.
Pocket Excel
Pocket Excel works with Microsoft Excel on your computer to give you easy access to copies of your workbooks. You can create new workbooks on your device, or you can copy workbooks from your computer to your device. Synchronize workbooks between your computer and your device so that you have the most up-to-date content in both locations.
Use Pocket Excel to create workbooks, such as expense reports and mileage logs. To create a new file, tap 📋, Programs, Pocket Excel, and then New. A blank workbook appears. Or, if you've selected a template for new workbooks in the Options dialog box, that template appears with appropriate text and formatting already provided. You can open only one workbook at a time; when you open a second workbook, you'll be asked to save the first. You can save a workbook you create or edit in a variety of formats, including Pocket Excel (.pxl) and Excel (.xls).
Pocket Excel contains a list of the files stored on your device. Tap a file in the list to open it. To delete, make copies of, and send files, tap and hold a file in the list. Then select the appropriate action from the pop-up menu.
Pocket Excel provides fundamental spreadsheet tools, such as formulas, functions, sorting, and filtering. To display the toolbar, tap View and then Toolbar.
![Pocket Excel 11:47 ok A3 =SUM(A1:A2) Cell contents appear here as you enter them. A B C 1 $44.00 2 $22.00 3 $66.00 4 5 6 Format button. Ready Sheet1 Sum=$66.00 F ≡≡≡ Σ $, .00 123 1 2 3 4 5 6 7 8 9 0 - = Tab g w e r t y u>i pivot[ ] CAP a s d f g h j k,l ; ' Shift z x c v b n m , . / ← Ctl áü \ ↓ ↑ ← → New Edit View Format Tools](/content/2026/05/1085736/images/32c113ff4256c65d44312953a7ab7e8d07e5bdea27a2aae6f639f0c338cf6914.jpg)

If your workbook contains sensitive information, you can protect it with a password. To do so, open the workbook, tap Edit, and then Password. Every time you open the workbook, you will need to enter the password, so choose one that is easy for you to remember but hard for others to guess.
Tips for Working in Pocket Excel
Note the following when working in large worksheets in Pocket Excel:
View in full-screen mode to see as much of your worksheet as possible. Tap View and then Full Screen. To exit full-screen mode, tap Restore.
Show and hide window elements. Tap View and then tap the elements you want to show or hide.
■ Freeze panes on a worksheet. First select the cell where you want to freeze panes. Tap View and then Freeze Panes. You might want to freeze the top and leftmost panes in a worksheet to keep row and column labels visible as you scroll through a sheet.
Split panes to view different areas of a large worksheet. Tap View and then Split. Then drag the split bar to where you want it. To remove the split, tap View and then Remove Split.
Show and hide rows and columns. To hide a hidden row or column, select a cell in the row or column you want to hide. Then tap Format, then Row or Column, and then Hide. To show a hidden row or column, tap Tools, then Go To, and then type a reference that is in the hidden row or column. Then tap Format, then Row or Column, and then Unhide.
For more information on using Pocket Excel, tap 📄 and then Help.
MSN Messenger
MSN® Messenger on your mobile device is an instant messaging program that lets you:
See who is online.
- Send and receive instant messages.
- Have instant message conversations with groups of contacts.
■ Telling contacts that you are unavailable.
- Blocking contacts from seeing your status or sending you messages.
To use MSN Messenger, you must have a Microsoft Passport™ account or a Microsoft Exchange e-mail account. You must have a Passport to use MSN Messenger Service. If you have a Hotmail® or MSN account, you already have a Passport. Once you have obtained either a Microsoft Passport or a Microsoft Exchange account, you are ready to set up your account.

Sign up for a Microsoft Passport account at http://www.passport.com. Get a free Microsoft Hotmail e-mail address at http://www.hotmail.com.
To switch to MSN Messenger, tap 📋, Programs, and then tap MSN Messenger.
Setting Up
Before you can use MSN Messenger, you must set up the instant messaging account(s) to use. For MSN Messenger Service, you must have a Microsoft Passport or Hotmail account. For Exchange Instant Messaging, you must have an Exchange account.
To set up an account and sign in:
- In the Tools menu, tap Options and then Accounts tab.
- Select Enable MSN Messenger Service and/or Enable Exchange Instant Messaging.
- Enter your sign-in name and password for the selected account(s).
- If you selected both accounts, under Sign in using this account first, select which account to sign in to first.
- To sign in, tap the sign-in screen and then Sign in button.

If you already use MSN Messenger on your computer, your contacts will show up on your device without being added again.
Working with Contacts
The MSN Messenger window shows all of your messenger contacts at a glance, divided into Online and Not Online categories. From this view, while connected, you can chat, send an e-mail, block the contact from chatting with you, or delete contacts from your list using the pop-up menu.
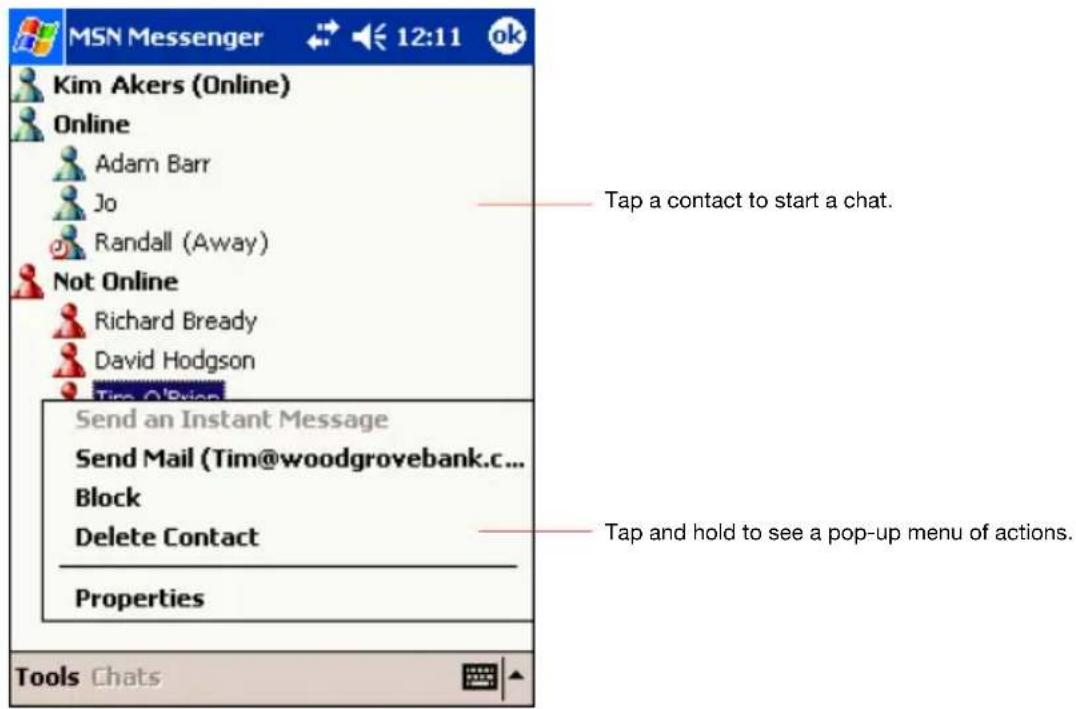

To see others online without being seen, in the Tools menu, tap My Status and select Appear Offline.
If you block a contact, you will appear offline but will remain on the blocked contact's list. To unblock a contact, tap and hold the contact, then tap Unblock on the pop-up menu.
Chatting with Contacts
Tap a contact name to open a chat window. Enter your message in the text entry area at the bottom of the screen, or tap My Text to enter a preset message, and tap Send. To invite another contact to a multi-user chat, in the Tools menu, tap Invite and tap the contact you want to invite.
![MSN Messenger 12:11 ok You are chatting with: Adam Enter message here. Hi. Can you meet at 2:00? Send Tap to send message. 123 1 2 3 4 5 6 7 8 9 0 - = Tab q w e r t y u i o p [ ] CAP a s d f g h j k l ; * Shift z x c v b n m , . / Ctl áü ` \ Tools Chats My Text](/content/2026/05/1085736/images/a40c28a32ea376e4e2269df71df4be45a91eed3cc820285103e933015271642e.jpg)

To switch back to the main window without closing a chat, tap the Contacts button. To revert back to your chat window, tap Chats and select the person whom you were chatting with.
To know if the contact you are chatting with is responding, look for the message under the text entry area.
![You are chatting with: Adam Kim Akers says: Hi. Can you meet at 2:00? View full chat. Send Adam is typing a message. View status of the chat. 123 1 2 3 4 5 6 7 8 9 0 - = Tab q w e r t y u i o p [ ] CAP a s d f g h j k l ; ' Shift z x c v b n m , . / Ctl äü ` \ Tools Chats My Text](/content/2026/05/1085736/images/b51b5d494bbaae49157d524547ad58ab3b6bc3a98221b37b52d8b0beae081487.jpg)
For more information on using MSN Messenger, tap 📄 and then Help.
Windows Media Player
Use Microsoft Windows Media Player to play digital audio and video files that are stored on your device or on a network. To switch to Windows Media Player for Toshiba Pocket PC, tap 📋, and then tap Windows Media.

Use Microsoft Windows Media Player on your computer to copy digital audio and video files to your Toshiba Pocket PC. You can play Windows Media and MP3 files on your Toshiba Pocket PC.
For more information about using Windows Media Player for Toshiba Pocket PC, tap 📋, and then tap Help.
Microsoft Reader
Use Microsoft Reader to read eBooks on your device. Download books to your computer from your favorite eBook Web site. Then, use ActiveSync to copy the book files to your activated device. The books appear in the Microsoft Reader Library, where you can tap them in the list to open them.
Each book consists of a cover page, an optional table of contents, and the pages of the book. You can:
Page through the book by using the Up/Down control on your device or by tapping the page number on each page.
■ Annotate the book with highlighting, bookmarks, notes, and drawings.
■ Search for text and look up definitions for words.
The Guidebook contains all the information you'll need to use the software. To open the Guidebook, tap Help on the Microsoft Reader command bar. Or, on a book page, tap and hold on the book title, and then tap Help on the pop-up menu.
To switch to Microsoft Reader, tap 📄, Programs, and then Microsoft Reader.
Getting Books on Your Device
You can download book files from the Web. Just visit your favorite eBook retailer and follow the instructions to download the book files.
Sample books and a dictionary are also included in the MSReader folder in the Extras folder on the Toshiba Pocket PC Companion CD.
Use ActiveSync to download the files from your computer to your activated device as described in the Read Me file in the Microsoft Reader folder.
Using the Library
The Library is your Reader home page; it displays a list of all books stored on your device or storage card.
To open the Library:
On the Reader command bar, tap Library.
On a book page, tap the book title, and then tap Library on the popup menu.
To open a book, tap its title in the Library list.
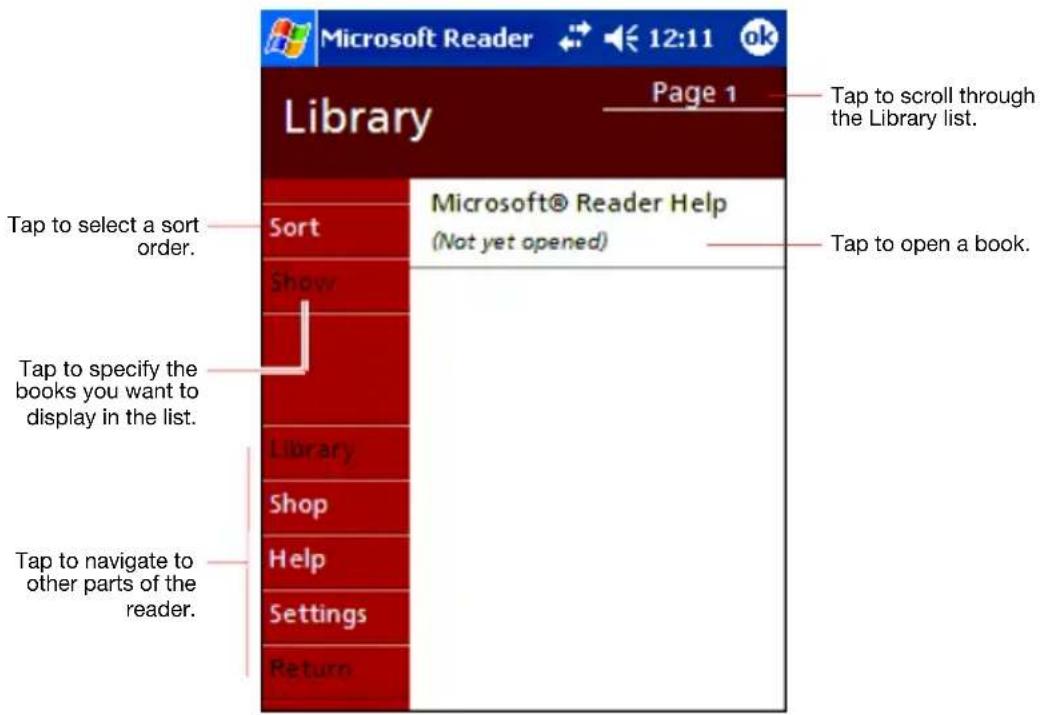
Reading a Book
Each book consists of a cover page, an optional table of contents, and the actual pages of the book. Navigation options are listed in the bottom portion of the cover page.
The first time you open a book, you will probably want to go to the first page or to the table of contents, if there is one. Subsequently, whenever you open the book, you'll be automatically taken to the last page read.
In addition to the text, each book page includes a page number and book title.
You can also page through a book by using the Up/Down control on your device.

Using Reader Features
Reading a book electronically gives you several options not available with paper books. These options are available on any book page.
Select text by dragging across the text on the page. Then, tap an option on the pop-up menu, as described here:
- Search for Text: Find text in a book by tapping Find on the pop-up menu. Enter the word you want to search for, and tap the desired Find option. MSReader highlights the text on the page. To close Find, tap outside the box. To return to your original page, tap the title and then tap Return on the pop-up menu.
Copy Text: You can copy text from books that support this feature into any program that accepts text. On a book page, select the text you want to copy. Then, tap Copy Text on the pop-up menu. The text can be pasted into the program of your choice.
Bookmarks: When you add a bookmark to a book, a color-coded bookmark icon appears in the right margin. You can add multiple bookmarks to a book. Then, from anywhere in the book, tap the bookmark icon to go to the bookmarked page.
■ Highlights: When you highlight text, it appears with a colored background.
Notes: When you attach a note to text, you enter the text in a note pad that appears on top of the book page. A Note icon will display in the left margin. To show or hide the note, tap the icon.
Drawings: When you add a drawing, a Drawing icon appears in the bottom-left corner of the page, and drawing tools appear across the bottom of the page. Draw by dragging your stylus.
To see a list of a book's annotations, including bookmarks, highlights, text notes, and drawings, tap Annotations Index on the book's cover page. You can tap an entry in the list to go to the annotated page.
Removing a Book
When you finish reading a book, you can delete it to conserve space on your device. If a copy of the book is stored on your computer, you can download it again at any time.
To remove a book from your device, tap and hold the title in the Library list, and then tap Delete on the pop-up menu.
Pictures
You can use Pictures to view .jpg pictures stored on your device or on a storage card, send pictures to others, view a slideshow of your pictures, or set a picture as the background on the Today screen.
Edit Pictures
You can rotate, crop, zoom, and adjust the brightness and color contrast of your .jpg pictures.
Tap ▲ to rotate a picture 90 degrees counter-clockwise.
Tap +to crop a picture by dragging and selecting the crop area. Tap outside of the box to stop cropping.
Tap to display the Zoom panel, from which you can zoom in or out of a picture, or return a picture to full-screen size.
Tap Edit and then Brightness and Contrast to adjust the brightness and contrast levels of a picture.
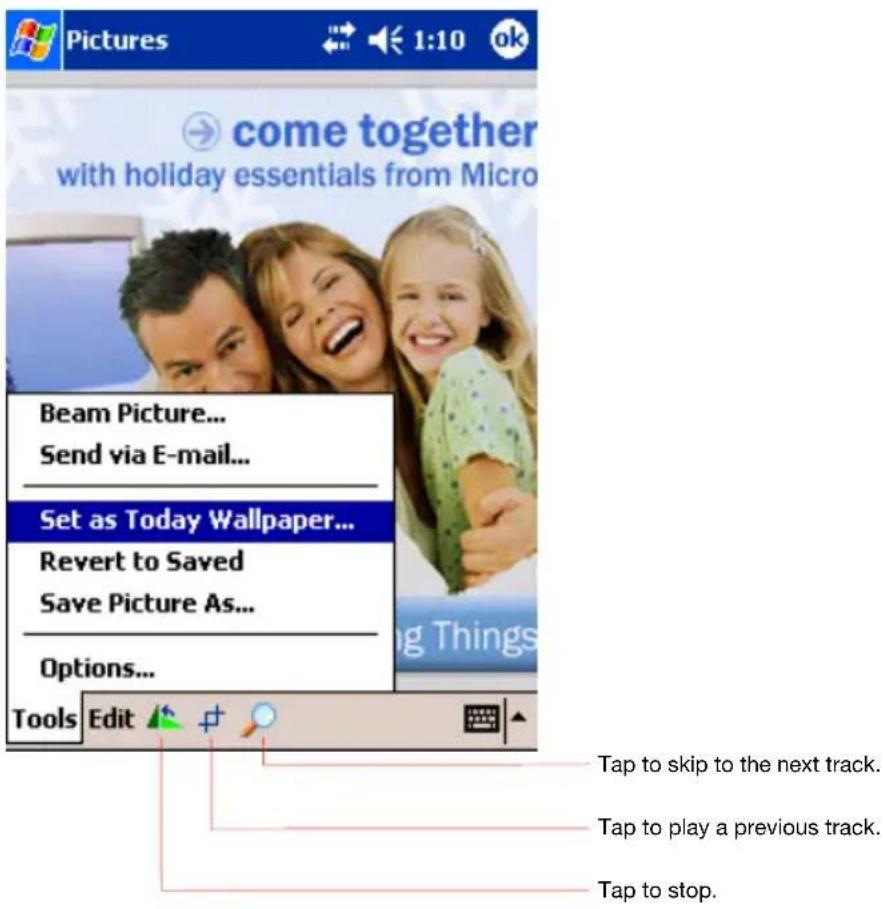
Send Pictures
You can send a .jpg picture to others as an e-mail attachment. Tap Tools and then Send via Email to create an e-mail message with the picture attached.
Set Picture as Background
You can use one of your own .jpg pictures as the background on the Today screen, and specify how you want it displayed on the screen, such as adjusting the transparency level.
- In Pictures, tap the picture you want to set as the background.
- Tap Tools and then Set as Today Wallpaper.
View Slideshow of Pictures
You can view your .jpg pictures as a slideshow on your device. Pictures will display slides of the pictures shown in thumbnail view with 5-second intervals between slides. In Pictures, tap to view pictures as a slide-show.
Pocket Internet Explorer
Use Microsoft® Pocket Internet Explorer to view Web or WAP pages in either of these ways:
During synchronization with your computer, download your favorite links and mobile favorites that are stored in the Mobile Favorites subfolder in Internet Explorer on the computer.
Connect to an Internet service provider (ISP) or network and browse the Web. To do this, you'll need to create the connection first, as described in Chapter 7.
When connected to an ISP or network, you can also download files and programs from the Internet or intranet.
To switch to Pocket Internet Explorer, tap 📁 and then Internet Explorer.
The Mobile Favorites Folder
Only items stored in the Mobile Favorites subfolder in the Favorites folder in Internet Explorer on your computer will be synchronized with your device. This folder was created automatically when you installed ActiveSync.
Favorite Links
During synchronization, the list of favorite links in the Mobile Favorites folder on your computer is synchronized with Pocket Internet Explorer on your device. Both computers are updated with changes made to either list each time you synchronize. Unless you mark the favorite link as a mobile favorite, only the link will be downloaded to your device, and you will need to connect to your ISP or network to view the content. For more information on synchronization, see ActiveSync Help on the computer.
Mobile Favorites
If you are using Microsoft Internet Explorer 5.0 or later on your computer, you can download mobile favorites to your device. Synchronizing mobile favorites downloads Web content to your device so that you can view pages while you are disconnected from your ISP and computer.
Use the Internet Explorer plug-in installed with ActiveSync to create mobile favorites quickly.
To create a mobile favorite:
- In Internet Explorer 5 or greater on your PC, browse to the page you want to view offline.
- Click Tools and then Create Mobile Favorite.
- To change the link name, enter a new name in the Name box.
- In the Update box, select a desired update schedule to keep the page in the Mobile Favorites folder up to date.
- To save the link in a subfolder of Mobile Favorites, click Create In and select the desired subfolder.
- Click OK. Internet Explorer will download the latest version of the page.
- To download the pages that are linked to the mobile favorite you just created, in Internet Explorer on your PC, right-click the mobile favorite and then click Properties. On the Download tab, specify the number of links deep you want to download. To conserve device memory, only go one level deep.

If you did not specify an update schedule in step 4, you will need to manually download content to keep the information updated on your computer and device. Before synchronizing with your device, in Internet Explorer on your computer, click Tools and then Synchronize. You will see the last time content was downloaded to the computer, and you can manually download content if needed.
You can add a button to the Internet Explorer toolbar for creating mobile favorites. In Internet Explorer on your computer, click View, Toolbars, and then Customize.
To save device memory
Mobile favorites take up storage memory on your device. To minimize the amount of memory used:
In the settings for the Favorites information type in ActiveSync options, turn off pictures and sounds, or stop some mobile favorites from being downloaded to the device. For more information, see ActiveSync Help.
Limit the number of downloaded linked pages. In Internet Explorer on the computer, right-click the mobile favorite you want to change and then Properties. In the Download tab, specify 0 or 1 for the number of linked pages you want to download.
Using AvantGo Channels
AvantGo is a free interactive service that gives you access to personalized content and thousands of popular Web sites. You subscribe to AvantGo channels directly from your device. Then, you synchronize your device and computer, or connect to the Internet to download the content. For more information, visit the AvantGo Web site.
To Synchronize an AvantGo channel
- In Pocket Internet Explorer on your device, tap ★ to display your list of favorites.
- Tap the AvantGo Channels link.
- Tap Activate.
- Follow the directions on the screen. You will need to synchronize your device with your computer and then tap My Channels to complete the AvantGo setup.
When synchronization is complete, tap the AvantGo Channels link in your list of favorites to see a few of the most popular channels. To add or remove channels, tap the Add or Remove link.
Using Pocket Internet Explorer
You can use Pocket Internet Explorer to browse mobile favorites and channels that have been downloaded to your device without connecting to the Internet. You can also connect to the Internet through an ISP or a network connection and browse the Web.

Welcome to Pocket Internet Explorer. Not online yet? Find out how to get connected and save offline content.
TOSHIBA
AvantGo ^TM

To view mobile favorites and channels:
- Tap the Favorites button to display your list of favorites.


2. Tap the page you want to view.
You'll see the page that was downloaded the last time you synchronized with your computer. If the page is not on your device, the favorite will be dimmed. You will need to synchronize with your computer again to download the page to your device, or connect to the Internet to view the page.
To browse the Internet:
- Set up a connection to your ISP or corporate network using Connections, as described in Chapter 7.
- To connect and start browsing, do one of the following:
Tap the Favorites button, and then tap the favorite you want to view.
Tap View and then Address Bar. In the address bar that appears at the top of the screen, enter the Web address you want to visit and then tap 📋. Tap the arrow to choose from previously entered addresses.

To add a favorite link while using the device, go to the page you want to add, tap and hold on the page, and tap Add to Favorites.
Chapter 7
Getting Connected
You can use your device to exchange information with other mobile devices as well as your computer, a network, or the Internet. You have the following connection options:
Use the infrared (IR) port on your device to send and receive files between two devices. If this is the method you want to use, see the following section “Transfer Items Using Infrared.”
Connect to your Internet service provider (ISP). Once connected, you can send and receive e-mail messages by using Inbox and view Web or WAP pages by using Microsoft® Pocket Internet Explorer. The communication software for creating an ISP connection is already installed on your device. Your service provider will provide software needed to install other services, such as paging and fax services. If this is the method you want to use, see “Connect to an Internet Service Provider” later in this chapter.
Connect to the network at your company or organization where you work. Once connected, you can send and receive e-mail messages by using Inbox, view Web or WAP pages by using Pocket Internet Explorer, and synchronize with your computer. If this is the method you want to use, see “Connect to Work” later in this chapter.
Connect to your computer to synchronize remotely. Once connected, you can synchronize information such as your Pocket Outlook information. If this is the method you want to use, see ActiveSync Help on your computer or Connections Help on the device.
Transfer Items Using Infrared
Using infrared (IR), you can send and receive information, such as contacts and appointments, between two devices.
To send information:
- Switch to the program where you created the item you want to send and locate the item in the list.
- Align the IR ports so that they are unobstructed and within a close range.
- Tap and hold the item, and tap Beam Item on the pop-up menu.

You can also send items, but not folders, from File Explorer. Tap and hold the item you want to send, and then tap Beam File on the pop-up menu.
To receive information:
- Align the IR ports so that they are unobstructed and within a close range.
- Have the owner of the other device send the information to you. Your device will automatically receive it.
Connect to the Internet
You can connect to your ISP, and use the connection to send and receive e-mail messages and view Web or WAP pages.
You can connect to work in one of two ways:
■ Create a modem connection. If this is the method you want to use, see “To create a modem connection to an ISP.”
Use an Ethernet card and a net tap to connect to the network. If this is the method you want to use, see “To create an Ethernet connection to an ISP.”
To create a modem connection to an ISP:
- Obtain the following information from your ISP: ISP dial-up access telephone number, user name, password, and TCP/IP settings. Some ISPs require information in front of the user name, such as MSN/username.
- If your device does not have a built-in modem, install a modem card, or use or use a NULL modem cable and appropriate adaptors to connect an external modem to your device through the serial port.
- Tap > Settings > Connections tab > Connections.
- In My ISP, tap Add a new modem connection, and follow the instructions in the New Connection wizard.

To change modem connection settings, in either My ISP or My Work Network, tap Manage existing connections. Select the desired modem connection, tap Edit, and follow the instructions on the screen.
- Enter a name for the connection, such as your ISP's name.
- In the Select a modem list, select your modem type. If you are using any type of external modem, in the Select a modem list, select the modem by name. If a listing does not exist for your external modem, tap Hayes Compatible on COM1.
- Enter the phone number exactly as you want it dialed. If you know part of the phone number will change frequently as you travel, use dialing rules to avoid creating numerous modem connections for the same phone number.
- Enter your user name, password, and domain name as provided by your ISP. If a domain name was not provided, try the connection without entering a domain name.
-
You should not need to change any advanced settings. Instances where you will want to change advanced settings include:
-
You want to change baud rate settings, dialing string commands, or credit card options.
-
You need to change port settings.
The server you are connecting to does not use dynamically-assigned addresses, and you need to enter your TCP/IP settings. -
To change advanced settings, tap Advanced. Otherwise, tap Finish. To start the connection, simply start using one of the following programs. Your device will automatically begin connecting. Once connected, you can:
Send and receive e-mail messages by using Inbox. Before you can use Inbox, you need to provide the information it needs to communicate with the e-mail server. For specific instructions, see "Connect Directly to an E-mail Server," later in this chapter.
- Visit Web and WAP pages by using Pocket Internet Explorer. For more information, see Chapter 6.
- Send and receive instant messages with MSN Messenger. For more information, see “MSN Messenger” in Chapter 5.
To create an Ethernet connection to an ISP:
- You do not need to create a new connection on your device. Instead, you must purchase and configure an Ethernet card that is compatible with your device.
- Obtain the following information from your ISP: user name, password, and domain name.
- Insert the Ethernet card into your device. For instructions on inserting and using the Ethernet card, see the owner's manual for the card.
- The first time you insert the card, Network Settings will appear automatically so that you can configure the network card. If it does not appear, or to change settings later, tap > Settings > Connections tab > Connections > Advanced tab > Network Card.
- If you need to enter specific server information, tap the appropriate adapter. Most networks use DHCP, so you should not have to change these settings unless your network administrator instructs you to do so.
- If necessary, connect the network card to the network by using a network cable. For information, see the documentation that came with your network card.
To start a connection, insert the network card, and begin using a desired program. For example, switch to Pocket Internet Explorer and browse to a Web page. Your device will automatically begin connecting.
Connect to Work
If you have access to a network at work, you can send e-mail messages, view intranet pages, synchronize your device, and possibly access the Internet. You can connect to work in one of two ways:
- Create a modem connection by using a RAS account. Before you can create this modem connection, your network administrator will need to set up a RAS account for you. If this is the method you want to use, see “To create a modem connection to a network.” Your network administrator may also give you VPN settings.
Use an Ethernet card and a net tap to connect to the network. If this is the method you want to use, see “To create an Ethernet connection to a network.”
To create a modem connection to a network:
- Get the following information from your network administrator: dial-up access telephone number, user name, password, domain name, and TCP/IP settings.
- If your device does not have a built-in modem, install a modem card.
- Tap > Settings > Connections and then tap Connections.
- In My Work Network, tap Add a new modem connection, and follow the instructions in the New Connection wizard.
-
Enter a name for the connection, such as your company's name.
-
In the Select a modem list, tap your modem type. If you are using any type of external modem, in the Select a modem list, select the modem by name. If a listing does not exist for your external modem, tap Hayes Compatible on COM1.
- Enter the phone number exactly as you want it dialed. If you know part of the phone number will change frequently as you travel, use dialing rules to avoid creating numerous modem connections for the same phone number.
- Enter your user name, password, and domain name as provided by your network administrator. If a domain name was not provided, try the connection without entering a domain name.
-
You should not need to change any advanced settings. Instances where you will want to change advanced settings include:
-
You want to change baud rate settings, dialing string commands, or credit card options.
-
You need to change port settings.
The server you are connecting to does not use dynamically-assigned addresses, and you need to enter your TCP/IP settings. -
To change advanced settings, tap Advanced. Otherwise, tap Finish.
To start the connection, simply start using one of the following programs. Your device will automatically begin connecting. Once connected, you can:
Send and receive e-mail messages by using Inbox. Before you can use Inbox, you need to provide the information it needs to communicate with the e-mail server. For specific instructions, see "Connect Directly to an E-mail Server," later in this chapter.
- Visit Internet or intranet Web or WAP pages by using Pocket Internet Explorer.
- Send and receive instant messages with MSN Messenger. For more information, see “MSN Messenger” in Chapter 5.
■ Synchronize. For more information, see ActiveSync Help on the computer.
To create an Ethernet connection to a network:
- You do not need to create a new connection on your device. Instead, you must purchase and configure an Ethernet card that is compatible with your device.
- Get the following information from your network administrator: user name, password, and domain name.
- Insert the Ethernet card into your device. For instructions on inserting and using the Ethernet card, see the owner's manual for the card.
-
The first time you insert the card, Network Settings will appear automatically so that you can configure the network card. If it does not appear, or to change settings later, tap > Settings > Connections tab > Connections > Advanced tab > Network Card.
-
If you need to enter specific server information, tap the appropriate adapter. Most networks use DHCP, so you should not have to change these settings unless your network administrator instructs you to do so.
- If necessary, connect the network card to the network by using a network cable. For information, see the documentation that came with your network card.
To start the connection, simply start using one of the programs listed in the preceding section. Once connected, you can perform the same activities as listed in the preceding section.
To set up a VPN server connection:
A VPN connection enables you to securely connect to servers, such as a corporate network, via the Internet. Ask your network administrator for your user name, password, domain name, TCP/IP settings, and host name or IP address of the VPN server.
- Tap > Settings > Connections and then tab Connections.
- To create a new VPN server connection, in My Work Network, tap Add a new VPN server connection and follow the instructions in the New Connection wizard.

To change existing settings, in My Work Network, tap Manage existing connections > VPN tab. Select the desired VPN connection, tap Edit, and follow the instructions on the screen.
- In Name, enter a name for the connection, such as your company's name. In Host name/IP, enter the VPN server name or IP address. Next to VPN type, select the type of authentication to use with your device: IPSec/L2TP or PPTP. If you aren't sure which option to choose, ask your network administrator.
- Select the type of authentication. If you select A pre-shared key, enter the key provided by your network administrator.
- Enter your user name, password, and domain name as provided by your ISP or network administrator. If a domain name was not provided, try the connection without entering a domain name.
- You should not need to change any advanced settings. Instances where you must change advanced settings include:
The server to which you are connecting does not use dynamically-assigned addresses, and you need to enter your TCP/IP settings.
- You need to change server DNS or WINS settings.
- To change advanced settings, tap Advanced. Otherwise, tap Finish.
To edit proxy settings:
- Tap > Settings > Connections tab.
- To change proxy server settings, in My Work Network, tap Edit my proxy server.
- Select This network connects to the Internet and This network uses a proxy server to connect to the Internet.
- In the Proxy server box, enter the proxy server name.
- To change such settings as port number or proxy server type, tap Advanced and change desired settings.
End a Connection
To disconnect, do one of the following:
When connected via dial-up or VPN, tap the Connection icon, ↗ on your navigation bar, and then tap End.
- When connected via cable or cradle, detach your device from the cable or cradle.
- When connected via Infrared, move the device away from the PC.
- When connected via a network (Ethernet) card, remove the card from your device.
Connect Directly to an E-mail Server
You can set up a connection to an e-mail server so that you can send and receive e-mail messages by using a modem or network connection and Inbox on your device.

The ISP or network must use a POP3 or IMAP4 e-mail server and an SMTP gateway.
You can use multiple e-mail services to receive your messages. For each e-mail service you intend to use, first set up and name the e-mail service. If you use the same service to connect to different mailboxes, set up and name each mailbox connection.
To set up an e-mail service:
In Inbox on your device, tap Services, and then New Service. Follow the directions in the New Service wizard.
For an explanation of a screen, tap 📋 and then Help. When finished, to connect to your e-mail server, tap Services and then Connect. For more information on using the Inbox program, see “Inbox: Sending and Receiving E-mail Messages” in Chapter 4.
Get Help on Connecting
More information on the procedures described here, as well as information on additional procedures, can be found in the following locations:
- “Inbox: Sending and Receiving E-mail Messages” in Chapter 4.
Online Help on the device. Tap 📋 and then Help. Tap View, All Installed Help, and then Inbox or Connections.
■ ActiveSync Help on the computer. In ActiveSync, click Microsoft ActiveSync Help on the Help menu.
For troubleshooting information, see the Pocket PC Web site at: http://www.microsoft.com/mobile/pocketpc
Chapter 8
Wi-Fi (IEEE 802.11b) Wireless LAN
Overview

This chapter is valid for Wireless LAN model only.
The IEEE 802.11b WLAN Adapter can connect your Toshiba Pocket PC e750/e755 wirelessly to an existing IEEE 802.11b wireless network or from its own Wireless Network. Using the adapter in the Toshiba Pocket PC e750/755, you can enjoy the complete mobile and high-speed wireless Internet connectivity while in range of a Wi-Fi compatible access point.
Configure Wireless LAN Network


Join to Existing Network
Pocket PC2003 has a interface that enables you to join to a existing network. If Pocket PC2003 detects a wireless network, it will show the above menu. Also, if you join to encrypted network(s), Pocket PC2003 will require entering a Network (WEP) key.
Launch Wireless LAN Configuration
In order to Configure Wireless LAN Settings, use the Configure Wireless Networks Screen. To launch Configure Wireless Networks Screen, tap the TMU (Traffic Monitoring Utility) Wireless LAN Indicator icon on the navigation bar, and then tap the "Config WLAN" Link. You can also launch by tapping Start > Settings > System > Wireless Networks


Turn Off/On Wireless LAN connection
If you want to turn off/on the wireless LAN, tap the arrows icon on the navigation bar and launch the Connectivity window. If you tap the "Turn Wireless off/on" link on the window you can turn off/on the wireless LAN module
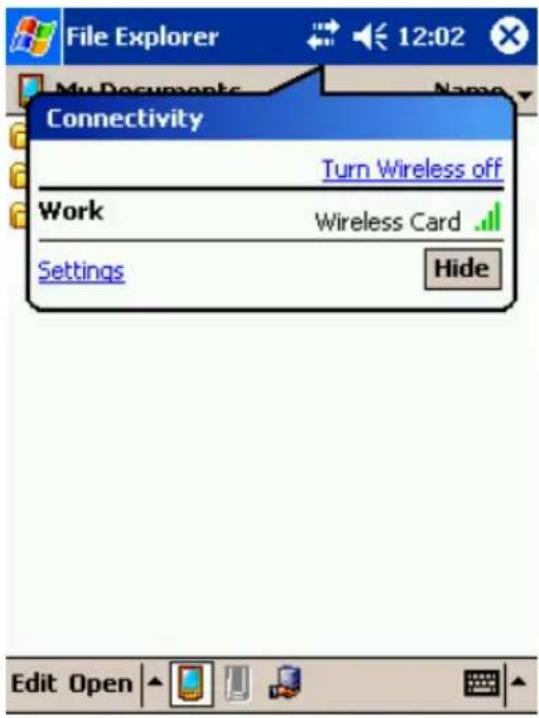
Power Off/On Wireless LAN modules
TMU (Traffic Monitor Utility) supplies Wireless power off/on function. If you want to turn off/on the wireless LAN tap the TMU icon and launch the Wireless LAN window. If you tap the "Power Wireless off/on" link on the window you can turn off/on the wireless LAN module. Please refer to page 134 for detailed information.
Select Preferred Network
TMU shows a Preferred network list where you can change wireless network connections from this preferred list. If you want to connect to wireless LAN network, you have to make a network setting and store to preferred network list. See the "Wireless LAN Configuration" to set up wireless network.
IP Address
IP Address Page
Use IP Address Page to view and edit the IP address, Subnet mask and Default gateway.
Click Connectivity (Arrows) icon > Settings > Advanced > Network Card > Network Adapters > "IEEE 802.11b WLAN Adapter"
You can also launch that
Start > Settings > Connections > Connections > Advanced > Network Card > Network Adapters > "IEEE 802.11b WLAN Adapter"
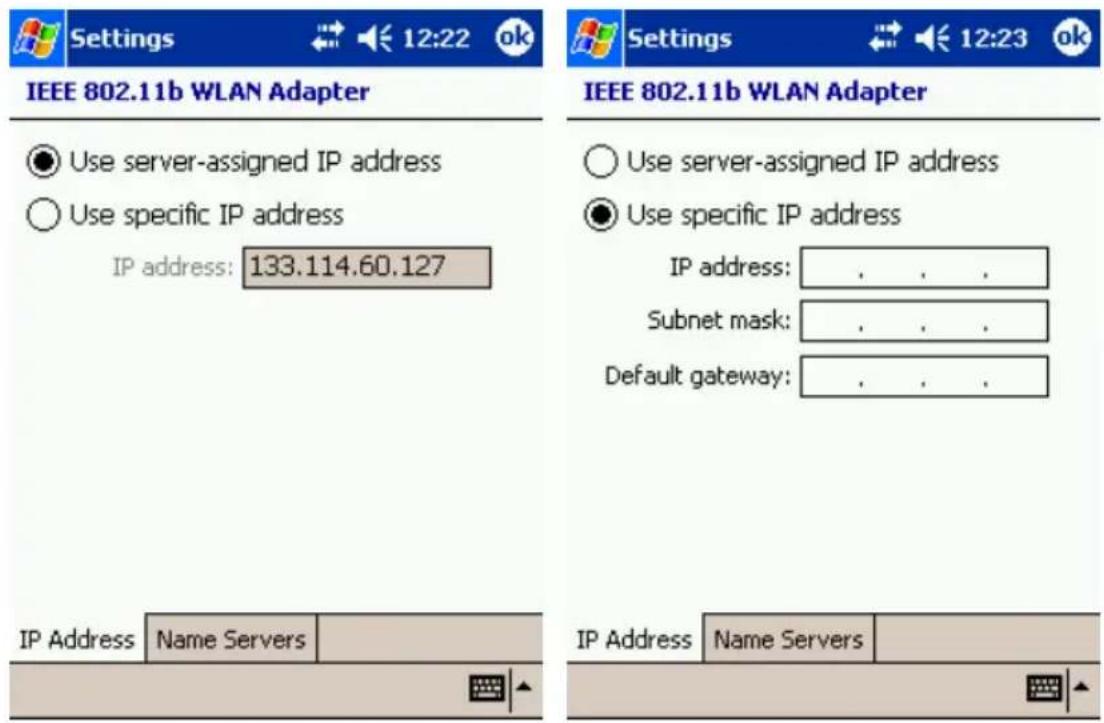
IP Address
IP Address is Internet Protocol Address; a numeric address such as 10.37.238.100 that the domain name server translates into a domain name. Each node on the IP network should have a unique IP address.
Subnet mask
A number used to identify a subnetwork when multiple networks share an IP address. For example 255.255.255.0
Default gateway
This is a device used to forward IP packets to and from a remote destination.

Please check with your network administrator for these connection settings.
Name Servers Page
Use Name Servers Page to view and edit DNS, Alt DNS, WINS and Alt WINS.
Click Connectivity (Arrows) icon > Settings > Advanced > Network Card > Network Adapters > "IEEE 802.11b WLAN Adapter" > Name Servers
You can also launch that
Start > Settings > Connections > Connections > Advanced > Network Card > Network Adapters > "IEEE 802.11b WLAN Adapter" > Name Servers

DNS
Domain Name System is a database system that translates addresses and domain names. For example, a numeric address like 232.245.021.54 can become something such as cba.com. DNS can also be used to control Internet email delivery.
WINS
In Pocket PC, Windows Internet Naming Service has two functions; one is a Microsoft Net BIO name server that eliminates the broadcasts needed to resolve computer names to IP addresses by providing a cache or database of translations. The other one is to set the IP address of the host computer that you already construct the partnership for Network adaptor Active sync purpose.

Without setting the host computer's IP address in the WINS, you cannot wirelessly synchronize your Pocket PC with your host computer.
Alt DNS
Alt DNS stands for Alternative Domain Name System. Used to substitute main DNS when necessary.
Alt WINS
Alt WINS stands for Alternative Windows Internet Naming Service. Used to substitute main WINS when necessary.
Wireless LAN Configuration
Set up a wireless network
Networks that you have already configured are preferred networks and are listed in Wireless networks. You can select to connect to only preferred networks or have your device search for and connect to any available network whether it is preferred or not.
Tap Start > Settings > Connections > Connections > Advanced > Network Card > Wireless tab.
And you can also launch this by tapping Start > Settings > System > Wireless Networks.
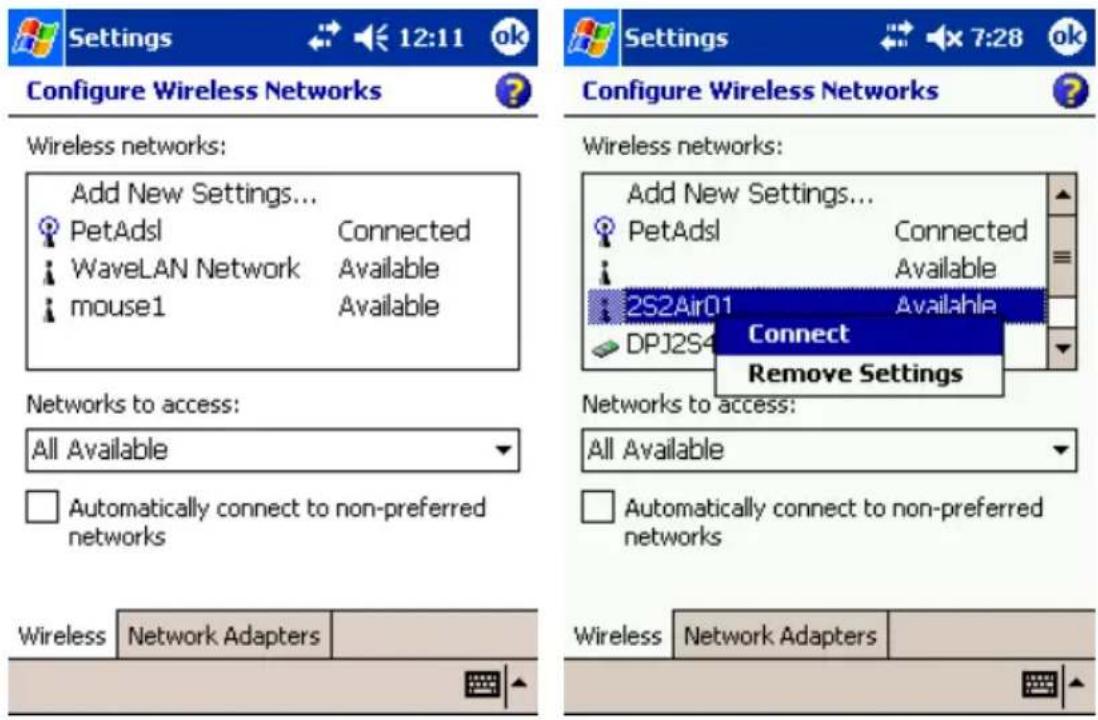
To change network settings, in Wireless networks, tap a network. If you do not see a desired network, tap Add new Settings... and follow the instructions on the screen.
From Networks to access, select All available, Only access points or Only computer-to-computer depending on the type of network(s) you connect to.
To connect only to networks you have already configured, clear Automatically connect to non-preferred networks.
To change the network to connect listed in preferred network, tap and hold a network that you want to connect and select "Connect" from menu.
To delete network listed in preferred network, Tap and hold a network that you want to delete and select "Remove Settings" from menu.
NOTICE:
If you select to automatically connect to non-preferred networks, you device will detect any new networks, your device will detect any new networks and provide you the opportunity to configure them.
Configure Wireless Network
A wireless network can be added either when the network is detected, or manually by entering settings information.


Network name: It is also known as "SSID" and "ESSID". Enter a network name, network name is a name given to the groups that form the wireless LAN network, and up to 32 single-byte English characters and symbols may be used. If the network was detected, the network name is automatically entered and can't be changed.
Connect to:: Select what your network connects to, Work or Internet.
This is a device-to-computer (ad-hoc) connection: To connect to an ad-hoc connection, select this.
Configure Network Authentication Screen
A wireless network can be added either when the network is detected, or manually by entering settings information. To determine if authentication Information is needed see your network administrator

Data encryption (WEP Enabled)
Click here to enable data encryption.
The Key is provided for me automatically:
Check here if you can obtain WEP key automatically from AP. Almost case this function is used with 802.1X function. Default is "Enable".
■ Network Key (WEP key):
Enter the ASCII characters and symbols that correspond to the mode selected.
64 bits (ASCII)
5-digit ASCII characters or symbols can be entered in "Network Key".
128 bits (ASCII)
13-digit ASCII characters or symbols can be entered in "Network Key".
64 bits (HEX)
Hexadecimal 10-digit English letters and numerals can be entered in "Network Key". Letters and numerals that can be entered are 0-9 and A(a) - F(f).
128 bits (HEX)
Hexadecimal 26-digit English letters and numerals can be entered in "Network Key". Letters and numerals that can be entered are 0-9 and A(a) - F(f).
Key Index:
This becomes enabled when WEP is selected. Select 1 - 4.
■ Enable network access using IEEE 802.1X:
Check here to enable 802.1x validation function.
EAP type:
Select protocol for using 802.1x validation function.
TLS (EAP-TLS)
Protocol used by Windows 2000 Server etc.
PEAP
Protocol use by Windows .NET Server 2003 etc.
Please ask your network administrator for further details of the 802.1x validation procedure.
TMU-Traffic Monitoring Utility
TMU Keeps users updated of current WLAN Module's activity status.
Icon Specification
Wireless Communication switch off:
Wireless Communication Switch, on the bottom of the PDA, is turned off. Clicking on the icon ☐! gives you a warning message, "Please turn on Wireless communication switch!" Click "OK" to close the Message Box. Turn on the switch and you will see the icon ☐! turns to ☐ or ☐, depends on the original setting for the WLAN Module Power.
Wireless Communication power off:
The WLAN Modules is at Power Off Status. Clicking on the icon ☐displays you a link "Power Wireless on". Click the link to turn on the Wireless LAN module power and then the icon ☐to ☐
Wireless Power on:
The WLAN Modules is at Power On Status. Clicking on the icon ☐displays you a link "Power Wireless off". Click the link to turn off the Wireless LAN module power and then the icon ☐to ☐. Number of wave indicates signal strength.
Wireless LAN Manager
Wireless LAN Manager enables you to control some power management settings and also enable to see some information of your Wireless LAN adapter.
Wireless LAN Indicator icon on the navigation bar, and then tap the "Info" Link.
And you can also launch this by tapping Start > Settings > System > Wireless LAN Manager
Manager Screen

■ Enable Wireless LAN Indicator: If you check this, the wireless LAN indicator is displayed in the navigation bar.
Transmission Rate: Select transmission rate to be used from the pull-down menu. If you select "Fully Auto", the adapter is automatically set to the most suitable transmission rate.
Channel: If you make a ad-hoc network, you can select a channel that used in that ad-hoc network from this list.
■ Enable Power Saving Mode: Check this to use power saving mode.
On Battery Power
Check this to run in power saving mode when on battery power. Power is turned off if there is no transmission for the time specified. Select the length of time for power saving mode from the pull-down menu.
On External Power
Check this to run in power saving mode when on external power. Power is turned off if there is no transmission for the time specified. Select the length of time for power saving mode from the pull-down menu.
Link Screen

Link Quality:
Link Quality shows quality of wireless LAN signal.
Link Information:
Link Informaiton shows some information about your wireless LAN adapter.
■ SSID: Displays the SSID currently connected to the access point or 802.11 ad hoc network.
Channel: The number of the channel being used by the access point or 802.11 ad hoc network.
Tx Rate: Displays the transmission rate used.
BSSID: Displays the BSSID set on the access point or 802.11 ad hoc network.
IP Address: Displays the IP address set.
Subnet Mask: Displays the subnet mask set.
Gateway: Displays the gateway IP address set.
IP Renew: This is for attempting to renew an IP address, but can only be used if DHCP is being used.
Info Screen

MAC Address

Version Information
Firmware : 1.03.06
Driver : 1.07.37
Utility : 1.2.3

MAC Address:
Display Wireless LAN MAC Address. MAC (Media Access Control) Address is a hardware address that uniquely identifies each device of network.
Version Information:
Firmware
Display FW version that included Wireless LAN hardware.
Driver
Display Wireless LAN Driver version.
Utility
Display Wireless LAN Configuration Utility version.
Toshiba Enroller
Configure "Toshiba Enroller", the tool for obtaining and administering certificates used for 802.1x validation. Please ask your network administrator for configuration details.
Certificate for TLS

■ User: Enter the user name of the person obtaining the client certificate.
Password: Enter the password of the user obtaining the client certificate. The password may be up to 14 single-byte characters in length. If this length is exceeded, the password will be blocked.
■ CA Server: Enter the URL or IP address of the certifying server issuing the client certificate. Any URLs of more than 255 characters will be blocked.
Submit: After you have entered user name, password and CA server, click on this button to request a certificate from the certifying server.
Certificate Import Wizard
- Config Wireless: Launch Certificate Import Wizard.
RootCert Page

Open Certificate:
Opens the root certificate. When the root certificate is opened, the person it has been issued to, the persons issued by, and the period of validity will be displayed. The root certificate is provided by the cer file.
Install Certificate:
Registers the open root certificate in the system. This button is enabled when the root certificate is opened.
NOTICE:
PPC 2003 supports *.cer DER encoded root certificate file as default. You can install root certificate if you double-click root certificate file.
Manage Page

■ Property:
Displays Information on certificates obtained.
Delete:
Deletes certificates. Please use the greatest possible care when deleting certificates.
When using EAP-TLS, one client certificate and one root certificate are required as a minimum. When using PEAP, one root certificate is required as a minimum.
Please ask your network administrator for details of operational procedures.
Advanced Page

- Requested Page: Part of URL to be accessed when obtaining client certificates.
■ Cert Template: Template used when obtaining client certificates.
■ Cert Attribute: Attribute used when obtaining client certificates.
Certificate for TLS: If you check here, Obtain ClientCert and RootCert simultaneously. Under normal circumstances configuration is not needed unless requested by your network administrator.
Toshiba Certificate Import Wizard
Toshiba Certificate Import Wizard helps you obtain certificates from network or disk to certificate store more easily. Toshiba Certificate Import Wizard requires ActiveSync environment to obtain certificate from server. Please prepare the Cradle and PC that can connect to Certification Authority (CA) Server.
Toshiba Certificate Import Wizard obtains Certification Authority via ActiveSync path thru a network connection.
You can exit this wizard when you tap the OK button. If you tap OK, all operations on this wizard will be cancelled.
Start Screen

Select 802.1x type from above menu and tap "Next >".
Please also refer the wireless network authentication screen page.
Example: Obtain TLS Certificate from server (1)
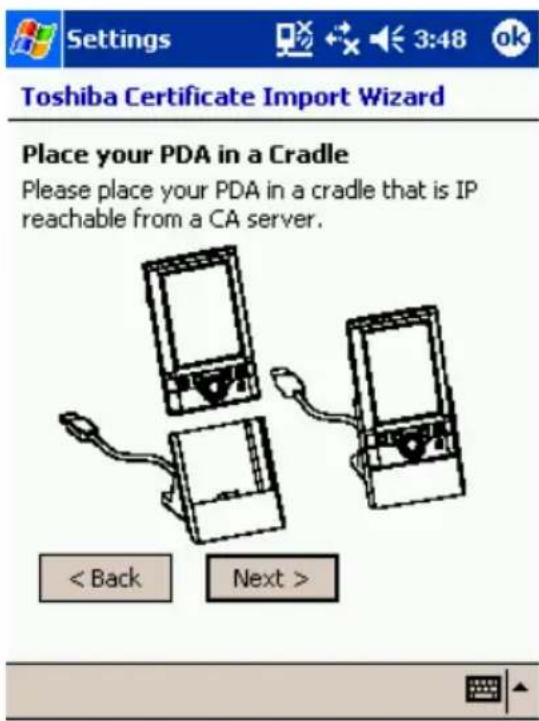
Obtaining a certificate for TLS always requires an ActiveSync connection. Please place your PDA into the cradle and tap "Next >" button. After tapping, if there are any problems about active syncing. Wizard will pop-up the problem.
Example: Obtain TLS Certificate from server (2)

You have to enter your user name, password, and CA server name (or IP) to obtain certificates from server. After filling parameters, tap the "Next >" button, If there is something wrong with the parameters, Wizard will pop-up the problem.
Example: Obtain TLS Certificate from server (3)

If you succeed in obtaining a Certificate from the server, the Certificate that you received.
Example: Obtain PEAP Certificate from a file (1)
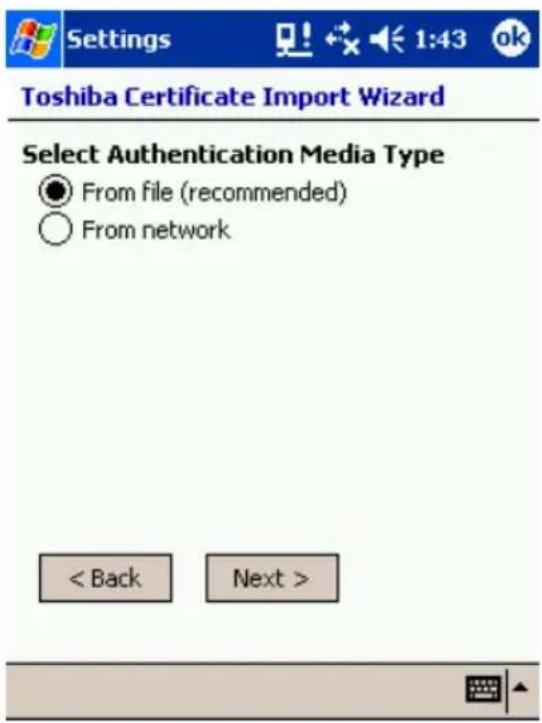
If your network supports PEAP authentication you can obtain certificate from file.
At this case, you'll try to obtain certificate via file. If you choice "From network"
You will take same steps as obtaining certificate of TLS.
Select "From file (recommended)", and tap "Next >"
Example: Obtain PEAP Certificate from a file (2)

Please choose certificate from file. Certificate file should be provided from you network administrator. If you don't have that, please contact to your network administrator.
Toshiba Certificate Import Wizard supports only DER encoded root certificate. If you try to import other format certificate file, Wizard will pop-up the error.
Example: Obtain PEAP Certificate from a file (3)
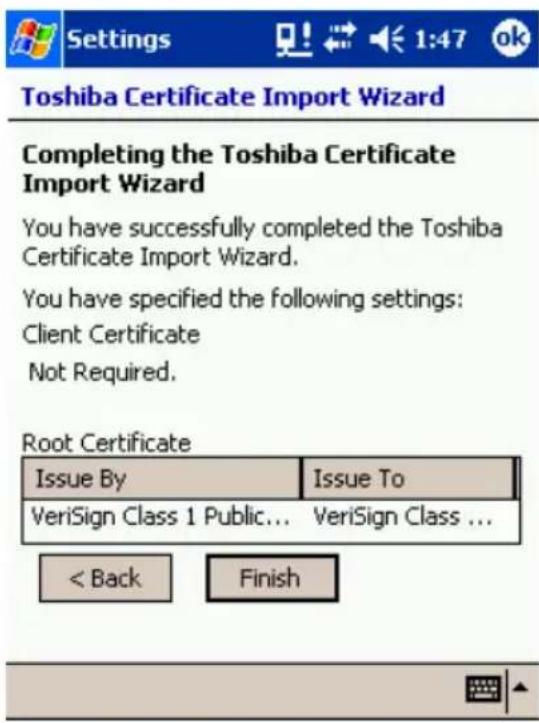
If you succeeded in obtaining the Certificate from the server, the certificate that you got will show up on the screen like the figure above. Since PEAP authentication doesn't require client certification, the wizard will not show information about client certification. If you tap Finish, certificates are stored to system.
Bluetooth

This chapter is valid for Bluetooth only.
The Toshiba Pocket PC has two types Bluetooth software. One is Toshiba Bluetooth software, the other is Microsoft standard Bluetooth software. The Toshiba Bluetooth software is available on the integrated Bluetooth model only. In other model, Microsoft Bluetooth icon and some Bluetooth function appears, but these does not work without available Bluetooth device.
This section describes only Toshiba Bluetooth software.
Specifications
By enabling the Bluetooth device on your Toshiba Pocket PC, you will be able to wirelessly communicate with Bluetooth-enabled PC's, modems and other peripherals, and chat with other Toshiba Pocket PC's.
You can use the Bluetooth to connect your Toshiba Pocket PC to only one device at a time.
The Toshiba Pocket PC supports these Bluetooth services:
■ COM service (Serial Port Profile)
This service enables you to connect to a computer via a serial port to send and receive data. COM service is also used when connecting to a computer with ActiveSync and when chatting with other Toshiba Pocket PCs.
■ DUN service (Dial-up Networking Profile)
■ LAP service (LAN Access Profile)
■ FTP service (File Transfer Protocol Profile)
This service enables you to transfer files to and from a device with FTP service, such as a computer.
■ OPP service (Object Push Profile)
This service enables you to connect to another Toshiba Pocket PC or cell phone and exchange address books and owner information.
The data formats and maximum size of receiving messages are as follows.
| Contact(address book)Business card(owner information) | vCard format(vCard2.1) | Other than memo ..... 1,022 charactersMemo...... Approx. 32,700 characters ^1 |
| Schedule | vCalendar(vCalendar1.0) | Subject...... 4,096 charactersLocation ...... 1,023 charactersCategory...... 1,023 charactersAttendees...... 1,022 characters (per person)Memo...... Approx. 2,500 characters |
| Task | vToDo format | Subject...... 4,095 charactersCategory...... 1,023 charactersMemo...... Approx. 7,600 characters |
- Approx. 7,600 characters for Toshiba Pocket PCs with the Microsoft Pocket PC 2002/2003 operating system.

Depending on the specifications of the device to which you are connected, sent and received data may not be properly stored in the respective device.
Major specifications
| Profiles supported by Toshiba Pocket PC | Serial Port Profile |
| Dial-up Networking Profile | |
| Object Push Profile | |
| File Transfer Profile | |
| LAN Access Profile | |
| Bluetooth specification | V1.1 |
| Not compatible with Bluetooth V1.0B devices. |
The connection speed of the Bluetooth varies depending on the location and orientation of the Toshiba Pocket PC, the communications range, the operating environment, the performance of the other party's device, and other factors.
The Bluetooth software cannot be used to communicate with devices for which it is unable to confirm the appropriate Bluetooth Service.
Bluetooth Settings
Enabling Bluetooth on Your Toshiba Pocket PC.
Enable Bluetooth on the Toshiba Pocket PC using the "Wireless Communication Switch". The Bluetooth Settings screen will appear. The Bluetooth Settings screen will also appear when the power is turned on using one of the program buttons.

Bluetooth Environmental Settings
Follow the procedure below to set the environmental settings, security settings, and the device name of Toshiba Pocket PC.
Once these settings are made, the setting information is stored. If you want to use the previous settings, the settings do not need to be changed.
- Tap Bluetooth icon.
When using Bluetooth Settings for the first time, or when a remote device (connected partner) is deleted, the dialog box shown above appears on the Bluetooth Settings. Tap OK.
The Bluetooth Settings screen appears.
You can also display the Bluetooth Settings screen by tapping Start > Programs > Bluetooth Settings.
- Tap Options on the command bar.
The Options menu appears.
- Tap Security Settings on the Options menu.
The Change Security Setting screen appears.
To change the security setting, tap the desired security setting and tap OK.
You can select from four security settings: Office, Mobile, Home, and Other. The default setting is Home.
Advanced Settings
To change an advanced setting, select the desired setting and tap OK. The default settings are as follows.
| Discoverability Mode | Connectability Mode | Security Mode | Encryption | |
| Office Discoverable | Connectable | Security | On | Yes |
| Mobile Non-discoverable | Non-connectable | Security | On Yes | |
| Home Discoverable | Connectable | Non-secure | No | |
| Other Discoverable | Connectable | Security | On | Yes |
In the default setting for Home, the Security Mode is set to Non-secure and, therefore, unspecified devices may be able to connect to Local Device. It is recommended that you set the Security Mode to Security On.
If you want to set the Connectability Mode to Non-connectable and you are operating your Toshiba Pocket PC in an environment in which there are three or more operating Bluetooth devices, you should also set the Discoverability Mode to Non-discoverable.
- Tap the Options menu and Local Device.
The Device Information screen for Local Device appears.
To change the name of the device, enter the new name in the Device Name box and tap OK.
The default device name is Toshiba BT.
The device name can be a maximum of 248 alphanumeric characters.
If the device name exceeds 248 alphanumeric characters, an error message appears.
The Bluetooth environmental settings are now complete.
Refer to the following for additional operations.
■ To use COM service
■ To use DUN/LAP service
■ To use OPP service
To use FTP service

Even if icon of Bluetooth program was lost from program menu, it can be recovered automatically. please execute following program using explorer, if you need.
\windows\bt_rescue.exe
Preparing to Connect with Bluetooth
Follow the procedure below to make preparations for a Bluetooth connection.
Search for peripheral devices

Bluetooth authentication and service update
- Tap Bluetooth icon.
When using Bluetooth Settings for the first time, or when a remote device (connected partner) is deleted, the dialog box shown above appears on the Bluetooth Settings. Tap OK.
The Bluetooth Settings screen appears.
You can also display the Bluetooth Settings screen by tapping Start > Programs > Bluetooth Settings.
- Tap Bluetooth icon on the command bar, or tap the Tools menu and Devices Search.
The local Device searches for Bluetooth devices in the vicinity while a message is displayed on the screen indicating that Local Device is searching for peripheral devices.
It may take several minutes to complete the device search.
Once the search is completed, the remote device list will be updated with the latest remote device information.

- Tap and hold on the name of the device to which you want to connect, then tap Update Service on the popup menu.
The Bluetooth Authentication screen appears on Local Device. Enter the Bluetooth passkey (PIN Code) within 20 seconds and tap OK.
The Bluetooth passkey can be a maximum of 16 alphanumeric characters. Depending on the remote device, the Bluetooth passkey might be a fixed value with a limit on the number of digits, so be sure to confirm these conditions.
If the Security Mode on either Local Device or the remote device is set to Security On, authentication is performed to confirm the remote device when connecting.
If either device has already been authenticated or the Security Mode on either Local Device or the remote device is set to Non-secure, the Bluetooth Authentication screen does not appear.
A message is displayed on the screen indicating that the service information is being updated.
![Bluetooth Passkey (PIN) Use the default PIN when a PIN is not entered. Requested Bluetooth device Device Address: 00:03:7a:00:a0:99 Device Name: MONZA10J-21-19 OK Cancel 123 1 2 3 4 5 6 7 8 9 0 - = Tab q w e r t y u i o p [ ] CAP a s d f g h j k l ; ' Shift z x c v b n m , . / Ctl äü ` \ ↓ ↑ ← →](/content/2026/05/1085736/images/2976be295b814450e868ac5bdfdd9474c8928dada00e260bcd6bfc1ea3a5ae90.jpg)
It may take several minutes to complete the service update. Now you are prepared to connect with Bluetooth.
Using COM Service
Establishing an ActiveSync connection with a computer
This section explains how to use COM service to connect to a computer.
Preparations
The computer to which you want to connect must be Bluetooth enabled and have ActiveSync installed. Your Toshiba Pocket PC must also have been synchronized with the PC using a cradle or a cable at least once to establish a "partnership" to the PC.
- From the service list on the Bluetooth Settings screen, tap and hold on the name of the COM service to which you want to connect, then tap ActiveSync Registration or Connection Registration on the popup menu.
If you select ActiveSync Registration, ActiveSync will be performed automatically and continuously. You need no more step.
When the connection registration is complete, the device and service icons change to registered connection icons.
- Tap OK.
The screen closes and the Today screen appears.
- From the computer, set the port that you will use when you are connecting with Bluetooth.
The computer is now ready to connect.
This operation may vary depending on the computer. Please refer to the user's guide supplied with your computer for more information.
- Tap Start > Programs > Bluetooth Connection.
Your Toshiba Pocket PC connects to the computer.
When the connection is complete, the Programs screen reappears.
Using DUN/LAP Service
Connecting to the Internet
This section explains how to use DUN service to connect to the Internet by connecting to a modem or cell phone.
LAP service uses the same method of connection.
Preparations
To connect to a Bluetooth-enabled modem, tap Start > Settings > Connection tab > Connections, in My ISP, tap Add a new modem connection. The Make New Connection screen appears. From the Select Modem list, select Bluetooth Card.

For operations of the modem or cell phone, please refer to the user's guide of the respective device.
Any dial-up number can be used for LAP service. Select and enter the desired number.
- From the service list on the Bluetooth Settings screen, tap and hold on the name of the DUN or LAP service to which you want to connect, then tap Connection Registration on the popup menu.
The screen is connected to DUN service.
When you disconnect from the Internet or exit your e-mail application, the Bluetooth connection is also terminated.
- Tap OK.
The screen closes and the Today screen appears.
For further operations, please refer to "Accessing the Internet" and "Sending and Receiving E-mail" in the user's guide of your Toshiba Pocket PC.
When you disconnect from or exit the Internet or your e-mail application, the Bluetooth connection is also terminated.
Using OPP Service
This section explains how to use OPP service to send and receive contacts, schedules, tasks, and business cards to and from other Toshiba Pocket PCs. "Business cards" here refers to Toshiba Pocket PC owner information. Please be aware that you cannot send voice data or handwritten data entered in the memo section.
Sending a contact
- Tap Start and Contact, then tap and hold on the contact you want to send.
A popup menu appears.

You can select multiple contacts by dragging them.
You can also send a contact by tapping the Tools menu.
- Tap Send by BT on the popup menu.
The device search screen appears.
- Select View All Devices and tap Device Search.
The device list appears.
- Select the device to which you want to connect by tapping the device name, then tap Connect.
A message is displayed indicating that Local Device is now connected to the remote device.
If the Bluetooth Authentication screen appears, enter the Bluetooth passkey (PIN Code) to perform authentication.
A message is displayed indicating that the contact is being sent.
After the contact is successfully sent, a message is displayed indicating this and the Bluetooth connection is terminated.
Tap Close to return to the contact list screen.
A message is displayed on the remote device indicating that the contact has been received.
Tap Close to close the screen.
Sending a schedule
- Tap Start and Schedule, then tap and hold on the schedule that you want to send.
A popup menu appears.
You can also send a schedule by tapping the Tools menu.
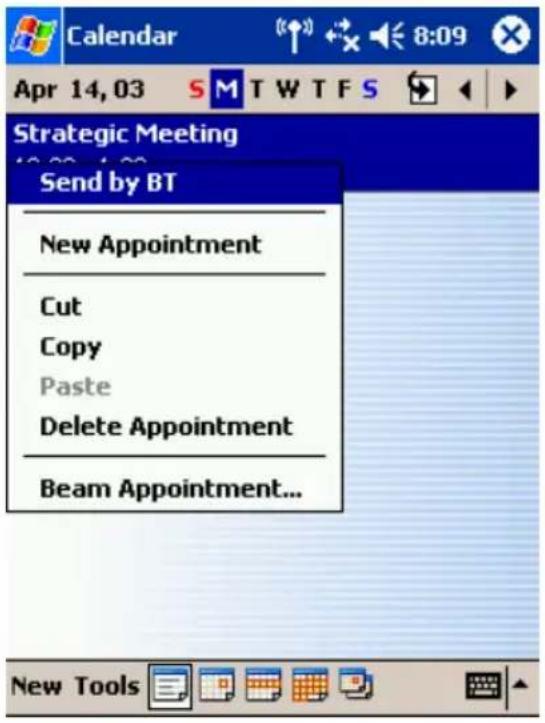
- Tap Send by BT on the popup menu.
The device search screen appears.
For further operations, follow Steps 3 and 4 in "Sending a contact."
Sending a task
- Tap Start and Task, then tap and hold on the task that you want to send.
A popup menu appears.
You can also send a task by tapping the Tools menu.
- Tap Send by BT on the popup menu.
The device search screen appears.
For further operations, follow Steps 3 and 4 in "Sending a contact."
Exchanging business cards
- Tap Start > Contact > Tools menu.

- Tap Exchange by BT.
The device search screen appears.
- Select View All Devices and tap Device Search.
The device list appears.
- Select the device to which you want to connect by tapping the device name, then tap Connect.
A message is displayed indicating that Local Device is now connected to the remote device.
If the Bluetooth Authentication screen appears, enter the Bluetooth passkey (PIN Code) to perform authentication.
The exchange of business cards begins.
When the exchange of business cards is completed, the name, e-mail address, and phone number of the remote device user appears on the screen, and the Bluetooth connection is terminated.
Tap Close to return to the contact list screen.
Receiving a business card
-
Tap Start > Contact > Tools menu.
-
Tap Receive by BT.
For further operations, follow Steps 3 and 4 in "Exchanging business cards."
When the business card is received, the name, e-mail address, and phone number of the remote device user appears on the screen, and the Bluetooth connection is terminated.
Using FTP Service
This section explains how to use FTP service to transfer files to and from another Toshiba Pocket PC.
Starting Bluetooth FTP
- Tap Start > Programs > Bluetooth FTP.
The server selection screen appears.

- Tap Search.
Local Device searches for Bluetooth devices in the vicinity while a message is displayed on the screen indicating that Local Device is searching for peripheral devices and obtaining device names.
The discovered devices are displayed
- Tap the device to which you want to connect, then tap OK.
If the FTP Authentication screen appears, enter the FTP password.

The FTP password can be a maximum of 16 alphanumeric characters.
On Local Device, the FTP (Client) screen appears.
On the remote device, Bluetooth FTP starts automatically and the FTP (Server) screen appears.
Sending a file
- In the Local Device window, tap and hold on the folder or file that you want to send.
A popup menu appears.
Tap on the file to start the associated application.
You can also send a file by dragging that file to the remote device window.
Send: This sends the file to the remote device.
Execute: This starts the associated application.
New Folder: This creates a new folder in the Local Device window.
Delete: This deletes a folder or file.
Rename: This enables you to rename a folder or file.
- Tap Send on the popup menu.
The message Sending... appears.
- To exit, tap the Tools menu and Exit.
Receiving a file
- In the remote device window, tap and hold on the folder or file that you want to receive.
A popup menu appears.
When you tap the file that you want to receive, the message Send/Execute Confirmation appears.
You can also receive a file by dragging that file to the Local Device window.
Receive: This receives the file from the remote device.
Receive/Execute: This receives the file from the remote device and starts the associated application.
New Folder: This creates a new folder in the remote device window.
Delete: This deletes a folder or file.
- Tap Receive or Receive/Execute on the popup menu.
The message Receiving... appears.
When you tap Receive/Execute, Local Device receives the file from the remote device and starts the associated application. If there is no associated application, an error message appears.
- To exit, tap the Tools menu and Exit.
FTP Authentication setting on Bluetooth FTP server
- Tap Start > Programs > Bluetooth FTP.Server
- Tap Tools on command bar.

- Tap Options on Tools menu.
The OBEX Authentication screen appears. You can enter the FTP password.
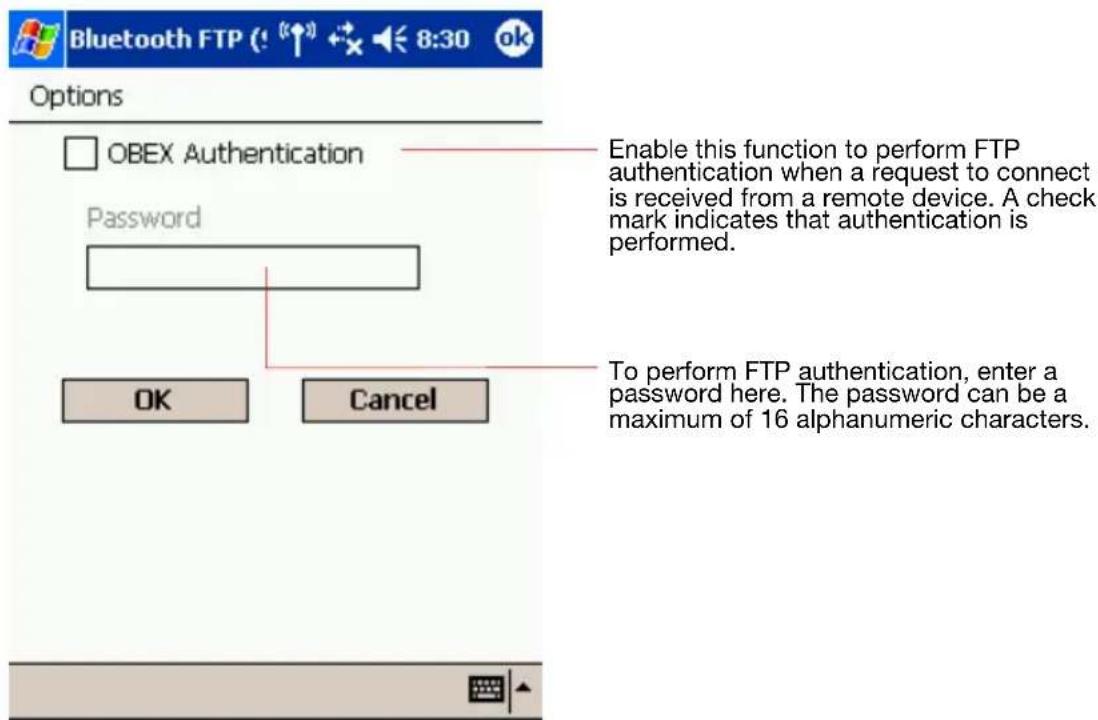

The FTP password is not registered in initial setting. Before using it, we recommend you to set up the FTP password.
The Bluetooth Settings Screen
The command bar on the Bluetooth Settings screen features three menus: Tools, View, and Options. You can use these menus to perform various Bluetooth operations. This section explains the various features of these menus.
Tools menu
Tap Tools on the command bar to display the Tools menu.
Searching for peripheral devices
When you tap Devices Search on the Tools menu, the Toshiba Pocket PC searches for Bluetooth devices in the vicinity while a message is displayed on the screen indicating that the local device is searching for peripheral devices.
All discovered devices are displayed in the device list of the Bluetooth Settings screen.
Updating service
Tap Update Service to display the updated service information of the selected device in the service list of the Bluetooth Settings screen.
Tap Connection Registration to register a connection. The icons displayed in the device and service lists change to registered connection icons.
Tap Connecting Registrations in the pop-up menu of item in the service list to register a connection.
Properties
Tap Properties to display the detailed information of the selected remote device.
Delete
Tap Delete to delete the selected remote device from the device list, service list, and database of discovered peripheral devices. The selected device cannot be deleted if it is connected to Local Device.
Search options
Tap Search Options on the Tools menu to display a popup menu.
If you select Enable Device Name Search, the device names are searched for during the search for peripheral devices and listed in the device list.
If you select Disable Device Name Search, the device names are not searched for during the search for peripheral devices, thereby reducing the search time. In this case, only the device addresses are displayed in the device list.
Deleting ghost devices
Tap Delete Ghost Device on the Tools menu to delete all devices displayed in the device list as ghosts.
View menu
Tap View on the command bar to display the View menu.
Details
Tap Details on the command bar to display the device names in the device list.
Icons
Tap an icon on the command bar to display that icon in the device list.
Filter
The currently selected device is indicated with a black dot. Tap the desired type of device.
Among the devices discovered using Devices Search in the Tools menu, only the types of devices selected in this display menu are displayed in the device list.
Options menu
Tap Options on the command bar to display the Options menu.
Security Settings
Tap Security Settings on the Options menu to display the Change Security Setting screen.
You can select from four security settings: Office, Mobile, Home, and Other. The default setting is Home.
To change the security setting, tap the desired security setting and OK.
Advanced settings
The default settings are as follows.
| Discoverability Mode | Connectability Mode | Security Mode | Encryption | |
| Office Discoverable | Connectable | Security | On | Yes |
| Mobile Non-discoverable | Non-connectable | Security | On Yes | |
| Home Discoverable | Connectable | Non-secure | No | |
| Other Discoverable | Connectable | Security | On | Yes |
In the default setting for Home, the Security Mode is set to Non-secure and, therefore, unspecified devices may be able to connect to Local Device. It is recommended that you set the Security Mode to Security On. If you want to set the Connectability Mode to Non-connectable and you are operating your Toshiba Pocket PC in an environment in which there are three or more operating Bluetooth devices, you should also set the Discoverability Mode to Non-discoverable.

You can also change the security setting by tapping and holding on Bluetooth icon on the Today screen and tapping Change Security Setting. A menu with the four security settings appears. Tap the desired security setting.
Registration History
Tap Registration History on the Options menu to display the Connection Registration History screen.
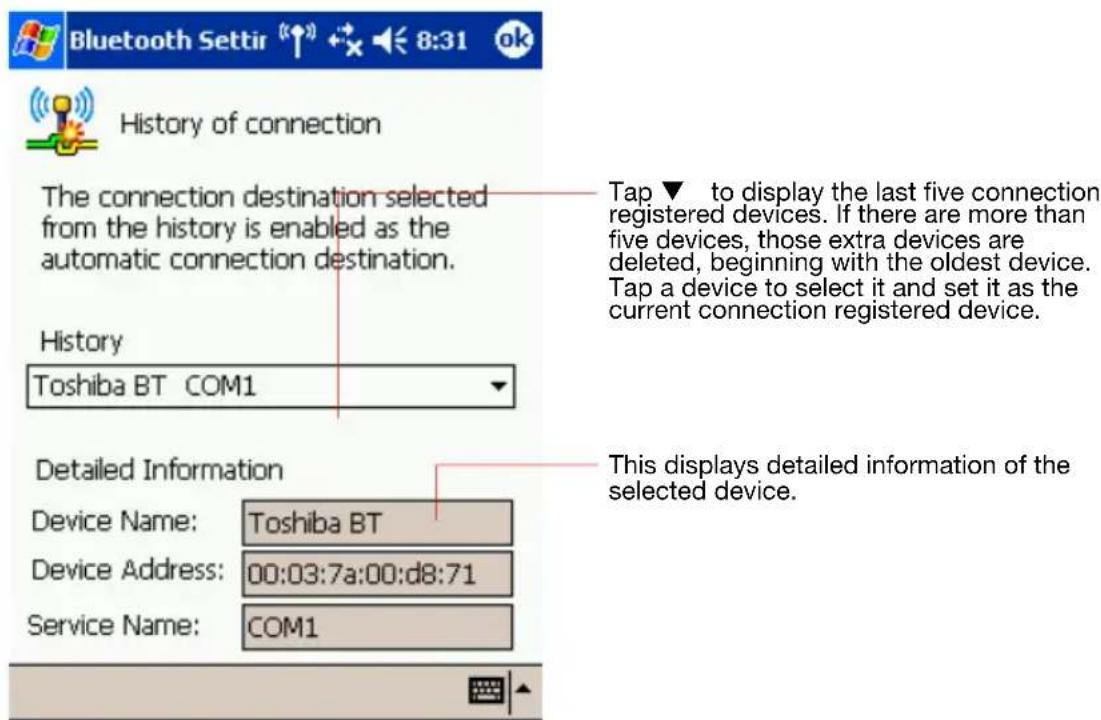
You can also change the connection registered device by tapping and holding on Bluetooth icon on the Today screen and tapping Registration History. A menu with the last five connected devices appears. Tap a device to select it and set it as the current connection registered device.
Local Device
Tap Local Device on the Options menu to display the Device Information screen for Local Device.
The default device name is Toshiba BT.
To change the name of the device, enter a new name in the Device Name box and tap OK.
The device name can be a maximum of 248 alphanumeric characters.
If the device name exceeds 248 alphanumeric characters, an error message appears.
Version Information
Tap About on the Options menu to display the version information of Bluetooth Settings.
Chapter 10
Optional Functions
Home
You can launch the built-in or installed applications easily by tapping the icon displayed on the Home screen. You can set a desired image to display as the screen background.
Launching an Application From the Home
Tap 📁, Programs, and then Home to display the Home screen.
You can also launch the Home by pressing the Toshiba Pocket PC Home button.

Tap the desired tab, and then tap the application icon you want to launch. The selected application starts up.

Also, you can launch an application by moving the cursor button or scroller to select and pressing the center of the cursor button to confirm. You can add tabs up to a maximum of 10 kinds and icons up to 18 in a tab.
About Running
In the Running tab, the active application names are displayed. The icons do not appear.
Application Activate/Stop:
Tap the application name you want to activate. You can also activate the application from the pop-up menu displayed by tapping and holding the application name.


You can show a pop-up menu by tapping and holding any portion other than the application names displayed in the Running tab. In this case, only the Stop All is selectable.
Display Icon List
The following list shows the tabs and icons for the initial setup.
| Tabs Icons Applications | ||
| Running | — | — |
| Main |  | Pocket Internet Explorer |
 | Windows Media Player | |
 | Notes | |
 | Tasks | |
 | Inbox | |
 | Calendar | |
 | Contacts | |
 | Pocket Word | |
 | Pocket Excel | |
 | Calculator | |
| Programs |  | File Explorer |
 | DataBackup | |
| Games |  | Solitaire |
 | Jawbreaker | |
Moving an Application Icon into Another Tab
The moved icon is placed next to the last icon on the tab screen. You cannot move an icon into a tab which already contains 18 icons.
To move using pop-up menu:
- Tap and hold the icon you want to move to display the pop-up menu.
- Tap Cut on the pop-up menu.
- Tap the destination tab, and then tap Paste on Edit menu. The selected icon is pasted on the screen.

You can also select Paste from the pop-up menu displayed by tapping and holding any portion other than the icon.
Deleting an Icon
- Tap and hold the icon you want to delete to display the pop-up menu.
- Tap Drop on the pop-up menu. The icon is deleted and the next icon positioned after the deleted icon automatically shifts to fill the deleted icon position. And all icons after the deleted icon likewise shift to fill the previous icon position.
Adding an Icon
You can add the application and your file icons to the Home screen.
-
Tap Edit and then Add to display the Add Application screen.
You can also select Add from the pop-up menu displayed by tapping and holding any portion other than the icon. -
Tap ▼ of Application file to show the file list. If there is no desired file on the file list, you can find it by tapping Browse. To refer to all folders and files, tap Browse to show the Browse Dialog screen. When the file is selected, its name is displayed in the Application file box.
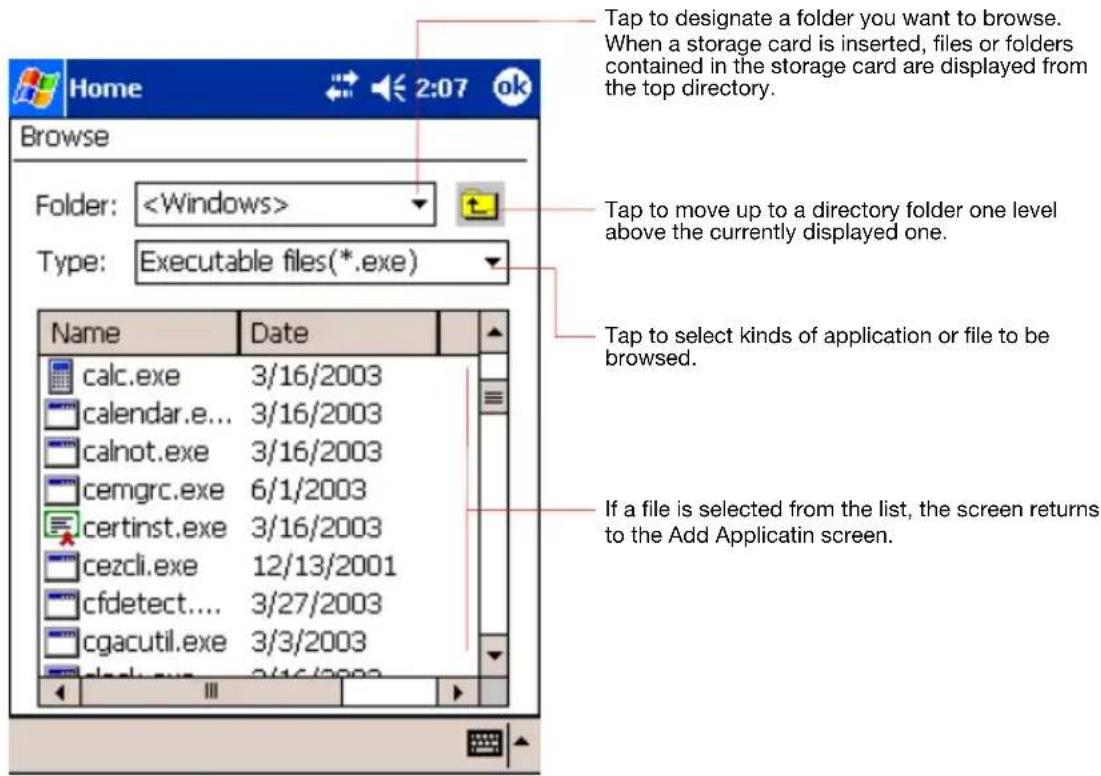
- Enter an icon name in the Application name box, which is to be displayed on the Home screen.
You can enter up to a maximum of 32 characters.
- When finished, tap OK to close the Add Application screen, and the new icon is added to the Home screen.

If the Application file is not designated, or if the Application name is not entered, you cannot add a new icon.
You cannot launch the icon added from the storage card, if the same card is not inserted in the Toshiba Pocket PC.
Tab Setting
You can set to add, delete or rename the tab on the Tab Settings screen. You can also set to display a desired image on your screen background.
To add a tab:
- Tap Tools and then Tab Settings to display the Tab Settings screen.
- Tap Tab Settings and then New to display a box to enter the new tab name.
- Enter a new tab name. When finished, tap OK to return to the Tab Settings screen. You can enter up to a maximum of 10 characters.
- Tap OK on the Tab Settings screen to return to the Home screen.
To delete a tab:
- Tap Tools and then Tab Settings.
- Select the tab name to delete, and then tap Delete, the Delete tab dialog for confirming appears. Please note that all the icons contained in the same tab will also be deleted.
- Tap OK on the Delete tab dialog to delete the tab. When finished, the screen returns to Tab Settings screen.
- Tap OK on the Tab Settings screen to return to the Home screen.

You cannot delete the Running tab.
To change the name of a tab:
- Tap Tools and then Tab Settings to display the Tab Settings screen.
- Select the tab name you want to change, and then tap Rename.
- Enter a new tab name. When finished, tap OK to return to the Tab Settings screen. You can enter up to a maximum of 10 characters.
- Tap OK on the Tab Settings screen to return to the Home screen.

You cannot rename the Running tab.
To change a background:
- Tap Tools and then Tab Settings to display the Tab Settings screen.
- Select the tab of which background you want to change.
- Tap Browse to display the Browse dialog screen.
- Tap the desired file from the list to return to the Tab Settings screen.
- Tap OK on the Tab Settings screen to return to the Home screen.

If the selected file is not a designated file type, you cannot set it on your screen background. The displayable range of the image on the Home screen is 240(W) x 246(H).
Text Colour Setting:
You can set the colour of application name for each tab using Text Color.
- Tap the tab whose colour you want to set to display the selected tab screen.
- Tap View and then Text Color to display the color list.
You can set the colour of the application name as desired. - Tap the colour you want to set, and the colour of the application name changes.
Home Help
Tapping an icon displayed at “Home” launches that application. In addition to applications, it is also possible to register icons for associated files here. The Home screen is divided into tabs. There are 4 tab types as default, and up to 10 types of tab can be registered. As for the icons on the tab, up to 18 icons per one tab can be registered.
An image can be used as the background for the tab screen.
"Running" tab
The names of currently running applications are displayed at the "Running" tab.
Applications can be switched or quit here.
“Text Color” can be selected from the “View” menu, and “Tab Settings” and “About” can be selected from the “Tools” menu.
To activate applications, tap and hold the name of the application you want to activate to, then tap Activate from the pop-up menu.
To stop an application, tap and hold the name of the application you want to stop, then choose Stop from the pop-up menu. If Stop all is selected from the pop-up menu, all currently running applications are stopped.
- “Stop all” can also be selected by tapping and holding on the “Running” tab screen without selecting an application name.
Launching applications
When an icon on the tab screen is tapped, the application or associated file registered at the icon is launched.
■ Applications can also be launched by selecting them with the cursor button then pressing on the center of the cursor button.
Switching the icon display
Tap on the View menu to display the current display settings. Current display settings are indicated by check mark at the left. To switch the display, select Large Icon or Small Icon.
Icon settings
1. Moving icons (using the pop-up menu)
- Tap and hold the icon you want to move on the tab screen.
- When the pop-up menu appears, select Cut from the menu.
- Tap on the tab to which you want to move the icon, then tap Paste from the Edit menu to move the icon and display it on the tab screen.
- Paste can also be selected from the pop-up menu displayed when you tap and hold at a position on the screen other than on icon.
It is not possible to move icons to tabs already containing 18 icons. When an icon is moved, it is positioned at the very end of the tab's icons.
2. Deleting icons
- Tap and hold the icon you want to delete. A pop-up menu appears.
- Tap Drop from the pop-up menu to delete the selected icon from the tab screen.
- When an icon is deleted, subsequent icons are all moved up one place.
3. Adding icons
- Tap the tab to which you want to add an icon to select that tab.
- Tap Add from the Edit menu to display the Add Application screen.
- Tap the Application file box.
- From the list, tap the application you want to add. To select a file not on the list, tap the Browse button, then select the file from the Browse dialog.
- Input the name of the icon you want to add (up to 32 characters) in the Application name box.
- Tap the OK button. The new icon is added.
- Associated files can be specified for added icons.
If either one of Application file or Application name is not filled in, an icon can not be added.
4. Browse Dialog
-
Tap the Folder box to select the folder to be browsed.
-
Tap the Type box to select the type of file to be browsed.
-
The list of the files of the specified type and in the specified folder appears on the screen. Select the desired application or file or the image to be used as the background and tap it. The original screen reappears.
If a SD/CF card is inserted into the main unit when adding icons, icons of applications and files on the SD/CF card are also displayed on the browse screen. The folders and files on the SD/CF card can be displayed in the Folder box, beginning at the topmost level.
If an icon on a SD/CF card is added, that SD/CF card must be inserted when the icon is tapped or the file will not be launched.
Tab settings
1. Switching tabs
Tap on another tab to switch the tab screen.
Initially four tabs are registered: Running, Main, Programs and Games.
2. Changing tab names
- Select Tab Settings from the Tools menu. The Tab Settings screen appears.
- Tap the Select tab box to select the tab to be changed.
- Tap the Rename button. The screen for inputting the new tab name appears.
- Input the new tab name (up to 10 characters) into the Rename to box.
- Tap the OK button. The tab name is changed and the Tab Settings screen reappears.
- Tap OK at the upper right to return to the Home screen.
3. Deleting tabs
-
Select Tab Settings from the Tools menu. The Tab Settings screen appears.
-
Tap the Select tab box to select the tab to be deleted.
-
Tap the Delete button. A dialog asking you to confirm you want to delete the tab appears.
-
Tap the Yes button. The tab is deleted and the Tab Settings screen reappears.
-
Tap OK at the upper right to return to the Home screen.
Note that when a tab is deleted, all the icons on that tab are also deleted.
- Delete cannot be selected if there are only two tabs on the Home screen.
4. Adding tabs
- Select Tab Settings from the Tools menu. The Tab Settings screen appears.
- Tap the New button. An input screen appears.
- Input the name you want to give the tab (up to 10 characters) into the New tab box.
- Tap the OK button. The new tab is added and the Tab Settings screen reappears.
- Tap OK at the upper right to return to the Home screen.
5. Setting the background image
- Select Tab Settings from the Tools menu. The Tab Settings screen appears.
- Select the tab whose background you want to set at the Select tab box.
- Tap the Browse button to display the Browse dialog.
- Select and tap the image to be used as the background. The Tab Settings screen reappears.
- Tap OK at the upper right to return to the Home screen.
6. Setting the text colour
Different colours can be set for the application names at the different tabs.
- Display the tab whose color you want to set, then select Text Color from the View menu.
- Tap the colour you want to set from the list of displayed colors. That colour is set for the application names.
How to Make a Backup
You can make a backup of the Toshiba Pocket PC data to the storage device. If you have backed up your data on the storage device, you can restore that data in your Toshiba Pocket PC. You can also delete backup file data from the storage device. Periodical data backup is recommended.
Data of the following three types can be backed up:
File: Includes a file created by Pocket Word, Pocket Excel, Notes, etc. or an additionally installed program and so on.
Registry: Setting information of Windows or a program.
Database: Database information of Microsoft Pocket Outlook.

If you update ROM programs using special installation programs with a *.zip extension, do not use the backup data which you made before updating ROM programs.
When using the DataBackup, beware of the remaining battery charge.
If you make a backup to the storage card or Flash ROM Disk by DataBackup Utility, please DO NOT remove the storage card, reset the device, and/or turn off the power of the device until the backup is completed.
If you restore the data from the storage card by DataBackup Utility, please DO NOT remove the storage card, reset the device, and/or turn off the power of the device until the restore is completed
Before making a backup, disable the password protection. Tap Start, Settings, Personal tab, Password, and select No password.
Failure to follow any of the above procedures may result in the loss of data.
Making a Backup
The backup function allows you to back up the data from the main unit to a storage device. The backed up data can be restored and deleted.
Before performing the backup or restore operations, do the following;
- Check that there is enough space in the main unit's memory and on the storage device. The data is saved as a backup file (.dbk) on your storage device.
Make sure the main unit's power is off when loading and unloading the CF/SD card. - Save current data in the main unit's memory before backing it up on the CF/SD card.
To make a backup to the CF/SD card, insert a CF Card or a SD Memory Card.
- Tap Start, Programs, and then DataBackup to display the DataBackup screen.
- Select a Custom Name, if you want.
- Select and tap the storage device.
- Tap the Backup button.
- Tap Yes. A message is displayed during the backup process. When the backup is completed, a backup finished message appears.
- Tap OK to return to the previous screen.

If the available storage device capacity is inadequate to contain the data from the e750, the backup process stops. Check the storage device capacity before starting the backup.
If the CF/SD card is write protected, you cannot save the backup data. Cancel the write protection before starting the backup.
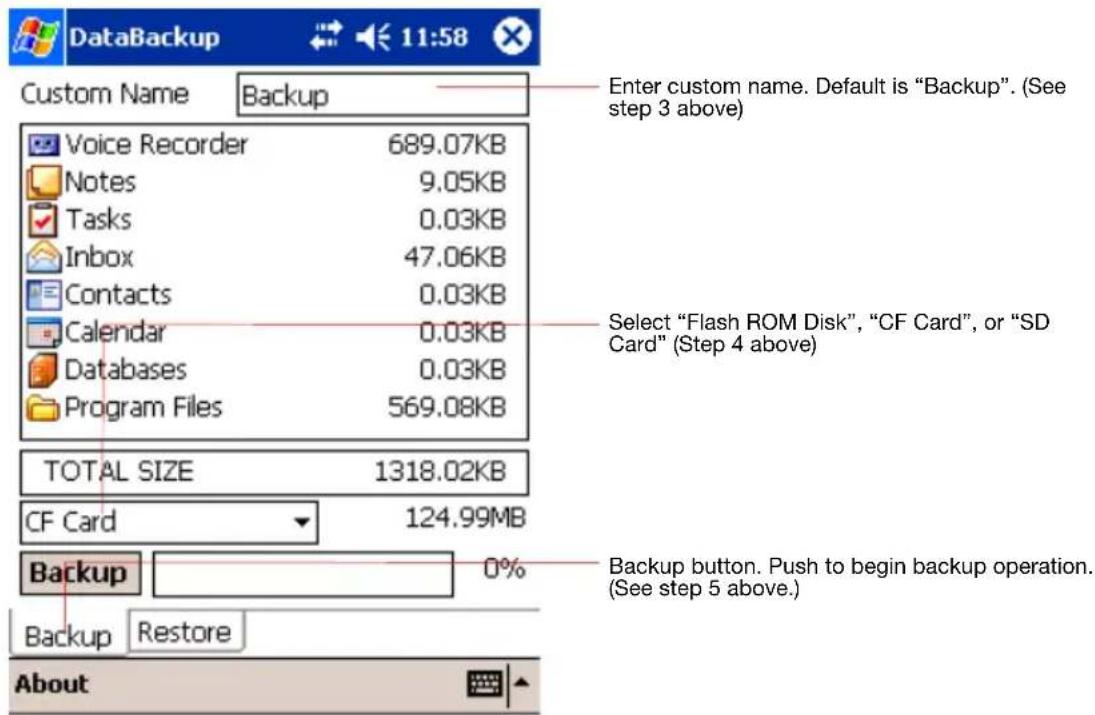
Carrying Out the Restore Operation
Use this operation to restore the backup data stored on the storage device onto the main unit. The restore function overwrites the backed up data from the storage device onto the main memory of your Toshiba Pocket PC e750.
If the same file name exists in the main memory of your Toshiba Pocket PC e750, the file data is replaced with the backup data from the storage device. If files exist in the main memory but not in the backup file, they will not be overwritten.
- To restore from the CF/SD card, insert the CF/SD card, which contains backup data into your Toshiba Pocket PC.
- Tap Start, Programs, and then DataBackup to display the DataBackup screen.
- Select Restore from tab, then select and tap the storage device.
- Select backup file from restored files list.
- Tap Delete if you want to delete backup file, and then Yes when prompted with a message screen.
- Tap Refresh if you want to refresh the storage device, and then Yes when prompted with a message screen.
- Tap Restore to display the Prompt message screen.
-
Tap Yes. The Proceeding message is displayed during the restore process.
When the restore is completed, a restore finished message appears. -
Tap OK. Your Toshiba Pocket PC e750 is reset and restarts automatically.

The data backup in Pocket PC 2002 can not be restored to Pocket PC 2003 by DataBackup.

System Information
The System Information program displays the system information such as CPU clock, CPU stepping, Boot Loader Version, OS Version, PIC Version, MAC address (WirlessLAN model only), and UUID. The information is displayed by accessing the Identity, Memory, Drivers, System, and Wireless tabs.
To launch the program, Click Start > Settings > System > System Information.
Identity Tab
The opening menu presents identification information for product service.

Memory tab
The Memory tab presents information about the systems RAM, ROM, and Flash ROM Disk.

Driver tab
The Driver tab displays the drivers used by the system's software applications.

System tab
The System tab displays CPU, operating system, and other system information.
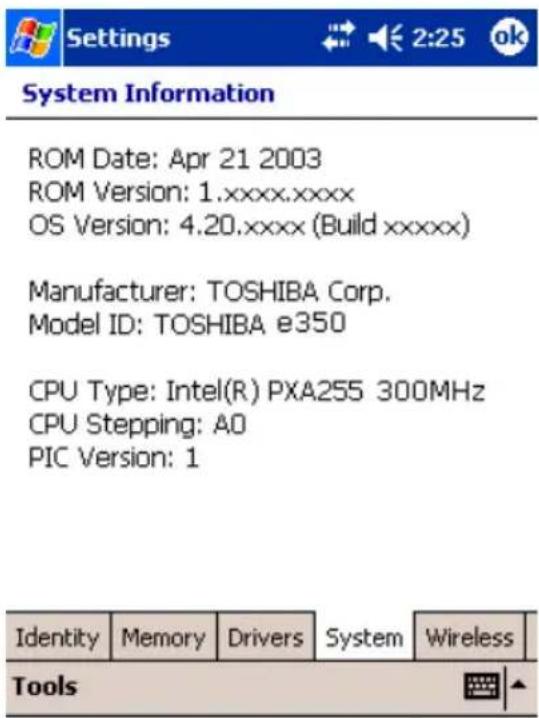
Wireless tab
The Wireless tab displays information about the Built-in Wireless LAN adapter.

Tools Menu
The Tools menu displays the system information and allows it to be exported to a text (*.txt) file. "Export" exports all system information parameters to a text (*.txt), and "About" displays the system information version.

ATI Presentation Pack
The Toshiba Expansion Pack with ATI IMAGEON Dual Display Solution comes bundled with the ATI Presentation Pack, which includes the IA Presenter and IA Screen Mirror modules.
IA Presenter
Take your Microsoft Windows PowerPoint slides and use IA Presenter to run a smooth presentation directly from your Pocket PC. IA Presenter can run as a standalone mobile PowerPoint player using your portable device's LCD screen. But with IA Presenter and the Toshiba Expansion Pack linked to an LCD projector or a monitor, you can create powerful presentations from your Pocket PC.
IA Screen Mirror
IA Screen Mirror with the Toshiba Expansion Pack project the current contents of your Pocket PC's LCD screen onto an external projector, or monitor. It can display up to nine different images from your LCD output at the same time on the second display.
IA Presenter
Getting Started
After you invoke IA Presenter, the screen lists all the converted PowerPoint presentations currently in your My Documents folder. A sample presentation file is included with the installation, so at least one file will be listed when you initially invoke IA Presenter.
To receive a presentation file into the My Documents folder of your Pocket PC via Infrared beaming, tap Tools in the lower left corner of the screen, then select Receive via InfraRed...from the menu shown above. To drag-and-drop a PowerPoint file from your computer to your Pocket PC, see the section Using IA Presenter's Desktop Converter on the next page.
The Options... command on the Tools Menu opens the General, File, Display, and VGA Output tabs. These tabs are explained in the on-line Help file, which can be accessed from the Tools Menu by tapping Help.... Or, after opening one of the tabs, select Help from the Windows Start Menu.
Installing the ATI Presentation Pack
All components of the ATI Presentation Pack are installed together by doing as follows:
- Make sure your Pocket PC is connected to your computer and that an ActiveSync connection has been established.
- Start the ATI Presentation Pack installation by running the Setup program.

You can setup ATI Presentation Pack from Companion CD
- After accepting the license agreement, choose the folder to which you want the ATI Presentation Pack to be installed. Click Next to accept the default destination folder; click Browse... to specify a different folder.
- Check your Pocket PC screen for any additional steps required to complete the installation.
Using IA Presenter's Desktop Converter
When you drag-and-drop a PowerPoint file from your PC to your Pocket PC, the ActiveSync Converter in the IA Presenter will automatically convert the PowerPoint file to a special IA Presenter format for your Pocket PC, using the resolution you specify. The file will be placed in any folder on your mobile device where you choose to drag-and-drop it.

PowerPoint 97 or PowerPoint 2000 (or greater) is necessary for using IA Presneter's Desktop Converter.
There are two ways to open the "Set ActiveSync Conversion Options" dialog box:
1) Select ATI Presentation Pack from the Start Menu, and then Set IA Presenter ActiveSync Conversion Options from the submenu. The dialog box will open, establishing it as your default PowerPoint filter for your ActiveSync drag-and-drop operations. You can choose a dimension and then uncheck the Show this option dialog box next time checkbox (it is checked by default as shown in the figure above). If you uncheck it, the dialog box will not open whenever you drag-and-drop a file from your computer to your mobile device. Instead, the dimension you specified will be used during each conversion.
2) You can set the dimension each time you drag-and-drop a PowerPoint file from your computer to your mobile device. If the Show this option dialog box next time checkbox has not been un-checked, the IA Presenter “Set ActiveSync Conversion Options” dialog box will open automatically every time you drag-drop a PowerPoint file to your Pocket PC.
Choosing Dimensions for the Converted .IAP File
The conversion filter supports both PPT and PPS PowerPoint files. The conversion options are:
- Pocket PC LCD Size – 320 x 240: Select this option if you only want to display the presentation on the LCD screen of your Pocket PC. However, if you have tried the 320 x 240 button and then find that images on the Pocket PC screen have been “stretched” to fit the screen, and you do not want this effect, try converting again using the User-defined button. After selecting User-defined, enter 240 in the first box, and 320 in the second box.
If you want to prepare the file to project the presentation to a VGA screen or video monitor, select one of these options:
VGA - 640 x 480
SVGA - 800 x 600
User-defined: If you do not want to use one of the pre-defined dimensions listed above, select the User-defined option and enter your own value in the fields.

XGA 1024 x 768 is not supported.
Opening a Presentation and Using View Modes
When you invoke IA Presenter, the first screen that appears lists all the converted PowerPoint presentations currently in your My Documents folder. Tap on the name of the file you want to load. You can then choose from the following view modes.
Normal View
Normal view allows you to view the current slide in the upper pane, while still able to navigate slides conveniently using the lower thumbnail pane. You can drag the Splitter Bar that divides the two panes up or down, to adjust the screen distribution above and below the splitter. The Normal View icon is located at the leftmost side of the Toolbar, as shown below.
You can also use the stylus to pan the slide image in the upper pane to show the part covered by the lower pane. The splitter position will automatically be remembered across multiple application sessions, freeing you from having to adjust the splitter position again during the current IA Presenter session.
To display a different slide in the upper pane, simply tap on the desired thumbnail in the lower pane, or use the Slide Title Bar (unnamed slides will be represented by a number in the Slide Title Bar drop-down list). The lower thumbnail pane in Normal view provides slide navigation. If you want to select multiple slides for further operations, use the Slide Sorter view, as explained in the next section.
You can project the currently selected slide to VGA Display by activating the VGA Slide Toggle command on the View Menu, or by tapping the VGA Slide Output Toggle icon at the rightmost side of the Toolbar. To end the projection, select the command again to toggle it off.
Slide Sorter
Slide Sorter view fills the entire application space with either large or small thumbnails, depending on whether Large Thumbnail or Small Thumbnail is active on the View Menu. You can select:
■ One slide by tapping on it, or
■ Multiple adjacent slides by dragging your stylus over them, or
If you select Multiple Select Mode on the Edit Menu, you can tap, drag, or a combination thereof, to select multiple slides that are separated.
Selected slides will be highlighted by a different border color.
You can project an individual slide to the VGA output by activating the VGA Slide Toggle command on the View Menu, or by tapping the VGA Slide Output Toggle icon at the rightmost side of the Toolbar. When you activate this function:
If one slide is selected at the time you toggle the VGA Slide Output "on," that slide will be output to the VGA Display.
If multiple slides happen to be selected, the first selected slide in the sequence will be output to the VGA Display.
If no slides are selected, there is no change to the current status of the VGA Display. That is, if an image is already displayed on the VGA Display, that image remains until you select a slide on your LCD screen for projection.
To end the projection and return to viewing the slide only on your mobile device's screen, just select the command again (or tap the icon a second time) to toggle it off.
Indicator Icons under Thumbnails
Under each thumbnail in Slide Sorter view mode, there may be various small icons displayed which indicate the status/attributes of the slide, as follows:

The transition icon indicates that a transition effect has been associated with the slide, and tapping the icon will “demo” the transition effect.

The shape icon indicates that the slide contains animated shapes.

If you assigned a transition delay-time to the slide in the Automatically field of the Edit Menu > Slide Transition... screen, the delay- time will be shown.

The slide number is always shown at the right. If the slide has been hidden using the Hide Slide command on the Edit Menu, the slide number will be enclosed in a red box with a line crossing it out.
Notes Page
Notes Page view displays the current slide content in the upper pane, with the lower pane displaying the speaker notes that were entered for the original PowerPoint presentation, or entered/edited in IA Presenter. The upper pane operation is the same as in Normal view. The lower pane is both a Notes display window and an editing window. After editing a Note, tap OK in the upper right corner to save it.
When in Notes Page view mode, you can project the currently-selected slide to VGA output by activating the VGA Slide Toggle command on the View Menu, or by tapping the VGA Slide Output Toggle icon at the rightmost side of the Toolbar. To end the projection and return to viewing the slide only on your mobile device screen, just select the command again to toggle it off.
Quick Notes
The Quick Notes command on the View Menu (and the Quick Notes View icon on the Toolbar) gives you a view mode that combines the thumbnail images of Slide Sorter view with the Notes pane of the Notes Page view. When you tap on a thumbnail, a border around it indicates it is selected. You can also use the Up, Down, Left, or Right buttons on your mobile device to move the selection focus (or the Slide Title Bar, if you chose to display it).
The lower pane displays the Speaker Notes that were entered for the original PowerPoint presentation, or entered/edited in IA Presenter. The lower pane is both a Notes display window and an editing window. Tap in the lower pane to start editing a Speaker Note. The editing functionality is the same as for Notes Page view.
If the Cut/Copy/Paste/Clear/Undo/Select All commands are required for editing the text, press your stylus within the Notes pane to activate the pop-up editing menu. The Notes-editing operation can be undone by selecting the multiple-steps Undo command on the Edit Menu, pop-up menu, or Toolbar.
Slide Show
The Slide Show command on the View Menu starts a full screen Slide Show on the Pocket PC's LCD screen. (If you want to project the slide show to VGA output, you must use the VGA Slide Show command.) Before selecting Slide Show or VGA Slide Show, you should select Set Up Show... from the Tools Menu to set up the desired behavior for your slide show.
If the Auto-Rotate option is checked in the Tools > Options > Display tab, the slide will be automatically rotated according to the direction you choose (Left or Right).
Depending on the slide advancement setting specified in the Slide Transition dialog box, you can tap to advance the slide (or the next animated object); use the navigation (arrows) buttons of your Pocket PC to advance/ back play the slides; or, IA Presenter will automatically advance slides based on the number of seconds (delaytime) you set. Sound effects will also be played according to your assignment.
Pop-Up Menu for Slide Show Mode
If the Show Popup-Menu Button option is checked in the Tools > Options > Display tab, a small transparent icon will be shown in the upper left corner of the LCD screen. Tapping on the small icon will activate the Slide Show mode's pop-up control menu. If this option isn't checked, you can always tap-and-hold your stylus during Slide Show mode to activate the pop-up menu. The commands on the menu are explained below.
Next / Previous
Displays the next or previous slide, or next or previous animated object (if the animated object display was designed). Hidden slides won't be shown.
Go
The Go submenu allows you to jump to the First Slide, Last Slide, Previously Viewed Slide, or jump to any slide using Navigate by Title.
Trigger
If the Trigger mode is selected, the slide show will advance according to the mode you set using the Tools > Set Up Show... command or Set Up Show icon. For example, if you have specified to advance the slides manually, they will advance each time you tap on the screen. If the slide show is set to play automatically, you can use the pop-up menu to put it on pause or end it immediately. IA Presenter is set to Trigger mode by default.
Pen
Select the Pen command to enter Ink annotation mode. During the Ink annotation mode, you can use the stylus to mark or highlight the presentation elements on the screen. To exit the Ink annotation mode, select the Trigger, VGA Pointer, or VGA Zoom mode from the pop-up menu.
Use the Pen Color submenu to choose the Ink color, and use the Pen Width submenu to choose a thickness.
If Pen mode is active when you select Blank from the Screen submenu, you will be able to draw or write Ink annotation on the projected black screen. (The Screen submenu also lets you undo the most recent Ink stroke, or erase all of the Ink strokes.)
VGA Pointer
This mode works only when IA Presenter is in VGA Slide Show view. After you select the VGA Pointer command, your stylus movements on the LCD screen will simulate a laser pen light on the VGA screen during presentations. (To exit the VGA Pointer mode, select Trigger, Pen, or VGA Zoom from the pop-up menu.)
VGA Zoom
This mode works only when IA Presenter is in VGA Slide Show view. After you select the VGA Zoom mode, you will be able to specify a portion of the screen which will be projected to the VGA screen, and also a zoom ratio for that specific area. (To exit VGA Zoom mode, select Trigger, Pen, or VGA Pointer from the pop-up menu.)
The message that appears on your screen when you invoke VGA Zoom mode depends on the value that is currently selected on the VGA Zoom Size submenu. The message will either tell you to tap-and-drag your stylus to define an area yourself, or it will tell you to simply tap your stylus to create a zoom area of pre-defined size. You can specify the zoom ratio using the VGA Zoom Ratio submenu, accessed from the Slide Show pop-up menu.
Pen Color
Tapping Pen Color opens a submenu of available colors to use for your Ink annotation when in Pen mode. Select one of the available colors as the new pen color. The Reset command resets the pen color to the default White color.
Pen Width
Tapping Pen Width opens a submenu of available pen widths to use for your Ink annotation when in Pen mode. Select a thickness settings as the new pen width to be used for Ink strokes on the LCD screen (and projection to VGA output, if desired). The 1 Unit option is the thinnest setting. Higher values give you thicker widths.
VGA Zoom Size
The VGA Zoom Size command opens a submenu of “zoom area” options. When you invoke VGA Zoom mode by selecting it on the pop-up menu, the current setting on the VGA Zoom Size submenu will be activated.
The Quarter, Large, Medium, Small, and Tiny settings on the submenu represent pre-defined areas. For example, if Quarter is selected, tapping on your LCD screen will automatically produce a rectangular area which is the size of one-quarter of your LCD screen (centered around the spot where you tapped).
The “zoom area” will be displayed on top of the already-existing projection of the entire slide on the VGA screen.
After the rectangular zoom area exists on your screen, you can drag it to any part of the screen you wish. It can also be converted to any of the other pre-defined sizes by pressing your stylus on the LCD screen to open the pop-up menu again, then selecting a different value from the VGA Zoom Size submenu. The size of the existing area will then be changed accordingly.
If you select Drag Select on the submenu, you will be able to drag your stylus on the LCD screen and freely define any area for zooming. After the desired area has been specified, you can drag it to any portion of the screen. You can also resize it by dragging any of its corners. To specify the zoom ratio for the projected zoom area, use the VGA Zoom Ratio command.
VGA Zoom Ratio
The VGA Zoom Ratio command opens a submenu of pre-defined “zoom ratio” options. When you invoke VGA Zoom mode by selecting it on the pop-up menu, the current setting on the VGA Zoom Ratio submenu will be activated.
Screen
The Screen submenu contains commands that allow you to pause a Slide Show (Pause Auto Play), project a blank screen (Blank), undo the most recent Ink stroke (Clear Last Pen), or erase all Ink strokes (Clear All Pen).
Pause Auto Play
If you have specified that you want slides to advance automatically after a specified number of seconds (using the Set Up Show... command on the Tools Menu or the Set Up Show icon on the Toolbar), you can select Pause Auto Play during the playing of a slide show to pause the show. When ready to continue the automatic progress of a slide show, tap Resume Auto Play.
Blank
When you select Blank, your LCD screen will become completely black, and the black screen will also be projected to your VGA screen. (After you have selected Blank, the command name changes to Restore. Tap Restore when you are ready to return to the slide that was previously displayed.)
Using the Blank Option with Pen Mode:
When the Blank option is active and IA Presenter is in Pen mode, you can write or draw digital Ink on the screen, and it will be output to the VGA device. In effect, this allows you to project an “electronic blackboard” which you might find useful when giving a presentation to an audience. Be aware that any Ink strokes you draw on the Blank screen will be lost when you exit Blank mode. They cannot be retained.
When IA Presenter is in VGA Zoom mode or VGA Pointer mode, the Blank option is not available.
Clear Last Pen
Erases the last individual Ink stroke. This command can be applied repeatedly until there are no more Ink strokes in the current slide.
Clear All Pen
Erases all the pen strokes on the current slide.
Speaker Notes
This command displays the current slide's Note text (if any) in a pop-up window, with the slide number also shown, on top of the displayed slide. To advance the slide or object when the Speaker Notes window is shown, tap on the underlying slide. When you advance the slides, the Speaker Notes window remains open and interactively displays the Note text of the related slide. To close the Speaker Notes window, tap the "X" in the upper right corner.
End Show
This command terminates the Slide Show playback mode and returns to the mode you were using prior to entering Slide Show mode. The Action button on your Pocket PC can also be used to exit Slide Show mode.
VGA Slide Show
VGA Slide Show mode operates almost identically to the Slide Show mode, except for the following operational differences:
- You should use the VGA Output tab in the Tools > Options... command to set VGA output-related options. You can also elect to have IA Presenter perform dithering for your slide if you project your slide to an external VGA/video device with less color capability (such as only 256 colors available).
During VGA Slide Show mode, the presentation output will be directed to both the Pocket PC's LCD screen and the external connected VGA device or video device. The Pocket PC will always show the reduced size version, while the VGA/video device will view the original matching dimensions set during ActiveSync conversion. Or if your current presentation has a dimension specified which is different from the exact dimension of your selected output dimension, IA Presenter will automatically re-size the slides to fit the output dimensions.
The Ink annotation will be projected to both the VGA video device and the LCD screen.
You can use VGA Zoom on the pop-up menu to designate an area on a slide during VGA Slide Show view, and project that specific area to the VGA screen (on top of the already-existing projection of the entire slide). Use the VGA Zoom Size command to specify an area of predefined size, or manually drag your stylus on the LCD screen to specify the desired area of the slide. Then use the VGA Zoom Ratio command to choose the ratio at which you want the zoomed area to be projected. After the “zoom window” has been created, it can be dragged to enclose other portions of the slide on your LCD screen, and this movement will also be reflected in the projected image on the VGA output. - You can use the VGA Pointer command on the pop-up menu to enable movements of your stylus on the LCD screen to simulate a laser pen light on the VGA screen during VGA Slide Show presentations.
In addition to being able to draw digital Ink annotation on your slides, you can project a black screen to the VGA output and write or draw projected Ink on it. To use Ink on the blank screen, make sure you are in Pen mode on the Slide Show pop-up menu before selecting Blank from the Screen submenu.
In addition, before a VGA Slide Show can be projected to a VGA screen, you must specify the appropriate settings. Select Options... from the Tools Menu, then tap VGA Output.
More information about the General, File, Display, and VGA Output tabs are included in the on-line Help.
Controlling Transition Effects
Any transition effects that were assigned in your original PowerPoint file will be retained when the IA Presenter Converter converts it to an .iap file on your Pocket PC.
However, IA Presenter also furnishes many attractive transition effects that can be assigned to the .iap file. You can assign a particular transition effect to an individual selected slide, or to all slides in the current file.
After you select one or more slides, tap Slide Transition... on the Edit Menu or the 📋 icon on the Toolbar.
The Slide Transition screen will appear. In it, you can select a transition effect, a speed for the transition effect, method of slide advancement during a slide show, and associate a sound (.wav file) to a slide.
Merging Presentations
You can merge the slides of two different presentations into one file. The new inserted slides will adopt the Master Slide style of the current file. Therefore, you should first open the presentation whose Master Slide style you want to adopt to.
The next thing you should do is select Options... from the Tools Menu and open the File tab. Tap OK to close the tab and save the settings.
If you selected To Current Selection in the File tab as the insertion position, use your stylus to tap the desired insertion point in the current file (in Slide Sorter view). Or, select the slide after which you want the imported slides to be inserted.
Select the Insert Slides From Files... command from the Tools Menu. A listing of files will appear. Tap the name of the file whose slides you want to merge with the current file, and it will be done immediately. This command can be undone or redone (Edit Menu). You can also use Save Presentation As... (Tools Menu) if you wish to save a backup copy before you start the merge operation, if desired.
More information about the General, File, Display, and VGA Output tabs are included in the on-line Help.
IA Screen Mirror
IA Screen Mirror projects an exact emulation of your mobile device's screen contents (LCD display) onto a connected external VGA output device or television monitor via the Composite video or S-video terminals. It allows you to project and display multiple LCD screens on the VGA screen simultaneously, "freeze" them in the desired state, and maintain one as the active viewport. Flexible output control options let you control the allocation of CPU utilization, orientation, resolution, and color optimization/dithering of projected images.
Getting Started
Tap the IA Screen Mirror icon in your Programs group to start the IA Screen Mirror program.
- Use the Layout tab to set up the viewports to which you will project images.
- Use the Switch tab to assign a "switching" button on your mobile device.
- Use the Refresh tab and VGA tab to customize other parameters as desired.
- Tap OK to project the LCD screen contents onto the active viewport.
- Start and operate the application you want to project ("foreground application").
- To make adjustments to the settings, use the "switching" button on your mobile device to freeze the active viewport and return to the IA Screen Mirror control screens. Tap OK to continue the projecting.
- Use the Exit Program button to terminate IA Screen Mirror entirely and stop projection to the VGA screen.
For more information please refer to the on-line Help.
On-line Help
This Manual serves as a quick-reference guide. For more details about any feature, consult the on-line Help. When using IA Presenter, select Tools > Help for the main Help table of contents. In IA Screen Mirror, tap the Help button in the About tab to access the main Help file. Context-sensitive Help is also available. If, during some operations, you cannot open the Tools Menu, you can access the context-sensitive Help messages via the Windows Start Menu.
A Note about Updates to the ATI Presentation Pack
Your copy of the ATI Presentation Pack contains the latest versions of IA Presenter and IA Screen Mirror. For updates, please visit the IA Style web site (www.iastyle.com).
Copyright and Contact Information
ATI ^® and IMAGEON ^® are registered trademarks of ATI Technologies, Inc.
Microsoft ^® , Windows ^® , and PowerPoint ^® are registered trademarks, and Windows CE ^TM is a trademark, of Microsoft.
IA Album ^® , IA Presenter ^® , and IA Screen Mirror ^® are registered trademarks of IA Style, Inc., and Information In Action ^™ is a trademark of IA Style, Inc.
The names of other actual companies, products, and brand names mentioned herein may be trade names, service marks, trademarks, or registered trademarks of their respective owners.
Additional Information
Troubleshooting
Check the following guide for the possible cause of a problem and how to correct it.
| Symptom Cause Correction | ||
| Even if the power button is pressed the power does not turn on. | The battery power is exhausted. | Charge the battery. |
| The Main Battery or the High Capacity Battery Pack is not attached. | Attach the Main Battery/High Capacity Battery and switch the Battery Pack Lock to the Lock position. | |
| The Battery Pack Lock is at the Release position. | Switch the Battery Pack Lock to the Lock position. | |
| suddenly cut off. | The battery power is exhausted. | Charge the battery. The power was |
| Automatic suspend is active. | Select Settings, System, Power to set to alter the power shut down time. | |
| Even if the battery is completely charged, it discharges after a short period of time. | The battery is extinct. | Replace the main battery with a new one. |
| The screen was tapped, but the correct action was not executed. | Touch screen adjustment is incorrect. | Select Settings, System, Screen, Align Screen to adjust the touch screen. |
Symptom Cause Correction
| The operation is slow in response. | Insufficient memory Secure the free memory. Quit the application if it is not in use. | |
| Some malfunction Reset the system. If no action is observed after resetting the system, initialise the system. (However, the data will be deleted.) | ||
| The screen was tapped, but there is no response. The operation button does not work either. | Some malfunction Reset the system. If no action is observed after resetting the system, initialise the system. (However, the data will be deleted.) | |
| The screen is dark. The Screen Light is off. Press and hold the power button until the Screen Light is turned on. | ||
| The screen is hard to see. | Brightness setting is incorrect. | Select Settings, System, Screen Light to adjust the screen brightness for better sight. |
| Cannot connect to your computer. | — See Help of ActiveSync. | |
| ActiveSync does not function when your Toshiba Pocket PC is connected to your computer with a cradle or USB cable. | The USB driver of your computer may not be compatible. | Reselect the USB driver. |
| Cannot access the Internet. | The connecting using a specified cellular phone connection cable was not correct. | Check whether the connecting using a specified cellular phone connection cable is correct. |
| Radio waves of a connected cellular phone are getting worse. | Carry out communications where radio wave conditions are satisfactory. | |
| Setting is incorrect. Carry out correct setting. | ||
Symptom Cause Correction
| Following message is displayed:“NOT ENOUGH BATTERY POWER. USB devices can not be used. Because PDA's battery power is low.” | The Battery power is too low to use USB devices. | Charge the battery or connect AC adapter. |
| Following message is displayed:"TOO MUCH USB CONNECTION " "Connecting USB devices are too much." | The total power consumption of connected USB devices is too large. | This USB port supports total 500mA USB device. Confirm connected USB device. |
| Following message is displayed:“USB OVER CURRENT DETECT USB device is turned off. Please disconnect USB device.” | The total power consumption of connected USB devices is too large. | This USB port supports total 500mA USB device. Confirm connected USB device.To enable USB port again, turn off the power of Pocket PC and push Reset Switch. |
Resetting
Reset is equivalent to "Restarting" of a computer. Reset your Pocket PC when a button or tapping the screen does not respond. When your Toshiba Pocket PC is reset, all data that was not stored during operation will be deleted. Stored data will be saved.

If the function cannot be restored even if the reset button is pressed, initialize your Toshiba Pocket PC e750.
When the power is on, press the reset button with the stylus, then release.

natural_image
Line drawing of a rectangular electronic device with a cable extending from its side (no text or symbols)Clear Memory
When you initialize your Toshiba Pocket PC, it returns to the status when it was purchased.

When you initialize your Pocket PC, all data stored in the memory is deleted. Your Pocket PC's initially installed programs are not deleted. Before initialization, remove all storage cards.
- Turn off the power.
- Press the power button while pressing and holding the reset switch with the stylus, and then release the power button.
- When a screen appears, release the reset switch. When initialization is completed, the Welcome screen appears. Set up the system according to the screen as in the case of startup procedure.
Troubleshooting for Wi-Fi
If you encounter some problems while using our product, please refer to this troubleshooting section
Symptom Solutions
| Cannot connect to the network | Make sure the Wireless Communication Switch is turned on.Check if the SSID is correct (note that it is case-sensitive)Check Link Quality in Configuration Page. If the link quality is poor, rescan and find another Access Point.Check if the operating mode is set properly. See Chapter 4, Configuration Page.Check if the WEP key is correctly entered.Be sure you are in the range of a working Access Point.Make sure the channel been set is in the range of 1~11. |
| The host computer cannot wirelessly connect with my Pocket PC? | Make sure you have setup the partnership for your Pocket PC and your host computer.Make sure you are within the range of a working network.Make sure you have entered the IP address of the host computer as the WINS server on your Pocket PC.Reset your Handheld PC or Pocket PC to make the TCP/IP settings take effect.Make sure the SSID, WEP keys and channel for all devices in the network are set the same.Make sure the channel been set is in the range of 1~11. |
| Cannot edit the "Channel" and "Country" field in "Infrastructure" Mode? | In Infrastructure mode, country and channel are decided by the Access Point. You can only join the existing network formed by the working Access Point, not to create a new Wireless Network. |
| The Pocket PC freezes | Reset the Pocket PC. |
Appendix A
Specifications
| External dimensions 80mm x 16mm x 125mm (W x D x H) | |
| Weight 196.5g | |
| Operating conditions Temperature: 0°C (32°F) to 40°C (104°F), Humidity: 30 to 80% RH, when only the Toshiba Pocket PC is operating Temperature capable of charging: 5°C (41°F) to 40°C (104°F) | |
| Battery type Lithium Ion battery | |
| Processor Intel® PXA255 processor at 400 MHz | |
| Memory RAM: 64MB, ROM: 32MB | |
| Flash ROM Disk 32MB | |
| Display 3.8” TFT colour LCD, 240 x 320 pixels, up to 64K colours |
Interfaces
DC-IN
Headphone 3.5mm, stereo mini plug compatible
Microphone Integrated with 3.5mm stereo mini plug
SD card slot SD memory card, SD I/O card or Multimedia card
Note: The security function of the SD memory card is not usable. Data encrypted by the SD memory card security function-compatible equipment is not usable.
Cradle connection port RGB, USB Host/Client
Audio AC 97 Codec, Mono record, Stereo playback, 8.0, 11.025, 22.05, and 44.1 KHz sample rate. Full Duplex record and playback. On board microphone. on board speaker. Stereo earphone/microphone jack x 1. software volume control.
Accessories AC Adaptor, USB client cable, stylus pen, cradle, USB host cable, battery pack, high capacity battery pack, battery charger. PDA / keyboard thumbpad.
Although the display is manufactured using an extremely high order of technology, there may be a case that some dots do not light or always light. It is not a malfunction.
Appendix B
FAQ for Wi-Fi
A. Compatibility
A1: Should I use equipment with the same brand as the IEEE802.11b WLAN Adaptor's to enable the wireless communication?
This is not necessary. IEEE802.11b WLAN Adaptor is Wi-Fi certified which means that it will work well with different branded equipment as long as the equipment is also Wi-Fi certified.
A2: Can I connect IEEE802.11b WLAN Adaptor to other devices using Bluetooth?
No, you can only connect the IEEE802.11b WLAN Adaptor to other IEEE802.11b equipment.
B. Wireless LAN Connectivity
B1: How do I form a wireless network?
Typically, you can form a wireless network by connecting Access Points. Different Access Points should have different channels. Every devices connected to the network should have the same SSID. When you are using Access Points, set the mode to “Infrastructure” mode. Without Access Points, you can still build a network where adaptors communicate peer-to-peer using a shared SSID. When you are not using Access Points, change the operating mode to be “802.11Ad Hoc”. To set the operating mode, click Start > Settings > System > Wireless LAN Utility > Config.
B2: How can I connect my Pocket PC to the usable Wireless Network?
Please click Start > Settings > System > Wireless LAN Utility > Scan to view Scan Page where you can find the usable Wireless Network. If you cannot see all the networks you are expecting, please click “Rescan” to see the list of usable Wireless Networks. Choose one Wireless Network you want and double click the BSSID to connect to the network. Once the network is chosen, you need to conFigure the IEEE802.11b WLAN adaptor.
Click Start > Settings > Connections > Network Adaptors > IEEE802.11b WLAN Adaptor > Properties > IP Address to set IP address, Subnet mask and Default gateway settings. Click Start > Settings > System > Wireless LAN Utility to edit other settings, such as Mode and SSID etc. If the WEP Mode of the Wireless Network you selected is enabled (64bit or 128bit WEP Mode), please choose the proper WEP KeyID and the proper WEP Key value network.
More Information
B4. What is 802.11 Ad Hoc Network? What should I do to form an 802.11 Ad Hoc Network? B5. What is the difference between “Infrastructure” and “802.11 Ad Hoc” Network Mode? How do I choose?
B6. Could I use the 802.11 Ad Hoc Mode to access the LAN resources? How can I access the LAN resource without an Access Point?
B7. What should I do if my host computer cannot wirelessly connect with my Pocket PC?
E1. What is WEP? E2. How many WEP security service mode does Wireless LAN support?
E3. How to set the WEP security service?
B3: How do I know whether or not my Pocket PC has already connected to an AP successfully?
- Check BSSID. When there is a link, the current Basic Service Set ID of the Access Point been used will be shown in the BSSID field in Link Page. When the adaptor is disconnected with the Access Point, "Non-associated" will appear in the BSSID field. To view BSSID, from your Pocket PC, click Start > Settings > System > Wireless LAN Utility > Link.
- Check Link Quality. Link Quality shows how clearly the adaptor can hear the Access Point. If the quality is poor, it's better to rescan and find a better performance Access Point or re-arrange the AP's position for better performance. To view Link Quality, from your Pocket PC, click Start > Settings > System > Wireless LAN Utility > Config.
B4: What is 802.11 Ad Hoc Network? What should I do to form an 802.11 Ad Hoc Network?
802.11 Ad Hoc Mode is used to create a peer-to-peer connection without an Access Point. The SSID must be the same among stations to enable the wireless communication within the local area network.

You need to choose a proper SSID and channel for the first 802.11 Ad Hoc station. For other stations want to join the same SSID group, you could only choose the same SSID as the first station for connection. The Channel setting for the 802.11 Ad Hoc Network stations to join the existing 802.11 Ad Hoc Network will automatically be set as the channel number of the network.
More Information
B5. What is the difference between “Infrastructure” and “802.11 Ad Hoc” Network Mode? How do I choose?
B6. Could I use the 802.11 Ad Hoc Mode to access the LAN resources? How can I access the LAN resource without an Access Point?
B7. What should I do if my host computer cannot wirelessly connect with my Pocket PC?
B5: What is the difference between "Infrastructure" and "802.11 Ad Hoc" Network Mode? How do I choose?
Infrastructure Mode is used to connect your Pocket PC with the Access Point. Usually, to form a Wireless Network, you can connect your Access Point to the ADSL, Cable Model or LAN Ethernet and then configure the Access Point base on the User Guide for the Access Point to set the proper SSID, Channel and WEP security service. After that, configure the IEEE 802.11b WLAN adaptor. Set the same SSID, Channel and WEP as the Access Point's. 802.11 Ad Hoc Mode allows your Pocket PC to form its own local network where devices communicate peer-to-peer, using a shared SSID, without Access Points. Under 802.11 Ad Hoc mode, the SSID must be the same among stations so that the devices can communicate properly within the Wireless Network. If you want to form your network without any Access Points, you should choose 802.11 Ad Hoc mode.
B6: Could I use the 802.11 Ad Hoc Mode to access the LAN resources? How can I access the LAN resource without an Access Point?
Yes, you can access the LAN resources without an Access Point. Follow the steps shown below:
- Make sure your host computer already successfully connect to the LAN or Internet through the LAN Adaptor or the Modem.
-
Install the Wireless LAN Adaptor into your Host computer successfully and set 802.11 Ad Hoc Mode and the proper SSID to form the 802.11 Ad Hoc Network. Install and enable the ICS (Internet Sharing Software, such as "SyGate"...) function in your host computer. (Note that the Windows 2K or later version, OS, supports the ICS function in Local Area Connection Properties? Sharing)
-
Set your Pocket PC as 802.11 Ad Hoc Mode and choose the same SSID to join the 802.11 Ad Hoc Network (choose the DHCP to get the IP assigned).
- Check and make sure the Wireless LAN Adaptor in the 802.11 Ad Hoc Network have the same IP group. (Please Ping each other to make sure the connection is successful)
- Now you can access the LAN resource successfully.
B7: What should I do if my host computer cannot wirelessly connect with my Pocket PC?
- Make sure you have setup the partnership for your Pocket PC and your host computer.
- Make sure you are within the range of a working network.
- Make sure you have entered the IP address of the host computer as the WINS server on your Pocket PC.
- Reset your Handheld PC or Pocket PC to make the TCP/IP settings take effect
- Make sure the SSID, WEP keys and channel for all devices in the network are set the same.
- Make sure the channel been set is in the range of 1\~11.
C. Application
C1: What should I do to use the ActiveSync Function through Wireless Network?
- Make sure you have already setup the partnership for your Pocket PC and your host computer through USB Interface and the ActiveSync can work properly. (The ActiveSync connection Interface should also choose the Ethernet interface for Wireless LAN ActiveSync Connection)
- Make sure you are within the range of a working Wireless Network.
- Make sure you can Ping your Pocket PC from your Host Computer. (Make sure the SSID, WEP keys and channel for all devices in the network are set the same.)
- Make sure you have entered the IP address of the host computer as the WINS server on your Pocket PC.
- Reset your Pocket PC to make the TCP/IP settings take effect and execute the ActiveSync function in the Pocket PC to enjoy the high speed ActiveSync Wirelessly.
C2: How do I wirelessly browse the Internet?
-
If your network uses DHCP (Dynamic Host Configuration Protocol), an IP address and DNS (or WINS) will be assigned automatically. On your Pocket PC, simply click Start > Setting > Connections > Network Adaptors > IEEE802.11b WLAN Adaptor > Properties to set the proper setting for Internet connection.
-
If your network does not use DHCP, you should enter the IP address, subnet mask, gateway and DNS (or WINS).
IP Address is Internet Protocol Address; a numeric address such as 10.37.238.100 that the domain name server translates into a domain name. Each node on the IP network should have a unique IP address.
Subnet mask is a number used to identify a subnetwork when multiple networks share one IP address. For example 255.255.255.0 Gateway is a device used to forward IP packets to and from a remote destination.
DNS stands for Domain Name System, a database system, which translates addresses and domain names. For example, a numeric address like 232.245.021.54 can become something like cba.com.
WINS stands for Windows Internet Naming Service which has two functions; one is a Microsoft Net BIO name server that eliminates the broadcasts needed to resolve computer names to IP addresses by providing a cache or database of translations. The other one is to set the IP address of the host computer that you already construct the partnership for Network adaptor Active sync purpose.
To set IP address, Subnet mask and Gateway, click Start > Settings > Connections > Network Adaptors > IEEE802.11b WLAN Adaptor > Properties > IP Address. To set DNS or WINS (Windows Internet Naming Service), click Start > Settings > Connections > Network Adaptors > IEEE802.11b WLAN Adaptor > Properties > Name Servers.
- To ping your Pocket PC from your host computer. In the Host Computer, open the DOS command mode window, type the command "Ping" followed by the IP address, such as "Ping 140.124.40.112". If you can see the reply from this IP address, the connection is complete. You are now ready to browse the Internet using Internet Explorer on your Pocket PC.
C3: How do I wirelessly check my e-mail?
-
Please make sure that you can use the ActiveSync function through USB Interface at first, and make sure you can use the ActiveSync to receive and send e-mail successfully. For corporate e-mail received and sent, please check with your network administrator for necessary connection settings.
-
Make sure you have entered the IP address of the host computer as the WINS server on your Pocket PC.
-
Reset your Pocket PC to make the TCP/IP settings take effect and execute the ActiveSync function in Pocket PC to enjoy the high speed ActiveSync Wirelessly to receive and send e-mail.
D. Settings
D1: What is SSID? What should I set in the SSID field?
SSID stands for Service Set Identification, which is the ID to form the Wireless Network. You can set up to 32 characters in the SSID field. For the Infrastructure Mode, you should set the SSID the same as the Access Point been connected with. To create a 802.11 Ad Hoc Network, the SSID must be the same among stations to enable the wireless communication within the local area network.

You need to choose a proper SSID and channel for the first 802.11 Ad Hoc station. For other stations want to join the same SSID group, you could only choose the same SSID as the first station, but the channel will not take effect. The 802.11 Ad Hoc must enter the proper SSID. Blank SSID for the 802.11 Ad Hoc Mode is not allowed. The stations want to join the 802.11 Ad Hoc Network must have the same SSID and are suggested to have the same IP Address in the Network group.
D2: Why can't I choose the "Channel" field in "Infrastructure" Mode?
For the Infrastructure Mode, the Channel is decided by the Access Point. You can only join the existing Access Point formed Wireless Network but not create a new Wireless Network. That is the reason why you can't set the “Channel” setting.
D3: When should I set the IP address, Subnet mask and Default gateway settings?
When the Wireless Network does not have the DHCP server, you should set your own IP address, Subnet mask and Default gateway for Wireless Network connection. Otherwise, the OS might set the different Network group IP address for you, which will cause the disconnection for the Wireless Network.
D4: How can I set the IP address, Subnet mask and Default gateway settings?
Simply click Start > Settings > Connections > Network adaptor > IEEE802.11b WLAN Adaptor > Properties > IP Address to set IP address, Subnet mask and Default gateway settings.
D5: What Transmit Rate should I choose for Wireless Connection?
Suggest you to use the “Fully Auto” option in the “Transmission Rate” field for full Transmission Data Rate range to automatically adjust the Best Communication Data Rate and to be compatible with other Low speed 802.11 Wireless Device.
E. Security
E1: What is WEP?
WEP stands for Wired Equivalent Privacy, a security service, used to prevent the unauthorized access to your wireless network.
E2: How many WEP security service modes does my Wireless LAN support?
WEP stands for Wired Equivalent Privacy that is the security service for the Wireless Network. There are three WEP security service modes available for “IEEE 802.11b WLAN Adaptor” formed Wireless Network. The first is “Disable” which will disable the WEP security service; the second is “64bit” which will support 5 bytes Hexadecimal value WEP security service; the third is “128bit” which will support 13 bytes Hexadecimal value WEP security service.
E3: How do I set the WEP security service?
Please click Start> Settings> System> Wireless LAN Utility> Security to view Security page where you can set the WEP security service. Please choose the proper WEP Key Mode, WEP KeyID and WEP Key value for the Wireless Network.

The WEP Mode, WEP KeyID and WEP Key value must be exactly the same as your Wireless Network's to enable the connection. Example of setting the WEP:
You can choose:
- WEP Mode "64bit", KeyID "1" and Key "1234567890", or
- WEP Mode "128bit", KeyID "1" and Key "12345678901234567890123456", or
- WEP Mode "Disable" for connection
F. Performance
F1: Will IEEE802.11b WLAN Adaptor work in the environment where Bluetooth network is employed?
Yes, IEEE802.11b WLAN Adaptor can coexist with Bluetooth environment.
F2: How far is the working range of IEEE802.11b WLAN Adaptor?
It depends on the data transmission rate and the condition of the environments. The higher the data rate, the smaller the range it could cover. At 11 Mbps, the adaptor can go up to 300 meter in an outdoor environment; however, in an indoor environment, it can only go up to 100 meter. Because of the ceilings, higher RF interference, interior walls and reflected signals, indoor range is usually shorter than outdoor range.
F3: How does the data transmission rate work?
IEEE802.11b WLAN Adaptor allows you to choose one of the six data rate options: Fixed 1Mbps, Fixed 2Mbps, Fixed 5.5Mbps, Fixed 11 Mbps, Auto Select 1 or 2 Mbps, and Fully Auto.
The farther the distance between two communicating devices, the slower the data rate should be used. Basically, with slower data rate, the data delivery will be more reliable. If you don't know which data rate should be used, simply choose “Fully Auto”, and the data rate will automatically step down from 11 Mbps, 5.5 Mbps, 2 Mbps, to 1 Mbps if you move farther your Pocket PC away from the Access Point or other connected mobile device.
F4: The Wireless LAN uses lots of power. What should I do to save power?
- Please turn off the Wireless Communication Switch if you are not using the Wireless Network currently, or
- You can click the "Turn Off" button on the TMU icon.
- You can click Start > Settings > System > Wireless LAN Utility > Manager to get into Manager Page and enable the “Enable Power Saving Mode”, and then tap the “Apply” button.

- Turn off the Wireless Communication Switch will cause the disconnection of the Wireless Network, please make sure to close all the Wireless Connection before you execute this function.
- "Turn Off" function on the TMU icon will cause the disconnection of the Wire- less Network, please make sure to close all the Wireless Connection before you execute this function.
- Enable "Power Saving Mode" will keep the connectivity but will lower down the average throughput due to longer connection period for the Wireless Network.
- If you are in 802.11 Ad Hoc Mode, you are not allowed to enable "Power Saving Mode", because Ad Hoc Mode doesn't support this function.
F5: How do I make sure that the Wireless LAN SW has been installed successfully and that Wireless LAN already work properly?
- Please check if the "IEEE 802.11b WLAN Adaptor" already exist in Start > Settings > Connections > Network Adaptors; if not, the Wireless LAN Driver is not Installed successfully.
- Please check if the Wireless LAN Utility already exist and could be opened successfully by simply click Start > Settings > System > Wireless LAN Utility.
- Click Start > Settings > System > Wireless LAN Utility > Link to check the current Link information in the Link Page.
Error Messages for Bluetooth
This section explains the causes of and solutions for the various displayed error messages.
Error messages during COM/DUN service
An error has occurred with the Bluetooth SD Card. Confirm that the card is working properly.
Cause There was an error when loading the driver.
Solution Try reinserting the Card.
Unable to retrieve Local Device information.
Solution Reset the Toshiba Pocket PC.
Unable to retrieve Local Device information due to insufficient memory. Check the amount of available memory.
Solution Reset the Toshiba Pocket PC, increase the memory, and then restart Bluetooth Settings.
Remote device search failed due to insufficient memory. Check the amount of available memory.
Solution Increase the memory and then try the remote device search again.
Unable to retrieve remote device information.
Solution Display the remote device list again or try the remote device search again.
Unable to update remote device information.
Solution Depending on communications conditions, Local Device may not be able to locate the service of the remote device. Try the remote device search again or reset the Toshiba Pocket PC.
The maximum number of remote devices (255) has been exceeded. Delete all unneeded remote devices.
Solution Delete unneeded ghost devices and try the remote device search again. If more than 255 devices are discovered, some devices will not be displayed.
Unable to delete remote device.
Solution Try deleting the remote device again or reset the Toshiba Pocket PC.
The device name that you entered exceeds the maximum byte count of 248 bytes. Enter a different device name.
Cause The name of Local Device exceeds 248 bytes after UTF-8 code conversion.
Solution Enter a name that does not exceed 248 bytes.
The retrieved information contains invalid data.
Cause The device information contains invalid data.
Solution Display the device list again or update the device information with the remote device search.
Unable to delete remote device due to insufficient memory. Check the amount of available memory.
Cause There is insufficient memory to delete the device.
Solution Increase the amount of available memory and then try to delete the device again.
Service list search failed due to insufficient memory. Check the amount of available memory.
Solution Increase the amount of available memory and then try the service list search again.
The maximum number of services (30) has been exceeded.
Cause The Toshiba Pocket PC has detected more than its maximum number of services (30).
Solution Have the remote device delete unneeded services, and then update the service list.
Unable to successfully connect. Check the status.
Cause An error occurred while trying to connect to a device or service.
Solution Check the status of the device or service and try connecting again.
Unable to successfully disconnect. Check the status.
Cause An error occurred while trying to disconnect from a device or service.
Solution Reset the Toshiba Pocket PC.
Unable to update service information.
Cause An error occurred while trying to update the service information.
The passkey was not entered within the 20-second time limit and, as a result, the program timed out.
An incorrect passkey was entered.
There are no available services.
Solution Try updating the service information again.
The connection is not registered. Use the Bluetooth Setup Utility to register the connection.
Solution Register the connection and try connecting again.
Unable to delete connection registration information.
Solution Reset the Toshiba Pocket PC.
An internal processing error has occurred.
Solution Reset the Toshiba Pocket PC.
An internal processing error has occurred with the Discoverability Mode setting.
Solution. Reset the Toshiba Pocket PC.
An internal processing error has occurred with the Connectability Mode setting.
Solution Reset the Toshiba Pocket PC.
An internal processing error has occurred with the Security Mode setting.
Solution Reset the Toshiba Pocket PC.
An internal processing error has occurred with the Encryption setting.
Solution Reset the Toshiba Pocket PC.
Unable to register the device name. The previous device name will be used.
Solution Try registering the connection again.
The device name that you entered contains invalid characters. Enter a different device name.
Cause The device name contains only spaces or nothing at all.
Solution Enter a device name that does not contain only spaces.
Unable to retrieve service information.
Solution Display the service list again.
Unable to register connection information.
Solution Close Bluetooth Settings, turn off the power of the Toshiba Pocket PC, and then turn the power on again, or reset the Toshiba Pocket PC.
Unable to retrieve connection information.
Solution Close Bluetooth Settings, turn off the power of the Toshiba Pocket PC, and then turn the power on again, or reset the Toshiba Pocket PC.
Bluetooth icon does not appear on the command bar.
Solution Tap Start > Programs > Bluetooth Settings, or reset the Toshiba Pocket PC.
Error messages during OPP service
Unable to connect to the specified device.
Cause The Bluetooth connection, authentication, or OPP service connection failed.
Request denied by the remote device.
The remote device does not support this function.
Cause The remote device does not support OPP service.
Unable to send the object.
Cause Local Device is unable to send a contact, schedule, task, or business card due to a problem with the signal or a similar communications error.
Unable to receive the object.
Cause Local Device is unable to receive a contact, schedule, task, or business card due to a problem with the signal or a similar communications error.
Select the item you want to send.
Cause You have not selected an item to send.
Unable to store all receiving data due to insufficient memory.
Cause A contact, schedule, or task cannot be stored due to insufficient memory.
Solution Delete any unneeded data to increase the memory capacity.
Name not specified in owner information.
Cause A name has not been specified in the Name area of the owner information.
Solution Complete the owner information setting. A name is required.
Bluetooth Settings has not been started.
Cause The Bluetooth Settings program has not been started because a Bluetooth device's power is not on in the Toshiba Pocket PC.
Solution Check the wireless switch to on position. And turn on Bluetooth power from utility.
Program cannot be started because Bluetooth receiving program is running.
Cause While the Bluetooth receiving program was running or the popup menu was displayed as you were trying to receive a contact, schedule, or task, you tried to send or receive another contact, schedule, or task.
Solution You can only receive one contact, schedule, or task at a time while the Bluetooth receiving program is running. Wait until you have finished receiving the first object before sending or receiving another object.
Program cannot be started because Bluetooth sending program is running.
Cause The Bluetooth receiving program was executed while the device search screen was displayed in the Bluetooth sending program.
Solution Close the device search screen and try again.
Bluetooth Settings encountered an error and could not be executed.
Cause An error occurred in the initial settings of the Bluetooth Settings program and the program could not be continued.
Solution Reset the Toshiba Pocket PC.
Processing interrupted due to insufficient memory.
Cause The memory capacity was insufficient because a buffer could not be allocated.
Solution Shut down other operating programs or reset the Toshiba Pocket PC.
Unable to retrieve device information.
Unable to send business card.
Unable to receive business card.
Unable to exchange business cards.
Unable to save receiving data.
Cause Invalid data has been received or the contact, schedule, or task data cannot be saved for a reason other than an insufficient memory.
Solution Confirm that the data sent by the connected remote device is in a format supported by Toshiba Pocket PC.
There is no response from the partner device.
Cause The remote device (server) did not respond to a request to connect or send/receive data within a set time.
Solution Confirm that the remote device is operating properly.
This cannot be sent because it contains invalid data.
Cause An error has occurred in the data conversion at the time the object was sent.
Processing interrupted due to an internal error.
Cause The processing could not be continued due to an internal error.
Solution Reset the Toshiba Pocket PC.
Error messages during FTP service
The FTP server could not be started because the FTP client is operating.
Cause A request to start the Bluetooth FTP server was received from a peripheral device while the Bluetooth FTP client is operating on Local Device.
Solution If you exit Bluetooth FTP on Local Device, the request from the peripheral device to start the Bluetooth FTP server can be accepted.
The FTP client could not be started because the FTP server is operating.
Cause You tapped the Bluetooth FTP icon to try to start Bluetooth FTP while the Bluetooth FTP server is operating.
Solution Exit Bluetooth FTP on Local Device. Once the Bluetooth FTP server is closed, start up Bluetooth FTP.
Unable to delete (file/folder name)
Cause An error occurred while trying to delete a file or folder, or a separate file or folder exists within the specified folder.
Solution Remove the file or folder from the specified folder and try deleting it again.
Unable to delete read-only file.
Cause Local Device tried to delete a file on the remote device, but because it is a read-only file, it could not be deleted.
The selected file/folder already exists. Enter another file/folder name.
Cause The name you tried to enter already exists.
Solution Enter a different name.
Enter a file/folder name.
Cause Either nothing has been entered for the name or the name consists of spaces or begins with a period.
Solution Enter a correct name.
The following characters cannot be used in the file/folder name. \ / ; , : \* ? " < > |
Cause You entered an invalid character in the file/folder name.
Solution Rename the file/folder using correct characters.
Cannot rename file/folder.
Cause A processing error occurred because the entered name exceeded the maximum length.
Solution Enter a shorter name.
Enter the folder name.
Cause After creating or changing a folder, either nothing has been entered for the name or the name consists of spaces or begins with a period.
Solution Enter a correct folder name.
The following characters cannot be used in the folder name. \ / ; , : * ? " < > |
Cause You entered an invalid character in the new folder name.
Solution Rename the folder using correct characters.
The folder name could not be created.
Cause A processing error occurred because the entered name exceeded the maximum length.
Solution Enter a shorter name.
The specified file could not be executed.
Cause You selected Execute or Receive/Execute, but the specified file is not executable or the associated application software could not be found.
The connection destination server is not selected. Select a server.
Cause You have not selected the device to which you want connect.
Sending or receiving failed. Cancelling process.
Cause Sending, receiving, deleting, or retrieval of folder information failed.
Solution Try the operation again.
The memory was exceeded while receiving files. Cancelling process.
Cause The memory to store the files or folders was insufficient when receiving or receiving/executing the files or folders.
Solution Delete any unneeded data to increase the memory capacity, and try again.
An error occurred during server search. Cancelling process.
Cause Local Device tried to send or receive a file, but was unable to connect to the remote device.
Unable to obtain usable COM port. Ending program.
Cause A COM port could not be opened during auto connect.
The OBEX password contains an invalid character. Enter the password again.
Cause On the FTP Server screen of the remote device, when Tools and Options were selected and the FTP authentication password entered, an invalid character was used.
Solution Use only alphanumeric characters when entering the password.
Unable to move folder or obtain folder information.
Solution Try the operation again.
Registry problem
Cause A problem occurred in the registry data required for processing.
There is no response from the partner device. Ending application.
Cause Local Device tried to connect, disconnect, or perform a service search, but there was no response from the remote device and a time-out error occurred.
Solution First exit Bluetooth FTP from Local Device.
An internal processing error has occurred. Cancelling process.
Could not allocate the memory for processing. Cancelling process.
Solution Delete any unneeded data to increase the memory capacity, and try again.
A file (or folder) with the same name exists. Skipping transfer.
Cause A file or folder exists with the same name as the file or folder that is being received.
An error occurred during server search.
Cause Local Device was unable to search for peripheral devices.
Solution Try the operation again.
Bluetooth Settings cannot be started.
Cause The Bluetooth may not be enabled in the Toshiba Pocket PC.
Solution Perform the steps to start Bluetooth Settings.
(Folder name) does not exist.
Cause The folder that you tried to locate in Local Device does not exist.
A communications error occurred.
Cause An internal OBEX error occurred when the remote device was started.
Solution If the device you to which you were unable to connect is not a Bluetooth SD Card, try the operation again without FTP authentication.
Appendix D
Glossary for Bluetooth
General Bluetooth terms
Bluetooth Passkey
This is a password. It is also called a PIN Code.
Device Address
Each Bluetooth SD Card has a unique device address that is listed on the card as BDA:XXX... X.
Local Device
In Bluetooth communications, this refers to the local Toshiba Pocket PC. It is also called a client.
Remote Device
In Bluetooth communications, this refers to the connected partner device. It is also called a server.
Profile
This refers to the specifications (services) used in Bluetooth communications. The specifications (services) are determined by the type of communications.
GUI Bluetooth terms
Authentication Status
For remote devices that have performed Bluetooth authentication, Pairable is displayed. For unauthenticated devices, Untrusted is displayed.
Authentication
This is the process of confirming an authentication password to allow a remote Bluetooth device to connect to Local Device. If the authentication passwords on both devices do not match, the connection is refused.
These are the following types of authentication
Bluetooth authentication
This is requested when trying to establish a Bluetooth connection with a remote device. You must enter the Bluetooth passkey to connect.
■ OPP authentication
This is requested when trying to connect to a remote device to send all contacts by OPP service. You must enter the OPP password.
FTP authentication
This is requested when trying to connect to a remote device to start FTP service. You must enter the FTP password.
Auto Connect
For a COM service, the program using COM is started and a connection is established with the connection registered Bluetooth device using the Serial Port Profile.
For a DUN service, Dial-up Networking is started and a connection is established with the connection registered Bluetooth device using the Dial-up Networking Profile.
COM Service Device
This is a device that provides SPP (Serial Port Profile) service.
Connectability Mode
This setting determines whether Local Device can be connected to by other Bluetooth devices in response to a connection request.
Connected Device
This is a remote device that currently has a Bluetooth connection to Local Device.
Connection Registration
This function is used to register an automatic connection.
Connection Status
This displays the current connection status (Connected, Discovered, or Ghost) of Bluetooth devices.
Delete Ghost Device
This function is used to delete ghost devices from the device list.
Device Address
This is the unique address given to each Bluetooth SD Card.
Device Class
This indicates the type of Bluetooth device (desktop computer, cell phone, etc.). A Bluetooth SD Card is categorized as a PDA.
Device Name
This is the name of a Bluetooth device. It can be a maximum of 248 bytes (after UTF-8 code conversion).
Discoverability Mode
This setting determines whether Local Device can be discovered by other Bluetooth devices.
Discovered
This is a device discovered during the search for peripheral devices.
DUN Service Device
This is a device that provides DUN (Dial-up Networking Profile) service.
FTP Service Device
This is a device that provides FTP (File Transfer Profile) service.
Ghost
This is a device that was previously discovered, but is no longer found during the search for peripheral devices.
LAP Service Device
This is a device that provides LAP (LAN Access Profile) service.
OPP Service Device
This is a device that provides OPP (Object Push Profile) service.
PIN Code
This is a password of up to 16 alphanumeric characters.
Depending on the remote device, the PIN Code might be a fixed value with a limit on the number of digits, so be sure to confirm these conditions.
It is also called a Bluetooth passkey.
Search for Peripheral Devices
This function is used to search for Bluetooth-enabled devices.
Security Mode
This setting determines whether authentication is performed when connecting to a remote Bluetooth device, and whether data sent and received is encrypted.
Security Settings
There are four security settings: Office, Mobile, Home, and Other.
Service Name
This indicates the type of service (profile) provided by a Bluetooth device.
Service Update
This function is used to search for and update information on services provided by a connected remote Bluetooth device.
TOSHIBA's Worldwide Computer Representatives
| Country | Address/Internet | Tel./Fax |
| Austria | Toshiba Europe GmbHLeibnizstr. 2, 93055 RegensburgEmail: technik.notebook@toshiba-tro.dewww.computer.toshiba.at | Tel: 0800-29 74 88Fax:+49-(0)941-780 79 25 |
| Azerbaijan | Azerbaijan Electronics (AZEL)Floor 5, 65 Fizuli str., 370014 Baku | Tel: +99412-974040Fax: +99412-974042 |
| Belgium | Toshiba Information Systems BelgiumExcelsiorlaan 401930 Zaventem, www.toshiba.be | Tel: +32-900-10990Fax: +32-2-7253030 |
| Bulgaria | IMPEX Sofia Ltd.12 Anton Naydenov Street, Sofia, 1710 / P.O. Box 184 | Tel: +359-2-962-1219Fax: +359-2-962-5062 |
| Canada | Toshiba of Canada Ltd.191 McNabb Street; Markham; Ontario L3R-8H2www.toshiba.ca | Tel.: +1-905-470-3500Fax: +1-905-470-3487 |
| CzechRepublic | CHG Service, a.s.Videnska 102, 619 00 Brnowww.chgservice.cz | Tel: +420-54 74 26 581Fax: +420-5474 26 590 |
| Denmark | Scribona Toshiba Digital MediaHovedvejen 9, DK-2600 Glostrupwww.toshiba-dm.com | Tel: +45-38 23 76 00Fax: +45-38 23 76 01 |
| Egypt | El Araby Co. for Trading and ManufacturingP.O. Box 1224/Off Beirut St.10 Mohamed Sabry Aboaalm Street, Kourba, Heliopolis,Cairo 11511 | Tel: +202 -291 6989Fax: +202 -291 6454 |
| Estonia | ServiceNet EE, Pärnu str. 142, 11317 Talline-mail: servicenet@servicenet.eewww.servicenet.ee | Tel: +372-650 49 49Fax: +372-6504-948 |
| Finland Stribona Suomi Oy/Toshiba Digital MediaSinimäentie 8 A / PL 83SF-02630 Espoowww.toshiba-dm.com | Tel: +358-9-5272555Fax: +358-9-5272500 | |
| France Toshiba Systemes (France) S.A.7, Rue Ampere; B.P. 131, F - 92804 Puteaux Cedexwww.toshiba.fr/pc | Tel.: +33-1-4728-2929Fax: +33-1-4728-2247 | |
| Germany Toshiba Europe GmbHLeibnizstr. 2, 93055 Regensburgwww.computer.toshiba.deE-mail: technik.notebook@toshiba-tro.de | Tel: 01805-23 16 32Fax: +49-(0)941-7807-925 | |
| Greece Ideal Electronics S.A., 190 Syngou Avenue17671 Kallithea, Athenswww.ideal.gr | Tel: +30-210-9551750Fax: +30-210-9519387 | |
| Hungary Technotrade Informatikai Rt.Öv utca 185., 1147 Budapestwww.technotrade.hu | Tel: +36-1-467-6100Fax: +36-1-252-6470 | |
| Israel Mafil Technologies (3000) Ltd8 Bareket Street / 49517 Petah Tikwawww.mafil.co.il | Tel: +972-(0)-3-9183333Fax: +972-(0)-3-9241310 | |
| Italy Progetto Elettronica 92 SpAVia de Gasperi 88a, 20017 Mazzo di Rhowww.pe92.it | Tel: +39-02-939 75551+39-02-939 75678Fax: +39-02-939 75299 | |
| Japan Toshiba Corporation, IOPC; 1-1,Shibaura 1-Chome, Minato-KU; Tokio 105-01www.toshiba.co.jp | Tel.: +81-334575565Fax: +81-354449262 | |
| Jordan Scientific & Medical Supplies Co. / Jabal Amman,1st Circle Al Hayyek Street, Opposite to Housing Bank11118 Amman | Tel: +962 (6) 4624907Fax: +962 (6) 462858 | |
| Kuwait Arabian Business Machines Co., P.O. Box 29961,Salhiya-Sulaiman AL Laheeb Building 3,13160 Safat E-Mail: abm@abm-kuwait.comwww.abm-kuwait.com | Tel.: +965 242-9154244-5373/-5369Fax: +965 241-4399 | |
| Latvia ServiceNet LV, Kalnciema 12a, LV1048 Rigawww.gnt.lv, www.servicenet.lv | Tel: +371-27 60 20 52Fax: + 371-7 61 38 87 | |
| Lebanon Pc Dealnet, P.O. Box 11-316Diab Bldg. Mkalles, Beirutwww.pcdealnet.com | Tel: +961-1-682956Fax: +961-1-682 955 | |
| Lithuania ServiceNet LT, Verslo g.6, Kumpiu km., Kauno raj.e-mail: servisas@servicenet.ltwww.servicenet.lt | Tel: + 370 37 757586Fax: + 370 37 757541 | |
| Malta Tabone Computer Centre Limited111 Old Railway Track, HMR-16 St Venera | Tel: +356-21-49-36-04Fax: +356-21-49-36-03 | |
| Morocco | C.B.I. Compagnie Bureautique Informatique / LotissementATTAOUFIK, Rue N° 1Immeuble 29, Sidi Maarouf / 20190 Casablanca, Maroc | Tel: +212- 22 43 71 71Fax: +212-22 43 71 87 |
| Netherlands | Toshiba Inf. Systems BeneluxRivium Boulevard 41, NL - 2909 LK Capelle a/d Ijsselwww.toshiba.nl | Tel: +31-0900-1000 1000Fax: +31-10-2882-390 |
| Norway | Scribona Norway A/SStålfjæra 20, P.O.Box 51, Kalbakken, N-0901 Oslowww.toshiba.se | Tel: +47-22-897-189Fax: +47-22-897-166 |
| Oman(Sultanate of Oman) | Bahwan IT, Sarco Building, Ground Floor, No. 459, WayNo. 3109, Al Noor Street, Ruwi, 113 Muscatwww.bahwanit.com | Tel.: + 968 790191-117Fax: +968-790192 |
| Poland | AC Serwis Sp. z o. o., ul. Partyzantów 71, 43-316 Bielsko-Bialawww.acserwis.com.pl | Tel: +48 33 8130-205Fax: +48 33 8130-209 |
| Portugal | Toshiba Information Systems PortugalEdificio D. Pedro I Quinta da Fonte2780-730 PaÇo de Arcos (Portugal)www.pc.toshiba.pt | Tel: +351-707265265Fax: +351-21-000 1675 |
| Qatar | Mannai Trading CompanyRayyan Road, P.O. Box 76, Dohalogie@mannai.com.qa | Tel: +974 441 25 55Fax: +974 444 54 13 |
| Jarir Bookstore QatarAl Maha Center, Ramada Crossing, Salwa Road,P.O. Box 24824, DohaE-mail: cscqatar@jarirbookstore.comwww.jarirbookstore.com | Tel: +974 444 0212Fax: +974 444 04 32 | |
| Romania | Scop Computers SRL162 Barbu Vacarescu St, Sector 2, 71424 Bucharestwww.scop.ro | Tel: +40-21-231-4602Fax: +40-21-231-4606 |
| Russia | AC SERSOSovetskoi Armii St. 5, 127018 MoscowE-mail: info@cepco.ruwww.cepco.ru | Tel: +7-095 284 5577Tel: +7-095 105-8161 |
| Microbit | SERSOLzmailovskiy Pr.2, S.Petersburg 198005www.microbit.ru | Fax: +7-095 284 5880Tel.: +7 812 327-5700 |
| Saudi Arabia | Arabian Business Machines Co, P.O. Box 2006, Dareen Center, Al Ahsa Road, 11451 Riyadhwww.olayangroup.com | Tel: +966-1-478 4909Fax: +966-1-477 7803 |
| Jarir Bookstore | P.O. Box 3196Olaya Street, 11471 RiyadhE-mail: cscriyadh@jarirbookstore.comwww.jarirbookstore.com | Tel: +966-1 462 6000Fax: +966-1 462 9500 |
| Slovakia | HT Computers, a.s., Dobrovicova 8, 811 09 Bratislava www.htc.sk | Tel: +421- 2- 59334 550Fax: +421- 2- 59334 555 |
| Slovenia | INEA d.o.o., Stegne 11, 1117 Ljubljana www.inea.si | Tel: +386-1-513-81-00Fax: +386-1-513-81-70 |
| South Africa | CS IT Solutions, Unit 6A, Mifa Industrial Park, 399 George Street, 1685 Midrand | Tel: +27-0-11-314-1023Fax: +27-0-11-314-2424 |
| RECTRON (Pty) Ltd. | Tel: +27-0-11-203-1000Fax: +27-0-11-203-1100 | |
| Spain | Toshiba Inf. Systems EspanaParque Empresarial San Fernando, Edif.Europa, Esc.A, 1a Planta, - 28830 San Fernando de Henares (Madrid) www.toshiba.es | Tel: +34-91-6606-700Fax: +34-91-6606-760 |
| Sweden | Toshiba Digital MediaSundbybergsvägen 1, P.O. Box 1374,S- 171 27 Solnawww.toshiba.se | Tel: +46-200-21 21 00Fax: +46-8-734-4656 |
| Switzerland | Toshiba Europe GmbH, Swiss Sales branch, Chriesbaumstrasse 4, CH 8604 VolketswilEmail: computer.service@toshiba.ch | Tel: +41 848 845250Fax: +41 1 9085658 |
| Turkey | Bekom Bilgisayar Sistemleri San. ve TIC. A.S., Buyukdere Cad. LaleIs Hani No. 62, Mecidiyeköy, Istanbulwww.toshibatr.com | Tel: +90 212 275 87 97Fax: +90 212 275 8740 |
| Ukraine | DKT-SERSOBlvd Lesi Ukrainki 2601133 Kievwww.dkt-cepco.com.ua | Tel: +380- 44-573-9627Fax: +380- 44 254 4646 |
| United Kingdom | Toshiba Information Systems (U.K.) Limited,Toshiba Court, Weybridge Business Park, Addlestone Road, Weybridge, Surrey KT15 2ULwww.toshiba.co.uk/computers/ | Tel: +44-(0)8702 202202Fax: +44-(0)1932-822958 |
| United Arab Emirates | Al-Futtaim Electronics, P.O. Box 5866, Bin Ham Building, Mezzanine Floor, Adjacent to Bur Juman Centre, Trade Centre Road, Dubai, UAEwww.toshibauae.com | Tel: +971 4 351 5004Fax: +971 4 351 4254 |
| Al-Futtaim Electronics, Central Services Operation,Garhound Area, P.O. Box:531 Dubai, U.A.E. | Tel: +971 4 282 5112Fax: +971 4 282 4094 | |
| Al-Futtaim Electronics, Central Services Operation, Mina-Area, P.O. Box:26605, Abudhabi, U.A.E. | ||
| USA Toshiba America Information Systems, Inc.; 9740 IrvineBlvd., Irvine, CA 92713-9724www.toshiba.com | Tel.: +1-949-583-3000Fax: +1-949-583-3345 | |
| Yugoslavia | CT Computers, Vladimira Popovica 6 (main office), Savski nasip 7 (service dept.)11070 Beograd,www.comtrade.co.yuEmail:servis@comtrade.co.yu | Tel: +381 11 311 2060Fax: +381 11 311 2060 |
| Or for all countries not listed, please call theToshiba International Service Line:or E-mail: toshibawarranty@nl.unisys.com | Tel: +352 460433Fax: +31-20-488 7654 | |
TOSHIBA addresses for the Internet/World Wide Web
TOSHIBA Europe
http://www.toshiba-europe.com
TOSHIBA America
http://www.toshiba.com
TOSHIBA Japan
http://www.toshiba.co.jp
TOSHIBA Canada
http://www.toshiba.ca
- Copyright Information
- Trademarks
- Limitation of liability
- Usage conditions
- Do not disassemble, modify or try to service this product yourself.
- Do not use this product in areas where the use of electrical devices is prohibited, such as on board an aircraft and in a hospital.
- Do not use the Bluetooth within 9 inches (22 cm) of persons with a heart pacemaker implant or defibrillator implant.
- Do not use the Bluetooth near an automated controlling device, such as an automatic door or fire alarm.
- Immediately discontinue use of the Bluetooth if it causes radio interference with other devices.
- Safety precautions
- Safety instructions
- DANGER
- WARNINGS
- CAUTIONS
- Dispose of used batteries
- NOTES
- Working environment
- CE compliance
- FCC Notice "Declaration of Conformity"
- Canadian Regulatory Information (Canada Only)
- FCC Class B Digital Devices & Peripheral Devices (Declaration of Conformity or Certification Authorization)
- Declaration of Conformity Label & Marking Requirements
- Instruction Manual Federal Communication Commission Interference Statement
- Table of Contents
- Chapter 1 Getting Started
- Chapter 2 Basic Skills
- Programs 2-22
- Navigation Bar and Command Bar 2-23
- Pop-up Menus 2-24
- Notifications....2-24
- Enter Information on Your Toshiba Pocket PC....2-25
- Find and Organise Information 2-34
- Customize Your Toshiba Pocket PC 2-35
- Chapter 3 Microsoft ActiveSync
- Chapter 4 Microsoft Pocket Outlook
- Calendar: Scheduling Appointments and Meetings......4-2
- Contacts: Tracking Friends and Colleagues....4-5
- Tasks: Keeping a To Do List....4-8
- Notes: Capturing Thoughts and Ideas....4-10
- Inbox: Sending and Receiving E-mail Messages....4-12
- Chapter 5 Companion Programs
- Pocket Word....5-1
- Pocket Excel....5-6
- MSN Messenger 5-7
- Windows Media Player....5-11
- Microsoft Reader....5-12
- Pictures....5-16
- Chapter 6 Pocket Internet Explorer
- The Mobile Favorites Folder....6-1
- Favorite Links 6-1
- Mobile Favorites....6-2
- Using AvantGo Channels....6-3
- Using Pocket Internet Explorer....6-4
- Chapter 7 Getting Connected
- Transfer Items Using Infrared 7-2
- Connect to the Internet....7-2
- Connect to Work 7-4
- End a Connection....7-7
- Connect Directly to an E-mail Server 7-8
- Get Help on Connecting 7-8
- Chapter 8 Wi-Fi (IEEE 802.11b) Wireless LAN
- Configure Wireless LAN Network 8-1
- IP Address....8-4
- Wireless LAN Configuration 8-6
- TMU-Traffic Monitoring Utility 8-9
- Wireless LAN Manager 8-9
- Toshiba Enroller 8-13
- Toshiba Certificate Import Wizard....8-17
- Chapter 9 Bluetooth
- Chapter 10 Optional Functions
- Home Help ....10-6
- How to Make a Backup....10-10
- Carrying Out the Restore Operation....10-12
- System Information....10-14
- Chapter 11 ATI Presentation Pack
- IA Presenter....11-1
- Opening a Presentation and Using View Modes ......11-3
- IA Screen Mirror 11-11
- On-line Help....11-11
- Copyright and Contact Information....11-12
- Chapter 12 Additional Information
- Chapter 1
- Getting Started
- Welcome
- Where to Find Information
- Chapter 2
- Basic Skills
- Parts Names and Function
- Initial Setting of Program Buttons
- Power Button
- Battery Switch
- Battery/Alarm LED
- Wireless Communication Switch (Wireless LAN/Bluetooth model only)
- Wireless LED Descriptions
- How to Use the Stylus
- About the Cursor Button
- About the Scroller
- Battery Charging
- How to Charge the Battery
- How to Attach/Detach the Main Battery Pack
- How to Use the optional High Capacity Battery Pack
- How to Prolong Battery Life
- Battery Life
- Battery Charge Level and Stored Data Protection
- How to Use the optional Expansion Pack
- Parts and Functions of the Expansion Pack
- Connecting the Expansion Pack to the Pocket PC
- Releasing the Expansion Pack from the Pocket PC
- How to use the optional USB Host Cable
- To connect a USB keyboard to the Pocket PC:
- Initial Setup
- Inserting a CF II Card
- To remove a card:
- Inserting an SD Card
- Connecting to a Computer
- To Connect Using the Supplied Cradle:
- To connect directly using a connection cable:
- Today Screen
- Programs
- Navigation Bar and Command Bar
- Pop-up Menus
- Notifications
- Enter Information on Your Toshiba Pocket PC
- Entering Text Using the Input Panel
- To type with the soft keyboard:
- To use Letter Recognizer:
- To use Block Recognizer:
- To use Transcriber:
- To select typed text:
- Writing on the Screen
- To write on the screen:
- To select writing:
- To convert writing to text:
- Tap Tools and then Recognize.
- Drawing on the Screen
- To create a drawing
- To select a drawing
- Recording a Message
- To create a recording:
- Using My Text
- Find and Organise Information
- Customize Your Toshiba Pocket PC
- Adjusting Settings
- Adding or Removing Programs
- To add programs using ActiveSync
- To add a program to the Start menu
- To remove programs
- Setting a Password
- To Set Screen Light
- Screen light
- On external power:
- Set the Brightness level.
- Screen light control
- Setting Power
- Setting Memory
- To change Memory allocation:
- To confirm usage status of a storage card:
- To release memory:
- Flash ROM Disk (NAND Flash Memory)
- Setting Advanced Sounds
- Setting Microphone
- Microsoft ActiveSync
- Change the synchronization schedule
- Microsoft Pocket Outlook
- Calendar: Scheduling Appointments and Meetings
- To create an appointment
- Using the Summary Screen
- Creating Meeting Requests
- To schedule a meeting:
- Contacts: Tracking Friends and Colleagues
- To create a contact:
- Tap New.
- Finding a contact
- Tasks: Keeping a To Do List
- To create a task:
- Notes: Capturing Thoughts and Ideas
- To create a note:
- Inbox: Sending and Receiving E-mail Messages
- Synchronizing E-mail Messages
- Using the Message List
- Composing Messages
- To compose a message:
- Managing E-mail Messages and Folders
- Folder behavior with a direct connection to an e-mail server
- Companion Programs
- Pocket Word
- Typing Mode
- Writing Mode
- Drawing Mode
- Recording Mode
- Pocket Excel
- Tips for Working in Pocket Excel
- MSN Messenger
- Setting Up
- To set up an account and sign in:
- Working with Contacts
- Chatting with Contacts
- Windows Media Player
- Microsoft Reader
- Getting Books on Your Device
- Using the Library
- Reading a Book
- Using Reader Features
- Removing a Book
- Pictures
- Edit Pictures
- Send Pictures
- Set Picture as Background
- View Slideshow of Pictures
- Pocket Internet Explorer
- The Mobile Favorites Folder
- Favorite Links
- Mobile Favorites
- To create a mobile favorite:
- To save device memory
- Using AvantGo Channels
- To Synchronize an AvantGo channel
- Using Pocket Internet Explorer
- TOSHIBA
- To view mobile favorites and channels:
- Tap the page you want to view.
- To browse the Internet:
- Chapter 7
- Getting Connected
- Transfer Items Using Infrared
- To send information:
- To receive information:
- Connect to the Internet
- To create a modem connection to an ISP:
- To create an Ethernet connection to an ISP:
- Connect to Work
- To create a modem connection to a network:
- To create an Ethernet connection to a network:
- To set up a VPN server connection:
- To edit proxy settings:
- End a Connection
- Connect Directly to an E-mail Server
- To set up an e-mail service:
- Get Help on Connecting
- Chapter 8
- Wi-Fi (IEEE 802.11b) Wireless LAN
- Overview
- Configure Wireless LAN Network
- Join to Existing Network
- Launch Wireless LAN Configuration
- Turn Off/On Wireless LAN connection
- Power Off/On Wireless LAN modules
- Select Preferred Network
- IP Address
- IP Address Page
- Subnet mask
- Default gateway
- Name Servers Page
- DNS
- WINS
- Alt DNS
- Alt WINS
- Wireless LAN Configuration
- Set up a wireless network
- NOTICE:
- Configure Wireless Network
- Configure Network Authentication Screen
- TMU-Traffic Monitoring Utility
- Icon Specification
- Wireless Communication switch off:
- Wireless Communication power off:
- Wireless Power on:
- Wireless LAN Manager
- Manager Screen
- On Battery Power
- On External Power
- Link Screen
- Info Screen
- MAC Address:
- Version Information:
- Firmware
- Driver
- Utility
- Toshiba Enroller
- Certificate for TLS
- Certificate Import Wizard
- RootCert Page
- Open Certificate:
- Install Certificate:
- Manage Page
- Advanced Page
- Toshiba Certificate Import Wizard
- Start Screen
- Example: Obtain TLS Certificate from server (1)
- Example: Obtain TLS Certificate from server (2)
- Example: Obtain TLS Certificate from server (3)
- Example: Obtain PEAP Certificate from a file (1)
- Example: Obtain PEAP Certificate from a file (2)
- Example: Obtain PEAP Certificate from a file (3)
- Bluetooth
- Specifications
- Major specifications
- Bluetooth Settings
- Enabling Bluetooth on Your Toshiba Pocket PC.
- Bluetooth Environmental Settings
- Advanced Settings
- Preparing to Connect with Bluetooth
- Using COM Service
- Establishing an ActiveSync connection with a computer
- Preparations
- Using DUN/LAP Service
- Connecting to the Internet
- Using OPP Service
- Sending a contact
- Sending a schedule
- Sending a task
- Exchanging business cards
- Receiving a business card
- Using FTP Service
- Starting Bluetooth FTP
- Sending a file
- Receiving a file
- FTP Authentication setting on Bluetooth FTP server
- The Bluetooth Settings Screen
- Tools menu
- Searching for peripheral devices
- Updating service
- Properties
- Delete
- Search options
- Deleting ghost devices
- View menu
- Details
- Icons
- Filter
- Options menu
- Security Settings
- Registration History
- Local Device
- Version Information
- Chapter 10
- Optional Functions
- Home
- Launching an Application From the Home
- About Running
- Application Activate/Stop:
- Display Icon List
- Moving an Application Icon into Another Tab
- To move using pop-up menu:
- Deleting an Icon
- Adding an Icon
- Tab Setting
- To add a tab:
- To delete a tab:
- To change the name of a tab:
- To change a background:
- Text Colour Setting:
- Home Help
- "Running" tab
- Launching applications
- Switching the icon display
- Icon settings
- Moving icons (using the pop-up menu)
- Deleting icons
- Adding icons
- Browse Dialog
- Tab settings
- Switching tabs
- Changing tab names
- Deleting tabs
- Adding tabs
- Setting the background image
- Setting the text colour
- How to Make a Backup
- Making a Backup
- Carrying Out the Restore Operation
- System Information
- Identity Tab
- Memory tab
- Driver tab
- System tab
- Wireless tab
- ATI Presentation Pack
- IA Presenter
- IA Screen Mirror
- Installing the ATI Presentation Pack
- Using IA Presenter's Desktop Converter
- Choosing Dimensions for the Converted .IAP File
- Opening a Presentation and Using View Modes
- Normal View
- Slide Sorter
- Indicator Icons under Thumbnails
- Notes Page
- Quick Notes
- Slide Show
- Pop-Up Menu for Slide Show Mode
- Next / Previous
- Go
- Trigger
- Pen
- VGA Pointer
- VGA Zoom
- Pen Color
- Pen Width
- VGA Zoom Size
- VGA Zoom Ratio
- Screen
- Pause Auto Play
- Blank
- Using the Blank Option with Pen Mode:
- Clear Last Pen
- Clear All Pen
- Speaker Notes
- End Show
- VGA Slide Show
- Controlling Transition Effects
- Merging Presentations
- On-line Help
- A Note about Updates to the ATI Presentation Pack
- Copyright and Contact Information
- Additional Information
- Troubleshooting
- Resetting
- Clear Memory
- Troubleshooting for Wi-Fi
- Appendix A
- Interfaces
- DC-IN
- Appendix B
- FAQ for Wi-Fi
- Compatibility
- Wireless LAN Connectivity
- B2: How can I connect my Pocket PC to the usable Wireless Network?
- More Information
- B3: How do I know whether or not my Pocket PC has already connected to an AP successfully?
- B4: What is 802.11 Ad Hoc Network? What should I do to form an 802.11 Ad Hoc Network?
- B5: What is the difference between "Infrastructure" and "802.11 Ad Hoc" Network Mode? How do I choose?
- B6: Could I use the 802.11 Ad Hoc Mode to access the LAN resources? How can I access the LAN resource without an Access Point?
- B7: What should I do if my host computer cannot wirelessly connect with my Pocket PC?
- Application
- C1: What should I do to use the ActiveSync Function through Wireless Network?
- C2: How do I wirelessly browse the Internet?
- C3: How do I wirelessly check my e-mail?
- Settings
- D1: What is SSID? What should I set in the SSID field?
- D2: Why can't I choose the "Channel" field in "Infrastructure" Mode?
- D3: When should I set the IP address, Subnet mask and Default gateway settings?
- D4: How can I set the IP address, Subnet mask and Default gateway settings?
- D5: What Transmit Rate should I choose for Wireless Connection?
- Security
- E1: What is WEP?
- E2: How many WEP security service modes does my Wireless LAN support?
- E3: How do I set the WEP security service?
- Performance
- F1: Will IEEE802.11b WLAN Adaptor work in the environment where Bluetooth network is employed?
- F2: How far is the working range of IEEE802.11b WLAN Adaptor?
- F3: How does the data transmission rate work?
- F4: The Wireless LAN uses lots of power. What should I do to save power?
- F5: How do I make sure that the Wireless LAN SW has been installed successfully and that Wireless LAN already work properly?
- Error Messages for Bluetooth
- Error messages during COM/DUN service
- Unable to delete remote device.
- The device name that you entered exceeds the maximum byte count of 248 bytes. Enter a different device name.
- The retrieved information contains invalid data.
- Unable to delete remote device due to insufficient memory. Check the amount of available memory.
- Service list search failed due to insufficient memory. Check the amount of available memory.
- The maximum number of services (30) has been exceeded.
- Unable to successfully connect. Check the status.
- Unable to successfully disconnect. Check the status.
- Unable to update service information.
- The connection is not registered. Use the Bluetooth Setup Utility to register the connection.
- Unable to delete connection registration information.
- An internal processing error has occurred.
- An internal processing error has occurred with the Discoverability Mode setting.
- An internal processing error has occurred with the Connectability Mode setting.
- An internal processing error has occurred with the Security Mode setting.
- An internal processing error has occurred with the Encryption setting.
- Unable to register the device name. The previous device name will be used.
- The device name that you entered contains invalid characters. Enter a different device name.
- Unable to retrieve service information.
- Unable to register connection information.
- Unable to retrieve connection information.
- Bluetooth icon does not appear on the command bar.
- Error messages during OPP service
- Program cannot be started because Bluetooth sending program is running.
- Bluetooth Settings encountered an error and could not be executed.
- Processing interrupted due to insufficient memory.
- Unable to retrieve device information.
- Unable to save receiving data.
- There is no response from the partner device.
- This cannot be sent because it contains invalid data.
- Processing interrupted due to an internal error.
- Error messages during FTP service
- The FTP server could not be started because the FTP client is operating.
- The FTP client could not be started because the FTP server is operating.
- Unable to delete (file/folder name)
- Unable to delete read-only file.
- The selected file/folder already exists. Enter another file/folder name.
- Enter a file/folder name.
- The following characters cannot be used in the file/folder name. \ / ; , : \* ? " < > |
- Cannot rename file/folder.
- Enter the folder name.
- The folder name could not be created.
- The specified file could not be executed.
- The connection destination server is not selected. Select a server.
- Sending or receiving failed. Cancelling process.
- The memory was exceeded while receiving files. Cancelling process.
- An error occurred during server search. Cancelling process.
- Unable to obtain usable COM port. Ending program.
- The OBEX password contains an invalid character. Enter the password again.
- Unable to move folder or obtain folder information.
- Registry problem
- There is no response from the partner device. Ending application.
- An internal processing error has occurred. Cancelling process.
- Could not allocate the memory for processing. Cancelling process.
- A file (or folder) with the same name exists. Skipping transfer.
- An error occurred during server search.
- Bluetooth Settings cannot be started.
- (Folder name) does not exist.
- A communications error occurred.
- Appendix D
- Glossary for Bluetooth
- General Bluetooth terms
- Bluetooth Passkey
- Device Address
- Remote Device
- Profile
- GUI Bluetooth terms
- Authentication Status
- Authentication
- Auto Connect
- COM Service Device
- Connectability Mode
- Connected Device
- Connection Registration
- Connection Status
- Delete Ghost Device
- Device Class
- Device Name
- Discoverability Mode
- Discovered
- DUN Service Device
- FTP Service Device
- Ghost
- LAP Service Device
- OPP Service Device
- PIN Code
- Search for Peripheral Devices
- Security Mode
- Service Name
- Service Update
- TOSHIBA's Worldwide Computer Representatives
- TOSHIBA addresses for the Internet/World Wide Web
Brand : TOSHIBA
Model : E755
Category : Smartphone